
Lesson 5. Transitions
If you have followed the lessons in order, you should feel comfortable with adding and deleting footage in your project, and trimming clips to improve the pace of your project. In this lesson, you’ll learn how to take a final cut project and add nuance and dimension using transitions between clips. You’ll learn how to do the following:
• Place a transition using the Effects and Transitions panel.
• Preview transitions.
• Modify transition settings.
• Create fade-ins and fade-outs.
Getting started
You will affect scenes in the movie project by adding transitions in stages, then you’ll review a final version of the project you’ll be creating.
1. Make sure you know the location of the files used in this lesson. If necessary, insert the Adobe Premiere Elements Classroom in a Book DVD and copy the Lesson05 folder to your hard drive. For help, see “Copying the Classroom in a Book files” on page 3.
2. Start Premiere Elements.
3. Click on Open Project. Navigate through your hard drive to locate the Lesson05 directory you copied to your hard disk. Select the file Lesson05_Start.prel and click Open.
4. The project file opens with the Media, Monitor, and Timeline windows. Choose Window > Restore Workspace > Edit to ensure your window layout is in the default editing mode.
Viewing the completed movie before you start
To see what you’ll be creating, you can take a look at the completed movie.
1. In the Media panel, select Lesson 05_movie.wmv and then double-click it to open the video into the Monitor panel.
2. Press the Play button (![]() ) to review the video you’ll be building in this lesson. Notice the transitions from one clip to the next.
) to review the video you’ll be building in this lesson. Notice the transitions from one clip to the next.
About transitions
The simplest form of a transition is the cut. A cut is when the last frame of one clip is followed by the first frame of the next. The cut is the most often used transition on video and film, and the one you will be using most of the time. However, you can also use other types of transitions to achieve effects between scenes.
The Effects and Transitions panel
Adobe Premiere Elements includes a wide range of transitions, including 3D motion, dissolves, wipes, and zooms. Transitions are grouped into two main folders in the Effects and Transitions panel: Audio Transitions and Video Transitions.
1. Effects and transitions can be added to your project directly from your Edit workspace by using the Effects and Transitions panel. To give yourself more room to work in, collapse the Media panel by clicking on the triangle to the left of the window name. If you are not in the Edit workspace, click the Edit button on your task bar to jump back to it. In Premiere Elements 2.0, you can access various audio and video effects directly from your Edit workspace, through the Effects and Transitions panel.
2. If necessary, click the triangle to the left of the Video Transitions folder to see the list of subfolders containing video transitions. You may need to scroll down the Effects and Transitions panel to see this folder.

3. Click the triangle to the left of the Dissolve folder to see the types of dissolve transitions available.
4. Premiere Elements 2.0 includes a Favorites folder where you can store your often used transitions and effects. Highlight the Cross Dissolve transition and click the star icon located in the lower right corner of the Effects and Transitions panel to add this effect as a favorite.

5. Click on the triangle next to the word Favorites in your main Effects and Transitions panel or the big yellow star icon at the top to view your Favorites folder.

Pretrimming a clip and adding a transition
Understanding how transitions work is essential to use them successfully. For a transition to shift from one clip to another, the transition must overlap frames from both clips for a certain amount of time.
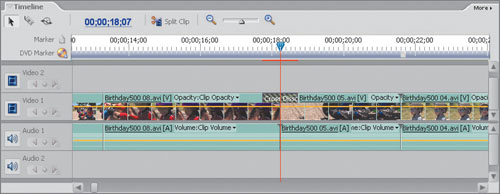
1. Move your current-time indicator to the 18;07 second mark to view the edit point between the Birthday500 08 clip and the Birthday500 05 clip. You will be placing a transition between these two clips.
Note
You do not have to use the current-time indicator to place transitions between clips. However, it is often helpful in locating the correct point in your project.
2. In the Effects and Transitions panel, click and drag the Cross Dissolve transition from the Favorites folder onto the edit line between the Birthday500 08 clip and the Birthday500 05 clip. You will see the transition has been added between the two clips as a small square with diagonal lines through it.
3. Preview the Cross Dissolve transition by moving your current-time indicator to the 16 second mark and then pressing the spacebar to preview the transition. After the transition ends, press the spacebar to stop playback.
Controlling effects
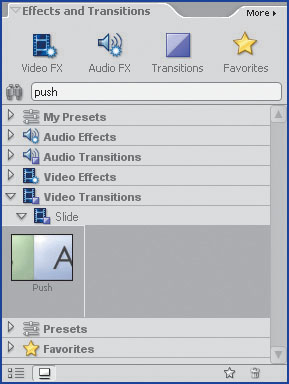
When you add a transition to a clip, the length of the transition is determined by your preferences. You can also modify the length of transitions. Additionally, there are other attributes to transitions which you can modify; such as alignment, start and end values, border, and softness. In this exercise, you will add a Push transition that pushes one image off-screen to replace it with the next clip. You will then modify the various attributes of the transition in the Properties panel.
1. In the Effects and Transitions panel, click in the text box to the right of the binoculars icon, and type the word push. This automatically searches the list of effects and locates the Push transition.
2. If necessary, move your current-time indicator so that you can see the dividing line between clips Birthday500 01 and Birthday500 03. Click and drag the Push transition, and place it onto the edit line between the Birthday500 01 clip and the Birthday500 03 clip. Despite the names, these are the first two clips in the Timeline.
3. In the Timeline, drag the current-time indicator and place it before the transition. Press the spacebar to view the transition. The Push transition will “push” the first clip off to the side. You will now modify the settings of the transition.
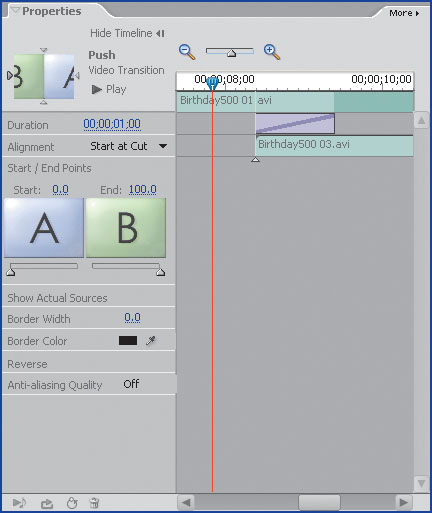
4. If it is not already selected, click on the Push transition in the Timeline. This will load the transition’s parameters into the Properties panel where you can edit them.

5. Click on the Show Timeline button at the top of the Properties panel to view a magnified version of your Timeline. This allows you to view the transition as it is applied between your two clips.
6. Drag the current-time indicator in the Properties panel back and forth over the transition to preview your transition effect.
Modifying transition settings
All transitions have default settings. To achieve specific results, you can customize the settings in the Properties panel. Modifying the length of the transition is an easy setting to customize, as you will see in this exercise.
1. To change the length of a transition in the Properties panel, place your cursor over the Duration value, and then click and drag to the left to change the Duration to 00;00;00;15. Remember that there are thirty frames of video in a second; therefore, fifteen frames represents a half-second of time.

2. Drag the current-time indicator to a position before the Push transition and press the spacebar to preview the transition. If you should accidently click on the track area of your Timeline, you will deselect the transition, and its parameters will vanish from the Properties panel. Don’t worry, just click on the transition in your Timeline to select and edit its properties again.
3. Depending on the size of your monitor, scroll down the Properties panel and check the box marked Reverse. This reverses the transition so that the second clip is now pushing the first clip to the left.
4. Drag your current-time indicator to approximately halfway through the transition. We used the 08;28 mark. Because you are in the middle of the transition, your screen will be split in half. This makes it easier to preview your modifications.

5. If necessary, scroll down the Properties panel to view the additional controls. Click on the value for Border Width, type the number 10, and then press Enter. This creates a 10 pixel border on the edge of your transition. The default color of the border is black; but, you can modify this as well.
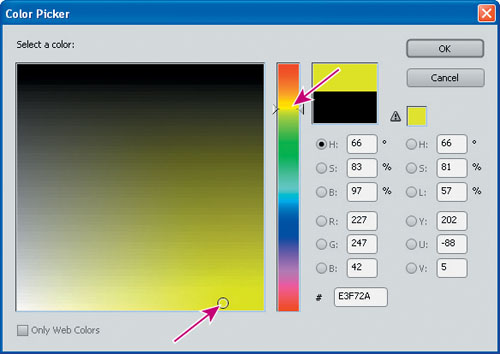
6. Click on the black color swatch, next to the Border Color attribute. This opens the Color Picker window.
7. In the color slider, which displays the spectrum of colors in a vertical strip, click in the yellow hues. Then, inside the larger color spectrum, click in the bottom right corner to select a bright yellow. Click OK. The border of your transition is now 10 pixels wide and yellow.
8. Drag your current-time indicator to a position before the transition, and then press the spacebar to play your modified transition.
Replacing a transition instance
To experiment with different transitions, you can drag and drop new transitions on top of existing ones. To get some practice, you will add an Iris Box transition between clips Birthday500 03 and Birthday500 08. Move your current-time indicator so that both these clips are visible on your Timeline. If necessary, you can use the Page Up and Page Down keys to advance through your Timeline from edit line to edit line.
1. In the Effects and Transitions panel, type Iris in the search text box to the right of the binoculars icon to automatically list all of the Iris transitions.
2. For this step, do not release the mouse until instructed. Drag the Iris Box transition onto the Edit line between the Birthday500 03 clip and the Birthday500 08 clip—these are the second and third clips in the Timeline; do not release the mouse. Pay careful attention to the appearance of your cursor.
3. Place your cursor to the left of the edit line between the two clips, and notice how your cursor changes to the End at Cut icon (![]() ). This will align the end of your transition to the end of your first clip. Now move your cursor slightly to the right, and your cursor changes to the Center at Cut icon (
). This will align the end of your transition to the end of your first clip. Now move your cursor slightly to the right, and your cursor changes to the Center at Cut icon (![]() ). This will center the transition over the cut. Finally, shift your cursor further to the right, and your cursor will change again to the Start at Cut icon (
). This will center the transition over the cut. Finally, shift your cursor further to the right, and your cursor will change again to the Start at Cut icon (![]() ). This aligns the beginning of the transition to the beginning of the second clip.
). This aligns the beginning of the transition to the beginning of the second clip.
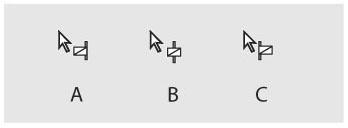
A. End at Cut. B. Center at Cut. C. Start at Cut.
4. Place the transition back over the Center at Cut (![]() ) and release. This is the option you will use most often. Preview the Iris Box transition by dragging your current-time indicator before the transition and then pressing the spacebar. When the transition is over, press the spacebar to stop playback.
) and release. This is the option you will use most often. Preview the Iris Box transition by dragging your current-time indicator before the transition and then pressing the spacebar. When the transition is over, press the spacebar to stop playback.
5. In the Effects and Transitions panel, click the Iris Round transition and drag it on top of the Iris Box transition, which is located between clips 3 and 8, to replace it. You may only have one transition between clips at a time.
6. Preview the new transition by dragging the current-time indicator before the transition, and press the spacebar to play.
Adding a single-sided transition to create a fade-in
Transitions do not necessarily need to be located between two clips. For example, you can quickly add a fade-in and fade-out to the beginning and end of your movie.
1. Click the top of the Timeline to make it active, and then press the Home key to return the current-time indicator to the beginning of your Timeline.
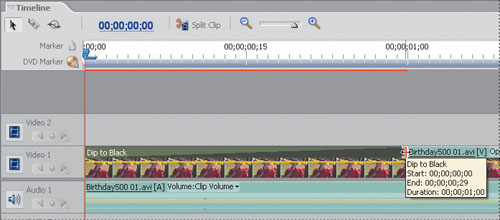
2. In the Effects and Transitions panel, type dip in the search text box to the right of the binoculars icon. The Dip to Black transition will automatically be located in the Dissolve folder.
3. Drag the Dip to Black transition from the Effects and Transitions panel onto the beginning of the first clip, Birthday500 01.avi.

4. Click the Timeline window to make it active, then press the spacebar to play the transition. The beginning of the transition starts at black and then quickly fades in to the video.
5. Press the Home key to return the current-time indicator to the beginning of the Timeline. Click your Zoom In tool (![]() ) to magnify the Timeline. Place your cursor over the end of the Dip to Black transition in the Timeline. Notice your cursor changes to the double arrow with the red bracket (
) to magnify the Timeline. Place your cursor over the end of the Dip to Black transition in the Timeline. Notice your cursor changes to the double arrow with the red bracket (![]() ) much like it does when you are trimming a clip. This is because transitions can be extended or shortened in the Timeline.
) much like it does when you are trimming a clip. This is because transitions can be extended or shortened in the Timeline.
6. Click and drag the edge of the transition to the right. Using the yellow context menu that appears, extend the duration of the transition by 00;15 (a half-second).
7. Press the spacebar to play the video. When the fade-in is over, press the spacebar to stop playback.
Rendering transitions
Throughout this lesson you have been viewing transitions in real time. In other words, when you add a transition, you can play it back immediately to see if you like the effect. Based on your system, or with more processor-intensive effects, you may note that the previews are not as smooth as you would want. This is often resolved by a process called rendering, which allows Premiere Elements to calculate each frame of your transition.
1. Look at each transition you have added in the Timeline. Directly above the transition is a small red bar corresponding exactly to the length of the transition. This bar signals that these transitions have not been rendered.
2. Make sure the Timeline is active by clicking on its top, and then press the Enter key. Premiere will automatically begin to render the video preview of each transition. When the program is done rendering, it will automatically begin playing the project from the beginning.
3. Notice the red bar above each transition has changed to green. This is a visual cue that the transitions in this project have been rendered. Once a transition has been rendered, you do not need to render it again unless you change any of its properties. If you were to save and close this file, and then reopen it, the green bar would still be there.
Note
You are not required to render your transitions. Rendering is an optional process useful for previewing your transitions as they will appear in the final exported movie.
4. Save your project as Lesson05_End.prel.
Congratulations, you have completed this lesson.
Exploring on your own
1. Add cross dissolves to all the remaining clips in your Timeline to get used to the process of quickly adding transitions to your clips.
2. Experiment with different transitions by choosing them in the Effects and Transitions panel. Remember that dragging a transition onto an existing transition will replace it. Transitions that you may find useful are Wipe, Cross Zoom, and Page Peel.
3. Be sure you are comfortable with modifying the default effect of your transitions. Double-click on the new transitions you have added and explore the settings to create your own style.
Review questions
1. Where are Video Transitions located and what are two ways to locate specific transitions?
2. Why might you want to render transitions and how do you go about doing this?
3. What are two methods of extending the duration of a transition?
Review answers
1. Video transitions are located inside the Effects and Transitions panel, which can be accessed at any time from your Edit workspace. Individual transitions are organized by transition type into folders and subfolders that can be opened. Additionally, specific transitions can be located by typing the transition name into the search field in the Effects and Transitions panel.
2. While Premiere Elements can display many transitions in real time this may cause an unnecessary strain on your system as it tries to perform the multiple calculations that it requires. Rendering transitions eliminates that strain. You can render your transitions by pressing the Enter key when the Timeline is active.
3. One method of extending the duration of a transition is by extending its length in the Timeline. The second method is to change the duration in the Properties panel. This window can be accessed by double-clicking on the transition.