Lesson 10. Customizing DVD Menus
In this lesson, you will be working with the DVD menu from an earlier lesson, but you will now customize the look of the menu with the advanced features of the DVD Layout menu. The advanced features of Premiere Elements 2.0 allow you to change the font, color, background, and layout of your DVD menu. In this lesson, you’ll learn how to do the following:
• Use the Properties panel to change the look of menu buttons.
• Make changes to your menu with the DVD Marker box.
• Add a motion menu.
• Animate buttons.
Getting started
To begin, you’ll launch Adobe Premiere Elements and open the Lesson 10 project. Then you’ll review a final version of the project you’ll be creating.
1. Make sure you know the location of the files used in this lesson. If necessary, insert the Adobe Premiere Elements 2.0 Classroom in a Book DVD and copy the Lesson 10 folder to your hard drive. For help, see “Copying the Classroom in a Book files” on page 3.
2. Start Premiere Elements 2.0.
3. Click on Open Project. Navigate through your hard drive to locate the Lesson 10 directory you copied to your hard disk. Select the file Lesson 10_End.prel and click Open. This is a finished version of the project file you will be creating in this lesson. You may review it now, or at any point during the lesson to get a sense of what your project should look like.
4. After reviewing the finished file, choose File > Close, then click the Open Project button, select the Lesson 10_start.prel, and click the Open button.
5. Your project file will open. Choose Window > Restore Workspace > Edit to ensure your window layout is in the default editing mode.
Using the DVD Layout menu
Customizing your DVD menu involves a combination of the DVD Layout menu, the Properties panel, and the DVD Marker dialog box. The Properties panel is part of the DVD Layout panel and is where the settings of your menu can be modified.

A. Media panel. B. Properties panel. C. Menu thumbnail. D. Menu Background section (expanded). E. Media drop zones. F. Motion Menu Buttons section (collapsed).
The Properties panel has two sections: Menu Background and Motion Menu Buttons. These two sections can be expanded or collapsed by clicking on the arrows to the left of the section. In the Menu Background section there are subsections for Video backgrounds, Still backgrounds, and Audio backgrounds. In these latter two background sections there are Media drop zones. Video clips, photo stills, and Audio clips can be dragged from the Media panel into the Media drop zones.
Customizing DVD menus
Although Premiere Elements 2.0 allows you to customize a DVD menu, keep in mind that you are customizing only a template. Changes made to your template cannot be saved, they apply only to the current project. If you would like to create custom templates to be used in multiple projects you can create one in Adobe Photoshop Elements and then add the template to Premiere Elements.
In this exercise you will make changes to your menu appearance and buttons.
1. Click the DVD button if it is not already selected. Choose Window > Restore Workspace > DVD to reset the location of your panels.
2. In the DVD Menus area, click the Main Menu 1 thumbnail to make sure the main menu is loaded.
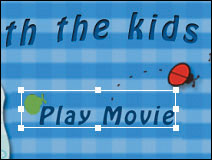
3. Click the Play Movie button text to select it. The rectangle around the button is referred to as the bounding box. There are eight selection points around the box. Place your cursor on one of the corners, then click and drag outward to enlarge the text box.
Scaling text boxes in this manner can be tricky because the width and height do not scale proportionally. Text can easily become distorted.
4. Press Ctrl+Z on your keyboard to undo the changes. Premiere Elements allows you to undo multiple steps, so you can backtrack through your changes.
![]() Pressing Shift+Ctrl+Z on your keyboard will redo your changes.
Pressing Shift+Ctrl+Z on your keyboard will redo your changes.
5. With the Play Movie button still selected, press the equal sign (=) on your keyboard and the text box scales proportionally. Press the minus key (−) on your keyboard to reduce the size of your text box proportionally. Using the keyboard commands to change the size avoids the risk of distorting the text.
6. Click on the Scenes button in the DVD Layout panel to select it and then press the left arrow key on your keyboard to move it. Continue pressing the left arrow key until the button is aligned with the other two buttons. Pressing the arrow keys on your keyboard allows you to move a button one pixel at a time in the direction of the button.

7. Double-click on the Scenes button text and type Kids Scenes. The labels of the buttons can be edited by double-clicking. Click OK to commit the change.
Changing text properties of menu buttons
The Properties panel allows you to modify the font, size, color, and style of your buttons.
Changes made to one type of button can automatically be applied to similar buttons.
There are four types of items which you can modify in Premiere Elements: Menu Titles, which are objects that are text only and are not linked to clips or movies; Play buttons, which link to the beginning of your main movie; Scene buttons, which link to the Scenes menu; and Marker buttons, which directly link to a DVD marker on the Timeline.
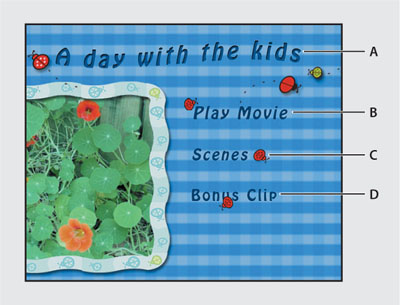
A. Menu Title. B. Play button. C. Scene button. D. Marker button.
1. Click on the Main title, “A day with the kids.” The Properties panel updates automatically and shows you that this is a text item. The Text subsection is open and allows you to change the properties of the text. If necessary, expand the size of the Properties panel to view its contents.
2. In the Text subsection, click on the first drop-down menu, which is a list of available fonts. Choose Arial from the list and the title appearance changes.
3. Click the drop-down menu currently set at Regular, and change the style to Bold.

4. Click the menu marked 36 pt. This allows you to change the text size to any of the preset sizes. Keep the text size at 36 pt.
5. Click on the blue color swatch to open the Color Picker. You will now change the color of your text to yellow. Click once in the vertical color spectrum in the general range of yellow. Then click in the lower right-hand corner of the color field to choose a bright yellow. Click OK to apply the color.

A. Click here first to choose a general range of color. B. Click here to specify the specific shade.
6. Click the Scene Menu 1 thumbnail in the DVD Layout menu. Notice that the text in the Scenes Title has retained its original formatting. Click back on the Main Menu 1. To change the text attributes of both titles simultaneously, you must instruct Premiere Elements to do so, otherwise the changes only affect the selected object.
7. Click on the Apply to all Text Items button in the Properties panel. This applies the same text attributes to the Scenes menu.

8. Click on the Scenes menu thumbnail to confirm that the changes took place.
Note
You can override any single button by returning to the Properties panel and making changes for just the selected button.
Customizing menu backgrounds
You can customize your menus even further in Premiere Elements 2.0 by adding sound, motion, or a still photograph. You can use video to create a moving background, or play an audio clip in the background. Clips can be taken from your movie or from other sources. You can also combine multiple items, such as a still photo for a background, and an audio clip. Alternatively, you can also add a video clip and replace the audio track with a separate audio clip, if desired.
Adding a still clip to a background
You can browse for images and add them to the background, or you can drag image files from the Media panel to your Properties panel.
1. In the DVD Menus, click to select the Scenes Menu 1. In the Properties panel, click Browse, and navigate to your Lesson10 folder. Locate and open the image file, kids.jpg. The background of the Scenes menu is replaced by the image of the children running. While the buttons may be more difficult to read, you now know how to change the color of the buttons and how to move their location.
2. Click the Reset button in the menu background. This returns the background to its original appearance.

3. Click the Main Menu 1 thumbnail in the DVD Menus section of your DVD Layout panel. You will now add the same image into the main menu. If any items on the menu page are selected, click on the background to deselect them.
4. If necessary, scroll to the bottom of your Media panel and locate the image named kids.jpg. Because you browsed for the image in the last step, Premiere Elements has added the image file into your Media panel for you to use.
5. Click and drag the kids.jpg image from the Media panel onto the Media drop zone marked “Drag Media Here.”

The image is added and the background is replaced. Certain DVD templates in Premiere Elements have “frames” which are designed to show only a portion of the menu background. Not every menu has this feature. In the next exercise, you will learn how to select a single image from a video clip, and place it in the frame.
Adding a video clip to the background
Video clips can also be added to your background. These are sometime referred to as motion menus because the entire menu can be made of a moving video clip. You can use any clip for a background. By default, both the video and the audio portion of a clip are used for the background.
1. Click and drag the farm1.avi video clip from the Media panel onto the Media drop zone in your Menu Background section. This replaces the still image from the last exercise.
2. In the Menu Background section, click the green Play button to begin playing the thumbnail version of the video clip. You may need to scroll down to see this button.
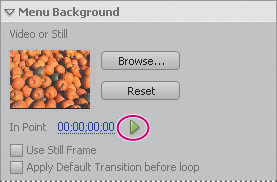
Click the button after a few moments to pause the playback. A single clip may be as long as 30 seconds.
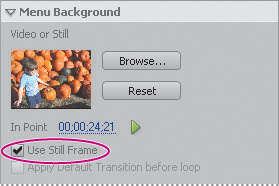
3. Place your cursor over the values for the In point then click and drag to change the In point to 00;00;24;21.
4. Click the Use Still Frame check box to select it. Premiere Elements will now use this frame as a still image.
5. Click on the Preview DVD button and you can see that the frame you selected is being used as an image element in your menu.
Adding an audio clip to the background
Audio clips can also be added to a menu background. If you add an audio track after you’ve already added a video and audio track, you will replace the original audio track. You can also add a separate audio track to a menu background.
1. Click the Add Media button and choose From Files or Folders. The Add Media window opens. Select the kids_music file. Click Open and the file kids_music.wav is added to the Media panel.

2. If necessary, scroll down the Properties panel and locate the Audio section. Currently, the audio is using the audio track from the video clip added in the last exercise.
3. Click and drag the kids_music clip from the Media panel to the speaker icon in the Audio section. This replaces the existing audio track with the new music track.
4. Click the Apply Default Transition before loop check box. This adds a fade-out so the audio loops nicely.
Animating buttons
Animated buttons take a few seconds of video from your Timeline and place them into your Scene and Main Menu buttons. In order to do this, your template must include buttons that display a thumbnail. The main menu for this project does not include any buttons with image thumbnails. However, the scene menu does have image thumbnails; and you can insert video clips into them.
1. Click the Scenes Menu 1 thumbnail in the DVD Menus of your DVD Layout panel.
2. Click the Soccer Time button to select it. Currently this button is displaying a still frame extracted from one of the video clips.
Note
For instructions on how to change the still image of your thumbnails, see Lesson 9, “Creating a DVD.”
3. In the Properties panel, scroll down to the Poster Frame section, if necessary, and select the Motion Menu Button checkbox.
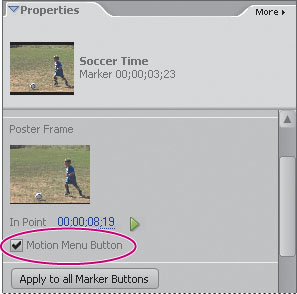
4. Click and drag on the blue numbers (currently reading 00;00;08;19) to the left to change the In point of the video clip. Change the values to 00;00;05;02. This will be the beginning of your clip.
Note
You cannot set the Out point or the end of clips in the Properties panel, but you can set all your motion menu buttons to be the same duration.
5. Click an empty area of your background menu. This deselects the Current Scene button, and the Properties panel switches to the Menu Background properties. Scroll down to the bottom of the Properties panel, if necessary, to locate the Motion Menu Buttons section.
6. Click and drag the duration values in the Motion Menu Buttons to the left to change the duration to 00;00;04;00. This value (4 seconds) will be the duration of all motion menu buttons. You cannot set the duration of motion menu buttons individually.

7. Click the Preview DVD button in the DVD Layout panel. In the Main screen, click on the Kids Scene button to access the Scenes menu. The Soccer Time button should now be animated.
8. Close the Preview DVD menu and return to the Scenes menu. Click on the second scene button, labeled Street Hockey. In the Properties menu, click on the Motion Menu Buttons check box to activate the animation.
9. Click the Preview DVD button again and click the Scene button to view your two animations. You must individually activate scene buttons to animate them. Animated buttons are the same duration. After you have reviewed the file, choose File > Save As. Name your file Lesson 10 Complete, save the file and then choose File > Close. Congratulations! You have finished the lesson.
Exploring on your own
1. Create a custom Scenes menu with Motion buttons using your own video.
2. Change the main menu pictures and clips used in the Scenes menu.
Review questions
1. Which properties can you change on the text of your DVD buttons, and how are these properties modified?
2. What are the four types of buttons you can modify in your DVD menus, and how can changes made to one button be applied to others in the same category?
Review answers
1. You can change the font, font size, font color, and font style of your text buttons. Changing the properties of your text is done inside the Properties panel in the DVD Layout panel.
2. The four types of buttons you can modify in your DVD menus are Menu Titles, Play buttons, Scene buttons, and Marker buttons. If you want to change all the buttons in a category to the same style, you can select the Apply to all Text Items check box located in the Properties panel.