Lesson 2. A Quick Tour of Premiere Elements
Over the course of this tour you will work on a 90 second short home movie. You’ll be working with video and audio clips provided on the DVD-ROM included with this Adobe Premiere Elements Classroom in a Book. If you were producing this project with your own video, you would be importing the video from a digital video camera using the Capture function.
For more information on capturing video and audio, see the previous lesson, “The World of Digital Video.”
Setting up a new project
To begin, you’ll launch Adobe Premiere Elements and open the Tour project. Then you’ll review a final version of the project you’ll be creating.
1. Make sure you know the location of the files used in this lesson. If necessary, insert the Adobe Premiere Elements Classroom in a Book DVD and copy the Lesson 2 folder to your hard drive. For help, see “Copying the Classroom in a Book files” on page 3.
2. Start Premiere Elements.
3. Click on Open Project. Navigate through your hard drive to locate the Lesson02 folder you copied to your hard disk. Select the file Lesson02_Start.prel, and click Open.

4. Your project file opens with your Media, Monitor, and Timeline windows open. Choose Window > Restore Workspace > Edit to ensure that your window layout is in the default editing mode.
Navigating the Premiere Elements workspace
If you are new to the program, a more complete introduction to the Adobe Premiere Elements Workspace can be found in the next lesson, Lesson 3, “Navigating the Workspace.”
Viewing the completed movie before you start
To see what you’ll be creating, you can take a look at the completed movie.
1. In the Media panel, select Lesson02_movie.wmv and then double-click it to open the video into the Monitor panel.
2. Press the Play button (![]() ) to review the video you’ll be building in this lesson. You can press the spacebar to stop the video at any time.
) to review the video you’ll be building in this lesson. You can press the spacebar to stop the video at any time.
Deleting clips from the Timeline
When you shoot footage with your camera, you almost always produce much more material than you’ll actually use in your video program. Premiere Elements allows you to easily remove unwanted clips, and shorten clips which are too long.
1. In the Monitor panel, click the Timeline button (![]() ) if it is not already selected, and then press the Play button to begin playing your project. Unlike the Lesson02_movie.wmv movie you played in the last step, you are now viewing a Premiere Elements project made up of individual video clips. As the movie is playing, notice the blue marker with the vertical line moving across the Timeline panel. This is referred to as the current-time indicator, and it shows your video at its current position in time.
) if it is not already selected, and then press the Play button to begin playing your project. Unlike the Lesson02_movie.wmv movie you played in the last step, you are now viewing a Premiere Elements project made up of individual video clips. As the movie is playing, notice the blue marker with the vertical line moving across the Timeline panel. This is referred to as the current-time indicator, and it shows your video at its current position in time.
2. Press the spacebar on your keyboard to stop the playback of the video. Place your cursor over the blue handle at the top of your current-time indicator; click and drag it to the right, and note how you can quickly navigate through your Timeline. Press the Home key on your keyboard to return the current-time indicator to the beginning of the Timeline. This is a keyboard shortcut you will be using often throughout this book.
3. Press the spacebar to start playing your video from the beginning. Notice the third clip, Farm 03.avi, has very shaky video. When the clip ends and the next clip starts, press the spacebar to stop playback.
4. Click on the third clip, Farm 03.avi, to select it. Then press the Delete key to remove the clip from the Timeline. Notice that all the following clips shift to the left, filling the gap.

Trimming clips in the Timeline
Although Premiere Elements places video into your Timeline when you import video, you will most likely want to shorten clips in order to remove uninteresting portions, and to make your video more engaging. To create scenes, cuts, and transitions, you’ll need to trim your clips to remove the parts you don’t need. When working in the Timeline, Premiere Elements provides two ways to do this.
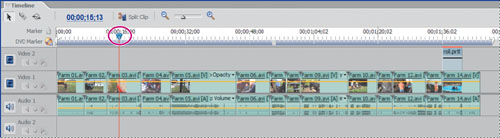
1. Move the current-time indicator to the 20 second, 5 frame mark (00;00;20;05). Use the time counter in the Timeline to locate this point. You can also select the time and enter the value.
2. Press the Play button to view the clip Farm 05.avi. When the clip ends, press the spacebar to stop playback. The second half of this clip will now be edited out of the video.
3. Click and drag the current-time indicator to the left to locate the point in the clip you would like to be the end of the scene. We used 28 seconds, 1 frame (00;00;28;01), roughly halfway through the clip.
4. Place your cursor at the end of the Farm 05.avi clip. Your cursor should change to a Trim Out tool, a double black arrow with a red bracket pointing to the left (![]() ). Pay close attention to which side of the edit line your cursor is located; as your cursor needs to be on the left side of the edit line.
). Pay close attention to which side of the edit line your cursor is located; as your cursor needs to be on the left side of the edit line.
5. Making sure the red bracket is pointing to the left, click and drag the end of the clip to the left, allowing the end of the clip to snap to your current-time indicator. The clip is trimmed, and the following clips automatically shift to the left to fill the gap.
6. Move the current-time indicator to the 20 second mark and press the spacebar to view the edited clip. You removed the second section of the clip, so now the scene ends when the vehicle comes to a stop.
Using the Razor tool
In addition to trimming clips by shortening them, you can also use the Razor tool to quickly cut out sections of your video.
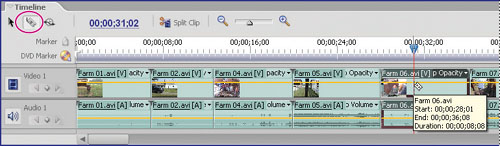
1. Move your current-time indicator to the 28 second point in your Timeline and press the spacebar to view the Farm 06.avi clip. When the clip is done, press the spacebar to stop playback. To quicken the pace of your movie, you will keep only the part where the girl pets the horse.
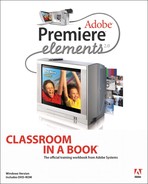
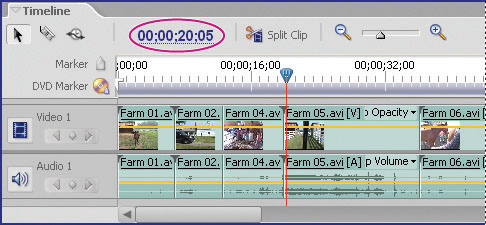
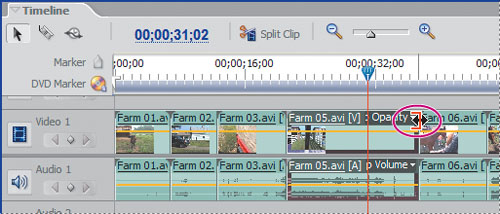
2. Move your current-time indicator to the 31 second, 2 frame mark (00;00;31;02).
3. Select the Razor tool (![]() ) in the Timeline.
) in the Timeline.
4. Place the Razor tool over the red line of your current-time indicator, making sure the tool is also over the Farm 06 clip, and then click once to split the clip. Alternately you could have used the Split Clip button (![]() ) located at the top of your Timeline to cut a clip at the location of the current-time indicator.
) located at the top of your Timeline to cut a clip at the location of the current-time indicator.
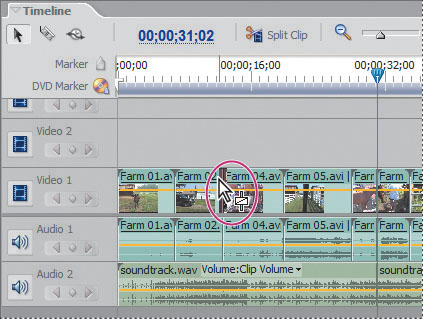
5. Click the Selection tool (![]() ) in the Timeline and then click on the first half of the Farm 06 clip you just split. Press the Backspace or Delete key to remove it from the Timeline.
) in the Timeline and then click on the first half of the Farm 06 clip you just split. Press the Backspace or Delete key to remove it from the Timeline.
6. Drag the current-time indicator to the left of the 25 second mark and then press the spacebar to play your movie and see your edit. When the clip is finished, press the spacebar to stop playback.
Adding sound to the Timeline
Sound is an important part of video projects. Premiere Elements supports up to 99 audio tracks, allowing you to add music and sound effects to enhance your videos.
1. The sound track for this video has been imported into your Media panel for you. With your Media panel scroll bars, you may need to scroll down to locate the file soundtrack.wav. The audio associated with your video clips is on the track Audio 1. In your Timeline, you will need to be able to see Audio 2. Scroll down the Audio tracks view, if necessary, by clicking on the down arrow at the bottom right corner of the Timeline.
2. Click and drag the soundtrack.wav file from the Media panel into the track Audio 2 of your Timeline. Be sure to place the beginning of the soundtrack clip at the beginning of the Timeline.

3. Click the top of the Timeline to make sure it’s active, then press Home on your keyboard to place the current-time indicator at the beginning of your Timeline. Press the spacebar to begin playing your video with the music.
Special effects
Adding effects and transitions in Premiere Elements is as simple as dragging and dropping. You will be adding a basic dissolve between the two clips Farm 02.avi and Farm 04.avi.
1. In the Effects and Transitions panel, in the text field next to the binoculars icon (![]() ) type the words cross dissolve. As you type, Premiere Elements automatically searches and opens the Video Transitions folder.
) type the words cross dissolve. As you type, Premiere Elements automatically searches and opens the Video Transitions folder.
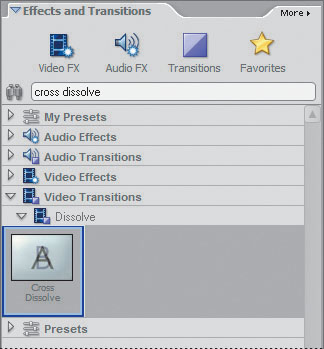
2. To add the transition, click and drag the Cross Dissolve transition from the Effects and Transitions panel onto the cut between Farm 02.avi and Farm 04.avi. Remember, there is no Farm 03 clip because you deleted it in an earlier exercise.
3. To see the results of the transition, move your current-time indicator to the 8 second mark and press the spacebar to play the video. Press the spacebar again to stop playback after viewing the transition.
Using the Shadow/Highlight effect
In addition to transitions, Premiere Elements offers numerous effects to improve or stylize your video. In this particular example, you will use the Shadow/Highlight effect to automatically brighten the details of a dark shot.
1. Move your current-time indicator to approximately the 1 minute, 9 second, 24 frame point (00;01;09;24). Notice the right side of the shot is considerably darker than the left.
2. In the Effects and Transitions panel in the text field next to the binoculars icon, type the words shadow/highlight.
3. Click and drag the effect onto the Farm 12.avi clip. When you release the effect onto the clip, you should notice an immediate change in the image as the shadow detail is brightened.

4. Choose Edit > Undo to view the original image. Choose Edit > Redo to reapply the Shadow/Highlight effect.
Superimposing a title and an image
You will now add a title to your video using the Titler, a powerful tool used to create beginning and end titles, along with scrolling credits. You will be adding the Title file to the Video 2 track.
1. Click the top of the Timeline to make it active, then choose Edit > Deselect All to deselect any clips in your Timeline. Press the Home key on your keyboard to send your current-time indicator to the beginning of the Timeline. Your time display should read 00;00;00;00. This ensures that your title is appearing at the very beginning of your video.
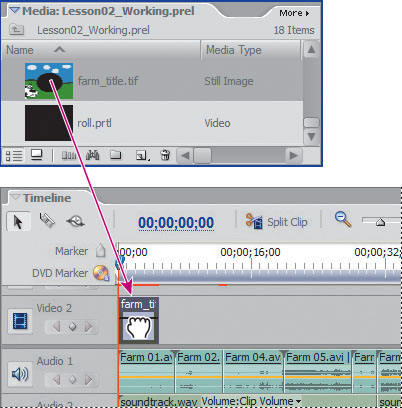
2. In the Media panel, scroll through the list of files to locate the image file farm_title. tif. This image has a transparent oval (alpha channel) in the middle, which will allow the video beneath it to show through.
3. Make sure your Video 2 track is visible in your Timeline. You may have to scroll your Timeline up to see it. Click and drag the farm_title.tif image from the Media panel into the Video 2 track of your Timeline. Make sure the image is at the beginning of the Timeline. You should be able to see the horse inside the oval.
4. In the Media panel, locate the file Farm_beginningtitle.prtl. Double-click on this file to open the title in the Titler.
Note
If you do not see the video, click the More button in the upper right corner of the Titler window and turn on the Show Video option by clicking on it.
5. Make sure your Text tool (![]() ) is selected, place your cursor over the letter “e” in the word “Main Title,” and click and drag to the left to highlight the words.
) is selected, place your cursor over the letter “e” in the word “Main Title,” and click and drag to the left to highlight the words.
6. Type A Trip to the Farm. Click the Edit button in your task bar to jump back to your editing Workspace. If you look at the little icon for the title in your Media panel, you will notice it has changed.
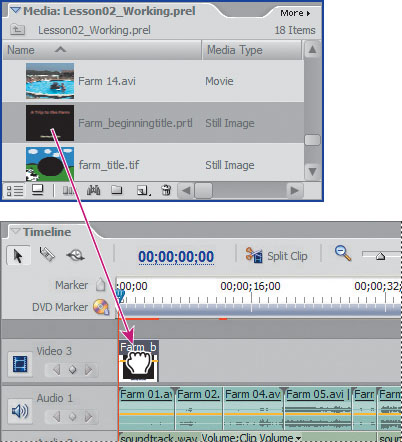
7. To superimpose the title over the video and the image file, use the scroll bars on the far right of your Timeline to scroll up and locate the Video 3 track. Drag the file Farm_beginningtitle.prtl into your Video 3 track, making sure the clip snaps to the beginning of the Timeline, and is aligned with the farm_title.tif.
8. Click on the top of the Timeline to make sure it is active. Press the spacebar to play your video from the beginning. After the title disappears, press the spacebar to stop playback.
Note
Premiere Elements comes with many templates which you can modify. You can also design titles from scratch by clicking the Titles button in the task bar. You will be learning how to work with titles in Lesson 8 “Titles and Credits.”
Creating a DVD
Once you have finished your movie, Premiere Elements offers several ways to share it. One of the most powerful features is the ability to create DVD menus and DVDs directly in Premiere Elements.
1. Click the DVD button (![]() ) in the task bar to load the DVD workspace. The DVD Layout panel appears in the center. The Monitor panel is now on the left side of the screen. Use this window to locate the areas of your video where you would want to place DVD markers for your chapters.
) in the task bar to load the DVD workspace. The DVD Layout panel appears in the center. The Monitor panel is now on the left side of the screen. Use this window to locate the areas of your video where you would want to place DVD markers for your chapters.
2. You should have the DVD Layout menu open. The text “Double-click to Edit” should be located at the top of the screen. This is one of many DVD templates which are included with Premiere Elements. In the DVD Layout panel, double-click the Menu item labeled “Double-click to Edit.”
3. The Change Text window appears; type A Trip to the Farm and click OK. The title is immediately updated.
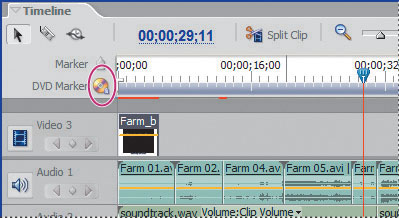
4. Click on the top of the Timeline to make sure it is active. Move your current-time indicator to approximately the 29;11 mark. Click on the DVD Marker button (![]() ) located on the left side of the Timeline to open the DVD Marker window.
) located on the left side of the Timeline to open the DVD Marker window.
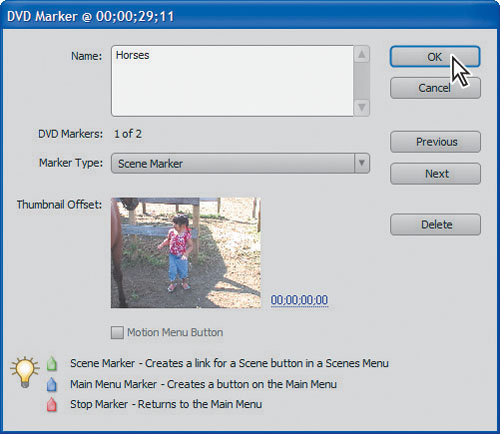
5. This creates the first chapter point which allows people to jump to this section using their remote control. In the Name field, type Horses and click OK.
6. Create a second DVD marker by moving your current-time indicator to 40 seconds and then click the DVD Marker button. In the Name field, type Buffalo and click OK.
7. In the DVD Layout panel, click the Scenes Menu 1 thumbnail to view the Scenes page. Premiere Elements automatically takes the first frame of the DVD marker and creates a button with a thumbnail image.

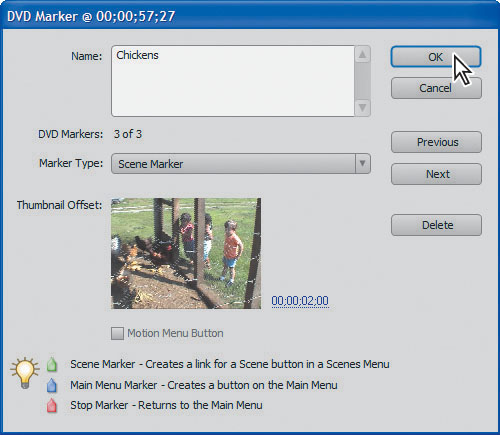
8. To add the last DVD marker, go to 00;01;00;08 and click the DVD Marker button to add the third DVD marker. Enter the marker name Chickens. Do not click OK yet. Notice the first frame of this clip is not particularly informative. To change the image that Premiere Elements uses as a button, you will change the Thumbnail Offset.
9. Place your cursor over the time display located to the bottom right of the thumbnail, click and drag the time to the 2 second mark and click OK. This gives you a better sense of the content of that chapter.
Previewing a DVD
Premiere Elements allows you to preview your DVD before you burn it. You want to make sure all your buttons work and that the image thumbnails are accurate.
1. In the DVD Layout menu, click the Preview DVD button (![]() ).
).
2. In the main menu, place your cursor over the menu name for Scene Selection and click once to jump to the Scene Selection page.
3. Using the controls (![]() ) at the bottom of the Preview DVD window, click the right arrow button to advance from scene to scene. These controls duplicate the controls on a standard DVD remote control. Navigate to the “Buffalo” chapter.
) at the bottom of the Preview DVD window, click the right arrow button to advance from scene to scene. These controls duplicate the controls on a standard DVD remote control. Navigate to the “Buffalo” chapter.
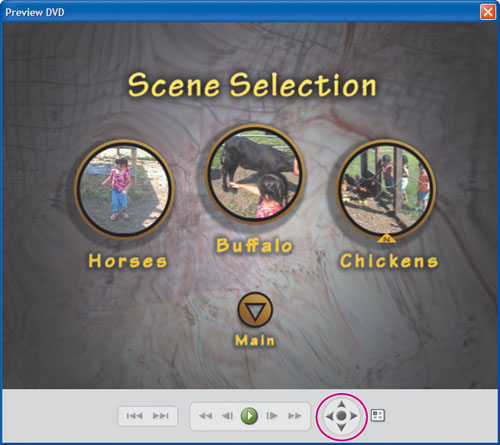
4. Press the Play button, and the Buffalo scene begins to play. To return to the main menu, press the Main Menu button (![]() ).
).
5. Close the DVD Preview window by clicking the Close button.
If you want to Burn a DVD, you must have a DVD recorder attached to your PC. Additionally, you must have blank media onto which you can record your movies. Premiere Elements can burn to DVD-R and DVD-RW. It is recommended you use a DVD-RW for test projects, as they are re-recordable.
Output to Web
In addition to a DVD, Premiere Elements also allows you to output a project suitable for display on the Internet. A movie exported for the Web is much smaller in resolution and file size than you would use for a DVD. Premiere Elements makes it easy to choose a size based on presets.
1. Click on the top of the Timeline to make it active. Click on the Export button (![]() ) on the task bar. In the menu that appears, choose Windows Media.
) on the task bar. In the menu that appears, choose Windows Media.
2. In the Export Windows Media window in the folder marked For Dial-up, choose the 128K Dual ISDN option. This will create a file with dimensions of 320 × 240, a size suitable for the Web.
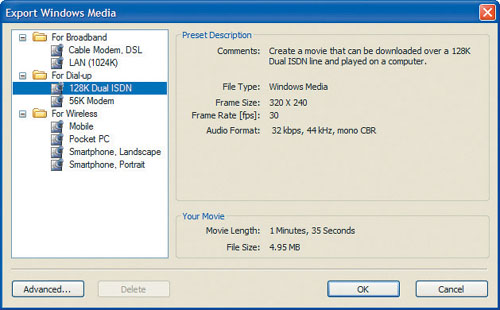
3. Click OK. In the Save window, type Lesson02_export.wmv and navigate to the Lesson02 folder, then click Save.
4. Premiere Elements starts making the movie, displaying a status bar that provides an estimate for the amount of time it will take to render the movie. The render or output time depends on the capabilities of your computer. On most systems, Premiere Elements should finish making the movie within a few minutes. You can cancel the process at any time by clicking the Cancel button.
5. When the movie is complete, it will be saved in the location you chose in step 3. Double-clicking on this file opens it in the program you have chosen to display movie files.
6. Select File > Save to save your project.
Congratulations, you have finished the Tour!