
Lesson 7. Advanced Effects
In this lesson, you’ll learn how to animate effects that you have created using Premiere Elements effect tools. You’ll use preset effects to automatically create pans and zooms on still images. You will modify the keyframes which are used on video clips in Premiere Elements to control properties such as the opacity of video clips, and the volume of audio clips. Specifically, you’ll learn how to do the following:
• Create a pan over a still image with preset effects.
• Control sound volume with keyframes.
• Control visual effects with keyframes.
Getting started
To begin, you’ll launch Adobe Premiere Elements and open the Advanced Effects project. Then you’ll review a final version of the project you’ll be creating.
1. Make sure you know the location of the files used in this lesson. If necessary, insert the Adobe Premiere Elements Classroom in a Book disk and copy the Lesson07 folder to your hard drive. For help, see “Copying the Classroom in a Book files” on page 3.
2. Start Premiere Elements.
3. Click on Open Project, then navigate through your hard drive to locate the Lesson07 directory you copied to your hard disk. Select the file Lesson07_Start.prel and click Open.
4. The project file opens with the Media, Monitor, and Timeline windows open. Choose Window > Restore Workspace > Edit to ensure your window layout is in the default editing mode.
Viewing the completed movie before you start
To see what you’ll be creating, you can take a look at the completed movie.
1. In the Media panel, select Lesson07_movie.wmv and then double-click it to open the video into the Monitor panel. Pay attention to the panning of the map and the audio.
2. Press the Play button (![]() ) to review the video you’ll be building in this lesson.
) to review the video you’ll be building in this lesson.
Creating an image pan with a still image
The image pan is a popular device in many documentaries and films. An image pan is defined as a movement of the camera, usually from left to right, although also from top to bottom. A traditional pan would actually involve the physical movement of a camera over an image; however, in Premiere Elements you can simulate the movement of the camera with the Image Pan preset effect.
1. In the task bar, click the Add Media button and choose From Files or Folders. Navigate to the Lesson07 folder. Locate the freedomtrail.jpg image and click Open to import it into your Project window. This image is a map of the Freedom Trail, but could just as easily have been a digital photo from your image collection.
Notice the preview area at the top of the Media panel, which allows you to identify the size of the digital image you have imported. If the preview area is not displayed, click the More button and choose View > Preview Area.
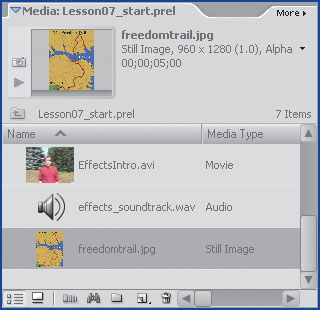
2. Click the freedomtrail.jpg image if it is not already selected. In the preview area, note that this image is 960 pixels wide and 1,280 pixels high. This information is necessary to create an image pan.
3. Click and drag the freedomtrail.jpg image into the beginning of your Timeline. Place the clip in Video Track 1 directly before the Effects1.avi clip. When you release the mouse, all the trailing clips shift to the right, making room for the freedomtrail.jpg image.
The image has been automatically scaled from top to bottom in the Monitor panel. Although the original image was 1,280 pixels high, Premiere Elements automatically scaled the image down to 480 pixels high. The default behavior of Premiere Elements is to scale still images to fit the screen. Keep the image selected.
4. Locate the Effects and Transitions panel. If necessary, scroll in the panel and then click the arrow next to the Presets folder to view the available presets. Click on the arrow next to the subfolder named Vertical Image Pans, and click on the preset 960×1280 Image Pan Up. You may need to expand your Effects and Transitions panel to view the preset names by clicking and dragging the handle on the bottom right corner of the Effects and Transitions panel.
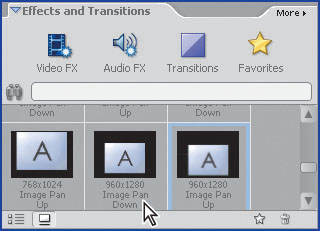
5. Drag the 960×1280 Image Pan Up preset from the Effects and Transitions panel onto the freedom.jpg clip in your Timeline. This automatically creates a vertical pan.
6. Click the freedomtrail.jpg image in the Monitor panel to select it. In the Monitor panel, click on the bottom left corner handle of the image then drag down and to the left. Release the mouse button after the image fills the width of the Monitor panel. Premiere Elements maintains the aspect ratio of the image as it is enlarged.
7. To view the pan effect, click on the top of the Timeline to make it active, then press the spacebar to play the project.
Modifying the image pan
Although presets are useful for quick and easy effects, they often need modifying after they have been applied. For example, the image pan in the last exercise stops and then quickly jumps to the next scene, which is a visually jarring effect. You will now extend the length of the clip to provide a better transition into the next scene.
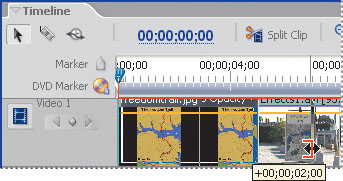
1. Place your cursor at the end of the freedomtrail.jpg clip. When your cursor changes into the Trim Out tool (![]() ), click and drag the clip to the right. As you drag, notice the small yellow box that appears, displaying the time that is added to the duration of the clip. We added approximately 2 seconds.
), click and drag the clip to the right. As you drag, notice the small yellow box that appears, displaying the time that is added to the duration of the clip. We added approximately 2 seconds.
2. Press the Home key to return the current-time indicator to the beginning of the Timeline. Press the spacebar to begin playback. Notice that at the 5 second mark, the pan stops, but there are now two seconds of the still image at the end of the clip.
Working with keyframes
Every clip in the Timeline has the ability to be modified over time. This involves a concept called keyframing. In the last step, when you added the image pan preset, Premiere Elements automatically created keyframes. The image started in one location, the first keyframe, and ended in a different location, the second keyframe. Premiere Elements moved the picture from one keyframe to the second keyframe, thereby creating the motion from bottom to top. When you create your own keyframes, you have much more control over the appearance and length of the effect.
Working with keyframes in the Timeline to create a fade-in
You can control keyframes in two locations in Premiere Elements: the Timeline and the Properties panel. In this exercise, you will control the opacity keyframes of a video clip and the volume keyframes of an audio clip.
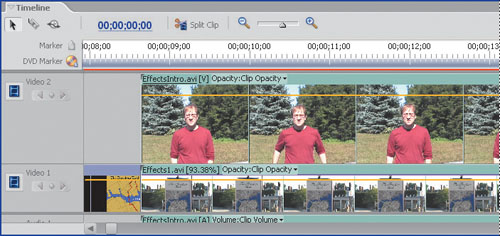
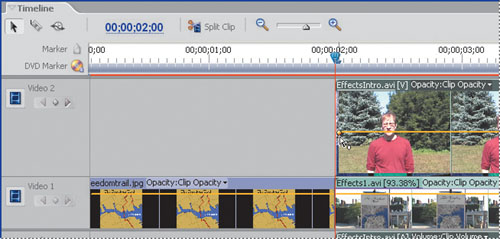
1. Click on the Effects_Intro clip in Video Track 2. You may need to scroll in the Timeline to fully see the clip.
2. Place the current-time indicator approximately in the middle of the clip. Click the Zoom in tool (![]() ) in the Timeline to increase your view of the clip. When working with clip keyframes, it is often helpful to increase the magnification. The orange line spanning horizontally across the clip is the connector line (or graph) between keyframes. By default, all clips have the Opacity property enabled.
) in the Timeline to increase your view of the clip. When working with clip keyframes, it is often helpful to increase the magnification. The orange line spanning horizontally across the clip is the connector line (or graph) between keyframes. By default, all clips have the Opacity property enabled.
3. Place your cursor over the orange connector line at the location of the current-time indicator. The cursor changes to a double-arrow icon (![]() ). Click and drag the connector line down toward the bottom of the clip. As you drag, you will see a small window with changing numbers. The numbers represent the opacity values. Drag the connector line down to approximately the 50% level. Don’t worry if you cannot get an exact number. When you release the mouse, you will see the clip is at 50% opacity, allowing you to see the video clip below.
). Click and drag the connector line down toward the bottom of the clip. As you drag, you will see a small window with changing numbers. The numbers represent the opacity values. Drag the connector line down to approximately the 50% level. Don’t worry if you cannot get an exact number. When you release the mouse, you will see the clip is at 50% opacity, allowing you to see the video clip below.
Note
If you do not see the opacity change, you may need to select the Effects_Intro clip inside the Monitor panel, then try the opacity change again.
4. Click and drag the connector line back up to the top of the clip to restore the clip’s opacity to 100%. Now you will create keyframes to automatically change the opacity levels from 0% to 100% over the length of two seconds.
5. Place your cursor at the beginning of the clip on the orange connector line (you are not placing it on the current-time indicator). This can be a little tricky because your cursor may also change to the Trim Out tool. However, you need the cursor to be the double-arrow icon (![]() ). Press the Ctrl key and click once on the connector line. You should see a small yellow diamond, which represents your first keyframe.
). Press the Ctrl key and click once on the connector line. You should see a small yellow diamond, which represents your first keyframe.
6. Move the current-time indicator to the 8 second mark. Place your cursor on the orange connector line at the 8 second mark. Hold down the Ctrl key and click to add a second keyframe.
7. You should now have two keyframes, as indicated by the two diamonds on the connector line. Place your cursor over the first keyframe at the beginning of the clip. Your cursor changes (![]() ) when it is correctly placed. Click and drag this first keyframe down to the bottom of the clip. This decreases the opacity of the first frame to 0%. There should also be a diagonal line connecting the first and second keyframe.
) when it is correctly placed. Click and drag this first keyframe down to the bottom of the clip. This decreases the opacity of the first frame to 0%. There should also be a diagonal line connecting the first and second keyframe.
8. To view the opacity fade-in, move your current-time indicator to the beginning of the EffectsIntro clip and then press the spacebar. Your picture-in-picture will fade in as the man begins talking.
Modifying keyframes
You may have noticed that this effect is similar to a Cross Dissolve transition. The visual effect is similar, but working with keyframes has certain advantages over transitions, including the ability to quickly change the duration of the effect and add keyframes. You will now shorten the fade-in you just created, and then add a fade-out.
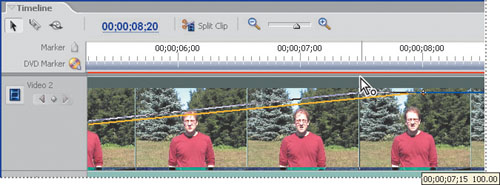
1. Place your cursor on the second keyframe in the EffectsIntro clip, again making sure your cursor has the correct display (![]() ). Click and drag the keyframe to the left. As you drag, a small yellow menu appears, displaying the current-time. Shorten the amount of time to 00;00;07;15. Be careful as you drag the keyframe not to drag it downwards, as that will change the opacity of the clip.
). Click and drag the keyframe to the left. As you drag, a small yellow menu appears, displaying the current-time. Shorten the amount of time to 00;00;07;15. Be careful as you drag the keyframe not to drag it downwards, as that will change the opacity of the clip.
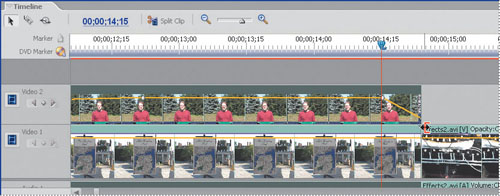
2. Place your cursor at the end of the EffectsIntro clip in Video track 2, directly on the orange connector line. Ctrl+click on the line to add a keyframe at the end of the clip.
3. Ctrl+click on the orange connector line to add another keyframe less than one second from the end of the clip. This keyframe will be the start of the fade-out. Our clip ended at 15;02 so we placed the second keyframe at 14;15.
4. Place your cursor over the last keyframe (at the end of the clip) then click and drag it downwards. This changes the value of the frame to 0% opacity. Premiere Elements is now animating the opacity between keyframes 3 and 4 to create a fade-out. If needed, click and drag a keyframe to reposition it.
5. Place the current-time indicator at the beginning of the EffectsIntro clip, and press the spacebar to view the fade-in and fade-out.
Raising and lowering volume with keyframes
Understanding how keyframes function is important if you want to improve the amount of control you have over the look and sound of your video projects. Keyframes can be used to control fixed effects, such as opacity, and can also be used to change the volume of your audio tracks. In this exercise, you will add keyframes to lower the volume of a segment from a music track.
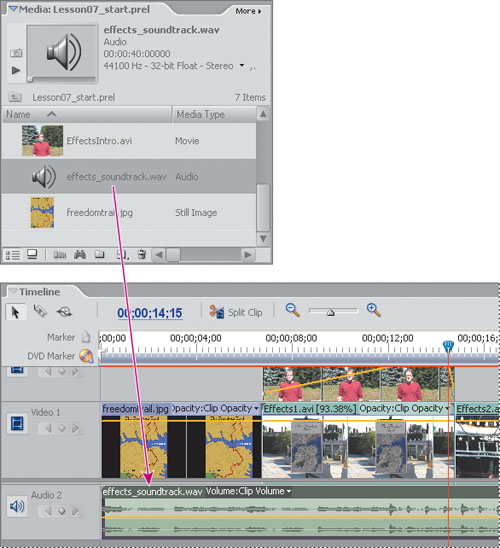
1. In the Media panel, locate the file effects_soundtrack.wav. Additionally, if necessary, scroll down your Timeline panel and locate the Audio 2 track. You may need to zoom out to see all the clips in your Timeline by clicking the Zoom Out button (![]() ).
).
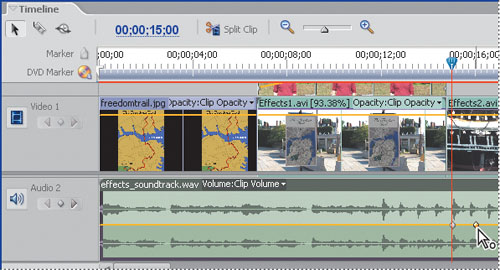
2. Click and drag the effects_soundtrack.wav file from the Media panel into the Audio 2 track. Be sure to place the beginning of the clip flush against the beginning of the Timeline. Notice that after the clip is placed into the Timeline, it has an orange connector line. This is the control for the Volume keyframes.
3. Place the current-time indicator at the beginning of the project and press the spacebar to listen to the sound track. In the section where the man is talking, the sound track is competing with his voice. You will lower the overall volume of the music track so the voice is easier to hear.
4. Place your cursor over the orange connector line in the effects_soundtrack clip and drag downwards. As you drag, a small yellow menu appears; change the value to approximately -8 db.
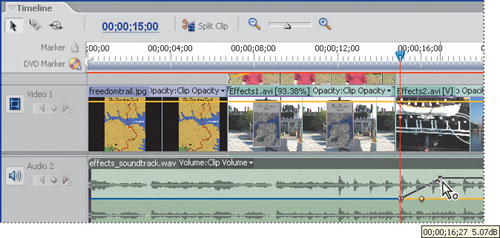
5. You lowered the volume of the entire clip; now you will bring the volume back up to its original level, but only after the man has stopped talking. Drag the current-time indicator to approximately the 15 second mark or 1 second before the end of the effects_ soundtrack.wav clip. Place your cursor on the connector line in the effects_soundtrack. wav clip and Ctrl+click to add a keyframe at the 15 second mark.
6. Move your cursor to the right to approximately the 16 second position or wherever your effects_soundtrack.wav clip ends. Ctrl+click again on the connector line to add a second keyframe.
7. Place your cursor over the keyframe you added near the 16 second mark, then click and drag it upwards and slightly to the right. Using the settings in the yellow context menu, move the keyframe at a time position of approximately 16;27 seconds with a volume level of approximately 5 db.
8. To hear this change, press the Home key and then press the spacebar to play. You should be able to hear the music track in the background. As soon as the man stops talking, the volume of the music track quickly increases due to the keyframe adjustments you made.
Using keyframes to animate effects
Adding keyframes to clips in the Timeline is perhaps the quickest way to work with advanced effects, but it is not the only way. Premiere Elements offers a more sophisticated set of keyframing tools in the Properties panel. One word of caution: this section is more advanced than some users of Premiere Elements may need, and you should feel free to skip to the next lesson if you find yourself in that category. Additionally, if you ever find yourself outgrowing the capabilities of Premiere Elements, you should know that this keyframing is the basis of animation in programs such as Adobe Premiere Pro and Adobe After Effects.
In this section, you will be animating the blur effect to create a unique transition.
1. Be certain the Effects and Transitions panel is visible. In the Effects and Transitions panel search section, type gaussian blur to locate the Gaussian Blur effect. This effect is located under the Video Effects folder, in the Blur & Sharpen section.
2. Move your current-time indicator to the beginning of the Effects2.avi clip and then click on the clip to select it. Drag and drop the Gaussian Blur effect on top of the Effects2.avi clip to apply it. You will not see any change in the image because the default value for the blur is 0; however, you will see the effect appear in the Properties panel.

3. Place your current-time indicator on the first frame of the Effects2 clip. Increase the magnification of the Timeline if necessary.
4. If necessary, in the Properties panel, click the arrow next to the Gaussian Blur effect to reveal the controls. Place your cursor over the value for Blurriness, and click and drag it to the right to change the value to 50. You will notice the screen image becomes more blurry.
![]() You can enter number values for effects directly by clicking once in the value field and then typing in the number you want.
You can enter number values for effects directly by clicking once in the value field and then typing in the number you want.
5. At the top of the Properties panel, click the Show Keyframes button. You may need to expand the size of the Properties panel to view the keyframes.
6. To the right of the Gaussian Blur property is a small stopwatch. Click this to turn on the animation for this property. After you click on the stopwatch, a small diamond appears in the small Timeline within the Properties panel. This represents a keyframe.

A. Toggle animation (stopwatch). B. Keyframe.
Note
The Timeline in the Properties panel and the Timeline panel are actually the same. You can use either Timeline to navigate through your clip. However, the Timeline in the Properties panel allows you only to navigate through the currently selected clip and is used primarily for working with keyframes.
7. Within the Properties panel, click and drag the current-time indicator to 16;15. Notice that the current-time indicator in the Timeline is also moving. Place your cursor over the value for Blurriness (it should be set to 50) then click and drag to the left to change the value to 0.
Changing the value automatically adds a second keyframe, which is represented as a second diamond in the Properties Timeline. Once animation has been turned on, Premiere Elements will automatically animate between the two values. In this case you moved from a blurriness of 50 to a blurriness of 0 over a span of 1 second.
8. Drag the current-time indicator to the beginning of the clip in the Properties panel and press the spacebar to play the clip and the effect. The clip starts out blurry and then quickly snaps into focus.
Extending the duration of an effect
Once you have added keyframes for an effect, you can control how quickly the effect occurs. For example, in the last exercise you animated the blurriness of the clip from 50 to 0 over the time period of approximately one second. What if you would like to extend the duration of the effect? Premiere Elements offers a simple way to do this.
1. Be sure the Effects2.avi clip is selected and that you can see the values for Gaussian Blur in the Properties panel.
2. Located at the far right of the Blurriness property are a set of three buttons. The left-facing arrow is Go to Previous Keyframe; the center button is Add/Remove Keyframe, and the right-facing arrow is Go to Next Keyframe. Click on the left-facing arrow until you reach the first keyframe. Note the time in your Timeline. Ours was 15;03—you may have a slightly different value. Also note that the blurriness value is 50.

3. Click on the Go to Next Keyframe button, which is the right-facing arrow, to move to the second keyframe. Notice the Timeline now reads 16;15 and the Blurriness value is 0. Using these two arrows to navigate between keyframes allows you to quickly jump from keyframe to keyframe. In addition, when you make changes to properties, you need to be exactly on a keyframe.
4. Move the current-time indicator in the Properties panel to approximately 17 seconds. Click and drag the second keyframe from its current location to the 17 second mark. This lengthens the animation. The blurriness values of 50 for the first keyframe and 0 blurriness for the second keyframe are still the same, except they now occur for a longer period of time.
5. Choose File > Save As and save your project as Lesson07_End.prel. Congratulations, you have finished this lesson.
Exploring on your own
1. Experiment with the various effects presets located in the Effects and Transitions panels, specifically, the Horizontal and Vertical image pans.
2. Using the effects_soundtrack.wav clip in your Audio 2 track, add 2 new keyframes at the beginning of the clip. Change the volume levels so that the beginning of the clip is louder and then decreases when the man starts talking.
3. Create two new Gaussian Blur keyframes on the Effects2.avi clip to create an effect which blurs out.
Review questions
1. What is a keyframe and what does it contain?
2. How would you change the volume of a clip over time using keyframes?
3. How do you modify keyframes once they have been added to a clip?
Review answers
1. A keyframe contains the values for all the controls in the effect and applies those values to the clip at the specific time.
2. Each Premiere Elements clip in the Timeline has an orange connector line which controls the keyframes of the clip. To add keyframes, you Ctrl+click on the line. You must have at least two keyframes with different values to automatically change the level of the volume of an audio clip.
3. Once keyframes have been added to a clip, they can be adjusted by clicking and dragging them along the connector line. If there are two keyframes, moving one keyframe farther away from the other extends the duration of the effect; moving a keyframe closer to another keyframe shortens the effect.