Menus are a common feature in almost every application. They provide access to application functionality without cluttering the main program window (although it is possible, and sometimes normal, to duplicate some functionality in menus and utility windows). Creating all sorts of menus in your AIR application is straightforward enough, and you’ll learn everything you need to know in this chapter.
The chapter begins with a discussion of the basic terminology, which is mostly a matter of the types of menus that exist. You’ll learn how to create menus, and then how to tie events to the menu items (so that selecting an option does something). Part of the point of AIR is to generate cross-platform applications, so you’ll also find the code you need to make appropriate menus for both Windows and Mac OS X. The chapter concludes with secondary topics, like creating keyboard equivalents to menu items, adding mnemonics, and changing other menu item properties.
Before getting into the actual code, it’s best to go through some of the terms used with menus. To start, there are several types of menus that a graphical program can contain.
Application menus exist on Mac OS X and appear at the top of the screen (Figure 7.1). A basic application menu is automatically created by the operating system, but you can replace it with your own.

Windows menus are a Windows operating system convention. These menus are associated with an individual window (Figure 7.2). Note that the application window must use the system chrome (see Chapter 6, “Making Windows”) in order to have a windows menu.

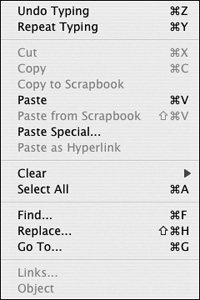
Contextual menus only appear when the user right-clicks, Command-clicks, or Ctrl-clicks, depending on the operating system and its configuration (Figure 7.3). Pop-up menus are like contextual menus but can be invoked anywhere within a window (whereas contextual menus are applied to selected text, an image, etc.).

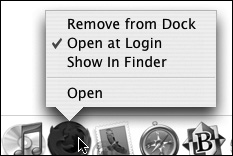
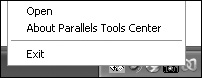
Dock and system tray menus appear when a user clicks on a representation of a program. On Mac OS X, all active and some inactive programs are represented in the Dock (Figure 7.4). As with the application menus, Dock menus start with some standard options, to which you can add options; however, unlike application menus, which can be completely overridden, you cannot remove the standard options from Dock menus. On Windows, some programs are represented in the system tray (Figure 7.5).
To create menus, you’ll use two Adobe AIR classes: NativeMenu and NativeMenuItem. The first creates the actual menu; the second creates the items within the menu.
✓ Tips
You can also create custom menus using ActionScript, MXML (an XML-based markup language associated with ActionScript), or JavaScript. But doing so is beyond the scope of this chapter, which instead focuses on native menus.
You can create contextual menus using standard JavaScript or the AIR
NativeMenuclass. Again, the focus here is on native menus.One key distinction between Mac OS X and Windows is in applications versus windows. On Windows, each window is essentially an instance of the application. If you close the window, you close that instance of the application. On Mac OS X, an application can be open without any windows being open, and multiple windows can be open within the same (the only) instance of the application. This is why Macs have application menus but Windows uses window menus.
The first class you’ll use for creating menus is, appropriately enough, NativeMenu. To start, you’ll always want to create the root, or base, menu. The code to use is
var rootMenu = new air.NativeMenu();
For contextual and pop-up menus, the root menu may contain any combination of submenus, individual menu items, and separator lines. If you want to create the more common application or windows menu, you can only place submenus within this root menu.
To add a submenu, start by creating another NativeMenu object:
var fileMenu = new air.NativeMenu();
Next, create items to be added to the submenu:
var open = new air.NativeMenuItem('Open'),
var close = new air.NativeMenuItem('Close'),
The argument to this method is the label the item will have (i.e., the text that will appear in the running application). To add an item to a menu, use the menu object’s addItem() method:
fileMenu.addItem(open);
fileMenu.addItem(close);
The items will appear in the menu in the order in which they are added.
To create a separator line, use NativeMenuItem, providing it with any label (which won’t be shown) or none at all, but also add a second argument with a value of true:
var sep = new air.NativeMenuItem('', true);
fileMenu.addItem(sep);
When the submenu is done, you can add it to the root menu:
rootMenu.addSubmenu(fileMenu, 'File'),
The first argument is the NativeMenu object; the second is the label the submenu should have.
If you execute the lines of code to this point, rootMenu will be a menu containing one submenu whose label is File. That submenu will have three items: the first with a label of Open, the second with a label of Close, and the third being a separator line. Separators don’t do anything, they just visually break up a menu (as the last item in this menu, the separator doesn’t even do that, but that’s irrelevant for now).
After you’ve completely defined the menu, you’ll need to set its type. To create a new window menu for Windows, use (Figure 7.6):
window.nativeWindow.menu = rootMenu;

To create a system tray icon menu for Windows, use:
air.NativeApplication.nativeApplication.icon.menu = rootMenu;
To create an application menu for Mac OS X, use (Figure 7.7):
air.NativeApplication.nativeApplication.menu = rootMenu;

Figure 7.7. The same menu as in Figure 7.6 but is now being used as an application menu on Mac OS X.
As a reminder, setting a new application menu will replace the standard menu created by the operating system.
To create a Dock icon menu for Mac OS X, use:
air.NativeApplication.nativeApplication.icon.menu = rootMenu;
As with the application menu, Mac OS X will provide a default set of menu options for the Dock menu. Unlike the application menu, by defining a new Dock menu, your menu items will be added to the existing Dock menu (Figure 7.8). You cannot modify the operating system-provided Dock menu items.

Figure 7.8. The same menu as in Figures 7.6 and 7.7 but is now added to the application’s Dock menu.
In your project’s primary HTML file, create a new native menu (Script 7.1):
var rootMenu = new air.NativeMenu();
This object will be the root menu. Every submenu will be added to it.
If you’d rather, you have the option of putting this and all the subsequent code within a function that’s called once the page has loaded. I’m choosing not to, just to keep things simple.
Add a submenu:
var fileMenu = new air.NativeMenu();
This application’s main menu (Figures 7.9 and 7.10) will have two submenus: File and Help. The code for the file menu will be written first.
Example 7.1. In this application, a menu with two submenus is created. You’ll need to remove the backslashes (
//) before one of the two last lines of JavaScript to create the menus for your operating system.1 <html><!-- Script 7.1 --> 2 <head> 3 <title>New Menu</title> 4 <script type="text/javascript" src="AIRAliases.js"></script> 5 <script type="text/javascript"> 6 7 // Root menu: 8 var rootMenu = new air.NativeMenu(); 9 10 // Add a submenu: 11 var fileMenu = new air.NativeMenu(); 12 13 // Add an item to the submenu: 14 var exit = new air.NativeMenuItem('Exit'), 15 fileMenu.addItem(exit); 16 17 // Add another submenu: 18 var helpMenu = new air.NativeMenu(); 19 20 // Add items to the submenu: 21 var showTips = new air.NativeMenuItem('Show Tips'), 22 helpMenu.addItem(showTips); 23 var helpPages = new air.NativeMenuItem('Help Pages'), 24 helpMenu.addItem(helpPages); 25 var separator = new air.NativeMenuItem('', true); 26 helpMenu.addItem(separator); 27 var checkForUpdates = new air.NativeMenuItem('Check for Updates'), 28 helpMenu.addItem(checkForUpdates); 29 var visitWebSite = new air.NativeMenuItem('Visit Web Site'), 30 helpMenu.addItem(visitWebSite); 31 32 // Add the submenus to the root menu: 33 rootMenu.addSubmenu(fileMenu, 'File'), 34 rootMenu.addSubmenu(helpMenu, 'Help'), 35 36 // Add the menu to the program... 37 38 // Un-comment to run on Windows: 39 // window.nativeWindow.menu = rootMenu; 40 41 //Un-comment to run on Mac OS X: 42 // air.NativeApplication.nativeApplication.menu = rootMenu; 43 44 </script> 45 </head> 46 47 <body> 48 <p>Page Content</p> 49 </body> 50 </html>Add an Exit option to the File menu:
var exit = new air.NativeMenuItem('Exit'),
fileMenu.addItem(exit);
To add an item to a menu, first create a new
NativeMenuItemand provide that constructor the label value to use. Then call the parent menu’saddItem()method.(As a reminder, a constructor is the default method automatically called when a new object of that type is created).
Add another submenu:
var helpMenu = new air.NativeMenu();
var showTips = new air.NativeMenuItem('Show Tips'),
helpMenu.addItem(showTips);
var helpPages = new air.NativeMenuItem('Help Pages'),
helpMenu.addItem(helpPages);
var separator = new air.NativeMenuItem('', true);
helpMenu.addItem(separator);
var checkForUpdates = new air.NativeMenuItem('Check for Updates'),
helpMenu.addItem(checkForUpdates);
var visitWebSite = new air.NativeMenuItem('Visit Web Site'),
helpMenu.addItem(visitWebSite);
These lines duplicate the same processes as found in steps 2 and 3. This second menu will contain two items, a separator, and then two more items (see Figure 7.10).
Add the submenus to the root menu:
rootMenu.addSubmenu(fileMenu, 'File'),
rootMenu.addSubmenu(helpMenu, 'Help'),
The order in which the submenus are added dictates their order in the final menu.
Add the menu to the program.
If you’re testing and running this on Windows, add this line:
window.nativeWindow.menu = rootMenu;
If you’re testing and running this on Mac OS X, add:
air.NativeApplication.nativeApplication.menu = rootMenu;
Script 7.1 shows both of these lines, but they are commented out (i.e., rendered inert). In the next section of this chapter you’ll learn how to do this dynamically.
Save, test, debug, and run the completed application.
One thing you’ll likely notice is that none of the menus items actually do anything. In fact, there’s no common way to exit the application because the Exit (or Quit, on Mac OS X) functionality provided by the operating system has been replaced. Keep reading for the solution. But in the meantime, just close the window to terminate the application.


✓ Tips
In terms of debugging, if any of the menu creation syntax is wrong, the end result will almost always be a running application with the default menus or none at all. In such cases, check the console for any errors that might have occurred.
Instead of creating menu items in the order in which you’d like them to appear, you can specify their index (order in the listing) using the
addItemAt()method. Its first argument is the item being added, the second is its desired indexed position (starting at 0):var sep = new air.NativeMenuItem('', true); fileMenu.addItemAt(sep, 2);
One crucial step is missing in the previous example: The menu items don’t actually do anything. As with most functionality in Adobe AIR applications, creating an object is only half the process; the other half is tying the object to an action. This means using events.
Two events are pertinent to menus: displaying and select. A displaying event is triggered just before a menu appears (in the nanosecond between the time a user clicks on it and when it’s displayed). The most obvious example of when you might use this event would be to update a list of recently opened files each time that menu is viewed.
A select event occurs when a user selects a menu item (except for a submenu or a separator, neither of which can be selected). To perform an action when a menu item is selected, add an event listener:
var fullScreen = new air.NativeMenuItem('Full Screen'),
fullScreen.addEventListener(air.Event.SELECT, makeFullScreen);
viewMenu.addItem(fullScreen);
This code tells the program that when the select event is triggered on the fullScreen menu item, the makeFullScreen() function (which would need to be defined) should be called. For more information on event listeners, see Chapter 4, “Basic Concepts and Code.” To practice this, let’s add a couple of event listeners to the menus already created.
Open Script 7.1 in your text editor or IDE, if it is not already.
Throughout this entire chapter you’ll continue to build on this one example until it’s fully functional (or reasonably so).
Anywhere within the JavaScript, define a function that should be called when the user selects File > Exit (Script 7.2):
function doExit(e) {
  air.NativeApplication.nativeApplication.exit();
}
Example 7.2. Two event handlers are added to the application so that selection of File > Exit or Help > Help Pages causes something to happen (namely, termination of the program and the display of an alert box, respectively).
1   <html><!-- Script 7.2 -->
2      <head>
3         <title>Menu Events</title>
4         <script type="text/javascript" src="AIRAliases.js"></script>
5         <script type="text/javascript">
6
7         // Function for handling the Exit menu item selection:
8         function doExit(e) {
9            air.NativeApplication.nativeApplication.exit();
10        }
11
12        // Function for handling the Help Pages menu item selection:
13        function showHelp(e) {
14           alert('This is when the Help window would appear.'),
15        }
16
17        // Root menu:
18        var rootMenu = new air.NativeMenu();
19
20        // Add a submenu:
21        var fileMenu = new air.NativeMenu();
22
23        // Add an item to the submenu:
24        var exit = new air.NativeMenuItem('Exit'),
25        exit.addEventListener(air.Event.SELECT, doExit);
26        fileMenu.addItem(exit);
27
28        // Add another submenu:
29        var helpMenu = new air.NativeMenu();
30
31        // Add items to the submenu:
32        var showTips = new air.NativeMenuItem('Show Tips'),
33        helpMenu.addItem(showTips);
34        var helpPages = new air.NativeMenuItem('Help Pages'),
35
36        // Add the helpPages event listener:
37        helpPages.addEventListener(air.Event.SELECT, showHelp);
38
39        // Continue adding items:
40        helpMenu.addItem(helpPages);
41        var separator = new air.NativeMenuItem('', true);
42        helpMenu.addItem(separator);
43        var checkForUpdates = new air.NativeMenuItem('Check for Updates'),
44        helpMenu.addItem(checkForUpdates);
45        var visitWebSite = new air.NativeMenuItem('Visit Web Site'),
46        helpMenu.addItem(visitWebSite);
47
48        // Add the submenus to the root menu:
49        rootMenu.addSubmenu(fileMenu, 'File'),
50        rootMenu.addSubmenu(helpMenu, 'Help'),
51
52        // Add the menu to the program:
53  //    window.nativeWindow.menu = rootMenu;
54  //    air.NativeApplication.nativeApplication.menu = rootMenu;
55
56        </script>
57     </head>
58
59     <body>
60        <p>Page Content</p>
61     </body>
62  </html>
This function takes one argument, which will be an
Eventobject. Although it won’t be used within the function, it’s still a good idea to accept that parameter. As for the function itself, it terminates the running application by invoking theexit()method of theNativeApplicationobject.It really doesn’t matter where within the JavaScript block you define this function, but I’ll add mine to the top to keep it separate from the rest of the menu code.
Add another function to handle the selection of the Help > Help Pages menu item:
function showHelp(e) {
  alert('This is when the Help window would appear.'),
}
Logically, when users select this particular menu item, they should be shown the Help files for this application. You can easily use some of the code from Chapter 6 to have a new window pop up with that information. But since there is no Help documentation as of yet, an alert dialog will be created instead (Figure 7.11).
After creating the
exitobject, add an event listener to it:exit.addEventListener(air.Event.SELECT, doExit);
The event listener is added to the
exitobject, which is a menu item. The event being watched isair.Event.SELECT. When that event occurs, thedoExit()function will be called (defined in step 2). You can place this code anywhere within the JavaScript after theexitobject is created and before therootMenuis turned into an application or windows menu.After creating the
helpPagesobject, add an event listener to it:helpPages.addEventListener(air.Event.SELECT, showHelp);
Most of this code is the same as the code in step 4; even the same event is being listened for. For this menu item, the function to be called is
showHelp(), defined in step 3.Save, test, debug, and run the completed application.
There’s no cosmetic difference in the program, but now selecting Help > Help Pages creates the alert box (Figure 7.11) and selecting File > Exit terminates the application, as it should.

In the example that I’ve been developing throughout this chapter, I instructed you to use this line:
window.nativeWindow.menu = rootMenu;
to create a windows menu for Windows and this version:
air.NativeApplication.nativeApplication.menu = rootMenu;
to create that same menu as an application menu on Mac OS X. But AIR applications are supposed to be cross-platform in nature. Although you could build and distribute two different versions of each program, you really don’t have to. Instead, you can programmatically check if a menu type is supported and only create those that are.
A windows menu in Windows is added through a native window object. To confirm that the program is running on Windows, prior to adding such a menu, use:
if (air.NativeWindow.supportsMenu) {...Conversely, an application menu on Mac OS X is added through a native application object. To confirm that the program is running on Mac OS X, prior to adding such a menu, use:
if (air.NativeApplication.supportsMenu) {(Technically, these conditionals aren’t confirming that the program is running on Windows or Mac OS X but just that the associated menu type is supported.) Let’s update the application with this in mind.
Open Script 7.2 in your text editor or IDE, if it is not already.
Replace the line where the menu is added to the program with (Script 7.3):
if (air.NativeWindow.supportsMenu) {
  window.nativeWindow.menu = rootMenu;
} else if (air.NativeApplication.supportsMenu) {
  air.NativeApplication.nativeApplication.menu = rootMenu;
}
These two conditions were explained earlier. Here, they’ve just been put into an
if-else ifconditional.Example 7.3. By using a conditional to check what kinds of menus the current operating system supports, this application can automatically create operating system-specific menus. For Mac OS X, it also changes the label for the File > Exit menu item to Quit.
1   <html><!-- Script 7.3 -->
2      <head>
3         <title>OS-Specific Menus</title>
4         <script type="text/javascript" src="AIRAliases.js"></script>
5         <script type="text/javascript">
6
7         // Function for handling the Exit menu item selection:
8         function doExit(e) {
9            air.NativeApplication.nativeApplication.exit();
10        }
11
12        // Function for handling the Help Pages menu item selection:
13        function showHelp(e) {
14           alert('This is when the Help window would appear.'),
15        }
16
17        // Root menu:
18        var rootMenu = new air.NativeMenu();
19
20        // Add a submenu:
21        var fileMenu = new air.NativeMenu();
22
23        // Add an item to the submenu:
24        var exit = new air.NativeMenuItem('Exit'),
25        exit.addEventListener(air.Event.SELECT, doExit);
26        fileMenu.addItem(exit);
27
28        // Add another submenu:
29        var helpMenu = new air.NativeMenu();
30
31        // Add items to the submenu:
32        var showTips = new air.NativeMenuItem('Show Tips'),
33        helpMenu.addItem(showTips);
34        var helpPages = new air.NativeMenuItem('Help Pages'),
35
36        // Add the helpPages event listener:
37        helpPages.addEventListener(air.Event.SELECT, showHelp);
38
39        // Continue adding items:
40        helpMenu.addItem(helpPages);
41        var separator = new air.NativeMenuItem('', true);
42        helpMenu.addItem(separator);
43        var checkForUpdates = new air.NativeMenuItem('Check for Updates'),
44        helpMenu.addItem(checkForUpdates);
45        var visitWebSite = new air.NativeMenuItem('Visit Web Site'),
46        helpMenu.addItem(visitWebSite);
47
48        // Add the submenus to the root menu:
49        rootMenu.addSubmenu(fileMenu, 'File'),
50        rootMenu.addSubmenu(helpMenu, 'Help'),
51
52        // Add the menu to the program:
53        if (air.NativeWindow.supportsMenu) { // Windows
54           window.nativeWindow.menu = rootMenu;
55        } else if (air.NativeApplication.supportsMenu) { // Mac
56           exit.label = 'Quit';
57           air.NativeApplication.nativeApplication.menu = rootMenu;
58        }
59
60        </script>
61     </head>
62
63     <body>
64        <p>Page Content</p>
65     </body>
66  </html>
Before the line that creates the Mac menu, change the label for the exit menu item:
exit.label = 'Quit';
As a convention, Macs use the word Quit instead of Exit. So to make this program even more operating system savvy, let’s change that value. You can do so by assigning the
labelattribute of the menu item a new value. All the other functionality (namely, calling thedoExit()function when selected) will remain the same.Save, test, debug, and run the completed application.
The only apparent difference will be the change in the name of the item in the File menu when running the program on Mac OS X (Figure 7.12). But more important, you can now distribute and run this same program on both operating systems without further modification.

✓ Tips
Because window menus on Windows can only be created within windows that use the system chrome, you can check that condition, too:
if (air.NativeWindow.supportsMenu && (air.nativeWindow.systemChrome!= air.NativeWindowSystemChrome.NONE) ) {...That being said, you, as the program’s developer, should know whether you’ve created a window with the system chrome or not, so this check shouldn’t be necessary.
Applications on Mac OS X normally have a menu whose name is the same as the application. You can create this by simply using:
rootMenu.addSubmenu(appMenu, 'Application Name'),
Obviously, you’d need to fill in the actual application’s name.
Often, items in a menu have a keyboard equivalent, also called a keyboard shortcut or an accelerator. Keyboard equivalents consist of the key and the modifier or modifier keys. Of course, you’re already familiar with this concept: Ctrl+C (Windows) or Command+C (Mac OS X) copies the currently selected item to the clipboard.
To add a keyboard equivalent to your AIR application, you start with the menu item:
var print = new air.NativeMenuItem('Print'),Then set the item’s keyEquivalent property to the primary key:
print.keyEquivalent = 'p';
Note that you should use a lowercase letter, because an uppercase letter assumes the use of the Shift key, which is one of the modifiers. Speaking of which, you also need to list the modifier or modifiers that go with the key. Obviously, you don’t want to just use a single key because, using this example, every time I type the word plié, I’ll trigger the menu item, and that would be maddening. Modifiers are set in an item’s keyEquivalentModifiers property. It always takes an array of values, even if only one modifier is being set:
item.keyEquivalentModifiers = [modifiers];
The modifier values are AIR constants and are defined within the Keyboard class. Most are what you’d expect them to be (Table 7.1).
When defining keyboard equivalents, keep a few details in mind. Every keyboard equivalent must be unique for the application. In addition, you should try to make them consistent with the operating system: On Windows, Ctrl+O is used to open a file from within an application, so your program should use that shortcut too (if it has that functionality).
Also, understand that if you replace the application or windows menu, you’ll lose all the standard operating system keyboard equivalents because you’ve eliminated those menus. So the program you create will not recognize Ctrl+P or Command+P for Print unless you make that explicit. Further, take into account that the different operating systems do not have the same modifier keys (Windows uses Shift, Ctrl, and Alt; Mac OS X uses Shift, Control, Option, and Command).
All that being said, one advantage of using keyboard equivalents is that when the user invokes that combination, a select event will be triggered on the corresponding menu item. No extra steps need to be taken in that regard.
Let’s apply this knowledge to the running example by adding some keyboard equivalents: one for the Help Pages menu item and another for Exit/Quit.
Open Script 7.3 in your text editor or IDE, if it is not already.
Within the Windows section of the conditional, add an equivalent for the Help Pages menu item (Script 7.4):
helpPages.keyEquivalent = 'f1';
Sometimes you’ll be able to create universal keyboard shortcuts (i.e., ones that are correct for any operating system), but not always. Since this file already has a conditional that essentially determines if the program is running on Windows or Mac, the keyboard shortcuts can easily be defined in a platform-conscience way. To start, a shortcut for Help Pages will be added. Although not universally supported, the first function key is frequently used for application or Windows help. It’s used without a modifier.
Note, again, that you should use the lowercase version of the letter: f1, not F1.
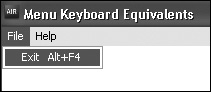
Example 7.4. The application has been updated by adding keyboard equivalents to two menu items (one in each submenu). These keyboard shortcuts are also operating system-specific.
1   <html><!-- Script 7.4 -->
2      <head>
3         <title>Menu Keyboard Equivalents</title>
4         <script type="text/javascript" src="AIRAliases.js"></script>
5         <script type="text/javascript">
6
7         // Function for handling the Exit menu item selection:
8         function doExit(e) {
9            air.NativeApplication.nativeApplication.exit();
10        }
11
12        // Function for handling the Help Pages menu item selection:
13        function showHelp(e) {
14           alert('This is when the Help window would appear.'),
15        }
16
17        // Root menu:
18        var rootMenu = new air.NativeMenu();
19
20        // Add a submenu:
21        var fileMenu = new air.NativeMenu();
22
23        // Add an item to the submenu:
24        var exit = new air.NativeMenuItem('Exit'),
25        exit.addEventListener(air.Event.SELECT, doExit);
26        fileMenu.addItem(exit);
27
28        // Add another submenu:
29        var helpMenu = new air.NativeMenu();
30
31        // Add items to the submenu:
32        var showTips = new air.NativeMenuItem('Show Tips'),
33        helpMenu.addItem(showTips);
34        var helpPages = new air.NativeMenuItem('Help Pages'),
35
36        // Add the helpPages event listener:
37        helpPages.addEventListener(air.Event.SELECT, showHelp);
38
39        // Continue adding items:
40        helpMenu.addItem(helpPages);
41        var separator = new air.NativeMenuItem('', true);
42        helpMenu.addItem(separator);
43        var checkForUpdates = new air.NativeMenuItem('Check for Updates'),
44        helpMenu.addItem(checkForUpdates);
45        var visitWebSite = new air.NativeMenuItem('Visit Web Site'),
46        helpMenu.addItem(visitWebSite);
47
48        // Add the submenus to the root menu:
49        rootMenu.addSubmenu(fileMenu, 'File'),
50        rootMenu.addSubmenu(helpMenu, 'Help'),
51
52        // Add the menu to the program:
53        if (air.NativeWindow.supportsMenu) { // Windows
54
55           // Add keyboard equivalents:
56           helpPages.keyEquivalent = 'f1';
57
58           exit.keyEquivalent = 'f4';
59           exit.keyEquivalentModifiers = [air.Keyboard.ALTERNATE];
60
61           window.nativeWindow.menu = rootMenu;
62
63        } else if (air.NativeApplication.supportsMenu) { // Mac
64
65           // Add keyboard equivalents:
66           helpPages.keyEquivalent = '?';
67           helpPages.keyEquivalentModifiers = [air.Keyboard.COMMAND];
68
69           exit.keyEquivalent = 'q';
70           exit.keyEquivalentModifiers = [air.Keyboard.COMMAND];
71
72           exit.label = 'Quit';
73
74           air.NativeApplication.nativeApplication.menu = rootMenu;
75
76        }
77
78        </script>
79     </head>
80
81     <body>
82        <p>Page Content</p>
83     </body>
84  </html>
Within the same conditional, add a Windows keyboard equivalent for Exit:
exit.keyEquivalent = 'f4';
exit.keyEquivalentModifiers = [air.Keyboard.ALTERNATE];
The combination of Alt+F4 is used to close most applications on Windows.
Within the Mac section of the conditional, define the Help Pages and Quit keyboard equivalents:
helpPages.keyEquivalent = '?';
helpPages.keyEquivalentModifiers = [air.Keyboard.COMMAND];
exit.keyEquivalent = 'q';
exit.keyEquivalentModifiers = [air.Keyboard.COMMAND];
Macs use Command+? for Help and Command+Q to quit in every application.
Save, test, debug, and run the completed application (Figures 7.13 and 7.14).
As you can see in the figures, the keyboard equivalents are automatically listed next to the menu items.
Unfortunately, at the time of this writing, some of the keyboard equivalents are not implemented successfully in the 1.0 release of AIR. For example, the proper Help shortcut on Mac OS X is Command+?, but an equivalent defined as such doesn’t work. You can instead define the shortcut using:
helpPages.keyEquivalent = '/';
helpPages.keyEquivalentModifiers = [air.Keyboard.COMMAND, air.Keyboard.SHIFT];
In terms of the keys the user presses, this is the same as Command+?, and this combination will work; however, the menu item lists the shortcut as Command+Shift+/. It’s a minor distinction, but one that other programs are able to get right.
Similarly, I have found using the function keys on Windows to be unreliable. Presumably these things will be worked out in future versions of AIR.

✓ Tips
To use multiple modifier keys, separate them by commas:
item.KeyEquivalentModifiers = [air.Keyboard.SHIFT, air.Keyboard.OPTION];
It does not matter in what order you list the keys.
You can add a key equivalent to a menu item in any type of menu, but they’ll only work for application and window menus. They’ll still appear in contextual menus, but they won’t function.
Instead of the F1 key, you can set the keyboard equivalent for the Help Pages menu item to the Help key, which exists on many keyboards:
helpPages.keyboardEquivalent = air.Keyboard.KEYNAME_HELP;
Along with keyboard equivalents and mnemonics, any item in a menu can have two states, which you can think of as just extra attributes. Commonly, some menu items are only usable when an action within the application has occurred. For example, you can only invoke Copy after you’ve made a selection. To add this quality to a menu item, set its enabled property. It takes a Boolean value:
var copy = new air.NativeMenuItem('Copy'),
copy.enabled = false;
if (/* something has been selected */) {
    copy.enabled = true;
}
Any menu item whose enabled property is false will be disabled and shown as grayed-out in the menu list (Figure 7.15).
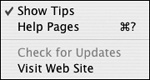
The second state a menu item might have is checked. Some menu items, when selected, place a checkmark next to them, indicating their status (Figure 7.16). Again, this property takes a Boolean value, but unlike the enabled property, subsequent selections of the same menu item should toggle its checked value (from checked to unchecked or from unchecked to checked). The code in this next example demonstrates this.

Open Script 7.4 in your text editor or IDE, if it is not already.
After the existing two functions, add a third (Script 7.5):
function showHideTips(e) {
  if (showTips.checked == false) {
     showTips.checked = true;
  } else {
     showTips.checked = false;
  }
}
Example 7.5. To round out the functionality of the menus, the Show Tips item gets an event handler that calls a function that toggles its
checkedstate. Secondarily, another menu item is disabled.1 <html><!-- Script 7.5 --> 2 <head> 3 <title>Menu States</title> 4 <script type="text/javascript" src="AIRAliases.js"></script> 5 <script type="text/javascript"> 6 7 // Function for handling the Exit menu item selection: 8 function doExit(e) { 9 air.NativeApplication.nativeApplication.exit(); 10 } 11 12 // Function for handling the Help Pages menu item selection: 13 function showHelp(e) { 14 alert('This is when the Help window would appear.'), 15 } 16 17 // Function for handling the Show Tips menu item selection: 18 function showHideTips(e) { 19 20 // Toggle the value of showTips.checked: 21 if (showTips.checked == false) { 22 showTips.checked = true; 23 } else { 24 showTips.checked = false; 25 } 26 27 } // End of the showHideTips() function. 28 29 // Root menu: 30 var rootMenu = new air.NativeMenu(); 31 32 // Add a submenu: 33 var fileMenu = new air.NativeMenu(); 34 35 // Add an item to the submenu: 36 var exit = new air.NativeMenuItem('Exit'), 37 exit.addEventListener(air.Event.SELECT, doExit); 38 fileMenu.addItem(exit); 39 40 // Add another submenu: 41 var helpMenu = new air.NativeMenu(); 42 43 // Add items to the submenu: 44 var showTips = new air.NativeMenuItem('Show Tips'), 45 46 // Add the showTips event listener: 47 showTips.addEventListener(air.Event.SELECT, showHideTips); 48 helpMenu.addItem(showTips); 49 50 var helpPages = new air.NativeMenuItem('Help Pages'), 51 52 // Add the helpPages event listener: 53 helpPages.addEventListener(air.Event.SELECT, showHelp); 54 55 // Continue adding items: 56 helpMenu.addItem(helpPages); 57 var separator = new air.NativeMenuItem('', true); 58 helpMenu.addItem(separator); 59 var checkForUpdates = new air.NativeMenuItem('Check for Updates'), 60 61 // Disable the 'Check for Updates' option: 62 checkForUpdates.enabled = false; 63 64 helpMenu.addItem(checkForUpdates); 65 var visitWebSite = new air.NativeMenuItem('Visit Web Site'), 66 helpMenu.addItem(visitWebSite); 67 68 // Add the submenus to the root menu: 69 rootMenu.addSubmenu(fileMenu, 'File'), 70 rootMenu.addSubmenu(helpMenu, 'Help'), 71 72 // Add the menu to the program: 73 if (air.NativeWindow.supportsMenu) { // Windows 74 75 // Add keyboard equivalents: 76 helpPages.keyboardEquivalent = 'f1'; 77 78 exit.keyEquivalent = 'f4'; 79 exit.keyEquivalentModifiers = [air.Keyboard.ALTERNATE]; 80 81 window.nativeWindow.menu = rootMenu; 82 83 } else if (air.NativeApplication.supportsMenu) { // Mac 84 85 // Add keyboard equivalents: 86 helpPages.keyEquivalent = '?'; 87 helpPages.keyEquivalentModifiers = [air.Keyboard.COMMAND]; 88 89 exit.keyEquivalent = 'q'; 90 exit.keyEquivalentModifiers = [air.Keyboard.COMMAND]; 91 92 exit.label = 'Quit'; 93 94 air.NativeApplication.nativeApplication.menu = rootMenu; 95 96 } 97 98 </script> 99 </head> 100 101 <body> 102 <p>Page Content</p> 103 </body> 104 </html>This function will be called whenever the Show Tips menu option is selected. Within the function, a conditional checks if the current value of
showTips.checkedis false (you can refer toshowTipswithin this function because it’s a global variable). If that value is false, it’ll be set to true. Otherwise, the value is true and should be set to false.In a complete program you’d also include the code here that turns on and turns off the actual show tips feature.
After defining the
showTipsobject (a few lines down in the script), add an event listener to it:showTips.addEventListener(air.Event.SELECT, showHideTips);
If you don’t include this step, the selection of the menu item will never invoke the
showHideTips()function.Disable the Check for Updates menu item.
checkForUpdates.enabled = false;
Arbitrarily, I’ll disable this just to demonstrate how that works. Again, in a standard program, there would be some condition that dictates when an object’s enabled state would be set to true or false.
Save, test, debug, and run the completed application (Figures 7.17 and 7.18).