
This final chapter in the book discusses the finishing touches that your complete Adobe AIR application might include. To start, the first two sections explain the optional application descriptor file elements. These can be used to provide more information to the end user, customize the application’s installation, or have your application use its own icons.
The third topic in this chapter describes how to provide a seamless installation of your applications. This installation method—where the application will be installed after the user clicks a link on a Web page—can be simpler for the end user, more so than having the user formally download and run the .air file. After that discussion, the chapter provides an example that details three more general techniques that a running application might use. The chapter concludes with a longish but useful example to demonstrate how to make an application update itself.
Chapter 2, “Creating an Application,” walks through the required application descriptor file elements, which are
idfilenameversioninitialWindowcontent(withininitialWindow)
But the application descriptor file contains many optional elements, all of which I’ll introduce here. The sidebar “Associating File Types” goes into a bit more detail on the optional fileTypes element, and the next section of the chapter explains how to use the icon element. Of course, if you open the descriptor-template.xml file, which is found within the SDK’s templates directory, you’ll see all these elements, along with additional descriptions of them.
Use the name, description, and copyright elements to personalize your application.
Although it’s optional, you should almost always provide a
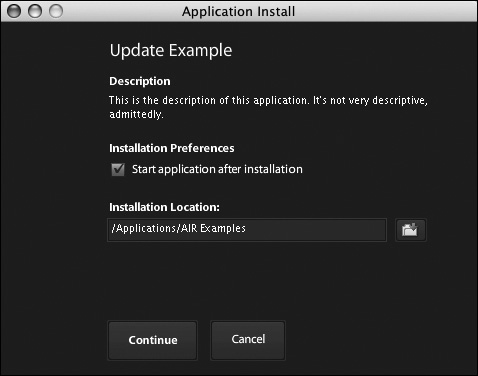
namevalue. It’s displayed by the installer (Figure 16.1) and used to determine where the application should be installed (within the default installation folder). Thedescriptionvalue also shows up during the installation process (see Figure 16.1). Including acopyrightvalue, which will appear in an About dialog box on Mac OS X, is a legal protection for you, the developer.Customize the main application window using the
initialWindowelement.The
initialWindowelement is required, as is its child element namedcontent. But theinitialWindowelement can also have these subelements:titlesystemChrometransparentvisibleminimizablemaximizableresizablewidthheightxyminSizemaxSize
Many of these settings play into the material covered in Chapter 6, “Making Windows,” and they all apply to only the first application window (the primary content window). For example, if you’d like the window to have a set size and location, use the
width,height,x, andyvalues.I’ll also add that although the
visibleelement is optional, you’ll want to use it if the user should be able to see your application, because this element’s default value is false.Set an
installFoldervalue to affect where the application will be installed.This element allows you to specify a subdirectory within the default installation directory where the application should be installed (Figure 16.2). You might want to do this if the program is part of a suite, so that all the applications are grouped together.
Similarly, the
programMenuFolderelement dictates a subdirectory in which to place the Start/Programs menu shortcut on Windows.Use the
customUpdateUIelement to create your own update interface.If a user installs a newer version of the same application, by default, the AIR application installer will handle that update. If you’d rather have your program manage the update process, set this element’s value to
true. Later in this chapter you’ll see an example of how to have an application update itself.Set
allowBrowserInvocationif you want this program to be startable through a Web link.Using a Shockwave file, a link in a Web page can be used to start a desktop AIR application if this element’s value is set to
true.

✓ Tips
Your application can access all the application descriptor file’s settings by using this code:
var data = air.NativeApplication.
nativeApplication.
applicationDescriptor;
After that line,
datais a string of text. You’ll then need to turn it into XML using aDOMParserobject (see Chapter 14, “Using Other Media”) to access the element values. You can see an example of this in the “Updating an Application” section of this chapter.The publisher ID of the current program is available in
air.NativeApplication.nativeApplication.publisherID. This value comes from the digital certificate used to sign the application.The application ID of the current program, which is defined within the application descriptor file, is available in
air.NativeApplication.nativeApplication.applicationID.
In the previous section of this chapter, several of the application descriptor file elements are highlighted. Here, I’ll discuss one more element: icon. The icon element contains four subelements, each representing the name of the icon file in a particular size:
<icon>
    <image16x16>icon16.png</image16x16>
    <image32x32>icon32.png</image32x32>
    <image48x48>icon48.png</image48x48>
    <image128x128>icon128.png</image128x128>
</icon>
You can use these elements to identify the icons used to represent your application. If you don’t take this step, the application will use the default Adobe AIR icon (Figure 16.3).

The rules for creating your own application icons are as follows:
The icons must be of PNG type.
The icons must be included in the built application (i.e., added when you create the
.airfile).You must provide at least one icon using any of the listed sizes.
As for this last rule, ideally you would provide a version of the icon in each of the sizes. If you don’t, the operating system will scale the closest available icon to the size it needs.
Create an icon for your application.
Use any program (I’m pretty sure Adobe has one) to make the image that best represents your application or just looks cool—or, in my case, one that you put together in five minutes because you have limited artistic skills (Figure 16.4).
Save the icon in PNG format in four sizes: 128x128, 48, x48, 32x32, and 16x16.
It’s not required, but you should indicate the size in the filenames—MyApp_16.png, MyApp_32.png, MyApp_48.png, MyApp_128.png—so they’ll be easy to reference in the application descriptor file.
Copy the icons to your project’s directory.
I recommend putting them within their own
iconsfolder, so they’re kept separate from the rest of the application content.Edit the project’s application descriptor file so that it uses the icon element (Script 16.1).
If you placed the icons within an
iconsfolder, the XML to add would be<icon> <image16x16>icons/MyApp_16.png</image16x16> <image32x32>icons/MyApp_32.png</image32x32> <image48x48>icons/MyApp_48.png</image48x48> <image128x128>icons/MyApp_128.png</image128x128> </icon>
This can go anywhere in the application descriptor file as long as it’s a child of the root element (i.e., not placed within another element like
initialWindow).Be certain to include the icons when you go to build the application.
How you do this depends on how you build the application. See Chapter 4, “Basic Concepts and Code,” for demonstrations using Aptana Studio, Adobe Dreamweaver, or the command-line
adt.After installing the application, confirm that it uses the custom icon (Figure 16.5).

Figure 16.5. The AIR application now uses its own custom icon instead of the default one (Figure 16.3).

✓ Tip
As you’ll see later in the chapter, an application’s icon is also used in alert dialogs on Mac OS X.
Example 16.1. By using the icon element within the application descriptor file, an application can use custom icons.
1 <?xml version="1.0" encoding="utf-8" ?>
2 <application xmlns="http://ns.adobe.com/
air/application/1.0">
3
4 <id>com.dmci.air.Ch16</id>
5 <filename>Update Example</filename>
6 <name>Update Example</name>
7 <version>2.1</version>
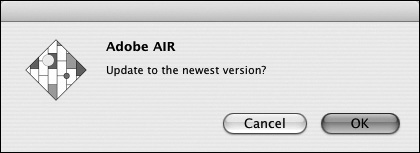
8 <description>This is the description
of this application. It's not very
descriptive, admittedly.</description>
9 <copyright>2008</copyright>
10
11 <initialWindow>
12 <content>script_16_02.html</content>
13 <visible>true</visible>
14 </initialWindow>
15
16 <installFolder>AIR Examples
</installFolder>
17 <programMenuFolder>AIR Examples
</programMenuFolder>
18
19 <icon>
20 <image16x16>icons/MyApp_16.png
</image16x16>
21 <image32x32>icons/MyApp_32.png
</image32x32>
22 <image48x48>icons/MyApp_48.png
</image48x48>
23 <image128x128>icons/MyApp_128.png
</image128x128>
24 </icon>
25
26 </application>Chapter 1, “Running AIR Applications,” shows how a user can install an AIR application once the user has the .air file. Because installing an application using that file works easily, you can distribute your applications in the same way you might distribute any file, via:
CD-ROM
Email
FTP server
Flash drive
You can also make the file available for download from your Web site. However, if that’s how you’re distributing an AIR application, an alternative is to use the seamless installation feature. A seamless installation installs the application on the user’s computer, including the AIR runtime, if necessary, without the user formally downloading and executing the file. In other words, it’s a one-click-while-surfing installation.
Seamless installation uses the badge.swf file that comes with the AIR SDK (in the samples/badge folder). It works with browsers that have Flash Player version 9, update 3, or later installed.
Create, test, debug, and build your AIR application.
For the sake of these steps, let’s say you end up with a file called
MyApp.air.Create an image for the seamless installer.
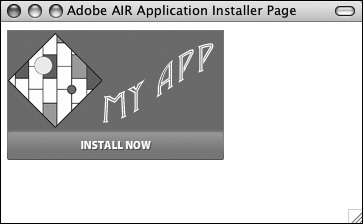
The seamless installer code will create a “badge” containing an image with some text underneath (Figure 16.6). The image should be approximately 215 pixels wide and 100 pixels tall.
Open a copy of
default_badge.htmlin your text editor or IDE.This file, also found within the SDK’s
samples/badgefolder, contains all the code necessary for placing the seamless install link on an HTML page. Although you’ll eventually want to copy the proper code out of this page and place it within your own site’s context, it’s best to start with this sample file to make sure it all works properly.Find the call to the
AC_FL_RunContent()function:AC_FL_RunContent( 'codebase','http://fpdownload.macromedia.com/pub/shockwave/cabs/flash/swflash.cab', 'width','217', 'height','180', 'id','badge', 'align','middle', 'src','badge', 'quality','high', 'bgcolor','#FFFFFF', 'name','badge', 'allowscriptaccess','all', 'pluginspage','http://www.macromedia.com/go/getflashplayer', 'flashvars','appname=My%20Application&appurl=myapp.air&airversion=1.0&imageurl=test.jpg', 'movie','badge' );
This function, which is defined within the
AC_RunActiveContent.jsfile that’s included by this page, does all the work. The function call in the HTML page is several lines long, with lots of values being sent to the function.Within the function call found in step 4, change the value that starts with appname= and ends with test.jpg to match the values for your application.
This value, which comes after flashvars, is a string of name=value pairs that are used to customize the seamless installation link. To edit this, you’ll want to leave the names, equal signs, and ampersands intact, changing the values that come after each equals sign.
The appname value should be the colloquial name of the application. Note that this needs to be encoded as it might be in a URL (for example, the name My Application becomes My%20Application). For the appurl value, use an absolute URL to the
.airfile on your Web site (e.g., http://www.example.com/MyApp.air). The airversion value reflects the minimum version of the Adobe AIR runtime required.The imageurl value should be the URL (absolute or relative) for the image file created in step 2. It is optional. Two more optional name=value pairs you can add are buttoncolor and messagecolor. The former is the color of the download button and the latter is the color of the text message displayed if the AIR runtime is not installed. Both take hex values.
In the end, you might edit this string to read:
appname=My%20App&appurl=http://www.example.com/MyApp.air&airversion=1.0&imageurl=images/badge.png&buttoncolor=f7f26e&messagecolor=000000
Upload
default_badge.html,badge.swf,AC_RunActiveContent.js, the image, and the.airfile to your server.Load the Web page in your browser (Figure 16.7).
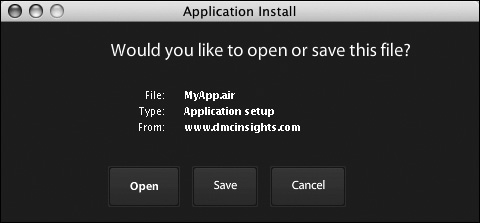
Click the Install Now link to confirm that the seamless install will work.
If the badge is configured properly, the user (which is to say you, for now) should be prompted after clicking that link (Figure 16.8). Clicking the Open option in the prompt will begin the installation process.
If the seamless install works, take the necessary code out of
default_badge.htmland place it within your own Web page.

✓ Tips
You can create your own Shockwave file, replacing
badge.swf, to further customize the seamless installation process. This process is covered in the online documentation.To ensure that your server properly delivers manually downloaded AIR files to the end users, tell the Web serving application (Apache, IIS, etc.) to associate the
.airextension with application/vnd.adobe.air-application-installer-package+zip. Alternatively, you could zip the.airfile so it’s always just downloaded to the user’s computer.
In this next example, I’ll discuss three more techniques that applications can incorporate. The first is detecting whether or not the application has been run before. This is useful to know so that the program can do whatever setup is required the first time the program runs. This may include getting information from the user, setting up a database, and so forth.
The second technique is having the program automatically start when the user logs in. To do that, set air.NativeApplication.nativeApplication.startAtLogin equal to true. Prior to taking this step, you should always first confirm that the user wants the application to launch when she or he logs in.
The third technique is detecting whether the user is actively using the computer (i.e., using the keyboard and mouse) or is idle. To do that, add event listeners to the NativeApplication object. You’ll want to listen to USER_IDLE and USER_PRESENT events. A user is considered idle when the mouse or keyboard hasn’t been used for longer than the air.NativeApplication.nativeApplication.idleThreshold value (by default this is five minutes). So, by default, after five minutes of inactivity, a USER_IDLE event is triggered. Whenever the user does use the mouse or keyboard again, the USER_PRESENT event is triggered. You might use this information to tidy up an application’s use of resources when the user goes idle (for example, disconnecting from a database or closing an open file).
In your project’s primary HTML file, create a
Fileobject (Script 16.2):var file = air.File.applicationStorageDirectory.resolvePath('prefs.xml');Most applications use a preferences file, which is what this object is a reference to. That file will contain XML data and be stored in the application’s storage directory. Chapter 14 demonstrates this concept in a fully functional example. You’ll also want to copy the
prefs.xmlfile (Script 14.6) into this project’s folder.Begin an anonymous function to be called after the application has loaded:
window.onload = function() {If the preferences file doesn’t exist, copy one from the application directory:
if (!file.exists) {
  var original = air.File.applicationDirectory.resolvePath('prefs.xml');
  original.copyTo(file);
If there is no
prefs.xmlfile in the application storage directory, the one that comes with the installed application needs to be copied there, which is what the second and third lines do.Most important, for the sake of this example, the conditional is a good and simple test to see if the application is being run for the first time. Unless something went awry, the preferences file will not exist (in the storage directory) only the first time the user runs this program.
If the user wants this application to automatically launch, establish that:
if (confirm('Always start application when you log in?')) {
  air.NativeApplication.nativeApplication.startAtLogin = true;
}
Example 16.2. Three new ideas are demonstrated by this program: checking if it has run before, setting it to automatically open when the user logs in, and watching for user activity and inactivity.
1    <html><!-- Script 16.2 -->
2       <head>
3          <title>Three New Ideas</title>
4          <script type="text/javascript" src="AIRAliases.js"></script>
5          <script type="text/javascript">
6
7          // Create the object associated with the preferences file:
8          var file = air.File.applicationStorageDirectory.resolvePath('prefs.xml');
9
10         // Function called when the application loads.
11         window.onload = function() {
12
13            // If the preferences file doesn't exist,
14            // the user hasn't run this program before.
15            if (!file.exists) {
16
17               // Copy the preferences file to its final destination:
18               var original = air.File.applicationDirectory.resolvePath('prefs.xml');
19               original.copyTo(file);
20
21               // See if the user wants the program to start automatically:
22               if (confirm('Always start application when you log in?')) {
23                  air.NativeApplication.nativeApplication.startAtLogin = true;
24               }
25
26            } // End of !file.exists IF.
27
28            // Check if this program is automatically launching:
29            if (air.NativeApplication.nativeApplication.startAtLogin) {
30               document.getElementById('launch').checked = true;
31            }
32
33         } // End of anonymous function.
34
35         // Adjust idle time to 30 seconds:
36         air.NativeApplication.nativeApplication.idleThreshold = 30;
37
38         // Add event listeners:
39         air.NativeApplication.nativeApplication.addEventListener(air.Event.USER_IDLE, userIdle);
40         air.NativeApplication.nativeApplication.addEventListener(air.Event.USER_PRESENT, userActive);
41
42         // Function called when the user goes idle:
43         function userIdle(e) {
44            document.getElementById('idle').checked = true;
45         }
46
47         // Function called when the user returns:
48         function userActive(e) {
49            document.getElementById('idle').checked = false;
50         }
51
52         </script>
53      </head>
54      <body>
55      <h3>Some Application</h3>
56      Automatically Launch: <input type="checkbox" id="launch"><br>
57      Idle: <input type="checkbox" id="idle">
58      </body>
59   </html>
For simplicity sake, a simple confirmation dialog (Figure 16.9) will ask the user if this program should automatically start when the user logs in. If the user clicks OK, the operating system is notified of this request by assigning the Boolean value
truetoair.NativeApplication.nativeApplication.startAtLogin.Check if the program is set to automatically launch:
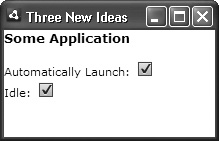
if (air.NativeApplication.nativeApplication.startAtLogin) {
  document.getElementById('launch').checked = true;
}
A check box in the application’s window will reflect the user’s decision (Figure 16.10). The first time the user runs this application, if the user clicked OK in the confirmation dialog, this conditional will naturally be true. It will also be true every subsequent time the application is loaded (again, assuming the user clicked OK).

Figure 16.10. The simple application with the first check box reflecting the user’s choice in the confirmation dialog (Figure 16.9).
Complete the anonymous function:
} // End of anonymous function.
Set the idle time to a small value:
air.NativeApplication.nativeApplication.idleThreshold = 30;
To demonstrate the concept of the user (i.e., you) being idle or active, this value will be set at 30 seconds, so you don’t have to sit around for five minutes to see the results.
Add two event listeners to the native application object:
air.NativeApplication.nativeApplication.addEventListener (air.Event.USER_IDLE, userIdle);
air.NativeApplication.nativeApplication.addEventListener (air.Event.USER_PRESENT, userActive);
The first line specifies that when the user is officially idle, which means that it’s been more than 30 seconds since the user used the mouse or keyboard, the
userIdle()function should be called. The second line specifies that when the user is idle and then does something again (uses the mouse or keyboard), theuserActive()function should be called.Define the
userIdle()function:function userIdle(e) { document.getElementById('idle').checked = true; }This function checks a box in the application window when the user goes idle (Figure 16.11).
Define the
userActive()function:function userActive(e) { document.getElementById('idle').checked = false; }This function unchecks the box that indicates the user is idle.
Within the body of the page, create the two requisite check boxes:
Automatically Launch: <input type="checkbox" id="launch"><br>
Idle: <input type="checkbox" id="idle">
In a more complete application, when the user unchecked the Automatically Launch check box, a function would be called that assigned a value of
falsetoair.NativeApplication.nativeApplication.startAtLogin.Save, test, debug, and run the completed application.
To fully test this, you should build and actually install the program; don’t just use the Adobe Debug Launcher (
adl). Make sure that you also include aprefs.xmlfile in the packaged application.The first time you run this program, the preferences file will be moved to the application’s storage directory and you’ll see the confirmation dialog. Click OK, and then log out and log back in. The application should automatically launch, and the check box should reflect your choice.
To test the idle/active check box, don’t do anything for 30 seconds. It doesn’t matter if this application is currently active or not, it will still watch for the idle and present events.

✓ Tips
To stop this application from automatically opening every time you log into your computer, you’ll need to have it set
air.NativeApplication.nativeApplication.startAtLogintofalse, and then rerun the application. Alternatively, you can search online for operating system-specific instructions for removing a program from the automatically start list.You can see how long it has been since the last time the user did something by referring to
air.NativeApplication.nativeApplication.timeSinceLast-UserInput.To react to the user making the application active (i.e., turning back to it after using other applications), watch for an
ACTIVATEevent:air.NativeApplication.nativeApplication.addEventListener( air.Event.ACTIVATE, nowActive);
One way to update an application is to have the user download and install the latest version of it. When a user installs the new version with the same application ID but a later version number (both from the application descriptor file) of an AIR application they have already installed, the user will be prompted to update it (Figure 16.12).

Another option is to have an application check for and handle updates itself. To do so, the application needs to check for the existence of a more current version. This means that the application first needs to know its own version number, which is defined in the application descriptor file. You can get that data by referring to air.NativeApplication.nativeApplication.applicationDescriptor. The returned string then needs to be turned into XML and parsed to get the version information (this next script will demonstrate all that).
The next step is for the application to communicate with your server to see if a newer version is available. The easiest way to accomplish that is to create a plain text page on your server that stores the current application version. Then the application could perform an XMLHttpRequest to that page to retrieve the value. Or the application could use a URLLoader object to read in the information (see Chapter 13, “Networking”).
If a new version is available, the application should download it. That will require creating a URLRequest object referring to the new version on the server and loading the new version into a URLStream. Then that data will be written to a new file on the user’s computer.
After all that has been accomplished, the updating process starts with an Updater object:
var updater = new air.Updater();
You’ll also need a reference to the downloaded file (the latest version of the application):
var file = air.File.desktopDirectory.resolvePath('MyApp.air');Finally, call the update() method of the Updater() object. It takes the file object as the first argument and the new version number as the second:
updater.update(file, version);
As soon as the update() method is called, the current invocation of the application will terminate, the new version will be installed, and then the new version will be opened. It’s all very professional, and this next script will demonstrate all the necessary code. As you can already tell, there are many steps to this process and the application I’ve created uses seven user-defined functions. But it’s still all accomplished within a little more than 50 lines of code (not including comments and blank lines).
In your project’s primary HTML file, declare the necessary global variables (Script 16.3):
var thisVersion, currentVersion, xhr, newAppFile, data, urlStream = null;
Example 16.3. This script has all the code required for an application to update itself.
1    <html><!-- Script 16.3 -->
2       <head>
3          <title>Update Example</title>
4          <script type="text/javascript" src="AIRAliases.js"></script>
5          <script type="text/javascript">
6
7          // Declare the global variables:
8          var thisVersion, currentVersion, xhr, newAppFile, data, urlStream = null;
9
10         // Function called when the application loads.
11         // This function begin the updating process.
12         // It gets the two application versions.
13         window.onload = function() {
14
15            // Get the version of the running application:
16            getThisVersion();
17
18            // Get the most current version:
19            getCurrentVersion();
20
21         } // End of anonymous function.
22
23         // Function gets the version of the running
24         // application from the application descriptor file.
25         function getThisVersion() {
26
27            // Get the data:
28            var appData = air.NativeApplication.nativeApplication.applicationDescriptor;
29
30            // Turn the file data into an XML object:
31            var dp = new DOMParser();
32            var xml = dp.parseFromString(appData, 'text/xml');
33
34            // Parse out and return the version value:
35            var version = xml.getElementsByTagName('version')[0].firstChild;
36            thisVersion = version.nodeValue;
37
38         } // End of getThisVersion() function.
39
40         // This function performs an XMLHttpRequest to get the
41         // version number of the most recent release.
42         function getCurrentVersion() {
43
44            // Perform the request:
45            xhr = new XMLHttpRequest();
46            xhr.open('get', 'http://www.example.com/air/version.txt');
47            xhr.onreadystatechange = askAboutUpdate;
48            xhr.send(null);
49
50         } // End of getCurrentVersion() function.
51
52         // This function asks the user if they want to update
53         // the application, if appropriate.
54         function askAboutUpdate() {
55
56            // Check the readyState value:
57            if (xhr.readyState == 4) {
58
59                // Get the current version:
60                currentVersion = xhr.responseText;
61
62                // If the current version is greater, ask the user:
63                if (currentVersion > thisVersion) {
64                   if (confirm('Update to the newest version?')) {
65                      downloadNewVersion();
66                   }
67                } else {
68                   alert('The current version is up to date.');
69                }
70
71             } // End of readyState IF.
72
73          } // End of askAboutUpdate() function.
74
75          // This function downloads the latest version.
76          function downloadNewVersion() {
77
78             // Create the variables:
79             var addr = 'http://www.example.com/air/MyApp.air';
80             var url = new air.URLRequest(addr);
81             urlStream = new air.URLStream();
82             data = new air.ByteArray();
83
84             // Add an event listener:
85             urlStream.addEventListener(air.Event.COMPLETE, saveNewVersion);
86
87             // Get the data:
88             urlStream.load(url);
89
90          } // End of downloadNewVersion() function.
91
92          // Function that writes the downloaded data to a file:
93          function saveNewVersion(e) {
94
95             // Read the downloaded data into the 'data' variable:
96             urlStream.readBytes(data, 0, urlStream.bytesAvailable);
97
98             // Write the data to a file:
99             newAppFile = air.File.desktopDirectory.resolvePath('MyApp.air');
100            var fileStream = new air.FileStream();
101            fileStream.open(newAppFile, air.FileMode.WRITE);
102            fileStream.writeBytes(data, 0, data.length);
103            fileStream.close();
104
105            // Call the function that performs the update:
106            updateApplication();
107
108         } // End of saveNewVersion() function.
109
110         // This function performs the actual update.
111         function updateApplication() {
112
113            var updater = new air.Updater();
114            updater.update(newAppFile, currentVersion);
115
116         } // End of updateApplication() function.
117
118         </script>
119      </head>
120      <body>
121         <h3>Update Example</h3>
122      </body>
123   </html>
Because this script uses so many functions, a number of global variables are required (because each of these will be referred to in more than one function). They are each initially given a
nullvalue.In an anonymous onload function, get the ball rolling:
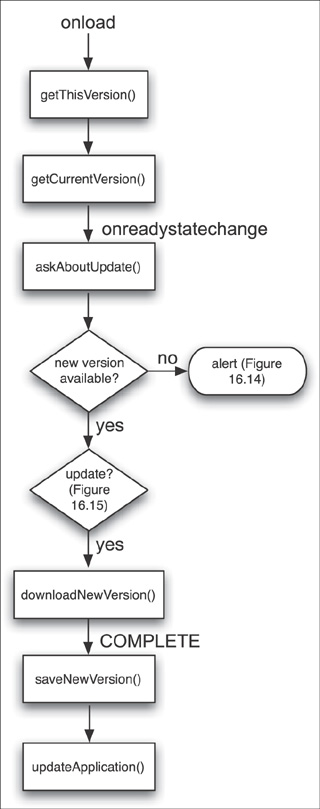
window.onload = function() {
  getThisVersion();
  getCurrentVersion();
}
As I said, there are seven functions involved (a figure later in the chapter will show the logic), beginning with this one. The premise is that after the application has loaded, a check would be made to see if a newer version of the application is available. To do that, calls to the
getThisVersion()andgetCurrentVersion()functions are made.Begin the
getThisVersion()function:function getThisVersion() { var appData= air. NativeApplication.nativeApplication.applicationDescriptor; var dp = new DOMParser(); var xml = dp.parseFromString (appData, 'text/xml');Very similar to code found in Chapter 14, this function starts by reading the contents of the application descriptor file into the
appDatavariable. You can do this by simply referring toair.NativeApplication.nativeApplication.applicationDescriptor.Then a new object of type
DOMParseris created, and theappDatastring is turned into an XML object.Complete the
getThisVersion()function:var version = xml.getElementsByTag Name('version')[0].firstChild; thisVersion = version.nodeValue; } // End of getThisVersion() function.This cumbersome code is best explained in Chapter 14. In short, the first line returns the first item from the XML data whose element name is version. There will only be one such element, but
getElementsByTagName()always returns an array. ThefirstChildattribute of that element is the value of the element, which will be a text node. Finally, the value of that text node, which is the value of the element—e.g., 1.2 or 3.59—will be assigned to the globalthisVersionvariable.Define the
getCurrentVersion()function:function getCurrentVersion() { xhr = new XMLHttpRequest(); xhr.open('get', 'http://www.example.com/air/version.txt'); xhr.onreadystatechange = askAboutUpdate; xhr.send(null); } // End of getCurrentVersion() function.This function finds out what the most recent version of the application is. That value will be stored in a text file on a server (presumably the same Web site where the user downloaded the program in the first place). This code performs a basic
XMLHttpRequestfor that document. TheaskAboutUpdate()function will be called when the request’sreadyStatevalue changes.Begin defining the
askAboutUpdate()function:function askAboutUpdate() { if (xhr.readyState == 4) { currentVersion = xhr.responseText;This function is called as the
XMLHttpRequestobject’sreadyStatevalue changes. Once that value equals 4, the request is complete and the response (which is the entire contents of theversion.txt) file will be assigned to the globalcurrentVersionvariable. This code as written will only work if the text file contains just a number and absolutely nothing else.If there’s a newer version of the application available, ask the user whether to install it:
if (currentVersion > thisVersion) {
  if (confirm('Update to the newest version?')) {
    downloadNewVersion();
  }
} else {
  alert('The current version is up to date.');
}
At this point in the script, the two numbers are stored in variables. One reflects the most recent version of the application available (fetched from the Web), and the other reflects the version of the currently running application. If the former is greater than the latter, a new version is available and the user can be asked whether to update the application (Figure 16.13).
Otherwise, the user is notified that the version running is the most current one available (Figure 16.14). You may not want to do this in a real application, but here it confirms that the process works.
Complete the
askAboutUpdate()function:} // End of readyState IF. } // End of askAboutUpdate() function.
Begin defining the
downloadNewVersion()function:function downloadNewVersion() { var addr = 'http://www.example.com/air/MyApp.air'; var url = new air.URLRequest(addr); urlStream = new air.URLStream(); data = new air.ByteArray();If the user clicks OK in the confirmation dialog (Figure 16.13), this function will be called. It downloads the newest version of the application from the server. To do that, it first identifies the full URL of the file to be downloaded. Then it creates three new objects: one
URLRequest, oneURLStream, and oneByteArray. The first two are discussed in Chapter 13 and the third is introduced in Chapter 10, “Working with File Content.”Complete the
downloadNewVersion()function:urlStream.addEventListener(air.Event.COMPLETE, saveNewVersion); urlStream.load(url); } // End of downloadNewVersion() function.
To perform the download, there are two final steps. First, an event listener is added to the
URLStreamobject, stating that thesaveNewVersion()function should be called when the entire file has been downloaded. Second, the file is loaded into the stream.Begin defining the
saveNewVersion()function:function saveNewVersion(e) { urlStream.readBytes(data, 0, urlStream.bytesAvailable);This function will take the data read from the server and store it as a file on the computer (so that it can be used for the update). To start, it takes the data loaded into the
URLStreamand writes it into thedataglobal variable.Write the data to a file:
newAppFile = air.File.desktopDirectory.resolvePath('MyApp.air');
var fileStream = new air.FileStream();
fileStream.open(newAppFile, air.FileMode.WRITE);
fileStream.writeBytes(data, 0, data.length);
fileStream.close();
The global
newAppFilevariable will be aFileobject that points to the new version of the application. By default, this will be on the user’s desktop and be given a name of MyApp.air. AFileStreamobject is created, the file is opened for writing, all the data is written to the file, and the file stream is closed.Complete the
saveNewVersion()function:updateApplication(); } // End of saveNewVersion() function.
Now that the newest version of the application is on the user’s computer, the last step is to actually perform the update. That will take place in the
updateApplication()function, called here after the file has been saved. Figure 16.15 shows the complete logic flow of this application.Define the
updateApplication()function:function updateApplication() { var updater = new air.Updater(); updater.update(newAppFile, currentVersion); }Ironically, the function that does the most important part is the easiest to write. An object of type
Updateris created, and then itsupdate()method is called. Its first argument is the file that represents the new version of the application. Its second argument is the version number.Create a file called
version.txtthat stores just a version number and place it on your server.The version number needs to be a simple integer or real number: 1 or 2.3 or 6.34. It cannot be v1 or 2.3.45. The number cannot be followed by any spaces, newlines, or carriage returns.
Go back to the code explained in step 5 and change the URL to match your server, if they don’t match already.
This whole application will not work unless the two URLs used by it are accurate.
Make sure the version of this application, as defined in the application descriptor file, matches the version number you put in
version.txt.The
update()method takes two arguments: the file to be used for the update and the version number. If the file (i.e., the new version of the application) does not use the same version number as that in the text file (and therefore, as that used in theupdate()method), the update won’t proceed.Save and build the completed application.
This first build will represent the “newer” version of the application.
Place the finished
.airfile on your server.Make sure that it has a name and location that matches the URL used in step 9.
Change the version of the application, as defined in the application descriptor file, to be lower than that used in the already built version.
This next build will represent the “older” version of the application. So if you built the previous version of this application as version 2.3, this version needs to be 1.0 or 1.8, or 2.23—anything less than 2.3.
Save, build, install, and run the completed application.
It’s very important that you actually install and run the application. You cannot test all of this using the command-line
adl.When you run the program, you should see a prompt like that in Figure 16.13. Click OK: The file will be downloaded, the application will close, be updated, and restart, generating the alert in Figure 16.14. Depending on the speed of your Internet connection and your computer, all of this should happen rather quickly (because the application file is really small).

✓ Tips
As an alternative, the
version.txtfile on the server could be calledversion.xml, storing more information:<?xml version="1.0" encoding="UTF-8"?> <update> <majorVersion>2</majorVersion> <minorVersion>3</minorVersion> <minFreeUpgradeVersion>2.0</minFreeUpgradeVersion> </update>
Then the
XMLHttpRequestwould refer to theresponseXMLinstead ofresponseText.Keep in mind that every AIR application is associated with a certificate, and self-signed certificates are only valid for five years. This means you can only provide updates for a self-signed application for five years. After that you’ll need to create a new application (with a new application ID) associated with a new certificate. This is another reason why professional applications require legitimate signing certificates.