The Adobe AIR software comes with the open source (and most excellent) SQLite database application built in. This is a lightweight tool that’s easy to use and has more than enough features for most programs. Thanks to the inclusion of SQLite, your AIR applications have a smart and simple way to store and retrieve data.
In this chapter you’ll learn the basics of working with an SQLite database from an AIR application. Although the chapter doesn’t assume experience with SQLite specifically, it will help if you’re familiar with using relational databases in general and have already utilized SQL (Structured Query Language, which is used to communicate with pretty much every database application). For more information on SQLite, see www.sqlite.org. For more on SQL, see my book MySQL, 2nd Edition: Visual QuickStart Guide (Peachpit Press, 2006) or any other reference you have available.
The fundamentals of using a database will be demonstrated in this chapter by creating a task-management application. In the next chapter you’ll learn some best practices and other techniques for incorporating a database into an AIR program. Before getting into the code, let me add that, like working with files and directories, you can use both synchronous and asynchronous functions. The first two examples are done synchronously, whereas the rest take the asynchronous route, which is generally better. Finally, note that some database-related debugging tips are at the end of the next chapter. If you have any problems with this chapter’s code, see the debugging tips for help in solving those problems.
Interacting with an SQLite database starts with the SQLConnection class. However, an SQLite database is just a file on the computer, so you’ll need a File object as well (see Chapter 9, “Files and Directories,” for the basics on working with files).
var conn = new air.SQLConnection();
var db = air.File.applicationStorageDirectory.resolvePath('something.db'),
This second line creates a new object of File type. This object represents the file called something.db, which is located within the AIR application’s storage directory. This is a logical place for an application’s database (see Chapter 9 and Chapter 4, “Basic Concepts and Code,” for more on this directory). Note that it doesn’t matter what extension you use, if any, for the database file, although .db is a logical choice.
To work with a database synchronously, you can just call the open() method, passing it the File object as the first argument:
conn.open(db);
If you’d like the referenced file to be created if it doesn’t exist (e.g., when you go to create the database for the first time), pass this function a second argument with the value air.SQLMode.CREATE.
conn.open(db, air.SQLMode.CREATE);
At this point you’re ready to run queries on the database: to create tables, to populate them (insert records), to update tables, to retrieve data, and so forth. The rest of the chapter explains those steps. When the application is done doing whatever needs to be done, close the database connection:
conn.close();
There’s not much in terms of functionality in the information provided thus far, but let’s run it in an application anyway, just to make sure it works before making the code more useful and more complicated.
In your project’s primary HTML file, create two new objects (Script 11.1).
var conn = new air.SQLConnection();
var db = air.File.applicationStorageDirectory.resolvePath('ch11.db'),
The first line creates the object of type
SQLConnection. The second line creates aFileobject that refers to a file namedch11.db, which is found within this application’s storage directory.Open the database connection:
conn.open(db, air.SQLMode.CREATE);
The database should now be open and will be created if the file doesn’t already exist.
Notify the user:
alert('A connection should be open to the database. Check the filesystem for the file or check the console for errors, just to be certain.'),So that the application does something, this alert is used.
Close the database connection:
conn.close();
As with files, you should close the connection to a database when the application is done using it.
Save, test, debug, and run the completed application (Figure 11.1).
Note that if any errors occur, they should be displayed in the console.
Example 11.1. This first simple script just tests the basics of connecting to an SQLite database.
1    <html><!-- Script 11.1 -->
2    <head>
3    <title>Databases</title>
4    <script type="text/javascript"
     src="AIRAliases.js"></script>
5    <script type="text/javascript">
6
7    // Create the objects:
8    var conn = new air.SQLConnection();
9    var db = air.File.
     applicationStorageDirectory.
     resolvePath('ch11.db'),
10
11   // Open the database:
12   conn.open(db, air.SQLMode.CREATE);
13
14   // Alert the user:
15   alert('A connection should be open to
     the database. Check the filesystem for the
     file or check the console for errors, just
     to be certain.'),
16
17   // Close the database:
18   conn.close();
19
20   </script>
21   </head>
22   <body>
23   </body>
24   </html>
Check your application’s storage directory for the creation of the database file (Figure 11.2).
The application storage directory is another folder on the computer—besides the folder where the application exists—dedicated to this program. On Mac OS X, this will be
/Users/username/Library/Preferences/appID.publisherID/Local Store. On Windows, this will be something likeC:Documents and SettingsusernameApplication DataappID.publisherIDLocal Store. Note that, in both cases, username would be replaced with your actual username for the computer and appID would be replaced with theidvalue from the application’s XML descriptor file. The .publisherID value comes from the signing certificate used when building the application. It’ll be a string of random-looking characters that uniquely identifies the application’s associated creator. When running the application using theadl(i.e., without formally installing it), there will be no .publisherID value.On my Mac my username is Larry and the
application.xmlfile for this program contains this line—<id>ToDoList</id>
—so I can find the created database in
/Users/Larry/Library/Preferences/ToDoList/Local Storeduring the testing process (when there is no publisherID value).✓ Tips
If you don’t provide a
Fileobject when callingopen()(or for asynchronous transactions,openAysnc()), SQLite will create the database in memory:conn.open(null, air.SQLMode.CREATE);
Since an SQLite database is just a file on the computer, it—and its contents—are accessible by other applications. SQLite, while great, doesn’t have the same security protections that other database applications possess. If the data being stored should not be accessible by other applications, use an
EncryptedLocalStoreinstead (see Chapter 15, “Security Techniques.”An application’s use of its storage directory is just one reason you need to give your AIR applications a unique
idvalue. If two programs have the same application ID and publisher ID, they’ll both read and write data from the same directory.


Any application should only need to create a database (which is to say create the tables in a database) once. In the next chapter you’ll learn how to distribute an application with the database already made, but here you’ll learn how to have the application create it from scratch.
Creating a table in a database is a matter of running the proper SQL command: CREATE TABLE tablename... To run any SQL command on SQLite, start with your SQLConnection object, which points to the database file:
var conn = new air.SQLConnection();
var db = air.File.applicationStorageDirectory.resolvePath('something.db'),
conn.open(db, air.SQLMode.CREATE);
Next, you’ll need an object of type SQLStatement:
var sql = new air.SQLStatement();
Assign the SQLConnection object to its sqlConnection property:
sql.sqlConnection = conn;
To run the query on the database, it must first be assigned to the SQLStatement object’s text property. The following command creates a table with two columns:
sql.text = 'CREATE TABLE testing (id INTEGER PRIMARY KEY AUTOINCREMENT, something TEXT)';
Finally, execute the SQL command:
sql.execute();
Note that these instructions are particular to synchronous procedures. When interfacing with SQLite asynchronously (discussed throughout the rest of the chapter), you’ll need to establish and use event listeners. Those instructions are in the next section of the chapter.
As mentioned in the introduction, there’s not enough room in the book to cover SQL in detail, but the language is pretty easy to follow. If you’ve never used SQLite before, Table 11.1 lists the available types you can use for table columns and the “Intro to SQLite” sidebar provides a brief introduction to the software as a whole.
Open Script 11.1 in your text editor or IDE, if it is not already.
Create an
SQLStatementobject (Script 11.2).var sql = new air.SQLStatement();
Example 11.2. This application actually creates a table in an SQLite database. The table made here is used in the rest of the chapter’s examples.
1    <html><!-- Script 11.2 -->
2    <head>
3    <title>Databases</title>
4    <script type="text/javascript" src="AIRAliases.js"></script>
5    <script type="text/javascript">
6
7    // Create the objects:
8    var conn = new air.SQLConnection();
9    var db = air.File.applicationStorageDirectory.resolvePath('ch11.db'),
10   var sql = new air.SQLStatement();
11
12   // Open the database:
13   conn.open(db, air.SQLMode.CREATE);
14
15   // Associate the statement with the connection:
16   sql.sqlConnection = conn;
17
18   // Define the query:
19   sql.text = 'CREATE TABLE todo (id INTEGER PRIMARY KEY AUTOINCREMENT, item TEXT NOT NULL, added
     TEXT DEFAULT CURRENT_TIMESTAMP, completed TEXT DEFAULT NULL)';
20
21   // Execute the query:
22   sql.execute();
23
24   // Alert the user:
25   alert('The table has been created.'),
26
27   // Close the database:
28   conn.close();
29
30   </script>
31   </head>
32   <body>
33   </body>
34   </html>
After opening the database connection but before closing it, link the connection object to the statement object:
sql.sqlConnection = conn;
This tells the statement object through which connection the queries should be executed.
Define the
CREATE TABLEquery:sql.text = 'CREATE TABLE todo (id INTEGER PRIMARY KEY AUTOINCREMENT, item TEXT NOT NULL, added TEXT DEFAULT CURRENT_TIMESTAMP, completed TEXT DEFAULT NULL)';
This command will create a table containing four columns. The first is named id and will be an automatically incremented primary key. Basically the
idcolumn will be a unique way to refer to every record in the column (if you’re not familiar with primary keys, search the Web or see one of my books about SQL). As an automatically incremented integer, the first record inserted will have anidvalue of 1, the next 2, and so on.The second column, item, will be the actual task in the user’s to-do list. It must always have a value (it cannot be null). The third and fourth columns will store textual representations of a point in time. The first will reflect when the item was added. Its default value will be the current timestamp (i.e., the moment the record is added to the table). The other column will be updated when a task is completed. If a task has no completed value, that means it still needs to be done. When it has been completed, this column will register the time that the task was marked as completed. Doing it this way is better than just deleting completed tasks, because the user would then have no record as to what has been accomplished.
Execute the query:
sql.execute();
Change the alert to reflect the updates to the script:
alert('The table has been created.'),Save, test, debug, and run the completed application (Figure 11.3).
✓ Tips
The
SQLConnectionobject has two properties that affect the size and behavior of a database that is created:autoCompactandpageSize. If you don’t know what these properties mean or how they are used, you can search online for details. These values can only be adjusted prior to creating a database.Your table names cannot begin with sqlite_, because that prefix is reserved for SQLite’s use.
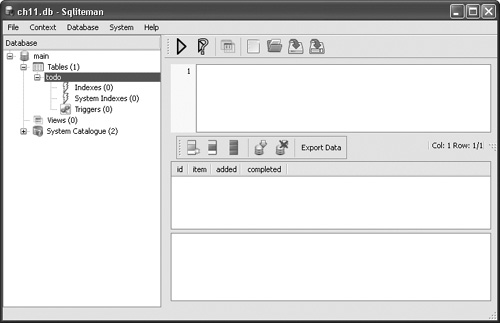
You can confirm the creation of the table by opening the database file in any application that can read SQLite databases (Figure 11.4). Search the Web for a program that will run on your operating system (one of the best seems to be Sqliteman at www.sqliteman.com).
The data types supported by SQLite are tricky. So it’s a subject that I’m glossing over here. If you’ll be using SQLite a lot, I recommend you read its simple manual, but with respect to data types, check out the pages on column affinity for more information.

When you have a complete and working database, you can start doing what’s important: storing data in it. This is accomplished using an INSERT query. The process of running an INSERT query is the same as that used to run a CREATE query: create the SQLConnection, File, and SQLStatement objects, open the connection, associate the connection with the statement, assign the SQL command to the SQLStatement’s text property, and then execute the statement. I could walk you through this, but it’s time to start performing asynchronous communications instead of the synchronous ones used thus far. When a program does activities that take more time to complete (like inserting, selecting, updating, and deleting records), using asynchronous communications will result in a more professional application.
You start by opening the database using openAsync(), but you’ll need to set up event listeners before doing so. The first event to watch for is air.SQLEvent.OPEN:
var conn = new air.SQLConnection();
var db = air.File.applicationStorageDirectory.resolvePath('something.db'),
conn.addEventListener(air.SQLEvent.OPEN, dbOpen);
conn.openAsync(db, air.SQLMode.CREATE);
What the corresponding handling function—doOpen() in this case—does depends on the application. If the application retrieves some information from the database when launched, the code that does that would be called after opening the connection.
The next steps would be to create the SQLStatement object and assign to it the connection:
var sql = new air.SQLStatement();
sql.sqlConnection = conn;
To this statement object you’ll want to add an event listener, watching for SQLEvent.RESULT. Such an event is triggered when a positive result is returned by the database:
sql.addEventListener(air.SQLEvent. RESULT, sqlResult);
Now you can assign the query to the SQL statement and execute it:
sql.text = 'INSERT INTO testing (something) VALUES ("This is some text.")';
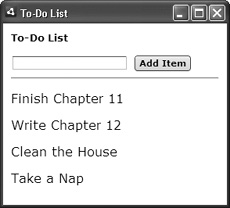
sql.execute();In the next example, I’ll start building a to-do list management application (Figure 11.5). By the end of the chapter, the application will allow the user to add new list items, mark them as completed, and delete them. This example will be started from scratch here with the assumption that the database has already been created using the previous application. Because the database should already exist, the openAsync() method will use a second argument of air.SQLMode.UPDATE instead of air.SQLMode.CREATE. This value indicates that the database should be opened for reading or writing but should not be created if it doesn’t exist.

Before running through these steps, there’s one other important item to note. For simplicity sake, the value a user enters into a text input will be used as-is in the SQL INSERT command. This is a potential security hole that allows the user to break the database. In the next chapter you’ll see a preferred but slightly more complicated way to integrate user-supplied values into a query.
In your project’s primary HTML file, create the necessary objects (Script 11.3):
var conn = new air.SQLConnection();
var db = air.File.applicationStorageDirectory.resolvePath('ch11.db'),
var insert = new air.SQLStatement();
Example 11.3. To start creating a to-do list manager, this program offers the user a way to add items to the database.
1    <html><!-- Script 11.3 -->
2    <head>
3    <title>To-Do List</title>
4    <script type="text/javascript" src="AIRAliases.js"></script>
5    <script type="text/javascript">
6
7    // Create the objects:
8    var conn = new air.SQLConnection();
9    var db = air.File.applicationStorageDirectory.resolvePath('ch11.db'),
10   var insert = new air.SQLStatement();
11
12   // Do the prep work after the application has loaded:
13   window.onload = function() {
14
15      // Disable the Add Item button until we're ready for it:
16      document.getElementById('btnAddItem').disabled = true;
17
18      // Add the event handlers:
19      conn.addEventListener(air.SQLEvent.OPEN, dbOpen);
20      insert.addEventListener(air.SQLEvent.RESULT, insertResult);
21
22      // Open the database:
23      conn.openAsync(db, air.SQLMode.UPDATE);
24
25   } // End of anonymous function.
26
27   // When the application has closed, close the database connection:
28   window.onbeforeunload = function() {
29      conn.close();
30   }
31
32   // Function called when the database is opened.
33   function dbOpen() {
34
35      // Associate the connection with the SQLStatement:
36      insert.sqlConnection = conn;
37
38      // Enable the 'Add Item' button:
39      document.getElementById('btnAddItem').disabled = false;
40
41   } // End of dbOpen() function.
42
43   // Function called when the user clicks
     'Add Item'.
44   function addItem() {
45
46      // Get the value:
47      var item = document.
        getElementById('item').value;
48
49      if (item.length > 0) { // Make sure
        there's something there!
50
51         // Escape any apostrophes:
52         item = item.replace(/'/g, "''");
53
54         // Insert the item:
55         insert.text = "INSERT INTO todo
           (item) VALUES ('" + item + "')";
56         insert.execute();
57
58      } // End of item.length IF.
59
60   } // End of addItem() function.
61
62   // Function called when an INSERT works.
63   function insertResult() {
64      alert ('The item has been added.'),
65      document.getElementById('item').value =
        null;
66   }
67
68   </script>
69
70   <style>
71   body {margin:10px;}
72   p {font-size: 16px;}
73   </style>
74
75   </head>
76
77   <body>
78
79   <h3>To-Do List</h3>
80
81   <input type="text" id="item" /> <button
     id="btnAddItem" onclick="addItem()">Add
     Item</button><hr />
82
83   </body>
84   </html>
There’s nothing new here, but I’ll point out two details. First, I’m calling the
SQLStatementobject insert, because it’ll be used to insert records into the database. Second, although the name of this database is stillch11.db(as in the previous two examples), the program will only work if it uses the same application ID and publisher ID values as the previous example. If that’s not the case, theapplicationStorageDirectorylocation will be different, and this program won’t have a database to use!Define a function to be called after the application loads:
window.onload = function() {
  document.getElementById ('btnAddItem').disabled = true;
} // End of anonymous function.
This anonymous function will be automatically called once the application (or window, technically) has loaded. It starts by disabling the Add Item button, so that the user can’t even attempt to add any items until this program knows that the database connection is open.
Add the event listeners and open the connection:
conn.addEventListener(air.SQLEvent. OPEN, dbOpen);
insert.addEventListener(air. SQLEvent.RESULT, insertResult);
conn.openAsync(db, air.SQLMode. UPDATE);
The first event listener watches for an
OPENevent on the connection object. When that happens, thedbOpen()function will be called. The second event listener watches for aRESULTevent on the statement object. When the statement query successfully runs on the database, this event will occur, thereby calling theinsertResult()function.Notice that when opening the database, the second argument is
air.SQLMode.UPDATE, which means that the database must already exist and it’s now being opened for just reading and writing.Create a function that closes the database connection:
window.onbeforeunload = function() {
  conn.close();
}
The database connection needs to remain open while the program is running (because the user may continue to add items to it). But it also should be closed before the application quits. To accomplish that, an anonymous function will be called right before the window unloads (i.e., closes). Within the anonymous function, the connection’s
close()method is called.Define the
dbOpen()function:function dbOpen() { insert.sqlConnection = conn; document.getElementById ('btnAddItem').disabled = false; } // End of dbOpen() function.This function is called after the connection has been made to the database. It needs to do two things: associate the connection with the insert statement and enable the Add Item button so the user can begin adding tasks.
Begin defining the
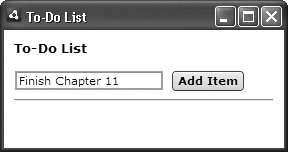
addItem()function:function addItem() { var item = document.getElementById('item').value; if (item.length > 0) {This function will be called when the user clicks the Add Item button (see Figure 11.5). The function starts by retrieving what the user entered into the text input, whose
idvalue is item. Next, a conditional confirms that something was entered into the input. This prevents insertions from being made before the user has even typed anything.Escape any apostrophes in the item’s value:
item = item.replace(/'/g, "''");
The to-do item’s value will be part of a query that looks like this:
INSERT INTO todo (item) VALUE ('The actual item value here.')Because the value is wrapped within single quotation marks, any apostrophes within the value will break the query. To prevent that, the
replace()method is applied to the value, globally replacing any occurrence of a single apostrophe with two apostrophes. This is how you escape the apostrophe to make it usable in a query.If you haven’t used regular expressions before, this code might not mean much to you. The slashes mark the beginning and end of the pattern being matched. The pattern here is just a single apostrophe. The g after the second slash means that a global replace should be made (i.e., every apostrophe should be replaced, not just the first one encountered).
Define and run the
INSERTquery:insert.text = "INSERT INTO todo (item) VALUES ('" + item + "')"; insert.execute();Step 7 shows the composed query with the value in place. With respect to the table, the
idcolumn doesn’t need to be provided with a value, because it will be automatically assigned. The same goes foradded, which will automatically be assigned the current timestamp. The fourth column also doesn’t need a value because it will benulluntil the task is actually done.Complete the
addItem()function:} // End of item.length IF. } // End of addItem() function.
Define the
insertResult()function:function insertResult() { alert ('The item has been added.'), document.getElementById('item').value = null; }This function will be called if the insert statement successfully runs on the database. It should notify the user that the item was added and clear the current value from the text input.
Within the body of the page, add a text input and a button:
<input type="text" id="item" /> <button id="btnAddItem" onclick="addItem()">Add Item</button><hr />
The text input needs to have an
idof item, matching the code inaddItem(). The button can have any name but needs to call theaddItem()function when clicked.I’ve also add a small section of CSS (see the script), just to make things a bit neater.
Save, test, debug, and run the completed application (Figures 11.6 and 11.7).
✓ Tips
To retrieve the value of the automatically incremented primary key, you would do this in this example’s
insertResult()function:var result = insert.getResult(); var pk = result.lastInsertRowID;
SQLite does not support the syntax for inserting multiple records using one query:
INSERT INTO todo (item) VALUES ('Something'), ('Something Else'), ('A 3rd Thing')This is possible within the popular MySQL database but is not part of the SQL standard.

A key difference between average and professional applications is how errors are handled. In a poorly written program, no consideration is made for errors, so it seems as if the expectation is they’ll never occur. A complete program addresses every possible error, no matter how much extra code it takes. When interacting with databases, errors are rather common (particularly during the development stage), so you should account for them.
To properly handle errors that occur, add an event listener to every SQL-related object:
var conn = new air.SQLConnection();
conn.addEventListener(air.SQLErrorEvent. ERROR, dbError);
var sql = new air.SQLStatement();
sql.addEventListener(air.SQLErrorEvent. ERROR, dbError);
The error to be watched for is SQLErrorEvent.ERROR. Whether the error occurred during the connection process or while executing a command, an SQLErrorEvent.Error will be raised. (This is true when performing asynchronous communications; synchronous errors are found within SQLError not SQLErrorEvent). Notice that you’ll need to add event listeners to both the SQLConnection and SQLStatement objects, but it’s acceptable if they both invoke the same function.
The error handling function should take an event as its argument. Within the function, the error message can be found in the event’s errorName.error.message property. More details will be in its errorName.error.details property. An associated error ID will be in errorName.error.errorID. The errorName.error.operation property reflects what was happening when the error occurred. With this in mind, to simply report when an error occurred, you would use:
function dbError(e) {
    alert('The following error occurred: ' + e.error.message);
}
Let’s apply this to the application so that any errors that occur will be handled in some way. As a reminder, Chapter 12, “Database Techniques,” has a section devoted to debugging applications that interact with an SQLite database.
Open Script 11.3 in your text editor or IDE, if it is not already.
Within the first anonymous function, add two more event listeners (Script 11.4):
conn.addEventListener(air. SQLErrorEvent.ERROR, dbError);
insert.addEventListener(air. SQLErrorEvent.ERROR, dbError);
Define the
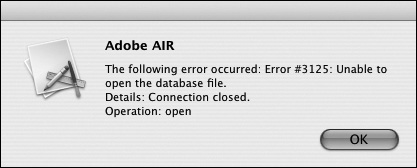
dbError()function:function dbError(e) { alert("The following error occurred: " + e.error.message + " Details: " + e.error.details + " Operation: " + e.error.operation); }This function will report the error message in some detail to the end user. To do so, some literal text plus the values of
e.error.message,e.error.details, ande.error.operationwill be alerted. Newlines (Example 11.4. For a more professional result, the application has been updated to handle (at least, acknowledge) any errors that might occur. (I’ve also cleaned out some comments and blank lines in the existing code, just to tighten up the length of the script.)
1    <html><!-- Script 11.4 -->
2    <head>
3    <title>To-Do List</title>
4    <script type="text/javascript" src="AIRAliases.js"></script>
5    <script type="text/javascript">
6
7    // Create the objects:
8    var conn = new air.SQLConnection();
9    var db = air.File.applicationStorageDirectory.resolvePath('ch11.db'),
10   var insert = new air.SQLStatement();
11
12   // Do the prep work after the application has loaded:
13   window.onload = function() {
14      document.getElementById('btnAddItem').disabled = true;
15
16      // Add the event handlers:
17      conn.addEventListener(air.SQLEvent.OPEN, dbOpen);
18      conn.addEventListener(air.SQLErrorEvent.ERROR, dbError);
19      insert.addEventListener(air.SQLEvent.RESULT, insertResult);
20      insert.addEventListener(air.SQLErrorEvent.ERROR, dbError);
21
22      conn.openAsync(db, air.SQLMode.UPDATE);
23   } // End of anonymous function.
24
25   // When the application has closed, close the database connection:
26   window.onbeforeunload = function() {
27      conn.close();
28   }
29
30   // Function called when the database is opened.
31   function dbOpen() {
32      insert.sqlConnection = conn;
33      document.getElementById('btnAddItem').disabled = false;
34   } // End of dbOpen() function.
35
36   // Function for reporting errors.
37   function dbError(e) {
38      alert("The following error occurred: " + e.error.message + "
Details: " + e.error.details +
        "
Operation: " + e.error.operation);
39   }
40
41   // Function called when the user clicks 'Add Item'.
42   function addItem() {
43      var item = document.getElementById('item').value;
44      if (item.length > 0) {
45         item = item.replace(/'/g, "''");
46         insert.text = "INSERT INTO todo (item) VALUES ('" + item + "')";
47         insert.execute();
48      } // End of item.length IF.
49   } // End of addItem() function.
50
51   // Function called when an INSERT works.
52   function insertResult() {
53      alert ('The item has been added.'),
54      document.getElementById('item').value =
        null;
55   }
56
57   </script>
58
59   <style>
60   body {margin:10px;}
61   p {font-size: 16px;}
62   </style>
63
64   </head>
65
66   <body>
67
68   <h3>To-Do List</h3>
69
70   <input type="text" id="item" />
     <button id="btnAddItem" onclick="addItem()">
     Add Item</button><hr />
71
72   </body>
73   </html>
You wouldn’t want to do this with a real application (with few exceptions, showing end users detailed and complex error messages isn’t appropriate), but it will be useful debugging information for you as you write and test the application.
Save, test, debug, and run the completed application.
To see the effect of this updated example, you’ll need to already have a problem, or introduce one here (Figures 11.8 and 11.9).
✓ Tips
Another very useful piece of information for debugging purposes is the value of the exact query being executed. You can display this value by referring to the
SQLStatement’stextattribute (e.g.,insert.text).To handle the errors that occur while performing synchronous communications, use a
try...catchortry...catch...finallystructure.

The next logical step when working with a database is to retrieve stored data from it. This is accomplished using a SELECT query, and it begins just like the CREATE and INSERT queries. Assuming you’ve already created the SQLConnection and File objects (conn and db, respectively), then added the event listeners and opened the database, the next steps would be:
var sql = new air.SQLStatement();
sql.sqlConnection = conn;
sql.addEventListener(air.SQLErrorEvent. ERROR, dbError);
sql.addEventListener(air.SQLEvent. RESULT, sqlResult);
sql.text = 'SELECT * FROM testing';
sql.execute();
Select queries differ from INSERT (and CREATE, UPDATE, and DELETE) queries in that they return a result set—the stored data that matched the query—that must be handled. That process would be accomplished within the function that handles the air.SQLEvent.RESULT event. To start, fetch the results:
var results = sql.getResult();
You should then confirm that the results aren’t empty (which would be the case if the SELECT query ran successfully but didn’t return any matches):
if (results.data != null) {Assuming that the result set isn’t empty, you can access every returned row using a loop:
for (var i = 0; i < results.data.length; i++) {
    // Do something with results.data[i].
}
In this loop, results.data is an array, where each element of that array represents one returned row. Within each element or row (results.data[i]), you have another array: the columns selected. Using the testing table example, where the table has two columns—id and something, you would therefore refer to results.data[i].id and results.data[i].something.
To apply this knowledge to the to-do list application, the list of existing events will be pulled from the database and displayed (Figure 11.10).
Open Script 11.4 in your text editor or IDE, if it is not already.
Create a second
SQLStatementobject (Script 11.5):var select = new air.SQLStatement();
Although you could reuse the
insert SQLStatementobject for theSELECTquery, it’s actually better if you don’t (see the debugging tips at the end of the next chapter). So a newSQLStatementis declared and is calledselect.Add two new event listeners:
select.addEventListener(air. SQLEvent.RESULT, listItems);
select.addEventListener(air. SQLErrorEvent.ERROR, dbError);
The
selectobject will use the same error handling function as the other two objects but have its ownSQLEvent.RESULTfunction called listItems.Within the
dbOpen()function, associate the newSQLStatementobject withconn, and then call theshowItems()function:select.sqlConnection = conn; showItems();
Example 11.5. Now the application will display the current to-do list by selecting those records from the database.
1    <html><!-- Script 11.5 -->
2    <head>
3    <title>To-Do List</title>
4    <script type="text/javascript" src="AIRAliases.js"></script>
5    <script type="text/javascript">
6
7    // Create the objects:
8    var conn = new air.SQLConnection();
9    var db = air.File.applicationStorageDirectory.resolvePath('ch11.db'),
10   var insert = new air.SQLStatement();
11   var select = new air.SQLStatement();
12
13   // Do the prep work after the application has loaded:
14   window.onload = function() {
15      document.getElementById('btnAddItem').disabled = true;
16
17      // Add the event handlers:
18      conn.addEventListener(air.SQLEvent.OPEN, dbOpen);
19      conn.addEventListener(air.SQLErrorEvent.ERROR, dbError);
20      insert.addEventListener(air.SQLEvent.RESULT, insertResult);
21      insert.addEventListener(air.SQLErrorEvent.ERROR, dbError);
22
23      select.addEventListener(air.SQLEvent.RESULT, listItems);
24      select.addEventListener(air.SQLErrorEvent.ERROR, dbError);
25
26      conn.openAsync(db, air.SQLMode.UPDATE);
27   } // End of anonymous function.
28
29   // When the application has closed, close the database connection:
30   window.onbeforeunload = function() {
31      conn.close();
32   }
33
34   // Function called when the database is opened.
35   function dbOpen() {
36
37      // Associate the connection with the SQLStatements:
38      insert.sqlConnection = conn;
39      select.sqlConnection = conn;
40
41      // Show the current list of items:
42      showItems();
43
44      document.getElementById('btnAddItem').disabled = false;
45   } // End of dbOpen() function.
46
47   // Function for reporting errors.
48   function dbError(e) {
49      alert("The following error occurred: " + e.error.message + "
Details: " + e.error.details +
        "
Operation: " + e.error.operation);
50   }
51
52   // Function called when the user clicks 'Add Item'.
53   function addItem() {
54      var item = document.getElementById('item').value;
55      if (item.length > 0) {
56         item = item.replace(/'/g, "''");
57         insert.text = "INSERT INTO todo (item) VALUES ('" + item + "')";
58         insert.execute();
59      } // End of item.length IF.
60   } // End of addItem() function.
61
62   // Function called when an INSERT works.
63   function insertResult() {
64      alert ('The item has been added.'),
65      document.getElementById('item').value = null;
66
67      // Update the list:
68      showItems();
69
70   } // End of insertResult() function.
71
72   // Function that selects all the items.
73   function showItems() {
74      select.text = 'SELECT id, item FROM todo ORDER BY added ASC';
75      select.execute();
76   } // End of showItems() function.
77
78   // Function that adds the items to the page.
79   function listItems() {
80
81      // If the list already exists, remove it:
82      if (document.getElementById( 'list' )) {
83         document.body.removeChild( document.getElementById('list') );
84      }
85
86      // Create a DIV:
87      var div = document.createElement('div'),
88      div.setAttribute('id', 'list'),
89
90      // Variable used to add elements:
91      var p = null;
92
93      // Get the results of the query:
94      var results = select.getResult();
95      if (results.data != null) { // Some records returned!
96
97         // Loop through the results:
98         for (var i = 0; i < results.data.length; i++) {
99
100            p = document.createElement('p'),
101
102            // Show the item:
103            p.innerText = results.data[i].item;
104
105            // Add to the DIV:
106            div.appendChild(p);
107
108         } // End of FOR loop.
109
110      } else { // No records returned!
111         div.innerText = 'There are currently no to-do items.';
112      }
113
114      // Add the DIV to the page:
115      document.body.appendChild(div);
116
117   } // End of listItems() function.
118
119   </script>
120
121   <style>
122   body {margin:10px;}
123   p {font-size: 16px;}
124   </style>
125
126   </head>
127
128   <body>
129
130   <h3>To-Do List</h3>
131
132   <input type="text" id="item" /> <button id="btnAddItem" onclick="addItem()">Add Item</button><hr />
133
134   </body>
135   </html>
When using asynchronous functions and event listeners, the logic of an application can become muddled. In step 3 it was established that the
listItems()function will be called when theSELECTquery returns a positive result. But the query still needs to be defined and executed. That will take place within theshowItems()function. Essentially, it starts the process of showing the list of to-do items, so it’s called within thedoOpen()function.Define the
showItems()function:function showItems() { select.text = 'SELECT id, item FROM todo ORDER BY added ASC'; select.execute(); }This function does two things: It defines the query to be run and then calls the
execute()method. The function selects two values from each row in thetodotable in the order in which they were added.Begin defining the
listItems()function:function listItems() { if (document.getElementById( 'list' )) { document.body.removeChild( document.getElementById( 'list' ) ); } var div = document.createElement('div'), div.setAttribute('id', 'list'), var p = null;As stated, this function will be called once the
SELECTquery has returned a result. Its role is to fetch those results and display them. Doing that requires adding elements to the Document Object Model (DOM). Every item will be placed within a paragraph that’s part of aDIVwhoseidattribute will have a value of list.This function starts by checking if such an element already exists. If so, it should be removed. This would be the case after a user has added another item, at which time the list needs to be updated (i.e., removed and re-created). This function then starts the process of creating the necessary elements and variables.
Fetch and validate the query results:
var results = select.getResult();
if (results.data != null) {
   for (var i = 0; i < results.data.length; i++) {
First, the results are fetched by calling the
getResult()method of theSQLStatementobject. Second, a check ensures that the results aren’t empty, meaning that some records were returned. Third, aforloop is defined that will be used to access every returned record.Within the
forloop, add the item to the page:p = document.createElement('p'), p.innerText = results.data[i].item; div.appendChild(p);First, a new item of type paragraph is created. Then its
innerTextattribute—the value between the opening and closing tags—is set to the value of theitemcolumn in the current row.Finally, the paragraph is added to the
DIV.Complete the
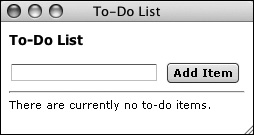
forloop and theifconditional:} // End of FOR loop. } else { // No records returned! div.innerText = 'There are currently no to-do items.'; }If the user doesn’t have any current to-do items, a message is added to the
DIVinstead of a series of paragraphs (Figure 11.11).Complete the
listItems()function:document.body.appendChild(div); } // End of listItems() function.
The function just needs to add the
DIVto the page.Call the
showItems()function within theinsertResult()function:showItems();
The
showItems()function, which starts the process of displaying the to-do list, is called by the anonymous function that runs after the page has loaded. But it needs to be called again here after a user has added a new item. If that step wasn’t taken, the just-added task wouldn’t show in the list until the user reran the application (and that just won’t do).Save, test, debug, and run the completed application.
✓ Tips
If you have an application that only needs to select records from a database and will never alter its contents (via updates or deletions), you can open the database in
air.SQLMode.READmode.There is a series of SQL classes and functionality defined in Adobe AIR for accessing a database’s schema. The schema represents information about a database: what tables it contains, what columns are in those tables, and so forth. One possible use for this information would be if you wanted to create an Adobe AIR application for managing SQLite databases. See the AIR documentation for details on these classes.
Thus far you’ve learned how to execute CREATE, INSERT, and SELECT queries. These are the most important three, but two more still need to be covered: UPDATE and DELETE. Both are executed just like every other query but handling the results is much more like an INSERT than a SELECT, because no records will be returned by them.
Code that both updates and deletes records in a table would look like this (without error handling and creating the requisite user-defined functions):
var conn = new air.SQLConnection();
var db = air.File.applicationStorageDirectory.resolvePath('something.db'),
conn.addEventListener(air.SQLEvent.OPEN, dbOpen);
conn.openAsync(db, air.SQLMode.UPDATE);
var update = new air.SQLStatement();
update.sqlConnection = conn;
var delete = new air.SQLStatement();
delete.sqlConnection = conn;
update.addEventListener(air.SQLEvent. RESULT, updateResult);
delete.addEventListener(air.SQLEvent. RESULT, deleteResult);
update.text = 'UPDATE testing SET something="new value" WHERE id=23';
update.execute();
delete.text = 'DELETE FROM testing WHERE id=7482';
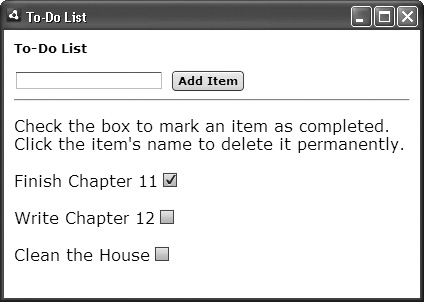
delete.execute();With this in mind, the application will be expanded one last time, providing the user a check box to indicate if a task is completed or not and the ability to delete a task by clicking on its name (Figure 11.12).
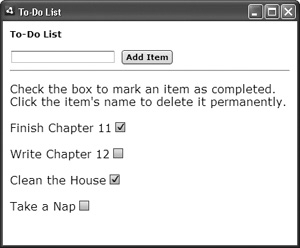
Figure 11.12. Another look at the complete application (similar to what’s shown on Mac OS X in Figure 11.5).
Open Script 11.5 in your text editor or IDE, if it is not already.
Add two more
SQLStatementobjects (Script 11.6).var update = new air.SQLStatement(); var del = new air.SQLStatement();
It may seem like overkill for this application to contain four different
SQLStatementobjects (one for each query type), but it really is best to do it this way. The result will be better performance and a less likelihood of bugs.Within the first anonymous function, add event listeners for the new objects:
update.addEventListener(air. SQLErrorEvent.ERROR, dbError);
del.addEventListener(air.SQLEvent. RESULT, deleteResult);
del.addEventListener(air. SQLErrorEvent.ERROR, dbError);
Both objects will have error event listeners but only the
deleteobject gets a result event listener. That’s because the update will be triggered by the user clicking the check box (see Figure 11.12), so an effect of the user’s action (i.e., the box being marked checked or unchecked) will already be apparent to the user.Within the
dbOpen()method, associate the new objects with the connection:update.sqlConnection = conn; del.sqlConnection = conn;
Within the
showItems()function, change theSELECTquery so that it also retrieves the completed value from the database:select.text = 'SELECT id, item, completed FROM todo ORDER BY added ASC';
The check box next to each item (see Figure 11.12) will indicate if a task has been completed or not. To know this, the
completedvalue for each item also must be fetched from the database.Within the
listItems()function, declare two more variables:var p, c, span = null;
This function will need a bit more work. Originally, it created a new paragraph for each item, and then added the paragraph to the
DIV. Now each item needs to have the item text and a check box as separate components within the paragraph, so more elements are needed. The desired end result is that each item will be added to the DOM in a format like this:<p><span id="#" onclick="deleteItem();">Item text.</span><input type="checkbox" id="#" onclick="updateItem()"></p>That’s the target HTML to create, replacing both instances of # with the item’s actual ID value from the database.
Remove the existing three lines from the
forloop (see Script 11.5) and start by adding these lines:p = document.createElement('p'), span = document.createElement('span'), c = document.createElement('input'), c.setAttribute('type', 'checkbox'),Rather than trying to tell you what changes to make to the existing
listItems()code, just remove the existing three lines and start writing theforloop’s body from scratch. It begins by creating three elements, making the input element a type of checkbox.Example 11.6. By adding check boxes, the user can mark a to-do list item as completed or not. Another addition to the to-do list management application is the ability to permanently delete any item by clicking its name.
1    <html><!-- Script 11.6 -->
2    <head>
3    <title>To-Do List</title>
4    <script type="text/javascript" src="AIRAliases.js"></script>
5    <script type="text/javascript">
6
7    // Create the objects:
8    var conn = new air.SQLConnection();
9    var db = air.File.applicationStorageDirectory.resolvePath('ch11.db'),
10   var insert = new air.SQLStatement();
11   var select = new air.SQLStatement();
12   var update = new air.SQLStatement();
13   var del = new air.SQLStatement();
14
15   // Do the prep work after the application has loaded:
16   window.onload = function() {
17      document.getElementById('btnAddItem').disabled = true;
18
19      // Add the event handlers:
20      conn.addEventListener(air.SQLEvent.OPEN, dbOpen);
21      conn.addEventListener(air.SQLErrorEvent.ERROR, dbError);
22      insert.addEventListener(air.SQLEvent.RESULT, insertResult);
23      insert.addEventListener(air.SQLErrorEvent.ERROR, dbError);
24      select.addEventListener(air.SQLEvent.RESULT, listItems);
25      select.addEventListener(air.SQLErrorEvent.ERROR, dbError);
26
27      update.addEventListener(air.SQLErrorEvent.ERROR, dbError);
28
29      del.addEventListener(air.SQLEvent.RESULT, deleteResult);
30      del.addEventListener(air.SQLErrorEvent.ERROR, dbError);
31
32      conn.openAsync(db, air.SQLMode.UPDATE);
33   } // End of anonymous function.
34
35   // When the application has closed, close the database connection:
36   window.onbeforeunload = function() {
37      conn.close();
38   }
39
40   // Function called when the database is opened.
41   function dbOpen() {
42
43      // Associate the connection with the SQLStatements:
44      insert.sqlConnection = conn;
45      select.sqlConnection = conn;
46      update.sqlConnection = conn;
47      del.sqlConnection = conn;
48
49      showItems();
50      document.getElementById('btnAddItem').disabled = false;
51   } // End of dbOpen() function.
52
53   // Function for reporting errors.
54   function dbError(e) {
55      alert("The following error occurred: " + e.error.message + "
Details: " + e.error.details +
        "
Operation: " + e.error.operation);
56   }
57
58   // Function called when the user clicks 'Add Item'.
59   function addItem() {
60      var item = document.getElementById('item').value;
61      if (item.length > 0) {
62         item = item.replace(/'/g, "''");
63         insert.text = "INSERT INTO todo (item) VALUES ('" + item + "')";
64         insert.execute();
65         showItems();
66      } // End of item.length IF.
67   } // End of addItem() function.
68
69   // Function called when an INSERT works.
70   function insertResult() {
71      alert ('The item has been added.'),
72      document.getElementById('item').value = null;
73      showItems();
74   } // End of insertResult() function.
75
76   // Function that selects all the items.
77   function showItems() {
78      select.text = 'SELECT id, item, completed FROM todo ORDER BY added ASC';
79      select.execute();
80   } // End of showItems() function.
81
82   // Function that adds the items to the page.
83   function listItems() {
84
85      // If the list already exists, remove it:
86      if (document.getElementById('list')) {
87         document.body.removeChild(document.getElementById('list'));
88      }
89
90      // Create a DIV:
91      var div = document.createElement('div'),
92      div.setAttribute('id', 'list'),
93
94      // Variables used to add elements:
95      var p, c, span = null;
96
97      // Get the results of the query:
98      var results = select.getResult();
99      if (results.data != null) { // Some records returned!
100        // Loop through the results:
101        for (var i = 0; i < results.data.length; i++) {
102
103            // Create the elements:
104            p = document.createElement('p'),
105            span = document.createElement('span'),
106            c = document.createElement('input'),
107            c.setAttribute('type', 'checkbox'),
108
109            // Mark completed items as checked:
110            if (results.data[i].completed != null) {
111               c.setAttribute('checked', 'checked'),
112            }
113
114            // Each ID attribute is its database ID:
115            c.setAttribute('id', results.data[i].id);
116            span.setAttribute('id', results.data[i].id);
117
118            // Show the item:
119            span.innerText = results.data[i].item;
120
121            // Add event listeners:
122            c.addEventListener('click', updateItem, false);
123            span.addEventListener('click', deleteItem, false);
124
125            // Add to the DIV:
126            p.appendChild(span);
127            p.appendChild(c);
128            div.appendChild(p);
129
130         } // End of FOR loop.
131      } else { // No records returned!
132         div.innerText = 'There are currently no to-do items.';
133      }
134      // Add the DIV to the page:
135      document.body.appendChild(div);
136   } // End of listItems() function.
137
138   // Function called when a DELETE works.
139   function deleteResult() {
140      alert ('The item has been deleted.'),
141      showItems();
142   } // End of deleteResult() function.
143
144   // Function for deleting items.
145   function deleteItem(which) {
146
147      // Get the item's info:
148      var id = which.target.id;
149      var item = which.target.innerText;
150
151      // Confirm with the user prior to deleting:
152      if (confirm('Delete "' + item + '"?')) {
153
154         del.text = 'DELETE FROM todo WHERE id='+ id;
155         del.execute();
156
157      } // End of confirm IF.
158
159   } // End of deleteItem() function.
160
161   // Function for marking items as completed.
162   function updateItem(which) {
163
164     // Get the item's ID:
165     var id = which.target.id;
166
167     // Make the query:
168     update.text = 'UPDATE todo SET
completed=';
169     if (which.target.checked) {
170        update.text += 'CURRENT_TIMESTAMP';
171     } else {
172        update.text += 'NULL';
173     }
174     update.text += ' WHERE id='+ id;
175
176     update.execute();
177
178  } // End of updateItem() function.
179
180  </script>
181
182  <style>
183  body {margin:10px;}
184  p {font-size: 16px;}
185  </style>
186
187  </head>
188
189  <body>
190
191  <h3>To-Do List</h3>
192
193  <input type="text" id="item" />
     <button id="btnAddItem" onclick="addItem()">
     Add Item</button><hr />
194  <p>Check the box to mark an item as
     completed. Click the item's name to
     delete it permanently.</p>
195
196  </body>
197  </html>
If the item is complete, check the box:
if (results.data[i].completed != null) {
 c.setAttribute('checked', 'checked'),
}
The
results.data[i].completedvariable refers to the returned completed value from the database for the currently accessed item. This column will either contain a date/time value ornull. If it’s not null, the box should be checked, indicating that the user had previously marked the task as completed.Add
idattributes to the span and check box, and then add the item text to the span.c.setAttribute('id', results.data[i].id); span.setAttribute('id', results.data[i].id); span.innerText = results.data[i].item;The span and the check box will be the elements that the user clicks on to make something happen: delete the item and mark it as completed, respectively. For this reason, each of these elements on the page needs to have an
idattribute whose value matches the item’s database ID. That’s what the first two lines do.Add event listeners to the span and the check box:
c.addEventListener('click', updateItem, false);
span.addEventListener('click', deleteItem, false);
If this application performed synchronous communications with SQLite, I would simply add
onclickattributes to both items, like so:c.setAttribute('onclick', 'updateItem(' + results.data[i].id + '),'),However, because the program performs asynchronous communication, I must formally add JavaScript event listeners to the objects using this code.
Add the items to the
DIV:p.appendChild(span); p.appendChild(c); div.appendChild(p);
Create the
deleteResult()function:function deleteResult() { alert ('The item has been deleted.'), showItems(); }This function will be called when the
deleteobject returns a positive result. It should alert the user that the item was deleted, and then refresh the list by callingshowItems().Begin the
deleteItem()function:function deleteItem(which) { var id = which.target.id; var item = which.target.innerText;This function will be called when the user clicks on a task’s name in the list. At that time, this function will be passed an event, which I’m assigning to a variable called which.
The function needs to run a
DELETEquery on the table using the task’s primary key in aWHEREclause. To get that value for the clicked on item, refer towhich.target.id. The which.target part refers to the object that was the recipient of the action (the clicking). Itsidattribute represents the associated database ID. The delete alert will confirm, by name, that the user wants to delete the task (Figure 11.13). To do that, the item’sinnerTextvalue, which is the actual task, is needed.Complete the
deleteItem()function:if (confirm('Delete "' + item + '"?')) { del.text = 'DELETE FROM todo WHERE id='+ id; del.execute(); } // End of confirm IF. } // End of deleteItem() function.The confirmation prompt (see Figure 11.13) is a nice little safety check. Then the query is defined and executed.
Begin the
updateItem()function:function updateItem(which) { var id = which.target.id; update.text = 'UPDATE todo SET completed=';This function is very similar to
deleteItem(). It first determines theidvalue of the item that was checked, and then it defines and runs anUPDATEquery on the database.Complete the
updateItem()function:if (which.target.checked) { update.text += 'CURRENT_TIMESTAMP'; } else { update.text += 'NULL'; } update.text += ' WHERE id='+ id; update.execute(); } // End of updateItem() function.This function could be called under two conditions. In the first, the user checked a box, meaning that the item should be marked as completed by setting its
completedvalue in the table to the current date and time. In the second condition, the user unchecks a previously checked box, in which case thecompletedvalue in the table should be set back tonull. The query is therefore defined based on the current value ofwhich.target.checked.Within the body, add some instructions for the user.
<p>Check the box to mark an item as completed. Click the item's name to delete it permanently.</p>
Save, test, debug, and run the completed application (Figures 11.14 and 11.15).
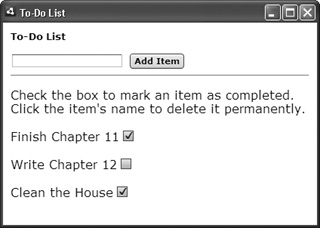
Figure 11.14. The result after clicking OK in the confirmation prompt (see Figure 11.13 for the prompt and compare the list with that in Figure 11.12).
✓ Tips
Technically, the value of the
idattribute in HTML can’t begin with a number. But that kind of restriction is more applicable to HTML run in a Web browser that may be formally validated. But if this choice bothers you, you could change each value to item# (where # represents the database ID value), and then chop off the item part in the functions to get to the ID.Clicking on an item’s name to delete it really isn’t the best or most logical interface, but I wanted to do something simple in that regard. Alternatively, you could create a delete button or image that when clicked passes the item’s ID to the
deleteItem()function.