
Chapter 1
Discovering Illustrator CC
IN THIS CHAPTER
![]() Knowing when to use Illustrator
Knowing when to use Illustrator
![]() Looking around the Document window
Looking around the Document window
![]() Opening and creating documents
Opening and creating documents
![]() Checking out the tools and panels
Checking out the tools and panels
![]() Changing your view
Changing your view
![]() Zooming in and out
Zooming in and out
Adobe Illustrator goes hand in hand with other Adobe products but serves its own unique purpose. Although Illustrator can create multiple-page artwork (with artboards), it isn’t meant to create lengthy documents with repeated headers, footers, and page numbers. Those types of files are more appropriate for applications such as InDesign. Typically, you wouldn’t create artwork in Illustrator that’s made from pixels, such as images edited or created in Photoshop. Illustrator is generally used to create vector logos, illustrations, maps, packages, labels, signage, art for applications, websites, and more. (See the nearby “Vector graphics” sidebar for more information.)
This chapter gets you started with Illustrator and helps you understand when Illustrator is the tool best suited for creating your art.
Deciding When to Use Illustrator CC
How do you draw a line in the sand and decide to create graphics in Illustrator rather than in Photoshop? The following questions can help you make up your mind:
- Does the graphic need to be scaled? Will it be used in sizes that you cannot predict at this time?
- Is the artwork technical in nature? Are precise measurements and placement of elements critical?
- Does the artwork require the use of spot colors, using a system such as the Pantone Matching System (PMS)?
- Will the artwork be used frequently in different formats, such as print and onscreen in apps or websites?
- Is the artwork illustrative with many solid colors and occasional gradients and vignettes? (If you have a photograph, or an illustration that contains many variations of tonal values, use Photoshop for your editing.)
If you answered yes to any of these questions, it is probably best to create and edit your artwork in Illustrator.
Keep in mind that by using Illustrator, you gain these benefits:
- Illustrator can save and export graphics into most file formats. By choosing to save or export, you can create a file that can be used in most other applications. For instance, Illustrator files can be saved as
.bmp,.jpg,.pdf,.svg,.tiff, and.pngfiles, to name a few. - Illustrator files are easily integrated into other Adobe applications. You can save Illustrator files in their native format and open or place them in other Adobe applications such as InDesign, Photoshop, and Adobe XD. You can also save Illustrator artwork as Portable Document Format (
.pdf) files, which lets anyone using the free Acrobat Reader software open and view the file but maintains editing capabilities when the file is opened later in Illustrator. - Illustrator artwork is reusable because the resolution of vector artwork isn’t determined until output. In other words, if you print to a 600-dpi (dots per inch) printer, the artwork is printed at 600 dpi; print to a 2,400-dpi printer, and the artwork prints at 2,400 dpi. Illustrator graphics are quite different from the bitmap images you create or edit in Photoshop, where resolution is determined as soon as you scan, take a picture, or create a new bitmap (created from pixels) document.
- Illustrator has limitless scalability. You can create vector artwork in Illustrator and scale it to the size of your thumb or to the size of a barn, and either way, it still looks good. See the nearby sidebar “Vector graphics” for more information.
Creating a New Document
In Illustrator CC, you may see a start screen when you launch Adobe Illustrator, as shown in Figure 1-1.
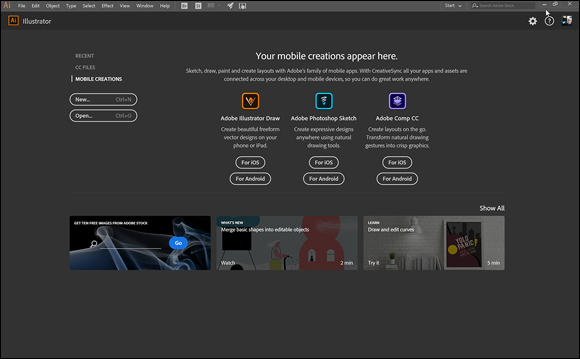
FIGURE 1-1: The initial start screen in Illustrator allows you to see recent files or start a new file.
To create a new document in Illustrator, click the New button on this screen.
Note: If you prefer not to see this start screen, you can choose to turn it off by unchecking Show the Start Workspace When No Files Are Open button in Edit ⇒ Preferences ⇒ General (Windows) or Illustrator ⇒ Preferences ⇒ General (Mac).
-
If you do not see the start screen, choose File ⇒ New.
The New Document dialog box appears, as shown in Figure 1-2. You use it to determine the new document’s profile, size, measurement unit, color mode, and page orientation as well as the number of artboards (pages) you want in the document.
If you are working with the default preferences, you see a rather large New Document window that allows you to choose a new document specific to the artwork you need to create, Mobile, Web, Print, Film & Video, Art & Illustration. Each of these choices comes with preset details that you can edit on the right side of the New Document dialog box. These options also come with templates that you are free to use in order to get a jump-start on your design.
 If you would prefer to see the legacy New Document window, you can click on the More Settings button at the bottom of the Preset Details section. You can set your preferences to always see the legacy New Document window by choosing Edit ⇒ Preferences ⇒ General (Windows) or Illustrator ⇒ Preferences ⇒ General (Mac) and checking the Use legacy “File New” interface option.
In this example, the legacy New Document window is referenced.
-
Click on More Settings at the bottom of the Preset details section.
The legacy New Document dialog appears, as shown in Figure 1-3.
-
Enter a name for your new file in the Name text field.
You can determine the name of the file now or later when you save the document. This can be done when you initially save your file as well.
-
Choose a profile from the New Document Profile drop-down list.
Selecting the correct profile sets up preferences, such as resolution and colors. If you choose a Print profile, your basic color swatches are built from CMYK colors (Cyan, Magenta, Yellow, and Black), and your settings default to a higher resolution. For the web, your color swatches are built from RGB colors (Red, Green, Blue), and your default resolution is set to a lower amount.
You can choose from the following default profiles: Print, Web, Mobile, Film and Video, Art & Illustration, Devices, and Basic RGB.
Based upon the profile that you select, you will be provided with certain size options. In this example, Print is selected as the profile and Letter is selected as the size.
-
In the Number of Artboards text box, you can enter the number of artboards you want in the document.
If you want a single-page document, leave this setting at 1. Creating a document with multiple artboards is discussed later in this chapter in the section “Creating multiple artboards.”
-
Enter in the Spacing text box the amount of space to leave between artboards.
You do not have to bother with making changes in this section unless you selected multiple artboards. If you want pages to abut, enter 0 (zero) or enter additional values if you want a little space between each artboard. If you’re adding artboards, you can enter in the Columns text box the number of columns of artboards you want arranged in the document.
-
Select from the Size drop-down list or type measurements in the Width and Height text fields to set the size of the document page.
You can select from several standard sizes in the Size drop-down list or enter your own measurements in the Width and Height text fields. As previously mentioned, these size options are dependent upon your profile selection.
-
Select from the Units drop-down list to select the type of measurement you’re most comfortable with.
Your selection sets all measurement boxes and rulers to the increments you choose: points, picas, inches, millimeters, centimeters, or pixels.
-
Pick the orientation for the artboard.
The artboard is your canvas for creating artwork in Illustrator. You can choose between Portrait (the short sides of the artboard on the top and bottom) and Landscape (the long sides of the artboard on the top and bottom).
-
Add values in the Bleed text boxes, if necessary.
A bleed value is the amount of image area that extends beyond the artboard. To print from edge to edge, enter a value for the bleed. Keep in mind that most desktop printers need a grip area, which is the part of the page that a printer needs to grab on to the paper. It typically forces any image area near the edge of a page to not print. Bleeds are typically used in jobs to be printed on a press.
-
When you’re finished making selections, click OK.
One or more Illustrator artboards appear.
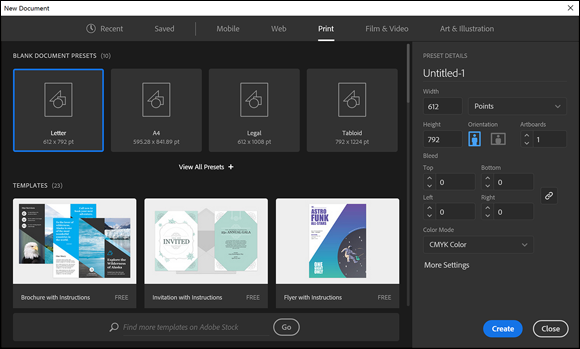
FIGURE 1-2: The New Document interface offers options for different types of files and templates.

FIGURE 1-3: The legacy New Document window.
Try a Template
In the New Document dialog box, click the Templates button to get a precreated artboard that can be used for web banner ads, business cards, and more.
Opening an Existing Document
It’s a good idea to familiarize yourself with the workspace before starting to work in Adobe Illustrator, but to do this you should have a document open. In this section, you jump right in by opening an existing document. Here’s how:
- Launch Adobe Illustrator CC.
-
Choose File ⇒ Open and select a file in the Open dialog box.
For this exercise, you can open one of your own files or one of the sample files located in the
DummiesCCfilesfolder that you can download fromwww.agitraining.com/dummies. If you choose to use the samples provided, open the sample file called CrazyFish.ai.Keep this file open so that you can follow along with the explanation of the workspace in the next section.
Taking a Look at the Document Window
To investigate the work area (shown in Figure 1-4) and become truly familiar with Illustrator, have a document open, like the AI_Sample file you were directed to in the preceding section, or create a new document and take a look around. In the Illustrator work area, a total of 227 inches in width and height helps create your artwork (and all artboards). That’s helpful, but it also leaves enough space to lose objects! The following list explains the tools you work with as you create artwork in Illustrator:
-
Imageable area: If you’re planning to print your Illustrator document, choose View ⇒ Show Print Tiling. A dotted line appears that marks the printing area on the page. Many printers can’t print all the way to the edges of the paper, so the imageable area is determined by the printer you set in the Print dialog box. If you don’t want to see the print tiling, choose View ⇒ Hide Print Tiling.
You can move the imageable area around on your page by using the Print Tiling tool. See the nearby sidebar, “The Print Tiling tool,” for more on this tool.
- Artboard: This area, bounded by solid lines, represents the entire region that can contain printable artwork. By default, the artboard is the same size as the page, but it can be enlarged or reduced. The U.S. default artboard size is 8.5 x 11 inches, but it can be set as large as 227 x 227 inches. If you’re using the default settings for Illustrator, the edge of the artboard is indicated by a transition from a white to a medium gray canvas.
-
Scratch area: This area outside the artboards extends to the edge of the 227-inch square window. The scratch area represents a space on which you can create, edit, and store elements of artwork before moving them onto the artboard. Objects placed onto the scratch area are visible onscreen, but they don’t print. However, objects in the scratch area appear if the document is saved and placed as an image in other applications.
If you’re having a difficult time seeing your items in the scratch area, choose Edit ⇒ Preferences ⇒ User Interface (Windows) or Illustrator ⇒ Preferences ⇒ User Interface (Mac) and select White for the Canvas color.
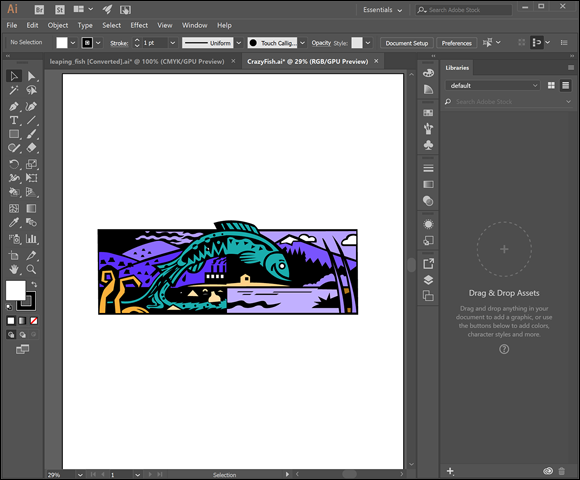
FIGURE 1-4: The Illustrator work area.
Taking Advantage of Artboards
As you already discovered, the page itself is referred to as the artboard. The options available to you when using artboards include the following:
- You can have multiple artboards in one document, creating essentially a multipage document.
- You can name and rearrange artboards by using the Artboard panel.
- You can copy entire artboards, allowing you to quickly create multiple versions for your artwork.
- You can use artboards to define a print area, eliminating the need to use the Print Tiling tool.
Creating multiple artboards
To create a document with multiple artboards, follow these steps:
-
Launch Adobe Illustrator CC and choose File ⇒ New.
The New Document dialog box appears, as shown in Figure 1-5 (if you still have the “Legacy” New Window option checked).
-
Specify the number of artboards to start with by entering a number in the Number of Artboards text box.
In our example, we added four artboards.
-
To specify how to arrange the artboard, click a grid or row arrangement icon to the right of the Number of Artboards text box, as shown in Figure 1-6.
Using these grid boxes, you can
- Specify how many rows and columns to use.
- Change the direction of the layout from left to right or right to left.
-
Enter an amount in the Spacing text box to determine the distance between artboards.
Enter 0 (zero) if you want the artboards to butt against each other, or a higher value if you want some space between them.
- Click OK to create your new document. (See Figure 1-7.) The document will not have multiple sized artboards or content.

FIGURE 1-5: Add multiple artboards right from the start.
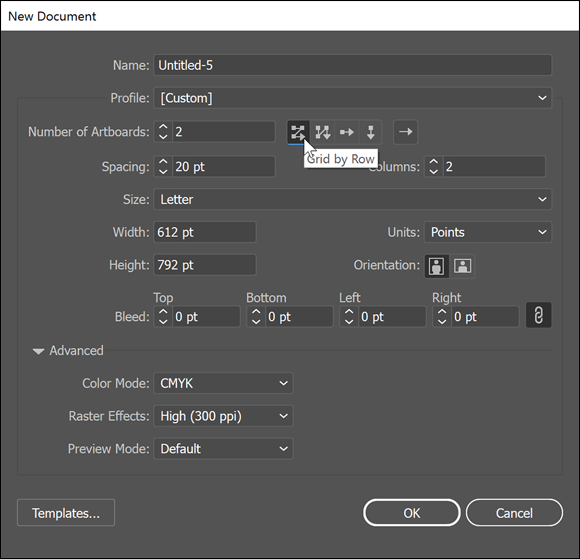
FIGURE 1-6: Choose how you want the artboards arranged.
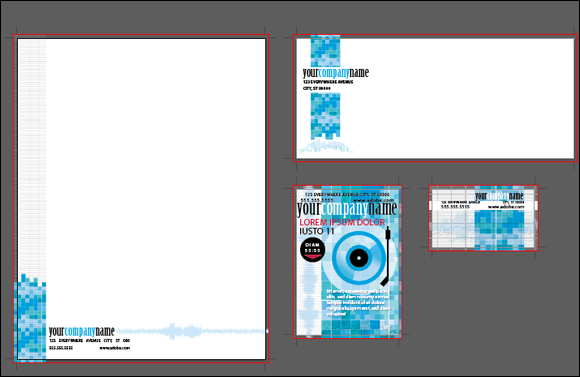
FIGURE 1-7: A document created using four artboards.
Exploring enhanced artboard features
After you create multiple artboards, choose Window ⇒ Artboards to see a panel with artboards listed individually, as shown in Figure 1-8.
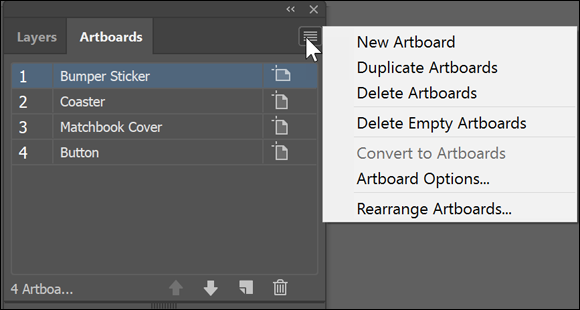
FIGURE 1-8: The Artboard panel, keeping your project organized.
Here are some swell things you can do to artboards from the Artboard panel:
- Navigate to a specific artboard. Just double-click the artboard’s number.
- Rearrange artboards. Drag the artboards inside the Artboard panel to reorganize their stacking order.
- Delete an artboard. Drag it to the Trash icon.
- Copy an existing artboard. Drag it to the New Artboard icon.
- Create a new artboard. Click the New Artboard icon.
- Edit additional artboard options, such as size and orientation, by selecting Artboard Options from the panel menu. The Artboard options appear as you see in Figure 1-9. Keep in mind that each artboard can be a different size than others in the same document.
- Rename an artboard. Double-click the Artboard name right in the Artboards panel, type a new name, and then press the Tab or Enter key.
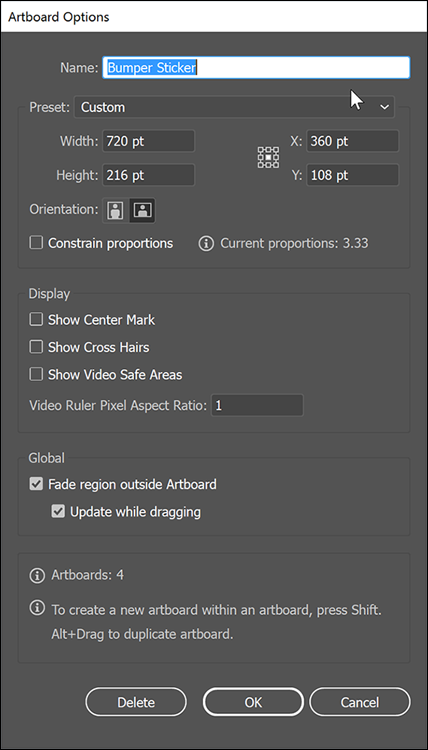
FIGURE 1-9: Edit existing artboards by using the Artboard Options dialog box.
Printing a document with multiple artboards
Pay close attention before you print a document with multiple artboards, or else you may print needless pages. To control which artboards are printed, follow these steps:
-
Choose File ⇒ Print.
The Print dialog box appears, as shown in Figure 1-10.
- Click the arrows underneath the Preview box in the lower-left corner to preview the artboards.
-
After you decide which artboards to print, enter them into the Range text box.
To print all artboards, select the All radio button; otherwise, enter a consecutive range such as 1–3 in the Range text box. You can also print nonconsecutive pages by separating them with commas — enter 1, 3, 4 to print only artboards 1, 3, and 4.
- Click Print to print the selected artboards.
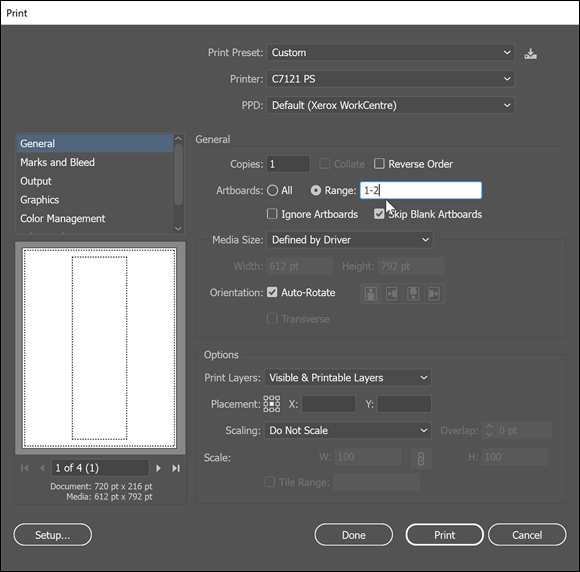
FIGURE 1-10: Printing a document with multiple artboards.
If you want to define an artboard within an artboard, select the Artboard tool and then hold down the Shift key when dragging out a new artboard.
Becoming Familiar with the Tools
As you begin using Illustrator, you’ll find it helpful to be familiar with its tools. Tools are used to create, select, and manipulate objects in Illustrator. The tools should be visible as a default, but if not, you can access them by choosing Window ⇒ Tools.
Table 1-1 lists the tools that we show you how to use throughout this minibook. Hover the cursor over the tool in the Tools panel to see the name of the tool in a tooltip. In parentheses on the tooltip (and noted in Column 2 of Table 1-1) is the keyboard command you can use to access that tool. When you see a small triangle at the lower-right corner of the tool icon, it contains additional, hidden tools. Select the tool and hold the mouse button to see it.
TABLE 1-1 Illustrator CC Tools
|
Icon |
Tool or Keyboard Command |
Task |
See Minibook Chapter |
|
Selection (V) |
Activate objects |
|
|
Direct Selection (A) |
Activate individual points or paths |
|
|
Group Selection (A) |
Select grouped items |
|
|
Magic Wand (Y) |
Select based on similarity |
|
|
Lasso (Q) |
Select freehand |
|
|
Pen (P) |
Create paths |
|
|
Curvature tool (Shift+~) |
Create curves |
|
|
Type (T) |
Create text |
|
|
Line Segment (/) |
Draw line segments |
|
|
Rectangle tool (M) |
Create shape objects |
|
|
Paint Brush (B) |
Create paths |
n/a |
|
Shaper (Shift+N) |
Create shapes |
n/a |
|
Eraser (Shift+E) |
Erase vector paths |
|
|
Rotate (R) |
Rotate objects |
|
|
Scale (S) |
Enlarge or reduce objects |
|
|
Width tool (Shift+W) |
Adjust strokes to variable widths |
|
|
Free Transform (E) |
Transform objects |
|
|
Shape Builder (Shift+M) |
Combine, edit, and fill shapes |
|
|
Perspective Grid (Shift+P) |
Provide perspective plane |
|
|
Mesh (U) |
Create a gradient mesh |
|
|
Gradient (G) |
Modify gradients |
|
|
Eyedropper (I) |
Copy and apply attributes |
|
|
Blend (W) |
Create transitional blends |
|
|
Symbol Sprayer (Shift+S) |
Spray symbols |
|
|
Column Graph (J) |
Create graphs |
n/a |
|
Artboard tool (Shift+O) |
Add or edit artboards |
|
|
Slice (Shift+K) |
Create HTML slices |
n/a |
|
Hand tool |
Push document window |
|
|
Zoom (Z) |
Increase and decrease the onscreen view |
Checking Out the Panels
The standardized interface in Adobe Creative Cloud is a useful boost for users because the Illustrator panel system is similar to all other products in the Creative Cloud. This consistency makes working and finding tools and features easier.
When you first open Illustrator, notice that some panels may have been reduced to icons on the right. To select a panel, click the appropriate icon, and the panel appears.
If all you see is an icon, how do you know which icon brings up which panel? Good question. If you’re hunting around for the appropriate panels, you can
- Choose Window ⇒ Name of Panel.
- Position your mouse on the left side of the icons and, when you see the double-arrow icon, click and drag to the left. The panel names appear.
- Click the Expand Panels button on the gray bar at the top of the icons, as shown in Figure 1-11. The panels expand so that you can see their contents and names.
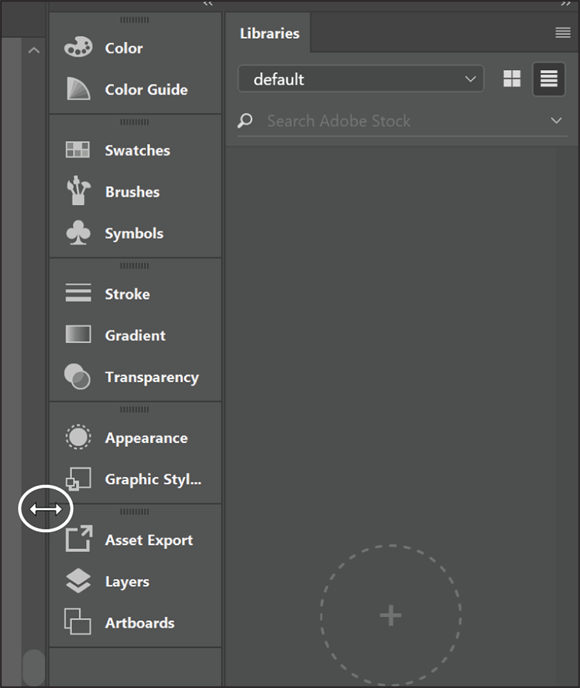
FIGURE 1-11: Expand the panels to see more options.
The panels you see as a default are docked together. To dock a panel means to attach the panel in the docking area for organizational purposes.
You can arrange panels to make them more helpful for production. You may choose to have only certain panels visible while working. Here’s the lowdown on using Illustrator panels:
- To see additional options for each panel (because some options are hidden), click the panel menu in the upper-right corner of the panel. (See Figure 1-12.)
- To move a panel group, click and drag above the tabbed panel name.
- To rearrange or separate a panel from its group, drag the panel’s tab. Dragging a tab outside the docking area creates a new, separate panel.
- To move a tab to another panel, drag the tab to that panel.
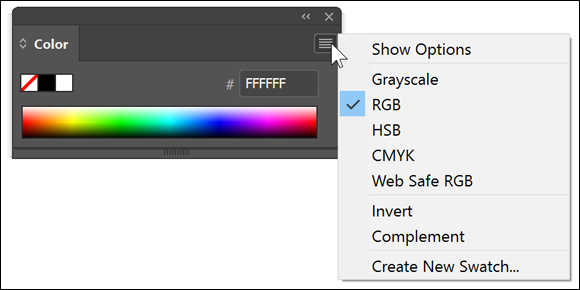
FIGURE 1-12: Many panels have additional menu options.
Look out for those panels — they can take over your screen! Some panels, but not all, can be resized. A panel that you can resize has an active lower-right corner (denoted by three small lines on the PC). To change the size of a panel, drag its lower-right corner (Windows) or drag the size box in the lower-right corner of the panel (Mac).
As you become more efficient, you may find it helpful to reduce the clutter on your screen by hiding all panels except the ones necessary for your work. You can save your own panel configuration by choosing Window ⇒ Workspace ⇒ New Workspace. Choose Window ⇒ Workspace ⇒ Essentials to return to the default workspace. You may need to reset the Essentials workspace if it still doesn’t look like the default. Choose Window ⇒ Workspace ⇒ Reset Essentials.
Changing Views
When you’re working in Illustrator, precision is important, but you also want to see how the artwork looks. Whether for the web or print, Illustrator offers several ways in which to view your artwork:
- Preview and Outline views: By default, Illustrator shows Preview view, where you see colors, stroke widths, images, and patterns as they should appear when printed or completed for onscreen presentation. Sometimes this view can become a nuisance, especially if you’re trying to create a corner point by connecting two thick lines. At times like this, or whenever you want the strokes and fills reduced to the underlying structure, choose View ⇒ Outline. You now see the outline of the illustration, shown in Figure 1-13.
-
Pixel view: If you don’t want to be surprised when your artwork appears in your web browser, use Pixel view. This view, shown in Figure 1-14, maintains the vectors of your artwork but shows how the pixels will appear when the image is viewed onscreen, as though it’s on the web.
Pixel view is helpful for previewing the look of text onscreen — some fonts just don’t look good as pixels, especially if the text is small. In Pixel view, you can review fonts until you find one that’s easily readable as pixels. -
Overprint view: For people in print production, the Overprint preview can be a real timesaver. Choose Window ⇒ Attributes to bring up the Attributes panel, which you can use to set the fill and stroke colors to overprint. This view creates additional colors when printing and aids printers when trapping abutting colors.
Trapping is the slight overprint of a lighter color into a darker color to correct for press misregistration — that is, when the printed colors don’t align exactly. When several colors are printed on one piece, the likelihood of perfect alignment is slim! Setting a stroke to Overprint on the Window ⇒ Attributes panel is one solution. With Overprint selected, the stroke is overprinted on the nearby colors. This mixing of color produces an additional color but is less obvious to the viewer than a white space created by misregistration. Select Overprint (View ⇒ Overprint Preview) to see the result of overprinting in Overprint view, as shown in Figure 1-15. With the Crazy Fish image, the Overprint Stroke is grayed out.
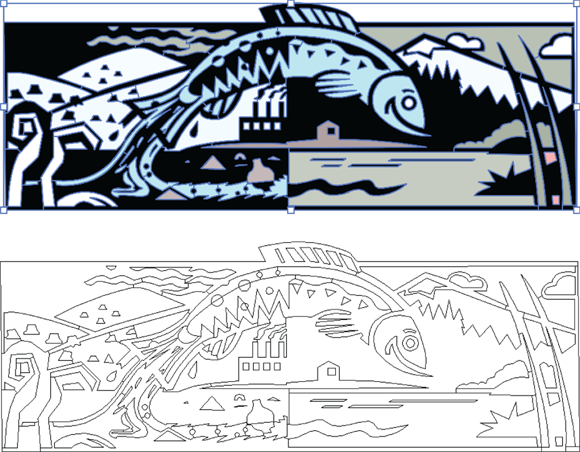
FIGURE 1-13: Preview mode (top) and Outline mode (bottom).

FIGURE 1-14: See how your artwork translates into pixels in Pixel view.

FIGURE 1-15: Overprint view. Image is of the Attributes panel.
Navigating the Work Area with Zoom Controls
You can navigate the work area efficiently by using the Hand tool and the various zoom controls. You can change the magnification of the artboard in several ways, including using menu items, the Zoom tool, and keyboard commands. Choose the method you feel most comfortable with:
-
 Hand tool: Scroll around the Document window by using the scroll bars or the Hand tool. The Hand tool lets you scroll by dragging. You can imagine that you’re pushing a piece of paper around on your desk when you use the Hand tool.
Hold down the spacebar to temporarily access the Hand tool while any tool (except the Type tool) is selected. Holding down the spacebar while the Type tool is selected gives you only spaces!
- View menu: Using the View menu, you can easily select the magnification you want by using Zoom In, Zoom Out, Fit in Window (especially useful when you’re lost in the scratch area), and Actual Size (provides a 100-percent view of your artwork).
 Zoom tool: Using the Zoom tool, you can click the Document window to zoom in; to zoom out, Alt-click (Windows) or Option-click (Mac). Double-click on the Zoom tool to quickly resize the Document window to 100 percent. Control which elements are visible when using the Zoom tool by clicking and dragging over the area you want zoomed into.
-
Keyboard shortcuts: Even if you normally dislike using keyboard shortcuts, you may change your mind about using them for magnification. They make sense and are easy to use and remember. Table 1-2 lists the most popular keyboard shortcuts to change magnification.
The shortcuts in Table 1-3 require a little coordination to use, but they give you more control in your zoom. While holding down the keys, drag from the upper-left corner to the lower-right corner of the area you want to zoom to. A marquee appears while you’re dragging; when you release the mouse button, the selected area zooms to the size of your window. The Zoom Out command doesn’t give you much control; it simply zooms back out, much like the commands in Table 1-2.
TABLE 1-2 Magnification Keyboard Shortcuts
|
Command |
Windows Shortcut |
Mac Shortcut |
Actual Size |
Ctrl+1 |
⌘ +1 |
Fit in Window |
Ctrl+0 (zero) |
⌘ +0 (zero) |
Zoom In |
Ctrl+ + (plus) |
⌘ + + (plus) |
Zoom Out |
Ctrl+ – (minus) |
⌘ +– (minus) |
Hand tool |
Spacebar |
Spacebar |
TABLE 1-3 Zoom Keyboard Shortcuts
|
Command |
Windows Shortcut |
Mac Shortcut |
Zoom In to Selected Area |
Ctrl+spacebar+drag |
⌘ +spacebar+drag |
Zoom Out |
Ctrl+Alt+spacebar |
⌘ +Option+spacebar |