
Chapter 4
Working with Objects
IN THIS CHAPTER
![]() Understanding layers
Understanding layers
![]() Grouping and ungrouping
Grouping and ungrouping
![]() Cloning and duplicating objects
Cloning and duplicating objects
![]() Transforming objects
Transforming objects
![]() Aligning and distributing
Aligning and distributing
Getting used to an unfamiliar interface can be trying. Something as simple as selecting a single object can cause frustration if you do not have a strong background in or an understanding of the way layers and groups work.
In this chapter, you discover how to organize, select, and group your objects in Adobe XD. You also find out how to scale and rotate your objects, as well as align and distribute them evenly.
Getting a Leg Up on Layers
If you are an Adobe Illustrator user, you will recognize that layer features in Adobe XD are very similar. Essentially, layers in XD are meant to help you organize your objects. This makes it easier to select, lock, and duplicate your objects. In this section, you find out how layers work.
Artboards and layers
The best way to explain layers is for you to give it a try yourself. Follow these steps in a document of your own to build confidence in how you use layers in XD:
-
Create a new file by selecting File ⇒ New. Use any size template that you wish.
In this example, we selected the iPhone 6/7 template.
-
Click the Layers icon in the lower-left of the window, as shown in Figure 4-1, to see that the artboard, which was created by default, is shown in the panel labeled Artboards. You can also use the keyboard shortcut Ctrl+Y (Windows) or Command+Y (Mac) to toggle the view of this panel on and off.
At first, you might be wondering why an artboard is listed in the Layers panel, but don’t worry — it will make sense after you start adding objects to this artboard. Note that the artboard has the default name based upon the template you selected and the screen number that is associated with this document. Since this is the first artboard, you see the name iPhone 6/7-1.
-
Select the Artboard tool from the Tools Panel and click anywhere in the work area to add a second artboard.
Note that you now have two artboards listed, with the newest artboard appearing at the top of the list and with a –2 following the template name, as shown in Figure 4-2.
- Keep the file that you started and experiment with some of the other features available in the Artboards panel.
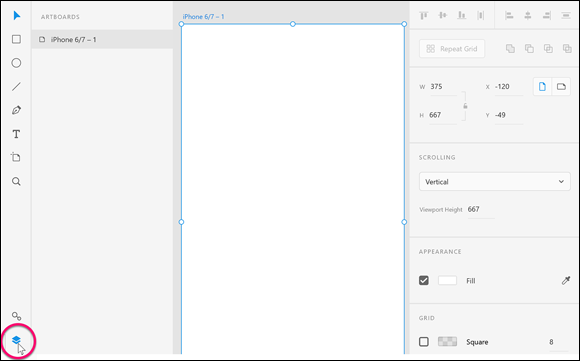
FIGURE 4-1: Click the Layers icon to reveal a panel that displays your default artboard.
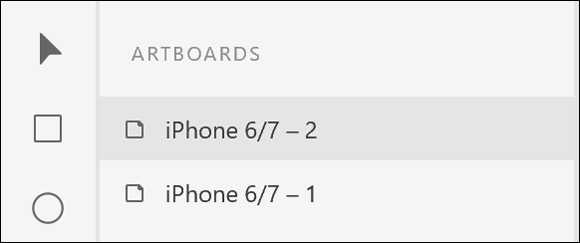
FIGURE 4-2: As you add artboards, they appear at the top of the stacking order.
What can you do with your artboards inside the Artboard panel?
Using the Layers panel that appears when you click on the Layers icon, you can rearrange the stacking order, rename, duplicate, delete, and select artboards.
Rearranging artboards
Click and drag up or down an artboard in the Artboard in the Layers panel in order to move it up or down in the stacking order. If you like working with contextual menus, you can right-click any artboard listed in the Layers panel to see a list of features you can use, including Copy, Paste, Duplicate, Delete, Rename, and Export. Following are other methods you can use to take advantage of these same features.
Renaming your artboards
You can rename your artboards using one of these methods:
- Double-click the Artboard name that appears directly above the artboard, and then type a new name.
- Double-click the Artboard name that appears in the Layers panel, and type a new name, as shown in Figure 4-3.
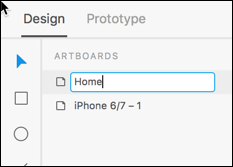
FIGURE 4-3: Double-click the artboard name to activate the textbox and change it.
Copying or duplicating an artboard
To copy your artboard in order to paste it into another document, right-click it and select Copy. Then open a new document or navigate to another open document and choose Edit ⇒ Paste.
To duplicate an artboard, right-click it and select Duplicate. A new artboard immediately appears at the top of the list and in your work area.
You can also duplicate an artboard by holding down the Alt (Windows) or Option (Mac OS) key and dragging the artboard into the work area.
Deleting an artboard
Be careful with deleting artboards. It is very easy to do, because you only have to select an artboard in the Layers panel and press the Delete or Backspace key. Fortunately, this step can be undone using Ctrl+Z (Windows) or Command+Z (Mac OS).
Selecting artboards
Before trying to select artboards, make sure that you have at least three in your project.
- To select an artboard, simply click the artboard name in the Layers panel. You can also click on the artboard name above the artboard to select it.
- To select multiple artboards, click an artboard, and then Shift-click on another. This action selects all artboards in between in the stacking order as well.
- To select artboards that are not contiguous, select an artboard and then hold down the Control+Shift(Windows) or Command+Shift keys and select another.
Objects you create and layers
In the beginning of this section, you pressed an icon that stated Layers, yet the information that has been covered thus far has been about artboards. In this section, you see how objects that you create on these artboards automatically create layers that you can use for organizing your artwork.
Make sure that you have a document open so that you can follow along with these steps:
- Select any shape and click and drag to add it to an artboard. If you do not have your Layers panel activated, make sure to click on the Layers icon in the lower-left side of workspace.
-
Notice that when you add an object to an artboard it becomes visible as a layer in the Layers panel as well. In Figure 4-4, a rectangle shape was added to the iPhone 6/7-2 artboard. In fact, you only see the active artboard and any objects on that artboard.
Note: You only see the active artboard and any objects that are on that artboard. If you want to see another artboard, you can either press the back arrow to the left of the Artboard name in the Layers panel or simply select an object on a different artboard in your work area. This either takes you back to the entire list of artboards, or directly to the artboard with the selected object,
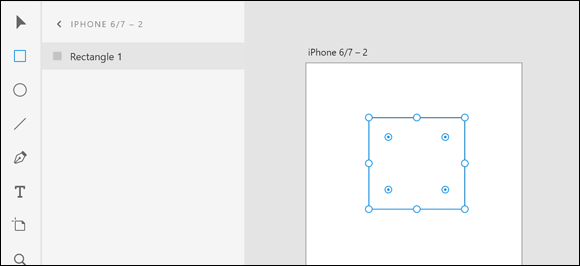
FIGURE 4-4: Objects that have been added to artboards can be viewed as a list in the Layers panel.
After you have placed an object on artboard, you can use the Layers panel to perform many functions, including copying the selected object and pasting an object, as well as duplicating, deleting, renaming, locking, grouping, converting your object to a symbol (covered in Chapter 7 of this minibook), and exporting. You can easily access these options by right-clicking on the object in the Layers panel. If you do not have a right-clicking mouse on your Mac, Ctrl-click to see this same contextual menu, as shown in Figure 4-5.
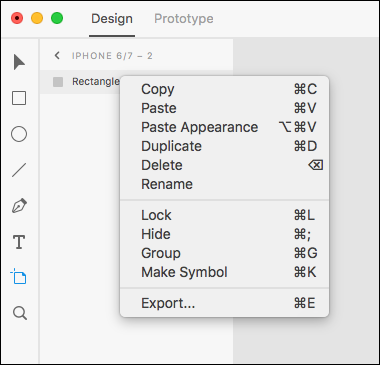
FIGURE 4-5: You can perform many functions with your selected object in the Layers panel.
 If you copy an object, you can use the Layers panel to paste only the attributes of the copied object. For instance, if you copied a red circle with a blue border and then selected a square, you could choose Paste Appearance from the Layers panel and have only the circle’s properties applied, such as the color and the stroke.
In this section, you have an opportunity to review these functions.
Renaming objects
To keep your files organized and make associating interactions easier, consider naming your objects with a logical naming structure. Keep your file names in lowercase, or with just an initial capital, with no spacing to keep it uniform with the typical standard for naming files used in development. Most importantly … name it something you will recognize if you try to select it from a list.
Example might include header_nav or Submit-button.
Selecting objects
As with selecting artboards, you can switch to the Select tool and then click on an object to select it, or you can follow these options for selecting additional objects:
- Using the Select tool, click an object listed in the Layers panel and then Shift+click on any other. Using the Shift key to add to a selection activates any other objects that are in between in the stacking order displayed in the Layers panel.
- Ctrl-click (Windows) or ⌘-click (Mac OS) to select noncontiguous items in the Layers panel.
- Click one object in the artboard and then Shift-click to add additional objects into the selection. When selecting via the artboard, using the Shift key does not select objects in between, as it does in the Layers panel.
- Using the Select tool, click and drag a marquee selection across the items that you want to select, as shown in Figure 4-6. You do not have to fully encompass the object with the marquee … just touching it adds it to the selection.

FIGURE 4-6: Click and drag using the Select tool to activate multiple objects.
Grouping and ungrouping objects
Now that you know how to select multiple objects, it seems a logical time to explain grouping. By grouping object, you can keep them together so that selecting them simultaneously is easier. This is especially important if you are building UI made of several parts, such as a button that consists of a shape, icon, and text, as shown in Figure 4-7.
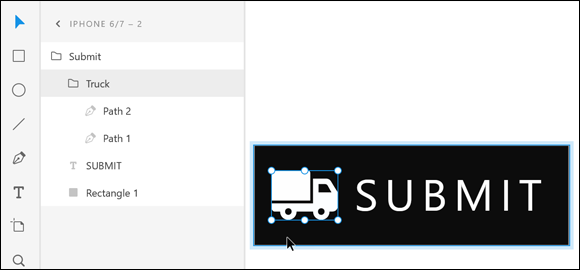
FIGURE 4-7: In this example, there is a group named Truck inside another group named Submit.
You can group objects by selecting them in the Layers panel and then right-clicking to select Group. You can also group by selecting the items on the artboard and then pressing Ctrl+G (Windows) or Command+G (Mac).
Notice that when you first group items they appear as Group in the Layers panel. You can rename this group with a more logical name so you can identify the object(s) as you work. Do this by double-clicking the word Group in the Layers panel and then typing a new name in the activated textbox.
Copying and pasting
Use these features if you want to copy something from one artboard to another or from one project to another. Use any of these options to cut and paste:
- Select an object right in the Layers panel and right-click it. In the contextual menu that appears, select Copy, and then right-click it again to select Paste. The object is duplicated in the same location right on the artboard. If you prefer, you can also use the typical keyboard shorts for copy and paste, which are Ctrl+C for copy and Ctrl+V, for paste (Windows), or Command+C and Command+V (Mac).
- As with artboards, you can duplicate an object by right-clicking it in the Layers panel and selecting Duplicate from the contextual menu that appears.
- Right-click a selected object and choose Copy from the contextual menu; then, go to another location in your project, right-click, and select Paste from the contextual menu in order to duplicate the object. When you copy and paste in XD, the object is pasted exactly on top of itself if you stay on the same artboard. Otherwise, it recalls the exact position and uses those same coordinates if you activate another artboard before pasting.
- You can hold down the Alt (Windows) or Option (Mac) key and drag a selected object in order to clone an object right on the artboard.
Locking an object
In order to keep other objects in position, you may want to lock them as you complete working with them. This is a temporary feature … an object can be unlocked at any time.
You can tell when an object is locked because a lock icon appears in the upper-left corner of the object when it is selected, as shown in Figure 4-8.
FIGURE 4-8: When an object is locked, a lock appears in the upper-left corner.
Use any of these options to lock an object:
- You can lock an object by positioning your mouse to the right of the object’s name in the Layers panel and then clicking on the padlock icon that appears. You can also click in that same location to unlock an object.
- You can lock an item by right-clicking (Windows) or Ctrl-clicking (Mac) and selecting Lock from the contextual menu. After an item is locked, you can choose Unlock from the same menu.
- In order to lock an item while you are working on the artboard, you can choose Object ⇒ Lock from the menu items, or press the keyboard shortcut Ctrl+L (Windows) or Command+L (Mac). The keyboard shortcut is a toggle key, meaning that you can select the locked object and press Ctrl/Command+L again to unlock it.
Hiding an object
You can hide an object to see what is behind it without moving it, or to try various options in your design. To hide an object, follow any of these steps:
The fastest way to hide an object is to click the eye icon that appears when you cross over the area to the right of the named object in the Layers panel. You can see this icon in Figure 4-9.
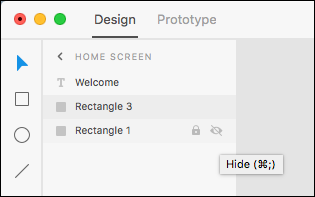
FIGURE 4-9: Turn on and off the visibility of an object by clicking the Hide eye icon in the Layers panel.
Additional features such as exporting and making a symbol are discussed in Chapters 5 and 7, respectively, of this minibook.
Transforming Objects
You can scale and rotate your objects quickly and easily right on the artboard, or you can use a more precise method by using the Properties panel.
Give it a spin
Rotate an object right from the artboard by selecting it with the Select tool and then positioning your cursor outside any of the object’s handles. When you see the curved arrows, shown in Figure 4-10, click and drag in the direction you would like to rotate.
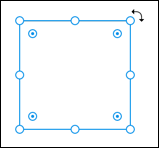
FIGURE 4-10: Click and drag outside an object’s handle in order to rotate it.
Hold down the Shift key while dragging to jump in increments of 15 degrees.
You can also select an object and then enter a value in the Rotation textbox in the Properties panel, shown in Figure 4-11.
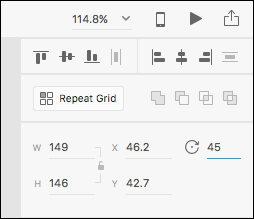
FIGURE 4-11: Enter an exact rotation in the Properties panel.
Aligning and Distributing
After you start creating many objects, you need to consider the position of those objects and how they relate to each other. In order to lessen noise in your design, you want to keep icons and text aligned and distributed in a clean manner. You can check your alignment in several ways, including using a grid or using guides.
Turning on your grid
You can turn on a grid that is only visible to you by following these steps:
- Select an artboard by clicking the artboard in the Layers panel or clicking the Artboard name above the artboard in your work area.
- Check the checkbox for the Grid in the lower portion of the Properties panel, as shown in Figure 4-12.
- If you prefer a different color for your grid, select the square to the right of the grid checkbox and select a color from the color picker. You can also use the Transparency slider to change the level of opacity.
- If you like, change the size of the grid by typing a value in the Grid Size textbox to the right of the checkbox.
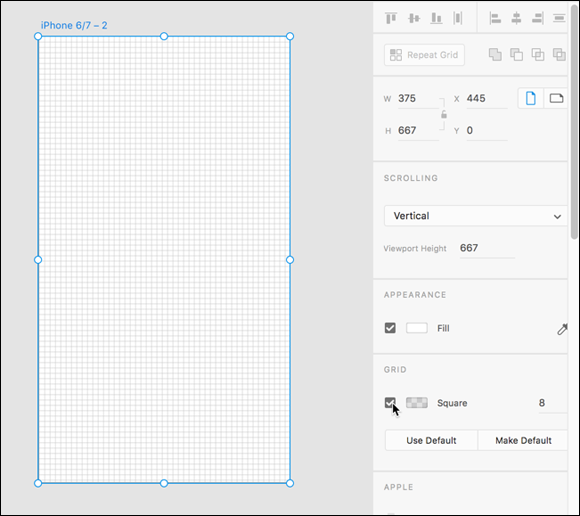
FIGURE 4-12: Turn on the Grid feature for your artboard.
Be smart about your guides
As a default, XD provides you with guides that turn on as needed. These are called Smart Guides and should be familiar to you if you use other Adobe Products.
To use the smart guides, simply pay attention to the lines and shaded areas that appear as you work. Note in Figure 4-13 that when the one diamond is dragged, a guide appears indicating that it is aligned with the diamond on the left.
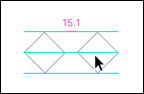
FIGURE 4-13: You can use Smart Guides for aligning objects.
Smart guides can help with distribution as well
Distribution of objects refers to the space between a bounding box created by a first object and a last object. In Figure 4-14, you see uneven distribution of several diamonds on the left, and even distribution of the same objects on the right. In this example, the spacing is evenly distributed horizontally.

FIGURE 4-14: Uneven distribution on the left side and even distribution on the ride side.
When you position objects, you will see shaded areas appear that indicate when the space between the objects is equal. This shading hint also appears when you Alt/Option drag to clone objects, as shown in Figure 4-15.
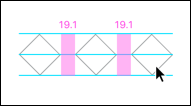
FIGURE 4-15: Smart guides provide a hint when space is even between objects.
Using the Align and Distribute feature
The Align and Distribute feature that is available in the Object menu and in the Properties panel can help you keep items in line and spaced evening.
If you select two items, you can take advantage of the Alignment features. If you select three or more objects, you can also use the Distribution features. See Figure 4-16 for a definition of which each icon in the Properties panel represents.

FIGURE 4-16: A visual definition of the Align and Distribute features in the Properties panel.
Keep in mind the trick to determining horizontal versus vertical. The horizon is horizontal. Anything going from left to right on your page should be distributed horizontally. Any objects going from the top to the bottom should be distributed vertically.