
Chapter 10. Animation with Shape Tweening
Shape tweening in Adobe Flash CS3 Professional works much like motion tweening. You set up a keyframe span (the graphic content of the beginning and ending keyframes must be different in some way), then you set the span’s Tween property to Shape. Flash redraws the graphics for each in-between frame, making the incremental changes that transform the first shape into the final one. Shape tweens can animate changes to the same types of properties as motion tweens (size, color, location, and so on), but shape tweens also animate changes to the path that defines the “shape” of your graphic content.
Flash can shape-tween more than one graphic on a layer, but the results can be unpredictable. When you have several shapes on a layer, there is no way to tell Flash which starting shape goes with which ending shape. By limiting yourself to a single shape tween on each layer, you tell Flash exactly what to change.
Because you’ll be setting the Tween property throughout this chapter, keep the Properties tab of the Property inspector open. Unless otherwise indicated, you can perform the tasks in this chapter using merge-shapes, drawing-objects, or primitives.
Creating a Bouncing Ball with Shape Tweening
Although shape tweens can animate changes in many properties of graphics—color, size, location—the distinguishing function of shape tweening is to transform one shape into another. You could use a shape tween to simply replicate the simple bouncing-ball animation you created in Chapters 8 and 9. A better use of shape tweening for a bouncing ball is to flatten the ball as it strikes the ground.
To define shape tweens via the Frame Properties tab of the Property inspector:
- In a new Flash document, or in a new layer of an existing document, position the playhead in frame 1.
- In the Tools panel, choose the oval tool.
The tool can be in Merge or Object Drawing mode. Do not use the oval-primitive tool.
- Set the stroke to No Color.
- Near the top of the Stage, draw a circle.
This circle will be the ball.
- In the Timeline, select frame 5, and choose Insert > Timeline > Keyframe.
Flash creates a new keyframe that duplicates the preceding keyframe.
- Select frame 10, and choose Insert > Timeline > Keyframe (Figure 10.1).
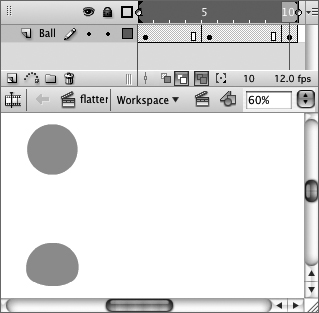
Figure 10.1. To begin setting up the bouncing ball as a shape tween, you create keyframes 1, 5, and 10, just as in the previous chapter.

- In frame 5, select the ball, and drag it to the bottom of the Stage.
- Use the drawing tools to reshape the oval in frame 5, flattening the bottom and elongating it a bit sideways (Figure 10.2).
Figure 10.2. Changing the shape of the ball graphic in the keyframe representing the bottom of the bounce makes the movement appear more natural. The ball seems to respond to gravity by flattening on contact with something solid—say, the floor. (Turn on onion skinning to see the beginning and ending keyframes.)
- To define the shape tween for the first half of the ball’s bounce, in the Timeline, select any of the frames in the first keyframe span (1, 2, 3, or 4).
Note that the ball is selected automatically. When you define a shape tween, the element to be tweened must be selected.
- In the Frame Properties tab of the Property inspector, from the Tween pop-up menu, choose Shape.
The settings for the shape tween appear (Figure 10.3).
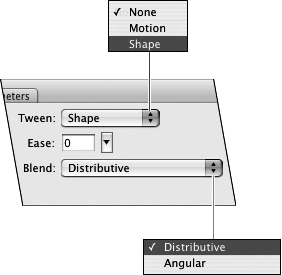
Figure 10.3. When you choose Shape from the Tween pop-up menu, the Frame Properties tab of the Property inspector displays the shape-tween settings.
Flash creates a shape tween in frames 1–4 and color-codes those frames in the Timeline. With Tinted Frames active (choose it from the Frame View pop-up menu at the end of the Edit Bar), Flash applies a light green shade to the frames containing a shape tween. If Tinted Frames is inactive, the frames are white (Mac) or patterned (Windows), but Flash changes the arrow that indicates the presence of a tween from black to green.
- From the Blend menu, choose either of the following options:
• To preserve sharp corners and straight lines as one shape transforms into another, choose Angular.
• To smooth out the in-between shapes, choose Distributive.
- To define the shape tween for the second half of the ball’s bounce, in the Timeline, select any of the frames in the second keyframe span (5, 6, 7, 8, or 9).
- Repeat steps 10–12.
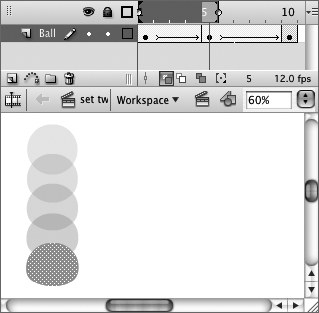
Flash creates the second half of the ball’s bounce with another shape tween (Figure 10.4).
Figure 10.4. With onion skinning turned on, you can see the in-between frames Flash creates for the shape tween. This animation looks similar to the bouncing ball created with a motion tween. In this case, the change in the object’s shape creates the illusion of impact.
Tween sequence for downward bounce
 Tips
Tips
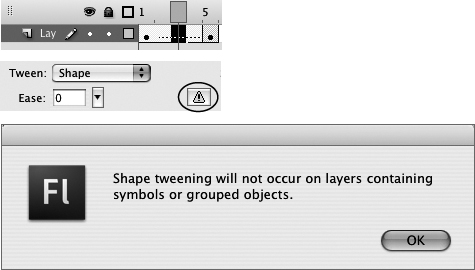
• Flash doesn’t prevent you from defining shape tweens for frames that contain grouped shapes or symbols, but those tweens won’t work. Flash does warn you by placing the broken-tween dotted line in the relevant frames in the Timeline. When you select such frames, a warning button appears in the Frame Properties tab of the Property inspector (Figure 10.5). When you see these warnings, go back to the Stage and reevaluate what’s there. If the item you want to tween is a group or symbol, you can use motion tweening. Or, to use shape tweening, you can break the group or symbol apart (select the shape or symbol, and then choose Modify > Break Apart). If there’s a symbol or group on the same layer as the editable shape you want to tween, move the extra item to its own layer (select it and choose Modify > Timeline > Distribute to Layers).
Figure 10.5. When there are groups or symbols in frames you’re defining as shape tweens, Flash puts a dotted line through the frame span to indicate a broken tween (top), and a warning button appears in the Frame Properties tab of the Property inspector (middle). Click the exclamation-sign button to see the warning dialog (bottom).
• Note that custom-easing settings aren’t available for shape tweens; they’re strictly for motion tweens.
Morphing Simple Lines and Fills
Flash can transform both fill shapes and lines (strokes). In this section, you try some shape-changing tasks with both types of shapes.
To transform an oval into a rectangle:
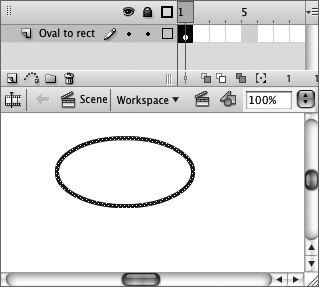
- In a new Flash document, or in a new layer, in frame 1, draw an outline oval on the Stage (Figure 10.6).
Figure 10.6. Draw an oval in the first keyframe of your shape tween.
- In the Timeline, select frame 5, and choose Insert > Timeline > Blank Keyframe.
Flash creates a keyframe but removes all content from the Stage.
- On the Stage, in frame 5, draw an outline rectangle (Figure 10.7).
Figure 10.7. Draw a rectangle in the second keyframe of your shape tween.
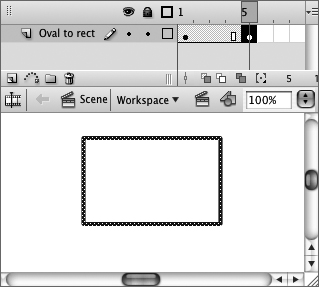
Don’t worry about placing the rectangle in exactly the same location on the Stage as the oval; you’ll adjust the position later.
- In the Timeline, select any of the frames in the keyframe span (1, 2, 3, or 4).
- In the Frame Properties tab of the Property inspector, from the Tween pop-up menu, choose Shape.
Flash transforms the oval into the rectangle in three equal steps—one for each in-between frame (Figure 10.8).
Figure 10.8. When you define frames 1–4 as shape tweens, Flash creates the three intermediate shapes that transform the oval into a rectangle. Turn on onion skinning to see the shapes for the in-between frames.

- To align the oval and rectangle, in the Timeline’s Status bar, click the Onion Skin button or the Onion Skin Outlines button.
Flash displays all the in-between frames.
- In the Timeline, position the playhead in frame 1.
- On the Stage, reposition the oval so that it aligns with the rectangle (Figure 10.9).
Figure 10.9. Use onion skinning to help position your keyframe shapes. Here, with frame 1 selected, you can drag the oval to center it within the rectangle (top). That makes the oval grow into a rectangle without moving anywhere else on the Stage (bottom).
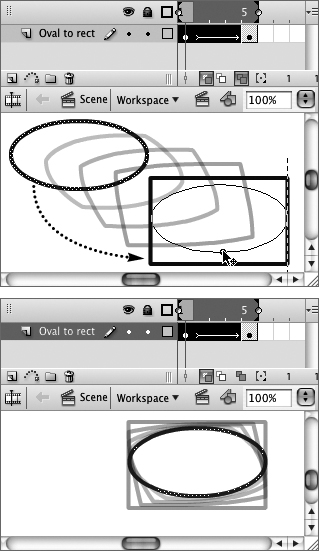
The oval transforms into a rectangle, remaining in one spot on the Stage.
To transform a rectangle into a free-form shape:
- In a new Flash document, or on a new layer, in frame 1, draw a rectangular fill on the Stage.
- In the Timeline, select frame 5, and choose Insert > Timeline > Blank Keyframe.
- On the Stage, in frame 5, use the brush tool to paint a free-form fill.
Don’t make the fill too complex—just a blob or brushstroke with gentle curves.
- In the Timeline, select any of the frames in the keyframe span (1, 2, 3, or 4).
- Set the Tween property to Shape (see step 5 of the preceding task).
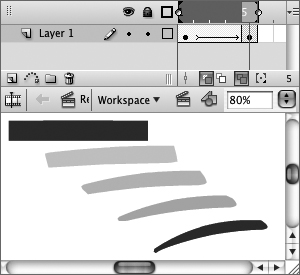
Flash transforms the rectangle into the free-form fill in three equal steps—one for each in-between frame (Figure 10.10).
Figure 10.10. Flash transforms a rectangle into a free-form brushstroke with shape tweening.
Shape-Tweening Multiple Shapes
In motion tweening, Flash limits you to one item per tween, meaning just one item per layer. In shape tweening, however, Flash can handle more than one shape on a layer. The drawback is that you may get some strange results. The simpler and fewer the shapes you use, the more reliable your multiple-shape tweens will be. For the most predictable results, limit yourself to one shape per layer.
You may want to keep both shapes on the same layer for a fill with an outline (stroke), however. As long as the transformation isn’t too complicated, Flash can handle the two together.
To shape-tween fills with strokes (outlines):
- Follow the steps in the preceding tasks to create a shape tween of an outline oval transforming into a rectangle.
- Fill each shape with a different color.
Flash tweens the fill and the stroke together and tweens the change in color (Figure 10.11).
Figure 10.11. Here, Flash transforms a shape with a stroke in five frames. The shape tween changes not only the graphic’s shape, but also its color (from dark to light).

Frame 1

Frame 2

Frame 3

Frame 4

Frame 5
Tips
• You can tween a disappearing act: Make the stroke around a shape (or the shape, or both) get gradually lighter and lighter, until it finally disappears. Make the color of the final stroke (and/or shape) in the tween match the color of the background, or give it a fully transparent color (one with an alpha setting of 0 percent).
• To ensure that the item in the preceding tip does fully disappear (some low-color monitors may not display tint and alpha changes accurately), select the frame following the last keyframe of the tween sequence. Choose Insert > Timeline > Keyframe to duplicate the previous keyframe; then delete your disappearing stroke (or shape). If you want both the shape and its stroke to disappear together, choose Insert > Timeline > Blank Keyframe.
When Multiple-Shape Tweens on a Single Layer Go Bad
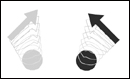
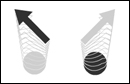
If you’re shape-tweening stationary elements, you probably can get away with having several on the same layer. But if the elements move around much, Flash can get confused about which shape goes where. Although you may intend the paths of two shapes to cross, Flash creates the most direct route between the starting shape and the ending one. Figure 10.12 illustrates the problem.
Figure 10.12. Tweening multiple shapes whose paths don’t cross in a single layer works fine. In the left-hand image, both objects are on the same layer, and the light circle transforms into the light arrow without a hitch. In the middle image, both objects are on the same layer, but Flash transforms the light circle into the dark arrow and the dark circle into the light arrow because that’s the most direct path. If you want to create diagonal paths that cross, you must put each object on its own layer, as in the right-hand image.
All objects on one layer
All objects on one layer

Transforming a Simple Shape into a Complex Shape
The more complex the shape you tween, the more difficult it is for Flash to create the expected result. You can help Flash tween better by using shape hints—markers that let you identify points on the path of the original shape that correspond to points on the path of the final shape.
To shape-tween a more complex shape:
- In a new Flash document, or on a new layer, in frame 1, draw an oval with no stroke on the Stage.
- In the Timeline, select frame 5, and choose Insert > Timeline > Keyframe.
Flash duplicates the contents of keyframe 1 in keyframe 5.
- In the Timeline, select any of the frames in the keyframe span (1, 2, 3, or 4).
- In the Frame Properties tab of the Property inspector, from the Tween pop-up menu, choose Shape.
- In the Timeline, position the playhead in frame 5.
- Using the selection tool or the pen and subselection tools, drag four corner points in toward the center of the oval to create a flower shape.
(For more detailed instructions on editing shapes, see Chapter 4.)
- Play the movie to see the shape tween.
Flash handles the tweening for this change well (Figure 10.13). It’s fairly obvious which points of the oval should move in to create the petal shapes. If you modify the shape further, however, it becomes more difficult for Flash to know how to create the new shape. That’s when you need to use shape hints.
Figure 10.13. Flash handles the tween from an oval to a simple flower shape without requiring shape hints.

Frame 1

Frame 2

Frame 3

Frame 4

Frame 5
- Using the animation you created in the preceding task, in the Timeline, select frame 10, and choose Insert > Timeline > Keyframe.
Flash duplicates the flower shape in a new keyframe.
- In keyframe 10, edit the flower to add a stem.
Reshape the flower’s path with the selection tool or the pen and subselection tools, or add a stem with a brushstroke in the same color as the flower.
- Define a shape tween for frames 5–9.
- Play the movie.
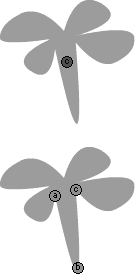
The addition of the stem to the flower makes it difficult for Flash to create a smooth tween that looks right (Figure 10.14).
Figure 10.14. The addition of a stem to the flower overloads Flash’s capability to create a smooth shape tween. Frames 7 and 8 are particularly bad.

Frame 5

Frame 6

Frame 7

Frame 8

Frame 9

Frame 10
- To begin adding shape hints, position the playhead in keyframe 5 (the initial keyframe of this tweening sequence).
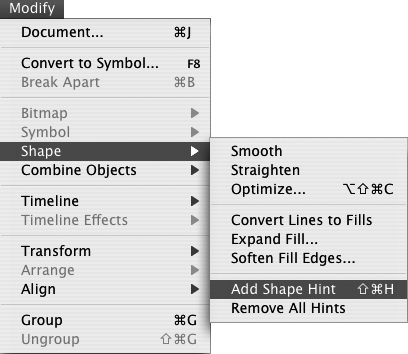
- Choose Modify > Shape > Add Shape Hint, or press Shift-
 -H (Mac) or Ctrl-Shift-H (Windows) (Figure 10.15).
Figure 10.15. Choose Modify > Shape > Add Shape Hint to activate markers that help Flash make connections between the original shape and the final shape of the tween.
Flash places a shape hint—a small red circle labeled with a letter, starting with a—in the center of the object in the current frame. You need to reposition the shape hint to place it on a problem point on the shape’s path.
- With the selection tool, drag the shape hint to a problem point on the edge of the shape.
As you drag, Flash previews the hint’s position with a circle icon; the circle gets darker and thicker when it connects with the path. Don’t worry about getting the shape hint in exactly the right spot; just make sure it is on the path. You can fine-tune its position later.
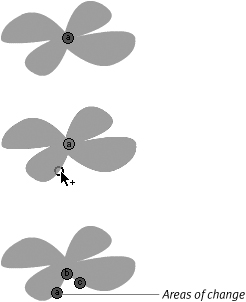
- Repeat steps 6 and 7 until you have placed shape hints on all the problem points of your shape in keyframe 5 (Figure 10.16).
Figure 10.16. Start adding shape hints in the first keyframe of a tween sequence. Flash places the hints in the center of the tweened object (top). You must drag the hints into position (middle). Distribute the hints in alphabetical order along the object’s path, placing them on crucial points of change (bottom). Here, the three points with hints a, b, and c define the points from which the stem of the flower will grow.
Each time you add a shape hint, you get another small red circle labeled with a letter. You can’t place the hints at random; you must place them so they go in alphabetical order around the edge of the shape. (Flash does the best job when you place shape hints in counterclockwise order, starting in the upper-left corner of the shape, but you can also place them in clockwise order.)
- In the Timeline, position the playhead in keyframe 10.
Flash has already added shape hints to this frame; they all stack up in the center of the shape.
- With the selection tool, drag each shape hint to its position on the path of the new shape.
Keep them in the same order (counterclockwise or clockwise) you chose in step 8 (Figure 10.17). When the end-of-tween shape hint is sitting on a path, the hint changes from red to green; if you select the initial keyframe of the span, you can see that the associated beginning-of-tween hint has turned yellow.
Figure 10.17. To complete the placement of shape hints, select the second keyframe of your tween sequence. Flash stacks up hints corresponding to the ones you placed in the preceding keyframe (top). You must drag them into the correct final position (bottom).
- To evaluate the improvement in tweening, play the movie.
- To fine-tune the shape hints’ positions, select one of the tween’s keyframes, and turn on Onion Skin mode.
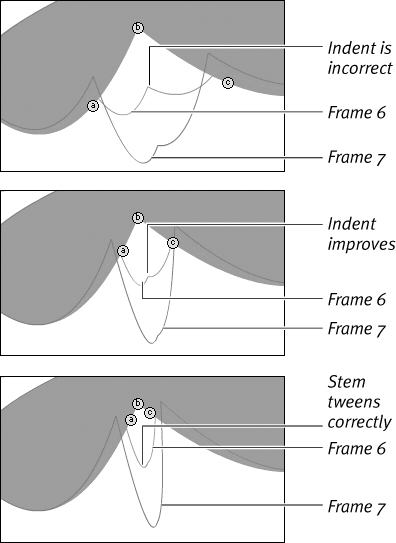
Set the onion markers to include all the frames of the tween. Where the onion skins reveal rough spots in the tween, you may need to match the hint position better from the first keyframe to the last one (Figure 10.18). Repositioning the shape hints changes the in-between frames. You may need to adjust the shape hints in both keyframes. If you still can’t get a smooth tween, try adding more shape hints.
Figure 10.18. It can be difficult to match up points in the two keyframes exactly when you first place the shape hints. When you’ve positioned the hints in the beginning and ending keyframes of a sequence, turn on onion skinning to see where you need to adjust the placement of your hints. With the initial placement, Flash starts the stem growing with an indent at the bottom (top). Moving the points closer together improves the tween (middle). When the onion skins reveal a smooth tween, you’re done (bottom).
Tips
• To remove a single shape hint, make the initial keyframe the current frame. Select the shape hint you want to remove, and drag it out of the document window. Or, Control-click (Mac) or right-click (Windows) the shape hint, and choose Remove Hint.
• To remove all the hints at the same time, with the initial keyframe current, choose Modify > Shape > Remove All Hints. Or ![]() -click (Mac) or Ctrl-click (Windows) any shape hint, and choose Remove All Hints.
-click (Mac) or Ctrl-click (Windows) any shape hint, and choose Remove All Hints.
• Onion skins don’t always update correctly when you reposition shape hints. Clicking a blank area of the Stage forces Flash to redraw the onion skins.
• If you can’t create a smooth tween using shape hints alone, break the tween into smaller pieces by adding keyframes where the morphing gets off track. Then redraw the shapes for those frames yourself.
The Pitfalls of Primitive Tweens
Although you can create shape tweens using oval- or rectangle-primitives, you’re likely to find the animation Flash creates with them to be a bit disappointing. When you use a primitive’s control points to change the primitive’s path on the Stage, there is a sense of motion as the shape redraws itself. Drag the control point for the start or end angle of an oval-primitive, and the preview radius line rotates like the minute hand of a clock. As Flash redraws the shape, there is feeling of rotation, as if you’re opening and closing a folding paper fan. You might think that shape-tweening the primitive-oval would recreate that motion. But Flash doesn’t animate the manipulation of control points when it tweens the shape; instead, Flash animates changes to the paths of the merge-shapes that lie at the foundation of the primitives (Figure 10.19). You may be able to add shape hints to achieve the look you want, or at least improve the transition. But more likely, you will need to break the primitive apart and add keyframes—or use a combination of frame-by-frame animation, motion tweens, and shape tweens—to create the feel you’re going for.
Figure 10.19. When you reposition control points to change the start and end angles of an oval-primitive, you drag the control points in an arc clockwise or counterclockwise. Flash can’t animate that rotating motion in a single shape-tween; Flash can only animate the change in the path—in this case, from a full oval to an oval with a wedge removed (top). Shape hints can help Flash create a cleaner transition from the first shape to the second (bottom), but shape hints aren’t enough to make Flash create the feeling of rotating and opening.
![]()
Shape tween, no shape hints

Shape tween, shape hints added
Creating Shapes That Move As They Change
You can’t create shape tweens that follow a path, but you can move shapes around the Stage in straight lines. To do so, reposition the elements on the Stage from one keyframe to the next.
To shape-tween a moving graphic:
- In a new Flash document, or on a new layer, select frame 20, and choose Insert > Timeline > Frame.
Flash adds blank in-between frames 2 through 20.
- In the Timeline, select any frame in the span (frames 1–20).
Note that you must click the frame to select it; you can’t just position the playhead in the frame.
- In the Frame Properties tab of the Property inspector, from the Tween pop-up menu, choose Shape.
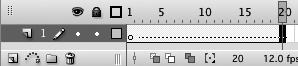
Even though you have no shapes on the Stage to tween yet, Flash gives the frames the shape-tween property. In the Timeline, the frames contain a dotted line, indicating that the tween is incomplete (Figure 10.20). Now you can add keyframes and shapes.
Figure 10.20. To save yourself numerous trips to the Tween pop-up menu in the Frame Properties tab of the Property inspector, you can assign the shape-tween property to a range of frames and add keyframes and shapes later. Flash defines a shape tween even though there’s no content to tween yet.
- In the Timeline, insert a blank keyframe at frames 5, 10, 15, and 20.
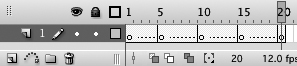
Flash creates four shape-tween sequences (Figure 10.21). For the moment, they’re broken tweens because the keyframes are empty.
Figure 10.21. When you insert keyframes into a long tween sequence, Flash breaks it into smaller tween sequences. Until you place content in the keyframes, the Timeline displays the dotted line in each span to indicate a broken tween.
- To complete the tween sequences, in each keyframe, draw a different shape; place each one in a different corner of the Stage.
In frame 1, for example, draw a circular fill in the bottom-left corner of the Stage. In keyframe 5, draw a rectangular fill in the top-right corner of the Stage. In keyframe 10, draw an oval in the bottom-right corner of the Stage. In keyframe 15, draw a star in the top-left corner of the Stage. And in keyframe 20, duplicate keyframe 1’s circle in the bottom-left corner of the Stage. For extra variety, give each object a different color. As you add content to keyframes, Flash fills in the spans in the Timeline with tween arrows.
- Play the movie.
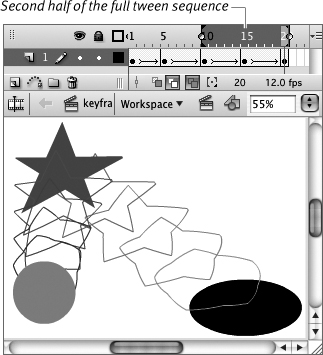
You see a graphic that bounces around the Stage, morphing from one shape to the next (Figure 10.22).
Figure 10.22. Place a different shape in a different location in each keyframe. Flash creates the intermediate steps necessary to transform the shapes and move them across the Stage. Play the movie or turn on onion skinning to examine the motion and shape changes on the in-between frames. (Here, Edit Multiple Frames is also on, making it easy to see the keyframe shapes.)
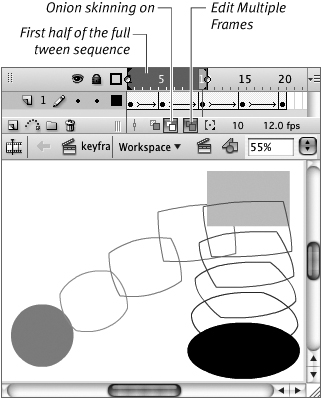
Tips
• Although shape-tweened objects can’t follow a path the way motion-tweened objects can, you can make Flash do the work of creating the separate keyframes you need to animate shape tweens that move on curved paths. First, create your shape tween. In the Timeline, select the full range of frames in the tween sequence. Choose Modify > Timeline > Convert to Keyframes. Flash converts each in-between frame (with its transitional content) into a keyframe. Now you can position each keyframe object anywhere you like. To simulate a motion guide, create a regular guide layer (see Chapter 6), and draw the path you want your morphing shape to follow. Choose View > Snapping > Snap to Objects. Reposition the shape in each keyframe. When you drag a shape close to the line on the guide layer, Flash snaps the shape to the line.
• Alternatively, to animate a changing shape that follows a path, you can create a shape tween, save that animation as a movie-clip symbol, then create a new motion tween using that symbol and a motion guide. You’ll learn about saving animation as movie-clip Symbols in Chapter 11.