Chapter 11. More-Complex Animation Tasks
You’ve learned to manipulate shapes and animate them one at a time, in a single layer, but Adobe Flash CS3 Professional is capable of handling much more complicated animation tasks. To create complex animated movies, you’ll need to work with multiple shapes and multiple layers. You may even want to use multiple scenes to organize long animations. In this chapter, you learn to work with multiple layers in the Timeline, stack animations on the various layers to create more-complex movement, and save animations as reusable elements for easy manipulation—either as animated graphic symbols or as movie-clip symbols. With these techniques, you can really start to bring your animations to life.
Understanding Scenes
If the Timeline is the table of contents for the “book” of your movie, scenes are the chapters. A Flash project requiring lots of animation may include hundreds of frames. You can break the animation into smaller chunks by creating scenes. When you publish a movie from a regular Flash document, the scenes play back in order unless you use the interactivity features to provide instructions for playing the scenes in a different order. (To learn more about interactivity in Flash movies, see Chapters 12 and 13.) Flash’s Scene panel makes it easy to see what scenes exist in your movie, create new scenes, delete scenes, and reorganize them.
To access the Scene panel:
• If the Scene panel isn’t open, choose Window > Other Panels > Scene.
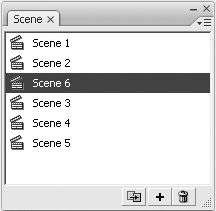
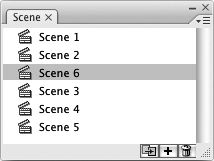
The Scene panel appears. In a new Flash document, the Scene panel lists only the default Scene 1. When you add scenes to a movie, the Scene panel lists all the movie’s scenes in order (Figure 11.1).
Figure 11.1. The Scene panel lists all the scenes in a movie. It also provides buttons for adding, duplicating, and deleting scenes.

To add a scene:
Do either of the following:
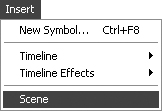
• Choose Insert > Scene (Figure 11.2).
Figure 11.2. To add a new scene to your Flash document, choose Insert > Scene (top) or, in the Scene panel, click the Add Scene button (bottom).
![]()
• In the Scene panel, click the Add Scene button.
Flash adds another scene, giving it the default name Scene 2.
To select a scene to edit:
• Click the Edit Scene button in the Edit bar.
A pop-up menu of scenes appears; select a scene from the list.
• From the scrolling list in the Scene panel, select a scene.
Flash displays the selected scene on the Stage, puts the scene name in the current-scene box in the Edit bar, and places a check next to that scene’s name in the Edit Scene pop-up menu (Figure 11.3).
Figure 11.3. The Edit bar displays the name of the current scene. Choose a scene from the Edit Scene pop-up menu to switch scenes quickly.

- In the Scene panel, click the Delete Scene button.
A dialog appears, asking you to confirm that you want to delete the selected scene (Figure 11.4).
Figure 11.4. When you delete a selected scene (top), Flash asks you to confirm the deletion (bottom).


- Click OK.
Flash deletes the scene, removing it from the Edit Scene pop-up menu in the Edit bar as well as from the scrolling list in the Scene panel.
 Tip
Tip
• If you don’t want to see the warning dialog when you delete a scene, ![]() -click (Mac) or Ctrl-click (Windows) the Delete Scene button in the Scene panel.
-click (Mac) or Ctrl-click (Windows) the Delete Scene button in the Scene panel.
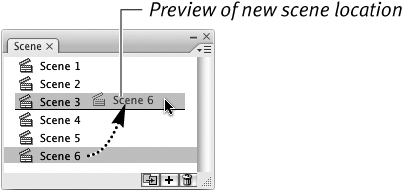
To change the scene order:
• In the Scene panel, drag a selected scene name up or down in the list.
Flash moves the clapper icon and scene name. In Windows, a highlighted line previews the new location for the scene; on the Mac, the highlight line underscores the name of the scene that will follow the scene you’re repositioning (Figure 11.5).
Figure 11.5. Dragging a scene name in the Scene panel changes the order of scenes. In Windows, a horizontal bar previews the new location for the scene; on the Mac, the bar underlines the scene that will follow the scene you’re dragging. When the scene is in the correct location, release the mouse button.

Drag to reposition scene
Reordered scenes
Drag to reposition scene
Reordered scenes
- In the Scene panel, double-click the name of the scene that you want to rename.
The Name field activates for entering text.
- Type the new name in the Name field.
- Press Enter.
or
Click outside the text-entry field.
Manipulating Frames in Multiple Layers
As your animation gets more complex, you’ll need to add layers to your document. You can perform editing operations on selected frames and layers, for example, by copying, cutting, and pasting frames across multiple layers. You can also insert frames, keyframes, and blank keyframes into selected frame spans and layers.
To select and copy frames in several layers:
- Create a Flash document that contains three layers, each with 20 frames.
Place content in the layers to help you see what’s going on as you work with the various frames and layers. Use the text tool, for example, to place the frame number in every other frame of layer 1 and to place a text block with the name of the layer in layers 2 and 3.
- In the Timeline in layer 3, to make frame selections, do either of the following:
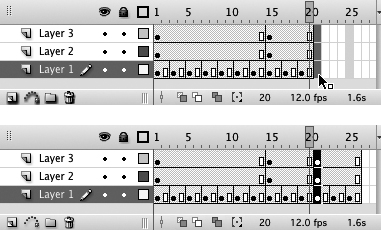
• In frame-based selection mode, click and drag as though you were drawing a selection rectangle from frame 5 through frame 10 in all three layers.
• In span-based selection mode,
 -click (Mac) or Ctrl-click (Windows), and drag to select a range of frames.
Flash highlights the selected frames (Figure 11.6).
Figure 11.6. In frame-based selection mode, click and drag across frames and layers (top) to select frames in those layers (bottom).
- Choose Edit > Timeline > Copy Frames.
Flash copies the frames and layer information to the Clipboard.
Tip
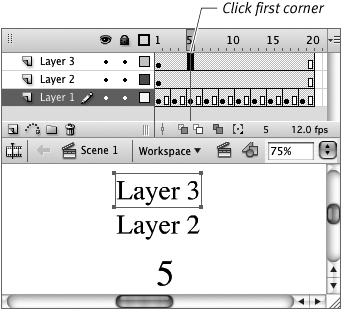
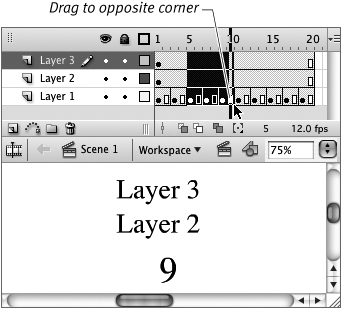
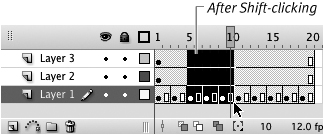
• To select a block of frames that spans several layers without dragging, in frame-based selection mode, click a frame at one of the four corners of the block. Then Shift-click the frame at the opposite corner. Flash selects all the frames in the rectangle that you’ve defined (Figure 11.7). In span-based selection style, ![]() -click (Mac) or Ctrl-click (Windows) one corner, and then Shift-
-click (Mac) or Ctrl-click (Windows) one corner, and then Shift-![]() -click (Mac) or Ctrl-Shift-click (Windows) the opposite corner to make your selection.
-click (Mac) or Ctrl-Shift-click (Windows) the opposite corner to make your selection.
Figure 11.7. To select a block of frames without dragging, in frame-based selection mode, click one corner of the block; then Shift-click the opposite corner to define the block. In span-based selection mode, ![]() -click (Mac) or Ctrl-click (Windows) the first corner, and then Shift-
-click (Mac) or Ctrl-click (Windows) the first corner, and then Shift-![]() -click (Mac) or Ctrl-Shift-click (Windows) the opposite corner of your selection block.
-click (Mac) or Ctrl-Shift-click (Windows) the opposite corner of your selection block.

To replace the content of frames with a multiple-layer selection:
- Continuing with the document you created in the preceding task, select frames 15–20 on all three layers.
- Choose Edit > Timeline > Paste Frames.
Flash pastes the copied frames 5–10 into frames 15–20 in each of the three layers. The numbers on the Stage in layer 1 now start over with 5 at frame 15, 7 at frame 17, and 9 at frame 19.
To paste a multiple-layer selection into blank frames:
- Continuing with the document you created in the preceding task, select frame 21 on all three layers.
- Choose Edit > Timeline > Paste Frames.
Flash pastes the copied frames 5–10 into protoframes 21–26 in each of the three layers (Figure 11.8). Layer 1 now displays the number 5 at frame 21, 7 at frame 23, and 9 at frame 25.
Figure 11.8. Pasting a multiple-layer, multiple-frame selection at the end of a set of defined frames (top) extends the Timeline to accommodate the new frames and layers (bottom).
To paste a multiple-layer selection into a new scene:
- Continuing with the document you created in the preceding task, insert a new scene, following the instructions in the first section of this chapter.
By default, the new scene has one layer and one keyframe.
- Select keyframe 1.
- Choose Edit > Timeline > Paste Frames.
Flash pastes the copied selection from the first scene (frames 5–10 on layers 1–3) into the new scene. Flash adds layers 2 and 3 and creates frames 1–6 in each layer (Figure 11.9). Layer 1 now displays the number 5 at frame 1, 7 at frame 3, and 9 at frame 5.
Figure 11.9. When you paste a multiple-layer, multiple-frame selection into the first frame of a new scene (top), Flash creates new layers and frames to hold the contents of the Clipboard (bottom).

Animating Multiple Motion Tweens
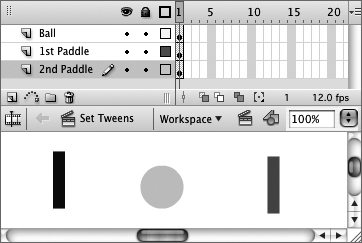
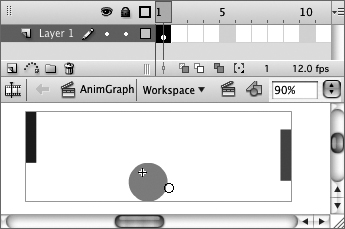
As you learned in Chapter 9, Flash can motion-tween only one item per layer. You can tween multiple items simultaneously; you just have to put each one on a separate layer. You can use Onion Skin and Edit Multiple Frame modes to make sure all the elements line up in the right place at the right time. To get a feel for tweening multiple items, try combining three simple motion tweens to create a game of Ping-Pong. One layer contains the ball; the other layers each contain a paddle.
To set up the three graphics in separate layers:
- Open a new Flash document, and add two new layers.
- Rename the layers.
Name the top layer Ball, the next layer 1st Paddle, and the bottom layer 2nd Paddle. Naming the layers helps you keep track of the elements and their locations.
- Create the graphics as symbols (see Chapter 7).
On the Stage, in the Ball layer, use the oval tool to create a ball; in the layer named 1st Paddle, use the rectangle tool to create a paddle; and then copy the paddle and paste the copy into the layer named 2nd Paddle. Give each shape a different color. Your file should look something like Figure 11.10.
Figure 11.10. To have several graphics motion-tween simultaneously, you must place each one on a separate layer. Here, each item is on a separate layer. The descriptive layer names help you keep track of what goes where.
To set up the tween in all layers with one command:
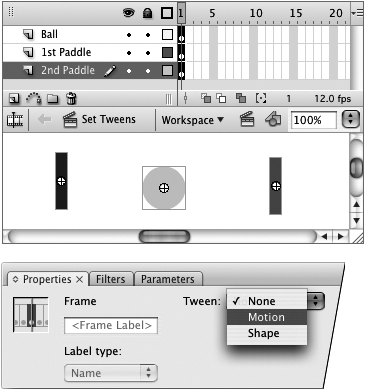
- Using the document you created in the preceding task, in the Timeline, select keyframe 1 in all three layers.
- In the Frame Properties tab of the Property inspector, from the Tween pop-up menu, choose Motion.
Flash gives all the frames the motion-tween property (Figure 11.11).
Figure 11.11. With frames selected on multiple layers (top), choosing Motion as the Tween property in the Frame Properties tab of the Property inspector (bottom) sets up motion tweens on all the layers.
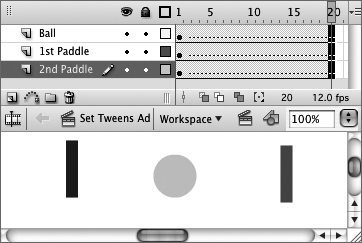
- In the Timeline, select frame 20 in all three layers.
- Choose Insert > Timeline > Frame.
Flash extends the motion tween through frame 20 on all three layers. A dotted line across the frames indicates an incomplete motion tween (Figure 11.12). Reposition the symbols and create keyframes to complete the tweens.
Figure 11.12. The frames on all three layers have a Tween property of Motion, but the tweens are broken, as indicated by the dotted lines. You must add keyframes and content.
Tip
• Currently, all layers in this Flash document have a Tween property of Motion. If you add more frames later, they will also be set to Motion. To completely end the tweening sequences, remember to set the Tween property of the last keyframe in each layer to None.
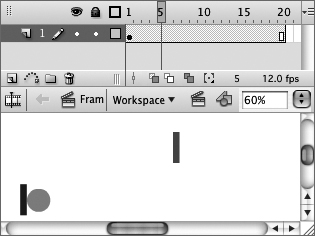
To adjust the positions of the tweened items:
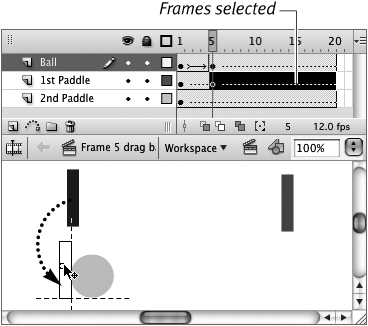
- Using the document you created in the preceding task, in the Timeline, position the playhead in frame 5.
- On the Stage, drag the ball to the approximate location where it should connect with one of the paddles for the first hit.
Flash makes Ball the active layer and creates a keyframe (in frame 5) for the ball in its new location (Figure 11.13). Flash completes the motion tween between keyframe 1 and keyframe 5 of the Ball layer and leaves the broken-tween line in all the other frames.
Figure 11.13. Moving a graphic in a frame that’s defined as part of a motion tween causes Flash to make the layer containing the graphic the active layer (top). Flash creates a keyframe in that layer for the graphic’s new position, thus completing one tween sequence (bottom).

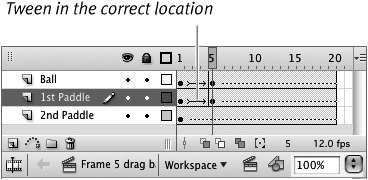
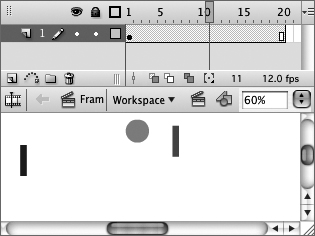
- On the Stage, reposition the first paddle graphic so that the paddle connects with the ball for the first hit.
Flash makes 1st Paddle the active layer and creates a keyframe (in frame 5) for the paddle in its new location (Figure 11.14).
Figure 11.14. As you reposition the paddle (top), Flash appears to be selecting the wrong set of frames; but when you release the mouse button, Flash correctly tweens frames 1–4 (bottom).
- In the Timeline, position the playhead in frame 10.
- On the Stage, drag the ball to the approximate location where you want it to connect with a paddle for the second hit.
Flash makes Ball the active layer and creates a keyframe (in frame 10) for the ball in its new location. Flash completes the motion tween between keyframe 5 and keyframe 10 of the Ball layer.
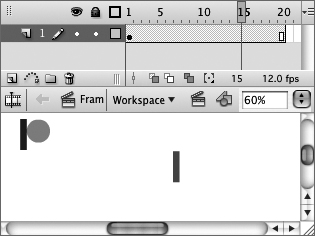
- On the Stage, reposition the second paddle so that it connects with the ball for the second hit.
Flash makes 2nd Paddle the active layer and creates a keyframe (in frame 10) for the paddle in its new location (Figure 11.15).
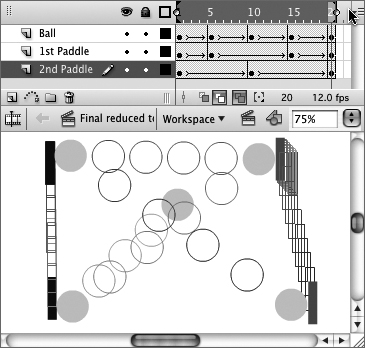
Figure 11.15. Moving an element in another frame creates another tween. Here, the paddle on the right side appears to move more slowly than the paddle on the left side, because Flash is creating a ten-frame tween for the right paddle, whereas the left paddle tweens in five frames. (Here onion skinning is turned on to make the tweened shapes visible.)

- Repeat steps 1–6, creating keyframes 15 and 20, to make the ball connect with each paddle one more time.
- Play the movie to see the animation in action.
- Select Onion Skin Outlines and Edit Multiple Frames, and then reposition objects as necessary to fine-tune the motion (Figure 11.16).
Figure 11.16. You can easily fine-tune the location of objects by selecting Onion Skin Outlines and Edit Multiple Frames. Here, the paddle on the right doesn’t move in a straight line. If you want it to do so, reposition the paddle graphics in the first and final frames so that one lies directly above the other; then reposition the ball so that it comes into contact with both paddles.
Although Edit Multiple Frames doesn’t show onion skins for keyframes, it does show them for tween graphics.
Tips
• After you define a set of frames as tweens, any slight change you make to an object causes Flash to create a new keyframe. Even clicking and holding more than a second or two causes Flash to insert a keyframe. So that you don’t change objects’ positions or create new keyframes accidentally, lock or hide the layers that you’re not working on.
• To position items on the Stage with greater precision than dragging allows, select an item and use the Properties tab of the Property inspector or the Info panel to set the item’s x and y coordinates.
• If you like to use Snap Align, Flash’s default setting, to help you position items, you’ll notice that sometimes in the preceding task, the snapping guides don’t appear as you drag graphic elements in in-between frames whose Tween property is set to Motion. These guides work best when all objects involved are in keyframes. If the guides aren’t appearing for you, drag items to approximate locations initially. Once Flash has created the new keyframes, you can drag your elements, and the guidelines will appear.
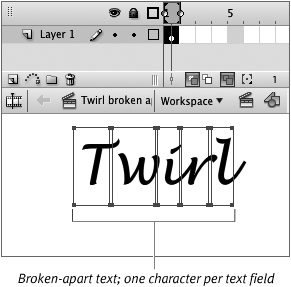
You can use the multiple–motion tween idea to animate individual characters within a piece of text. After you create the text that you want to animate, select it and choose Modify > Break Apart. That command places each character in its own text field. Next, with each character of the text selected, choose Modify > Timeline > Distribute to Layers. Each character winds up on its own layer. Now use any of the animating techniques you learned in Chapters 8 and 9, or in earlier tasks in this chapter, to animate the individual text characters (Figure 11.17).
Figure 11.17. Using Flash’s Modify > Break Apart command in conjunction with the Modify > Timeline > Distribute to Layers command, you can set up tweens quickly to animate individual text characters. Each letter in this animated text is a motion tween.

To transform the shapes of the letters, you need to use shape tweening. That means converting the letters from editable text elements to editable graphics. Select one or more text fields containing individual letters, and choose Modify > Break Apart. The letterforms look the same, but now they’re raw shapes that you can modify with the drawing tools and use in shape tweens. Shape-tweening letters can get pretty complex. Remember to use shape hints (see Chapter 10) to help Flash make the transition between shapes correctly.
Animating Shape Tweens in Multiple-Shape Graphics
An important thing to remember about complex shape tweens is that Flash deals most reliably with a single shape tween on a layer. In the following tasks, you create a multipart, multilayer graphic and shape-tween the whole package simultaneously.
To create shape tweens on separate layers:
- Open a Flash document, and add two new layers.
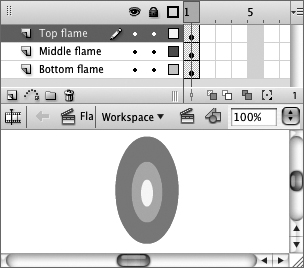
- Rename the layers Top Flame, Middle Flame, and Bottom Flame.
Naming the layers helps you keep track of the objects and their locations.
- Create the shapes.
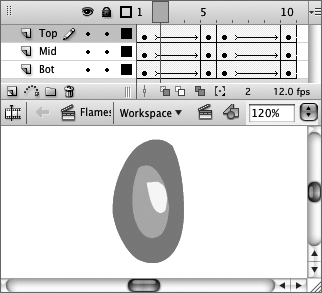
On the Stage, use the oval tool to create three concentric oval shapes without strokes. In the Bottom Flame layer, create a large oval; in the Middle Flame layer, create a medium oval (center it over the first oval); in the Top Flame layer, create a small oval (center it over the medium oval). Give each oval a different color. Your file should look something like Figure 11.18.
Figure 11.18. Create each part of a multiple-element shape tween on a separate layer. Name the layers to help you track what goes where.
- Select frame 5 in all three layers.
- Choose Insert > Timeline > Keyframe.
Flash creates a keyframe with the same content as keyframe 1 for each layer.
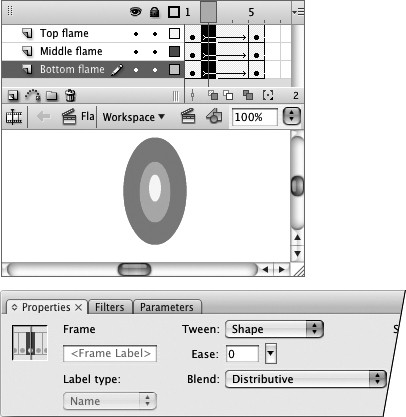
- In the Timeline, select any of the frames in the keyframe 1 span (1, 2, 3, or 4) in all three layers.
- In the Frame Properties tab of the Property inspector, from the Tween menu, choose Shape.
Flash gives the shape-tween property to frames 1–4 on all three layers (Figure 11.19). To create flickering flames, you need to reshape the ovals in keyframe 5.
Figure 11.19. When you select multiple frames, you can set the tweening property for those frames simultaneously by choosing a property from the Tween pop-up menu in the Properties tab of the Property inspector.
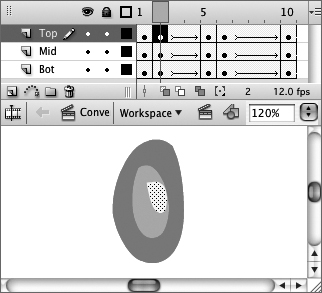
- In the Timeline, position the playhead in keyframe 5.
- On the Stage, edit the ovals to create flame shapes.
- Play the movie to see the animation in action.
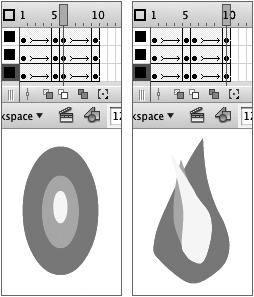
Flash handles the shape-tweening of each layer separately. For comparison, try creating the oval and flame shapes on a single layer and then shape-tweening them (Figure 11.20).
Figure 11.20. No matter whether you use merge-shapes or drawing objects, if you put the three flames on separate layers (left), Flash does a reasonable job of tweening even when you don’t add shape hints. With all three flame shapes on a single layer (right), Flash has difficulty creating the tweens.

Each object on a separate layer

All objects on one layer
- Select Onion Skin Outlines and Edit Multiple Frames; then reposition the flame objects as necessary to fine-tune the motion.
Reversing Frames
Sometimes, you can save effort by creating just half the animation that you need and letting Flash do the rest of the work. Think of the candle flame that grows and shrinks. The shrinking phase is the reverse of the growing phase. You can make a copy of the growing-flame animation and then have Flash reverse the order of the frames.
To reverse the order of frames:
- Open the document you created in the preceding section.
This movie spans five frames on three layers. The first keyframe shows the flame as three concentric oval shapes; the final keyframe shows the flame in a taller, flickering configuration.
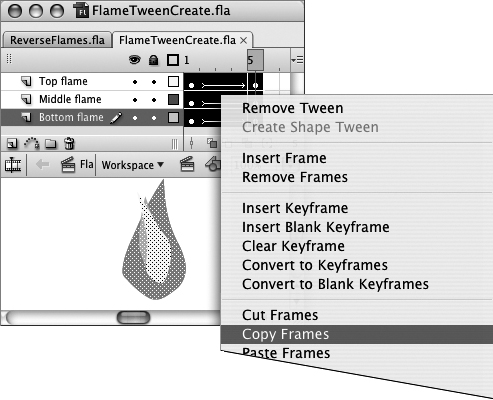
- In the Timeline, select all five frames on all three layers.
- In one of the selected frames, Control-click (Mac) or right-click (Windows) to access the frame-editing contextual menu; then choose Copy Frames (Figure 11.21).
Figure 11.21. The contextual menu for frames lets you copy all selected frames with a single command.
- In the Timeline, select frame 6 in all three layers.
- In one of the selected frames, Control-click (Mac) or right-click (Windows) to access the frame-editing contextual menu, and choose Paste Frames.
Your movie now contains two back-to-back animation sequences of the growing flame (Figure 11.22).
Figure 11.22. After you paste the copied selection, the second tween sequence starts with the oval flame (left) and ends with the tall, flickering flame (right).
- In the Timeline, select frames 6–10 on all three layers.
- Choose Modify > Timeline > Reverse Frames (Figure 11.23).
Figure 11.23. Choosing Modify > Timeline > Reverse Frames rearranges the order of selected frames. Use this command to make a selected tween run backward.

Flash reverses the tween in the second sequence so that the flame starts out tall and flickery, and winds up in its original oval configuration in the final keyframe (Figure 11.24).
Figure 11.24. After you reverse the frames, the second tween sequence starts with the flickering flame (left) and ends with the oval flame (right).

Combining Tweening with Frame-by-Frame Techniques
Especially with shape tweening, you can’t always rely on Flash to create in-between frames that capture the exact movement you want. You can combine Flash’s tweening with your own frame-by-frame efforts, however, letting Flash do the work whenever it can. Or, let Flash create the broad outlines of your animation, and then add keyframes to refine the movement. Flash helps with the process by letting you convert those intangible in-between frames to keyframes that you can edit and refine yourself.
In the preceding section, you created a crude version of a flickering flame. In the following tasks, you refine it.
To convert in-between frames to keyframes:
- Open the Flash document you created in the preceding section.
- In the Timeline, position the playhead in frame 2 by clicking the number 2 above the layers or by dragging the playhead.
The first step in this tween isn’t particularly effective: The central flame portion seems to be a bit too far to the side (Figure 11.25). Because frame 2 is an in-between frame, however, you can’t edit it. You can try to improve the motion by adding shape hints, or you can create a new keyframe to refine the animation.
Figure 11.25. Flash’s shape tween in frame 2 leaves something to be desired.
- To convert the in-between frame to a keyframe, in the Timeline, select frame 2 in all three layers.
- Choose Modify > Timeline > Convert to Keyframes, or press F6 (Figure 11.26).
Figure 11.26. Choose Modify > Timeline > Convert to Keyframes to create a keyframe you can use to adjust your multilayer tween.

Flash converts frame 2 from an in-between frame to a keyframe; then it creates the contents of keyframe 2 from the transitional shapes it created for the shape tween at that frame. Now you’re free to edit the contents to improve the tweening action (Figure 11.27). If you want to create a smoother motion, expand the tween between keyframe 1 and keyframe 2.
Figure 11.27. After you convert frame 2 from an in-between frame (part of a tween) to a keyframe, you can edit the flame shapes.
- To add more in-between frames, position the playhead in keyframe 1.
- Choose Insert > Timeline > Frame, or press F5.
Flash adds new in-between frames in all layers. You can repeat the Insert > Timeline > Frame command to add as many frames as you like (Figure 11.28). These frames inherit the shape-tween property that you defined for keyframe 1. Now you can examine Flash’s tweening for the new frames and repeat the process of converting any awkward tween frames to keyframes and editing them.
Figure 11.28. Use the Insert > Timeline > Frame command to increase the length of your new span.

Tips
• In step 4 of the preceding task, when converting in-between frames of a shape tween to keyframes, Flash always creates the new shapes as merge-shapes (even if the shapes in the preceding keyframe are drawing-objects or primitive-shapes). This could result in unexpected consequences if your shapes are on a single layer. It’s another reason to make sure your shapes are on separate layers for tweened animation.
• Flash limits you to one color change per tween sequence. To speed the process of making several color changes, set up one long tween (either motion or shape) that goes from the initial color to the final color. Then selectively convert in-between frames to keyframes so that you can make additional color changes.
Saving Animations As Graphic Symbols
In Chapter 7, you learned to save work for reuse and keep file sizes small by using symbols. Flash lets you do the same thing with entire multiple-frame, multiple-layer animation sequences. You can save such sequences either as an animated graphic symbol or as a movie-clip symbol. You can use these symbols repeatedly with a much smaller hit on file size than if you simply re-create the animation by using graphic-symbol instances within separate animations. Additionally, for complex animations, symbols help keep down the number of frames and layers that you have to deal with.
To convert an animation to a graphic symbol:
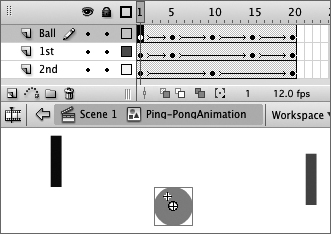
- Open the document you created to make the Ping-Pong animation in “Animating Multiple Motion Tweens,” earlier in this chapter, or create your own multiple-layer animation.
The Ping-Pong animation is a three-layer, 20-frame animation.
- In the Timeline, select all 20 frames in all three layers (Figure 11.29).
Figure 11.29. To convert an existing animation to a symbol, first select all the frames and layers that make up the animation sequence.

- Choose Edit > Timeline > Copy Frames.
- Choose Insert > New Symbol, or press -F8 (Mac) or Ctrl-F8 (Windows).
The Create New Symbol dialog appears (Figure 11.30).
Figure 11.30. You set a new symbol’s type in the Create New Symbol dialog. Movie clips operate from their own independent Timeline. Animated graphic symbols play in sync with the main movie that contains them. One frame in the main movie’s Timeline displays one frame of the graphic symbol’s Timeline.

- In the Create New Symbol dialog, type a name for your symbol (for example, Ping-PongAnimation).
- Choose Graphic as the symbol type.
- Click OK.
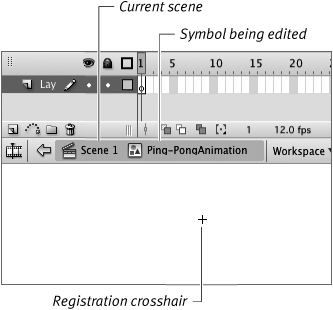
Flash creates a new symbol in the library and switches you to symbol-editing mode for that symbol.
The name of your symbol appears in the Edit bar. The default Timeline for your new symbol consists of one layer and a blank keyframe at frame 1.
- In the symbol Timeline, select keyframe 1, and choose Edit > Timeline > Paste Frames.
Flash pastes the 20 frames and three layers that you copied from the original Ping-Pong movie into the Timeline for the Ping-PongAnimation symbol (Figure 11.31). If you want to make any adjustments in the animation sequence, you can do so at this point.
Figure 11.31. When you create a new symbol, Flash switches to symbol-editing mode, making the new symbol’s Timeline available for editing (top). You must paste all the frames of your animation into the symbol’s Timeline to create the animated symbol (bottom).
All frames of animation pasted into Timeline
- To return to document-editing mode, choose Edit > Edit Document.
Flash places a copy of the new symbol in the library of the active document.
Tips
• In the list of symbols in the Library panel, an animated graphic symbol looks the same as a static graphic symbol; both have the same icon, and both are listed as Graphic in the Type column. An animated graphic symbol, however, has Play and Stop buttons in the top-right corner of the preview window; a static graphic symbol doesn’t (Figure 11.32). You can preview an animated symbol by clicking the Play button.
Figure 11.32. An animated graphic symbol (top) in the Library panel has Stop and Play buttons as part of its preview; otherwise, it’s indistinguishable from a static graphic symbol (bottom).


• When you paste multiple frames and layers into the Timeline in symbol-editing mode, the registration crosshair may be in a strange position for the symbol as a whole. To reposition the items making up the symbol, in the Status bar, click the Edit Multiple Frames button; from the Modify Onion Markers pop-up menu, choose Onion All; finally, choose Edit > Select All to select the contents of each keyframe in each layer. Now you can position the symbol as a whole in relation to the crosshair.
Using Animated Graphic Symbols
To put an animated graphic symbol to work, you must place an instance of it in your main movie. The layer of the movie where you place the symbol must have enough frames to display the symbol. You can use instances of an animated graphic symbol just as you would any other symbol—combine it with other graphics on a layer; motion-tween it; modify its color, size, and rotation; and so on.
To place an instance of an animated graphic symbol:
- In the movie you created in the preceding section, choose Insert > Scene to create a new scene.
Flash displays the new scene’s Timeline—a single layer with a blank keyframe in frame 1. The Stage is empty.
Adding a new scene gives you a blank Stage to work with and makes it easy to compare the two animations: the original (created directly in the main movie Timeline) and the instance of the graphic symbol placed in the movie.
- Access the Library panel.
If it’s not open, choose Window > Library.
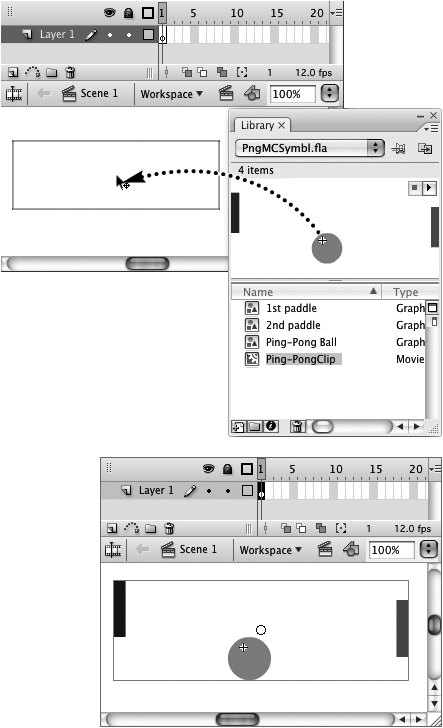
- In the Library panel for your document, select the Ping-PongAnimation symbol.
The first frame of the animation appears in the preview window (Figure 11.33).
Figure 11.33. Select the graphic symbol you want to use, and then drag a copy to your Flash document to place an instance on the Stage.

- Drag a copy of the selected symbol to the Stage.
Flash places the symbol in keyframe 1. At this point, you can see only the first frame of the animation (Figure 11.34). The animation is 20 frames long, so you need to add least 20 frames to view the symbol in its entirety.
Figure 11.34. When you drag an instance of the animated graphic symbol to the Stage, you see the symbol’s first frame with its graphics selected. You must add frames to allow the full animation of the symbol to play in the main movie.
- In the Timeline, select frame 20, and choose Insert > Timeline > Frame.
Flash adds in-between frames 2–20.
- Play the movie.
Now Flash can display each frame of the animated graphic symbol in a frame of the movie. Frame 2 of the symbol appears in frame 2 of the movie, frame 5 of the symbol appears in frame 5 of the movie, and so on (Figure 11.35). If you place fewer than 20 frames in the movie, Flash truncates the symbol and displays only as many frames of the symbol as there are frames in the movie.
Figure 11.35. Frames 1–20 have a tweening property of None, but they still display animation. Flash displays the 20 tween frames of the graphic symbol that you placed in keyframe 1. It’s as though the symbol is a tray of slides, and Flash is projecting one image per frame in the main movie. If the main movie is longer than the slide show, Flash starts the slide show over.

Tip
• By default, Flash loops the animation of graphic symbols. If the layer containing the animated-symbol instance in the main Timeline has more frames than the symbol requires, Flash starts playing the graphic symbol over again to fill those extra frames. You can prevent such looping. Select the symbol instance on the Stage. In the Properties tab of the Property inspector, from the Options for Graphics menu, choose Play Once (Figure 11.36). The options settings also let you choose to start the symbol’s animation with a frame other than 1. Enter the desired frame number in the First field. (You can even choose to display just one frame of the animated graphic symbol. From the Options for Graphics menu, choose Single Frame, and then enter the desired frame number in the First field. You can use this technique to pause the animation of the symbol for a certain number of frames in the main movie. At the frame where the symbol should start running, add another keyframe and another copy of the symbol and set it to loop.)
Figure 11.36. By default, animated graphic symbols move in lockstep with the Timeline of the main movie. If the symbol’s animation contains fewer frames than does the layer containing the symbol instance in the main Timeline, the animated graphic symbol loops. To stop the selected symbol instance from looping, in the Properties tab of the Property inspector, from the Options for Graphics menu, choose Play Once.

Saving Animations As Movie-Clip Symbols
The procedure you use to save an animation as a movie-clip symbol is the same as for saving an animated graphic symbol, except that you define the symbol as a movie clip in the Create New Symbol dialog.
To convert an animation to a movie-clip symbol:
- Open the document you created to make the Ping-Pong animation in “Animating Multiple Motion Tweens,” earlier in this chapter.
The Ping-Pong animation is a three-layer, 20-frame animation.
- In the Timeline, select all 20 frames in all three layers.
- Choose Edit > Timeline > Copy Frames (Figure 11.37).
Figure 11.37. To save Timeline animation as a symbol, start by selecting all the frames (and layers) that make up the animation, then choosing the Edit > Timeline > Copy Frames command.

- Choose Insert > New Symbol, or press -F8 (Mac) or Ctrl-F8 (Windows).
The Create New Symbol dialog appears.
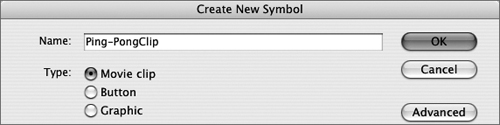
- In the Name field, type a name for your symbol—for example, Ping-PongClip.
Flash remembers the symbol type you selected for the last symbol you created and selects that type for you when you choose Insert > New Symbol.
- Select Movie Clip as the symbol type (Figure 11.38).
Figure 11.38. Selecting Movie Clip in the Type section of the Create New Symbol dialog defines a symbol that has an independent Timeline. The entire movie-clip symbol runs in a single frame of the main movie.
- Click OK.
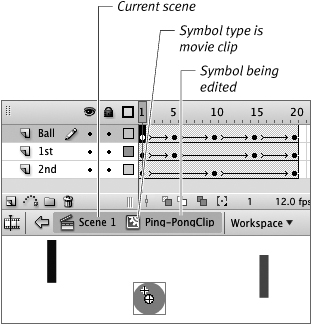
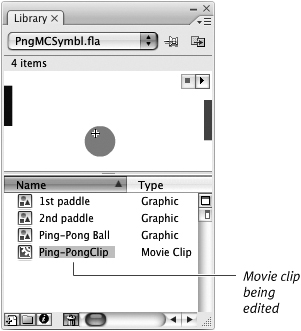
Flash creates a new symbol in the Library panel and switches you to symbol-editing mode, with that symbol selected.
The name of your symbol appears in the Edit bar. The default Timeline for your new symbol consists of one layer and a blank keyframe at frame 1.
- In the symbol Timeline, select keyframe 1, and choose Edit > Timeline > Paste Frames.
Flash pastes all 20 frames and three layers that you copied from the original Ping-Pong animation into the Timeline for the Ping-PongClip symbol (Figure 11.39). If you want to make any adjustments in the animation sequence, you can do so at this point.
Figure 11.39. After you name the symbol and define its type in the Create New Symbol dialog, Flash switches to symbol-editing mode. The icon that precedes the name of the symbol indicates that this symbol is a movie clip. Now you can paste the animation frames into the symbol’s Timeline.
- To return to document-editing mode, click the current scene name in the Edit bar.
Tip
• To make a movie clip that contains exactly the same frames as an existing animated graphic symbol (as you did in the preceding task), you can duplicate that symbol and change its type. Select the animated graphic symbol in the Library panel. From the Library panel’s options menu, choose Duplicate. The Duplicate Symbol dialog appears, allowing you to rename the symbol and set its type to Movie Clip.
The Mystery of 9-Slice Scaling
One of the beauties of Flash is the way it lets you reuse elements. One of the frustrations of reusing elements is that resizing (scaling) can distort them. Imagine creating a rectangle with rounded corners; you’ll resize the rectangle for various situations; it could be the graphic for an interface element, such as a button, or it could be a building block for an artistic animation. You would expect the amount of rounding in the corners to remain the same when you made the rectangle larger or smaller. In fact, the corners can change, sometimes distorting horizontally, sometimes vertically.
This distortion can occur in the Flash document, as you create your content, or at runtime when people view your movie. Runtime resizing happens if you create scripts that scale elements dynamically; it can also happen if people resize the browser window displaying your movie. You have some control over the second type of scaling when you set options for publishing a movie (see Chapter 17).
In Flash CS3, when publishing for Flash Player 9 or 8, you can also impose conditions on the way movie-clip symbols scale at runtime by invoking 9-slice scaling guides. When you activate the 9-slice guides, Flash superimposes a grid over your movie-clip symbol. The corner sections defined by the grid don’t scale at all; the other sections of the grid scale up or down as required, and then the corners are pasted back on. This method allows you to keep the corners of an element uniform at all sizes.
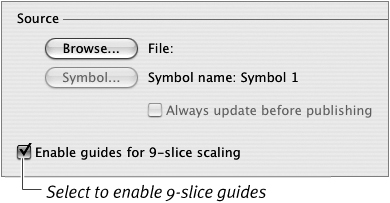
To activate 9-slice scaling when you originally create a movie-clip symbol, open the Advanced section of the Symbol Properties dialog, and select the “Enable guides for 9-slice scaling” check box (Figure 11.40) To enable the guides later, select a symbol in the Library panel, choose Properties from the Library panel’s options menu to open the Symbol Properties dialog, and then select the “Enable guides for 9-slice scaling” check box. (You can also enable 9-slice scaling through ActionScript.)
Figure 11.40. To enable 9-slice scaling for movie-clip symbols, in the Create New Symbol dialog, click the Advanced button to access the advanced settings (top). In the Source section, select the “Enable guides for 9-slice scaling” check box (bottom).

When the 9-slice guides are enabled, grid lines appear in the symbol preview window in the Library panel and also when you edit the symbol (Figure 11.41). In symbol-editing mode, you can drag the guide lines to define the nonscaling corner areas appropriate to the graphic content of the movie-clip symbol you’re creating.
Figure 11.41. With 9-slice scaling enabled, a symbol shows its scaling guides in the Library panel. In symbol-editing mode, the guides appear on the Stage and are adjustable. Drag a guide to reposition it.

Here’s another way to avoid distortion when resizing a graphic-object in the authoring environment: Create the object as a primitive-shape and scale it by changing its height and/or width in the Property inspector, Transform panel, or Info panel. When you enter new values for the primitive’s height and width, Flash uses the 9-slice scaling technique to scale the objects. If you scale a primitive-shape using the free-transform tool, however, you can still get distortion.
Using Movie-Clip Symbols
You put movie-clip symbols to work by placing an instance of a symbol on the Stage in your Flash document. Unlike animated graphic symbols, movie-clip symbols have their own Timeline. A movie clip plays continuously, like a little film loop, in a single frame of the main movie. As long as the movie contains no other instructions that stop the clip from playing—a blank keyframe in the Timeline for the layer containing the movie clip, for example—the clip continues to loop.
As you work on your Flash document, you can see only the first frame of a movie clip. To view the animation of the movie-clip symbol in context with all the other elements of your movie, you must export the movie (by choosing one of the test modes, for example). You can preview the animation of the movie-clip symbol by itself in the Library panel.
To place an instance of a movie clip:
- Continuing with the movie you created in the preceding task, choose Insert > Scene.
Flash creates a new scene and displays its Timeline: a single layer with a blank keyframe in frame 1. The Stage is empty.
- Access the Library panel.
If it’s not open, choose Window > Library.
- Select the Ping-PongClip symbol.
The first frame of the animation appears in the preview window.
- Drag a copy of the selected symbol to the Stage.
Flash places the symbol in keyframe 1 (Figure 11.42). You don’t need to add any more frames to accommodate the animation, but you must export the movie to see the animation.
Figure 11.42. Drag an instance of your movie clip from the Library panel to the Stage (top). Flash places the instance in keyframe 1 (bottom).
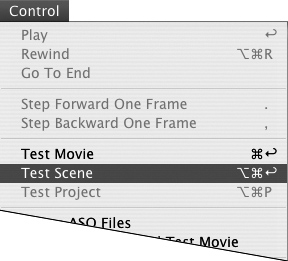
To view the movie-clip animation in context:
- Continuing with the movie you created in the preceding task, choose Control > Test Scene (Figure 11.43).
Figure 11.43. Choose Control > Test Scene to preview the animation of just one scene in a movie.
Flash exports the movie to a Flash Player format file, adding the .swf extension to the filename and using the current publishing settings for all the export options. (For more information on publishing settings, see Chapter 17.) During export, Flash displays the Exporting Flash Movie dialog, which contains a progress bar and a Stop (Mac) or Cancel (Windows) button for canceling the operation (Figure 11.44).
Figure 11.44. The Exporting Flash Movie dialog contains a progress bar and a button for canceling the export.

When it finishes exporting the movie, Flash opens the SWF file in Flash Player so you can see the movie in action (Figure 11.45).
Figure 11.45. Flash Player displays your movie in a regular window. To exit the Player, close the window.

- When you’ve seen enough of the movie in test mode, click the movie window’s Close button (Mac) or Close box (Windows) to exit Flash Player.
Flash’s original impact on the Web was due in part to its ability to animate using vector graphics rather than bitmaps, which made Flash animations quick to download. However, when an image is complex but doesn’t change much over time, especially when changes involve repositioning rather than redrawing shapes, animations may be faster and less processor-intensive when created with bitmaps rather than vectors.
An easy example to imagine is a cartoon background—say, a forest thick with trees and flowers, bushes and vines, over which you animate the creatures that move through the forest. If the background remains still, you can create a bitmap background layer that extends the length of your movie and doesn’t require redrawing in each frame.
But there are drawbacks to that method. You can’t create or edit the bitmap inside Flash; you must use a program such as Adobe Fireworks or Adobe Photoshop and import the image. (You must edit the image externally and re-import it each time you do.)
And what if you want the background to move from time to time? Let’s say you want to create a backdrop that’s much wider than the screen and then shift it to the right periodically to show a bit of the scenery that’s been hidden. Nothing changes but the position of the background. If you use a bitmap image, Flash can move it pixel by pixel without too much slowdown of the movie, but you still have the inconvenience of creating the image outside Flash. If you use a vector image, Flash must recalculate all the vectors in that background for each move, bogging things down. Flash CS3 gives you the best of both worlds by turning a vector image into a bitmap at runtime.
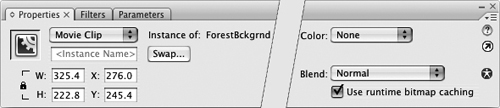
This technique is called bitmap caching. To enable it, you must create your complex element as a movie-clip symbol. Select the symbol instance on the Stage. In the Properties tab of the Property inspector, for that symbol instance, select the “Use runtime bitmap caching” check box (Figure 11.46). At runtime, Flash captures a snapshot of the vector image by turning it into a bitmap; then Flash moves that bitmap pixel by pixel as needed, thus avoiding recalculating all those vectors.
Figure 11.46. If a movie clip contains complex graphics that don’t animate in complex ways, you can ask Flash to cache a bitmap of the symbols’ image at runtime. Flash creates a sort of bitmap snapshot, redrawing the vector graphics only when something changes. Bitmap caching can speed processing during playback of your Flash creations. Select an instance of a movie-clip symbol on the Stage; then, in the Properties tab of the Property inspector, select “Use runtime bitmap caching.”
Using Animated Masks
In Chapter 6, you learned about Flash’s ability to create mask layers that hide and reveal objects on lower layers. Sometimes, the best way to create the illusion of movement is to animate a mask so that it gradually hides or reveals objects.
Imagine a line that starts at the left edge of the Stage and goes all the way to the right edge. If you create a mask that reveals the line bit by bit, you create the illusion of a line that draws itself. Reverse the process, and you have a line that gradually erases itself.
Creating rotating and shape-tweened mask graphics can give you some interesting effects. The more familiar you are with using animated masks to reveal stationary items, the better sense you’ll have of when to use this technique. For practice, try animating a mask that creates a growing rainbow.
To create a stationary graphic and a moving mask that reveals it:
- Create a Flash document that has two layers.
Name the bottom layer Rainbow and the top layer Rotating Rectangle.
- In keyframe 1 of the Rainbow layer, on the Stage, use the drawing tools to create a rainbow graphic.
One way to create the rainbow is to use the oval tool in Merge Drawing mode to draw a perfect circle. Give the circle a radial-gradient fill that has distinct bands of color. Then erase the bottom half of the circle (Figure 11.47).
Figure 11.47. An easy way to create a rainbow is to fill a circle with a multiple-color radial gradient and then delete the bottom half of the circle. Here, bisecting a merge-shape circle by drawing a line through it (middle) makes deletion easy; select the line and the bottom half of the circle (bottom), and press Delete.
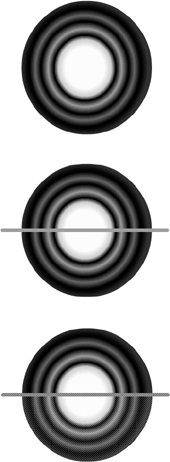
What’s left is your rainbow shape. For safety, convert the rainbow to a symbol (select the rainbow on the Stage, choose Modify > Convert to Symbol, choose Graphic as the type, name the symbol, and click OK) so you’ll have a copy of the rainbow in case you accidentally delete the original.
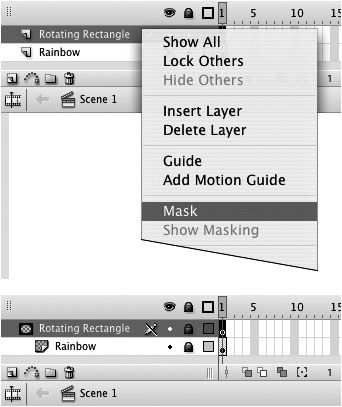
- In the Timeline, Control-click (Mac) or right-click (Windows) the Rotating Rectangle layer.
The contextual menu for layers appears.
- Choose Mask.
Flash converts the layer to a mask, links the Rainbow layer to the mask, and locks both layers (Figure 11.48).
Figure 11.48. Control-click (Mac) or right-click (Windows) a layer and select Mask from the contextual menu to create a mask layer (top). Flash automatically links the layer directly below the mask layer in the Timeline and locks both layers (bottom).
- In the Timeline, click the padlock icons in the Lock column of the Rainbow and Rotating Rectangle layers to unlock them.
- On the Stage, in keyframe 1 of the Rotating Rectangle layer, use the rectangle tool to draw a rectangle just below the bottom of the rainbow (Figure 11.49).
Figure 11.49. To create a mask that reveals the entire rainbow, draw a rectangle that’s large enough to cover the rainbow. Positioning the rectangle below the rainbow hides the rainbow completely.
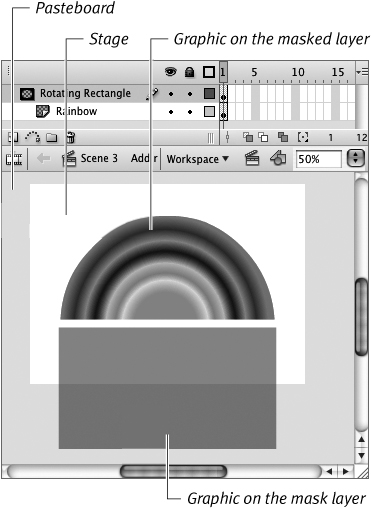
The rectangle is your mask. Any items that lie directly below the rectangle on a linked layer appear; everything else is hidden.
Make the rectangle a bit larger than the rainbow so the mask can cover the whole rainbow. Using a transparent fill color lets you see the rainbow through the mask rectangle and helps you verify the mask’s position. (To make the rectangle’s fill color transparent, select it and then, in the Color panel, assign it a low Alpha percentage.)
Tip
• You can use any of the three types of animation on a mask layer: frame-by-frame, motion tweening, or shape tweening. You can also use an animated graphic symbol or a movie-clip symbol. Advanced ActionScripters can also use ActionScript to tell one movie-clip symbol to mask another and to create transparent masks.
To prepare the mask for rotational animation:
- Select the rectangle, and choose Modify > Convert to Symbol.
Because you want to create rotational animation, you must use a motion tween for the mask, which means the mask graphic must be a graphic-object. You could use a drawing-object, a primitive-shape, or a grouped element, but it’s a good idea to use a symbol so that you can easily reuse the mask.
The Convert to Symbol dialog appears.
- In the Name field, enter a name for the symbol, choose Graphic as the symbol type, and click OK.
- Using the free-transform tool, select the rectangle on the Stage, and position the pointer over the transformation point of the object (indicated by a white circle, located in the middle of the symbol by default).
A small white-circle modifier appears next to the arrow pointer, indicating that you can move the selected object’s transformation point.
- Drag the transformation point to the middle of the top edge of the rectangle (Figure 11.50).
Figure 11.50. Use the free-transform tool to reposition the point around which a symbol (or grouped item) rotates. Drag to a new position the circle that indicates the transformation point. A small circle previews the new transformation-point location. With the transformation point at the center of the rectangle’s top edge, the rectangle stays centered over the rainbow as you rotate the rectangle.

Now you can rotate the rectangle so that it swings up and over the rainbow but stays centered horizontally in relation to the rainbow.
To complete the rotating-mask animation:
- In the Timeline, in the Rainbow layer, select frame 15, and choose Insert > Timeline > Frame.
- In the Timeline, in the Rotating Rectangle layer, select frame 15, and choose Insert > Timeline > Keyframe.
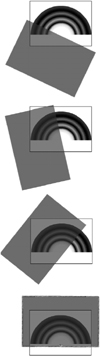
- In keyframe 15, with the rectangle selected on the Stage, use the free-transform tool in Rotate and Skew mode to reposition the rectangle; click and drag the bottom-left corner of the rectangle and rotate it so that the rectangle covers the rainbow (Figure 11.51).
Figure 11.51. In the final keyframe of your sequence, position the mask to cover the item(s) it should reveal. Here the free-transform tool rotates the rectangle mask over the rainbow graphic.

The mask that covers the rainbow in authoring mode will reveal the rainbow in the final movie.
- In the Timeline, in the Rotating Rectangle layer, select any of the frames in the keyframe 1 span (frames 1–14).
- In the Frame Properties tab of the Property inspector, from the Tween pop-up menu, choose Motion.
- From the Rotate pop-up menu, choose CW.
- Enter 0 in the Times field.
This step sets up the motion tween that rotates the rectangle 180 degrees, swinging it up and over the rainbow until it fully covers the rainbow (Figure 11.52).
Figure 11.52. In the final keyframe with the completed motion tween for the mask object, the mask covers the rainbow completely. Giving the mask a transparent fill lets you see the objects to be revealed through it as you work. The transparency of objects on the mask layer won’t appear in the final movie.

To preview the animation:
• Choose Control > Test Movie, or Control > Test Scene.
or
• In the Timeline, click the padlock icon in the Lock column to lock both layers and see the masked rainbow; then play the movie to see the mask reveal the rainbow.
If the rainbow isn’t fully revealed during the tween, you may need to enlarge or reposition the rectangle. Unlock both layers, and move the playhead through the movie to see where the rectangle is in each in-between frame (Figure 11.53).
Figure 11.53. As you play the movie with the layers unlocked (left), you can see the in-between positions of the mask graphic. When you lock the layers (right), you see the masking as it will appear in the final exported movie.
Play movie, layers unlocked

Play movie; layers locked
Tip
• To make the rainbow appear to fade in gradually, tween a change in its transparency. Select frame 15 of the Rainbow layer and press F6, duplicating the rainbow-symbol instance in a new keyframe. Select keyframe 1 of the Rainbow layer; in the Properties tab of the Property inspector, from the Tween pop-up menu, choose Motion. With the rainbow symbol-instance still selected, from the Property inspector’s Color menu, choose Alpha; in the Value field, enter a low percentage.
Blend modes give designers control over the way graphics in different layers and sublayers interact in Flash. Blends can be used to create special graphic effects. The techniques for creating sophisticated effects with blends are beyond the scope of this QuickStart Guide, but here’s a brief overview to give you a glimpse of the possibilities for this feature.
Anyone familiar with using blends in Adobe Fireworks or Adobe Photoshop already has an idea about what Flash’s blend modes can do, because they work similarly. Blends let you force overlapping images to interact in ways that create new colors and interesting effects. Artists often use blend modes for compositing—overlapping multiple images so that parts of each appear in one combined image (for example, superimposing an image of a child’s face on an image of a balloon to make a balloon with a face). Photographers use blend modes to enhance or correct flaws in digital photos (for example, using a blend to lighten the areas of a photo where there is too much shadow).
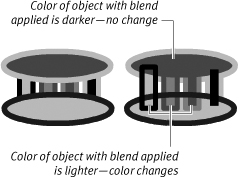
You apply a blend to an instance of a movie clip on the Stage. Flash calculates new colors pixel by pixel, modifying the RGB values of each pixel in the movie clip according to a formula dictated by the chosen blend mode. Whether a particular pixel changes color depends on the type of blend, the color of the pixel in the movie clip, and the color of the pixel that lies on the layer below the movie clip. The pixels on lower layers may be other movie clips, graphic elements, or the background color of the Stage. You apply blends to selected movie-clip instances through the Properties tab of the Property inspector (Figure 11.54).
Figure 11.54. On the Stage, select a movie clip to which you would like to apply a blend; then choose a mode from the Blend menu (here, Darken is being chosen) in the Properties tab of the Property inspector. These two ovals are movie clips lying on a layer above the bar graphics. On the left, the ovals have a Blend property of Normal; they don’t interact with the layer below. On the right, the ovals have a Blend property of Darken. Flash evaluates each pixel. Where the pixels in the object to which the blend is applied (the ovals) are lighter than the pixels in the underlying layer, Flash changes the pixels to the darker color.

Using Filters
Flash CS3 offers seven filters for creating special effects: drop shadow, blur, glow, bevel, gradient glow, gradient bevel, and adjust color. Only three types of graphic-objects—movie-clip symbols, button symbols, and text fields—can have filters applied. Start by selecting one of these objects on the Stage, then access the Filters tab of the Property inspector to choose filters and settings. One object can have multiple filters. You can copy and paste filters from one object to another and create filter presets to save filter settings and apply them to other objects. You can also animate changes to filters, to make a glowing button change colors over time, for example. The techniques for creating sophisticated filter effects are beyond the scope of this book, but the basic techniques for applying all filter types is similar.
The tasks in this section outline creating a simple drop-shadow text field as an introduction to the mechanics of applying filters in Flash.
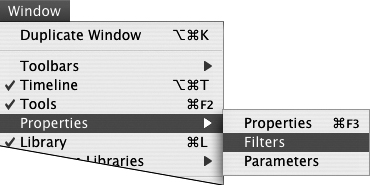
To access the Filters panel:
• If the filters panel is closed, or is not foremost in the Property inspector, choose Window > Properties > Filters (Figure 11.55).
Figure 11.55. To access the Filters tab of the Property inspector, choose Window > Properties > Filters.
Flash opens or brings forward the Property inspector with the Filters tab foremost.
- On the Stage, select a text field, movie-clip instance, or button instance, to which you want to apply a filter.
For this task, select a text field.
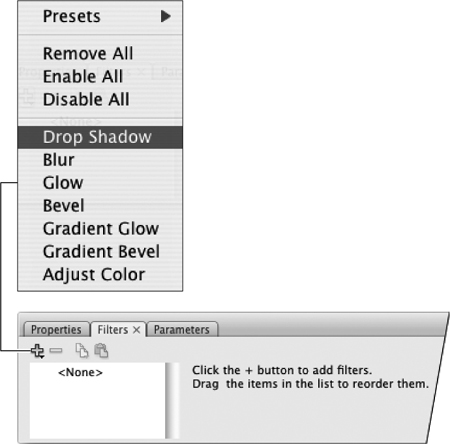
- In the Filters tab of the Property inspector, from the Add Filter menu (the plus sign), choose a filter effect.
For this task, choose Drop Shadow (Figure 11.56).
Figure 11.56. To add a drop-shadow effect to text using filters, with a text field selected on the Stage, access the Filters tab of the Property inspector. Click the Add Filter menu and choose Drop Shadow.
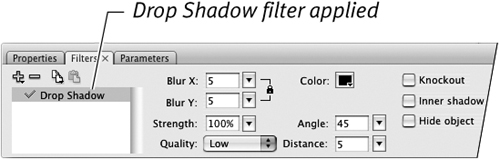
Flash applies the filter to the object on the Stage and adds the filter name to the list of filters applied to this object. Controls for the filter’s parameters, with default values, appear on the right side of the Filters tab (Figure 11.57). Adjust the controls to create the effect you want.
Figure 11.57. Choosing Drop Shadow from the Add Filter menu applies a drop-shadow filter to the selected text field.


Tips
• You can apply multiple filters to one movie-clip symbol, button symbol, or text field. The more filters you apply, however, the more processor power it demands. Avoid applying numerous filters to one object.
• The order in which filters are applied influences how the effects look. To change the order, in the list of applied filters in the Filters tab of the Property inspector, drag one of the filter names to a new position in the list.
To modify filter settings (Drop Shadow):
- On the Stage, select a text field, button, or movie clip to which you have applied a filter.
For this task, select the text field to which you applied the Drop Shadow filter in the preceding task.
- In the Filters tab of the Property inspector, from the list of applied filters, select the effect you want to modify—in this case, Drop Shadow.
The settings that define the effect appear on the right side of the Filters tab (Figure 11.58).
Figure 11.58. A list of filters applied to the currently selected object appears on the left side of the Filters tab. Select an item in the list to see settings for that effect on the right side of the tab. The Drop Shadow filter has ten parameters.

- To modify the drop shadow, do any of the following:
• To modify the size of the shadow, enter new values in the Blur X and/or Blur Y fields. Blur X determines the width of the shadow; Blur Y determines the height. By default Flash constrains these fields so that width and height are the same value (a locked padlock icon appears with lines pointing to each field). To set different values for Blur X and Blur Y, click the Constrain button (the padlock icon) (Figure 11.59).
Figure 11.59. When the Constrain button (the padlock) is in its locked state (top), the values for width and height of the drop shadow are always the same. When the button is in the unlocked state (bottom), you can enter values in each field separately.

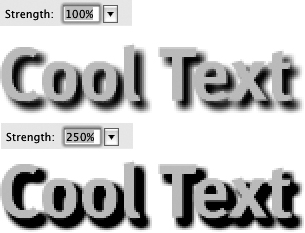
• To modify how dark the shadow appears, in the Strength field, enter a value between 0 and 1000 percent. Higher values translate to darker shadows (Figure 11.60).
Figure 11.60. With a Color setting of black for the drop shadow, a value of 100 percent in the Strength field creates a dark gray drop shadow; at 250 percent, the shadow is almost solid black.
• To modify the shadow color, click the Color control to open a set of color swatches and choose a new color (for more on using color controls, see Chapter 2).
• To modify how far the shadow is offset from the object, enter a value from –32 to 32 in the Distance field. Negative numbers position the shadow above the object; positive values position the shadow below the object.
• To modify the angle of offset, enter a value from 0 to 360 in the Angle field. Values correspond to degrees of a circle. In terms of an analog clock, 0 puts the shadow at 9 o’clock; 90 puts the shadow at 12 o’clock, 180 puts it at 3 o’clock, and so on.
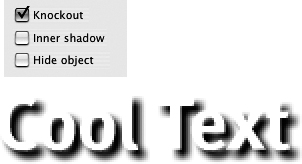
• To create an effect where the object appears to cut a shape out of the shadow, select the Knockout check box (Figure 11.61).
Figure 11.61. Choosing the Knockout check box creates a ghostly stencil effect with the Drop Shadow filter.
• To create an effect where the shadow appears only inside the boundaries of the object itself, select the Inner Shadow check box.
• To completely hide the object and see only the shadow it casts, select the Hide Object check box. This feature is helpful when you want to fine-tune the shadow without the distraction of seeing the overlying object.
• To set the image quality of the shadow, from the Quality pop-up menu, choose Low, Medium, or High. To assure the greatest playback speed, even on low-end machines, choose Low.
Tip
• As with most fields where you enter values, you can use a slider to change the Drop Shadow settings interactively. Click the triangle to the right of a field to activate its slider. The Angle field’s slider is circular; drag the control point around the circle as if turning a dial to position the drop shadow interactively.
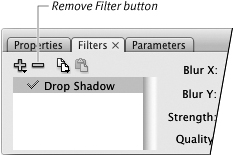
To remove a filter from an object:
- On the Stage, select the object whose filter you want to remove.
- In the Filters tab of the Property inspector, from the list of applied filters, select the filter to be removed.
- Click the Remove Filter button (the minus sign) (Figure 11.62).
Figure 11.62. Select a filter to be removed from the list of applied filters in the Filters tab of the Property inspector. Then click the Remove Filter button.
Flash removes the filter from the list and removes the effects related to that filter from the object on the Stage.
Tips
• If you wish to turn off a filter, but not delete it entirely, you can disable it temporarily. In the Filters tab of the Property inspector, in the list of applied filters, a green checkmark appears to the left of each filter name. Click the checkmark and it changes to a red X; Flash disables the filter and its effect is no longer visible on the Stage.
• To disable all filters but one, Option-click (Mac) or Alt-click (Windows) the checkmark of the filter you want to keep enabled. Red X’s appear beside all the other filters for that object. To enable all the filters, Option-click (Mac) or Alt-click (Windows) the lone green checkmark; Flash enables all the filters in the list.
• To enable or disable all the items in the list of applied filters, from the Add Filter menu, choose Enable All or Disable All.
To copy filter settings from one object to another:
- On the Stage, select the object whose filter you want to copy.
- In the Filters tab of the Property inspector, from the list of applied filters, select a filter to be copied.
- From the Copy Filters pop-up menu (Figure 11.63), choose one of the following:
• To copy just the selected filter, choose Copy Selected.
• To copy all the filters currently displayed in the applied filters list, choose Copy All.
Figure 11.63. Click the double-document icon to open the Copy Filters pop-up menu. Use this feature to copy either one selected filter in the applied-filters list or all the filters in the list.

- On the Stage, select the object to which you want to apply the copied filter(s).
- In the Filters tab of the Property inspector, click the Paste Filters button (Figure 11.64).
Figure 11.64. Click the Paste Filters button to apply copied filters to a movie clip, button, or text field that’s selected on the Stage.

Flash applies the copied filter(s) and settings to the selected object.
Tips
• You can also save filter settings as presets to create a library of commonly used filter effects. Once filters have been applied to an object and modified to your satisfaction, select the object on the Stage; in the Filters tab of the Property inspector, from the Add Filter menu, choose Presets > Save As; enter a name for the preset in the dialog that appears; and click OK. You can now apply that preset to any selected object by choosing Add Filter > Presets, and the name you chose.
• You can share with other Flash users the preset filters you create. Filter presets are XML files that live in a folder named Filters that appears in the user-level Configuration folder (for more details on finding the Configuration folder, see Chapter 1).