Chapter 5. Complex Graphics on a Single Layer
In Chapters 2 and 4, you learned to make and modify simple individual shapes from strokes (lines) and fills by using Adobe Flash CS3 Professional’s drawing tools. In your movies, you’ll want to use many shapes together, and you’ll need to combine strokes and fills in complex ways. You might combine several shapes, such as ovals and rectangles, to create a robot character, for example. To work effectively with complex graphics, you must understand how multiple graphic elements—merge-shapes, drawing objects, and primitive-shapes—interact when they’re on the same layer or on different layers. In this chapter, you learn how to work with multiple graphic elements on one layer in a Flash document. (To learn more about the concept of layers, see Chapter 6.)
Two of Flash’s drawing tools—the brush tool and the eraser—offer special modes for use with multiple fills and strokes on a single layer. In this chapter, unless you’re specifically requested to do otherwise, leave both tools at their default settings of Paint Normal (for the brush tool) and Erase Normal (for the eraser).
You can think of each frame in a Flash movie as being a stack of transparent acetate sheets. In Flash terms, each sheet is a layer. Graphics on different layers have a depth relationship: items on higher layers block your view of items on lower layers, just as a drawing on the top sheet of acetate would obscure drawings on lower sheets.
Imagine that you have two layers in your movie. If you draw a little yellow square on the bottom layer and then switch to the top layer and draw a big red square directly over the yellow one, the little square remains intact, but you can’t see it. The square on the top layer is in the way.
On a single layer in Flash, however, merge-shapes interact with one another, almost as though you were painting with wet finger paint. Here’s a quick rundown of how lines (strokes) and shapes (fills) created in Merge Drawing mode interact within a single layer.
When Merge-Shape Lines Intersect
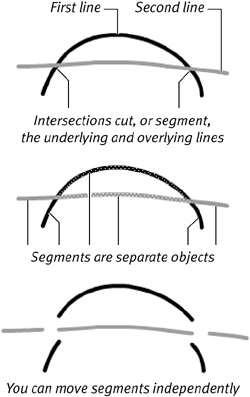
Intersecting merge-shape lines drawn on the same layer affect one another. Draw one line in Merge Drawing mode, and then draw a second line that intersects the first. The second line cuts—or, in Flash terminology, segments—the first. Segmentation happens whether the lines are the same color or different colors, but it’s easiest to see with contrasting colors (Figure 5.1).
Figure 5.1. When you draw one line across another in Merge Drawing mode, every intersection creates a separate segment.
You might expect that the second line you drew would wind up on top of the first, but sometimes that’s not the case. Start with a red line, and then draw a blue line across it; the blue line jumps behind the red one when you release the mouse button. Flash creates a stacking order for merge-shape lines based on the hex-color value of the line’s stroke-color setting. The higher the hex value of the stroke color, the higher the line sits in a stack of merge-shape lines drawn in one layer. A merge-shape line whose stroke color is set to a hex value of 663399 always winds up on top of one whose stroke color is set to 333399.
When Merge-Shape Lines and Fills Intersect
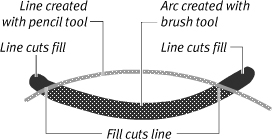
A fill that has no stroke still has a path (the invisible outline that describes the fill shape). When you work in Merge Drawing mode, fill paths can cut the strokes of other shapes. When you place merge-shape lines over merge-shape fills, you can wind up with lots of little segments. Try drawing lines (strokes) with the pencil tool and arcs (fills) with the brush tool; set the tools to Merge Drawing mode. If you paint a fill that intersects a stroke, the fill remains one solid object, but the stroke gets segmented (Figure 5.2). If you draw a stroke that intersects a fill, the stroke cuts the fill, and the path of the fill cuts the stroke (Figure 5.3).
Figure 5.2. When a merge-shape fill overlays a merge-shape stroke, the fill segments the stroke. As the selection highlighting shows, the fill remains one solid object.

Figure 5.3. When a merge-shape line overlays a merge-shape fill, the line’s path cuts the fill, and the fill’s path cuts the line.
When Merge-Shape Fills Intersect
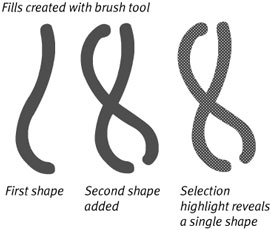
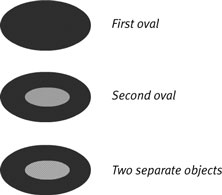
When intersecting fills created in Merge Drawing mode are the same color, the newer fill adds to the merge-shape (Figure 5.4).
Figure 5.4. When you draw overlapping fills in the same color in Merge Drawing mode, Flash puts the two shapes together to create a single merge-shape.
When fills of different colors interact, the newer fill replaces the older one where the two overlap (Figure 5.5).
Figure 5.5. When one merge-shape fill overlaps another of a different color, the fills don’t meld but remain separate. The second oval here replaces the first where they overlap.
Working with Groups
A group is a type of virtual container that holds graphic elements. Groups serve several functions. They prevent selected merge-shapes from interacting. They also lock down the attributes of shapes and preserve spatial relationships among graphic elements. Although you can also group drawing-objects and primitive-shapes, for the tasks in this section you want to see the interaction with merge-shapes; make sure the Object Drawing button in the Tools panel is deselected.
- Select one or more items on the Stage using any of the methods discussed in Chapter 4 (Figure 5.6).
Figure 5.6. The first step in grouping is selecting the shapes you want to use in the group.

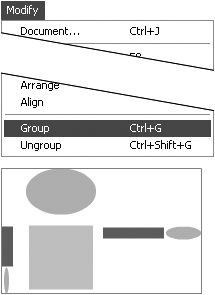
- Choose Modify > Group, or press
 -G (Mac) or Ctrl-G (Windows).
Flash groups the items, placing them within a bounding box (Figure 5.7). The visible bounding box lets you know that the group is selected. When the group isn’t selected, the bounding box is hidden.
Figure 5.7. The Modify > Group command unites multiple selected shapes within a single bounding box.
 Tip
Tip
• If you choose Modify > Group when nothing is selected, you immediately enter group-editing mode: anything you draw on the Stage is part of a new group.
To return objects to ungrouped status:
- Select the group that you want to return to ungrouped status.
- Choose Modify > Ungroup, or press Shift--G (Mac) or Ctrl-Shift-G (Windows).
Flash removes the bounding box and selects all the items.
Tips
• The command for breaking apart symbols (Modify > Break Apart or ![]() -B (Mac) or Ctrl-B (Windows)) also works to ungroup groups. However, it can produce unexpected results on groups containing a mix of shape types. When a merge-shape is part of a group, the Break Apart command converts all the shapes to merge-shapes, even if they were drawing-objects or primitives originally. Break apart a group that contains no merge-shapes, and the group members revert to their original types. To retain the original status of all elements in a mixed group, use the Modify > Ungroup command.
-B (Mac) or Ctrl-B (Windows)) also works to ungroup groups. However, it can produce unexpected results on groups containing a mix of shape types. When a merge-shape is part of a group, the Break Apart command converts all the shapes to merge-shapes, even if they were drawing-objects or primitives originally. Break apart a group that contains no merge-shapes, and the group members revert to their original types. To retain the original status of all elements in a mixed group, use the Modify > Ungroup command.
• Interactions between strokes and fills occur not only when you draw a shape but also when you place a copy of a shape or move a shape. Be careful when placing copies of merge-shape fills and strokes on a single layer; you can inadvertently add to or delete part of an underlying merge-shape. If you ungroup a grouped shape that overlaps merge-shapes on a single layer, the shapes will segment one another.
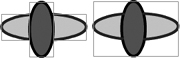
To prevent interaction between merge-shapes on one layer:
- In the Tools panel, choose the oval tool in Merge Drawing mode.
- Set the stroke color to No Color and the fill color to red.
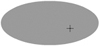
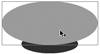
- On the Stage, draw a fairly large oval (Figure 5.8).
Figure 5.8. The oval before grouping.

- In the Tools panel, switch to the selection tool, and select the oval you just drew.
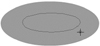
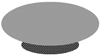
- To make the oval a grouped element, Choose Modify > Group (Figure 5.9).
Figure 5.9. The oval after grouping.

- Back in the Tools panel, choose the oval tool and a different fill color.
- On the Stage, draw a smaller oval in the middle of your first oval (Figure 5.10).
Figure 5.10. Draw a second oval on top of the grouped oval.
When you finish drawing the new oval, it immediately disappears behind the grouped oval (Figure 5.11). That’s because grouped objects always stack on top of ungrouped objects (see the sidebar “Understanding Stacking Order,” later in this chapter).
Figure 5.11. The ungrouped oval stacks beneath the grouped oval.
- Switch to the selection tool, and reposition the large oval so that you can see the small one (Figure 5.12).
Figure 5.12. Drag the grouped oval to make the ungrouped oval visible.
- Deselect the large oval, and select the small oval (Figure 5.13).
Figure 5.13. Select the small oval.
- To make the small oval a grouped element, Choose Modify > Group.
Flash puts the small oval in a bounding box and brings it to the top of the stack (Figure 5.14). Flash always places the most recently created group on the top of the stack. Now you can reposition the two ovals however you like, and they won’t interact.
Figure 5.14. After grouping, the small oval—the most recently created group—pops to the top of the stack.

Editing Groups
Although you can transform a group as a whole (scale, rotate, and skew it), you can’t directly edit the individual shapes within the group the way you can edit an ungrouped shape. To edit the shapes within a group, use the Edit Selected command.
To edit the contents of a group:
- In the Tools panel, choose the selection tool.
- On the Stage, select the group you want to edit.
- Choose Edit > Edit Selected.
Flash enters group-editing mode (Figure 5.15). The Edit bar just above the Stage changes to indicate that you’re in group-editing mode. The bounding box for the selected group disappears, and Flash dims all the items on the Stage that aren’t part of the selected group. These dimmed items aren’t editable; they merely provide context for editing the selected group.
Figure 5.15. The eyes and eyebrows are a selected group (top). In group-editing mode (bottom), the selected shapes are ready to edit; the other items on the Stage are grayed out to indicate that you can’t edit them.

- Make changes to the contents of the group.
- To return to document-editing mode, do one of the following:
• Choose Edit > Edit All.
• Double-click an empty area of the Stage or the Pasteboard.
• Click the current scene name in the Edit bar.
• Click the Back button in the Edit bar.
Tips
• To enter group-editing mode quickly, double-click a grouped item on the Stage with the selection tool.
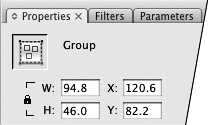
• When the Properties tab of the Property inspector is open, you can see—and change—the height, width, and x- and y-coordinates of the bounding box of a selected group (Figure 5.16).
Figure 5.16. The Property inspector displays the height, width, and x- and y-coordinates for the bounding box of a group you’ve selected on the Stage. Enter new values to change any of those parameters.
• When you’re editing a group nested within another group, clicking the Back button moves you up one level in the nesting hierarchy.
• You can also enter group-editing mode for a selected item by choosing Edit > Edit in Place. When you edit groups, there is no difference between this command and Edit > Edit Selected. There is a difference when you use these commands to edit symbols. (You’ll learn about symbols in Chapter 7.)
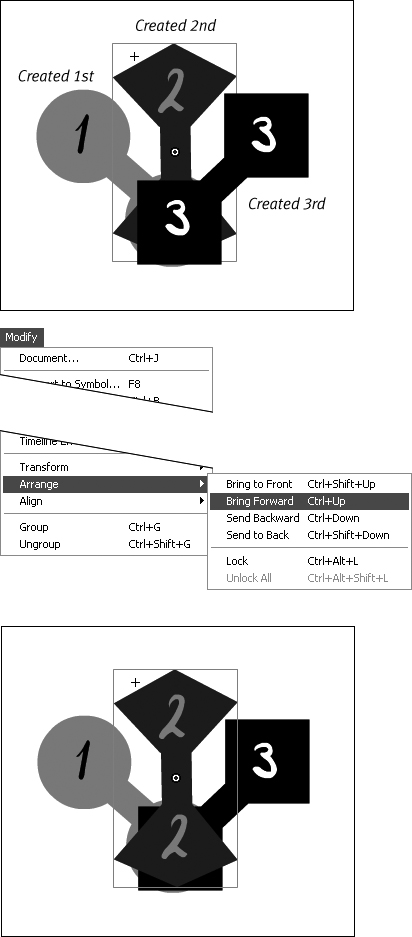
Controlling Stacking Order
Within a single layer, text fields, grouped objects, drawing-objects, and primitives stack as if they were sitting on sublayers above any ungrouped merge-shapes. Stacking order exists even if objects don’t literally lie on top of one another. If you have a group on one side of the Stage and a drawing-object on the other, you can’t see which one stacks higher than the other; but if you drag the objects so they overlap, the order becomes apparent. (Symbols, which you’ll learn about in Chapter 7, are another type of graphic-object that stacks on top of ungrouped merge-shapes.)
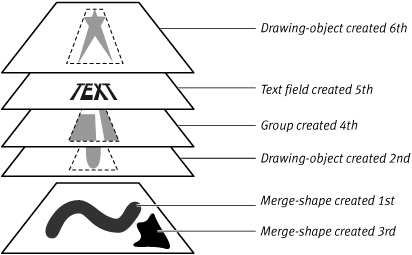
Merge-shapes on a single layer always stay on the same layer, segmenting one another whenever they inhabit the same space on the Stage. All graphic-objects (drawing-objects, primitives, text fields, groups, and symbols) stack on top of one another. By default, Flash stacks each new graphic-object that you create on top of the preceding one; the last graphic-object created winds up on top of all the others (Figure 5.17). A higher-level graphic-object obscures any graphic-object that lies directly beneath it.
Figure 5.17. This schematic shows Flash’s default stacking order for graphic-objects. The most recently created graphic-object is on top. Merge-shapes are always on the bottom.
You can change the stacking order of graphic-objects via the Modify > Arrange menu. You can move objects up or down in the stacking order one level at a time, or you can send an object to the top or bottom of the stack of sublayers.
To change position in a stack by one level:
- On the Stage, create at least three graphic-objects.
Use any combination of grouped shapes, drawing-objects, primitives, or text fields.
- Select one of the graphic-objects.
- From the Modify > Arrange menu, choose either of the following:
• To move the selected item up one level, choose Bring Forward, or press
–up arrow (Mac) or Ctrl–up arrow (Windows).• To move the selected item down one level, choose Send Backward, or press
–down arrow (Mac) or Ctrl–down arrow (Windows).Flash moves the selected item up (or down) one sublayer in the stacking order (Figure 5.18).
Figure 5.18. Each dumbbell-like shape here is a separate group (top). Choose Modify > Arrange > Bring Forward (middle) to move a selected group up one level in the stacking order (bottom).
To move an element to the top or bottom of the stack:
- On the Stage, select one of the graphic-objects you created in the previous task.
- From the Modify > Arrange menu, choose either of the following:
• To bring the item to the top of the stack, choose Bring to Front, or press Option-Shift–up arrow (Mac) or Ctrl-Shift–up arrow (Windows).
• To move the item to the bottom of the stack, choose Send to Back, or press Option-Shift–down arrow (Mac) or Ctrl-Shift–down arrow (Windows).
Flash places the selected item at the top (or bottom) of the heap.
Combining Drawing-Objects and Primitives
Drawing-objects and primitive-shapes don’t interact with one another or with merge-shapes, even when they overlap. You can force them to interact by using the Modify > Combine Objects commands. Flash converts combined primitives to drawing-objects.
To unite multiple drawing-objects or primitives:
- Use the drawing tools in Object Drawing mode, or the rectangle- or oval-primitive tools, to create overlapping shapes:
• Make two or more overlapping fills with the same colors.
• Make two or more overlapping shapes with fills and strokes; use different colors for the fills and strokes in each shape.
- Select the overlapping fills that are the same color.
- Choose Modify > Combine Objects > Union.
The two fills become a single drawing-object shape (Figure 5.19).
Figure 5.19. Applying the Modify > Combine Objects > Union command to drawing-object or primitive-shape fills of the same color (left) melds the fills and creates a single drawing-object (right).

- Select the overlapping shapes of different colors.
- Repeat step 3.
The fills and strokes of the shapes segment one another, but you wind up with a single drawing-object containing all those segmented shapes (Figure 5.20).
Figure 5.20. Applying the Modify > Combine Objects > Union command to drawing-objects (or primitive-shapes) of different colors (left) causes the selected fills and strokes to replace and segment one another as merge-shapes would. The resulting shapes unite in a single drawing-object (right).
Tips
• You can also use the Modify > Combine Objects > Union command to combine a mix of merge-shapes, drawing-objects, and primitives into a single drawing-object.
• To access and edit merge-shapes inside a drawing-object, double-click it (Figure 5.21).
Figure 5.21. Try double-clicking the new drawing-object after you’ve applied Union to drawing-objects (or primitives) of different colors. In drawing-object–editing mode, you can see how the shapes segment one another. Each chunk of stroke and fill is a separate shape.

To use one drawing-object to remove part of another:
- Use the drawing tools in Object Drawing mode, or the rectangle- or oval-primitive tools, to create two or more overlapping shapes with a variety of fills and strokes.
- From the Modify > Combine Objects menu, choose one of the following:
Intersect retains fills and strokes only where all the selected shapes overlap, and deletes all other fills and strokes. The resulting shape(s) take stroke and fill attributes from the topmost shape.
Punch uses the topmost shape like a cookie cutter to remove any shapes directly below it. (Imagine the shape left in the cookie dough after you’ve cut out a cookie; that’s what Punch creates.) The resulting shape(s) retain their original attributes.
Crop uses the topmost shape like a cookie cutter to select a new shape from any shapes that lie below it. (Imagine the cookie cutter again, but this time you wind up with the cookie itself.) The resulting shape(s) retain their original attributes (Figure 5.22).
Figure 5.22. The last three commands in the Modify > Combine Objects menu have different results depending on which object lies on top of the stack. Intersect creates a new shape from the intersection of all selected shapes, using the top shape’s attributes. With Punch, the top shape takes a bite out of the others and removes it; the remaining shapes keep their original attributes. With Crop, the top shape takes the same bite but this time removes everything else; the resulting shapes keep their original attributes.

Tips
• When you select merge-shapes, the Modify > Combine Objects menu only offers the Union command. You can use this command instead of grouping merge-shapes. The Union command preserves the spatial relationships between shapes but gives you the ability to change fills and strokes directly on the Stage as described in Chapter 4.
• If you choose Modify > Combine Objects > Intersect and all your shapes disappear, it means there was no place where they all intersected. That result may seem self-evident, but if you’ve selected many shapes or your shapes are complex, it may be difficult to see.