
Most of the power of Flash comes from its ability to create and manipulate symbols. A symbol is a master object that resides in one place—a panel called the Library—but can generate multiple copies of itself that can be used anywhere in Flash. Symbols offer a variety of advantages, including:
• Economy. If you have a visible object that’s intended to appear more than once in a Flash movie, you can convert it to a symbol. You can then place any number of instances (copies) of that symbol on the stage without any significant increase in the movie’s file size.
• Adaptability. Whenever you make a change in a symbol, that change is instantly reflected in all instances of the symbol.
• Flexibility. Every symbol has its own internal timeline. As a result, a symbol can contain its own animated content that plays independently of the animation in the main timeline.
• Nestability. Symbols can be embedded in other symbols, which can be embedded in still other symbols. By nesting symbols in this way, you can animate complex movements easily—for example, you could embed a symbol of a propeller turning inside a symbol of an airplane flying.
• Scriptability. Two kinds of symbols—buttons and movie clips—can be controlled using ActionScript. Movie clips can even include scripts of their own, allowing them to control other movie clips or the movie that contains them.
This chapter shows you the basics of creating, modifying, and organizing symbols. More advanced use of symbols is covered in Chapter 5 (Creating Basic Animation) and Chapter 11 (Introducing ActionScript).
Any object (or group of objects) that can appear on the stage can be made into a symbol. Here’s how to do it:
1. Select one or more objects on the stage. The selected objects may include paths, text objects, bitmaps, or even other symbols.
2. Choose Modify > Convert to Symbol, or press the F8 key. The Convert to Symbol dialog box appears.
(While this book usually doesn’t mention keyboard shortcuts, F8 is an exception because Convert to Symbol is such a frequently used command.)
3. Enter a name for the symbol into the Name field.
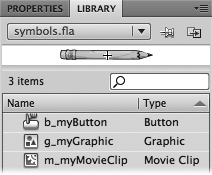
4. Click the radio button for the type of symbol you want to create: a movie clip, button, or graphic. (For the differences between these symbol types, see #27 and #28. If you’re experimenting with symbols for the first time, the simplest choice is Graphic.)
5. Click one of the small squares in the diagram next to the word Registration. The square you click will determine the symbol’s registration point (Figure 22a).
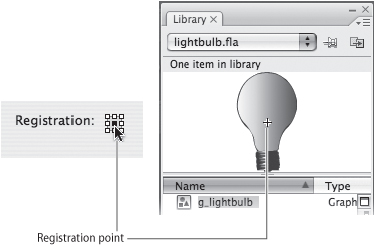
Think of the registration point as the handle by which Flash will hold the symbol when it’s in motion (see #42). When you’re in doubt, the center is usually a good choice.
6. Click OK.
You can find the symbol you just created in the library. (If the library isn’t part of your current workspace, choose Window > Library.) When you click the symbol’s name in the library list, you’ll see the symbol in the viewing pane above the list (Figure 22b).
It’s also possible to create a symbol from scratch, without starting with an object on the stage. To do so, choose Insert > New Symbol. You’ll see a Create New Symbol dialog box, which is identical to the Convert to Symbol, except for the lack of a Registration diagram.
When you complete the dialog box and click OK, Flash enters symbol-editing mode (see #24). If you wish, you can create some visual content for the symbol; if you’d rather wait until later, click Scene 1 in the bread-crumb trail to return to normal mode. If you don’t create any content for the symbol, it will still be listed in the library, but the viewing pane will be blank when you click the symbol’s name.
When you convert an object to a symbol, as you did in #22, the original object seems to remain on the stage. Although that object may look exactly as it did originally, it has become something quite different: It’s now an instance of the symbol in the library.
An instance is a marker that points back to a symbol in the library and tells Flash, “display that symbol here.” That’s why multiple instances of a symbol don’t significantly affect file size: The symbol in the library contains all the information that defines it, and therefore takes up space in the file, but each instance contains barely any information other than a pointer to the symbol.
Note
Flash developers often refer to instances as symbols, as in “Let’s remove that symbol from the stage,” but that’s just shorthand. Strictly speaking, a symbol can be only in the library; any copy of it on the stage is an instance.
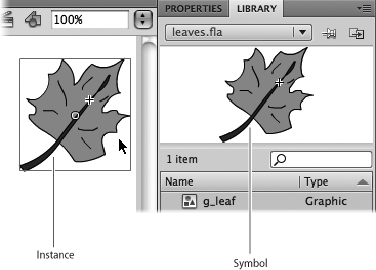
To create additional instances of a symbol, drag the symbol out of the library and onto the stage. The symbol itself stays in the library; what gets dragged is actually an instance of the symbol (Figure 23a). Another way to create additional instances is to duplicate an instance that’s already on the stage—by copying and pasting, for example.
At first, all instances of a symbol look exactly the same as that symbol. It’s possible, however, to change the appearance of an instance in two ways (Figure 23b):
• Transformation. By using the Free Transform tool, you can transform an instance in most of the same ways that you would a path: You can rotate it, scale it, or skew it (see #15). If an instance contains only vector paths, you can distort it as well.
• Color effects. When you select an instance on the stage, a menu labeled Style appears in the Color Effect section of Properties. You can change the instance’s brightness, tint, or opacity by choosing the appropriate item from the menu (see #25).

When you alter an instance, you affect only that instance. The other instances and the symbol in the library remain unchanged. In contrast, when you edit a symbol, the changes you make are reflected in all instances of that symbol (see #24).
There are two ways to edit a symbol. The first is to find the symbol in the library and double-click either its name in the list or its image in the viewing pane. When you do so, everything on the stage disappears, and the symbol you’re editing becomes the only visible object. This is a good way to edit if you don’t want to be distracted, but it prevents you from seeing the symbol in context with the other items on the stage.
The second way to edit a symbol, called editing in place, is to double-click any instance of a symbol on the stage. Flash goes into a symbol-editing mode that looks just like the group-editing mode described in #17: Everything other than the selected instance is dimmed, and the elements of the symbol become the only objects you can select and edit (Figure 24a). What’s unusual about editing in place is that when you double-click the instance, the master symbol temporarily takes its place. Any changes you make to the symbol will affect not only the instance you double-clicked, but all other instances as well.
While you’re in symbol-editing mode, using either editing method, you’ll see a small white circle with crosshairs. That circle represents the symbol’s registration point. The crosshairs can’t be moved, but if you want to change the symbol’s registration point, you can drag the contents of the symbol to a different position relative to the crosshairs.
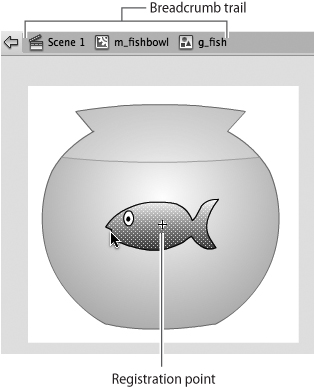
If you have symbols nested within symbols, you can drill down one level at a time by editing the outermost symbol, then double-clicking a symbol embedded in it, and so on. You can return to any earlier level by clicking the appropriate link in the breadcrumb trail (see #17). Clicking the leftmost link, called Scene 1 by default, takes you back to the main stage and exits symbol-editing mode.
Any changes you make to a symbol affect not only the symbol in the library, but all instances of that symbol, even if they were placed on the stage before you edited the symbol (Figure 24b).

Let’s say you want to change the color of an individual instance of a symbol. You can’t use the Color panel to change its stroke or fill, because a symbol instance isn’t editable. You can’t double-click the instance and change its color in symbol-editing mode, because doing so would change the color of all instances of that symbol.
The solution is to select the instance and look on the Properties panel for a section labeled Color Effect. Below that label is the Style menu, from which you can choose the type of effect you want to apply. Depending on which option you select, a different control (or set of controls) will appear next to the menu. The available options are:
• Brightness. The brightness control is a slider ranging from –100% to 100%, with 0% as the default. Choosing a positive number brightens the instance; choosing a negative number darkens it.
• Tint. There are several tint controls. The first, to the right of the Style menu, is a standard color menu that allows you to choose a tint for the instance in the same way you’d ordinarily choose a color for a stroke or fill (see #8). Farther down are three sliders—labeled Red, Green, and Blue—that allow you to adjust the level of each primary color on a scale ranging from 0 to 255.
None of these tint controls discriminates between strokes and fills. As a result, tinting an instance causes the stroke and fill to appear exactly the same color, even if they had contrasting colors to begin with.
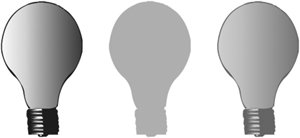
To avoid this problem, you can use the Tint slider. This control acts as if the tint were a separate object overlaying the instance: If the slider is set to 100%, only the tint is visible; if the slider is set to 0%, only the unchanged instance is visible. At intermediate settings—such as 50%, the default—the tint is treated as if it’s partly transparent, allowing some of the underlying instance to show through. As you lower the tint amount, the original contrast between the stroke and fill colors becomes more apparent, but the tint looks increasingly washed out (Figure 25a).
Figure 25a The effects of the Tint slider can be seen in these three different views of the same instance. On the left, the tint is set to 0%, leaving the original instance unchanged. In the center, the tint is set to 100%, completely covering the instance with a uniform color. On the right, the tint is set to 50%, allowing the instance to partially show through the tint.
• Alpha. Alpha is synonymous with opacity. When the Alpha slider is set to 100% (the default), the instance is completely opaque; when it’s set to 0%, the instance is completely transparent (invisible). If the background behind the instance is white, the effect of lowering the alpha is indistinguishable from that of raising the brightness.
• Advanced. This option lets you control tint and alpha at the same time. There are four controls—one each for Alpha, Red, Green, and Blue—with settings that align in columns (Figure 25b). By changing the values in the left column, you can vary the amount of alpha and of each primary color by percentage. (Note that a setting of 100% in this column indicates the level of alpha or color that’s already in the instance. For example, if the instance originally contains 30 percent blue, a setting of 100% would maintain that level of blue; a setting of 50% would bring it down to 15 percent blue.)
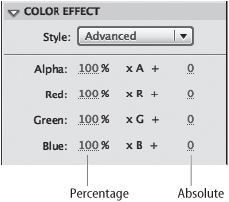
By changing the values in the right column, you can add or subtract absolute amounts of alpha, red, green, and blue, in increments ranging from 255 to –255. Because these controls apply their calculations individually to each color in the instance, they preserve the differences between stroke and fill colors. Therefore, if you wish to apply a color effect to an instance, you’ll usually get better results with the Advanced option than you would with the Tint option.
As you’ve seen in #23 and #25, there are several techniques for modifying individual instances without changing the original symbol. Those techniques are limited, however. What if you really want to change the appearance of an instance—for example, by cutting a hole in it or changing its shape?
The answer is, you can’t—at least not while the object you want to change is an instance. But it’s possible to break the connection between an instance and a symbol, turning the instance into an independent, editable object. To do so, select the instance and choose Modify > Break Apart (Figure 26).

Keep in mind that using the Break Apart command has some negative consequences. When you break apart an instance, any color effects that you’ve applied to it disappear (since color effects work only on instances of symbols). Once an instance has been broken apart, it will no longer reflect changes you make to its parent symbol. And, most significantly, breaking apart an instance increases your movie’s file size, since the former instance now contains real information instead of pointing to a symbol in the library.
Think twice before you break apart an instance, because the process isn’t reversible. Turning an editable object into an instance of an existing symbol isn’t possible, although you can convert the object into a new symbol (see #22).
A button is typically used in an interactive environment (such as a Web page) as a way for the user to make something happen. As interactive design has matured, users have developed additional expectations. When they move the pointer over a button, they expect it to respond in some way—by getting brighter, for example. This change in a button’s appearance when a user rolls over it is known as a rollover effect.
When users click a button, they expect some feedback showing that their input has been recognized. This feedback may take the form of an audible beep or click, an appearance change, or both.
Flash has made it easy to create buttons that provide all of these responses. Here’s the usual procedure for making a functional button:
1. Use the drawing tools to create the button’s normal appearance.
2. Select the paths that constitute the button and choose Modify > Convert to Symbol, or press F8. The Convert to Symbol dialog box appears.
3. Type a name for the symbol (preferably with a prefix such as b_) into the Name field.
4. Below Type, choose Button.
5. Click a square to choose the registration point. (For a button, the center position is typical.)
6. Click OK. The button symbol appears in the library, and the button on the stage becomes an instance of the symbol.
7. Enter symbol-editing mode, either by double-clicking the button symbol in the library or by double-clicking its instance on the stage.
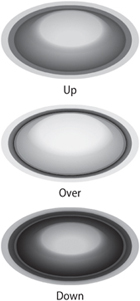
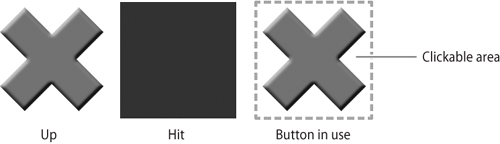
You’ll notice that the timeline changes from its standard layout to a series of four cells labeled Up, Over, Down, and Hit (Figure 27a). The labels Up, Over, and Down refer to three variations, or states, of the button. The Up state is the button’s appearance when the user isn’t interacting with it; the Over state is the way the button looks when the user rolls the pointer over it; and the Down state is the way the button looks when the user is clicking it (Figure 27b).
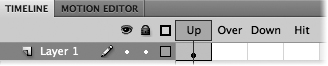
The black dot in the Up cell indicates that the symbol that’s currently on the stage will represent the Up state of the button.
8. Click in the cell below the Over label. The cell darkens to indicate that it’s selected.
9. Choose Insert > Timeline > Keyframe, or press F6. (To understand what’s happening in this step, see #30) A black dot appears in the Over cell. Make sure this keyframe is highlighted (selected) for the next step.
10. Change the button’s appearance to how you’d like it to look in its Over state. (The changes you make won’t affect the button’s appearance in the Up state.)
11. Repeat Steps 8 through 10 in the next cell for the button’s Down state. You can ignore the Hit cell for now.
12. Click Scene 1 in the breadcrumb trail above the stage. Flash exits symbol-editing mode.
13. Choose Control > Enable Simple Buttons. (If the Enable Simple Buttons command already has a check mark next to it, skip this step.)
14. Roll your pointer over the button instance on the stage. You’ll see it change to its Over state.
15. Click the button instance on the stage. While your mouse button is depressed, you’ll see the button in its Down state.
While those are the basic steps for making a multi-state button, there are other things you might want to do to enhance it. For example:
• Add audio. You can add sounds as well as images to the Over and Down states. To find out how to attach an event sound to a keyframe, see #64
• Add motion. A button doesn’t have to be static; any or all of its three states can be animated by means of embedded movie clips. To find out how to accomplish this, see #36
• Add a Hit frame. Some buttons are difficult for a user to click—for example, because they’re too small or irregularly shaped (Figure 27c). You can make the button more user friendly by giving it a larger or more uniform “hot zone.” To do so, return to editing the button, and repeat Steps 8 through 10 for the Hit cell. The variation of the button you use for the Hit frame won’t ever be seen on the stage, but it determines the size and shape of the clickable area around the button.
Although this button may be attractive and easy to use, it’s still missing one important feature: It doesn’t do anything. To make the button functional, you’ll have to control it with ActionScript, which you’ll find out about in #88
While button symbols are used for a single, specialized purpose, graphic symbols and movie clips have broader applications. Although graphic symbol sounds like something that contains a still image, and movie clip sounds like something that contains motion, the truth is that either type of symbol can have either type of content. The differences lie elsewhere.
If you’re creating a symbol, and you don’t know whether to make it a graphic symbol or a movie clip, consider these issues:
• Dependent or independent? Any instance of a graphic symbol is dependent on the pace of the movie it’s placed in. If the symbol contains animation that takes 52 frames to complete, then you’ll probably want the instance to remain on the stage for exactly 52 frames. If the movie ends before those frames have elapsed, the action in the symbol will appear to be interrupted in the middle.
In contrast, a movie clip runs independently of the movie it’s in. As long as a movie clip is on the stage, its animation will continue, even if the main movie ends (Figure 28a). For that matter, when the action in the movie clip reaches its end, it will start playing all over again from the beginning and loop repeatedly—unless you deliberately stop it with ActionScript.

• Passive or interactive? ActionScript can’t control instances of graphic symbols—in fact, it doesn’t even recognize that they’re there. For that reason, graphic symbols are useful mostly for traditional animation—the kind that the user watches, but doesn’t interact with.
In contrast, a movie can use ActionScript to control the movie clip instances within it, and any of those instances can use ActionScript to control any of the others. (In fact, many interactive movies are only one frame long. The action of the movie takes place not in the timeline, but in sequential commands issued to movie clips by ActionScript.)
The fact that a movie clip instance can be controlled by ActionScript doesn’t mean it has to be. It’s fine to have a movie clip that simply plays animation. However, in a situation in which a graphic symbol or a movie clip would serve equally well, it makes sense to go with the graphic symbol. Because of their more limited capabilities, graphic symbols take up less space in the SWF file and make fewer demands on the computer’s processor.
Tip
If you create a symbol as a movie clip and decide later that it should have been a graphic symbol—or vice versa—it’s not too late to change your mind. Select the symbol name in the library list and click the Properties button (a lowercase | in a circle) at the bottom of the Library panel. A Symbol Properties dialog box appears, in which you can rename the symbol and assign it a different symbol type.
The library is more than a repository for symbols; it’s also a place where you can actively organize, modify, and track symbols. Many of the library’s features are hidden away—either represented by small, unlabeled icons, or listed on menus that are not immediately obvious (Figure 29a).
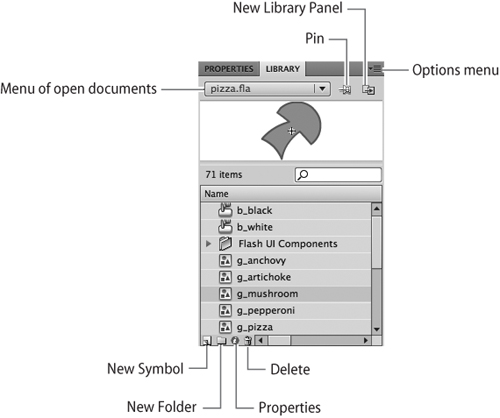
Let’s look first at the four icons at the bottom of the Library panel. They are, from left to right:
• New Symbol. Clicking this icon brings up the Create New Symbol dialog box (see #22).
• New Folder. Just like the files on your computer’s hard drive, the items in the Flash library can be sorted into folders. Clicking the New Folder icon creates an empty folder into which you can drag any number of library items (including other folders). To expand a folder—that is, to see the folder’s contents—double-click the folder in the library list; to collapse the folder, double-click it again.
• Properties. When you select any item in the library (other than a folder), clicking this icon opens a dialog box that lets you modify the item’s properties. The name and contents of the dialog box depend on what type of item you’ve selected. For example, if you’ve selected a symbol, the Symbol Properties dialog box appears; if you’ve selected a sound file, the Sound Properties dialog box appears.
Tip
For library items that can’t be edited in Flash (such as bitmaps and sounds), another way to bring up the Properties dialog box is to double-click the item’s icon in the library list.
• Delete. You can delete any item in the library by selecting it and clicking the Delete icon or pressing the Delete key. Be careful, however: If you delete a symbol, all instances of that symbol will vanish from the movie. If you delete a folder, Flash will delete everything contained in the folder without giving you a warning or asking for confirmation.
If more than one document is open, the panel displays the library contents of whichever document is in the foreground. To see the contents of another document’s library, you can select the document’s name from the pop-up menu above the viewing pane.
The Pin icon to the right of that menu allows you to “pin” the current library in place—that is, to keep the current document’s contents visible in the Library panel even if you bring a different document to the foreground. Click the icon once to “pin” the library; click it again to “un-pin” it.
The next icon to the right is the New Library Panel icon, which opens another copy of the current library in a separate panel. Doing this can be useful if you want to drag items between panels to copy them.
Tip
If you copy an instance from the stage of one FLA file and paste it to the stage of another, the instance’s parent symbol will automatically appear in the second file’s library.
Most of the library’s other features can be found in the Options menu, which you open by clicking the three-line icon on the upper right of the panel. You can get an almost identical contextual menu by right-clicking (Windows) or Control-clicking (Mac) anywhere in the Library panel.
Some of the menu items, such as New Folder and Delete, are alternative ways to access features we’ve already looked at; others, such as Rename and Select Unused Items, are self-explanatory. Two menu items that need special explanation are those that deal with use counts.
Among the features that become visible when you widen the Library panel is the Use Count column (Figure 29b). For each item in the library, the Use Count column tells you how many instances of that item have been used in the movie. By default, the numbers in this column are refreshed only when you right-click (Windows) or Control-click (Mac) the Library panel and choose Update Use Counts Now from the contextual menu. If you want the use counts to be updated automatically, you can choose Keep Use Counts Updated; however, this option can place a drag on the program’s performance.
