The process of converting a Flash movie into a format suitable for public consumption is called publishing. Effective publishing requires that you know as much as possible about the audience who will be viewing your movie: What kind of computers are they likely to have? How fast are their connections to the Internet? What versions of Flash Player can you expect them to have installed? The answers to questions like these help you choose the most appropriate output options for a movie. Those options—called Publish Settings—are stored in the movie’s FLA file.
In addition to publishing movies in SWF and other distribution formats, Flash has the capacity to convert Flash movies—or single frames of Flash movies—into a variety of file types through a process called exporting. Although Flash offers more export formats than publishing formats, export settings are not saved in the FLA file.
The emphasis of this chapter will be on publishing for the Web, although we’ll also look briefly at distribution media such as QuickTime movies and desktop computer applications.
The first step in publishing a movie is deciding how you plan to distribute it. Will the movie be posted on the Web, burned to a DVD, emailed, displayed continuously on a public kiosk, or presented to your audience in some other way? Each distribution method requires a suitable file format.
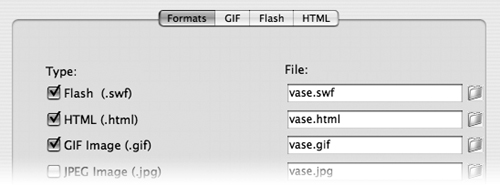
To select the distribution formats for your movie, choose File > Publish Settings. In the Publish Settings dialog box, click the Formats tab (if it’s not selected already). You can choose one or more of the following formats:
• Flash (.swf) and HTML (.html). Both of these options are selected by default, because most Flash movies are published for the Web. See #75 for an explanation of how SWF and HTML files work together on a Web site.
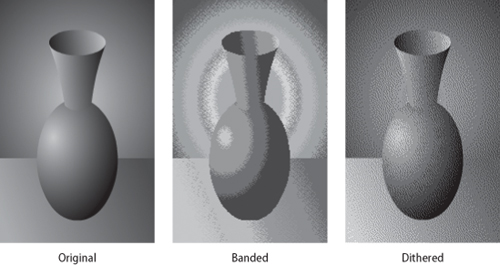
• GIF image (.gif). Before Flash, most animation on the Web was in GIF format. Unlike SWF files, GIF files don’t require a plug-in; any Web browser can play an animated GIF file. The drawbacks are that the GIF format doesn’t work very well with photos or gradients (Figure 74a); it doesn’t support sound; and its file sizes are often impractically large because each frame is a separate bitmap. Nevertheless, the GIF format is still used occasionally for short, simple animations.
Flash allows an entire movie to be saved as an animated GIF file, or a single frame to be saved as a static GIF file.
• JPEG image (.jpg) and PNG image (.png). For information on these single-image bitmap formats, see #80.
• Windows projector (.exe) and Macintosh projector. These are Flash movies in the form of standalone, executable files. For more information, see #82.
Each format has options that you can set by clicking the appropriate tab at the top of the Publish Settings dialog box (Figure 74b). The only options covered in this book are those for the SWF and HTML files; you can learn about the others from the Help panel.
By default, published files are saved in the same folder as the FLA file they’re generated from. To specify a different name or location for a file, use the File field to the right of each format in Publish Settings.
Standard Web pages are coded HTML (Hypertext Markup Language). HTML language consists of plain text; in fact, you can create a Web page from scratch in a text-editing program. Non-text elements, such as graphics, video, and Flash movies, aren’t part of the HTML file; they’re uploaded separately to the Web server. The HTML code includes pointers to those external files that tell the browser where and how to display them on the page.
When you publish a SWF file, Flash creates an HTML file containing the code needed to display the Flash movie in a browser. The exact content of this file depends on the HTML options you choose in Publish Settings (see #77). Even with the default settings, the code isn’t trivial: Although a still image can be placed on a page by means of a single HTML tag, a SWF movie requires a paragraph’s worth of HTML to play reliably (Figure 75).

The Web page created by the Flash HTML file is a bare-bones affair: All it does is show your movie against a solid-color background. If you want other content to appear on the Web page, you have three options:
• Add more HTML code to the file that Flash created, either by hand or by using the Web-page editing program of your choice.
• Copy the necessary code from the Flash HTML file and paste it into another Web page that has the content you want. (This option requires some familiarity with HTML.)
• If you have Dreamweaver, use it to create your Web page. When you import the SWF file, Dreamweaver automatically inserts the HTML code to play it, making the Flash HTML file unnecessary.
If you’ve chosen Flash and HTML as your file formats in Publish Settings, you’ll see a tab for each file type at the top of the dialog box. Clicking the tabs allows you to set options for both files: The HTML options will be covered in #77; the Flash options are covered here. In both cases, we’ll look only at the most significant options; you can read about the others in the Help panel.
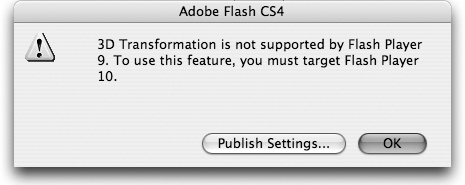
• Player. Each time the Flash Player is updated, the new version may take months or years to catch on. Therefore, to make your movie available to the largest possible audience, you may want to publish a SWF file that’s compatible with earlier versions of the player.
The catch is that earlier versions of the player don’t support the features in later versions of Flash. For example, if your movie uses 3D translation, which was introduced in Flash CS4 (also known as Flash 10), the 3D effect will disappear if your publish your movie in Flash 9 format.
Once you’ve decided which version of the Flash Player you want to use—a process often referred to as targeting—choose that version from the Player menu. Thereafter, if you add a feature to your movie that isn’t supported in the targeted version, Flash will give you a warning (Figure 76).
• Script. Like targeting earlier versions of Flash Player, targeting earlier versions of ActionScript may make your movie available to a larger audience. The Script menu lets you choose from ActionScript 1.0, 2.0, or 3.0 (see #83). Early versions of Flash Player may not support higher levels of ActionScript. ActionScript 3.0, the latest version, will work only in Flash Player 9 or later.
• JPEG Quality. This slider sets the default quality level for images compressed with JPEG compression. It doesn’t override the individual settings that you made under Bitmap Properties (see #54).
• Audio Stream. When you publish a SWF file, Flash combines all of the movie’s streaming sounds into a single audio stream. By default, it applies the compression settings of the highest-quality streaming sound to the entire stream. If you want Flash to use different settings, you can specify them here and select the Override Sound Settings option (described below).
• Audio Event. These settings apply to event sounds for which you didn’t specify individual compression settings in Sound Properties (see #62).
• Override Sound Settings. Selecting this option causes the Audio Stream and Audio Event settings to apply to all sounds in the movie, regardless of whether you set their compression rates individually.
Most of the settings that affect your Flash movie’s appearance are contained not in the SWF file, but in the HTML file to which the SWF file is linked (see #75). Some of these settings—particularly those involving dimensions, alignment, and scale—interact in unintuitive ways.
The HTML settings are:
• Template. This menu allows you to choose the underlying HTML code that Flash will modify according to your settings. The default template, Flash Only, displays your Flash movie on an empty Web page as described in #75. Most of the other templates offer minor variations for special situations. The Detect Flash Version option is treated separately in #79.
• Dimensions. This menu allows you to specify the dimensions of the rectangular frame in which your movie is displayed in the Web browser window. (Although Flash refers to it as a window, we’ll call it a frame to distinguish it from the browser window.) The default choice is Match Movie, which means that the frame will be the same size as your movie. The other choices are Pixels, which allows you to specify exact dimensions for the frame, and Percent, which allows you to specify the frame size as a percentage of the size of the browser window, so it resizes along with the browser window.
Note that these settings apply to the frame, not to the movie itself. Keeping that distinction in mind will make the alignment and scale settings easier to understand.
• Playback. These options control the behavior of your movie rather than its appearance. For example, the Loop option is selected by default, and you can deselect it if you want the movie to play once and stop. However, the Loop and Paused at Start options are controlled much more reliably by ActionScript than by HTML. (One obvious reason is that ActionScript commands continue to work if the SWF file is separated from the HTML file.) The Display Menu option determines whether the user can right-click the movie to see a contextual menu, but the menu doesn’t allow the user to do much besides zoom in and out.
• Quality. These settings control the trade-off between processor load and image quality. The higher settings improve the appearance of bitmaps—particularly those that rotate or resize—but they make greater demands on the user’s computer processor. The default choice, High, is suitable in most situations, but the most appropriate setting will depend on the content of your movie and on the computers likely to be used by your target audience.
• Window Mode. Choosing Transparent Windowless from this menu causes the background of the stage to become transparent, allowing other content on the HTML page (such as a background pattern) to show through. Because this feature doesn’t work reliably in all browsers, most Flash developers stay with the default choice, Window, which leaves the movie’s background opaque.
• HTML Alignment. This menu determines how the frame in which the movie appears is positioned relative to the user’s browser window.
• Scale. This menu works with the Dimensions options described earlier. It controls how the movie adapts to frame dimensions that are different from the size of the original movie (Figure 77). Show All and No Border both assure that the movie always maintains its original aspect ratio (ratio of width to height). If the aspect ratio of the frame is different from that of the movie, Show All adapts by using letterbox-type borders, while No Border crops part of the movie. In contrast, the Exact Fit setting causes the movie to adopt the aspect ratio of the frame, even if this distorts the image. The No Scale setting is similar to No Border, but it keeps the movie from scaling even if the size of the frame changes dynamically.

• Flash Alignment. This setting comes into play if the dimensions of the frame are smaller than those of the movie, and Scale is set to No Border or No Scale, causing the movie to be cropped. Flash Alignment determines which area of the movie remains visible. (For example, in the No Border illustration in Figure 77, Flash Alignment is set to Top Left.)
Once you’ve adjusted the Publish Settings as needed, you can publish your movie by clicking the Publish button at the bottom of the Publish Settings dialog box. Alternatively, you can click OK to store the settings in the FLA file, and then publish the movie later by choosing File > Publish.
Flash has a Publish Preview feature, but its name is misleading: It might more accurately be called Publish Postview. That’s because there’s no way to see what your published movie is going to look like without actually publishing it. When you choose File > Publish Preview and pick a file type (Figure 78), Flash responds in the same way as it would to File > Publish—that is, it publishes the movie—but then it goes one step further: It opens the published file in a suitable application so you can look at it. If you’ve published an HTML file, Flash loads it into your default browser; if you’ve published a PNG file, Flash opens it in Fireworks (or your computer’s default image-editing program). If you don’t like what you see, you can modify the movie or the Publish Settings and publish it again; the new files will overwrite the old ones.

By default, published files are saved to the same folder as the original FLA file. Assuming you’ve published your movie for the Web, you’ll end up with at least two new files: SWF and HTML. In addition, if your movie includes imported video, another file may appear in the folder: a SWF file containing the skin you selected for the video player (see #69). All of these files—except, of course, the FLA file—have to be uploaded to your Web server for the movie to work properly (see #67).
Ever since Flash came into being, its developers have grappled with the problem of how to handle users who don’t have the latest version of Flash Player, or who don’t have Flash Player at all. What happens when they visit a Web site with Flash content?
Early versions of Flash left this problem to the individual user; later versions experimented with various ways to detect the existence and version number of Flash Player. Because of the many differences among browsers, platforms, and users’ preference settings, no form of Flash detection turned out to be foolproof. The latest implementation of Flash detection in CS4 still isn’t foolproof—for example, it works only with Player 4 and newer—but it’s much more reliable than earlier attempts.
To implement Flash detection:
2. Click the Flash tab and choose the version of Flash Player that you targeted (see #76).
3. Click the HTML tab and choose a template.
4. Directly below the Template menu, select the Detect Flash Version check box.
5. In the Version field below, enter the version of the Flash Player that you’re targeting. (The minor revision numbers are optional.)
Note
If your FLA file uses ActionScript 3.0, Flash won’t allow you to target versions of the Flash Player earlier than 9.0.
6. Publish the movie. Flash creates a SWF file and an HTML file as usual.
7. Open the HTML file in a text editor or web-page editing program, and scroll down to the line that says var alternateContent = 'Alternate HTML content should be placed here.’ (Figure 79a)
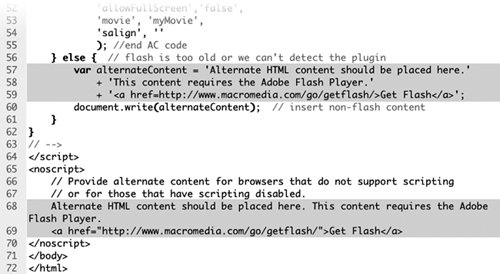
There are three lines of text, each enclosed in single quotation marks and joined to the others by a plus sign. These lines of text are what will be seen by a user who has the wrong version of Flash Player (or doesn’t have it at all). By default, the text provides a link for downloading the latest version of Flash Player, but you can substitute whatever content you want. (You can even add more lines if you’re careful to follow the same syntax.)
8. Scroll down further, until you get to the line that says // Provide alternate content for browsers that do not support scripting.
Below that comment, there’s another copy of the alternate content that you saw in Step 7 (although not in quotation marks this time). This text is what will be seen by a user whose browser has JavaScript turned off.
As before, you can leave the alternate content as it is or replace it with your own.
9. Save the file and upload it to your Web server along with the SWF file and any other necessary files.
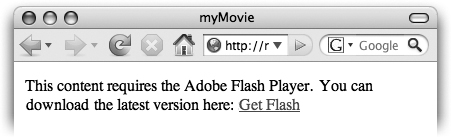
Your setup of Flash detection is complete. Except in rare cases, users who visit your Web page with the appropriate version of Flash Player will see your movie; others will see the alternate content (Figure 79b).
Standard Web browsers can display images in the JPEG, GIF, and PNG formats, but unlike GIFs, JPEG and PNG files can’t contain animation. If you save your movie as JPEG or PNG, the resulting file will contain only the frame at which the playhead is positioned at the time you export.
Although Flash offers the choice of exporting or publishing, single frames often look better when exported than when published. For example, publishing GIF or PNG files with transparent backgrounds doesn’t work properly, but exporting the same images is problem-free.
The ability to export a single frame is handy if you want to include portions of your animation in printed material (this book, for example). Also, it allows you to substitute a still image for an animation in Web browsers that don’t have the Flash plug-in (see #79).
Each file format has different strengths and weaknesses:
• GIF. As noted in #74, GIF has trouble with continuous-tone images; it’s better suited to technical or cartoon-style drawings that have sharp edges and areas of flat color. Unlike JPEG, however, GIF supports transparency: If you select the Transparent option, the background color of the stage drops out.
• JPEG. As you saw in #54, JPEG compression can store full-color images in amazingly small files. Apart from that, however, the JPEG file format doesn’t have much going for it: it doesn’t hold color very accurately, and anything more than moderate compression introduces obvious artifacts.
• PNG. PNG is a robust, multipurpose format that combines the best aspects of all the others: it supports full color, masking, and transparency, and it’s capable of very good compression. Unfortunately, support for PNG’s features is still spotty: Flash, for example, doesn’t implement compression in PNG files, and some browsers still don’t support PNG transparency.
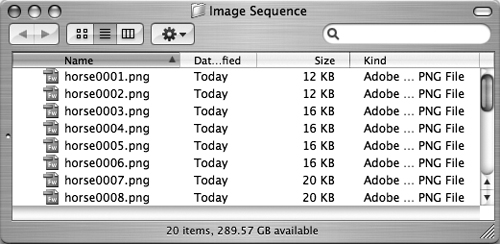
Although the JPEG and PNG file formats don’t support multiple frames as GIF does, it is possible to export a Flash movie as an image sequence, in which all the movie’s frames are saved as a series of serially numbered files in the bitmap format of your choice. (Figure 80). You’ll find this option below File > Export > Export Movie (not, as you might guess, below Export Image). Image sequences are especially useful when you want to enhance each frame individually in Photoshop and then reassemble the movie. Many video editing programs, including Adobe Premiere Pro, recognize image sequences and import them as continuous video clips.
If your Flash movie consists solely of animation, with no ActionScript or interactivity, you can export it in QuickTime format. The resulting file can be viewed in the QuickTime Player, burned to a DVD, or imported into a video-editing program such as Adobe Premiere Pro.
To export a QuickTime movie, choose File > Export > Export Movie; then choose QuickTime from the Format menu in the Export Movie dialog box. When you click Save, a QuickTime Export Settings dialog box appears. The basic settings are:
• Render Width and Render Height. These dimensions are locked to the width and height of the Flash stage; they can’t be changed.
• Ignore Stage Color. If this option is selected, the stage is made transparent, allowing the animation to be superimposed on other elements in a video-editing program (Figure 81).

• Stop Exporting. To export a QuickTime file, Flash essentially plays your movie in real time and records what it sees. As you learned in #31, Flash rarely plays back animation at a steady frame rate; therefore the exact duration of a movie can’t be predicted. You can choose to have Flash export the entire movie regardless of its playback time, or to cut the movie short after a certain number of hours, minutes, and seconds.
• Store Temp Data. To keep playback smooth, Flash buffers the animation, moving data in and out of temporary storage areas. Buffering in memory provides the best results, but only if the movie is short enough to fit in your computer’s available RAM. There’s no harm in trying the In Memory option; if the movie stalls because of insufficient RAM, you can try exporting again with On Disk selected.
• QuickTime Settings. If you’re experienced with digital video, you can click this button to access advanced settings such as audio and video codecs, data rates, and so on.
The publishing formats we’ve looked at in this chapter have one important thing in common: They all require some sort of player. Viewing a SWF file requires the Flash Player; viewing a QuickTime file requires the QuickTime Player; even viewing animated GIF files requires a graphics program or a Web browser. In some cases, however, you may want to create a Flash movie that acts like a freestanding computer program—that is, an application. This is particularly desirable if the movie uses ActionScript to interact with the user.
Flash offers two ways to create applications—one older, one newer. The old way is to create a projector—a hybrid file that combines a SWF file with the playback mechanism of Flash Player. Regardless of whether a computer has Flash Player installed, double-clicking a projector causes the embedded movie to play.
To create a projector, select Windows Projector or Macintosh Projector on the Formats tab in the Publish Settings dialog box. (A Windows projector won’t work on a Mac, nor vice versa.) No extra tabs appear, and there are no options for you to set. When you publish the movie, the projector file appears in the same folder as the FLA file.
Because most computers these days already have Flash Player installed, projectors aren’t needed very often. Their large file size (at least 2 MB for Windows, and nearly 10 MB for Mac) makes them unsuitable for use on the Web. They’re most often used for distributing Flash movies on CD-ROM or DVD-ROM, or for kiosk applications in which a movie runs directly off a computer’s hard drive.
Projectors have long been used by amateur software developers as a tool for creating standalone applications: The developer creates the user interface in Flash, adds programming in ActionScript, and then outputs the result as a projector. Double-clicking the projector icon initiates whatever the projector has been programmed to do, even if that has nothing to do with animation (Figure 82a).

Adobe’s recent introduction of a technology called AIR has made this use of projectors essentially obsolete. AIR, which stands for Adobe Integrated Runtime, is a more sophisticated way of turning Flash movies into applications.
Unlike a projector, an AIR application is cross-platform: It can run on any computer that has the AIR Runtime software installed. Your computer already has AIR Runtime; it was installed when you installed Flash. Users who don’t have it can download it free from Adobe’s website. It’s available for both Windows and Macintosh, and a Linux version is being developed.
Here are the basic steps for creating an AIR application:
1. Choose File > New, and then select Flash File (Adobe AIR) from the New Document dialog box; or open an existing FLA file and choose Adobe Air 1.1 from the Player menu in Publish Settings (see #76). Click OK.
2. Add content to the movie as usual, and test it by choosing Control > Test Movie.
3. Make sure Flash (.swf) is selected on the Formats tab in Publish Settings (see #74).
4. Publish the movie. A Digital Signature dialog box appears, with the Sign the AIR File with a Digital Certificate radio button selected by default.
5. Click Create. A Create Self-Signed Digital Certificate dialog box appears. (The certificate you’re creating will identify you to anyone who installs your AIR application; if they don’t have reason to trust you, they can choose not to proceed with the installation.)
6. Fill in the text fields with whatever information is appropriate; then type in a password and confirm it.
7. Click the Browse button at the bottom of the dialog box, navigate to a folder on your hard drive where you want to keep the certificate, and click Choose.
8. Click OK to close the Create Self-Signed Digital Certificate dialog box. An alert box appears, telling you that a certificate has been created. Click OK to close the alert box.
Note
After you’ve completed Steps 5 through 8, you can reuse the certificate as many times as you like. When you create future AIR applications, you can go directly from Step 4 to Step 9.
9. Enter your password (the one you created in Step 6) in the Password field of the Digital Signature dialog box, and click OK. An alert box appears, informing you that an AIRI file—a temporary installation file—has been created. Click OK to close the alert box.
Flash has now added three files to the folder in which the FLA file resides. If the name of the FLA file is MyMovie.fla, the new files would be MyMovie.swf (a normal SWF file), MyMovie-app.xml (a data file with information about the movie), and MyMovie.airi (the temporary installation file).
10. Choose File > AIR Settings. An Application & Installer Settings dialog box appears.
11. Change any of the settings in the dialog box (see Help for explanations), or just keep the defaults.
12. At the bottom of the dialog box, click Publish AIR File.
13. As you did in Step 9, enter your password in the Password field of the Digital Signature dialog box, and click OK. An alert box appears, telling you that an AIR file has been created. Click OK to close the alert box.
Flash has added another file to the folder in which the FLA file resides. This file, which has the file extension .air, is the installation file for your application.
When a user double-clicks the AIR file, a dialog box asks whether he or she is willing to install your application. If the user agrees, the application is installed in the standard folder (Program Files on Windows, Applications on Mac) and launches automatically (Figure 82b).