
Using Flash can be like visiting a restaurant in a foreign country. To request one of the restaurant’s standard meals, you can point to what you want on the menu. But to get something prepared a special way, you have to talk to the waiter—and to do that, you have to speak the waiter’s language.
The language that Flash understands is ActionScript. If you can “speak” in ActionScript, you can get Flash to do almost anything you want.
Like any other language, ActionScript requires serious study and practice. You can’t learn it from a chapter in a book—especially a book like this, which is focused on tasks rather than fundamental principles. All that can be provided here is a taste of how ActionScript works and what its capabilities are. To learn underlying principles and more techniques, try a more in-depth book such as Flash CS4 Professional Advanced for Windows and Macintosh: Visual QuickPro Guide by Russell Chun (Peachpit Press).
In the meantime, you can learn a few phrases to use in a pinch—the Flash equivalent of being able to say “Diet Coke, no ice” in a way that the waiter will understand.
The original version of ActionScript, now known as ActionScript 1.0, was designed to be as easy as possible for beginners to learn and use. It had a set of intuitive commands and a simple syntax that made it possible to add interactivity to Flash movies—the ability of viewers to start, stop, skip around in, and otherwise affect the movies they were watching.
At the time ActionScript 1.0 was released, no one envisioned that Flash would become a professional-level tool for building complex interfaces and Web applications. Nevertheless, as more serious programmers began to use Flash, they began to develop sophisticated kinds of interactivity—such as allowing users to input data or interact with server-side software—that pushed against ActionScript’s limitations. The Flash development team responded with a revised and extended scripting language, ActionScript 2.0, which gave experienced programmers many of the tools they needed while remaining accessible to nonprogrammers.
The current version, ActionScript 3.0, created a stir when it was released a couple of years ago. Unlike its predecessors, it’s an industrial-strength, object-oriented programming language (see #87) that has much in common with widely used languages such as C++ and Java.
On the positive side, ActionScript 3.0 makes Flash a viable development tool for sophisticated applications, both on the Web and—with the help of Adobe AIR (see #82)—on the desktop. On the negative side, it puts ActionScript further out of beginners’ reach. Unless you’re familiar with the principles and techniques of object-oriented programming—or are willing to learn them—you won’t be able to do much with ActionScript 3.0.
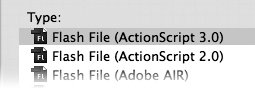
Fortunately, Flash CS4 continues to support earlier versions of ActionScript (Figure 83). When you create a new document, the first decision Flash requires you to make is whether you want to use ActionScript 2.0 or 3.0. (Choosing 2.0 allows the use of 1.0 as well.) The choice you make determines which versions of Flash Player you can target in Publish Settings (see #76) and which commands are available to you in the Actions panel (see #84).
If you’re a newcomer to ActionScript, you have two options.
The first is to start with 1.0 and work your way gradually toward 3.0. A drawback of this approach is that it instills bad programming habits that you’ll have to unlearn when you begin scripting in 3.0. Another drawback is that it limits the things you can do with Flash—for example, the 3D and Inverse Kinematics tools work only in ActionScript 3.0 FLA files.
The second option is to start working with 3.0 right away. Although the learning curve is steeper and the scripting process is slower, the skills you acquire will be up to date.
This chapter is geared to the second option; it focuses entirely on ActionScript 3.0. Although you can’t learn how to program in a span of 25-or-so pages, you can learn enough fundamentals and see enough simple examples to get you started.
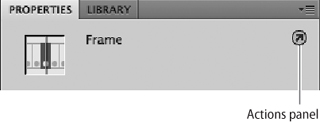
The Actions panel is where you write and edit ActionScript code. To open it, choose Window > Actions or press F9 (Windows) or Option-F9 (Mac). If you’ve selected a keyframe in the timeline, you can open the Actions panel by clicking the ActionScript icon in the Properties panel (Figure 84a).
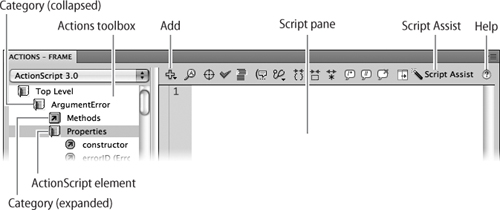
By default, the Actions panel has three panes, although it can acquire a fourth pane if you turn on Script Assist (see #85). The top-left pane is the Actions toolbox, which contains a categorized list of ActionScript elements, including commands, functions, classes, methods, properties, and other items (Figure 84b). The right pane is the Script pane, where you write and edit your scripts. Double-clicking an ActionScript element in the toolbox causes it to appear in the Script pane, accompanied by any necessary punctuation.
Figure 84b In the Actions panel, categories are indicated by an open or closed book icon; ActionScript elements are indicated by a round ActionScript icon.
Many beginners prefer to look up the ActionScript elements they need in the toolbox and double-click them to let Flash “write” a script in the Script pane, often with the aid of Script Assist. If you’re not sure what an item means or how it’s used, you can select it and click the Help icon for an explanation. (If you prefer, you can choose ActionScript elements from menus and submenus by clicking the Add icon, but you can’t use Help in that case.)
Tip
Another way to add an element to your script is to drag it directly from the toolbox into the Script pane.
Once you have enough experience with ActionScript, you may choose to type your code directly into the Script pane—a much faster technique, but one that can more easily lead to mistakes.
If your FLA file contains more than one script, the bottom-left pane—called the Script Navigator—helps you find the one you’re looking for. Double-clicking a script in the Script Navigator “pins” the script, keeping it visible in the Actions panel even if you select something else on the stage or in the timeline.
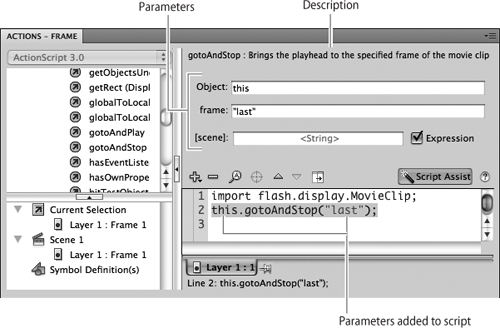
Most ActionScript commands require additional information for Flash to carry them out. For example, if you use the command gotoAndStop (which moves the playhead to a specified frame and pauses it there), Flash has to know which frame you want to move to and which timeline that frame is in. These extra pieces of information are called parameters.
If you’re not experienced with ActionScript, you probably don’t know what parameters a particular command requires and how they need to be coded. Clicking the Script Assist button (Figure 84b) opens a new pane in the Actions panel that helps answer these questions.
Script Assist does two things: If you select an ActionScript element in the toolbox, the Script Assist pane displays a brief description of that element (Figure 85). If you bring that element into the Script pane (by double-clicking or dragging it), Script Assist adds a field or menu for each parameter that the command requires. As you fill in each parameter, Script Assist adds it to the script with the proper syntax.
For clarity of presentation, the coding examples you’ll see in this chapter assume that Script Assist is turned off. When you begin to do your own coding from scratch, however, you may find it helpful to keep the Script Assist pane open.
In ActionScript 3.0, every script must be attached to a keyframe in the timeline. When you play a movie, and the playhead arrives at a keyframe that has an attached script, Flash executes the instructions in that script.
For a very simple example, suppose you have a movie that’s 20 frames long. When the playhead leaves frame 20, its default behavior is to snap back to frame 1, causing the movie to loop. In this case, however, you don’t want the movie to loop—you want it to play once and stop.
You can accomplish this with a script:
1. Insert a keyframe in frame 20.
2. With that keyframe still selected, make sure that the script type on the upper-left corner of the Actions panel is Actions – Frame (Figure 86a). If it’s anything other than that, the keyframe isn’t selected. Go back and reselect it.

3. In the Script pane, type the following:
stop();
Keep all the letters lowercase, and be sure to include the parentheses and the semicolon. (For an explanation of the odd punctuation, see the sidebar “Syntax, Part 1.”)
Note
When you write a script in the Actions panel, you don’t have to press Enter or click an OK button to make the script “stick.” A script becomes active the moment it’s entered in the Script pane.
4. Preview or test the movie. When the playhead reaches frame 20, it executes the script; as a result, the movie stops.
You can tell that a keyframe has a script attached to it by the letter a that appears in the timeline (Figure 86b). Technically, you can attach a script to any keyframe. In practice, however, it’s highly recommended that you add a new layer and put all your scripts in that layer. (Most people call the layer Actions or Scripts, and they put it at the top of the timeline so that it can be seen easily.)
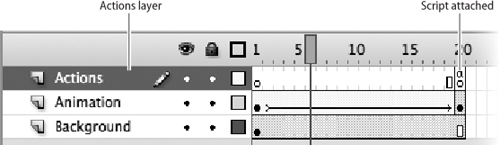
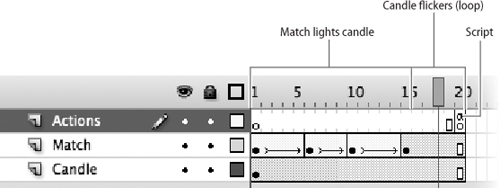
Besides stop, the command used most frequently in simple scripts is gotoAndPlay. For example, imagine 20-frame animation in which a match lights a candle and exits in frame 15, leaving the candle flame flickering. You’d want the candle-lighting portion of the animation to play once, but you’d want the candle to go on flickering indefinitely. In this case, you could attach a script to frame 20 that tells the playhead to jump to frame 16. The technique is illustrated in Figure 86c.
Figure 86c Every time the playhead reaches frame 20, a script causes the playhead to go to frame 16.
Computer programming is sometimes described as feeding a computer a series of instructions. That description was more accurate in the early days of computing, when programmers used line-oriented languages such as FORTRAN and COBOL. Programs in those languages essentially told the computer “First you do this, next you do this. . . .” Even now, the simple scripts we looked at in #86 work in much the same way: They give Flash linear instructions such as “When the playhead gets to frame 20, send it to frame 16.”
Starting in the 1980s, a more sophisticated programming model, called object-oriented programming (OOP), became common. The basic idea behind OOP was to manage a computer the way we manage large organizations. For example, the president of a company doesn’t sequentially dictate every action that takes place in the company; instead, he or she delegates responsibilities to top-level staff, who delegate some of their responsibilities to lower-level staff, and so on. As a result, a variety of actions can take place at the same time, each independent of the others.
Similarly, imagine a Flash movie with a collection of buttons on the stage. Because they’re buttons, they all have a common purpose: to respond to a user’s mouse movements and clicks. Among them, one group of buttons may look and work a certain way because they’re all instances of a particular symbol; another group may look and work another way because they’re instances of a different symbol. There are further differences within each group: Each button has its own instructions about what to do when a user clicks it or rolls over it. Each button does its job individually, independent of what the other buttons are doing.
The elementary scripts we’ll be working with won’t come close to demonstrating the power and flexibility of this sort of programming model. Nevertheless, there are some OOP-related terms and ideas that you need to be familiar with for the rest of this chapter to make sense.
• Class. A class is a group whose members have something fundamental in common. As noted earlier, all buttons in Flash have broadly shared characteristics; therefore, ActionScript provides a Button class. (Class names always begin with a capital letter.) Other examples include the MovieClip, Sound, and Math classes.
• Object. An object is a member of a class. However, the word is often used loosely—for example, a movie-clip symbol is an object, but so is an instance of that symbol. In practice, anything that you can place in the timeline or control by means of ActionScript can be thought of as an object.
• Property. A property is a characteristic of an object—for example, its size, position, or opacity. An object’s properties depend on what class it belongs to. A sound, for example, has volume and duration among its properties, but not height or visibility.
• Method. A method is an activity that an object is capable of carrying out. As with properties, an object’s methods depend on the class that the object belongs to. For example, a movie clip’s methods include playing and stopping; a text string’s methods include splitting into substrings.
• Instance Name. ActionScript can “talk” to instances of movie-clip and button symbols, but only if you assign each instance an instance name by which ActionScript can distinguish it from other objects in the movie. To do so, select the instance on the stage and type a name in the Instance Name field in the Properties panel (Figure 87). The name can be whatever you like, but it must begin with a lowercase letter and contain only letters and numbers, with no spaces or punctuation. It’s recommended—though not required—that you give movie-clip instance names the suffix _mc, and button instance names the suffix _btn (see #91).

Some commands—such as stop and gotoAndPlay—are carried out automatically when Flash encounters them in a script (see #86). Others are executed only in response to an event—something that happens on the stage, in the timeline, or elsewhere in the Flash environment.
In ActionScript 3.0, responding to events is the responsibility of an object called an event listener. Each event listener is assigned a particular event to “listen” for—for example, the pressing of a key on the keyboard. If and when that event takes place, the event listener carries out a predefined set of instructions. The event listener and its instructions are usually defined in a script in frame 1 of the timeline.
Let’s look at an example. In #27, you created a button symbol that displayed a rollover effect, but didn’t do anything else. To make practical use of an instance of that symbol, you have to create an event listener for it. (For easier reading, we’ll refer to an instance of a button symbol simply as a button.)
Let’s say you’ve placed a button on the stage. You want to use it as a pause button, so that when the user clicks it, the movie stops. Here’s a way to do that:
1. Select the button on the stage.
2. In the blank field at the top of the Properties panel, type an instance name (see #87). For this example, we’ll name the instance pause_btn.
3. Create a Script layer in the timeline and select the keyframe in cell 1.
4. In the Actions panel, click the Insert Target Path icon (Figure 88). A dialog box appears, listing all of the objects that have instance names.
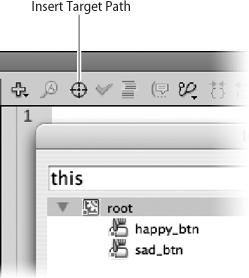
5. Select pause_btn and click OK. The Script pane displays this.happy_ btn followed by a flashing cursor.
Note
If you prefer, you could just type the instance name. The advantage of using the Target Path icon is that you can choose the name from a list instead of having to remember it.
6. Press the Period key. A list appears, containing all the possible ActionScript elements that might follow the instance name.
7. From the list, double-click addEventListener. The Script pane now displays this.happy_btn.addEventListener(
8. Complete the line of code as follows, paying special attention to the case of the characters:
this.happy_btn.addEventListener(MouseEvent.CLICK, moviePause);
The MouseEvent object causes the button to “listen” for a mouse-related event, in this case a click. (There are many other possible mouse events, such as DOUBLE_CLICK and ROLL_OVER. To see them, go to the Actions toolbox and choose flash.events > MouseEvent > Properties.)
The word moviePause doesn’t mean anything at all; it’s the name of a user-defined function. A function can be thought of as an ActionScript command that you invent. (It’s like writing your own dictionary—you can make up words and then make up definitions for them.) We used moviePause for this example, but a function’s name can be whatever you like, so long as it follows the rules governing instance names (see #87).
9. Press Enter (Windows) or Return (Mac) to start a new line. Type the following lines of code:
function moviePause(event:MouseEvent){
stop();
}
This code creates a function called moviePause, whose definition—stop();—resides within the curly braces. Once the function has been defined, it can be called (executed) at any time.
The phrase in parentheses (event:MouseEvent) isn’t strictly part of the function. It’s an example of data typing, which is used in ActionScript 3.0 to make coding errors easier to detect. In this case, it tells Flash that the only type of event that will be allowed to trigger this function is a mouse event.
10. Preview or test the movie.
When you click the pause button on the stage, the event listener “hears” the click of the mouse button; in response, it calls the moviePause function, causing the movie to stop.
To allow the user to resume the movie, you can create a play button: Follow the same steps, but create a different function name (for example, movieResume) in Steps 8 and 9, and replace stop(); with play(); in Step 9.
When you play an audio CD, you can listen to it all the way through from beginning to end, or you can jump from one track to another. The Flash timeline can work the same way. The techniques we’ve worked with so far involve playing the timeline continuously from beginning to end, but it’s also possible to divide it into discrete segments and let the user decide which segments to play.
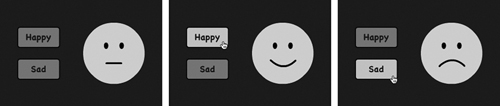
For example, imagine a Flash movie that shows a neutral face and two buttons, one labeled Happy and one labeled Sad. If the user clicks the Happy button, you want the corners of the mouth to turn upward; if the user clicks the Sad button, you want them to turn downward (Figure 89a).
You can accomplish this by dividing the timeline into three segments. The first segment displays the neutral face; since it’s not animated, it only has to be one frame long. The second segment animates the transition from neutral to happy; the third segment animates the transition from neutral to sad (Figure 89b).
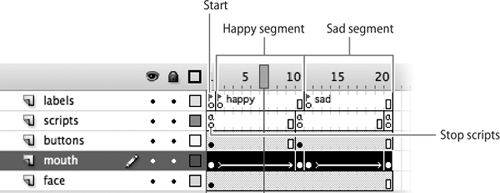
To make this arrangement work, you need to add stop scripts to various frames (see #86): one in frame 1, to keep the playhead paused at the beginning of the movie until the user clicks a button; one in frame 11, to stop the playhead from moving into the “sad” segment when it comes to the end of the “happy” segment; and one in the final frame, to prevent the playhead from snapping back to frame 1.
You also need to write event-handling code for the buttons. As noted in #88, event listeners are usually defined in a script in frame 1. Since frame 1 already contains a script, you’ll need to add more code to the existing script. Select the script’s keyframe in the timeline and add the following lines of code after the stop command in the Actions panel:
this.happy_btn.addEventListener(MouseEvent.CLICK, goSmile);
this.sad_btn.addEventListener(MouseEvent.CLICK, goFrown);
function goSmile(event:MouseEvent) {
gotoAndPlay(2);
}
function goFrown(event:MouseEvent) {
gotoAndPlay(12);
}
(Note that goSmile and goFrown are made-up function names; you can replace them with whatever names you like.)
There’s still one problem with this arrangement: If you decide to move any of the keyframes to lengthen or shorten the animation, you’ll have to go back and change the frame numbers in the scripts. If you forget to do this, or if you change the numbers incorrectly, the movie won’t work.
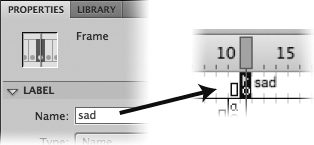
The solution to this problem is to use frame labels to mark the beginning of each segment. To add a label to a frame, insert a keyframe (if there’s not one there already), select the keyframe, and type a label into the Frame Label field in the Properties panel (Figure 89c). The label appears in the timeline, marked by a red flag.
You can now change the frame numbers in the scripts to frame labels, as in:
function goSmile(event:MouseEvent) {
gotoAndPlay("happy");
}
function goFrown(event:MouseEvent) {
gotoAndPlay("sad");
}
The frame labels have to be in quotation marks, or Flash won’t recognize them. Also, note that ActionScript is case-sensitive, so you can’t use “Happy” as the parameter if the frame label is “happy.”
Like scripts, frame labels are best placed in a layer of their own at the top of the timeline. If you need to move a keyframe of animation, you can select the frame label at the same time and move them in tandem.
Although the movie we created in #89 is technically “legal,” most programmers wouldn’t be happy with it. The ActionScript code is scattered among various scripts—a long script in frame 1 and short scripts in frames 11 and 20—with no easy way to know which instructions are where. Programmers prefer to have all their code in one place, where they can easily revise it and troubleshoot it.
For this reason, many professional Flash developers strive to limit their movies to one frame. All the animation is stored inside movie-clip symbols, which can be controlled by a single script in the main timeline. (As you learned in #28, one of the distinguishing features of movie clips is that they respond to ActionScript commands.)
To see how this might be done, let’s work with the same example that is used in #89: a movie in which the Happy button causes a face to smile and the Sad button causes it to frown. Here are the steps you might follow:
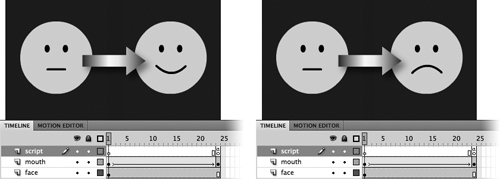
1. Create two movie-clip symbols—one containing animation of the neutral-to-happy face, the other containing the animation of the neutral-to-sad face. (For this example, we’ll name the symbols m_happy and m_sad, although you can use whatever names you like.) Be sure to put a stop script at the end of each movie clip’s animation (Figure 90a).
2. In frame 1 of the movie’s main timeline, recreate the layout shown in Figure 89a: the neutral face and two buttons. In this case, however, use an instance of m_happy for the face.
3. Select the instance of m_happy and give it an instance name—for example, happy_mc.
4. Stack an instance of m_sad on top of the instance of m_happy. Make sure both are positioned in exactly the same place on the stage.
5. Select the instance of m_sad and give it an instance name—for example, sad_mc.
6. Create a layer called Script. The timeline should now resemble the one in Figure 90b.
7. Select the keyframe in the Script layer.
8. In the Actions panel, click the Insert Target Path icon (see #88). A dialog box appears, listing all of the objects with instance names.
9. Select happy_mc and click OK. The Script pane displays this.happy_mc followed by a flashing cursor.
10. Press the Period key. A list appears, containing all the possible ActionScript elements that might follow the instance name.
11. From the list, double-click stop. The Script pane now displays this.happy_mc.stop(
12. Type the closing parenthesis and semicolon: this.happy_mc.stop();
You’ve just used ActionScript to issue a command to a movie-clip instance. Specifically, you’ve told the instance called happy_mc not to play its internal animation, thus ensuring that the face on the stage will keep its neutral expression.
13. Repeat Steps 8 through 12 for sad_mc.
14. In the Actions panel, create event listeners and functions for the two buttons as you did in #89.
15. Modify the goSmile function as follows:
function goSmile(event:MouseEvent) {
this.sad_mc.visible=false;
this.happy_mc.play();
}
Note
If you wish, you can use the Insert Target Path icon for this step, as you did for Steps 9 through 12.
Once again, you’ve used ActionScript to communicate with a movie clip—or, in this case, two movie clips. You’ve told sad_mc to become invisible, so it won’t block happy_mc. Then you’ve told happy_mc to play its internal animation.
16. Modify the goFrown function as follows:
function goFrown(event:MouseEvent) {
this.sad_mc.visible=true;
this.sad_mc.play();
}
This function makes sad_mc visible and causes it to play its internal animation.
17. Test the movie. It should work identically to the movie in #89.
One of the trickier aspects of using ActionScript is coding an object’s movement on the stage. A series of motion tweens that takes a few minutes to create in the timeline could take hours to recreate in ActionScript.
Why would you want to animate in ActionScript rather than in the timeline? Usually, it’s because you want to be able to vary the animation while the movie is playing—for example, by giving the user controls that allow the movement to be sped up, slowed down, or even redirected. If the animation is coded as a function in ActionScript, you can change any aspect of the animation by feeding new parameters to the function.
Flash has the ability to convert timeline animation to ActionScript code. It works with motion tweens only—not with shape tweens or frame-by-frame animation—and it converts to ActionScript 3.0 only. To use it:
1. Motion-tween an object on the stage. The animation can be as elaborate as you want: It can contain any number of intermediate keyframes, and you can adjust any of its properties in the Motion Editor (see #44).
2. Choose a movie-clip symbol to which you want to copy the animation, and drag an instance to the stage. (Graphic and button symbols won’t work.)
3. Give the new object an instance name (see #87).
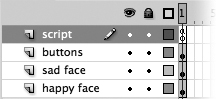
4. In the timeline, select all the frames of the original object’s motion tween (Figure 91).

5. Choose Edit > Timeline > Copy Motion as ActionScript 3.0. A dialog box appears, asking for the instance name of the object to which you want to apply the animation.
6. Type in the instance name from Step 3 and click OK.
7. If there’s not already an Actions layer in the timeline, create one; then select the keyframe in frame 1.
8. Open the Actions panel (if it’s not already open) and click in the Script pane.
9. Choose Edit > Paste. The ActionScript code representing the animation appears in the pane.
10. Test the movie and compare the coded motion of the second object to the timeline animation of the first object. They should look the same.
Try changing some parameters in the ActionScript code; then test the movie again. The coded animation will look different; the timeline animation will stay the same.
If you wish, you can remove the original object from the timeline.
The scripts we’ve worked with so far have all been embedded in the FLA file. You have the option, however, of keeping your scripts in external files. External files are useful for editing scripts without having to open them in Flash, storing scripts that are too long to fit conveniently into the Actions panel, or sharing one script among several movies.
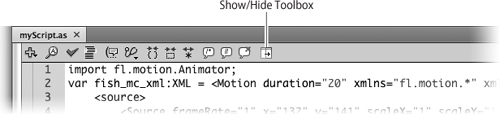
An external script file is a plain text file. You can create one in any text-editing program, as long as you save it with a filename that has an AS extension. Another option is to use the Script window built into Flash. Like the Actions panel, it contains an Actions toolbox and other tools to help you write and edit your script (Figure 92). When you save a script in the Script window, the resulting file is automatically given the AS extension.
The Script window is often overlooked because it’s not on the Window menu (or, for that matter, any other menu). To get to it, choose File > New to open the New File dialog box; then choose ActionScript File from the list of file types. To edit an existing AS file in the Script window, choose File > Open and navigate to the file, or double-click the file outside of Flash.
An AS file won’t be executed unless you associate it with a specific FLA file:
1. Put the AS file and the FLA file in the same folder.
2. Add a script, or edit the existing script, in frame 1 of the FLA file’s timeline. Add the command include "filename.as" (keeping the quotation marks, but replacing filename with the actual name of the file).
3. Test or publish the movie. Flash incorporates the contents of the AS file into the SWF file.
Because the AS file is needed only when you create the SWF file—not when you play it—there’s no need to upload AS files to a Web server. Remember, however, that if you make any changes to the AS file, they won’t take effect until you generate a new SWF file.
As was noted in #88, Flash ignores tabs, line breaks, and extra spaces when it interprets ActionScript. An entire script could be written on one long line, and Flash wouldn’t know the difference: To make sense of a script, it pays attention only to punctuation such as parentheses, braces, and semicolons.
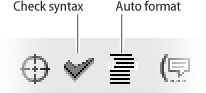
Nevertheless, it’s important to format a script neatly and consistently, so that people who edit your script can know at a glance what’s going on. Flash does some formatting on the fly when you type in the Actions panel or Script window, but it doesn’t do really thorough formatting until you click the Auto Format icon (Figure 93a).
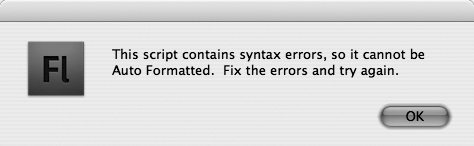
To format your script, Flash has to understand the script: It has to know which words are commands, which are variables, which are properties, and so on. Assuming your spelling, syntax, and punctuation are correct, Flash has no trouble figuring out what’s what. If you’ve made even a single error, however, Flash loses its bearings. As a result, when you click Auto Format, you’ll often see an alert telling you that formatting was unsuccessful (Figure 93b).
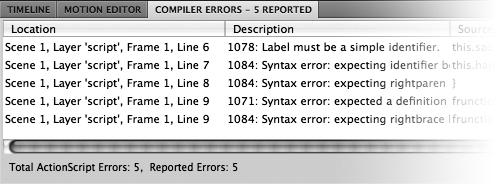
Finding a mistake can be difficult when there’s only one incorrect character among thousands. Flash makes the task easier by giving you some guidance: A panel called Compiler Errors appears and lists the errors that Flash found (Figure 93c).
The Check Syntax and Auto Format features find errors in the structure of your script, but they don’t find errors in the content. Suppose you have the following script in frame 1:
this.myButton_btn.addEventListener(MouseEvent.CLICK, disappear);
function disappear(event:MouseEvent) {
this.myInstance_mc.visible=false;
}
When the user clicks the button called myButton_btn, this script is supposed to cause a movie-clip instance called myInstance_mc to become invisible. In the Actions panel, the script checks out with no errors; the vocabulary and syntax are fine.
But imagine that when you test the movie, it doesn’t work. No matter how many times you click the button, myInstance_mc remains visible on the stage. What do you do now?
The first step is to figure out where the problems might be. Perhaps the button isn’t receiving your mouse clicks. Perhaps the script isn’t communicating properly with the button. Perhaps there’s something wrong with myInstance_mc.
The next step is to test each of these possibilities. In a situation like this, the trace command is indispensable. Its job is to send you status reports from inside a movie.
For example, you might modify your function as follows:
function disappear(event:MouseEvent) {
trace ("The button has been clicked");
}
The trace command always communicates through the Output panel. In this case, when you test the movie and click the button, the Output panel pops open and displays the message “The button has been clicked.” This tells you that the button is indeed receiving your mouse clicks and that the script is working.
The trace command can send two types of messages. The first type, shown in this example, is what’s called a string—a collection of characters that ActionScript doesn’t understand, but you do. A string is surrounded by quotation marks. When the trace command is executed, it simply repeats what’s between the quotation marks—in this case, “The button has been clicked.”
The other type of message the trace command can send is a value. For instance, you might modify your function to look like this:
function disappear(event:MouseEvent) {
trace (myInstance_mc.visible);
}
In this example, myInstance_mc.visible—which isn’t in quotation marks—is an expression ActionScript does understand. If myInstance_mc is visible on the stage, the expression should have a value of “true.” If not, the value should be “false.”
Let’s say you test the movie and click the button. On the stage, myInstance_mc remains visible, as it has all along. In that case, you’d expect the Output panel to display true—but instead, it says:
TypeError: Error #1010: A term is undefined and has no
properties.
Well, that’s strange. An instance has to be either visible or invisible—how can it be undefined and have no properties?
One possible answer is that the instance called myInstance_mc doesn’t exist. But that seems unlikely; after all, you can see it on the stage.
On the other hand, is the object you’re seeing on the stage really myInstance_mc? If you double-check, you might discover that the object’s instance name doesn’t match what’s in the script. For example, if you accidentally named the instance myIntance_mc, then there is no object called myInstance_mc.
The bottom line is that there’s no straightforward procedure for troubleshooting an interactive movie. Troubleshooting is an exercise in creative thinking: You have to be part plumber, part Sherlock Holmes, and part gunslinger with the trace command in your holster.
Using the Debugger for the simple scripts we’re using in this book is like using a sledgehammer to swat flies. For tracking down errors in a beginner’s ActionScript file, the trace command (see #94) is usually all you need.
Most of the Debugger’s features become useful with scripts that contain variables, nested functions, and if-else statements, all of which are beyond the scope of this book. There is, however, a feature that can come in handy for scripts of any size: the ability to set breakpoints.
A breakpoint is a pause that you insert between lines of ActionScript code. When you play a movie in the Debugger, the script stops executing at each breakpoint and continues only when you want it to. By seeing how your script executes step by step, you can often find out where the problems are.
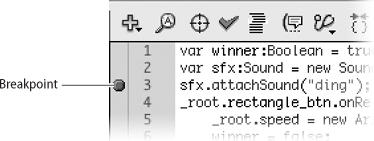
You can add breakpoints to a script in the Actions panel by clicking in the margin to the left of any line of code. Clicking once turns a breakpoint on (identified by a red dot); clicking again turns the breakpoint off (Figure 95a). Breakpoints are saved with the FLA file, but they don’t have any effect unless the movie is played in the Debugger.
To see your breakpoints in action, select Debug > Debug Movie. Your movie previews in the Flash Player as it normally does when you test a movie, and the Debugger—a collection of five panels—opens at the same time (Figure 95b). In the Code View panel, you can see your script displayed as it is in the Actions panel. A yellow arrow moves from line to line as the script executes. When it gets to a breakpoint, the execution stops.
Figure 95b This is the ActionScript 3.0 debugger. The 2.0 debugger is laid out differently, but has many of the same features.
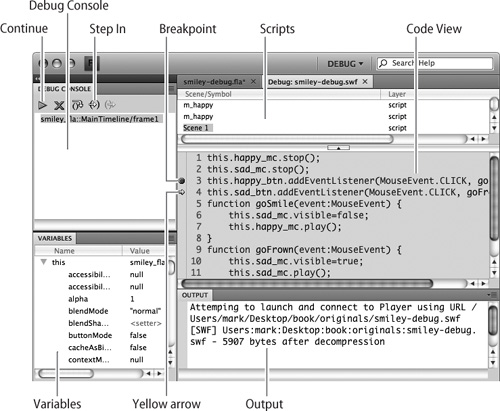
From the breakpoint, you can step through lines of code, one by one, by clicking the Step In icon, or you can click Continue to resume execution of the script.
To return from the Debugger to the normal Flash environment, choose Debug > End Debug Session.