The rapid growth in high-speed access to the Internet has made video one of the most popular features in Flash. Unlike other forms of video whose players vary between platforms, Flash video works identically on any computer that has a recent version of the Flash Player. And because Flash video can be controlled by ActionScript, any developer can easily create a custom video player with its own unique style and functionality. It’s no wonder that popular video sites such as MSN Video and YouTube use Flash Video as their delivery format.
Digital video is a huge topic, and using it to its full potential requires more technical information than this book can offer. By reading this chapter, however, you’ll learn the basics of getting video into your Flash movie and making it playable on the Web.
To work effectively with video in Flash, it’s helpful to know a few things about digital video in general.
Fundamentally, all digital video is a succession of bitmap images, each visible for a fraction of a second (Figure 65). As with animation, the slight changes from one frame of video to the next give the illusion of motion. Because displaying so many bitmaps so quickly requires a powerful processor and a fast hard drive, it’s only recently that most home computers have become capable of playing full-screen, full-motion video.
Companies such as Apple and Microsoft pioneered techniques for storing and playing back digital video in formats such as QuickTime and Windows Media. Web sites often must make their video content available in a variety of formats, since there’s no way to predict which type of player (or players) a user might have.
A further complication for users is compression. To be downloadable and playable by the average computer, digital video must be squeezed into as small a file as possible. Software developers offer dozens of compression schemes, each of which is embodied in a file called a compressor/decompressor—a codec for short. If a video file is created using a certain codec, it can be played only on a computer that has that codec. For example, if someone sends you a QuickTime file that was compressed with the DivX codec, your QuickTime Player won’t play it unless DivX is installed on your computer.
Adobe has been able to bypass these obstacles because of the popularity of the Flash Player, which is installed on nearly all Macs and PCs (not to mention many Linux and Solaris computers). Adobe’s proprietary video format, Flash Video (FLV), can be played by recent versions of the Flash Player with no need for additional software. As a result, FLV has become the closest thing to a universal Web video format.
Unlike QuickTime, which offers a choice of about 20 codecs, FLV uses only two: Sorenson Spark (the latest version of which requires Flash Player 7 or later) and On2 VP6 (which requires Flash Player 8 or later). In addition, Adobe recently introduced a new video format called F4V—a variation of Flash Video using the open-standard H.264 codec—which requires Flash Player 9.2 or later.
Note
The Flash Player can play an FLV file only if the file is embedded in or linked to a SWF file. To play an FLV file directly, you need the Adobe Media Player (bundled with CS4 software) or a third-party application such as VideoLAN’s VLC media player.
To use a video file in your Flash movie, you must convert it to a format that Flash can use. Flash CS4 will accept any video file that’s been compressed with the H.264 codec, even if it’s in a non-Adobe format such as QuickTime. Nearly every up-to-date video-conversion program—including free ones such as MPEG Streamclip (from Squared 5) or Any Video Converter Free Version (from AnvSoft)—can do H.264 compression; so can Apple’s popular QuickTime Pro.
Most Flash users prefer to convert their video files to Adobe’s FLV format, which is compatible with earlier versions of the Flash Player. You can do so with the Adobe Media Encoder, a standalone program that’s installed on your hard drive when you install Flash (see #72).
As with audio files, it’s best to edit your video files before importing them into Flash. Nearly every computer these days comes with a simple video-editing program (such as Apple’s iMovie or Microsoft’s Windows Movie Maker). You may prefer a higher-end program such as Adobe Premiere Pro, which—unlike some other video-editing software—can export files in FLV format.
You’re already familiar with the import dialog boxes that Flash uses with certain types of vector and bitmap files. Because video is so much more complex, Flash gives you not just a dialog box, but a whole series of dialog boxes—collectively known as the Video Import wizard—that guide you through the process of importing a video file.
Tip
If the video file that you want to import is on your computer’s hard drive, move it into the folder that contains your FLA file. Do this before you begin to import the video.
To begin the import process, choose File > Import > Import Video. (It’s OK to choose Import to Stage or Import to Library instead; if you select a video file to import, Flash recognizes it and launches the Video Import wizard.)
The first screen of the Video Import wizard asks you to locate the file you want to import. If the file is on your hard drive:
1. Click the On Your Computer radio button.
2. Click the Browse button.
3. Navigate to the video file you want to import and click Open.
4. Choose a deployment method (see #67).
5. Click Next (Windows) or Continue (Mac). If the video file you’ve chosen is in a format that Flash can import (see #65), a new dialog box—either Embedding or Skinning, depending on the deployment method—appears.
6. If the file can’t be imported, Flash displays an alert box advising you to launch the Adobe Media Encoder. Click OK to dismiss the alert box; click the Launch Adobe Media Encoder button, and convert the file (see #72). Then repeat Step 5.
If the file is online:
1. Click the Already deployed to a Web server, Flash Video Streaming Service, or Flash Media Server radio button.
2. Type the URL of the file, including the protocol (for example, http://).
3. Click Next (Windows) or Continue (Mac). The Skinning dialog box appears (see #70).
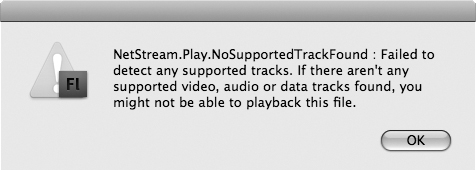
Unlike the On My Computer option, the Already Deployed. . . option doesn’t verify the format of the video file you’ve selected. Even if the video file is incompatible, Flash lets you proceed through the rest of the Video Import wizard without telling you that anything is wrong. The first sign of trouble you’ll see is when you test the movie in Flash (see #35): Flash displays an alert box beginning with the phrase “Netstream.Play” (Figure 66). If you see this dialog box, you’ll have to delete the incompatible video file and import another.
When you import a video file from your own computer (see #66), the Video Import wizard offers you three different ways to incorporate that video into your Flash movie:
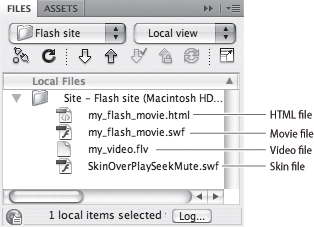
• Load External Video with Playback Component. This is the most common choice. Your video remains in a separate file; when you publish your movie, Flash links the video file to the SWF file. You must upload both files to your Web server (Figure 67).
Figure 67 If your Flash movie uses external video, making it available on the Web requires you to upload several files to your Web server (shown here in Dreamweaver): the SWF movie file, which contains your animation and ActionScript; the HTML file, which allows the movie file to be displayed in a Web browser (see #75); the video file; and—if you want the user to be able to control the video with an onscreen video player—a skin file (see #69).
• Embed FLV in SWF and Play in Timeline. This option is a legacy from older versions of Flash, in which video was treated like a bitmap or sound—stored in the library, dragged to the timeline, and played from inside the SWF file. Embedded video is used much less often now that streaming and progressive download are available, but it’s still a convenient way to handle short video clips (see #68).
• Import as Mobile Device Video Bundled in SWF. Choose this if your video file is intended to be played on a mobile device (such as a cell phone) using the Flash Lite player, which is outside the scope of this book. Unless you’ve deliberately set Flash Lite as your target format in Publish Settings (see #74), the Video Import wizard won’t let you select this option.
When you’ve made your choice, click Next (Windows) or Continue (Mac).
If you’ve chosen Embed FLV in SWF and Play in Timeline, the Video Import wizard takes you to the Embedding dialog box, which is covered in #68. If you’ve chosen any of the other options, you can skip to #69, which deals with the Skinning dialog box.
Adobe discourages the embedding of video in Flash movies, and for good reasons: Embedded video bloats the SWF file, has to be downloaded in its entirety before it can be played, and frequently has audio synchronization problems. It also demands a lot of memory, and if the user’s computer doesn’t have enough, the Flash Player may crash. To minimize these problems, Adobe recommends that embedded video be limited to clips that are less than 10 seconds long and have no audio tracks.
However, there are also some good reasons to embed video. Embedded video is easy to work with: Each frame of video corresponds to a frame in the timeline (Figure 68), allowing you to synchronize events in your movie to the action in the video without using ActionScript (see #69). You don’t have to remember to upload multiple files to your Web server, because the video and its playback controls are contained in a single SWF file.
Figure 68 When you put your video in the timeline, you can synchronize animation to it just as you would with a streaming sound (see #62). Unlike streaming sounds, however, embedded video doesn’t stream; it has to be fully downloaded before it can play.

To embed a video file, choose Embed FLV in SWF and Play in Timeline in the first screen of the Video Import wizard (see #67). The Embedding dialog box appears, offering these options:
• Symbol Type. If you choose Embedded Video, your imported video is stored in the library simply as a video file. If you prefer, you can import the video as a movie clip or graphic symbol. Importing it as a movie clip allows the video to play independently of the main timeline (see #28). There’s no real advantage to importing it as a graphic symbol.
• Place Instance on Stage. This option—selected by default—causes Flash to put the imported video both on the stage (with a single keyframe in the timeline) and in the library. Otherwise, the video is imported only into the library.
• Expand Timeline if Needed. This option is available only if Place Instance on Stage is selected. It causes Flash to insert enough frames in the timeline to play the entire video.
• Include Audio. As of this writing, this option doesn’t do anything. Flash imports the entire file, including the audio track, regardless of whether the Include Audio check box is selected.
After you’ve made your choices, click Next (Windows) or Continue (Mac) to go to the Finish Video Import screen, which summarizes the choices you’ve made. Click Finish to exit the Video Import wizard.
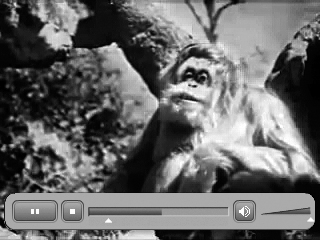
The FLVPlayback component—known informally as the video player—is what displays your video on the stage (Figure 69a). Normally, to use the user-interface components that come with Flash, you have to write ActionScript (see Chapter 12). In this case, however, no scripting is required; all you have to do is choose a skin for the player.
“Skin” is a somewhat misleading term. Applying a skin to an object usually means changing only its outward appearance; its functionality remains the same. In this case, however, your choice of skin determines what the player is able to do.
From a menu on the Video Import wizard’s Skinning screen, you can choose from 34 different skins. (As you can see from the SWF file extensions, each skin is itself a Flash movie.) The skins vary in size, in types of video controls, and in where they’re positioned in relation to the video (Figure 69b).
Figure 69b Flash names each skin according to what it does. The selected skin—shown in use in Figure69a—is called SkinOverPlayStopSeekMuteVol.swf, indicating that the control bar is superimposed over the video rather than placed beneath it, and that the player has Play, Stop, Seek, Mute, and Volume controls.
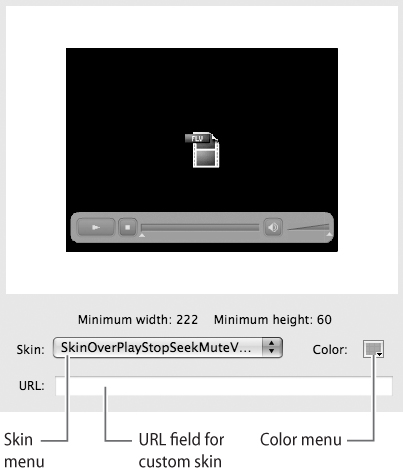
To the right of the Skin menu is a standard Flash color menu from which you can choose a skin color. A preview window lets you see the skin and use its controls, but your video doesn’t appear there, and the controls don’t have any effect.
Some advanced Flash users design their own skins instead of using the ones supplied by Flash. (Designing a custom skin is not a trivial task; it’s something you should not try until you’re very familiar with Flash and ActionScript.) To use a custom skin, enter the URL of its SWF file in the field below the menus.
If you don’t want your movie’s audience to interact with the video, you can choose None from the Skin menu, allowing the video to appear on the stage as a plain rectangle with no controls.
When you’ve selected a skin, click Next (Windows) or Continue (Mac). You’re taken to a text screen that summarizes your choices. Click Finish to exit the Video Import wizard.
If you’ve chosen a skin for the video player, the skin’s SWF file will be created when you test or publish the movie. This file must be uploaded to your Web server along with the movie’s other files (see #67).
After you’ve imported and encoded a video file, you’ll find a new item in the library: the video file itself (if you’ve embedded the video) or the FLVPlayback component (if you’ve chosen one of the other deployment methods). You can drag multiple instances of these items to the stage or embed them in symbols; you can use the Free Transform tool to scale, rotate, or skew those instances (Figure 70a); you can even motion-tween instances. (Actually, motion-tweening the FLVPlayback component doesn’t work, but if you embed the component in a movie clip, you can motion-tween an instance of the movie clip.)

In all these cases, however, the rule you learned in childhood applies: Just because you can do something doesn’t mean you should do it. Watching video—not to mention starting and stopping it—is difficult when the video is rotated or skewed, or is moving around the stage. More important are the technical limitations: Playing back video in a Flash movie already puts a big load on the computer’s processor; playing back video that’s been transformed or animated can challenge even a powerful computer. Out of courtesy to your audience and their hardware, it’s best just to put the video somewhere on the stage and leave it there.
If you must animate or transform a video instance, you can reduce its demand on the user’s computer by keeping the video’s frame rate low and its dimensions small. Scaling down the video on the stage doesn’t help; you have to reduce its dimensions before you import it, using the Adobe Media Encoder (see #73) or a video-editing or file-conversion program.
If you haven’t embedded your video, you can change some characteristics of the video player by using a panel called the Component Inspector. For example, the default behavior of the FLVPlayback component is to start playing the video as soon as an instance of the player appears on the stage. In some cases, however, you may want the video to remain paused until the user clicks Play. To make that change, select the video player on the stage and choose Window > Component Inspector. On the Parameters tab of the Component Inspector (Figure 70b), change the value of the autoPlay parameter from “true” to “false.” (Do this only if your video player has a skin with a Play button; otherwise, there’s no way for the user to start the video.)
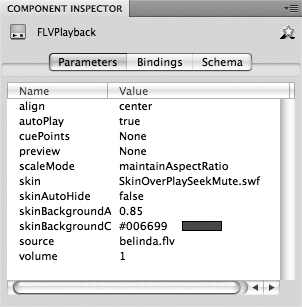
Some of the parameters in the Component Inspector call for technical expertise, but others are easy to change. For example, use the skin parameter to change the player’s skin, use the skinBackgroundColor parameter or skinBackgroundAlpha parameter to change the color or opacity of the skin, and use the volume parameter to set the initial volume of the video’s audio track. (To do this, enter a number between 0 and 1, where 0 represents silence and 1 represents full volume.) If you move the FLV file that’s linked to the player, use the source parameter to tell Flash where to find it.
Flash has no tools for editing video. If you’ve imported a video file and then decide to change it, you’ll have to open the file in an external video-editing program. The process for getting the re-edited file back into Flash depends on how it was originally deployed (see #67).
If the video was deployed as a linked external file:
1. Open the video file in the video-editing program of your choice. (If the video file is in FLV format, you may have to work with the original file from which the FLV file was made. Most video-editing programs can’t open FLV files.)
2. Edit the video file and save it with a new name.
3. If necessary, use the Adobe Media Encoder (see #72) to convert the file to FLV or F4V format.
4. Move or copy the file to the folder where the earlier version of the video file resides.
5. Select the instance of the video file on the Flash stage.
6. Edit the source parameter in the Component Inspector to replace the original filename with the new one.
7. Remove the earlier version of the video file from the folder.
If the file was imported as embedded video:
1. Make a backup copy of the original video file and store it in a safe place.
2. Open the original video file (not the backup) in the video-editing program of your choice.
3. Edit the file and save it with the same filename to the same folder. (In other words, overwrite the original video file.)
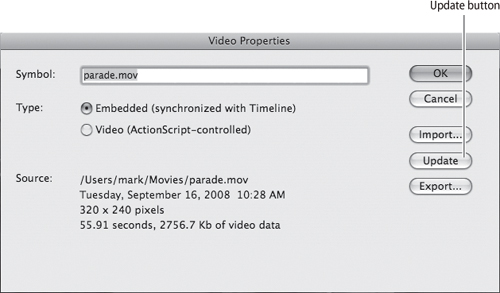
4. In the library, double-click the icon next to the embedded video file to open the Video Properties dialog box (Figure 71).
5. Click the Update button in the dialog box. Flash replaces the embedded video with the new version.
The Adobe Media Encoder is a separate application that’s included with version CS4 of the Creative Suite. Unlike its predecessor, the Flash Video Encoder, this new program can import and export many kinds of media in a variety of file formats used by Soundbooth, Premiere Pro, and other CS4 programs. For Flash users, its main purpose is to convert video files to the FLV and F4V formats preferred by Flash.
To use it:
1. Locate the Adobe Media Encoder application on your hard drive and double-click its icon to launch the program. Alternatively, click the Launch Adobe Media Encoder button in the Video Import wizard (see #66).
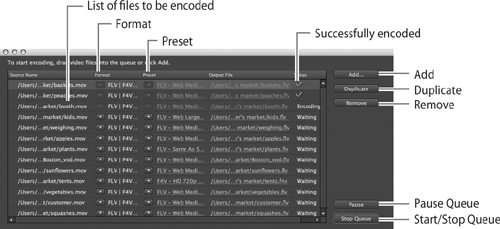
2. Drag one or more video files into the program’s list pane (Figure 72), or click the Add button to navigate to the files that you want to convert.
3. If you wish, drag files up and down within the list pane to change their order in the queue.
4. For each filename, click the arrow in the Format column to choose the file format that you want it to be converted to. You’ll generally want to stay with the default option, FLV/F4V.
5. For each filename, click the arrow in the Preset column to choose the encoding options for the file (see #73).
Tip
You can select multiple files by clicking the first one and then Control-clicking (Windows) or Command-clicking (Mac) additional ones. Changing the Format or Preset setting for one of the selected files makes the same change for all of them.
6. Click Start Queue. The Adobe Media Encoder converts the files one by one, giving you constant progress reports in the lower portion of the window. By default, each newly converted file is placed in the same folder as the original.
When the batch is complete, all the files in the list will have green check marks next to them.
7. Files on the list don’t disappear, even when you quit the Adobe Media Encoder and open it again. To remove files manually, select them and click Remove.
To convert video files in a way that best suits your needs, the Adobe Media Encoder needs input from you: for example, which codec you want to use, how much compression you want to apply, and at what frame rate you want the video to play. Applying these settings when the video is converted is known as encoding the video.
The easiest way to specify encoding options is to use the Preset menu (see #72). Each item on the menu is a collection of video and audio settings designed to fit a particular audience. For example, if your Web site is aimed at frugal families, many of whom have old computers and dialup connections, you might choose the FLV–Web Modem preset. If your Web site is directed at corporate executives, you might go for one of the F4V–Web Large presets.
Many of the presets are optimized for particular kinds of source video, including NTSC or PAL (usually output by camcorders) and 720p or 1080p (usually found on DVDs). If you’re not sure what kind of video you’re converting from, it’s safest to use one of the Same as Source presets found at the top of the menu.
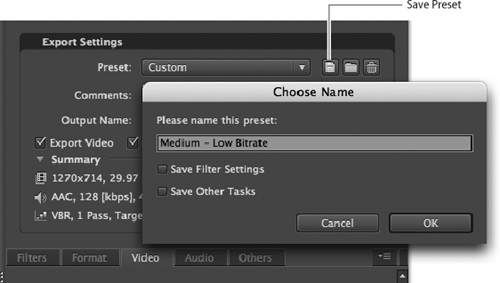
If none of the presets fits your needs, and you have some technical knowledge of video and audio, you can modify settings individually to create your own custom presets. To do so:
1. From the Preset menu next to one of the files in the queue, choose the existing preset that’s closest to what you want.
2. Open the Preset menu again and choose Edit Export Settings. An Export Settings dialog box appears, displaying the individual settings for the preset you chose.
3. Change the settings in any way you like. Most of the settings are organized into seven tabbed groups. Here are some of the controls that you’ll find on each tab:
• Source. Scale the video, crop it, set its in and out points, and set cue points that can trigger ActionScript commands at selected moments in the video.
• Output. Decide how the scale and crop settings are interpreted—for example, a widescreen video can be letterboxed or “squished” to fit in a standard-size video window.
• Filters. Blur the video horizontally, vertically, or both.
• Format. Choose whether the converted video will be in FLV or F4V format.
• Video. Choose between the Sorensen Spark, On2 VP6, or H.264 codecs; set the frame rate and bit rate.
Tip
If your video was created with a transparent background (as is possible in Adobe After Effects), use the On2 VP6 codec and select Encode Alpha Channel to preserve the transparency.
• Audio. Choose an audio codec; choose between mono and stereo.
• Others. Enter FTP information that lets you upload encoded files to a remote server.
4. If you wish, click the Save icon in the Export Settings pane to save your custom preset for future use (Figure 73); otherwise, click OK to apply the current settings to the selected file in the queue.