
11. Publishing and Exporting Your Site
Lesson overview
• Exclude pages from export
• Publish your site as a temporary site
• Publish changes
• Convert your temporary site to a live site
• Publish your site to a host of your choice
• Export your site as HTML
Muse offers three methods for publishing site content: You can publish directly from Muse to Adobe web hosting, publish to a third-party host, or choose File > Export As HTML to create a local copy of all the files for your website.
Understanding Adobe Muse publishing
After you’ve finished designing your site, the next step is to publish the site or export the site content. If you want to publish the site for the world to see, you can publish directly to Adobe web hosting or to your own hosting provider from within Muse. If you plan on uploading the site to your host using a different FTP client, you want to keep a local copy of the site files, or you want to get the optimized content like images that Muse generates, you can choose File > Export As HTML.
![]() Note
Note
If you have not already downloaded the project files for this lesson to your computer from your Account page, make sure to do so now. See “Getting Started” at the beginning of the book
Using any of these methods will generate HTML files, CSS, related script files, images, and other content necessary to make the site work in a browser. All of the .psd files in your Muse site will also be converted at this point to the best web format, depending on the image content. Any alternate layouts (Phone, in the case of the SPC site) will also be published or exported.
Publishing your site
With Muse, you can create and publish an unlimited number of temporary sites using Adobe web hosting. Each temporary site you create is active for 30 days and has a temporary URL, for example, http://my_site.businesscatalyst.com. The “my_site” part of the URL is something you can customize. The site is live on the web and can be visited via a web browser using the supplied URL, even on different devices.
![]() Tip
Tip
If a temporary site you are designing expires, you can extend it by simply opening the .muse file and publishing the site again. Using this strategy, you can keep working on a site and incorporating client feedback until the site design is deemed complete. Then you can upgrade and launch it.
Publishing temporary sites is an easy way to upload in-progress sites to share with your clients or to review the live sites in a browser and test them on various screens and devices before showing them to your clients.
As you work with your clients through the design and approval process, you can choose either to update the existing temporary site or to publish new temporary sites to compare several iterations. Some clients prefer to visit links to preview several different designs at once, so they can view them side by side during the approval process.
Excluding pages from export
When you publish your site or export it as HTML, Muse exports all of the pages in your site map, even those that you’ve excluded from the navigation (such as the SPC site ContactEvent). If you are experimenting with a design, have a page containing an old product, or have an outdated sale page, you may not want to export that page. To hold back pages that aren’t necessary, you can exclude them from export, specifying them either from Plan or Design mode. If you stop a page from exporting, none of the assets unique to that page export either. Assets, such as images, common to the excluded page and other necessary pages do export.
Although clearing your site map of extraneous pages as you work is the best practice, excluding pages at the end of the design process is simple.
![]() Note
Note
If you are starting from scratch using the Jumpstart method described in the “Jumpstart” section in “Getting Started,” your workspace may look different than the figures you see in this lesson.
Because the SPC site has two layouts (Desktop and Phone), excluding a page in one layout would normally require excluding it in the other layout as well. In Lesson 10, you deleted the ContactEvent page in the Phone layout, so there is no need to exclude it.
Next, you’ll exclude the ContactEvent page in the Desktop layout from exporting when the site is published or exported.
![]() Note
Note
You need to be careful when choosing which pages not to export. Suppose you choose to not export a page that appears in a Menu widget. The text label displaying the excluded page’s name will still appear in the dynamically generated menu item (the default setting) when the site is exported, but the page will not exist, so the link will be broken.
1. With the SPC site open and in Plan mode, right-click the ContactEvent page thumbnail and choose Export Page to deselect the option.
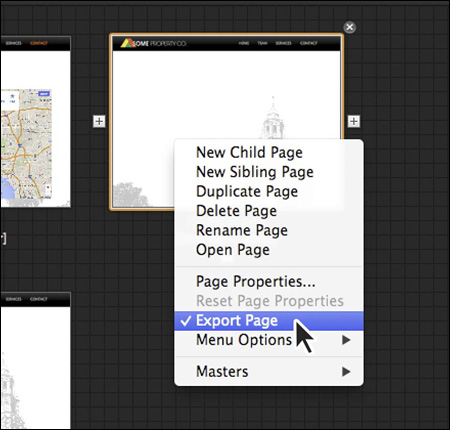
When a check mark appears to the left of the Export Page command, the page will export when you either publish by choosing File > Upload To FTP Host or File > Publish, or export when you choose File > Export As HTML command.
2. Choose File > Save Site.
Publishing a temporary site
Next, you’ll publish the SPC site to a temporary site. Whether or not you are ultimately planning on hosting the site using Adobe web hosting, you can publish the site temporarily and test the site for free for 30 days.
1. With the SPC site still open, click the Publish link in the upper-right corner of the Application window or choose File > Publish.
If there are any missing fonts or issues with assets, a dialog box will appear indicating that you should fix the issue before proceeding.
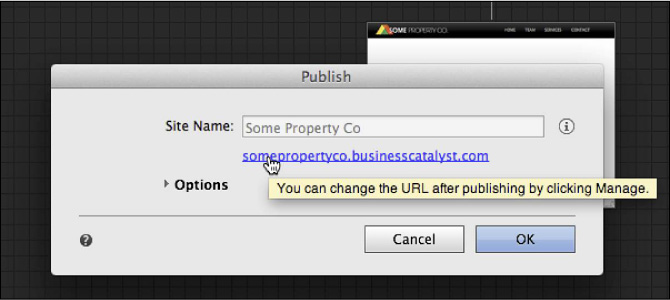
2. In the Publish dialog box, enter a site name and leave the Publish dialog box open. You could type Some Property Co, and the suggested URL beneath the field will look something like “somepropertyco01.businesscatalyst.com.” The 01 (or other number) indicates that the URL you entered was already taken by someone else.

![]() Tip
Tip
In the Publish dialog box, a FAQ link helps users learn more about the publishing process.
When you publish this site as a temporary site for testing, this name will be a part of the initial URL. So, if you typed SomePropertyCo for instance, the URL for the temporary site would be somepropertyco.businesscatalyst.com. Muse checks the starting address to determine if it’s valid (it doesn’t contain unsupported characters, for instance) and if it’s available. If the name is not available, the field will update with an alternate suggestion. You do not have to use that suggestion if you prefer to change the site name to another name that is not yet taken. This will be the temporary address at which you can view the site in a browser or send to your clients for reviewing the site. You can change the address to something permanent later if you upgrade the site to a paid site or use one of the hosting credits that are included with your Creative Cloud subscription. You’ll learn more about assigning a custom domain later in the lesson.
![]() Note
Note
The site’s URL field in the Options section automatically removes any special characters and spaces that you enter in the Site Name field. It creates a suggested URL that will be used to access the live temporary site. You can edit the contents of the URL field to change the automatically generated URL, if desired.
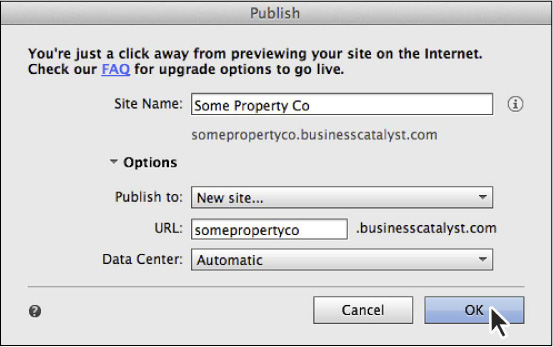
3. Click the word Options to reveal more options and set the following:
• Publish To: New Site (the default setting)
• URL: Leave the URL unless you want to change it
• Data Center: Automatic (the default setting. This sets the location where the site will be hosted.)
![]() Note
Note
If your client lives in a different country, you can choose the Data Center closest to your client’s location. The site will load and perform best in the location that corresponds with the Data Center you select. So if your client is viewing the site in Australia, you can choose the Australia Data Center option to ensure that the site looks best to them, even if you are located in the United States.
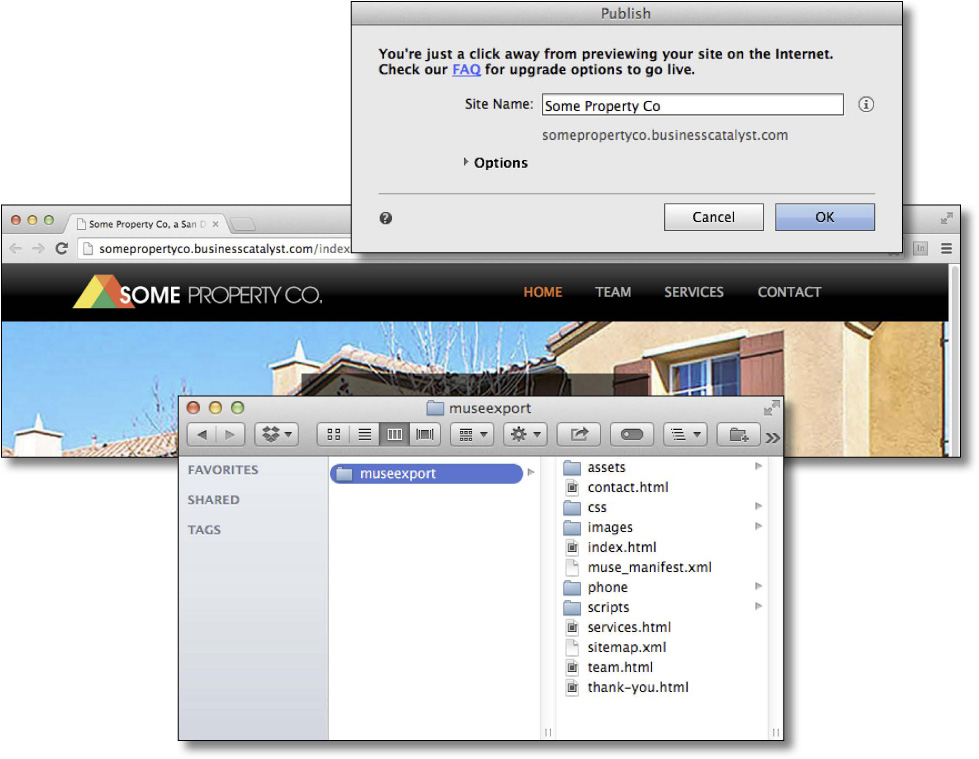
4. Click OK, and the temporary site will be published to an Adobe Business Catalyst hosting server.

For each of the layouts (Desktop and Phone in the SPC site), Muse now generates the HTML files, CSS, related script files, images, and other content that is necessary to make the site work in a browser. That content is then uploaded to the Adobe web hosting servers. Muse also converts the .psd files in your site to the best web format, depending on the image content. This may take a little while.
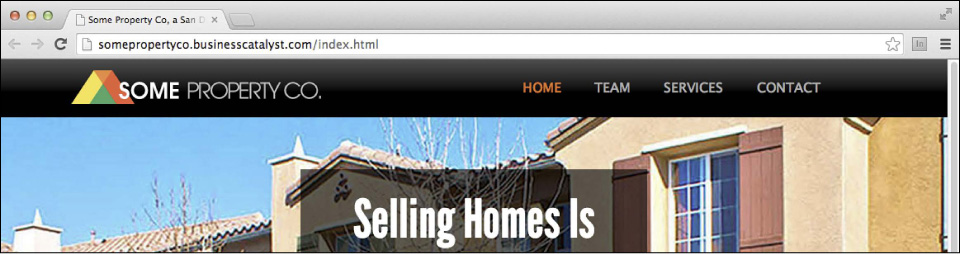
When Muse completes its work, the temporary site is published and the site appears in a new window in the default browser on your machine.
5. After looking at the URL in the browser (it’s a live site), close the browser and return to Muse.
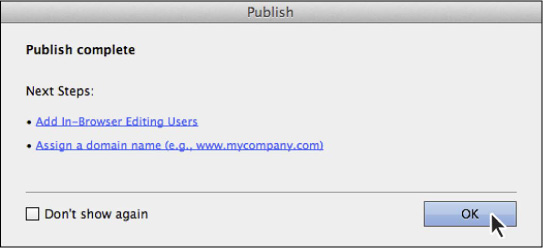
6. The Publish dialog box back in Muse, indicates possible next steps like adding In-Browser Editing Users or assigning a custom domain name. Click OK.
![]() Tip
Tip
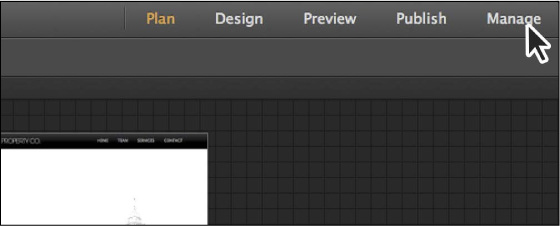
You can tell when a Muse site has been published by choosing File > Publish or by clicking the Publish link, because the Manage link is active in the upper-right corner of the Application window with the site file open in Muse.

Now that the site has been published, you can share the domain name (ours is somepropertyco.businesscatalyst.com) with your clients for review by simply emailing them the domain name. A notification message is also sent to the email address associated with Publish With Account found in Muse preferences. The email message tells the recipient that a temporary website has been created and includes the URL and instructions for taking the site live.
After publishing your temporary site, sometimes you can forget the URL for the site. The following method is an easy way to help you remember the site domain name.
7. Click the Publish link in the upper-right corner of the Application window or choose File > Publish with the SPC site open.
8. If an Information dialog box appears, click OK to dismiss it.
9. Click the blue URL link (somepropertyco.businesscatalyst.com for us) to open the default browser on your machine and view the live site. You could also use a mobile device to type the URL in the device browser and view the site.
![]() Tip
Tip
When the cursor is over the URL link in the Publish dialog box, a tooltip appears. The tooltip states that you can change the URL of the temporary site after publishing by clicking the Manage link in the upper-right corner of the Application window.
10. Close the browser and return to Muse.
11. In the Publish dialog box click Cancel.
If you were to click OK, any changes you made to the site would be published.
![]() Note
Note
If you are working on a shared workstation with another person, you can change the publish account associated with Muse. Choose Adobe Muse CC > Preferences (Edit > Preferences), and select Switch Accounts from the Publish With Account menu. This will allow you to enter the username and password of an existing Adobe ID. Using this strategy, you can each use your own preferences. Whenever you sign into Muse on the computer, your preferences will be preserved.
Making changes and republishing
After you publish your site, you can make changes in Muse, and then upload any changes you make, overwriting existing files on the host server with the new content.
In this exercise, you’ll make a change to the SERVICES page in your site and publish the changed content.
1. In Plan mode, press Command+7 (Ctrl+7) to ensure that the Desktop site map is showing. Double-click the SERVICES page thumbnail to open that page in Design mode. SERVICES [Desktop] should appear in the tab at the top of the Document window.
2. Choose View > Fit Page In Window.
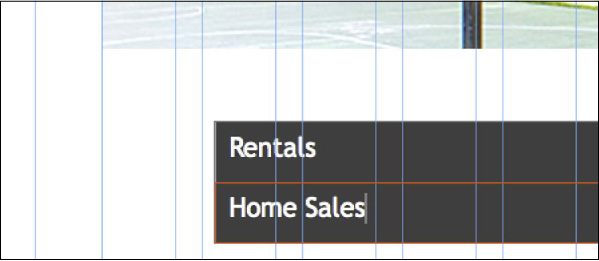
3. Select the Text tool and select the text “Sales” in the second label of the accordion. Change the text to Home Sales. You may need to zoom in.
5. Click the Publish link in the upper-right corner of the Application window.
![]() Tip
Tip
You could also choose File > Publish or press Command+Option+P (Ctrl+Alt+P).
6. In the Publish dialog box, click the word Options. Notice that the Publish To menu currently shows the URL of the temporary site (somepropertyco.businesscatalyst.com in our case). That information is saved with the Muse file.
7. Click the Publish To menu, and you will see that information at the top of the menu. You can publish the site to a new site (to experiment with a new design without affecting the original testing site), or you could associate the files with another published site by selecting that site in the menu. Any other Muse sites that you have previously published are listed in the Publish To menu. You can overwrite them with the current file, but choose carefully! If you make a mistake, you’ll have to open the other site’s .muse file and publish it again to restore an existing site.
8. Click away from the Publish To menu without making a change, within the Publish dialog box, to hide the menu.
Notice in the Publish menu that there is now a Folder option beneath the Publish To option. The Folder option allows you to publish the site content to a subdirectory on the hosting server. This can be very useful for site content organization, for creating another section of your site from content in another .muse site file, or for creating a microsite for an event that has a URL named something like “mysite.com/conference2015.”
You need to specify a folder name, and if the folder does not exist on the server, it will be created by Muse during the publish process. This is a more advanced option and will not be used by everyone.
9. Click the Upload menu to see that you can choose to upload all of the files or only those that have been modified. The default option of Only Modified Files is preferred if you are making changes.
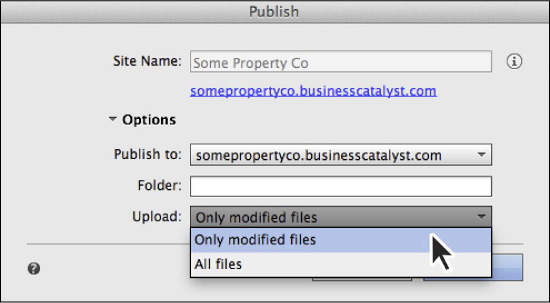
Publishing only the modified files will most certainly be faster because only the files that have been changed will be uploaded to the server. If you find that there are issues with the site, someone has made changes using In-Browser Editing that you want to overwrite (which you’ll learn about later in this lesson), or you just want to upload all of the site content again, you would choose All Files from the Upload menu.
10. Click OK to publish just the modified files. The updated site will open in the default browser.
11. In the browser, click the SERVICES page menu item in the top navigation to view the SERVICES page, and notice the text change in the Composition widget. Close the browser, and return to Muse.
12. Back in Muse, click OK to close the Publish dialog box.
By default, Muse publishes only the content in your site that has been changed. In this case, it publishes the SERVICES HTML page and any other files necessary, such as CSS and related scripts. If you add a new image or other asset, that new asset is converted to a web format, if necessary, and uploaded as well as the page, replacing just those files on the server. If you select All Files in the Upload menu, Muse publishes all of the site content and replaces the files currently on the server.
13. Close the SERVICES [Desktop] page to return to Plan mode.
Launching a temporary site
When you’re finished testing a site that you published using Adobe web hosting, you can “launch” the site (upgrade the site’s hosting plan), which allows you to set up your own registered domain name (URL), ensure that the site won’t expire, and add users that can help administer the site. Launching a site involves either paying a monthly hosting fee or using a hosting credit included with your Muse or Adobe Creative Cloud subscription.
![]() Tip
Tip
The Muse account that is tied to your Adobe ID can have multiple sites associated with it, some temporary sites and some paid sites, depending on what point in the design and testing process they are in.
Instead of using the Publish command to publish your site using Adobe web hosting, you can also simply publish the site to a host of your choice by choosing File > Upload To FTP Host or exporting the site files by choosing File > Export As HTML.
Before embarking on the launching process, you need to publish a temporary site from Muse (you did that in the previous section) and then purchase a domain name from a third-party domain name registrar (examples: GoDaddy.com, NetworkSolutions.com, 1and1.com). For the purposes of this book, the domain name somepropertyco.com was purchased.
With your account set up and domain name registered, you’re ready to launch a finished site and take it live.
1. With the SPC site open in Muse, click the Manage link in the upper-right corner of the Application window.
In your default browser, the Muse Admin Console will open. The Admin Console content that first loads in the browser when you click Manage in Muse is called the Dashboard.
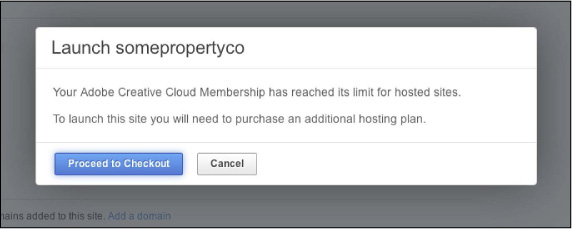
2. Click the Launch Site button in the main area of the Dashboard content. A window appears in the page and the rest of the page content is dimmed. The window you see could be created in Muse using a Lightbox Display Composition widget!
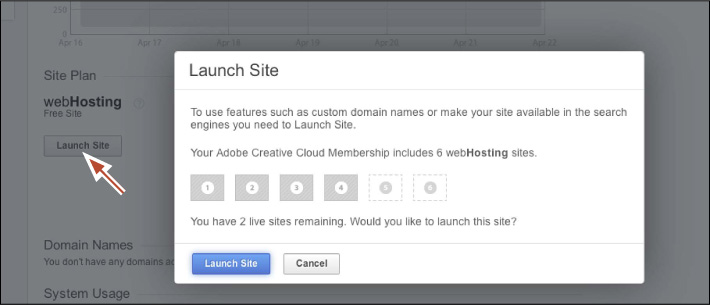
If you are an active Creative Cloud subscriber and have a hosting credit available, a Launch Site button appears at the bottom of the window. If you are not an active Adobe Muse or Creative Cloud subscriber or if you have used all of the hosting credits that come with your Creative Cloud membership, a Proceed To Checkout button appears at the bottom of the window.
If you are an active Creative Cloud subscriber, continue on to the next section. If you are not an active Creative Cloud subscriber or have used all of the hosting credits that come with your Creative Cloud membership and you see a Proceed To Checkout button, you can skip to the “Launching a temporary site using a credit card” section that follows.
Launching a temporary site using a Creative Cloud hosting credit
At the time of this writing, your Creative Cloud subscription includes five web hosting credits. If you have a Creative Cloud single app membership (for Muse), then you may have one credit available. That means you can host either one or five sites, depending on your subscription, without paying an additional monthly hosting cost. In this section, we’ll lead you through how to launch a site using one of those Creative Cloud hosting credits.
Important! If you want to follow along with the next few steps, know that you will use one of those Creative Cloud hosting credits. If you don’t feel comfortable doing that, you can simply follow along when you have your own site. Just know that you can delete the SPC site after launching it and reuse that hosting credit after completing the lesson. See the section “Deleting the SPC site and getting the hosting credit back.”
In this exercise, you’ll use a Creative Cloud hosting credit to upgrade the site on Adobe web hosting.
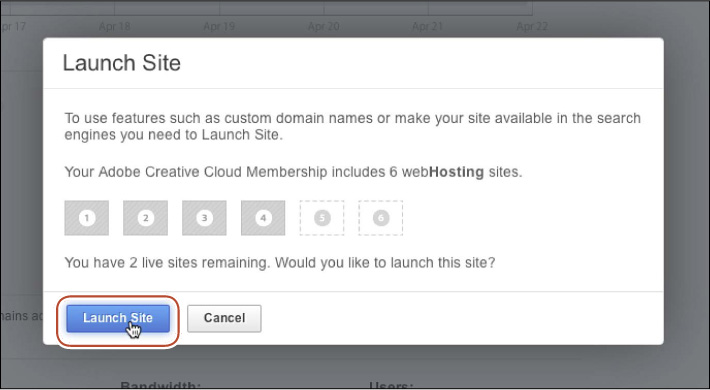
1. With the window still open in the browser, you’ll see the number of hosting credits available to you. If you want to follow along (see the preceding Important! statement) and you have a hosting credit available, click the Launch Site button.
A few moments after clicking the Launch Site button the window will display “Live Site,” and the interface allows you to add your own domain. You’ll see that process shortly.
2. For now, click the Done button to return to the Dashboard.
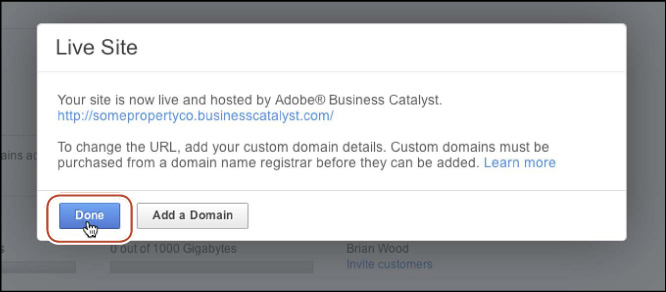
In the Dashboard in the Site Plan section, you will now see “webHosting” and “Live,” indicating that the site is now associated with a paid hosting plan that is included in your Creative Cloud subscription.
Deleting the lesson site and getting the hosting credit back
If you use one of your Adobe Creative Cloud hosting credits, you can always delete the site and get back your credit to use the hosting for another site. Know that the site will no longer be accessible on the web at that URL, and the site files that you published on the Adobe web hosting servers (not your original Muse site content on your computer) will be permanently deleted.
Here’s how you can get the hosting credit back if you desire:
1. Open the site project file in Muse that you used to publish the site (in this case, the SPC site).
2. Click the Manage link in the upper-right corner of the Application window.
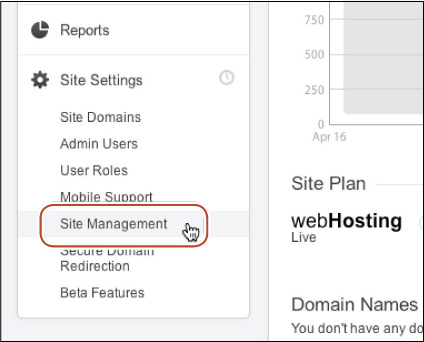
3. In the browser, with the Dashboard content showing in the Admin site, click the Site Settings option on the left side of the page, and then click the Site Management link that appears.
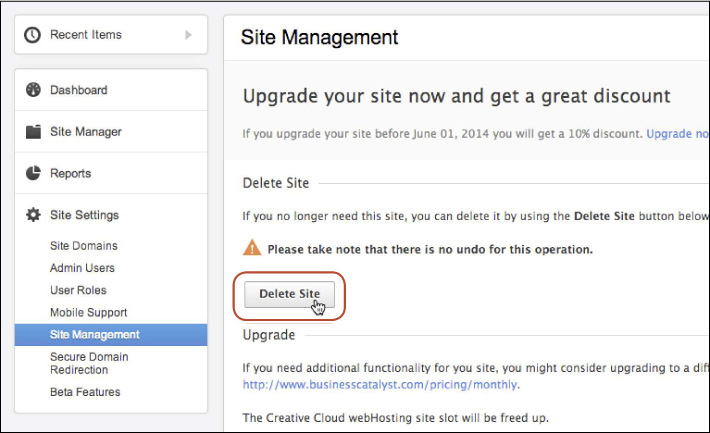
4. Click the Delete Site button.
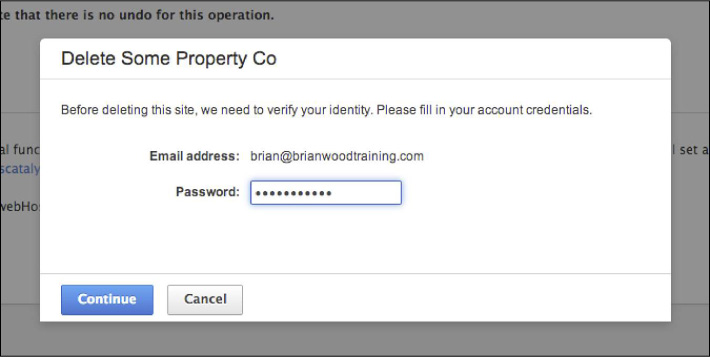
5. Enter the password for your Adobe ID and click Continue.
6. Another page appears in the browser that asks you to fill out a brief survey. At the bottom of the page, click the Delete Site button.
7. A pop-up will appear asking if you want to delete the site content. Make sure that you want to delete the site, and then click OK.
The site content has now been deleted from the Adobe web hosting servers. If you had assigned a domain to the site, it will simply not work anymore, but you could reuse that domain name by reassigning it to another site.
![]() Tip
Tip
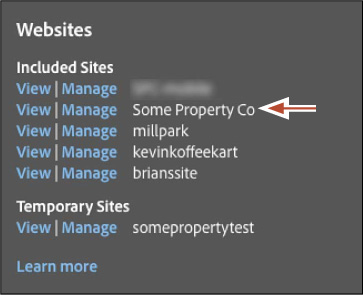
To see which sites are using a hosting credit, you can log in to the https://creative.adobe.com/ website using your Adobe ID. With the Files link selected in the upper-left corner of the page, you can see the sites listed on the right side of the page in the “Websites” section in the gray sidebar. If they are not appearing, try refreshing the page. The temporary sites you have created are listed, and the sites using a hosting credit appear in the “Included Sites” section. You can click the Manage link for any of the sites and delete the site if you choose by following the steps in the “Deleting the lesson site and getting the hosting credit back” section.
Launching a temporary site using a credit card
If you are not an active Creative Cloud subscriber or have used all of the hosting credits that come with your Creative Cloud membership, you can still purchase a hosting plan for your site to launch it. We’ll go through that process next.
1. With the window still open in the browser, click the Proceed To Checkout button.
![]() Note
Note
If you choose to pay for Adobe web hosting via a credit card, you’ll begin paying monthly hosting fees for that one site—and you are free to continue updating the site’s content as needed.
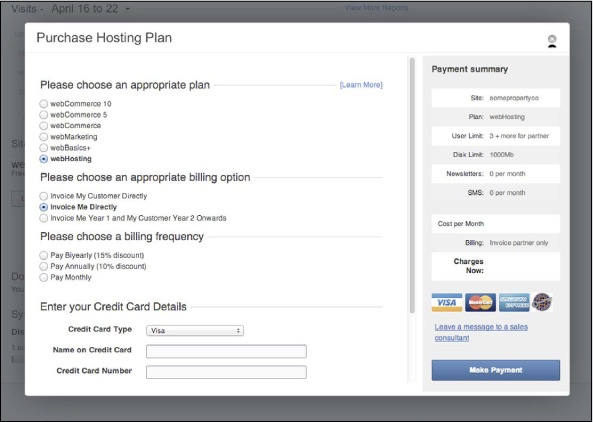
Another window with the headline Purchase Hosting Plans appears in the browser. Here, you can choose the appropriate hosting plan for your site needs. You must purchase one of the plans to continue the process. You can even choose to invoice your client (customer) directly instead of paying for the hosting plan yourself.
![]() Tip
Tip
In the Purchase Hosting Plans window, if you click the Learn More link to the right of “Please choose an appropriate plan,” you will be taken to a new page that shows a comparison of the plans offered.
To complete the process, you would choose the appropriate hosting plan, select a billing option and frequency, enter your credit card information, and then click Make Payment.
2. For this exercise, click the X in the upper-right corner of the window to close it and return to the Dashboard in the browser.
Associating a domain with your site after it’s launched
One of the benefits of upgrading your live site to use Adobe web hosting is that you can assign a custom domain name to the site using the Dashboard, and that’s what you’ll do next.
![]() Note
Note
In a real-world scenario, before continuing you would need to purchase a domain from a registrar. In this lesson, you can simply stop when it asks you to enter a domain name.
1. In Muse, with the SPC site open, click Manage to open the Muse Admin Console page again in the default browser.
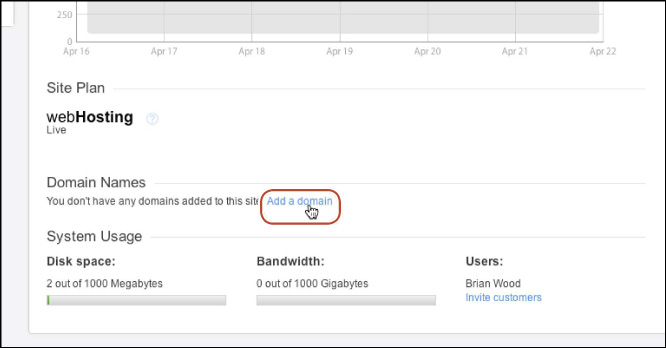
When the Muse Dashboard appears in the browser, if you chose to launch the site in the previous sections notice that the Launch Site button is gone because the site has been launched, and under the Status header, the status shows as “Live.”
Next, you’ll associate the domain name you purchased with the site to change its URL.
2. In the Domain Names section directly below the web hosting status, click the “Add a domain” link.
3. In the Associate Existing Domain window that appears, enter the domain name you have already purchased.

We entered somepropertyco.com, but you won’t be able to enter the same. Several advanced settings are available in the Associate Existing Domain window, but you won’t need to adjust these settings for many sites.
![]() Tip
Tip
To learn more about this process, visit http://helpx.adobe.com/business-catalyst/using/change-site-domain.html
For the remainder of this section, simply follow along unless you are working on your own site and have already purchased a custom domain name.
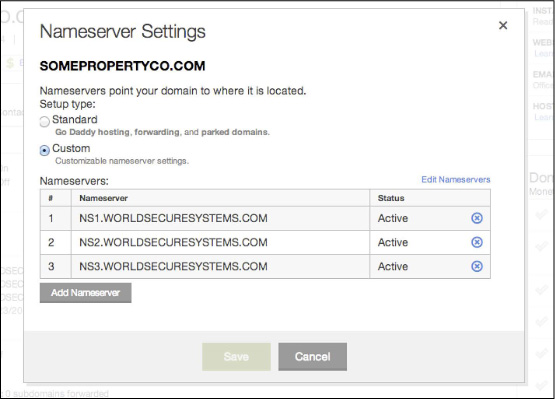
After successfully associating a domain with your site, you’ll see the Domain Added window. Now you’ll need to visit the website of the registrar that you used when you registered your domain name to update the DNS settings. This update points your domain name to the Adobe Business Catalyst hosting servers. For more information on updating the DNS information for a domain, contact the registrar where you purchased your domain name.
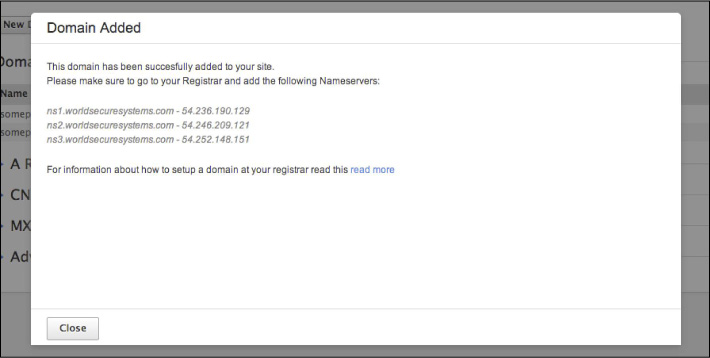
You can use the following DNS information to point to Adobe web hosting:
• NS1.WORLDSECURESYSTEMS.COM
• NS2.WORLDSECURESYSTEMS.COM
• NS3.WORLDSECURESYSTEMS.COM
The following figure shows an example of editing the DNS information on GoDaddy.com.
5. In the Domain Added window, click Close.
You will now see the domain added to the list of domains in the “Site Domains” section of the Dashboard. Use this area of the interface whenever you want to remove a domain from a site or add another.
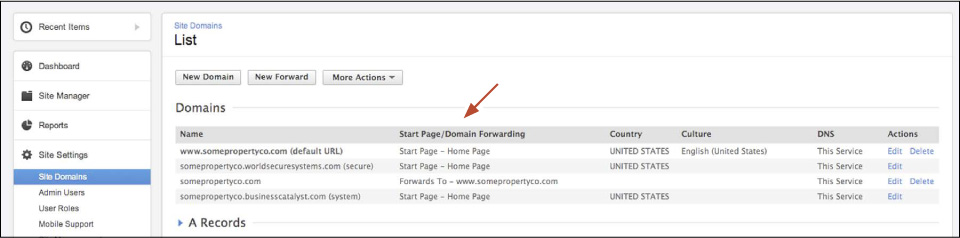
You can add multiple domain names to your site in the Muse Admin Console. For instance, you could specify somepropertyco.com and somepropertyco.biz to point both domains to the same site. Of course, you must own both domains and have access to the registrar account in order to change the DNS settings.
6. Close the browser window and return to Muse.
After you’ve upgraded the site, associated a domain name, and updated the DNS settings of the domain, users will be able to access the site after a maximum of seven days. Sites can usually be seen within 24 to 48 hours (but often sooner).
![]() Tip
Tip
To learn more about the process of associating a domain with your site as it relates to specific domain registrars (like GoDaddy.com, crazydomains.com, and others, at the time of this writing, you can visit http://forums.adobe.com/docs/DOC-3394.
Uploading your site to a third-party host
With Adobe Muse, you can also upload a site you create in Muse to a third-party hosting service by choosing File > Upload To FTP Host. Before proceeding with this command to publish your site to a host of your choice, you need to have a hosting account set up with that host. A host provider will supply you with information necessary to upload to its servers, such as a domain name (URL), FTP Host address, username, and password.
Next, you’ll explore the process for uploading to a third-party host.
1. With your SPC site file open in Muse, choose File > Upload To FTP Host.
2. In the Connect To FTP Server dialog box, enter the required information and ensure that Store Credentials is selected to save the FTP information with the site. Click Next.
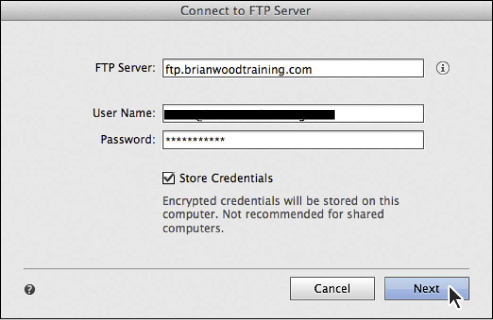
If you are not sure of the FTP host, host directory, and login credentials required to access your hosting account, contact your hosting provider. In many cases, your provider sends the information via an email message when you first sign up. You also don’t need to save the FTP credentials with Muse, but if you don’t, Muse won’t be able to automatically check for changes made using In-Browser Editing whenever a site file is open.
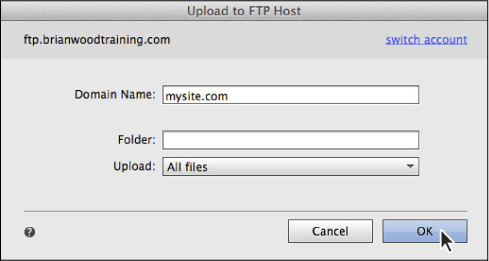
3. In the Upload To FTP Host dialog box that appears after the FTP information is verified, enter the domain name. The domain name is required because it is used to generate the sitemap.xml file.
You can publish to a specific Host Directory (subfolder on the server). This can be a great way to publish a site or section of a site to a subfolder of the main site. Suppose that the main site URL is “mysite.com.” If you publish a new Muse site (for instance) to a Host Directory (subfolder) and name that subfolder “clients,” the URL for the new site would be “mysite.com/clients.” That Muse site could be a microsite, such as an event site, for instance that has a URL something like mysite.com/conference2015. Publishing to a Host Directory can also be useful for organizing your site content and can have potential SEO (Search Engine Optimization) benefits.
4. In the Upload To FTP Host dialog box, leave the folder field blank, and choose All Files from the Upload menu. Click OK.
If you entered a domain name that cannot be verified as to whether it’s associated with the FTP server and folder, a warning dialog box will appear. If the warning dialog does appear, either click No and enter the correct domain or click Yes and know that forms you create may not work properly and the sitemap.xml file that is generated may not help with SEO (Search Engine Optimization); however, the site files will be uploaded to the server, and the site will work.
![]() Note
Note
If you enter a folder name in the Upload To FTP Host dialog box and the folder doesn’t exist, a dialog box will appear called FTP – Create Folder, indicating that the folder was not found and will be created at the root level of the server.
5. After uploading, the Upload To FTP Host dialog box will show any issues that Muse ran across when generating and uploading the files.
Pay attention to the warnings because they can impact the appearance and functionality of your site. You can click View Site to open the site in the browser. Know that Muse will attempt to launch the domain name you entered when uploading the site to your web hosting account.
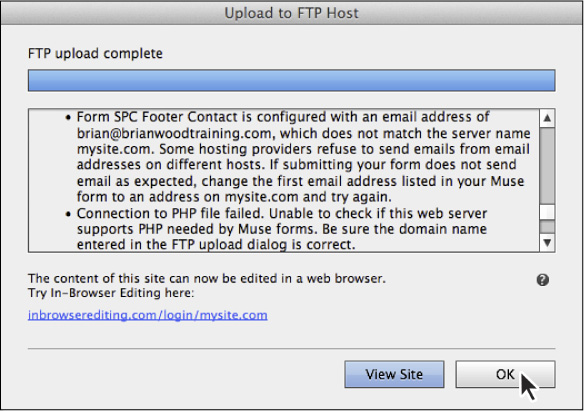
6. Click OK in the Upload To FTP Host dialog box to close it.
Exporting your site as HTML
If you simply want to access the site code generated by Muse to edit in another application, such as Adobe Dreamweaver (which is not recommended, but your experience may vary depending on the site’s layout and content), or you want to export a folder of conveniently sliced and optimized image files to use for other web purposes (newsletters, social media site updates, email signatures, mobile apps, and more), you can export the site as HTML. When you export, Muse generates the HTML, CSS, JavaScript, and web-friendly image files necessary to run the site.
Next, you’ll export the SPC site as HTML.
1. With the SPC site open, choose File > Export As HTML.
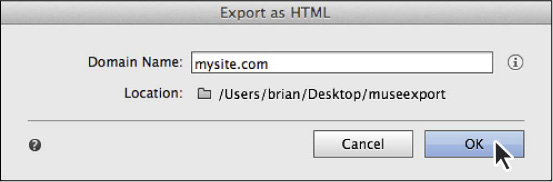
2. In the Export As HTML dialog box, enter a domain name for the site. This URL is used in the sitemap.xml file that is generated for the site when it is exported.
![]() Note
Note
If you don’t have a domain name for the site, you can enter a placeholder domain name. Know that the resulting sitemap.xml file should be discarded rather than uploaded if you do that and export the site files.
3. Click the Location folder icon. In the Select Local Folder To Export dialog box that opens, create a new folder on your Desktop (if necessary) and then click Choose. Click OK.
4. After Muse exports the site, click OK to close the dialog box.
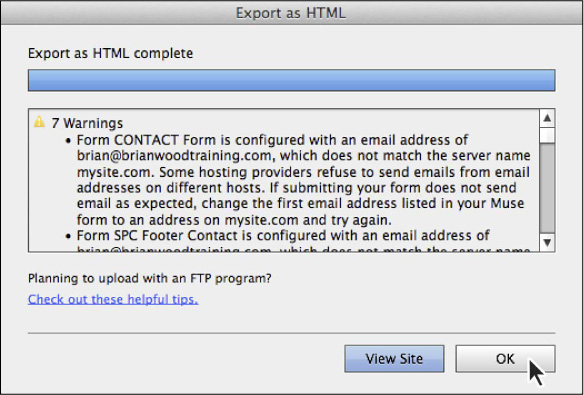
In the Export As HTML dialog box, you may see warnings. Pay attention to these warnings because they may affect the appearance and/or functionality of the site. Also, when you export HTML from Muse, the files that Muse generates cannot be read back in. In other words, if you make any changes to the site in Muse, you will need to reexport the HTML and then re-upload the entire folder of site files to the host server (if you did that already).
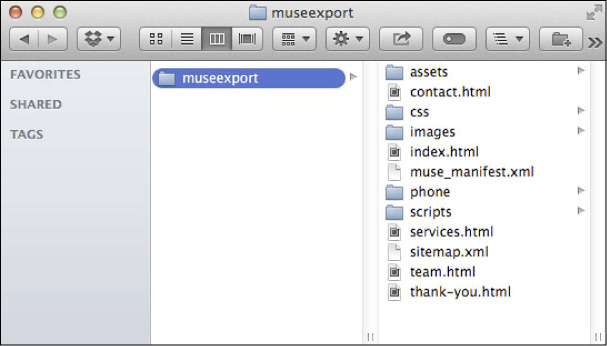
5. Go to the folder on your desktop into which you exported the site content to see what Muse created.
6. Back in Muse, choose File > Close Site to close the SPC site.
In-Browser Editing
In Adobe Muse CC, In-Browser Editing allows anyone you invite to change content, such as text and images, in a browser. This means that you (the site creator) can grant others access to the Muse Admin Console so they can make simple text and image edits using nothing more than a browser and login information. These changes are made to the live site, so as soon as they are made and published, visitors who access the live site can see them. You can then incorporate those changes back into the original Muse site file, if you want. To take advantage of In-Browser Editing, the site does not need to be hosted using Adobe web hosting.
To learn more about In-Browser Editing, visit http://helpx.adobe.com/muse/tutorials/in-browser-editing-muse-part-1.html.
Congratulations! You’ve finished the site, gotten a good grounding in the workings of Muse, and published your site for the world to see.
Review questions
1. Describe the benefits of excluding pages from exporting.
2. Using the Muse workspace, where can you publish your site to?
3. What does the term “temporary site” mean?
4. Name an advantage for upgrading your temporary site to a live site.
5. Name a reason why you might export as HTML.
Review answers
1. Excluding pages from exporting in Muse will not publish or export the designated pages or the content that is unique to excluded pages (image files, etc.). This is useful when you’re designing test pages or to hide pages that contain a product you are no longer selling, for instance.
2. From within Muse, you can publish to either Adobe web hosting by choosing File > Publish or by clicking the Publish link in the upper-right corner of the Application window. You can also publish the site to a third-party host of your choice by choosing File > Upload To FTP Host.
3. A temporary site is a site published from Muse using the Publish command (File > Publish) or by clicking the Publish link in the upper-right corner of the Application window. It has a temporary URL (somepropertyco.businesscatalyst.com) and is active for 30 days.
4. Taking your temporary Muse site live has many benefits: It won’t expire, you can use your own domain name, and you can add other admin users who can also access the site’s Dashboard to view site statistics (reports) or help manage the website settings, to name a few.
5. You might export to HTML if you plan on using a third-party hosting provider and you want to upload the site using your favorite FTP client. You can also export a site to repurpose the web optimized image files for social network sites, email newsletter campaigns, mobile applications, and more.