
2. Creating Your Site
Lesson overview
• Create a new site
• Edit site properties
• Work in Plan mode
• Add, edit, and organize pages
• Set page specific properties
• Add metadata
After creating your site file in Adobe Muse, you’ll take advantage of Plan mode to quickly and visually add, delete, and organize pages in your site, as well as add information about your pages, which is called metadata, for search engines to index and rank the site in search results.
Creating a new site
In this lesson, you’ll learn the fundamentals of creating an Adobe Muse site, adding and organizing pages in Plan mode, and adding metadata to your pages.
![]() Note
Note
If you have not already downloaded the project files for this lesson to your computer from your Account page, make sure to do so now. See “Getting Started” at the beginning of the book.
When you begin to work in Muse, you first create a site file with the extension .muse. That site file contains all of the pages, master pages, colors, styles, and more that you’ll use in your website. Muse provides an environment where you can easily plan, design, and organize all of your web documents.
You need to create a Muse site before you can begin creating pages that belong to that site, and that’s what you’ll do first.
1. Launch Muse. When the Welcome screen appears, click Site in the Create New section. Alternatively, you can close the Welcome screen and choose File > New Site.
The New Site dialog box appears. Here you’ll choose an initial layout and set default page dimensions, margins, columns, and other attributes that become the default properties for the pages of your initial layout.
![]() Note
Note
If you want to see the final site that you’ll create in these lessons, open the SPC_final.muse site file in the Lessons folder.
![]() Note
Note
Going forward, the units you’ll use in Muse will be in pixels unless otherwise indicated.
2. In the New Site dialog box, set the following options:
• Initial Layout: Desktop
The Initial Layout is an important setting. It determines the initial design size that is preset to target a specific screen size. If you click the menu, you can see Tablet and Phone are the other options.
• Page Width: 980
• Min Height: 500 (the default setting)
• Sticky Footer: Selected (the default setting)
• Columns: 12
• Column Width: 60 (the default setting)
• Gutter: 20 (the default setting)
• Top, Bottom, Left, Right Margins: 20 (the default setting) (To change them independently, you would click the Make All Margin Settings The Same button (![]() ) first.)
) first.)
• Top and Bottom Padding: 36 (the default setting) (The Padding adds spacing between the top and bottom of the page area and the browser window.)
• Center Horizontally: Selected (the default setting)
• Resolution: Standard (the default setting) (The web designs created in Muse can take full advantage of the display quality provided by high-resolution (HiDPI) screens, such as Apple Retina displays. HiDPI is a term given to screens with high pixel density. When you upload or export a HiDPI site from Muse, the code generated will include both standard and 2x images, and will automatically detect which images to use when the site is viewed on a HiDPI or standard resolution display. To take advantage of HiDPI images, you need to choose HiDPI (2x) from the Resolution menu and create images that are at least twice (2x) the size they will appear on the site. To learn more about HiDPI images, choose Help > Adobe Muse CC Help and search for HiDPI.
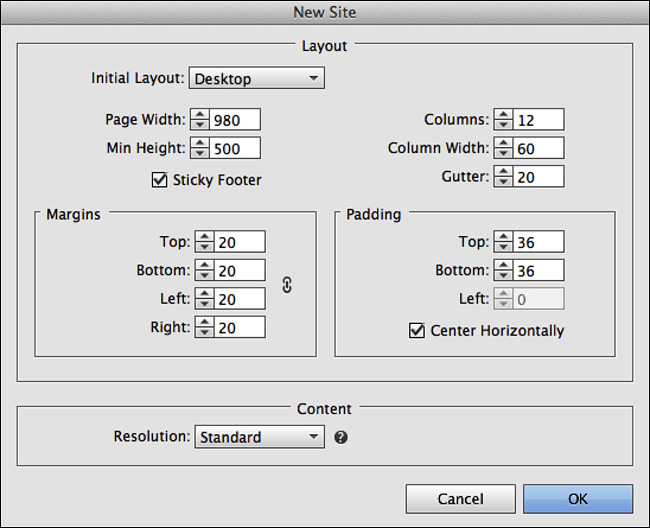
Notice that you cannot edit the Left Padding value (it is dimmed) because the page is set to center horizontally in the browser window.
![]() Tip
Tip
To learn more about the New Site dialog box settings, see the “site_settings.pdf” file in the Lessons > Lesson02 folder.
3. Click OK.
Muse opens the new site you created in Plan mode.
4. Choose File > Save Site As. In the Save Adobe Muse File As dialog box, navigate to the Lessons folder. Type SPC (SPC stands for Some Property Company) in the Save As (Filename) text field, and click Save. The site file is saved as SPC.muse in the root level of the Lessons folder.
Editing the site properties
You don’t always get the site properties right the first time. You can easily edit the options you originally set for your site as well as add some new ones at any point later on. That’s what you’ll do next.
1. With the SPC.muse site file still open, choose File > Site Properties. Click the Layout tab at the top of the dialog box, if it’s not already selected.
The Site Properties dialog box opens, displaying the layout settings you specified when you created the site as well as other optional properties, such as scroll bar settings and a Favicon Image setting.
On the left side of the Site Properties dialog box you’ll see the word Desktop. As mentioned in the previous lesson, any layouts you want to create (for example, Tablet or Phone layouts) are contained in a single site file. The area on the left that contains Desktop is where you would see all of the alternate layouts you have in the site file. Currently, you have only a Desktop layout. If we created an alternate layout for tablet devices, for instance, you would be able to select it in the list and edit the layout properties for the pages that will appear on tablet devices.
![]() Tip
Tip
A favicon is a small image that displays to the left of your site’s address in a browser’s Address bar and other places. If you want to add a favicon to your pages, you can make a new document that is 32 pixels by 32 pixels with a resolution of 72 ppi (pixels per inch) in a program like Adobe Photoshop or Adobe Illustrator. Add your content, and save it as a .jpg, .gif, or .png file. In the Site Properties dialog box, simply click the folder icon to the right of Favicon Image and select it. To see the favicon, you must preview the page in a browser on your machine rather than previewing the page in Preview mode in Muse.
2. Change the Top Padding option to 0.

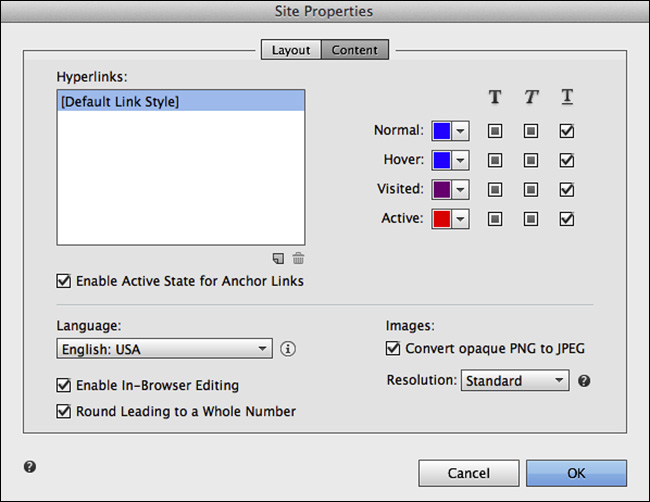
3. Click the Content tab at the top of the Site Properties dialog box.
When you create text links to other pages, sites, and so on, Muse allows you to create hyperlink styles for the various states of those links that change the link appearance based on user interactivity. You can set and adjust the colors and other formatting options for those styles here, among a variety of other options. You’ll create hyperlink styles in Lesson 6, “Working with Links and Buttons.”
4. Click OK to close the Site Properties dialog box.
5. Choose File > Save Site.
Now you’ll begin to explore Plan mode and the site map by adding and organizing pages in your site.
Editing your site map
The best way to begin working on your site is by editing your site map. Refining a site map is a critical first step because the map is where you add pages to your site and determine how the pages will be ordered and how they connect to each other in the site navigation. In the exercises that follow, you’ll edit your site map in Plan mode.
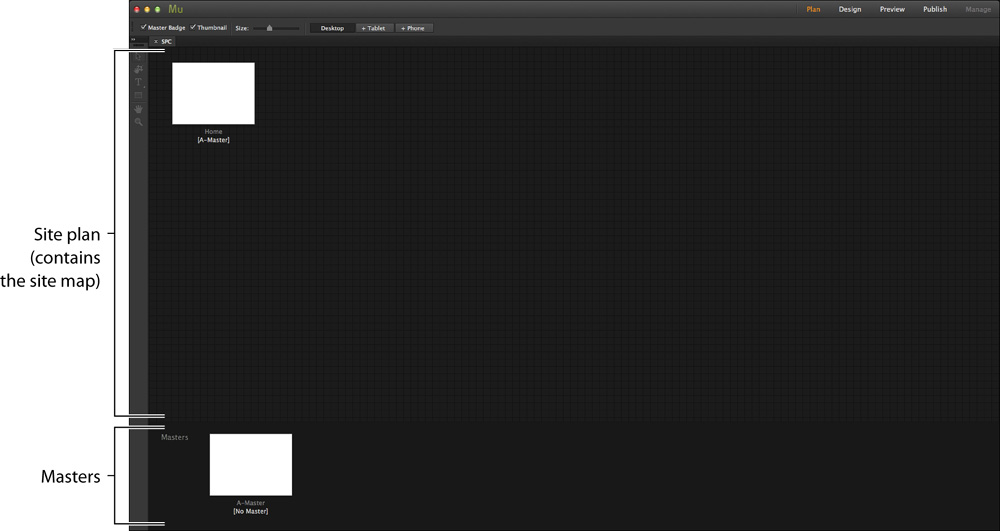
With the SPC.muse site file open, make sure Plan mode is selected in the upper-right corner of the Application window. As you can see, Plan mode is divided into two main sections: the site map area and the master page area. The site map area contains thumbnail images of the current layout’s pages (designed for the desktop, in our case) organized into a hierarchy that shows how those pages connect to each other. Below each page thumbnail are the page’s name and, in brackets, the name of the master page associated with that page. The masters section, below the site plan area, contains the default master page that every Muse site starts with. A master page can contain design elements that are shared across multiple pages of a site, like a header, footer, or Menu widget, and allows you to maintain consistency across the pages in your website. You’ll learn more about master pages in the next lesson, Lesson 3, “Working with Master Pages.”
When you create a new site, Muse creates one blank Home page and one blank A-Master page by default. These pages are the starting point for your site map and website. The next steps are to begin adding pages to your site and determining how users will navigate your site.
![]() Tip
Tip
Muse gives you lots of flexibility when creating your website. You can add blank pages to your site map and then apply masters to them later, or you can add design content to the default master page, which populates the Home page automatically, and then create new pages based on that master page.
Adding and deleting pages in your site
In Muse, your site map is structured like a flowchart. You can quickly see the relationship between pages at the top (called parent pages), which are accessible through the main site navigation on the web page, and child pages, which are often available through submenus or other navigation. Sibling pages appear on the same level in the site plan. Using simple tools in Plan mode, you can add and remove pages, connect pages to each other, work with master pages, and rearrange pages for each layout you create.
You can organize your site however you feel will benefit the end user the most. Suppose you were building a site for your portfolio. The parent pages could include the Home page, Contact page, Projects page, and so on. The child pages for the Projects parent page could consist of different types of projects, like web and print. It always helps to explore the web and examine how others are organizing pages in their sites. Keep in mind that you can edit your site map later if your needs change, but a well-structured site map will guide your process and determine the site navigation.
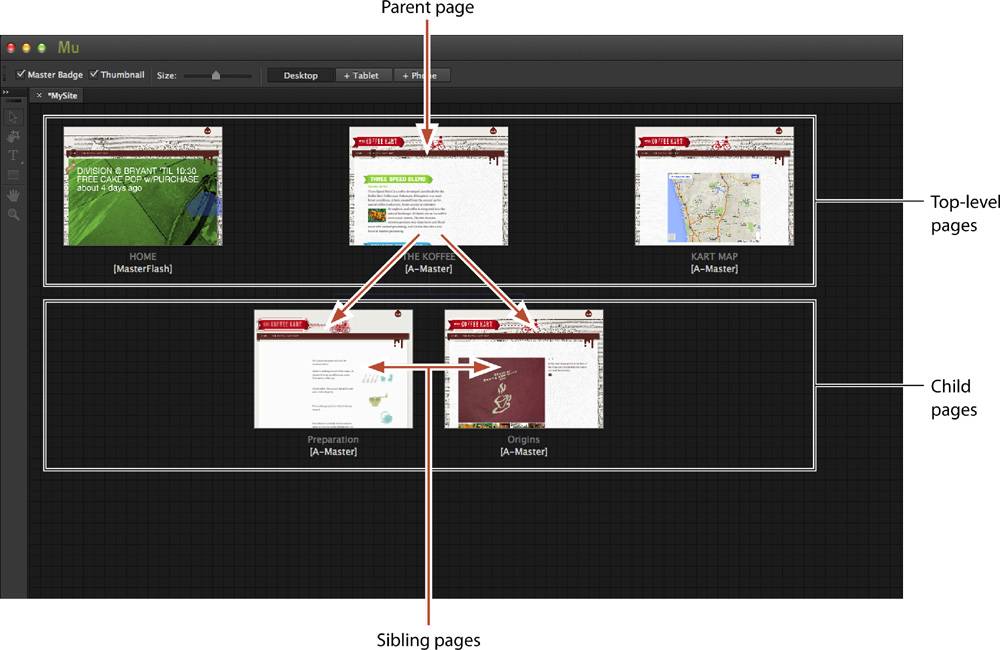
Example site map
The site map’s top level includes the pages that will make up the site’s main navigation. For example, the page named Home is always a top-level page. Any pages that you create to the right or left of the Home page are considered siblings to Home and are also in the top level of the site navigation. The next figure illustrates how a Muse site map later translates into a navigation menu for the site.
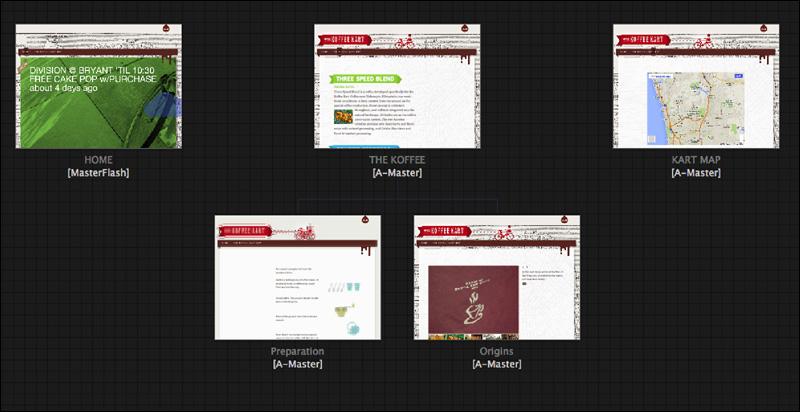
The original example site map in Plan mode
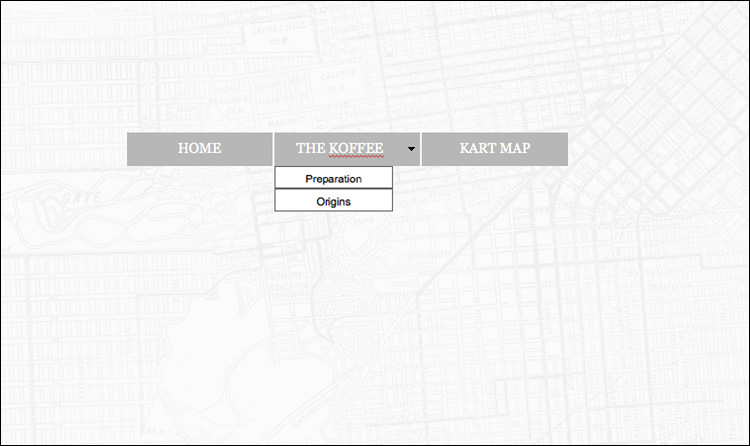
The Horizontal Menu widget that Muse populates based on the example site map
You’ll learn more about the relationship between the site map and Menu widgets in Lesson 7, “Working with Widgets”; for now you’ll concentrate on adding top-level pages to your site.
Adding top-level pages
To start, you’ll add a few pages to your site. These pages will be in the main navigation.
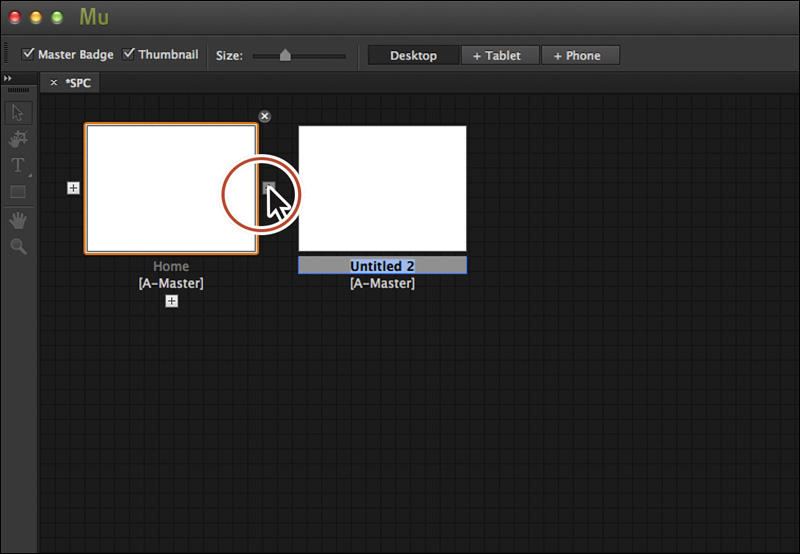
1. Position the cursor over the Home page thumbnail in the site map area.
Notice that a series of plus (+) signs appear on the right, bottom, and left sides of the thumbnail. Clicking the plus (+) sign to the right or left of a page thumbnail adds a sibling page (a page on the same level). Clicking the plus (+) sign beneath the page thumbnail adds a child page (a page beneath, on the second level).
2. Click the plus (+) sign to the right of the Home page thumbnail to add a new sibling page to the right of the Home page.
After inserting a page, you can immediately change the title of the page.
![]() Tip
Tip
You can also choose Page > Add New Top Level Page to add a new page to the top level of the site map, or right-click a page thumbnail in the site map and choose New Sibling Page in the context menu that appears.
3. Select the text “Untitled 2” beneath the new thumbnail to rename the page, and type Services.
When the site is published, by default Muse uses the name that appears beneath each page thumbnail in the site map as the page’s title at the top of the browser window. Later, if you choose to add a navigation menu to your pages, Muse creates a navigation menu based on the top-level pages in the site map. You’ll learn more about Menu widgets in Lesson 7.
![]() Note
Note
If you cannot select the text “Untitled 2” beneath the page thumbnail, double-click the text to select it. You can also right-click the page thumbnail and choose Rename Page to edit the text.
4. Choose File > Preview Page In Browser to open the home page in the default browser installed on your machine.
Notice that Muse used the thumbnail’s name, Home, as the title of the page at the top of the browser window. You’ll learn how to specify more descriptive titles for pages in “Adding page metadata” later in this lesson.
5. Close the browser window, and return to Muse.
6. Position the cursor over the thumbnail labeled Services, and then click the plus (+) sign to its right to add a new sibling page to the right of the Services page.
7. Change the name of the page to Team using the technique in step 3.
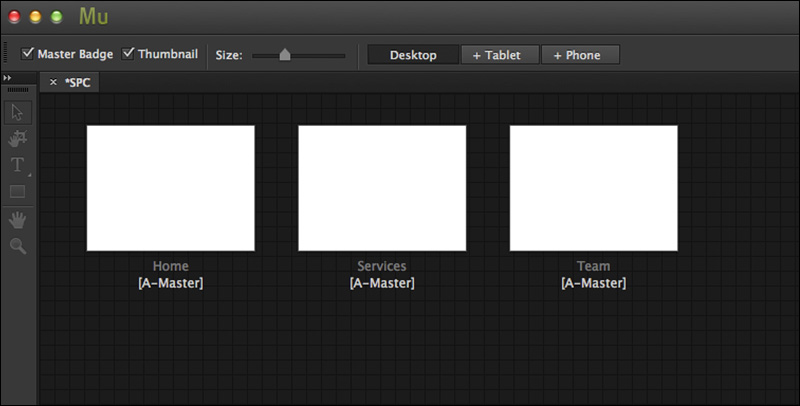
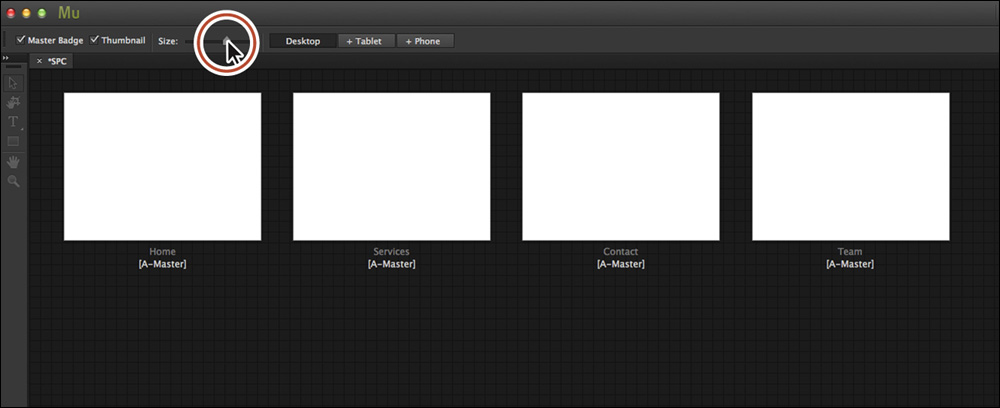
8. Position the cursor over the Services thumbnail, and then click the plus (+) sign to the right one more time. Change the name of the new page to Contact. You should now have a total of four pages: Home, Services, Contact, and Team.
9. In the upper-left corner of the Application window, drag the Size slider to the right to make the page thumbnails larger. If the thumbnails no longer fit in the site plan area, horizontal and/or vertical scroll bars will appear.
Adding child pages
Child pages are typically lower-level pages that can be accessible on a web page via a menu that appears when you hover the pointer over the top-level navigation. You can add child pages to help further organize the pages in your site.
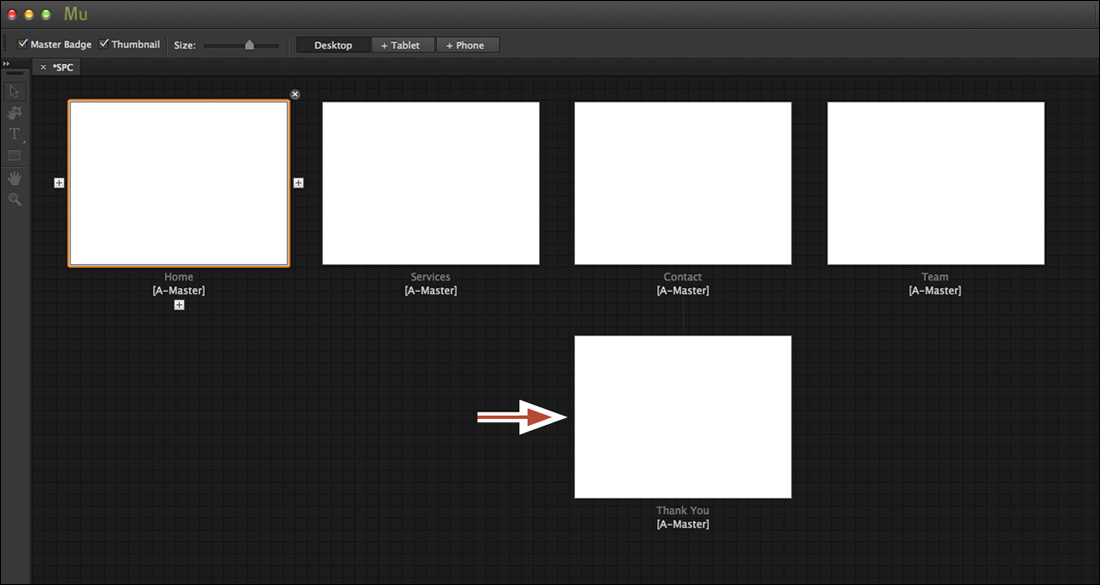
Once published, the SPC site will contain a simple contact form. After users fill out the form, they will be taken to a Thank You page that will be a child page of the Contact page. You’ll create the Thank You page next.
1. Hover the pointer over the Contact page thumbnail, and click the plus (+) sign that appears beneath it.
2. Select the default name of the new child page, and type Thank You.
Notice that a line now connects the Contact (parent) and Thank You (child) pages, indicating their relationship.
![]() Tip
Tip
In Plan mode, you can collapse and expand child pages by clicking below the parent page on the expand/collapse icon that appears. This allows you to hide pages temporarily, simplifying the Plan mode and reducing the amount of scrolling required.
3. Hover the pointer over the Thank You page thumbnail, and then click the plus (+) sign to the right to add a new sibling page to the right.
![]() Tip
Tip
Another way to add a child page is to right-click a page thumbnail and choose New Child Page. This command adds a new child page beneath the active page thumbnail.
Notice that the two new pages are now sibling pages of each other and are also child pages of the parent page Contact. If the addition of the child pages made the page thumbnails spread out too much to be seen, drag the Size slider in the upper-left corner of the Application window to the left until all the page thumbnails are visible in the site map area.
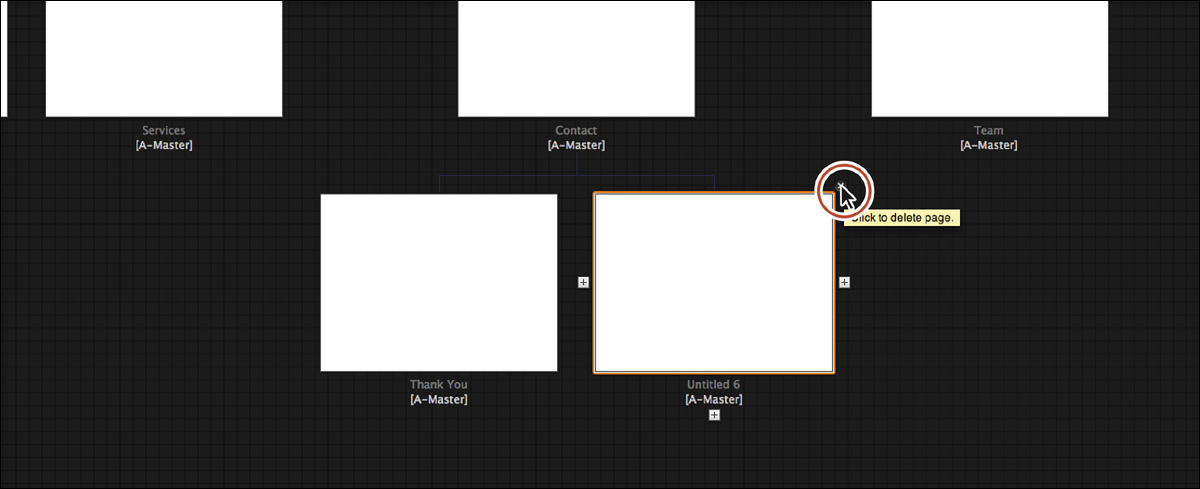
4. Position the pointer over the new page thumbnail (ours is called Untitled 6).
Notice the Delete button (x) that appears off the upper-right corner of the thumbnail. Just as you can add pages to your site map with a click, you can delete them as easily.
5. Click the Delete button to remove the page from the site map.
As you add and delete pages to create your site map, know that you don’t have to finalize the site map before you begin adding content to existing pages. You can always add, delete, and rearrange pages at a later time.
![]() Tip
Tip
Another way to delete a page is to right-click a page thumbnail and choose Delete Page. You can also choose Edit > Undo Delete Page if you want the page back.
Arranging pages in the site map
With pages in your site map, you can rearrange them when necessary to create a more organized site map. This structure can help you immensely when you begin to insert a Menu widget into your pages, as you’ll see in Lesson 7.
1. If necessary, drag the Size slider to the left until all the page thumbnails are visible in the site map area.
![]() Note
Note
If you were to delete a parent page, such as Contact, Muse does not delete the children of the page; instead, it raises them to the level of the former parent page.
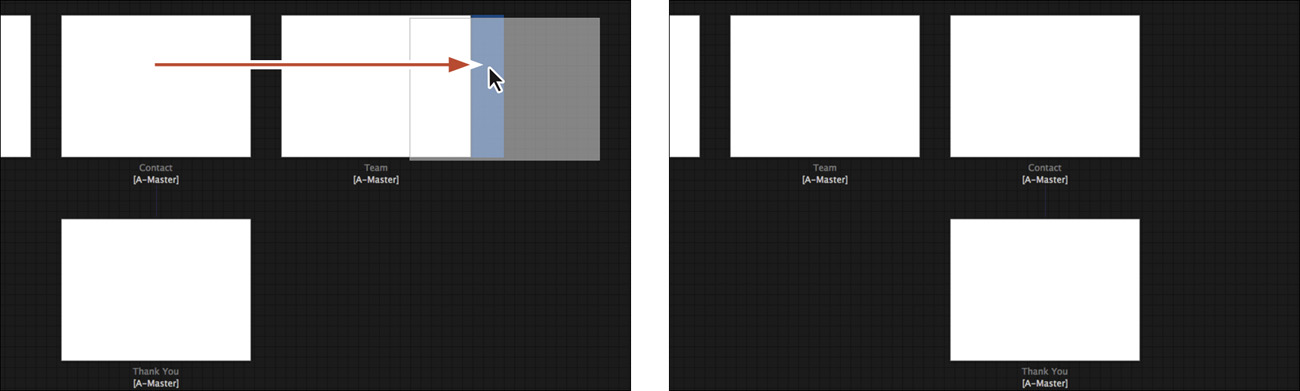
2. Click and drag the Contact page thumbnail to the right of the Team page. When you see a blue drop zone to the right of the Team page, release the mouse. The Contact page thumbnail and its Thank You child page now reside to the right of the Team page thumbnail in the site map.
![]() Note
Note
Relocating a parent page moves all of its child pages at the same time.
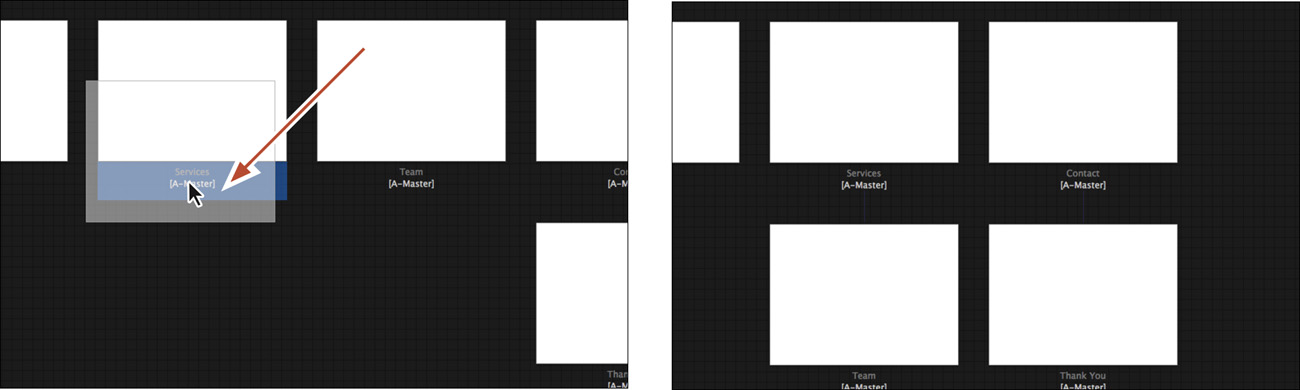
As you drag pages in the site map, pay attention to the blue drop zones that appear around other page thumbnails. The blue drop zone indicates where the page will be in the site map when you release the mouse button. For instance, if you drag a page thumbnail beneath another thumbnail and the blue drop zone appears, the page you are dragging will become a child of the page that shows the drop zone (see the following figure for an example).
![]() Tip
Tip
You can press and hold the Option (Alt) key as you drag a page thumbnail to duplicate a page.
3. Choose File > Save Site.
![]() Tip
Tip
You can always choose Edit > Undo Rearrange Page to return the page thumbnail to where it was.
Setting page properties
When you created your site and edited the site properties, you set default properties for the master pages and pages in your site. In addition to editing those properties for the entire site, you can also edit them on a master page or on a page-by-page basis. In this exercise, you’ll edit the page properties for pages in your site map. In Lesson 3, you’ll learn how to edit properties for a master page.
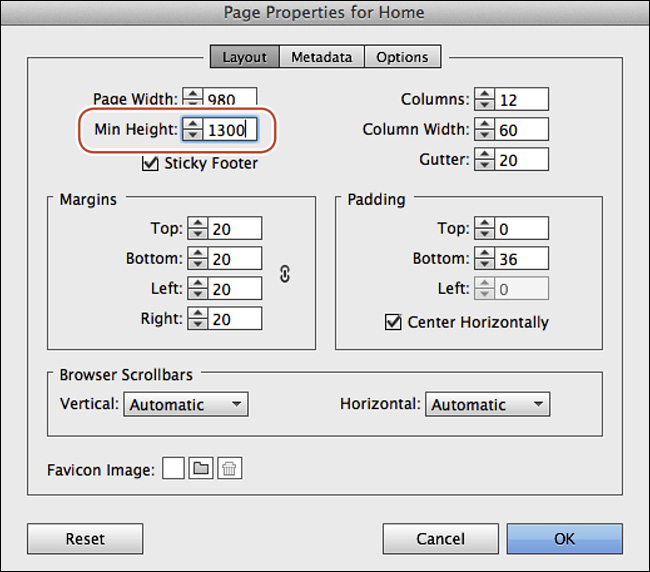
1. In Plan mode, hover the pointer over the Home page thumbnail, right-click, and choose Page Properties. In the Page Properties For Home dialog box, make sure the Layout tab is selected at the top of the dialog box.
![]() Tip
Tip
If a page is open in Design mode, you can also choose Page > Page Properties to set properties for that page.
In the Page Properties For Home dialog box that opens, you’ll see familiar options, like Page Width. Any changes you make will affect the Home page only and will override the default site properties set when you first created the site or edited by choosing File > Site Properties.
2. Change the Min Height to 1300. Leave the dialog box open and continue to the next section.
Adding page metadata
In addition to setting standard page properties in the Page Properties dialog box, you can also add metadata to each of your pages. Consisting of key information about your site, metadata is a great way for you to provide search engines, such as Google and Bing, with a summary of your page.
Adding metadata is also a first step on the long road of search engine optimization (SEO), the process of trying to improve the visibility of a website in search engines in unpaid search results. The goal is to have search engines rank your site higher than other sites, meaning that search engines perceive your site as more relevant to the search terms someone enters and place it higher in their returned lists of results. Metadata can also make site content more accessible to visitors using screen readers and other assistive devices to search the web.
In Muse, you can add three types of metadata to describe the page content to a search engine:
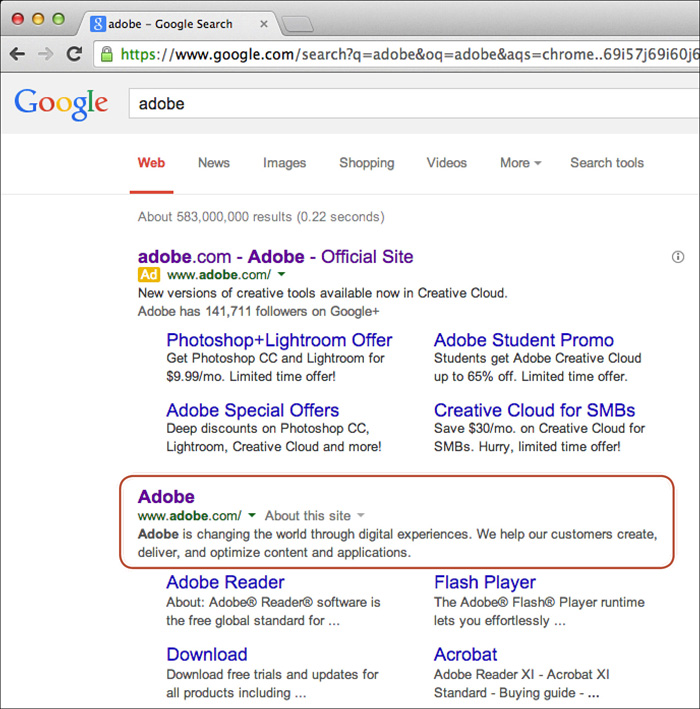
• The title appears at the top of the browser window when you preview a page or visit it on the web and can appear in the search results for search engines. For instance, when you visit Adobe.com, you can see the title of the page at the top of the browser window. The title is also generally shown as the title in search results (at least for Google).
You’ll learn about setting the title in the next section.
• The description briefly describes the page content or provides information about a blog post, such as author and date or byline information. In some cases, search engines may show a portion of this description in their results. If you search for Adobe at Google.com, for instance, in the search results you would see the site title and a description below that. Some search engines also display the description metadata that you add to each page.
• Keywords are words and phrases that relate directly to the content on your site and that someone is likely to type in when searching for your business or website in a search engine. These days, search engines like Google don’t use the keywords you enter in its web search ranking.
Adding metadata to your pages doesn’t guarantee that your site will be ranked higher than others by a search engine, but using at least a relevant title and description in your pages typically doesn’t hurt and is considered the best practice. In addition, search engines may display some of this metadata information to users in their search results, which might draw in some extra visitors. Let’s add some metadata now.
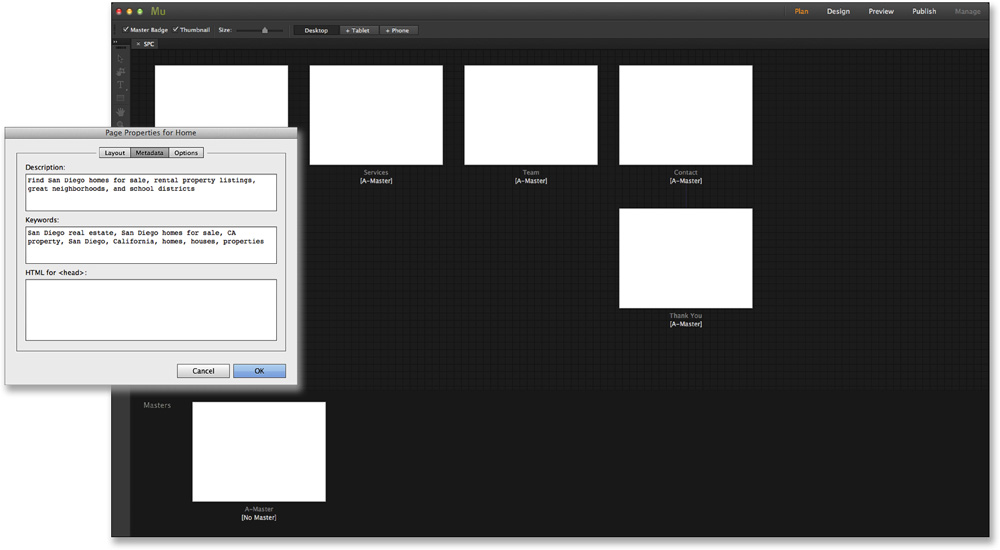
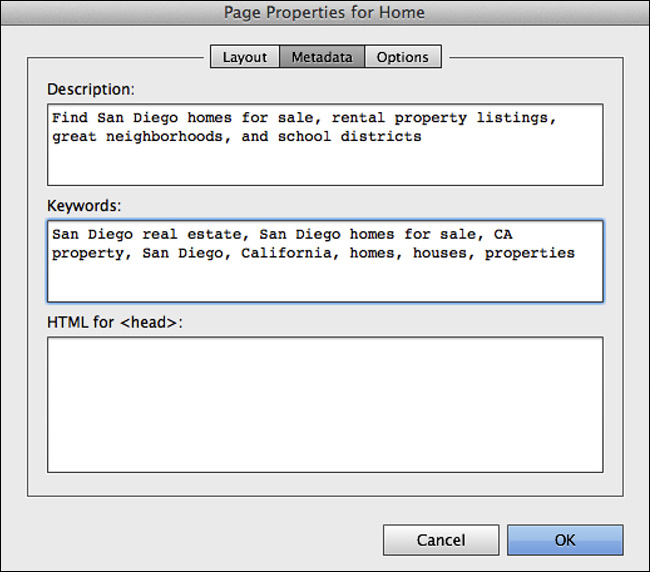
1. Click the Metadata tab at the top of the Page Properties For Home dialog box to view the metadata options.
2. In the Description field, type Find San Diego homes for sale, rental property listings, great neighborhoods, and school districts.
3. In the Keywords field, type San Diego real estate, San Diego homes for sale, CA property, San Diego, California, homes, houses, properties.
Be sure to prioritize the list of keywords, from most to least important, and to separate each keyword or key phrase with a comma. Choose keywords that are relevant to the specific page you’re working on. Also, avoid keyword “stuffing,” which is loading a web page with keywords or numbers in an attempt to manipulate a site’s ranking in search engine results.
Skip over the HTML for <head> field. It is used to add code to a section of the HTML page that is generated when you preview, publish, or export a site. Leave the Page Properties For Home dialog box open and continue to the next section.
Setting page options
The Options section in the Page Properties dialog box allows you to adjust the title for a page, edit the HTML page name, and more, which is what you’ll do next.
1. Click the Options tab at the top of the Page Properties For Home dialog box to view the other options.
As you can see in the Options section, the Page Name is the name you gave the page in Plan mode (this is another place to change it). You can change the name, but remember that Muse will display this name in the Menu widget you’ll add later.
Muse uses a page’s name (the name you used for the page’s thumbnail in Plan mode) as its title. As you’ll see in this exercise, you can use the Page Properties dialog box to change the title to a more descriptive phrase. Your title provides visitors and search engines with useful information about your site.
2. In the Page Title field, deselect the option Same As Page Name.
The title appears at the top of the browser window when you preview a page or visit it on the web and can appear in the search results for search engines. For instance, when you visit Adobe.com, you can see the title of the page at the top of the browser window.
By default, Muse sets the Page Title field to be the same as the Page Name field. Deselecting Same as Page Name enables you to enter a unique, more descriptive title in the Page Title field. Make sure your page title effectively communicates the topic of the page’s content. Ideally, you should add a unique page title to each of your pages.
3. In Page Title, type Some Property Co., a San Diego real estate property team | Home.
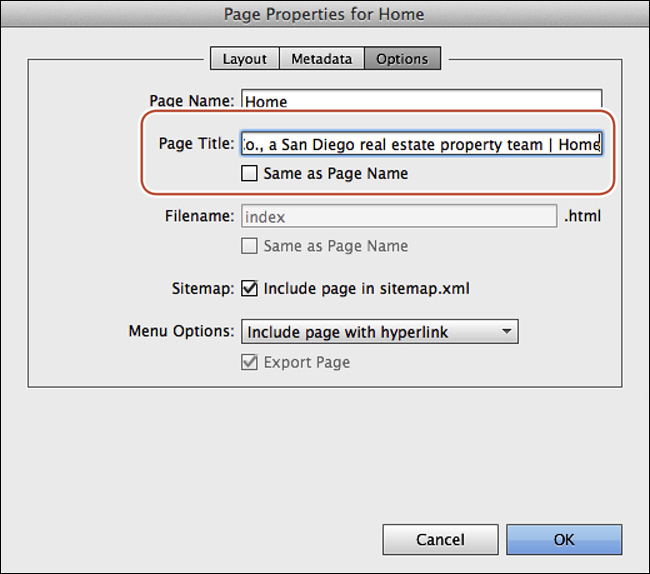
By specifying a relevant title and adding the text “| Home” to the end, you give the search engine information about the page and orient visitors to the current page.
Below the Page Title field is the Filename field. The name of the HTML file that Muse generates when you publish the site will be the same as the page name. For a page named Team in the site map, for example, Muse names the HTML file team.html. The exception to this rule is the Home page. Conventionally, the first page of a website, which is usually the Home page, has the filename index.html. You cannot edit the filename for the Home page, so this option is dimmed. Editing the filename is necessary only under special circumstances. For example, you can edit filenames as requested by a web developer on your team.
In Lesson 7, we’ll explore the settings available in the Menu Options.
4. Click OK.
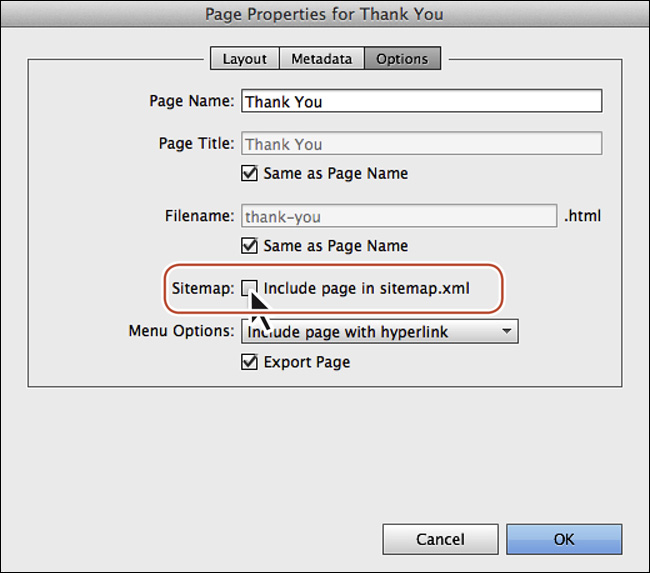
5. In Plan mode, hover the pointer over the Thank You page thumbnail, right-click, and choose Page Properties.
Muse auto-generates an XML site map for your site when it is published to a third-party hosting provider or exported (File > Export As HTML) for better SEO. By facilitating the indexing process, you help search engines understand a site’s structure, which can then lead to better ranking in the search result. You can exclude a page from the XML file (if you don’t want search engines to find it) by deselecting the Include Page In Sitemap.xml option in the Page Properties dialog.
6. Deselect the option Include Page In Sitemap.xml. Click OK.
7. Choose File > Save Site.
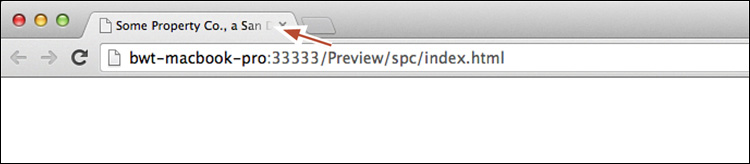
8. Choose File > Preview Site In Browser to see that the title at the top of the browser window now reads, “Some Property Co., a San Diego real estate property team | Home.” The Home page of the previewed site opens by default if there are no pages open in Muse.
9. Close the browser and return to Muse, leaving the site open for the next lesson.
After setting the page properties, you might later realize that you don’t want those properties (like metadata or columns) to be different from other pages in your site. You can always reset the page properties to the default site properties by right-clicking a page thumbnail in the site map and choosing Reset Page Properties. While a page is open in Design mode, you can also choose Page > Reset Page Properties.
As you progress through the lessons, you can add titles, descriptions, and keywords to each of the site’s pages if you like.
In the next lesson, you’ll learn about working with master pages, which make it easier and faster to apply consistent content and formatting to multiple pages.
Review questions
1. When you create a new site in Muse, briefly describe what the Initial Layout option is in the New Site dialog box.
2. Describe how the Min Height setting affects pages.
3. Name the two main parts of Plan mode.
4. What is the purpose of the site map in Plan mode?
5. What is a top-level page?
6. What are the three types of metadata that you can add in the Page Properties dialog box?
Review answers
1. When you create a new site file, the Initial Layout option allows you to decide between designing a Desktop, Tablet, or Phone layout first. Using Muse, you can design unique layouts for desktop, tablet, and smartphone screens that are contained within a single Muse project file.
2. Min Height is the minimum height that a page is displayed in within the browser. As you add content to a page, the page height will expand to fit the new content.
3. The two parts of Plan mode are the site map area (pages area) and the masters area.
4. Building a site map in Plan mode is a critical first step in the website creation process because it determines the number of pages in your site, how the pages are organized, and how they connect to each other in the site navigation dynamically generated in Menu widgets.
5. A top-level page appears in Plan mode in the top tier of the site map. Top-level pages are the main sections of the site and automatically appear in the menu items of Menu widgets (unless they are set to Manual). In the example site project, the top-level pages are Home, Services, Team, and Contact.
6. Three types of metadata that Muse allows you to insert into your pages in the Page Properties dialog box (Page > Page Properties) are a page title, a description, and keywords. The page name and filename can also be used by search engines to help rank your page and are considered metadata as well.