
2. Enriching Illustrator Artwork with Photoshop Content
Lesson overview
In this lesson, you’ll learn how to do the following:
Understand the different layer types in Adobe Photoshop.
Place and embed Photoshop documents into Adobe Illustrator.
Place and link local Photoshop documents into Illustrator.
Place and link Photoshop cloud documents into Illustrator.
Update linked Photoshop documents.
Bring Photoshop paths into Illustrator.
Apply a 3D effect to text.

This lesson will take about 1 hour to complete. Please log in to your account at adobepress.com/DesignCIB to download the files for this lesson, or go to the “Getting Started” section at the beginning of this book and follow the instructions under “Accessing the Lesson Files and Web Edition.” Store the files on your computer in a convenient location.
Your Account page is also where you’ll find any updates to the lesson files. Look on the Lesson & Update Files tab to access the most current content.

The ability to place Adobe Photoshop content into Illustrator offers you a tremendous amount of flexibility and creative freedom.
Placing and managing Photoshop artwork in Illustrator
Creating documents that combine Photoshop and Illustrator artwork is a common workflow for designers. And the options available when bringing Photoshop content into your Illustrator document assure you a great deal of flexibility when going back and forth between applications.
Embedding versus linking when placing
![]() Note
Note
Once you create a link to a document, be careful about renaming or deleting the document or moving it to a different location. Doing so will break the link and Illustrator will prompt you to fix the link the next time you open the file.
Throughout this book, when you place content from one application into a document in another application you will often be presented with a choice between embedding it and linking it. Each method comes with its advantages and disadvantages, and it is up to you to decide which path to take. By the time you have finished the exercises in this book you’ll be better able to make that choice.
Linking inserts a reference to an external file. The linked file remains completely independent.
Embedding inserts a copy of the entire document into the Illustrator document at full resolution.
Workflow criteria
Let’s go over a few of the criteria that will help you make better workflow decisions. When in doubt, ask yourself the following questions.
Will the placed file be changed?
This is probably the most important question to ask yourself. How often might you need to update your placed document? Hypothetically speaking, what creative or technical impact would your project suffer if it were impossible for you to update the placed artwork in your document? If this question makes you nervous, it would be best to link the document instead of embedding it, to ensure easy future updates. Also remember that others might ask you to update your work later, since artwork often needs to go through an approval process when, for example, working for a client. So try to anticipate this as you build your projects.
Is the placed file a “heavy” file?
Another good argument for choosing to link the placed artwork instead of embedding it is the amount of data that you are bringing into Illustrator. Embedding means adding all data to the Illustrator document. This means that the entire file size of all placed Photoshop documents will increase your Illustrator document’s size by potentially dozens or hundreds of megabytes (or even gigabytes) of data. This is not always problematic, but given the potential complexity of the placed Photoshop artwork, the complexity of the Illustrator document, your computer hardware specifications, and the available hard drive disk space and network bandwidth, you might want to consider linking versus embedding the Photoshop document in order to avoid slowdowns in your workflow.
Will I need to share the placed Photoshop document across teams or projects?
Also consider the possibility of needing to collaborate on your project with other stakeholders or team members by means of sharing the document—for example, via a server or online drive. Embedding Photoshop artwork (instead of linking) would take away the ability for them to access the same version you’re working on. Additionally, you would no longer have the ability to place and link the same document in other Adobe applications, like InDesign, Illustrator, and others.
If this is the case, then the probability of needing to update multiple instances of the same Photoshop file at the same time is very high. This is a clear argument in favor of linking instead of embedding, since it allows us to link multiple documents to a single source of truth that can be easily updated for all projects at the same time.
It is also possible that others might need to use the same artwork in their design, especially when you work in a large team. If you choose to embed artwork, it might take some time to dissect and extract the embedded artwork from the Illustrator document before your teammates can use it.
When is it appropriate to embed Photoshop artwork in Illustrator?
![]() Tip
Tip
Illustrator allows you to convert linked files into embedded files, and vice versa, using the Properties panel.
The answer to this question is based entirely on the answers in the previous paragraphs. If the answer to all three questions is no, then embedding Photoshop artwork can be a good practice. Embedding Photoshop documents in Illustrator gives you the following advantages:
You have the option of converting Photoshop layers into Illustrator objects while placing, giving you the ability to modify these objects directly in Illustrator.
Embedding artwork in Illustrator enables you to apply the full range of filters and effects available in the app to the placed artwork.
Embedding artwork makes it easier to manage your file.
Linking a Photoshop document in Illustrator
In the following exercise you’ll learn how to place and link a Photoshop document into an Illustrator document and update its contents.
Getting started
You’ll start the lesson by viewing an image of the final composition and placed artwork.
Start Photoshop, and choose Photoshop > Preferences > General (Mac) or Edit > Preferences > General (Win).
In the Preferences dialog box, click Reset Preferences On Quit. Then restart Photoshop.
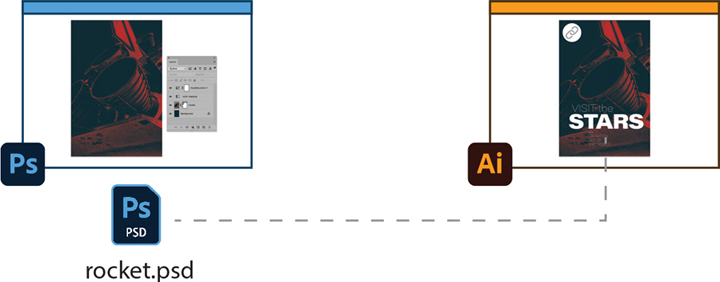
From the Lesson02/Imports folder, open rocket-end.psd.

The image of a rocket has been recolored in Photoshop using adjustment layers. The final image will be used to create a poster in Illustrator.
Close rocket-end.psd.
Start Illustrator, and choose Illustrator > Preferences > General (Mac) or Edit > Preferences > General (Win).
In the Preferences dialog box, click Reset Preferences, then click OK.
In the dialog box that opens, click Restart Now.
From the Lesson02 folder, open L02-poster-end.ai.

Here you can see how the placed Photoshop document is used in Illustrator to create a poster.
Close the file.
Inspecting the Photoshop and Illustrator documents
Launch Photoshop and open rocket-start.psd from the Lesson02/Imports folder.
Choose File > Save As. Photoshop will prompt you to choose between saving the file as a local document and saving it as a cloud document. Select Don’t Show Again, and click Save On Your Computer.
Save the file as rocketWorking.psd.
Inspect the Layers panel and notice that the design consists of three layers:
A regular background layer.
A layer named “rocket” with a vector mask attached.
A fill layer called “color mapping.”

 Note
NoteIf you can’t find the Layers panel, remember that it might be hidden. Choose Window > Layers to open it.
Choose Image > Image Size.
NoteDespite its large dimensions, this document is too low in resolution for a printed poster. But since this exercise is about the importance of file linking, this is a problem we can ignore.
Notice that the document measures 24.25 in. x 36.25 in.
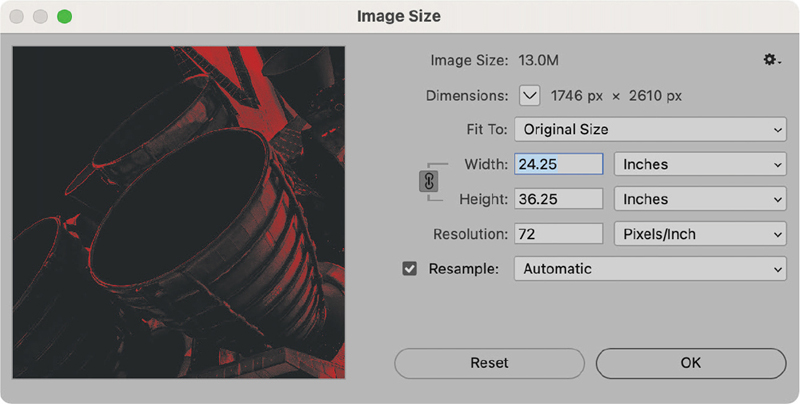
Click OK to close the dialog box.
Leave the file open.
Launch Illustrator.
From the Lesson02 folder, open L02-poster-start.ai.
Choose File > Save As. Illustrator will prompt you to choose between saving the file as a local document and saving it as a cloud document. Select Don’t Show Again, and click Save On Your Computer.
Save the file as L02-posterWorking.ai.
 Note
NoteThe transparency grid has been turned on to make the white elements on the artboard easier to see.
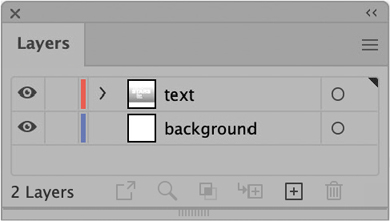
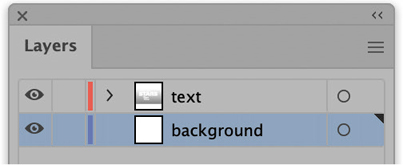
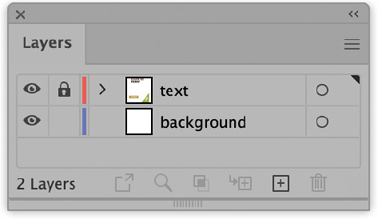
Open the Layers panel and notice there are two layers:
text holds all the text layers, which are currently the only visible elements in the document.
background, which is currently empty.
In the Tools panel, select the Artboard tool
 .
.In the Properties panel, look at the Transform controls at the top right of the screen and notice that the artboard measures 24 x 36 in.
Choose File > Document Setup.

Notice that there is a bleed of 0.125 in. applied around the artboard.
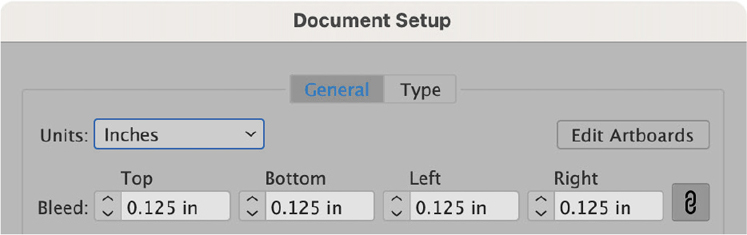
Click OK to close the dialog box.
Placing and linking
In Illustrator, on the Layers panel select the layer named background.
In the Tools panel, select the Selection tool
 .
.
Choose File > Place.
Navigate to the folder containing rocketWorking.psd and select the file.
Make sure the Link option is selected and that the Template and Show Import Options options are unselected.

Click Place.
With the loaded cursor, click once on the artboard to place the Photoshop document.
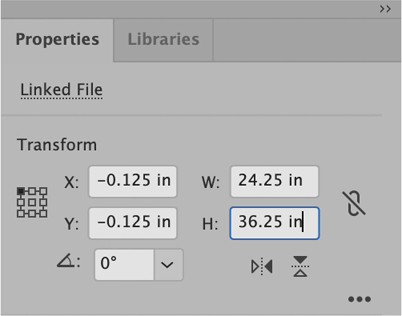
Next, you’ll position the linked file on the artboard. Recall that the artboard is 24 x 36, the linked file is 24.25 x 36.25, and the difference is equal to the bleed we defined in the Document Setup dialog box (0.125 on all sides).
With those values in mind, you’ll set the upper-left corner of the file to be 0.125 to the left of the edge of the artboard and 0.125 above it; the linked file will be exactly centered over the artboard.
In the Properties panel, under Transform, click the top left Reference Point.
In the Properties panel, change both the X and Y values to –0.125 in. to fit the image on the artboard.
The sum of the project artboard and bleed values equals the size of the Photoshop document, resulting in a perfect fit.
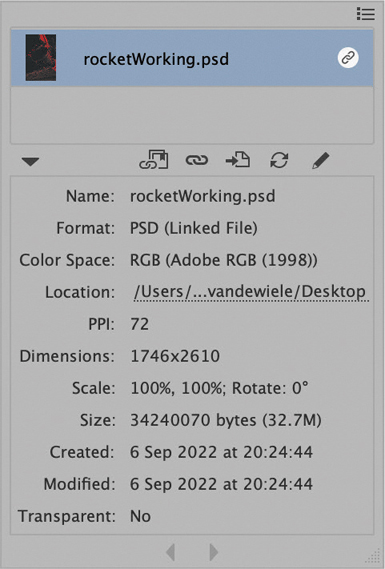
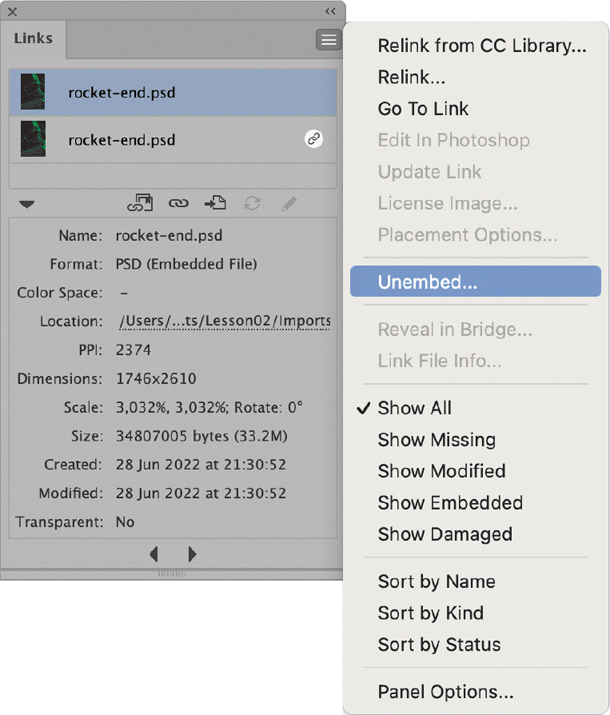
Looking at the Properties panel, notice that the graphic is labeled Linked File.
Click the Linked File label at the top left of the screen to temporarily open the Links panel.
Notice the link icon next to the artwork filename.
Double-click the placed filename to expand its properties.
 Tip
TipClicking the path to the placed link reveals the folder in which it resides.
The Location metadata provides the path to the linked source folder.
Updating the Photoshop document
Return to Photoshop.
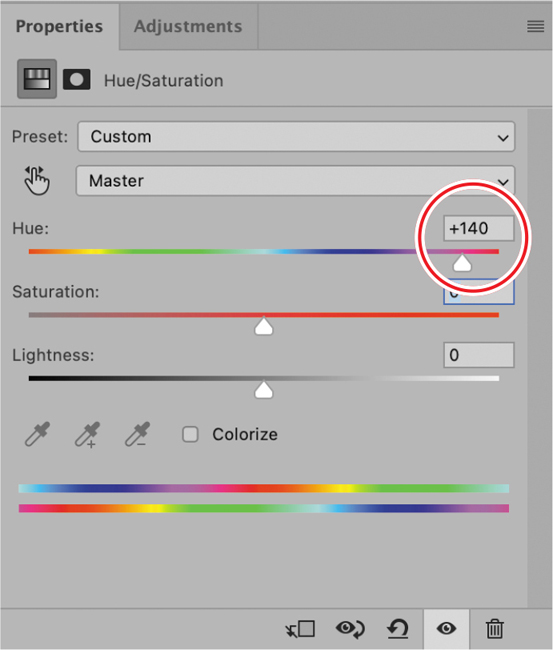
At the bottom of the Layers panel, click the New Adjustment Layer button and choose Hue/Saturation to create a new adjustment layer.
NoteIf you can’t find the Properties panel, choose Window > Properties.
The Properties panel now shows Hue/Saturation options.
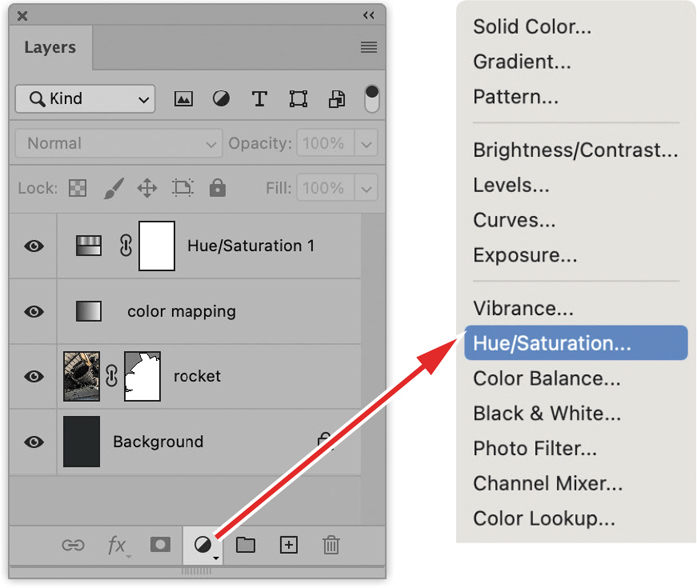
In the Properties panel, drag the Hue slider to the right until you reach a value of roughly +140. The rocket now turns bright green and the background receives a warm tint.
Choose File > Save to save your work.
Return to Illustrator.
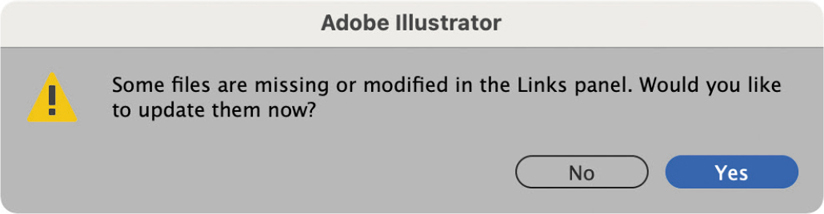
Illustrator informs you that a linked file has been modified. Click Yes to update the file.
NoteIf you accidentally clicked No when you were prompted to update the linked file, you can always update the file in the Links panel (choose Window > Links).
Save your work.
Close the file but leave Illustrator open.
Embedding a Photoshop document in Illustrator
The following exercise will present you with a good example of when to embed a Photoshop document into Illustrator.
![]() Note
Note
This book assumes that Photoshop and Illustrator are using their default settings. If you are unsure of how to return to the default settings, review the steps in “Linking a Photoshop document in Illustrator.”
Getting started
You’ll start the lesson by viewing an image of the final composition and placed artwork.
From the Lesson02/Imports folder, open dish-start.psd in Photoshop.
Make sure Photoshop is using the Essentials workspace by choosing Window > Workspace > Essentials. Then choose Window > Workspace > Reset Essentials.
This Photoshop document will be embedded in Illustrator as part of an ad campaign.
Leave the document open, and from the Lesson02 folder, open L02-menu-end.ai in Illustrator.

Reset the Illustrator workspace by choosing Window > Workspace > Essentials and then choosing Window > Workspace > Reset Essentials.
This document is the finished menu ad. Notice that Illustrator was able to reuse vector shapes from Photoshop (situated around the dish) when it was placed.
Close the document but leave Illustrator open.
Inspecting the project files
Return to dish-start.psd in Photoshop.
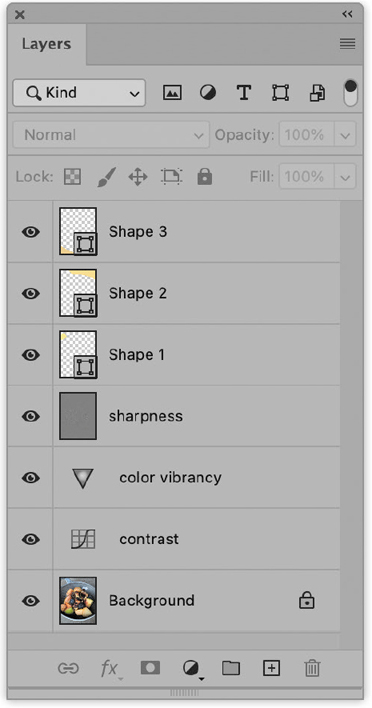
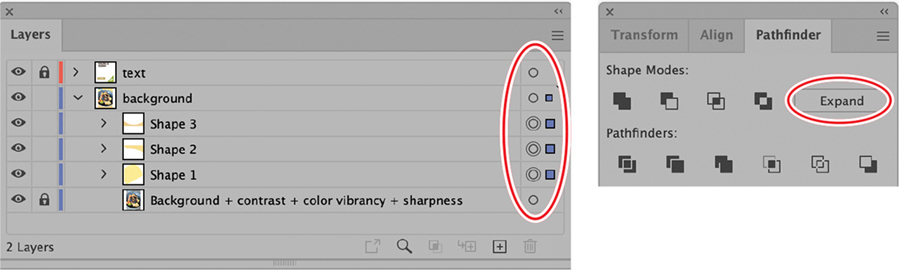
Inspect the Layers panel and note that the design consists of seven layers:
A regular background layer
Three adjustment layers for changing the background’s sharpness, color vibrancy, and contrast
Three consecutively named shape layers
Return to Illustrator.
From the Lesson02 folder, open L02-menu-start.ai.
Choose File > Save As, and save the file as L02-menuWorking.psd.
Click the Layers panel and note that there are two layers:
text holds all the text and shape layers, which are currently the only visible elements in the document.
background, which is currently empty.
Placing and embedding
In Illustrator, click the background layer in order to add items to it.
Choose File > Place.
Navigate to the Lesson02/Imports folder and click to select dish-start.psd.
Deselect the Link option to embed the placed document.
Verify that the Template option is unselected.
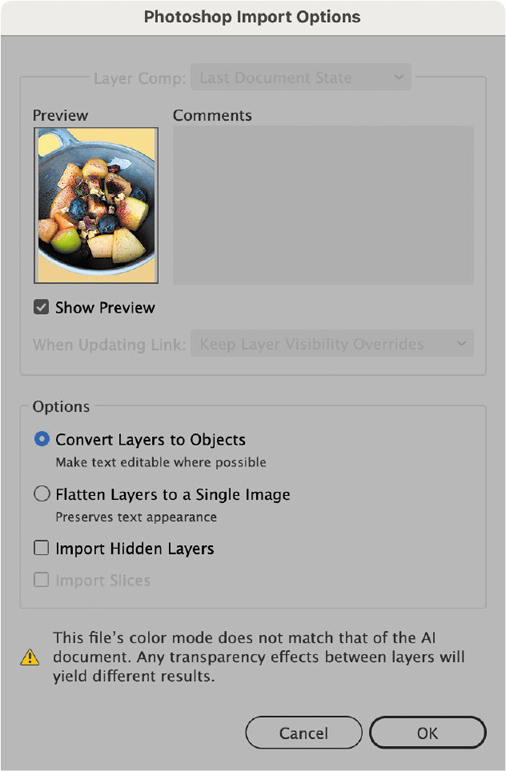
Select Show Import Options.

Click Place.
In the Photoshop Import Options dialog box, select Convert Layers To Objects. This option will keep Photoshop shape and type layers editable in Illustrator.
NoteThe message at the bottom of the dialog box warns us that because the Photoshop and Illustrator documents use different color modes, different transparency effects will result. This is not a concern in this exercise, because no transparent effects are used in the Photoshop document.
Click OK to close the dialog box.
NotePhotoshop shape or type layers affected by layer blending modes or adjustment layers will be flattened when placed into Illustrator. This prevents unexpected results. Because of this it will not be possible to manipulate these objects once they are imported into Illustrator.
With the loaded cursor, start dragging from the upper-left corner of the red rectangle surrounding the document (the bleed) to the lower-right corner to place the graphic. The design will overflow the document a little bit, which is fine.

Editing converted objects
Use the Selection tool
to select the placed image. The Properties panel identifies this object as a group.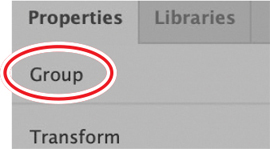
Choose Object > Ungroup, or press Shift+Cmd+G/Shift+Ctrl+G.
Deselect all objects by clicking the gray zone surrounding the artboard.
In the Layers panel, twirl open the background layer by clicking the arrow icon. Note that the three Photoshop shape layers have been retained and are available for editing in Illustrator.
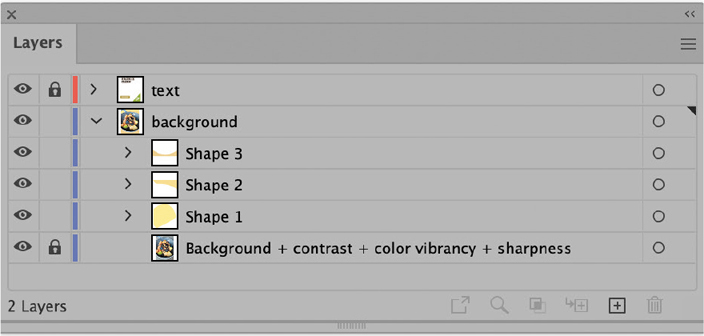
Now that this Photoshop file has been placed in Illustrator, the bottom layer in the background group is the product of merging the Photoshop background layer with the adjustment layers above it. This layer has also been locked because it was locked in the original Photoshop document.
Select the object named Shape 1 by clicking in the selection column at the far right side of the layer. A color box appears in the column to indicate that the layer is selected.
Hold down the Shift key and use the same method to add Shape 2 and Shape 3 to your selection.
Choose Window > Pathfinder to open the Pathfinder panel.
 Tip
TipWhen you embed Photoshop documents in Illustrator documents, shape layers will be converted into compound shapes, meaning they consist of more than one object. To avoid unexpected results, it is good practice to convert these compound shapes into regular objects first.
With the current active selection, click the Expand button in the Pathfinder panel to convert all compound shapes into regular objects.
The currently selected object type has changed from Compound Shape to Path.
Double-click the Fill color icon in the Tools panel to open the Color Picker, and change the color values of the selected objects as follows: C: 91% M: 85% Y: 38% K: 30%.
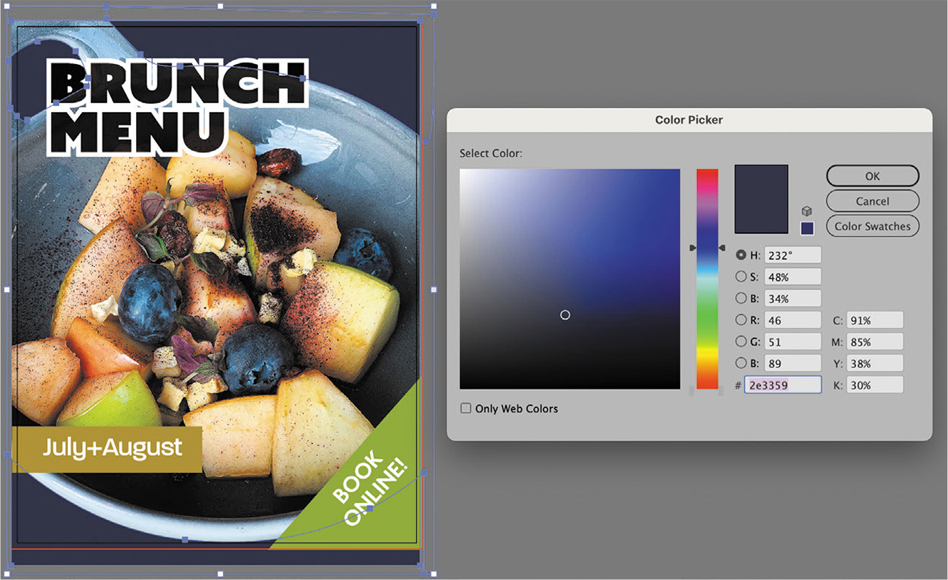
Click OK to close the Color Picker.
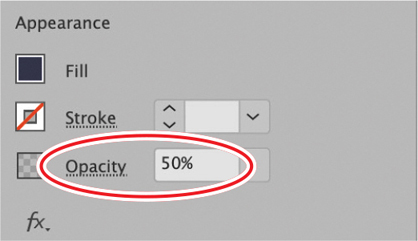
In the Properties panel, lower the Opacity value to 50%.
NoteBecause we chose to embed the Photoshop document in an Illustrator document, no edits made in the original Photoshop file will be reflected in the Illustrator composition.
Deselect all objects.
Save your work.
Copying and pasting graphics
In addition to using the Place command in Illustrator, it’s also possible to copy and paste layers directly from Photoshop into Illustrator. If the Copy Merged command was used in Photoshop to copy information from multiple layers, all data will be merged and pasted as a single embedded image in Illustrator. There are two potential disadvantages to pasting from Photoshop:
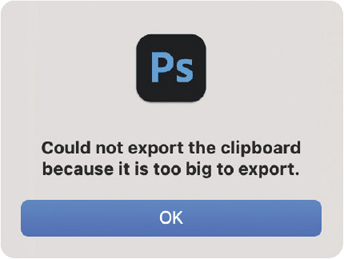
First, if there is more data selected than your computer clipboard memory can store you will get an error that reads “Could Not Export The Clipboard Because It Is Too Big To Export.” This means that there was more data selected than Photoshop can export, making it impossible to paste into Illustrator (or any other app for that matter).
Second, pasting from Photoshop doesn’t offer you any import options for converting layers to objects.
Unembedding a placed file
Embedding a placed Photoshop file in Illustrator means that some or all Photoshop layers were merged during the import process. The Links panel in Illustrator will display all of the placed files in the current document, both linked and embedded. You can use commands on the Links panel menu to embed linked files and even to unembed embedded files. The Links panel identifies linked files using a link icon while embedded files have no additional icon. Selecting any link in the Links panel and clicking the Link Info button (the downward pointing triangle) will allow you to see additional information about the selected link. However, it is very important to realize that Illustrator can’t recreate the original Photoshop layers during the unembedding process, which means the embedded file will be converted to a linked flattened Photoshop document.
Using Photoshop paths in Illustrator
![]() Note
Note
This book assumes that Photoshop and Illustrator are using their default settings. If you are unsure of how to return to the default settings, review the steps in “ Linking a Photoshop document in Illustrator.”
Adobe Illustrator is a vector drawing program. But other applications, such as Photoshop, also include the ability to draw vector paths. Photoshop’s vector drawing tools, like the Pen or shape tools, allow you to accurately create shapes, masks, or selections. In the following exercise you’ll learn how to recycle Photoshop vector paths by bringing them into Illustrator.
Getting started
You’ll start the lesson by viewing an image of the final composition and placed artwork.
Return to Photoshop.
Reset the Photoshop Workspace by choosing Window > Workspace > Essentials and then choosing Window > Workspace > Reset Essentials.
Return to Illustrator.
Reset the Illustrator Workspace by choosing Window > Workspace > Essentials and then choosing Window > Workspace > Reset Essentials.
From the Lesson02 folder, open L02-advanced-poster-end.ai in Illustrator.
This project continues the rocket poster we worked on earlier. The line and grid patterns in the document are applied to vector paths that were created in Photoshop and copied into Illustrator.

Close the document without saving changes, but leave Illustrator open.
Viewing Photoshop paths
From Photoshop, open rocket-start.psd from the Lesson02/Imports folder.
Open the Paths panel, which is by default located in the same panel group as the Layers panel. If you can’t find it, choose Window > Paths.
Note the five paths saved in the Paths panel. These were created with the Pen tool and Ellipse tool.
NoteRead Lesson 4, “Using Photoshop Paths, Alpha Channels, and Grayscale Images in InDesign,” to learn more about creating and saving paths in Photoshop.
Keep the file open.
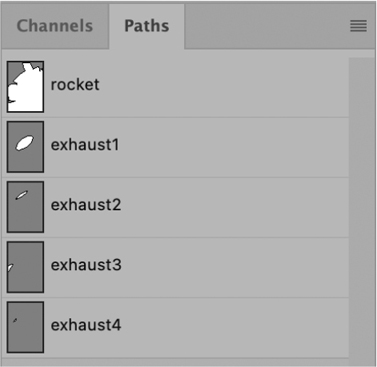
To see where each path is located in the document, click each path in the Paths panel to select it. As you select each path, it becomes highlighted in the document.
Copying and pasting paths
In the next part of the exercise you’ll learn how to reuse a Photoshop path in Illustrator by means of copying and pasting. We’ll then apply a pattern fill to the paths in Illustrator.
In rocket-start.psd, in the Paths panel, click the path named rocket.
The rocket path becomes highlighted on the canvas.
In the Tools panel, select the Path Selection tool
 (not to be confused with the Move tool
  ).
).
Click the path on the canvas to select it; note that its anchor points become highlighted.
Press Cmd+C/Ctrl+C to copy the path to the clipboard.
In Illustrator, open L02-advanced-poster-start.ai from the Lesson02 folder.
Choose File > Save As and save the file as L02-advanced-posterWorking.ai.
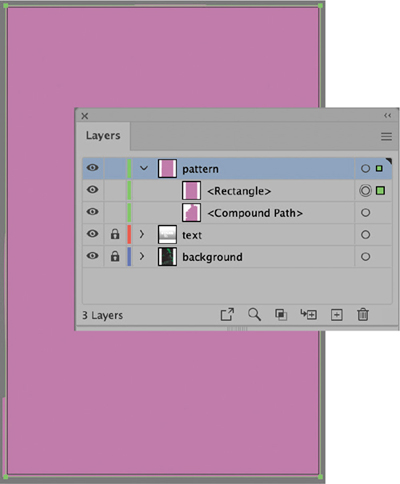
In the Layers panel, click to select the layer named pattern.
TipSince the pasted path doesn’t include any overlapping shapes, it doesn’t really matter which option you choose. But if you are pasting several overlapping shapes at once it is recommended to select Compound Shape, as it gives you more flexibility over how the individual shapes interact with each other. You can then use the Pathfinder panel in Illustrator to choose to add, subtract, or exclude individual pairs of objects.
Press Cmd+V/Ctrl+V to paste the path.
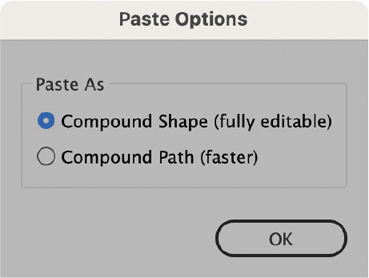
In the Paste Options dialog box, select Compound Shape, then click OK.
With the active selection, double-click the Fill color in the Tools panel and apply a random color to the path in order to see it better.
Choose View > Smart Guides to activate Smart Guides (if there is a checkmark next to the menu item, that means it was already active).
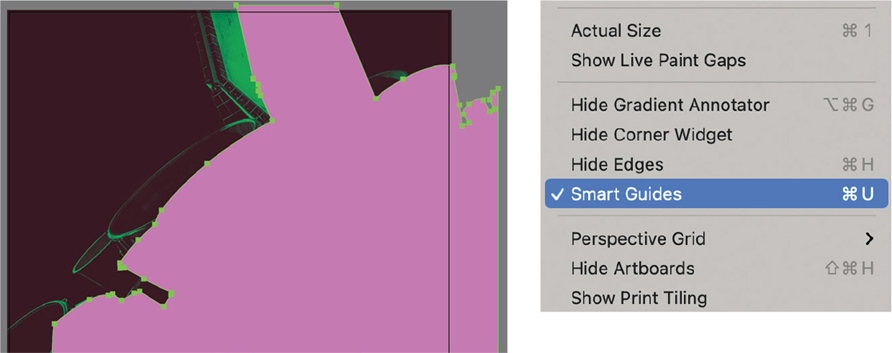
Use the Selection tool
to align the rocket path with the lower-right corner of the bleed area. It should snap automatically to the edge thanks to the Smart Guides. When it’s in position, deselect it.We now have an object shaped like a rocket. But what we want to create is a shape that covers the entire artboard except for the rocket. In other words, we need a way to invert the shape we have. We’ll use a large rectangle and the Pathfinder panel to achieve this.
In the Tools panel, select the Rectangle tool
 .
.Using the Rectangle tool
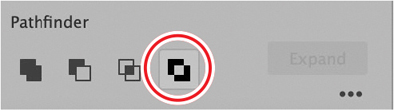
, draw a large rectangle from the upper-left corner of the bleed to the lower-right corner, completely overlapping our design. The Smart Guides should help you to perfectly align the rectangle to the corners of the bleed.In the Layers panel, the pattern layer should now show you two objects named <Rectangle> and <Compound Path>. With the active selection of the rectangle, hold down the Shift key and click the same area next to the <Compound Path> layer to add it to the selection.
In the Pathfinder area in the Properties panel, click the Exclude button to make a rocket-shaped hole in the selection.
NoteIf needed, choose Window > Pathfinder to open the Pathfinder panel.
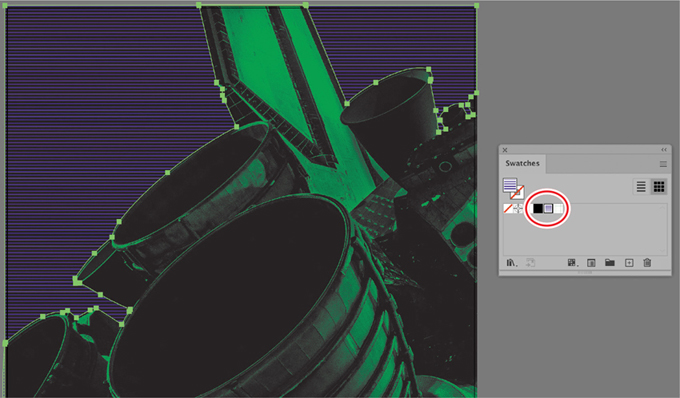
Open the Swatches panel and click the 6 lpi 40% pattern swatch to apply a purple line pattern to the fill of the shape.
Deselect the shape.
Exporting paths
In the next step we’ll need to import the paths around the rocket exhausts into Illustrator. While doing so, we want to keep their relative positioning and move all four paths in unison. Because of this we’ll choose the Export command as an alternative method for transferring Photoshop paths into Illustrator. There are two main advantages to this technique:
Exporting paths creates a separate Illustrator.ai document, which you can store for future reference or easily share with others. Whereas copying and pasting a path should be considered a quick, one-off technique.
The exported document will retain the canvas size and absolute position of all paths in the document.
Launch Photoshop and open rocket-start.psd from the Lesson02/Imports folder (if it’s not already open).
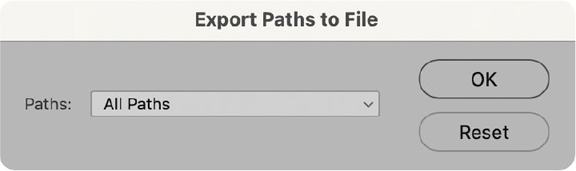
Choose File > Export > Paths To Illustrator.
In the Export Paths To File dialog box, choose All Paths from the Paths menu. Click OK to confirm.
Name the file exhaust.ai and save it.
Return to Illustrator and open the newly created exhaust.ai.
It’s important we choose the correct options when opening the document, as the wrong choice will disregard Photoshop’s original canvas size and absolute path positioning.
In the Convert To Artboards dialog box, make sure only Crop Area(s) is selected.
Click OK to confirm.
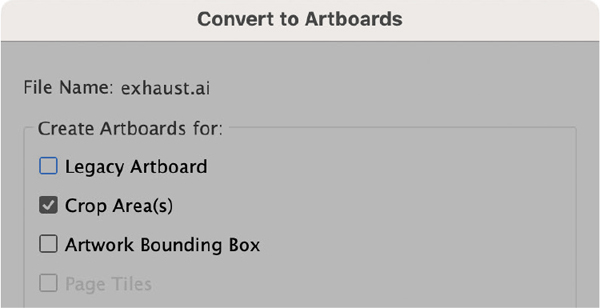
When Illustrator opens the document, it will append [Converted] to the filename. This is because the Export Paths To File dialog box in Photoshop creates documents in legacy Illustrator formats, which Illustrator first needs to convert to its newer file system.
Press Cmd+0/Ctrl+0 to to zoom out and fit the entire artboard onscreen.
Press Cmd+Y/Ctrl+Y to turn on Outline mode. This shows you the outlines of the exported paths.
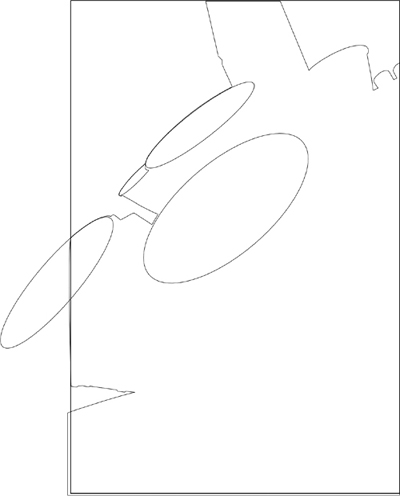
Using the Selection tool
, Shift-click to select the four exhaust objects and copy them to the clipboard. Don’t select the rocket itself this time.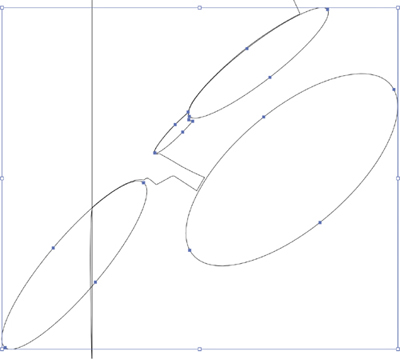
Return to L02-advanced-posterWorking.ai.
Make sure the pattern layer is still highlighted in the Layers panel.
Choose Edit > Paste In Front to paste the artwork in place at the top of the layer stack.
With the current selection still active, click the Grid .5 Inch Lines swatch in the Swatches panel to apply a green grid pattern. Keep the selection active.

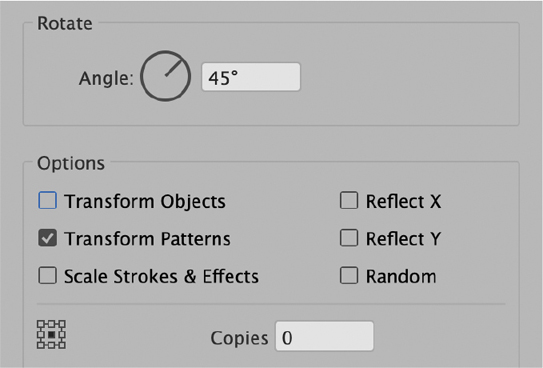
Choose Effect > Distort & Transform > Transform.
In the Transform Effect dialog box, deselect Transform Objects and select Transform Patterns.
Now change the Angle value to 45°.
Choose OK to close the dialog box, and then deselect all objects.
Save your work.
Photoshop cloud documents in Illustrator
![]() Tip
Tip
To learn more about cloud documents, check out Lesson 9, “Collaborating using Creative Cloud Libraries and Cloud Documents.”
Multiple applications in Adobe Creative Cloud offer the ability to save documents as cloud documents. This includes Adobe Photoshop, Illustrator, XD, Fresco, and InDesign. Saving a document as a cloud document unlocks specific features that you can use to your advantage. This exercise will demonstrate the basic linking functionality when working with a cloud document. The main thing to understand for now is that a cloud document is a regular document that is saved in Creative Cloud’s online infrastructure instead of your desktop or server. This means the cloud document is available to you from any location (as long as you have an active internet connection).
Getting started
You’ll start the lesson by viewing an image of the final composition and placed artwork.
![]() Note
Note
This book assumes that Photoshop and Illustrator are using their default settings. If you are unsure of how to return to the default settings, review the steps in “Linking a Photoshop document in Illustrator.”
Return to Photoshop.
Reset the Photoshop Workspace by choosing Window > Workspace > Essentials and then choosing Window > Workspace > Reset Essentials.
Return to Illustrator.
From the Lesson02 folder, open L02-holiday-end.ai in Illustrator.
The background in this image is a linked Photoshop cloud document. You’ll soon learn how to place a Photoshop cloud document in Illustrator yourself. Additionally, you’ll use Illustrator’s 3D features to add 3D text to the design.
Reset the Illustrator Workspace by choosing Window > Workspace > Essentials and then choosing Window > Workspace > Reset Essentials.
Close the document but leave Illustrator open.
Saving a Photoshop cloud document
Launch Photoshop and open 3d-palm-start.psd from the Lesson02/Imports folder.
This document is a local Photoshop file. We’ll now save a copy of the document in the cloud.
Choose File > Save As.
In the Save As dialog box, select Save To Cloud Documents.
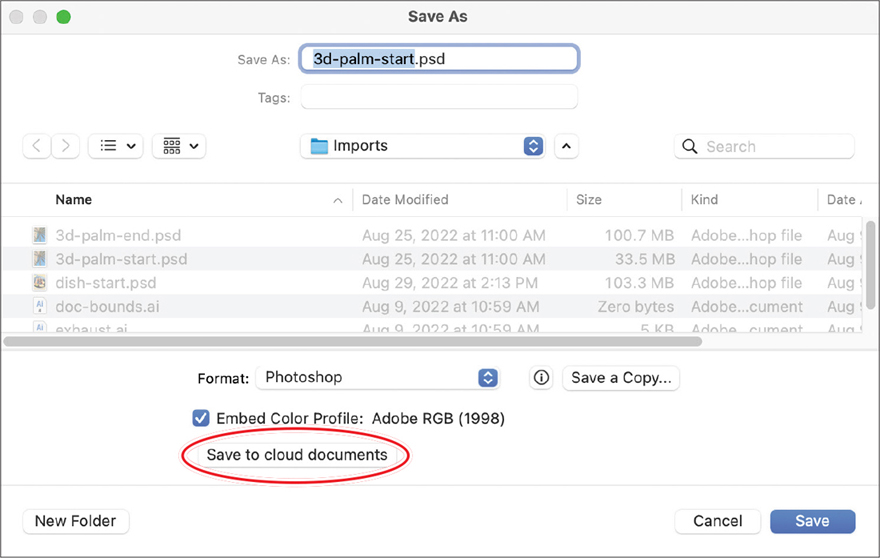
In the Save To Creative Cloud dialog box, name the file 3d-palm and click Save to save the document as a Photoshop cloud document.
NotePhotoshop cloud documents use the PSDC file format; the C stands for “cloud.”
The filename in the document tab changes to 3d-palm.psdc and a cloud icon appears next to it. Leave the file open.

Placing a Photoshop cloud document in Illustrator
In Illustrator, open L02-holiday-start.ai from the Lesson02 folder.
Choose File > Save As and save the file as L02-holidayWorking.ai.
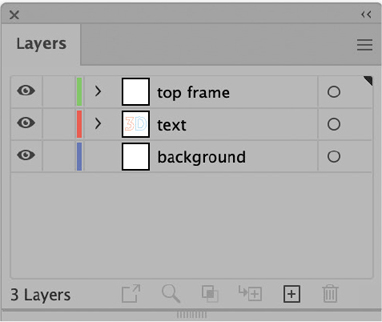
Inspect the Layers panel and notice that the design consists of three layers:
top frame holds a white frame.
text holds all text elements.
background is an empty layer.
Click the background layer.
Choose File > Place.
In the dialog box that appears, click Open Cloud Document.
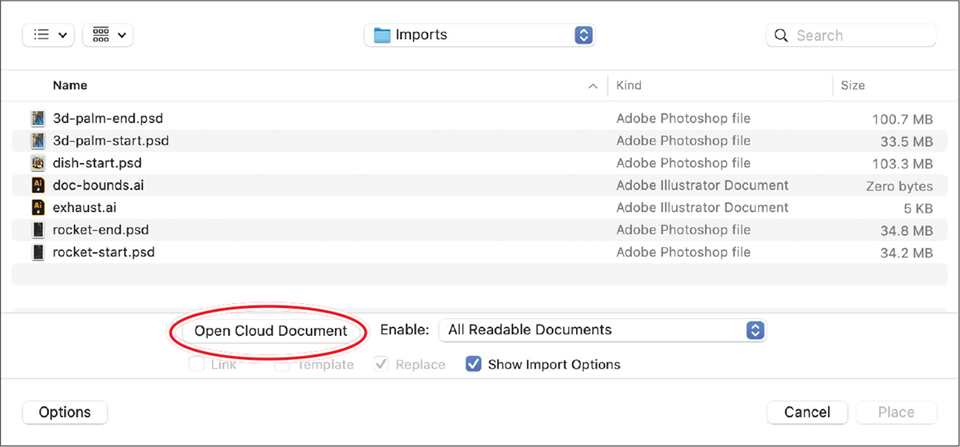
The Place From Creative Cloud dialog box opens, displaying all the cloud documents that are available for placing. This includes Photoshop cloud documents and documents from Adobe Fresco.
Click to select 3d-palm. Next, make sure Linked is selected at the bottom of the dialog box.
Click Place.
With the loaded cursor, drag from the upper-left corner of the artboard to the lower-right corner to place and fit the graphic to the artboard.
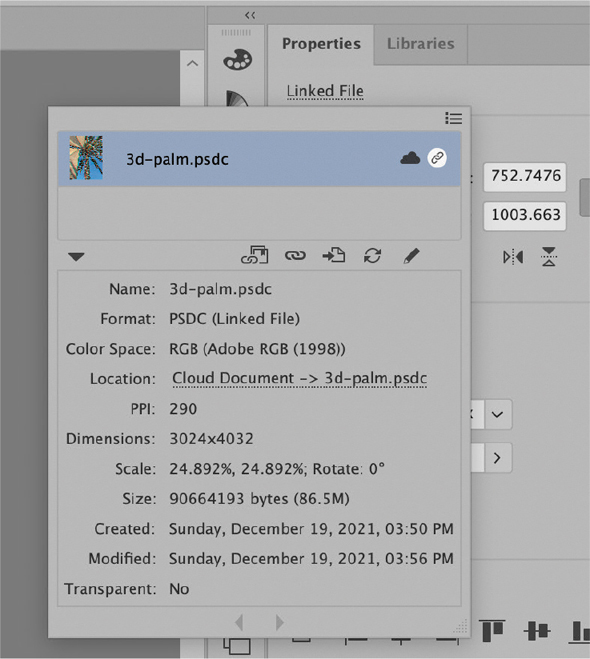
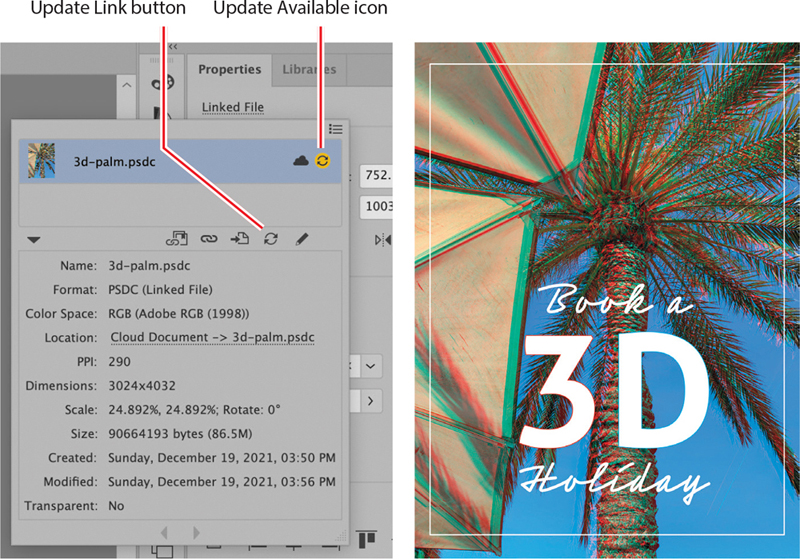
While the image is still selected, click the Linked File label at the top of the Properties panel to temporarily view the Links panel. Notice the cloud and link icons.

In the temporary Links panel, double-click the placed filename to expand its properties. Notice that the Location metadata clearly mentions the cloud source.
Click away from the Links panel to make it disappear.
Updating a Photoshop cloud document
Return to Photoshop, where 3d-palm.psdc should still be open.
In the Layers panel, select the Background layer.

Press Cmd+J/Ctrl+J to duplicate the layer.
Double-click the name of the duplicated layer and rename it 3d.
In the next few steps we’ll create a 3D effect by displacing the red channel of the layer.
Double-click the 3d layer thumbnail to open the Layer Style dialog box.
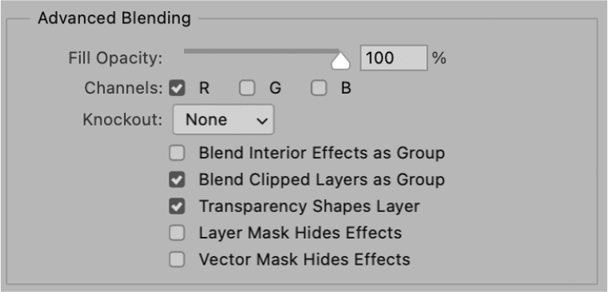
In the Advanced Blending section of the Blending Options panel you’ll find three Channels options: R (red), G (green), and B (blue). Deselect G and B, leaving only the red channel active.
Click OK to close the dialog box.
Select the Move tool
from the Tools panel.With the 3d layer still selected, hold down the Shift key and then press the Left Arrow key a few times to nudge the image to the left 10 pixels at a time. Nudge the layer about 10 times until you get a 3D effect.
Choose File > Save to update the cloud document.

Return to Illustrator and L02-holidayWorking.ai.
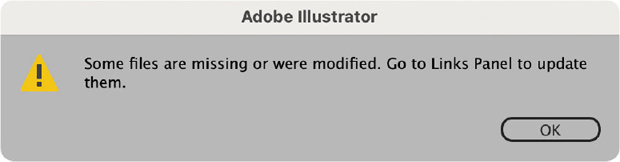
Illustrator presents you with a message that linked files are missing or have been modified.
Select the Background layer, then click Linked File in the Properties panel to display the Links panel.
The Update Available icon next to the cloud icon indicates the document needs to be refreshed.
Click the Update Link button to update the graphic.
NoteBecause this is a cloud document, updating the link might take a few seconds after you click the button. Be patient.
 Note
NoteBecause it’s not possible to link your exercise to the author’s cloud document, a local version was used to create L02-holiday-end.ai to illustrate the result of the project.
Keep the document open.
Adding 3D text
Using the Selection tool
, select the “3D” object. This object consists of a pair of text characters that have been converted into outlines (shapes) with a white fill and a red and blue stroke, respectively. NoteAt the time of writing, the 3D And Materials panel is still considered a Technology Preview by Adobe. This means it may not be completely production-ready yet. Exercise discretion while using it.
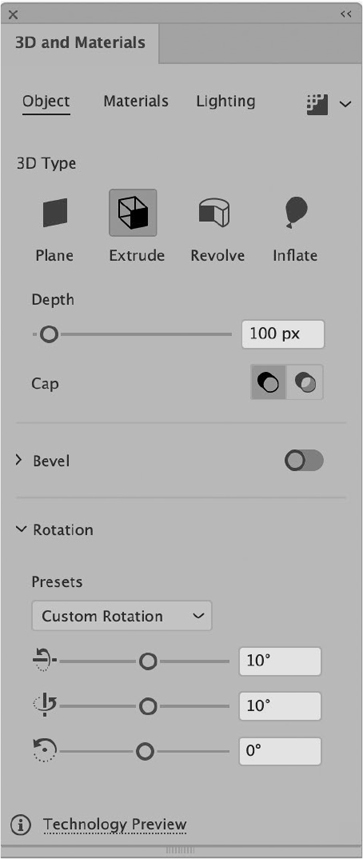
Choose Effect > 3D And Materials > Extrude & Bevel. The 3D And Materials panel appears.
In the 3D And Materials panel, change the Depth value to 100 px.
Change the Rotation values to 10°, 10°, and 0°.
Click the Lighting tab at the top of the panel.
Set Intensity to 100%.
Set Rotation to 84°.
Set Height to 44°.
Set Softness to 45%.
Deselect Ambient Light.
Close the 3D And Materials panel.

Save your work, and keep the file open.
Packaging the project
Every time you place and link files into Adobe Illustrator, a relationship is created between the two documents. This principle is the same regardless of the location of the linked document—that is, your hard drive, your server, or the cloud. When you ultimately finish your project, it is recommended that you package all the linked assets together.
The main advantage of packaging your work is that it creates a standalone version of your project with its own version of the linked files. This means that accidental changes to linked artwork—for example, changes made by someone who has access to the artwork but was unaware it was linked to your project—will not affect your main project.
When you create a package, a folder is created that holds the following:
![]() Note
Note
Because embedded graphics are included in the Illustrator document, you will not find them in a separate folder. Only linked content is collected.
A duplicate of your project file.
A subfolder that holds copies of all linked content.
A subfolder that has copies of all the local fonts used in the document. Note that because of licensing restrictions, fonts synchronized via Adobe Fonts are never included in a package, only local fonts.
Then, all links in the duplicate project (in this case, the Illustrator document) are relinked to the duplicated linked files in the newly created subfolder.
Choose File > Package.
Choose a location to store the packaged folder.
Name the folder L02-holiday-end_Folder.
Leave all options selected.
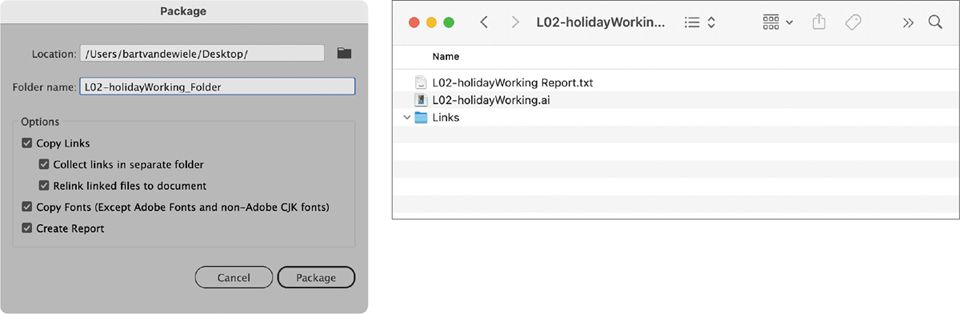
Click Package.
If a prompt with legal information regarding fonts appears, click OK.
Once your package is created, it is ready to be sent to others (your printer, client, or coworker) or to be archived on a server as a backup.
![]() Note
Note
Because all fonts in this project were converted to outlines, no fonts will be packaged. Also, when this is written, cloud documents will not be included in an Illustrator package.
Review questions
1 Name two advantages of linking a Photoshop document in Illustrator, compared to embedding.
2 You are viewing Import Options of an embedded Photoshop document in Illustrator and select Convert Layers To Objects. What will happen to any adjustment layers that exist in the placed Photoshop document?
3 Name one advantage of using the Export > Paths To Illustrator command in Photoshop, compared to pasting paths from Photoshop to Illustrator.
4 What might prevent you from copying and pasting graphics from Photoshop into Illustrator?
5 After you’ve embedded a layered Photoshop document in Illustrator, is there still a way to recover the original document?
Review answers
1 Linking a Photoshop document in Illustrator allows the user to update the original file in Photoshop. It can also prevent the Illustrator file from becoming “heavy,” since the Photoshop document is not embedded in the Illustrator document.
2 Illustrator can’t convert Photoshop adjustment layers to Illustrator objects. Because of this, all adjustment layers will be merged down into the first image layer in the Photoshop layer stack.
3 Using the Paths To Illustrator command in Photoshop will allow you to export all paths in the Photoshop document at once. Additionally, the exported file will match the original Photoshop canvas size.
4 When you have more data selected in Photoshop than your computer clipboard can store, an error message will appear that tells you the clipboard can’t be exported.
5 Embedding a Photoshop document in Illustrator will flatten the document permanently. It is possible to convert the embedded file to a linked file by choosing the Unembed command from the Links panel menu, however this will result in a flattened linked file being created.