WHEN YOU FIRST MOVE INTO A NEW HOME, it’s easy to find the basics, such as the kitchen and the shower. But you never quite feel at home until you’ve got all your stuff arranged just the way you like it: the TV in the best corner of the living room for watching movies, the kitchen utensils stored right where you’d reach for them when you cook, and the alarm clock at just the right position on the nightstand for when your arm swings over to crush the snooze button every morning.
Anyone who spends a lot of time in any software program typically starts treating it like a home, positioning windows, customizing controls, and otherwise tweaking its behavior. Each person uses Photoshop in a slightly different way, and combined with the fact that Photoshop is a very deep program, there is value in bringing forward the parts of the program that you most want to use so that the areas where you spend the most time are most easily accessible to you. This chapter is about personalizing Photoshop until you feel quite comfortable moving around in it.
![]() Each time I launch Photoshop I’m overwhelmed by all the palettes and menus. What’s the best way to get familiar with what I see on screen?
Each time I launch Photoshop I’m overwhelmed by all the palettes and menus. What’s the best way to get familiar with what I see on screen?
![]() Becoming familiar with Photoshop’s work area is a wise first step. The entire work area is designed not only to provide you with the tools you need, but also to surround the document window with useful information about the status of the image, the current tool, and Photoshop itself. Because Photoshop is used in many different and specialized ways, it’s possible to customize the work area to a great extent. We show you how in “Making Arrangements for Your Palettes,” later in this chapter.
Becoming familiar with Photoshop’s work area is a wise first step. The entire work area is designed not only to provide you with the tools you need, but also to surround the document window with useful information about the status of the image, the current tool, and Photoshop itself. Because Photoshop is used in many different and specialized ways, it’s possible to customize the work area to a great extent. We show you how in “Making Arrangements for Your Palettes,” later in this chapter.
Here is an overview of the Photoshop work area (Figure 1.1):
Menu bar. As in other programs, the menu bar contains commands you can apply to alter an image or Photoshop’s behavior.
Options bar. Located just below the menu bar, the Options bar presents controls for the tool you’ve selected in the Tools palette.
Palettes. The Tools palette appears along the left edge of the work area, while other palettes appear along the right edge. You can arrange palettes by dragging the tab at the top of a palette, and you can show or hide palettes using the commands under the Window menu. We give you more palette-arranging tips in “Windows and Palettes,” later in this chapter.
Tip
Because the controls on the Options bar change when you change tools, the Options bar isn’t like those unchanging horizontal toolbars found in other programs. Note that you can always jump to the first editable field of the Options bar (when there is one) by pressing the Return/Enter key. If there is more than one field, you can Tab or Shift-Tab from one to the next.
Document window. Photoshop makes good use of the space around the document window. Along the top of the window you see the normal title bar. To the left of the title is a preview icon that’s dimmed (on the Mac OS) if recent changes aren’t saved. To the right of the title are the zoom percentage, the color mode, and the bit depth—plus the preview mode, if View > Proof Colors is turned on (not shown in Figure 1.1).
Along the bottom edge of the document window, at the left edge, you’ll find a numerical field you can use to control the view magnification. To the right of that is a Version Cue indicator icon (it won’t do anything if Version Cue is disabled), and to the right of that is a status bar you can customize by clicking the triangle.

Figure 1.1. In the default Photoshop work area, you see the Tools palette on the far left, the menu bar across the top, and the Options bar under the menu bar. At the far right of the Options bar is the palette well, and to the left of the palette well is the Go to Bridge button that switches to Adobe Bridge (or File Browser in Photoshop CS).
![]() Okay, I’ve bought your book. But other than your sage wisdom, what might I do when I have a question that isn’t answered in this particular book?
Okay, I’ve bought your book. But other than your sage wisdom, what might I do when I have a question that isn’t answered in this particular book?
![]() While there’s been much grumbling about the increasing rarity of printed manuals, information about Photoshop is much faster and easier to find online—both on your own computer, and over the Internet.
While there’s been much grumbling about the increasing rarity of printed manuals, information about Photoshop is much faster and easier to find online—both on your own computer, and over the Internet.
The online help system contains all of the topics in the printed manual along with additional topics, so you’re more likely to find and answer there. Open the help system by choosing Help > Photoshop Help (Figure 1.2).

If you need a quick description of a tool or control that you can see in front of you, a tool tip might help (Figure 1.3). If tool tips don’t appear when you hover your cursor over a tool or palette, you might need to turn them on; choose Photoshop > Preferences (Mac OS X) or Edit > Preferences (Windows) and turn on Show Tool Tips.

In Photoshop CS2, Adobe uses the bottom of the Info palette to provide a little more information than they could fit in the tool tips (Figure 1.4). The Info palette goes beyond simply telling you about the currently selected tool. It reminds you how modifier keys can change the tool’s behavior.
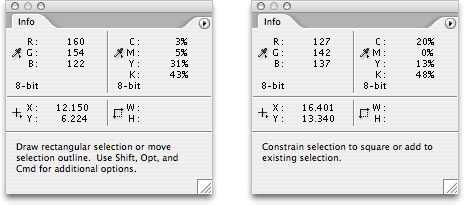
Figure 1.4. The bottom of the Info palette for the Marquee tool with no keys pressed (left) and with Shift key pressed (right)
In addition to the training resources that come with Photoshop, don’t forget about the wealth of educational materials available online. Adobe keeps a vast storehouse of tips and techniques on its Adobe Studio site (studio.adobe.com). We also like the Web sites photoshopnews.com and photoshoptechniques.com. You can discover countless other tips by typing “Photoshop tips” or “Photoshop tutorials” into your favorite online search engine. And, of course, there are always books on the subject, such as this one, David’s Real World Photoshop (which he co-authored with Bruce Fraser) and others.
Because Photoshop is upgraded every 18 months or so, you may experience the upgrade process a few times before you’ve even accumulated five years of experience with the program. But upgrading can lose files and settings that your workflow may depend on. Therefore, we want to include a few topics that help you upgrade Photoshop without throwing your workflow into a tailspin.
![]() I upgraded to Photoshop CS2 and none of my non-Adobe plug-ins came along for the ride. Do I have to buy them all over again?
I upgraded to Photoshop CS2 and none of my non-Adobe plug-ins came along for the ride. Do I have to buy them all over again?
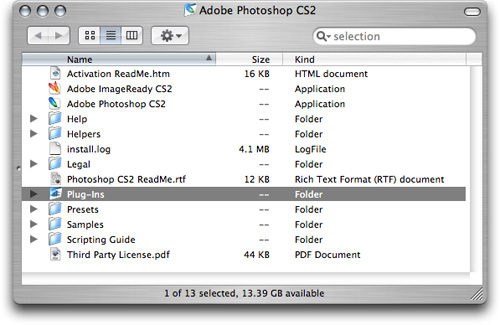
![]() Photoshop plug-ins are installed into the Plug-ins folder inside each Photoshop version’s application folder. This means that plug-ins don’t automatically appear in a newer version of Photoshop—you have to move them manually. Before you delete your old Photoshop folder, locate each non-Adobe plug-in and drag it to the corresponding folder in the Photoshop CS2 Plug-ins folder (Figure 1.5).
Photoshop plug-ins are installed into the Plug-ins folder inside each Photoshop version’s application folder. This means that plug-ins don’t automatically appear in a newer version of Photoshop—you have to move them manually. Before you delete your old Photoshop folder, locate each non-Adobe plug-in and drag it to the corresponding folder in the Photoshop CS2 Plug-ins folder (Figure 1.5).
If you move a plug-in to a newer version of Photoshop and it isn’t compatible, Photoshop displays an alert (when you launch the program) telling you that the plug-in wasn’t loaded. At that point, you know that it’s time to get a newer version of that plug-in.
![]() OK, so I’ve got my plug-ins working in the upgrade. But now I don’t see all of my carefully crafted Photoshop actions. What’s the answer this time?
OK, so I’ve got my plug-ins working in the upgrade. But now I don’t see all of my carefully crafted Photoshop actions. What’s the answer this time?
![]() Before you upgrade, save your actions from the Actions palette to a file on disk. (This is also a good way to back up your actions at any time.) Here’s how:
Before you upgrade, save your actions from the Actions palette to a file on disk. (This is also a good way to back up your actions at any time.) Here’s how:
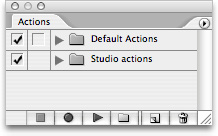
In the Actions palette, click the Create New Set button.
Name the folder and click OK. Now you’ve got a folder where you can store just the actions you create (Figure 1.6).
If you’re storing any custom actions in Photoshop’s default actions folder, drag your actions into the folder you created.
In the Actions palette menu, choose Save Actions.
Specify a name and location, and click Save.
Once your old actions are saved to disk, you can import them into Adobe Photoshop CS2 by choosing Load Actions from the Actions palette menu, locating your saved actions file, and clicking Load.
You’ll probably want to test any actions you migrate between versions. Some actions might not work correctly if they depend on commands, palettes, dialog boxes, and file locations that have changed.
Tip
If you have any plug-ins that didn’t come with Photoshop, keep them in a folder that’s independent of the folders containing the plug-ins that do come with Photoshop. For example, if your name is John, create a folder named John and drag your non-Adobe plug-ins into that folder only. When you upgrade to a new version, just move or copy that whole folder to your new Photoshop’s Plug-ins folder. This works because Photoshop finds any plug-in in any subfolder of the Plug-ins folder.
![]() Can I transfer my Preferences dialog box settings to a new version? The settings I use are quite different than the defaults.
Can I transfer my Preferences dialog box settings to a new version? The settings I use are quite different than the defaults.
![]() Alas, there’s no way to directly transfer your current set of preferences from one version to another, or from one person to another. However, you can make a record of the settings in your Preferences dialog box and enter them into the new version.
Alas, there’s no way to directly transfer your current set of preferences from one version to another, or from one person to another. However, you can make a record of the settings in your Preferences dialog box and enter them into the new version.
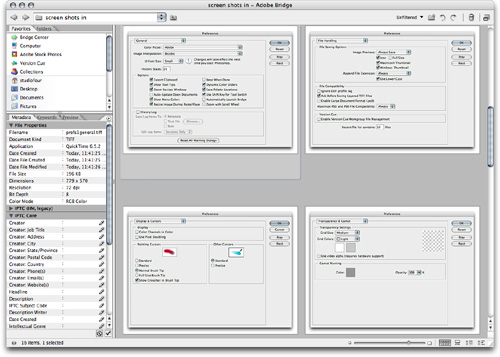
Instead of having to write down all of your settings, we like to take a screen capture of each pane and refer to them as we set up our new version of Photoshop. Note that if you put your set of Preferences screen shots into their own folder, you can use File Browser (in CS) or Adobe Bridge (in CS2) to browse to that folder so that you can easily cycle through the screen shots as you adjust each one in the new version of Photoshop (Figure 1.7).
![]() I’ve painstakingly arranged Photoshop workspaces. How can I transfer these to a new version of Photoshop?
I’ve painstakingly arranged Photoshop workspaces. How can I transfer these to a new version of Photoshop?
![]() Because the number and shape of palettes can change between Photoshop releases, workspaces aren’t always carried over to new versions.
Because the number and shape of palettes can change between Photoshop releases, workspaces aren’t always carried over to new versions.
You can try to move the old workspace files to the new version. On Mac OS X, workspaces are stored here:
Computer/username/Library/Preferences/Adobe Photoshop CS2 Settings/WorkSpaces
In Windows, workspaces are stored here:
C:Program FilesAdobeAdobe Photoshop CS2PresetsWorkspaces
However, Photoshop is very sensitive to changes in the window environment. Photoshop may reset to the default workspace if there is anything even slightly incompatible about the old workspace, such as if a workspace uses a palette that’s changed. If transferring old workspaces doesn’t work, you’ll need to create new workspaces in Photoshop CS2.
![]() My new monitor has such high resolution that it’s hard to read text in dialog boxes and palettes. Is there a way to adjust the size of text in those locations?
My new monitor has such high resolution that it’s hard to read text in dialog boxes and palettes. Is there a way to adjust the size of text in those locations?
![]() On large monitors or on monitors set to a very high resolution, the pixels get so small that text in windows and dialog boxes can become hard to read. In Photoshop CS2, you can change the user interface (UI) font size in the Preferences dialog box. Simply open the Preferences dialog box, and in the General pane, choose a size from the UI Font Size popup menu.
On large monitors or on monitors set to a very high resolution, the pixels get so small that text in windows and dialog boxes can become hard to read. In Photoshop CS2, you can change the user interface (UI) font size in the Preferences dialog box. Simply open the Preferences dialog box, and in the General pane, choose a size from the UI Font Size popup menu.
![]() Is it just me, or does it seem like Adobe is always changing keyboard shortcuts? Why do they do that, and is there any way to stop it? Old habits die hard, and all that.
Is it just me, or does it seem like Adobe is always changing keyboard shortcuts? Why do they do that, and is there any way to stop it? Old habits die hard, and all that.
![]() Well, it’s not easy to come up with a single set of keyboard shortcuts that works for everybody. In addition, Photoshop doesn’t exist in a vacuum. Over the years, Photoshop has changed shortcuts to be consistent with the other Adobe products that people like to use together; also, the Mac and Windows operating systems have added shortcuts that sometimes clash with Photoshop shortcuts.
Well, it’s not easy to come up with a single set of keyboard shortcuts that works for everybody. In addition, Photoshop doesn’t exist in a vacuum. Over the years, Photoshop has changed shortcuts to be consistent with the other Adobe products that people like to use together; also, the Mac and Windows operating systems have added shortcuts that sometimes clash with Photoshop shortcuts.
Fortunately, Adobe has implemented the right solution: If you can’t please each person, let each person do what they want. Photoshop does this by letting you customize keyboard shortcuts (Figure 1.8).
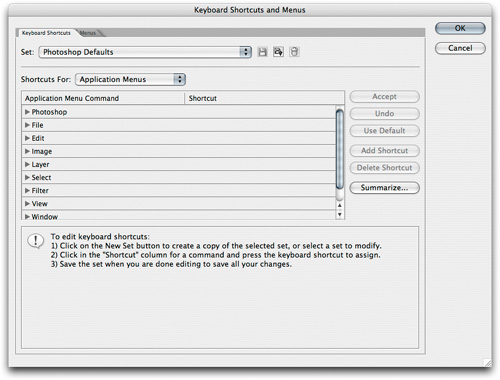
Figure 1.8. The Keyboard Shortcuts tab of the Keyboard Shortcuts and Menus dialog box lets you assign any shortcut to any menu item.
Choose Edit > Keyboard Shortcuts.
Choose a category from the Shortcuts For popup menu.
In the commands list, locate the command you want to customize by scrolling and clicking the disclosure triangles as needed.
Select the command, and type the shortcut you want to use. Photoshop warns you if the shortcut is already in use or not available for use, so that you can try again.
Click Accept.
Tip
Do you often mistakenly press a shortcut that’s one key off from the actual shortcut? Photoshop allows more than one shortcut per feature, so you can add your “mistake” shortcut to the same feature. Just click the Add Shortcut button in the Keyboard Shortcuts tab of the Keyboard Shortcuts and Menus dialog box. Now you get what you want whether you press the “right” shortcut or the “wrong” one.
![]() I miss the Quick Reference card that used to be included with Photoshop for keyboard shortcuts. How do they expect me to learn the shortcuts now? After all, not all shortcuts appear in the menus.
I miss the Quick Reference card that used to be included with Photoshop for keyboard shortcuts. How do they expect me to learn the shortcuts now? After all, not all shortcuts appear in the menus.
![]() It no longer makes much sense to print a card when the shortcuts are so easy to change. What you now have instead is the ability to generate a list of the current shortcut set. In the Keyboard Shortcuts pane of the Keyboard Shortcuts and Menus dialog box, click Summarize. You’ll quickly get a reference list in HTML format. You can save the HTML document in any folder and make a convenient bookmark to it in any web browser, or you can print it out if you want to tack it up on the wall with your other shortcut cards. The great advantage of the Summarize button, of course, is that you can always keep your shortcut reference up to date if you change shortcuts.
It no longer makes much sense to print a card when the shortcuts are so easy to change. What you now have instead is the ability to generate a list of the current shortcut set. In the Keyboard Shortcuts pane of the Keyboard Shortcuts and Menus dialog box, click Summarize. You’ll quickly get a reference list in HTML format. You can save the HTML document in any folder and make a convenient bookmark to it in any web browser, or you can print it out if you want to tack it up on the wall with your other shortcut cards. The great advantage of the Summarize button, of course, is that you can always keep your shortcut reference up to date if you change shortcuts.
![]() Every time I upgrade, the menus in Photoshop get longer and longer. I don’t even use half of the commands that are available. Can’t Adobe make Photoshop modular so that we don’t have to see the features we don’t use?
Every time I upgrade, the menus in Photoshop get longer and longer. I don’t even use half of the commands that are available. Can’t Adobe make Photoshop modular so that we don’t have to see the features we don’t use?
![]() There isn’t a way to turn features off (unless they’re plug-ins), but you shouldn’t have to worry about that anyway—while all features are made available at startup, they don’t actually load into memory unless you start using them. (That’s why it often takes longer to use a feature the first time.)
There isn’t a way to turn features off (unless they’re plug-ins), but you shouldn’t have to worry about that anyway—while all features are made available at startup, they don’t actually load into memory unless you start using them. (That’s why it often takes longer to use a feature the first time.)
On the other hand, there is a way to simplify the menus. Starting with Photoshop CS2, Adobe makes it possible for you to hide menu items. You can make Photoshop display only the commands that are useful to you or your workgroup. In addition, you can highlight menu commands with a color. This feature can be useful for emphasizing preferred workflows, or if you want to associate certain commands with each other.
The controls to customize the menus are in a different tab in the same dialog box as the one to customize keyboard shortcuts. To customize menus:
Choose Edit > Menus.
In the Menus tab of the Keyboard Shortcuts and Menus dialog box, choose a menu set from the Menu For popup menu.
Scroll to locate the menu command you want to edit.
For the command you’re editing, click the Visibility column to hide or show the command, or click the Color column to apply a color to the command.
Click the Save icon (the first one to the right of the Set popup menu) to save your changes to the current set.
Click the Save New Set icon (second from the left) to create a new set based on the current settings. After you create a new set, you can choose it from the Window > Workspace submenu. Photoshop comes with several custom menu workspaces already installed; to try them, choose one from the Window > Workspace submenu.
![]() I often see other people with interesting palette arrangements, including different ways to attaching palettes to each other. Can you let me in on some of these secrets?
I often see other people with interesting palette arrangements, including different ways to attaching palettes to each other. Can you let me in on some of these secrets?
![]() Let us open the book of palette secrets. The three main ideas with palette arrangement are grouping, docking, and workspaces.
Let us open the book of palette secrets. The three main ideas with palette arrangement are grouping, docking, and workspaces.
When you group palettes, they occupy the same space, so only one of the palettes in a group can be in front at a time. You can group or ungroup palettes by dragging palette tabs to or from other palette tabs.
When you dock palettes, they’re attached to each other vertically, so they’re all visible at once. You can combine grouping and docking (Figure 1.9). To dock a palette, drag its palette tab to the bottom of another palette—you can let go when you see the dark black line appear at the bottom of the palette. Grouped palettes always appear and disappear at the same time. For example, David always docks his Character and Paragraph palettes together.

Figure 1.9. Here, the Histogram and Info palettes are docked, and the Info and Color palettes are grouped. Dragging the title bar moves all three palettes.
You can hide or show all palettes at once by pressing the Tab key (as long as the Text tool isn’t typing, of course). You can control all palettes from the Window menu, but if you want a palette to be clickable yet still take up no screen space, drag its tab to the palette well, the dark area at the right side of the Options bar (Figure 1.10).
Individual palettes have their own tricks. The minimize/zoom button in a palette’s title bar alternates between collapsing a palette into its title bar, and showing all of its options. If a palette is touching the bottom of the screen when you collapse it, the palette conveniently collapses at the bottom of the screen.
To save different palette arrangements, choose Window > Workspace > Save Workspace, name it, make sure Palette Locations is checked, and click OK. Workspaces are great for saving different palette arrangements for specific tasks or situations. For example, when Conrad plugs his calibrated monitor into his laptop, he chooses a workspace that fills the laptop monitor with palettes.
![]() I see two numbers at the bottom of my document window, and I’ve never known what those numbers stand for. How can I find out?
I see two numbers at the bottom of my document window, and I’ve never known what those numbers stand for. How can I find out?
![]() What you’re seeing is the status bar. By default, it displays the document size, or rather, sizes. The first number is the size of the document if you flatten it, and the second number is the size of the document as saved (uncompressed) on disk with all of its layers (Figure 1.11). If the document doesn’t have any layers, the first and second numbers are probably the same.
What you’re seeing is the status bar. By default, it displays the document size, or rather, sizes. The first number is the size of the document if you flatten it, and the second number is the size of the document as saved (uncompressed) on disk with all of its layers (Figure 1.11). If the document doesn’t have any layers, the first and second numbers are probably the same.
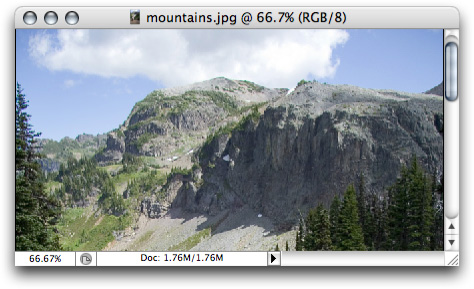
Figure 1.11. The status bar at the bottom of a document window can display different kinds of document information, such as the disk usage information shown at right.
If you click-and-hold on that information, you can see how the image will print on the current page size. If you Option/Alt-click, you get info about the image size and dimensions.
How can you tell that they’re document sizes? Because it says so: Click the black triangle to the right of the status bar to see a popup menu of the different kinds of information you can display in the status bar. You can choose a different status bar display from the popup menu, such as the document dimensions or the document’s color profile.
![]() Dragging the scroll bars all day long sure makes my arms tired. Are there better ways to move around a document?
Dragging the scroll bars all day long sure makes my arms tired. Are there better ways to move around a document?
![]() You’re going to get tired of us saying this, but it’s always good to hear: Photoshop provides many ways to accomplish the same thing. You can get around quite well in a document without any scroll bars at all. You can:
You’re going to get tired of us saying this, but it’s always good to hear: Photoshop provides many ways to accomplish the same thing. You can get around quite well in a document without any scroll bars at all. You can:
Use the Navigator palette to zoom and scroll around a document window.
Use the Hand tool to push the document around in its window.
Press Page Up and Page Down to scroll vertically. To scroll horizontally, add the Command/Ctrl key. These shortcuts are like clicking the scroll bars. To scroll in smaller increments, add the Shift key; it’s like clicking the scroll bar arrows.
Press Home to scroll to the top left corner of a document, or press End to scroll to the bottom right corner of a document.
![]() Are there some quick ways to organize multiple windows on screen? When I work with many images at a time for my publication, the document windows get out of control pretty quickly.
Are there some quick ways to organize multiple windows on screen? When I work with many images at a time for my publication, the document windows get out of control pretty quickly.
![]() Why, you can practically turn yourself into a window-managing drill sergeant with the options that Photoshop provides.
Why, you can practically turn yourself into a window-managing drill sergeant with the options that Photoshop provides.
To offset windows across the screen while keeping them large, choose Window > Arrange > Cascade (Figure 1.12).
To see all open document windows evenly spaced across the screen, choose Window > Arrange > Tile Horizontally or Tile Vertically.
To cycle through each window, press Ctrl-Tab (or Shift-Ctrl-Tab to cycle backward; yes, that’s the Control key, even on the Macintosh). This is useful for flipping through a stack of large windows, particularly when your windows are in Full Screen mode.
On Mac OS X, press F10 to use the Exposé window-selection feature on the current application’s windows only (in this case, Photoshop). You can’t edit documents in this mode, so it’s useful mostly for comparing documents.
To close all open image windows, press Option (Mac OS) or Shift (Windows) while clicking any image window’s close button. If any open images have unsaved changes, you’ll be asked whether you want to save them before closing the document.
![]() I arranged my document windows on the screen just the way I like them, but when I use the keyboard shortcut to zoom in or out, the size of a window changes, and I have to arrange the windows again. This is driving me nuts... please, make it stop!
I arranged my document windows on the screen just the way I like them, but when I use the keyboard shortcut to zoom in or out, the size of a window changes, and I have to arrange the windows again. This is driving me nuts... please, make it stop!
![]() Don’t worry, there is a way out of this. By default, Photoshop resizes the image window when you zoom a window using the keyboard shortcuts, such as Command-+ (plus sign) (Mac OS) or Ctrl-+ (Windows) (Figure 1.13). This can sometimes be inconvenient, such as when you have a carefully tiled window arrangement that you want to preserve.
Don’t worry, there is a way out of this. By default, Photoshop resizes the image window when you zoom a window using the keyboard shortcuts, such as Command-+ (plus sign) (Mac OS) or Ctrl-+ (Windows) (Figure 1.13). This can sometimes be inconvenient, such as when you have a carefully tiled window arrangement that you want to preserve.

Figure 1.13. Original (left), zoomed in without window resizing (middle), and zoomed in with window resizing (right).
You can prevent Photoshop from resizing windows when keyboard zooming, and you can set which behavior is the default. Choose Preferences > General (Mac OS) or Edit > Preferences > General (Windows), deselect Zoom Resizes Windows, and click OK.
Tip
There’s no built-in shortcut for closing all open documents without saving changes. However, you can use the Actions palette to create an action that closes a document without saving, and then run that as a batch action on all open documents. Of course, you have to be sure you want to discard all changes—that’s why there’s no built-in shortcut for this inherently risky operation.
To reverse the default window resizing behavior, add the Option (Mac OS) or Alt (Windows) key. For example, if you set the Zoom Resizes Windows default to be on but you’d like to override it this one time, press Command-Option-+ (plus key) instead of Command-+.
![]() Is there a way to fill the screen with an image, similar to when you view a slide show?
Is there a way to fill the screen with an image, similar to when you view a slide show?
![]() Photoshop provides two full screen modes—with or without the menu bar. Either way, you’ll hide all of the window trimmings and have an unobstructed view of the current document. To change the screen mode, click one of the three screen mode icons on the toolbox. To cycle through the three screen modes when the toolbox is hidden, press F repeatedly.
Photoshop provides two full screen modes—with or without the menu bar. Either way, you’ll hide all of the window trimmings and have an unobstructed view of the current document. To change the screen mode, click one of the three screen mode icons on the toolbox. To cycle through the three screen modes when the toolbox is hidden, press F repeatedly.
Of course, you do lose some features in full screen view. For example, you don’t have scroll bars, the title bar, or the status bar, or even the menu bar if you hid that. However, there are plenty of ways to be productive and flexible in full screen mode:
To hide and show the menu bar, press Shift-F.
To hide and show all palettes, use the Tab key.
If you’re addicted to the status bar, you can display the same information in the Info palette (choose Palette Options from the palette’s menu) and leave the palette open.
You can still switch tools and open palettes using keyboard shortcuts. Remember, you can customize Photoshop’s keyboard shortcuts!
To zoom and scroll, use the Navigator palette. If you prefer to hide the Navigator palette, use keyboard shortcuts or a mouse wheel to zoom and scroll. See the topic “Navigating the Seas of Photoshop,” earlier in this chapter.
If you move the document window to another monitor before entering full screen mode, the document displays in full screen mode on that monitor without affecting other monitors.
![]() When an image is zoomed out to a size smaller than the window, there’s a gray background behind the image. Is there a way to change that window background color? I would prefer to work against a black background, not the default gray one.
When an image is zoomed out to a size smaller than the window, there’s a gray background behind the image. Is there a way to change that window background color? I would prefer to work against a black background, not the default gray one.
![]() Yes, there is a way. First, set the foreground color using the toolbox, the Swatches palette, or the Color palette. In your case, set the foreground color to black. In a document window, zoom out until you can see the background area outside of an image. Then select the Paint Bucket tool, and Shift-click the window background. Voilà, now black is the new gray!
Yes, there is a way. First, set the foreground color using the toolbox, the Swatches palette, or the Color palette. In your case, set the foreground color to black. In a document window, zoom out until you can see the background area outside of an image. Then select the Paint Bucket tool, and Shift-click the window background. Voilà, now black is the new gray!
![]() Can I see two views of the same document? What I’d like to do is see the same document at two zoom levels—a close-up of the area I’m editing in the document, and a big-picture view I can keep an eye on.
Can I see two views of the same document? What I’d like to do is see the same document at two zoom levels—a close-up of the area I’m editing in the document, and a big-picture view I can keep an eye on.
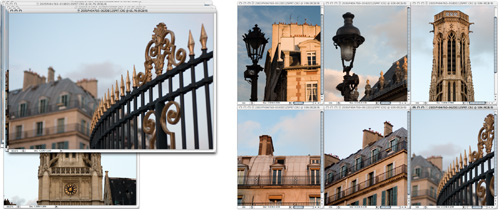
![]() We’ve got the perfect solution: the New Window command. With your document open, choose Window > Arrange > New Window For <document name>. You can certainly set one window to a different zoom level than the other window (Figure 1.14). But you can also use the New Window command for other useful purposes, such as having one window show the normal view, and another window that previews the same document as a CMYK or sRGB soft-proof.
We’ve got the perfect solution: the New Window command. With your document open, choose Window > Arrange > New Window For <document name>. You can certainly set one window to a different zoom level than the other window (Figure 1.14). But you can also use the New Window command for other useful purposes, such as having one window show the normal view, and another window that previews the same document as a CMYK or sRGB soft-proof.

Figure 1.14. Two windows on the same document. In each window’s title bar and status bar, you can see that each window is set to a different zoom percentage.
You don’t even have to limit yourself to two views. You can open as many new windows as you want, and set each of them to different view settings.
![]() I’m having fun with the multiple view feature, but when I move around in one window, I have to go to the other window and change its view too. Can I avoid this tedious shuffling between windows?
I’m having fun with the multiple view feature, but when I move around in one window, I have to go to the other window and change its view too. Can I avoid this tedious shuffling between windows?
![]() You’re in luck—there’s an easy answer. First, activate the window that you want the other windows to match. Then choose one of the following commands from the Window > Arrange submenu: Match Zoom, Match Location, or Match Zoom and Location.
You’re in luck—there’s an easy answer. First, activate the window that you want the other windows to match. Then choose one of the following commands from the Window > Arrange submenu: Match Zoom, Match Location, or Match Zoom and Location.
The commands are pretty self-explanatory. Match Zoom sets all other windows to the same zoom level, and Match Location sets them all to the same scroll position (of course, Match Location is most predictable if the windows are the same size).
Match Zoom and Match Location commands affect all open windows, whether they’re views of the same document or different documents. When you use these commands, you might want to make sure that the only windows you have open are windows that you want to be affected by these commands.
Tip
For a clean preview of your document, you can instantly hide all nonprinting objects like the grid, guides, annotations, current selections, and slices. Just press Command/Ctrl-H, which is the keyboard shortcut for enabling or disabling the View > Extras command.
Tip
Photoshop has a nasty habit of resetting palettes to their default locations every time you connect or disconnect monitors, or change monitor settings. Once you have a palette arrangement you like, be sure to save the arrangement as a workspace (see the topic “Making Arrangements for Your Palettes,” earlier in this chapter). This is especially important on a laptop, where you may be connecting and disconnecting monitors often.
![]() Here’s something that’s been bugging me for years: If I choose View > Print Size, and hold a print of that same document up to the screen, it isn’t the same size! Not only that, but the on-screen ruler doesn’t match up to a real ruler. What exactly does Print Size mean, then, and can I make it work right?
Here’s something that’s been bugging me for years: If I choose View > Print Size, and hold a print of that same document up to the screen, it isn’t the same size! Not only that, but the on-screen ruler doesn’t match up to a real ruler. What exactly does Print Size mean, then, and can I make it work right?
![]() This is a tricky answer, but stick with us. To display an image at its real-world size, an application must know both the resolution and the physical size of the monitor it’s displaying on. While it isn’t too hard to obtain the monitor dimensions in pixels, it’s usually impossible to automatically detect the size of the screen in inches. However, there is a manual way.
This is a tricky answer, but stick with us. To display an image at its real-world size, an application must know both the resolution and the physical size of the monitor it’s displaying on. While it isn’t too hard to obtain the monitor dimensions in pixels, it’s usually impossible to automatically detect the size of the screen in inches. However, there is a manual way.
First, find out the pixel dimensions of your monitor. On Mac OS X, this information is in the Display tab of the Displays system preference. On Windows, right-click the desktop, choose Properties from the popup menu, and click the Settings tab. For example, Conrad’s laptop screen is at its native setting of 1280 x 854 pixels.
Tip
A scroll wheel mouse is extremely useful in Photoshop. Obviously you can spin the scroll wheel to pan a window vertically, but such a mouse can do other tricks. too. To pan horizontally, press Command/Ctrl as you spin the mouse wheel. To zoom in and out, Option/Alt-scroll. To scroll or zoom in larger increments, press Shift as you spin the mouse wheel.
Next, get the physical dimensions of your monitor’s display area. Conrad’s laptop screen is 12 11/16 inches (12.6875 inches) wide. Now divide the width in pixels by the width in inches, and you’ll get the actual resolution of the screen in pixels per inch. Conrad’s monitor works out to about 100 pixels per inch.
Now open up the Photoshop Preferences dialog box and switch to the Units & Rulers pane. For Screen Resolution, enter the resolution that you worked out in the previous paragraph.
To verify that you’ve got it right, turn on the rulers (View > Rulers) and hold an actual ruler up to the screen. One inch on screen should now match one inch on your real-world ruler. And the next time you choose View > Print Size, the image should display at an accurate size.
![]() I’ve heard of people using multiple monitors with Photoshop. What makes multiple monitors so useful? I usually only look at one image at a time.
I’ve heard of people using multiple monitors with Photoshop. What makes multiple monitors so useful? I usually only look at one image at a time.
![]() In an application like Photoshop, you’re usually not just looking at an image. You also need space for palettes and dialog boxes. Multiple monitors are useful whenever more screen real estate would come in handy. Here are some ways to use multiple monitors:
In an application like Photoshop, you’re usually not just looking at an image. You also need space for palettes and dialog boxes. Multiple monitors are useful whenever more screen real estate would come in handy. Here are some ways to use multiple monitors:
Keep your palettes on a less expensive monitor, so you can dedicate your best calibrated and profiled monitor to image display. A monitor used only for palettes doesn’t have to be of high quality.
Spread out palettes that you want to have visible all the time. For example, if you often use the History and Actions palettes, drag them apart. It’ll take a lot of space, but that’s what the second monitor is for.
Keep Photoshop on one monitor and other applications on another monitor. For example, on your second monitor you can keep Adobe Bridge nearby for easy image access, or watch for incoming messages in your e-mail application.
When a dialog box opens, drag it to the monitor that doesn’t contain the image, so you can see the entire image.
Take advantage of multiple-window views. If you choose Window > Arrange > New Window, you get a second window on the same image. For example, one window can show the entire image while another window shows a zoomed-in detail of the same image.
![]() I connected a second monitor, but when I look at the same image on both monitors simultaneously, they don’t look the same. How can I fix this?
I connected a second monitor, but when I look at the same image on both monitors simultaneously, they don’t look the same. How can I fix this?
![]() To match image tone and color across multiple monitors, you pretty much have to use a hardware monitor calibrator (such as the Gretag Macbeth Eye-One device) to create a monitor profile for each monitor. However, even calibrated monitors may not match completely if their basic characteristics are different, such as comparing the same image on a CRT monitor and an LCD monitor.
To match image tone and color across multiple monitors, you pretty much have to use a hardware monitor calibrator (such as the Gretag Macbeth Eye-One device) to create a monitor profile for each monitor. However, even calibrated monitors may not match completely if their basic characteristics are different, such as comparing the same image on a CRT monitor and an LCD monitor.
Note that doing this is usually easier to do on the Macintosh than on Windows. On Windows, you may need to do a little research before attempting to calibrated multiple monitors connected to the same video card. Many video cards that have multiple video ports are unable to assign specific profiles to each connected monitor under Windows. If you have a video card with this limitation, you’ll have to use one monitor for accurate color and another just for palettes. Just calibrate the monitor that you’re using for good color, and don’t worry about accurate color on your palette monitor. Just be aware that you don’t want to preview image colors on the palette monitor.
![]() I’m really getting into using the keyboard so I don’t have to mouse around so much. But I’d like to find a way to select the tools that are in the popup menus in the toolbox. Any shortcuts for that?
I’m really getting into using the keyboard so I don’t have to mouse around so much. But I’d like to find a way to select the tools that are in the popup menus in the toolbox. Any shortcuts for that?
![]() The key to achieving your goal is the Shift key. First, make sure you’re familiar with the single-letter keyboard shortcuts for your favorite tools, such as M for the Marquee tool or V for the Move tool.
The key to achieving your goal is the Shift key. First, make sure you’re familiar with the single-letter keyboard shortcuts for your favorite tools, such as M for the Marquee tool or V for the Move tool.
Next, open the Preferences dialog box, switch to the General pane, and enable the Use Shift Key for Tool Switch checkbox. After you click OK, you’ll be able to use the Shift key to cycle through the tools in each of the popup tool menus. For example, press J to switch to the Spot Healing Brush tool, and press Shift-J to cycle through the other tools in the same popup menu (the Healing Brush, Patch, and Red Eye tools).
If you don’t select the Shift key preference mentioned above, you can cycle through tools without adding the Shift key. For example, to cycle through the marquee tools, you would simply press M repeatedly. However, we prefer to use the Shift key to cycle, because it’s a safer way to work, especially if you like to hide the toolbox. If the Shift key preference is on, you always know that pressing a tool’s shortcut selects the last-used variation of that tool. If Shift-switching is off and you can’t see the toolbox, you might not realize that pressing the tool shortcut key switched you to a tool you weren’t expecting.
![]() I once saw an option that lets me scroll all windows simultaneously. I want to do this when I’m comparing different views of the same document. I looked in Window > Arrange submenu, but the Match commands there aren’t real-time.
I once saw an option that lets me scroll all windows simultaneously. I want to do this when I’m comparing different views of the same document. I looked in Window > Arrange submenu, but the Match commands there aren’t real-time.
![]() An often overlooked area of available options is the Options bar. In your example, select the Hand tool and you’ll see that this is where the Scroll All Windows option appears (Figure 1.15). (The Options bar for the Zoom tool contains a similar Zoom All Windows option.)
An often overlooked area of available options is the Options bar. In your example, select the Hand tool and you’ll see that this is where the Scroll All Windows option appears (Figure 1.15). (The Options bar for the Zoom tool contains a similar Zoom All Windows option.)
Figure 1.15. Even though the Options bar is usually at the top of the screen, most people don’t look closely at the cool tool options and buttons it contains.
Even more experienced users can miss the Options bar, because it only appears when a tool is actually selected in the toolbar. For example, if you’re in the habit of pressing the spacebar to use the Hand tool, as many advanced users do, you might not select the Hand tool in the toolbox very often. As a result, you might not see the other options that are available for the Hand tool.
![]() I have a few crop sizes that I always use, but I’m getting tired of entering each set of dimensions over and over again. Is there a way to save the settings?
I have a few crop sizes that I always use, but I’m getting tired of entering each set of dimensions over and over again. Is there a way to save the settings?
![]() If you haven’t yet clicked the button at the left end of the Options bar, now would be a good time. That button manages tool presets, which are saved settings for the current tool. When you have tool settings that you want to save, click the tool presets button and then click the Create New Tool Preset button. Name the preset and click OK, and from now on you can use that preset by clicking the Tool Preset button and selecting your preset from the list.
If you haven’t yet clicked the button at the left end of the Options bar, now would be a good time. That button manages tool presets, which are saved settings for the current tool. When you have tool settings that you want to save, click the tool presets button and then click the Create New Tool Preset button. Name the preset and click OK, and from now on you can use that preset by clicking the Tool Preset button and selecting your preset from the list.
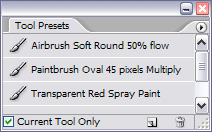
Adobe must really want you to use tool presets, because the Options bar isn’t the only way to use them. You can more easily manage tool presets by using the Tool Presets palette (Figure 1.16), especially when the Options bar isn’t visible. If you disable the Current Tool Only checkbox, tool presets for all tools are listed. Then, clicking a preset in the Tool Presets palette both switches tools and selects a preset in one step.
![]() When I do detailed retouching, the tool icons seem a bit clumsy and imprecise. Is there a way to make the cursor show the size of the brush I’m using?
When I do detailed retouching, the tool icons seem a bit clumsy and imprecise. Is there a way to make the cursor show the size of the brush I’m using?
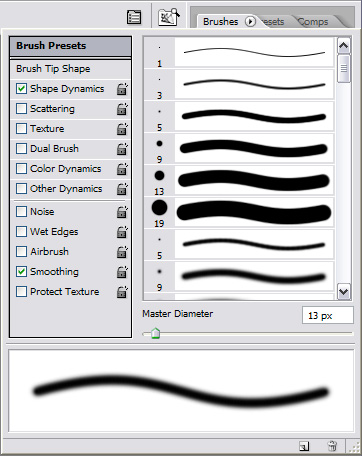
![]() You’ve got lots of options here. Open the Preferences dialog box, and then open the Display & Cursors pane. In the middle of the dialog box, you’ll see a number of cursor options.
You’ve got lots of options here. Open the Preferences dialog box, and then open the Display & Cursors pane. In the middle of the dialog box, you’ll see a number of cursor options.
Photoshop ships with the cursors set to the Standard option you see in the Display & Cursors pane. You can set any cursor to Precise, which displays a little crosshair so that you can tell exactly where you’re clicking.
For painting cursors, which have a brush size, you can choose the Normal Brush Tip or Full Size Brush Tip. The Full Size Brush Tip is a little more intuitive; it’s the outer edge of the brush size you’re using. Normal Brush Tip is a little trickier—the circle it draws is where the brush opacity is at 50%, based on how much feathering you’ve applied. Knowing where 50% falls can be handy because it is a common threshold value for things like magic wand selections.
You can see both the precise click point and the brush size if you enable the Show Crosshair in Brush Tip option.
![]() I’ve seen people use shortcuts for nudging numbers in palettes and dialog boxes. How exactly does that work?
I’ve seen people use shortcuts for nudging numbers in palettes and dialog boxes. How exactly does that work?
![]() There are several handy shortcuts you can use when you just want to tweak a number up or down a little. These shortcuts work in number fields in both palettes and dialog boxes.
There are several handy shortcuts you can use when you just want to tweak a number up or down a little. These shortcuts work in number fields in both palettes and dialog boxes.
Press the up arrow or down arrow key to increase or decrease a value by 1 increment. The increment varies depending on the option.
Press Shift-Up Arrow key or Shift-Down Arrow key to increase an increment by ten times the normal arrow key increment.
Position the cursor over a numeric field and Command/Ctrl-drag left to increase a value, or right to increase a value (Figure 1.17). You can add the Shift key here too, if you want to change the numbers more quickly.

![]() In other programs, I’ve used the keyboard to move around in dialog boxes. Can I do the same thing in Photoshop?
In other programs, I’ve used the keyboard to move around in dialog boxes. Can I do the same thing in Photoshop?
![]() You can do more than you possibly imagined. In Photoshop, there are several cool shortcuts that can make dialog boxes much more pleasant to use:
You can do more than you possibly imagined. In Photoshop, there are several cool shortcuts that can make dialog boxes much more pleasant to use:
As in palettes and many other applications, you can press Tab and Shift-Tab to highlight the next and previous text or number fields.
In many dialog boxes, such as Curves, Levels, and filter dialog boxes, you can actually zoom and pan the window with keyboard shortcuts while the dialog box is still open. For example, you can press the spacebar to use the Hand tool, and you can press the Zoom tool shortcuts to zoom in and out.
Instead of clicking OK to close the dialog box and apply changes, you can press Return or Enter. Instead of clicking Cancel, you can press Esc. Instead of clicking Don’t Save, you can press the D key.
![]() I am a long-time Mac user and am used to the single mouse button. What’s so special about having a right mouse button bring up a context menu, when I can do the same thing from menu bar commands and keyboard shortcuts?
I am a long-time Mac user and am used to the single mouse button. What’s so special about having a right mouse button bring up a context menu, when I can do the same thing from menu bar commands and keyboard shortcuts?
![]() The beauty of context menus is that you don’t have to remember where a command is on a menu, and you don’t have to remember the command’s keyboard shortcut either. As the feature’s name suggests, context menus show you commands that relate directly to whatever you clicked, automatically excluding a whole lot of commands that don’t apply to what you’re trying to do.
The beauty of context menus is that you don’t have to remember where a command is on a menu, and you don’t have to remember the command’s keyboard shortcut either. As the feature’s name suggests, context menus show you commands that relate directly to whatever you clicked, automatically excluding a whole lot of commands that don’t apply to what you’re trying to do.
Context menus can be so useful that many Mac power users like them too. You don’t need a two-button mouse to enjoy context menus. On the Mac, Control-click to see an object’s context menu. If you use a graphics stylus or other non-mouse pointing device on Mac OS X or Windows, you can usually program one of its buttons to bring up context menus.
![]() Is there a good way to open many images at the same time? It would help me when I have to process large numbers of images from my camera or scanner.
Is there a good way to open many images at the same time? It would help me when I have to process large numbers of images from my camera or scanner.
![]() There are actually several ways to open multiple documents in Photoshop.
There are actually several ways to open multiple documents in Photoshop.
From a Mac Finder or Windows desktop folder window, select the files and drag them to the Photoshop icon in the Dock (Mac OS) or to the Photoshop application window (Windows).
In Adobe Bridge, you can select multiple files and choose File > Open or just press Return or Enter. Dragging and dropping to Photoshop works too. If the images open in a program other than Photoshop, from Bridge choose File > Open With > Adobe Photoshop CS2.
Or, in Photoshop, choose File > Open, locate a folder containing multiple files you want to open, and select them. As on the desktop, you can use the Shift key to select a continuous range, and you can use the Command (Mac OS) or Ctrl (Windows) to select a discontinuous range.
![]() I have a file that takes up way too much disk space. How can I make it smaller?
I have a file that takes up way too much disk space. How can I make it smaller?
![]() How you make it smaller depends on what it’s for. If you’re making a copy for the Web or e-mail, choose File > Save for Web and use the optimization controls there to lower the file size.
How you make it smaller depends on what it’s for. If you’re making a copy for the Web or e-mail, choose File > Save for Web and use the optimization controls there to lower the file size.
If you’re trying to reduce the size of a file that you want to archive or use on press, you need to be more careful in order to preserve high resolution and quality. Here are a few ideas:
If you no longer need to use layers, choose Layer > Flatten Image. If you don’t want to flatten, look for unneeded layers you can delete.
If you’ve been working in 16-bit mode but you no longer need to, choose Image > Mode > 8 Bits/Channel.
If the image dimensions are currently larger than the largest size at which you anticipate using the graphic, you can choose Image > Image Size, turn on the checkbox labeled Resample Image, and reduce the image dimensions.
All of those methods are irreversible once you save and close the document, so be sure you want to do them.
![]() I don’t like the way my digital camera names photos. Does Photoshop provide a way to rename many files at once?
I don’t like the way my digital camera names photos. Does Photoshop provide a way to rename many files at once?
![]() In CS2, you can easily take care of this using the Adobe Bridge application, which includes a powerful batch renaming feature.
In CS2, you can easily take care of this using the Adobe Bridge application, which includes a powerful batch renaming feature.
In Adobe Bridge, select the images you want to rename. If no images in the current folder are selected, they’ll all get renamed, so be sure to move or delete images you don’t want to rename.
Arrange images in the order you want to number them during renaming. You can drag images into the order you want, or you can choose View > Sort and choose a sort order.
Choose Tools > Batch Rename. In the Batch Rename dialog box (Figure 1.18), select a Destination Folder. It’s always safest to use the Copy to Other Folder option so that your originals are intact in case you make a mistake.
In the New Filenames section, set up options for renaming. To build a name out of the naming option such as date, sequence number, or metadata, click a plus button. The Preview section shows you what you’ll get.
In the Options section, change the options if needed, and click Rename.

![]() A little while back, Photoshop was acting strangely, and the next time I started Photoshop, my preferences were somehow reset to their default settings, so I had to enter all my customized preference settings again. Is there a way to restore preference settings?
A little while back, Photoshop was acting strangely, and the next time I started Photoshop, my preferences were somehow reset to their default settings, so I had to enter all my customized preference settings again. Is there a way to restore preference settings?
![]() It is a fact of life that the preference file of any application can become corrupted at any moment. If that happens, Photoshop may revert back to its default preferences. Photoshop has no mechanism for backing up its preferences file, but it’s a good idea to do it yourself. Once you’ve got the Photoshop preferences just the way you like them, make a copy of the preferences file wherever you keep backup copies of other valuable documents. The file you’re looking for is called Adobe Photoshop CS Prefs.psp or Adobe Photoshop CS2 Prefs.psp. It’s located in Mac OS X at:
It is a fact of life that the preference file of any application can become corrupted at any moment. If that happens, Photoshop may revert back to its default preferences. Photoshop has no mechanism for backing up its preferences file, but it’s a good idea to do it yourself. Once you’ve got the Photoshop preferences just the way you like them, make a copy of the preferences file wherever you keep backup copies of other valuable documents. The file you’re looking for is called Adobe Photoshop CS Prefs.psp or Adobe Photoshop CS2 Prefs.psp. It’s located in Mac OS X at:
Computer/Users/[username]/Library/Preferences/Adobe Photoshop CS2 Settings
Tip
On Mac OS X, you can drag the title bar icon of a document as if it was the file icon in the Finder (but only after saving the document). For example, dragging the title bar icon to a Finder folder window moves the document to that folder.
Tip
Here’s a quick way to manually reset Photoshop preferences to their default settings. Immediately after you start up Photoshop, hold down the Shift, Option, and Command keys on Mac OS X, or Shift, Alt and Ctrl keys on Windows. An alert appears, asking you if you want to delete the Adobe Photoshop Settings file. Click Yes to throw out the existing Preferences file and continue with default preferences.
In Windows, it’s located at:
C:[username]Application DataAdobePhotoshop9.0Adobe Photoshop CS2 Settings
If you ever find that your Photoshop preferences are reset, you can easily copy your backup preferences file into the Settings folder and continue on your merry way.
![]() Photoshop seems a little sluggish. How can I tell if I need to install more memory in my computer?
Photoshop seems a little sluggish. How can I tell if I need to install more memory in my computer?
![]() At the bottom of a Photoshop document window, click the black triangle to the right of the status bar, and choose Efficiency (or Show > Efficiency if Version Cue is installed). If Efficiency falls below 100%, you may want to install more RAM in your computer.
At the bottom of a Photoshop document window, click the black triangle to the right of the status bar, and choose Efficiency (or Show > Efficiency if Version Cue is installed). If Efficiency falls below 100%, you may want to install more RAM in your computer.
You can also switch the status bar to display Scratch Sizes. The number on the left tells you how much RAM your open documents are using; it goes up and down depending on what’s open and how much work you’re doing. The number on the left tells you how much unused RAM you have available. If the number on the left becomes more than the number on the right, Photoshop starts using disk space to store temporary working files. If you find that your hard disk space is running low when you use Photoshop, connect another hard disk and assign it as a scratch disk in the Plug-Ins and Scratch Disks pane of the Preferences dialog box.
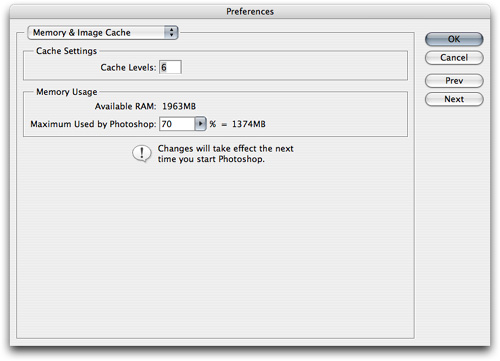
If you don’t run many other programs at the same time as Photoshop, you can try increasing the percentage of RAM that you allow Photoshop to use. Open the Memory & Image Cache pane in the Preferences dialog box (Figure 1.19) and increase the Maximum Used by Photoshop value. It’s usually a good idea to set a value no higher than 75% unless you have several gigabytes of RAM installed, because you must leave a few hundred megabytes for the system to use. If you plan to use Photoshop alongside other programs, such as those in the Adobe Creative Suite, you may want to lower Photoshop memory usage to leave RAM for those other programs.