THE UNIVERSE PHOTOSHOP USERS IS BOTH wide and deep; people use Photoshop for everything from purely creative works to precise scientific imaging and processing. It naturally follows that there are many ways for an image to find its way into Photoshop. For years, many Photoshop images would start out as files from a scanner, but now many images arrive directly from a digital camera. Many fine artists and graphic designers start by “painting” on the proverbial blank canvas.
However, digital cameras have become so ubiquitous and scanners have become so cheap that it’s easy to find yourself with hundreds of new digital photos each day. Opening each image at a time is not always practical, so the trick is to see how efficiently you can process massive numbers of images—preparing them for a Web site or a printer. We wrote most of this chapter to help you become as efficient as possible, using not only Photoshop but the cool (and super powerful) “Cracker Jack” toys you also received in the box along with Photoshop CS2: Adobe Bridge and Camera Raw.
![]() I’ve noticed that when I choose New from the File menu, the document size numbers sometimes change. Not only that, but sometimes the numbers mysteriously become exactly what I need. What’s going on and how can I control this?
I’ve noticed that when I choose New from the File menu, the document size numbers sometimes change. Not only that, but sometimes the numbers mysteriously become exactly what I need. What’s going on and how can I control this?
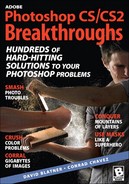
![]() The New dialog box has a few tricks up its sleeve. When you choose File > New, Photoshop automatically guesses the specifications for the document. By default, the New dialog box displays the specifications from the most recent document you created.
The New dialog box has a few tricks up its sleeve. When you choose File > New, Photoshop automatically guesses the specifications for the document. By default, the New dialog box displays the specifications from the most recent document you created.
If there’s an image on the Clipboard, the New dialog box uses the specifications of that image (Figure 2.1). Accordingly, the Preset popup menu is set to Clipboard in this case.
Figure 2.1. Set up new documents in the New dialog box. Here, Photoshop takes the default image specifications from the image on the clipboard.
You can also copy document settings from any document currently open in Photoshop. Just choose the document’s name from the Windows menu on the menu bar (it’s not in the New dialog box). This is one of those times when you can use the menu bar even though a dialog box is open.
![]() In my job, we create graphics for a few standard sizes. Is there a way to make Photoshop templates so that I don’t have to keep checking all of my document specs every time I create a new document?
In my job, we create graphics for a few standard sizes. Is there a way to make Photoshop templates so that I don’t have to keep checking all of my document specs every time I create a new document?
![]() If you often use certain new document settings that aren’t already in the Preset popup menu in the New dialog box, the next time you enter those settings, click the Save Preset button to name and save your own preset.
If you often use certain new document settings that aren’t already in the Preset popup menu in the New dialog box, the next time you enter those settings, click the Save Preset button to name and save your own preset.
![]() What’s the best and fastest way to bring digital camera photos into Photoshop? Some people tell me that I should use the included cable, while others tell me I need to buy a separate reader even though I already have a cable.
What’s the best and fastest way to bring digital camera photos into Photoshop? Some people tell me that I should use the included cable, while others tell me I need to buy a separate reader even though I already have a cable.
![]() You typically get a cable free with the camera, so it’s an obvious, easy way to get pictures from your camera to Photoshop. However, it may not be the best way, for the following reasons:
You typically get a cable free with the camera, so it’s an obvious, easy way to get pictures from your camera to Photoshop. However, it may not be the best way, for the following reasons:
If you’re shooting an event, you can’t take any pictures while you’re transferring photos.
You spend precious battery energy for file transfer, leaving less energy for taking pictures, unless you plug an AC adapter into the camera during the transfer.
Many cameras still transfer photos using USB 1.1 or the Full Speed version of USB 2.0, both of which are very slow. Hi-Speed USB 2.0 and FireWire are much faster.
If a transmission glitch occurs, the glitch may ruin photos on your camera’s memory card. It does happen.
What’s the alternative? Instead of using a cable, use a card reader connected to your computer. Remove the card from your camera and insert it in the reader; you can then put another card into your camera and keep taking pictures during the transfer. A card reader is powered by your computer, so you don’t drain your camera battery. FireWire and Hi-Speed USB 2.0 card readers are the fastest.
Tip
Never edit digital camera photos directly off the camera or the card. This practice is unreliable and also very slow compared to a hard disk. First copy the images to a folder on your computer’s hard disk, and then edit them. Professional photographers often make at least one backup copy of the untouched originals on CD or DVD before editing, in case something goes horribly wrong during editing or a batch process.
Also, consider using Adobe Bridge to preview, annotate, and open one or more images in Photoshop. If you are using raw camera files, in Adobe Bridge you can also choose File > Open in Camera Raw to make adjustments without having to open or tie up Photoshop.
![]() Sometimes I double-click an image that’s a file type Photoshop should be able to open, but instead the system tells me that it can’t be opened, or a different program opens it. How can I fix this?
Sometimes I double-click an image that’s a file type Photoshop should be able to open, but instead the system tells me that it can’t be opened, or a different program opens it. How can I fix this?
![]() Don’t give up. A file can sometimes “forget” which application it belongs to as it’s transferred over networks or across platforms. However, Photoshop can often look deeper into an image than the operating system can. Instead of double-clicking the image file, try opening it from Photoshop by choosing File > Open (or File > Open As in Windows) and selecting the file. You can also try dragging the file to the Photoshop program icon or to the Photoshop application window (Windows).
Don’t give up. A file can sometimes “forget” which application it belongs to as it’s transferred over networks or across platforms. However, Photoshop can often look deeper into an image than the operating system can. Instead of double-clicking the image file, try opening it from Photoshop by choosing File > Open (or File > Open As in Windows) and selecting the file. You can also try dragging the file to the Photoshop program icon or to the Photoshop application window (Windows).
Also, check to see if the file has an extension at the end of the filename, such as .TIF or .JPG. Sometimes that’s all the system needs to hook up format with the default application that opens it. On the Mac OS, you can also select the file in the Finder and choose File > Get Info to set which application it belongs to. In Windows, open the Properties dialog box and click the Change button.
![]() In my job, I have to process a lot of screen shots. How can I streamline the process of cleaning them up?
In my job, I have to process a lot of screen shots. How can I streamline the process of cleaning them up?
![]() After you take your screen shots using your operating system shortcuts or a screen shot program, try these suggestions:
After you take your screen shots using your operating system shortcuts or a screen shot program, try these suggestions:
If the screen shot is saved to the desktop (as on Mac OS X by default), drag it to Photoshop to open it. If you simply double-click the file, it will likely open in a program other than Photoshop.
If the screen shot is on the clipboard (as in Windows, by default), choosing File > New in Photoshop enters the clipboard contents as the dimensions of the new document you’re about to create. After the new document appears, all you need to do is paste.
If you need to remove empty blank space around the screen shot (Figure 2.2), the easiest way is to choose Image > Trim. If the upper left pixel is the color of the area you want to remove, you can usually accept the default settings in the Trim dialog box and click OK.
![]() What is the point of Camera Raw? The files are bigger, they take longer to save, and are more complicated to process. My camera takes great pictures, and when I take them off the camera they’re ready to roll. So why shouldn’t I just use the JPEG format, which seems more convenient all around?
What is the point of Camera Raw? The files are bigger, they take longer to save, and are more complicated to process. My camera takes great pictures, and when I take them off the camera they’re ready to roll. So why shouldn’t I just use the JPEG format, which seems more convenient all around?
![]() Many people believe that the JPEG image that comes out of a camera is exactly what the camera saw. In fact, the raw sensor data needs a great deal of processing which digital cameras perform as you take the shot. A camera converts the raw data—which isn’t even really RGB yet—into tones and colors, and applies other enhancements like sharpening. All of this processing affects the final JPEG image.
Many people believe that the JPEG image that comes out of a camera is exactly what the camera saw. In fact, the raw sensor data needs a great deal of processing which digital cameras perform as you take the shot. A camera converts the raw data—which isn’t even really RGB yet—into tones and colors, and applies other enhancements like sharpening. All of this processing affects the final JPEG image.
The problem with JPEG is the camera typically has a 12-bit sensor producing pure, uncompressed data, while JPEG is only an 8-bit format which is highly compressed to save space. This means the camera already throws out a lot of information before the image even reaches your camera’s memory card. In addition, JPEG compression allows quality to degrade as you apply successive edits. However, if your camera can save its raw sensor data and if the camera’s format is supported by Adobe Camera Raw, you can alter the judgments that would normally be applied by the camera, and you’ll end up with higher-quality data.
If you want the most control in order to achieve the best quality, editing raw camera data is the best workflow in digital photography. If speed, convenience, and file size are more important to you, you may be happier shooting JPEG.
A useful analogy to editing raw camera data is developing your own film and prints in a darkroom. You can get exactly the quality you want because you have control over every step, but the process can be too daunting for casual users. Happily, learning Adobe Camera Raw is much faster and easier than learning how to use a darkroom!
![]() I select images in Bridge and try to open them in Camera Raw, but instead they open directly into Photoshop. Also, the Open in Camera Raw command isn’t available for these images. How can I edit these images in Camera Raw?
I select images in Bridge and try to open them in Camera Raw, but instead they open directly into Photoshop. Also, the Open in Camera Raw command isn’t available for these images. How can I edit these images in Camera Raw?
![]() The big question here is, are those images actually camera raw files? In Bridge, check the Document Kind field in the File Properties section of the Metadata tab. If it doesn’t say Camera Raw, it won’t open in Camera Raw.
The big question here is, are those images actually camera raw files? In Bridge, check the Document Kind field in the File Properties section of the Metadata tab. If it doesn’t say Camera Raw, it won’t open in Camera Raw.
Camera Raw only opens camera raw files. Image files in formats like TIFF, JPEG, and Photoshop must be opened in Photoshop itself. Only digital cameras can save camera raw files; you can’t save or convert existing files to Camera Raw format. This is because a camera raw file is a record of a specific camera sensor.
If you’re absolutely sure you’re trying to open an actual camera raw file and this is the first time you’ve tried to do this, it’s possible that your camera is not yet supported by Adobe Camera Raw. As of this writing, every camera’s raw data is stored in a way that’s unique to that camera, so every time a new camera comes out, Adobe must adapt Camera Raw and properly test the new camera before releasing an update to Camera Raw. Check the list of supported cameras at: www.adobe.com/products/photoshop/cameraraw.html
When you have a new camera that isn’t yet supported by Camera Raw, you may need to convert the camera’s raw files with the software provided by the camera manufacturer. Raw conversion software is typically included with cameras that can save raw data. You might not have as much control as you would in Camera Raw, but you’ll be able to use your files.
![]() In Camera Raw, I see lots of functions that duplicate features in Photoshop itself, like Contrast and Sharpness. Do I apply these in Camera Raw, in Photoshop, or in both places?
In Camera Raw, I see lots of functions that duplicate features in Photoshop itself, like Contrast and Sharpness. Do I apply these in Camera Raw, in Photoshop, or in both places?
![]() The general rule is, if you can do it in Camera Raw, do it there—you’ll generally get a cleaner image with the controls in Camera Raw. For example, fixing white balance in Camera Raw preserves more image quality than converting a raw image at the wrong color balance and fixing it in Photoshop.
The general rule is, if you can do it in Camera Raw, do it there—you’ll generally get a cleaner image with the controls in Camera Raw. For example, fixing white balance in Camera Raw preserves more image quality than converting a raw image at the wrong color balance and fixing it in Photoshop.
However, there are important exceptions. In some cases it may be better to apply sharpening and noise reduction in Photoshop rather than in Camera Raw.
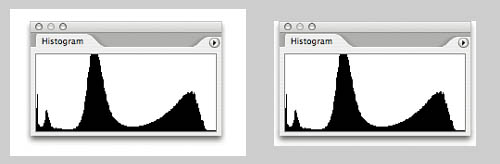
In the Detail tab in the Camera Raw dialog box (Figure 2.3), the amount of Sharpness is best adjusted relative to the specifications of your final output. If you don’t yet know the exact conditions of the output for the image, it may be better to apply sharpness later, after conversion. In addition, the Sharpness control in Camera Raw is rather basic; you can apply better sharpening techniques in Photoshop, including the wonderful Smart Sharpen feature (Filter > Sharpen > Smart Sharpen) in Photoshop CS2.
Similarly, the Reduce Noise feature in Photoshop CS2 provides different controls than the noise reduction features in Camera Raw (Luminance Smoothing and Color Noise Reduction in the same Detail tab). Depending on the noise reduction, you may want to use the Reduce Noise feature in Photoshop CS2 (Filter > Noise > Reduce Noise); in that case, set the Camera Raw noise reduction to zero.
In short, apply sharpening and noise reduction in either Camera Raw or Photoshop, but not in both. For all other Camera Raw options, it’s better to apply them in Camera Raw, and it’s OK to fine-tune the image in Photoshop if needed.
![]() I’m confused. Camera Raw is supposed to help me get the most quality out of my digital camera. But for years, the experts have been warning us away from the Brightness and Contrast sliders in Photoshop, because they can wreck a photographic image. And yet I see Brightness and Contrast sliders prominently placed in Camera Raw. Does that mean it’s OK to touch Brightness and Contrast now? And one more thing: What’s the difference between Exposure and Brightness?
I’m confused. Camera Raw is supposed to help me get the most quality out of my digital camera. But for years, the experts have been warning us away from the Brightness and Contrast sliders in Photoshop, because they can wreck a photographic image. And yet I see Brightness and Contrast sliders prominently placed in Camera Raw. Does that mean it’s OK to touch Brightness and Contrast now? And one more thing: What’s the difference between Exposure and Brightness?
![]() It’s true, there is some confusing terminology in the Adjust tab of the Camera Raw dialog box. Some of the labels in Camera Raw actually don’t mean the same thing they do in Photoshop. The trick is to ignore what the labels say, and study what they actually do. Here’s a head start:
It’s true, there is some confusing terminology in the Adjust tab of the Camera Raw dialog box. Some of the labels in Camera Raw actually don’t mean the same thing they do in Photoshop. The trick is to ignore what the labels say, and study what they actually do. Here’s a head start:
Exposure sets the value of the lightest level you’ll convert. To adjust Exposure, enable the Highlights checkbox at the top of the Camera Raw dialog box. This marks clipped highlights (lost details in bright areas) in red. Now drag the Exposure slider as far to the right as you can without blowing out details in the highlights.
Shadows sets the value of the darkest level you’ll convert. Enable the Shadows checkbox at the top of the Camera Raw dialog box to mark clipped shadows (lost details in dark areas) in blue. Now drag the Shadows slider as far to the right as you can without blocking up shadow details.
Brightness is nothing like the Brightness control in Photoshop, so you don’t have to be afraid of it. Brightness actually sets the image’s midtone for the conversion. Always get Exposure and Shadows right before adjusting Brightness.
Contrast is not as destructive as the Contrast control in Photoshop, so it’s really not scary either. In Photoshop, contrast pushes tones apart and lets them clip. In Camera Raw, Contrast applies an S-curve around the midtone you set using Brightness. While the S-curve doesn’t clip tones, if you turn it up too high it can still push midtones too far into the harder-to-reproduce highlights and shadows.
Tip
There is so much more that we could say about Camera Raw but couldn’t fit in this book—that one Camera Raw dialog box is deeper than it looks. If you love (or want to learn to love) what Camera Raw does, you should read either Real World Photoshop CS2 or Real World Camera Raw with Adobe Photoshop (both Peachpit Press), written by our esteemed colleague Bruce Fraser.
Saturation, fortunately, does exactly what it says, and has the same implications as it does in Photoshop. Saturation simply controls the intensity of color.
There’s one more control to mention here, and that’s the Curve tab. If you’re a Photoshop veteran, you might instinctively bypass the Adjust tab and run straight to the Curve tab. In Camera Raw, don’t do that. The Curve tab applies after the Adjust tab, so to apply Curves to the best possible source data, first get the Adjust tab right, and then use Curve for fine-tuning.
![]() Every time I convert camera raw files, they come out as 8-bit AdobeRGB files. I like to work in 16-bit ProPhoto RGB. Is there a way to change the conversion?
Every time I convert camera raw files, they come out as 8-bit AdobeRGB files. I like to work in 16-bit ProPhoto RGB. Is there a way to change the conversion?
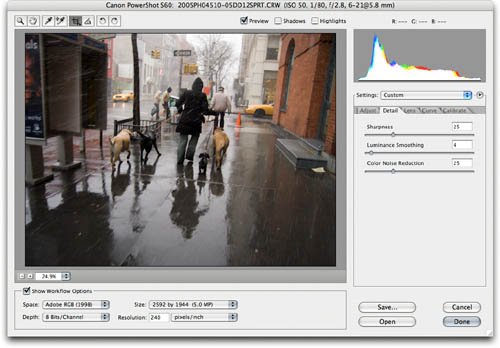
![]() At the bottom of the Camera Raw dialog box, enable the Show Workflow Options checkbox. In the rest of the dialog box you control how the image looks, and you use the workflow options to control the specifications of the converted file. Here are your options:
At the bottom of the Camera Raw dialog box, enable the Show Workflow Options checkbox. In the rest of the dialog box you control how the image looks, and you use the workflow options to control the specifications of the converted file. Here are your options:
The Space popup menu determines the color space. It defaults to Adobe RGB, but you can change it. This is where you can convert the raw data into a nice ProPhoto RGB image for fine-art printing, or as 8-bit sRGB for the Web.
The Depth popup menu determines the bit depth. If you want 16 bits per channel, set it here; there’s no point in converting to 8 bits per channel and later changing to 16.
Size is the dimensions of the image in pixels. Sizes with a minus or plus sign after the dimensions are downsampled or upsampled from the original, respectively. However, the more advanced resizing choices in the Image Size dialog box in Photoshop are superior to resizing in Camera Raw, so if you’d rather resize in Photoshop, leave the middle (original size) command selected in Camera Raw’s Size popup menu and resize in Photoshop later.
Resolution is the same as setting the resolution in the Image Size dialog box and is included here only for convenience. Changing resolution here doesn’t add or remove any image data (changing Size will, though).
Tip
When you select a camera raw image in Adobe Bridge, you can choose to open it in Bridge (via File > Open in Camera Raw) or in Photoshop (via File > Open With > Adobe Photoshop CS2). The first methods opens Camera Raw inside Bridge without tying up Photoshop. The second method opens Camera Raw inside Photoshop without tying up Bridge.
![]() There are days when I’ll bring home a couple hundred images and look at them in Bridge. I edit one and I like how it looks, but there are fifty more just like it that need the same correction. Can I transfer my corrections to other raw images?
There are days when I’ll bring home a couple hundred images and look at them in Bridge. I edit one and I like how it looks, but there are fifty more just like it that need the same correction. Can I transfer my corrections to other raw images?
![]() Yes, you’ll be able to convert so many at once that you’ll feel like the leader of a trendy cult. There are several great ways to edit in bulk.
Yes, you’ll be able to convert so many at once that you’ll feel like the leader of a trendy cult. There are several great ways to edit in bulk.
You can open a folder full of raw images in Bridge and select a range of images that are similar. From there, you can open all those images in Camera Raw (see tip on opposite page for details of how to open images in Camera Raw). Once Camera Raw opens, you see all the images in filmstrip mode (Figure 2.4). If you select more than one of those images, any edits you make apply to all the images selected in Camera Raw.

Figure 2.4. Along the left edge of the Camera Raw dialog box, you see multiple raw images opened from Adobe Bridge (“filmstrip mode”). The first two images are selected. The image at the top has a thicker border, so it’s the image being viewed. Any changes to the viewed image apply to all selected images.
Alternately, you can play around with one image in Camera Raw and arrive at a good set of corrections that you’d like to apply to a bunch of other images. Fortunately, this is easy to do. If you’re still in Camera Raw with a set of similar images selected, click the Synchronize button. You can then select which attributes to apply to the other selected images. Note that there are two selection levels in Camera Raw: The images highlighted with a lighter background, and the one image highlighted with a thicker border. When you synchronize, it’s the image with the thicker border that becomes the source of the synchronization for other selected images.
Finally, if you aren’t even in Camera Raw anymore, you can still apply one image’s settings to others. In Adobe Bridge, select a properly corrected camera raw image and choose Edit >Apply Camera Raw Settings > Copy Camera Raw Settings. Next, select the other images you want to change, and choose Edit >Apply Camera Raw Settings > Paste Camera Raw Settings. You’ll get the same dialog box you see when synchronizing in Camera Raw (Figure 2.5); just set it and click OK.

![]() Can you help me understand the difference between the Save, Open, Cancel, and Done buttons at the bottom of the Camera Raw dialog box?
Can you help me understand the difference between the Save, Open, Cancel, and Done buttons at the bottom of the Camera Raw dialog box?
![]() That we can do. For the buttons in Photoshop CS2:
That we can do. For the buttons in Photoshop CS2:
Save creates a new DNG, JPEG, TIFF, or PSD document.
Open converts and opens the converted image in Photoshop.
Cancel exits Camera Raw—and this part is important—discards all edits you made in the current Camera Raw session. Don’t click Cancel unless you really want to!
Done saves the changes you made in the current Camera Raw session, closes the image, and returns you to Bridge or Photoshop without creating or opening anything.
When you press the Option/Alt key, two of the buttons change. The Save loses its ellipses, meaning it saves using the last-used settings, bypassing the dialog box of save options. Option/Alt also changes the Cancel button to Reset, which discards changes but keeps Camera Raw open so you can try again.
Tip
Use caution when pressing the Esc key in Camera Raw. When the cursor is in a numerical field, Esc simple cancels what you changed there; Esc also cancels out of an active tool such as the Crop tool. However, if cursor focus is not on a tool or text field, pressing Esc closes Camera Raw without saving any changes you made to any of the images you’ve got open in it—game over, dude!
In Photoshop CS, there are two buttons: OK and Cancel. Pressing Option/Alt changes them to Update (same as Done in CS2) and Reset, respectively.
![]() In Camera Raw, I noticed that I can turn off the Auto checkboxes, and I like that better, but I’m getting tired of turning off those little boxes over and over again. Can I permanently turn off the Auto checkboxes?
In Camera Raw, I noticed that I can turn off the Auto checkboxes, and I like that better, but I’m getting tired of turning off those little boxes over and over again. Can I permanently turn off the Auto checkboxes?
![]() The Auto values are Camera Raw’s “best guess” for the correct settings, and you should use them as a starting point. The result may look different than what other raw converters may display. Some converters prioritize contrast over tonal quality, while Adobe Camera Raw tries to preserve more tonal quality in the shadows and highlights so that you have more flexibility and potentially lose fewer tones when you edit.
The Auto values are Camera Raw’s “best guess” for the correct settings, and you should use them as a starting point. The result may look different than what other raw converters may display. Some converters prioritize contrast over tonal quality, while Adobe Camera Raw tries to preserve more tonal quality in the shadows and highlights so that you have more flexibility and potentially lose fewer tones when you edit.
Tip
Camera raw files are read-only, so changes you make in Camera Raw are saved either in a central Camera Raw database or in an XMP metadata file stored alongside your camera raw files. In Camera Raw Preferences, you can control where the changes are stored. If you use XMP metadata files, use Adobe Bridge to move and rename the raw files; Bridge makes sure each XMP file is moved and renamed with its Camera Raw file.
You can turn off all Auto settings for an image by disabling Use Auto Adjustments. This command is in the menu you get when you click the round button to the right of the Settings popup menu (Figure 2.6). If you don’t like the Auto settings and would like to have them off as the default, first turn them all off for the selected image, and then choose Save New Camera Raw Defaults from the same popup menu.

Figure 2.6. You can turn the automatic adjustments on or off from this menu in Adobe Camera Raw, and you can also use this menu to save your favorite Camera Raw settings as the default settings.
Alternately, you can press Command/Ctrl-U as a shortcut for the Use Auto Adjustments command. This is a great way to quickly see what an image looks like with and without the Camera Raw auto adjustments.
![]() I love my digital camera, but I have a lot of print and film images that I need to convert to digital through scanning. Do you have any tips for wading through the endless number of controls in my scanning software?
I love my digital camera, but I have a lot of print and film images that I need to convert to digital through scanning. Do you have any tips for wading through the endless number of controls in my scanning software?
![]() There are a few basic steps to getting a good scan. Like car dashboards, scanning controls may seem to vary across different scanning programs, but they usually work the same way. Whichever scanning software you use, the most important steps in relation to Photoshop are these:
There are a few basic steps to getting a good scan. Like car dashboards, scanning controls may seem to vary across different scanning programs, but they usually work the same way. Whichever scanning software you use, the most important steps in relation to Photoshop are these:
Don’t scan without first using the Preview button in the scanning software to help determine what scan settings to use.
Crop unneeded areas to scan faster and use less disk space. You can rotate and flip if you want, but you can do that in Photoshop too.
Set the resolution and dimensions based on your final output.
Set the black point and white point (Figure 2.7). The black point and white point define the darkest and lightest tones, respectively, that you’ll scan from the original. Too narrow a range wipes out detail in the shadows and highlights. Too wide a range will lack contrast. If you’re a pro scanning at 16 bits per channel, it’s possible to skip this step and fine-tune the black and white points later in Photoshop.
Adjust the color balance. If you aren’t comfortable with the color balancing controls in the scanning software, you can skip this step and fix the color in Photoshop.
When everything looks good, you can finally click the Scan button in the scanning software.

![]() I like to scan photos right into Photoshop so I can edit them right away. This doesn’t work well for batch scanning because the scanning plug-in ties up Photoshop, and all these windows of unsaved scans pile up (seems risky). Is there a better way?
I like to scan photos right into Photoshop so I can edit them right away. This doesn’t work well for batch scanning because the scanning plug-in ties up Photoshop, and all these windows of unsaved scans pile up (seems risky). Is there a better way?
![]() Scanning directly from within Photoshop is convenient for occasional scans. However, for maximum productivity see if your scanning software is capable of running as an independent program. If it can, you can work on completed scans in Photoshop while other scans are in progress in the scanning software. You can use the following technique to set up an efficient scanning and editing workflow with Photoshop.
Scanning directly from within Photoshop is convenient for occasional scans. However, for maximum productivity see if your scanning software is capable of running as an independent program. If it can, you can work on completed scans in Photoshop while other scans are in progress in the scanning software. You can use the following technique to set up an efficient scanning and editing workflow with Photoshop.
Open Photoshop, Adobe Bridge, and your scanning software.
Set your scanning software to save completed scans to a folder.
In Adobe Bridge, locate and view the folder you set up in Step 2.
Use your scanning software to scan an image or two. You’ll see your scans appear in Adobe Bridge as the scanning software saves them, so you can monitor the progress of the batch scanning operation.
In Adobe Bridge, select a scan and choose File > Open (or just press Return or Enter). The scan opens in Photoshop, and you can work on it as your scanner works on another image.
Tip
Some scanning software lets you apply digital restoration and enhancements, like scratch and dust removal, grain enhancement, and color restoration for faded originals. If you’re scanning an old or damaged original and your scanning software has those features, feel free to use them. The restoration features in today’s scanners are often faster and more effective than performing the same tasks in Photoshop.
If you save your edited scans to another folder, you can open an additional window in Adobe Bridge (File > New) to monitor the folder containing edited scans. You can monitor progress of scanned and edited images simultaneously.
![]() I’ve scanned lots of slides, but negatives really throw me for a loop. The color and contrast never look right after I invert them and try to color-correct them.
I’ve scanned lots of slides, but negatives really throw me for a loop. The color and contrast never look right after I invert them and try to color-correct them.
![]() Color negative film can be a challenge to scan. On negative film, the image is both inverted and has an orange-colored mask, so arriving at a final image requires some interpretation. Fortunately, there are a couple of quick ways to handle scans of color negatives.
Color negative film can be a challenge to scan. On negative film, the image is both inverted and has an orange-colored mask, so arriving at a final image requires some interpretation. Fortunately, there are a couple of quick ways to handle scans of color negatives.
If your scanning software provides a selection of presets for color negative film types, select your film type if available. If your scanning software doesn’t have any color negative conversion options, try this manual and somewhat more involved Photoshop method.
Scan at 16 bits per channel, and apply no tone or color corrections in the scanning software. Don’t even invert the image.
Open the color negative scan in Photoshop and choose Image > Adjustments > Invert. Don’t expect it to look good yet (Figure 2.8).
Open the scan in Photoshop, choose Layer > New Adjustment Layer > Levels, and click the Options button (Figure 2.9).
In the Auto Color Correction Options dialog box, click Find Dark & Light Colors and Snap Neutral Midtones. If the color balance is unrealistic, disable Snap Neutral Midtones and try different options in the Algorithms section.
If you want, adjust the Clip values for Shadows and Highlights (we tend to use smaller values than the defaults). When you’re done, click the OK button.
If the image is still too dark or light, drag the Input midtone slider left or right in the Levels dialog box. If you realize the black or white point needs adjustment, click Options and change the clip values instead of dragging the black point or white point sliders in the Levels dialog box—you’ll get more balanced results.
When you’re satisfied with the overall tonal range and color balance, click OK until both the Auto Color Correction Options dialog box and the Levels dialog box are closed. The image should now be at a stage (Figure 2.10) where you only need to fine-tune it.


![]() What’s the best way to scan line art for Photoshop? I set my scanner to the Line Art setting, but the results are sometimes uneven or blocked up.
What’s the best way to scan line art for Photoshop? I set my scanner to the Line Art setting, but the results are sometimes uneven or blocked up.
![]() If you’ve ever tried to copy line art with a photocopier, you know that the machine itself can alter the image. This is sometimes the problem with using a scanner at its Line Art (or Black and White) setting. For more control, try a method that lets you tweak the line art easily in Photoshop:
If you’ve ever tried to copy line art with a photocopier, you know that the machine itself can alter the image. This is sometimes the problem with using a scanner at its Line Art (or Black and White) setting. For more control, try a method that lets you tweak the line art easily in Photoshop:
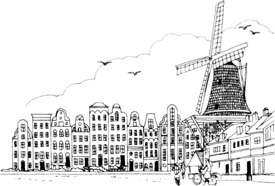
Scan the original line art in grayscale mode—8 bits per channel—at the optical resolution of your scanner (Figure 2.11).
Open the image in Photoshop.
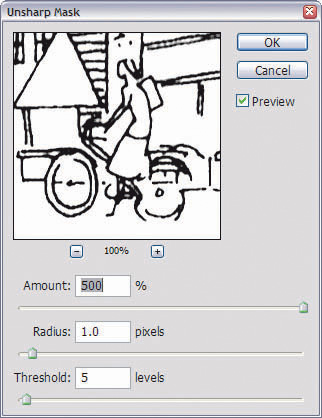
Choose Filter > Sharpen > Unsharp Mask, setting Amount to 500 percent, Radius to 1, and Threshold to 5. You may need to increase the Radius or Amount at higher resolutions (Figure 2.12).
Choose Image > Adjustments > Threshold (or add a threshold adjustment layer) to adjust the level where gray pixels jump to white or black (Figure 2.13). You’re controlling the edge of the line art. Aim for a value that looks right, above the point where lines break up and below the point where spaces between lines block up.
Choose Image > Mode > Bitmap (Figure 2.14). Choose 50% Threshold from the Method popup menu, and click OK. This step freezes your edits into a final 1-bit line art file. If the document has layers, changing modes flattens the document.


![]() A client asked me to include a photo from one of their old catalogs. When I scanned it, there was a terrible pattern across it. I asked if there were better copies of the photo, but there aren’t. I have to use the one from the old catalog. How do I get rid of that pattern?
A client asked me to include a photo from one of their old catalogs. When I scanned it, there was a terrible pattern across it. I asked if there were better copies of the photo, but there aren’t. I have to use the one from the old catalog. How do I get rid of that pattern?
![]() Before printing an photograph on a typical printing press, an image must be converted to halftone dots. If you scan an image that’s already been printed on a press, the halftone dots can appear as a distracting moiré pattern (Figure 2.15) due to the interference pattern between the halftone dots and the scanner’s pixel grid.
Before printing an photograph on a typical printing press, an image must be converted to halftone dots. If you scan an image that’s already been printed on a press, the halftone dots can appear as a distracting moiré pattern (Figure 2.15) due to the interference pattern between the halftone dots and the scanner’s pixel grid.
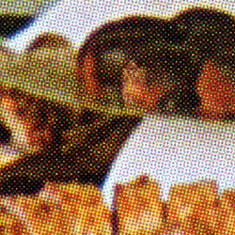
Figure 2.15. The rosette pattern visible in a halftone image, which can cause a moiré pattern when scanned.
The best way to remove the halftone dot pattern is to use a descreening feature on your scanner, if it has one. The most important setting in a descreening feature is lines per inch (lpi); entering a value that matches the actual lpi of the print is most likely to produce a clean result. If your scanning software doesn’t have a descreening option or you were given an image that was scanned by someone else, you can try these tips:
If you have access to the printed original, scan it at an odd angle (try between 6 and 10 degrees) and set the scanner to a higher resolution than normally needed (try an additional five to ten percent more resolution). The purpose of this step is to avoid aligning the halftone screen with the scanner’s pixel grid. After trying some of the techniques below, straighten the scan again.
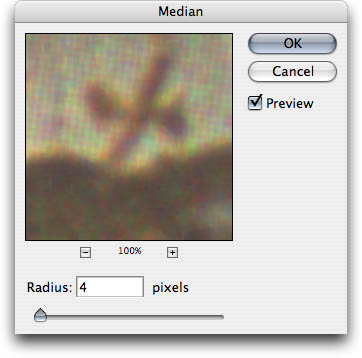
In Photoshop, experiment with the Median filter (Filter > Noise > Median) (Figure 2.16) or Gaussian Blur filter (Filter > Blur > Gaussian Blur) with different settings.
For color scans, experiment with Filter > Noise > Reduce Noise, and try increasing the Reduce Color Noise value without obliterating the details.
If you scanned the image at a higher resolution and at an odd angle as we suggested in the first item on this list, your last step should be to downsample and straighten the image. Choose Image > Image Size, check the Resample Image box, and set the image to the desired dimensions and resolution. Then straighten the image; see the topic “Rotating an Image the Fast, Precise Way” in Chapter 3, Image Editing Basics.
There isn’t one solution for all descreening problems, because screened images are printed to many different specifications, which can create varying patterns. You’ll typically need to experiment with different combinations of the ideas above, until something works.
![]() I’m trying to scan black-and-white negatives for Photoshop, but they look awful no matter what I do! What’s strange is that color negatives come out great.
I’m trying to scan black-and-white negatives for Photoshop, but they look awful no matter what I do! What’s strange is that color negatives come out great.
![]() Try turning off any dust or scratch-removal features in the scanning software. Dust and scratch removal is a useful feature in newer scanners, and it really does work... on most originals. Defect removal may not work on silver-based black-and-white film—compared to the flat dye layers in color film, the non-flat silver grains are perceived as dust by the defect-removal software. Dye-based (chromogenic) black-and-white films, such as Kodak BW400CN, work fine with scanner-based defect removal.
Try turning off any dust or scratch-removal features in the scanning software. Dust and scratch removal is a useful feature in newer scanners, and it really does work... on most originals. Defect removal may not work on silver-based black-and-white film—compared to the flat dye layers in color film, the non-flat silver grains are perceived as dust by the defect-removal software. Dye-based (chromogenic) black-and-white films, such as Kodak BW400CN, work fine with scanner-based defect removal.