THIS THE PART WHERE YOU GET TO PLAY DOCTOR. The image is your patient, of course, and the first thing you do is look over the image and take a few notes on areas that need improvement. Shadows that aren’t black enough, an overall purple cast, some dust specks picked up during the scan or a pimple that showed up on the raw camera file, and so on. Once you’ve got an inventory of ailments to address, you can plan your procedures and the order in which you’ll perform them.
Once you complete your diagnosis, you can place your patient on the operating table, surround it with all kinds of monitoring equipment (such as the Info palette and the Histogram), and whip out your precision tools—like the Smart Sharpen filter and the Healing Brush tool. (We’re sure there are medical doctors out there who wish they had one of those!)
When you’ve got the right Breakthrough tips and tricks, you can cure whatever ails your images. Because there are already 1,000-page Photoshop books out there that show you the long way around (David has even written some of them), we’ve concentrated on the quickest, easiest techniques. Image correction shouldn’t be brain surgery!
![]() When I have a new image in front of me, what should I do first—do some retouching or fix the tone and color?
When I have a new image in front of me, what should I do first—do some retouching or fix the tone and color?
![]() Typically, it’s best to correct tone and color first. It can be easier to spot abnormalities like dust spots if the image generally looks normal. Unlike scans, digital camera images won’t have surface defects, so those images can always go straight to color correction.
Typically, it’s best to correct tone and color first. It can be easier to spot abnormalities like dust spots if the image generally looks normal. Unlike scans, digital camera images won’t have surface defects, so those images can always go straight to color correction.
The important thing is to complete both basic color correction and remove unwanted blemishes (such as pimples and telephone wires) before you start making copies for different media, or moving on to deeper edits. If you ever need to go back to your master image, you don’t want to have to recreate changes you made later in the process. For example, let’s say you crop and resize an image and then remove unwanted telephone wires. Later you realize you need another version of the master image with a different crop. The telephone wires weren’t removed in the master, so you’ll have to remove them again.
Give the image a quick check again after you apply sharpening. Sometimes sharpening brings out blemishes or film scratches that were not visible before.
![]() When I correct my scanned images, I fix any scratches and dust I can find, but later I often notice areas I missed. What’s the best way to inspect an image without missing anything?
When I correct my scanned images, I fix any scratches and dust I can find, but later I often notice areas I missed. What’s the best way to inspect an image without missing anything?
![]() Photoshop power users have a systematic way of carrying out search-and-destroy missions in search of image defects. When the image contains many more pixels than the screen, a popular method is to use keyboard shortcuts to scroll to check the image sector by sector. Here’s how to do it:
Photoshop power users have a systematic way of carrying out search-and-destroy missions in search of image defects. When the image contains many more pixels than the screen, a popular method is to use keyboard shortcuts to scroll to check the image sector by sector. Here’s how to do it:
Click one of the Full Screen mode icons on the toolbar (or press F), and press Tab to hide all the palettes.
Press Command-Option-zero/Ctrl-Alt-zero to jump to Actual Size.
Press the Home key to scroll to the upper left corner of the document. Inspect this portion of the image for defects, and fix them if needed.
Press Command/Ctrl-Page Down to scroll the document one screenful to the right. Inspect this area and fix defects as needed, then scroll another screenful to the right (Figure 4.1).
When you reach the right edge of the document, press Page Down to go down one screenful. Inspect and fix as needed.
On this row, press Command/Ctrl-Page Up to scroll the document one screenful to the left, inspecting and fixing until you reach the left end of the row. Keep moving back and forth, row by row, until you reach the end of the image.
Some defects are easier to see when zoomed in, so you may prefer to perform your inspection at 200% even though covering the image may take longer.
![]() Now wait a minute. I have a laptop, and the keyboard doesn’t seem to have Home, End, Page Up, and Page Down keys. Am I out of luck?
Now wait a minute. I have a laptop, and the keyboard doesn’t seem to have Home, End, Page Up, and Page Down keys. Am I out of luck?
![]() Because laptop keyboards are smaller than desktop keyboards, they often don’t have dedicated Home, End, Page Up and Page Down keys. If you use such a laptop, find out if those keys are accessible through function key combinations. For example, on an Apple PowerBook, Home is printed on the same key as the left arrow, and the left arrow is the default function. To use the Home function of that key, press Fn-Left Arrow.
Because laptop keyboards are smaller than desktop keyboards, they often don’t have dedicated Home, End, Page Up and Page Down keys. If you use such a laptop, find out if those keys are accessible through function key combinations. For example, on an Apple PowerBook, Home is printed on the same key as the left arrow, and the left arrow is the default function. To use the Home function of that key, press Fn-Left Arrow.
![]() There’s a tiny black spot in the same location on a whole bunch of frames I just downloaded from my digital SLR. It looks like I’ll have to hit every frame with the healing brush. Is there a problem with my camera?
There’s a tiny black spot in the same location on a whole bunch of frames I just downloaded from my digital SLR. It looks like I’ll have to hit every frame with the healing brush. Is there a problem with my camera?
![]() It’s possible for dust to affect a digital camera image if it gets into the camera and lands on the image sensor. Dust can enter a digital SLR when you change the lens. If you see the same spot on your photos over and over, your sensor may be dusty. You may be able to locate some dust on the sensor by shooting a bright light source at a small aperture like f/22. While cleaning kits and techniques exist, the sensor is extremely delicate, and you risk causing irreversible damage to the sensor if you make a wrong move. It may be best to have the sensor cleaned by an authorized service center.
It’s possible for dust to affect a digital camera image if it gets into the camera and lands on the image sensor. Dust can enter a digital SLR when you change the lens. If you see the same spot on your photos over and over, your sensor may be dusty. You may be able to locate some dust on the sensor by shooting a bright light source at a small aperture like f/22. While cleaning kits and techniques exist, the sensor is extremely delicate, and you risk causing irreversible damage to the sensor if you make a wrong move. It may be best to have the sensor cleaned by an authorized service center.
![]() Everyone tells me to check the histogram when I’m evaluating image quality, but to me, it’s just a graph. What am I looking for when I view a histogram?
Everyone tells me to check the histogram when I’m evaluating image quality, but to me, it’s just a graph. What am I looking for when I view a histogram?
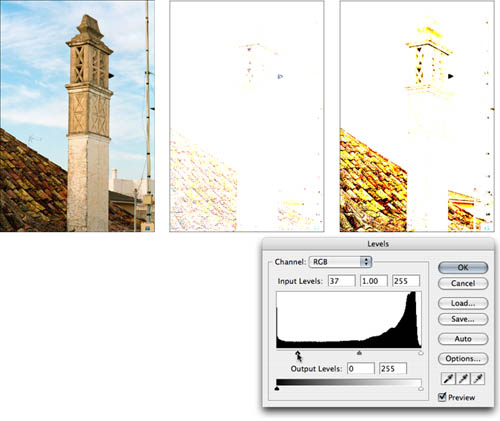
![]() For a typical image, a good histogram shows a full, solid range of tones from black to white. When you evaluate a histogram, you’re keeping an eye out for two things: gaps and clipping (Figure 4.2):
For a typical image, a good histogram shows a full, solid range of tones from black to white. When you evaluate a histogram, you’re keeping an eye out for two things: gaps and clipping (Figure 4.2):
A gap at the left side means no pixels in the image are black. If you want black pixels, adjust the black point in the Levels or Curves dialog box, or the Shadows slider in Camera Raw.
A gap at the right side means nothing in the image is white.
Gaps in the middle mean there are tones where no information exists. Small gaps are rarely a problem, but if there is a regular pattern of gaps, you might see posterization or stair-stepping in the image’s gradations.
If the histogram falls off abruptly at the left or right edge, too many levels may be clipped—you may have lost shadow or highlight detail. Look into this further in the topic “Checking for Clipping.”

Figure 4.2. An image lacking contrast (top) and its histogram (second from top) revealing a lack of any tones in the shadows and highlights; next, an image with proper contrast (third from top) with its histogram (bottom).
Keep in mind that there’s no ideal histogram; it all depends on the image. If you take a picture of a cloudy sky, there won’t be any black in the image, therefore it would be normal to see most of the image’s tones at the right side of the graph.
![]() How can I tell if the shadows or highlights of an image are clipped?
How can I tell if the shadows or highlights of an image are clipped?
![]() These tips can help you locate clipping in Photoshop.
These tips can help you locate clipping in Photoshop.
In the Levels dialog box, press Option/Alt while dragging the black or white Input sliders to see which pixels get clipped at a given level (Figure 4.3).
If you see many levels bunched up against the left or right side of the Histogram palette, check for clipping. Levels at the ends of the histogram don’t necessarily indicate that anything important is clipped, because the clipped levels may be absolute black shadows or white specular highlights.
Adding a Threshold adjustment layer can show which pixels exist at a given level, so that you can note the shadow and highlight levels at which meaningful details are clipped. You can then use those values in the Levels dialog box.
In Camera Raw, enable the Shadow and Highlight checkboxes at the top of the Camera Raw dialog box to display blue pixels if shadows are clipped, or red pixels if highlights are clipped.
![]() What’s the Info palette good for? How can I use its readouts?
What’s the Info palette good for? How can I use its readouts?
![]() The Info palette is like a trusted advisor who constantly whispers valuable guidance into your ear about the current tool, selection, or document. Photoshop CS2 adds even more display options to the Info palette. Maximize the usefulness of the Info palette (Figure 4.4) with these tips:
The Info palette is like a trusted advisor who constantly whispers valuable guidance into your ear about the current tool, selection, or document. Photoshop CS2 adds even more display options to the Info palette. Maximize the usefulness of the Info palette (Figure 4.4) with these tips:
To customize the information displayed in the Info palette, choose Palette Options from the Info palette menu.
The Info palette displays the same list of items as the status bar. This may sound minor, but if the status bar is hidden—such as when you work in full screen mode—it can be a significant advantage to display your favorite status bar items in the Info palette instead.
In the Info Palette Options dialog box, turning on Show Tool Hints displays useful text that typically describes not only what the current tool does, but also extra functions when you also press a modifier key such as Shift. We think it’s a great middle ground between the too-brief tool tips and having to navigate the help file.

![]() What are the most useful filters for removing defects like dust and scratches?
What are the most useful filters for removing defects like dust and scratches?
![]() First of all, if you’re scanning and your scanner has defect-removal features, use them first. Photoshop provides techniques for “painting in” corrections where you want them, preserving the quality of the rest of the image (we cover those in the section “Making Local Corrections,” later in this chapter). However, if an image has small defects throughout the whole image, you may want to use a Photoshop filter for defect removal. The best ones are on the Filter > Noise submenu (Figure 4.5):
First of all, if you’re scanning and your scanner has defect-removal features, use them first. Photoshop provides techniques for “painting in” corrections where you want them, preserving the quality of the rest of the image (we cover those in the section “Making Local Corrections,” later in this chapter). However, if an image has small defects throughout the whole image, you may want to use a Photoshop filter for defect removal. The best ones are on the Filter > Noise submenu (Figure 4.5):
Despeckle applies a quick blur and can be useful for some types of noise. However, it isn’t adjustable.
Dust & Scratches is a step up from Despeckle, because it provides controls. Dust & Scratches looks for defects based on their size (controlled by the Radius option) and the amount of difference between their tone and color and the surroundings (controlled by Radius). Start with low values and increase them, but back off when the image starts to lose actual detail.
Median isn’t adjustable because it simply assigns a pixel the median value of the pixels of similar brightness surrounding it. As you might remember from math class, the median is not the average value; it’s halfway between the minimum and maximum. This method tends to locate and then de-emphasize pixels that are significantly brighter or darker than their surroundings, which is how defects often appear.
Reduce Noise is the newest and most sophisticated filter in this group. We cover it in the topic “Don’t Bring the Noise”. Like the filter name says, Reduce Noise is optimized for locating and reducing digital camera noise, so if you want to remove film grain from print or film scans, you may want to try a plug-in such as Grain Surgery by Visual Infinity (www.visinf.com). Reduce Noise isn’t designed for removing dust and scratches, either.
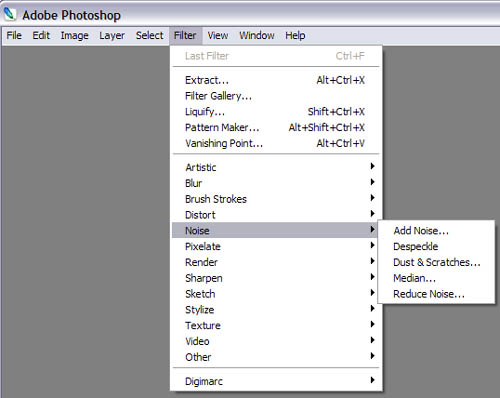
Figure 4.5. The Filter > Noise submenu contains filters that can be useful for minimizing noise and surface defects.
Most defect removal filters share an important limitation: It’s hard for software to tell the difference between details and defects. Just when you think you’ve applied a filter at sufficient strength to wipe out dust or noise, you notice that you’re losing important details like stone textures or blades of grass.
![]() What’s the fastest way to color-correct an image?
What’s the fastest way to color-correct an image?
![]() The Auto Color command in Photoshop can be a quick and convenient way to correct images that should have a fairly typical color balance—particularly if you quickly become lost when making manual Levels and Curves adjustments. But avoid choosing the Auto Color command from the Image menu’s Adjustments sub-menu. Instead, you can control this feature more precisely through the Levels dialog box (Figure 4.6). Thanks to Bruce Fraser for showing us this cool technique.
The Auto Color command in Photoshop can be a quick and convenient way to correct images that should have a fairly typical color balance—particularly if you quickly become lost when making manual Levels and Curves adjustments. But avoid choosing the Auto Color command from the Image menu’s Adjustments sub-menu. Instead, you can control this feature more precisely through the Levels dialog box (Figure 4.6). Thanks to Bruce Fraser for showing us this cool technique.
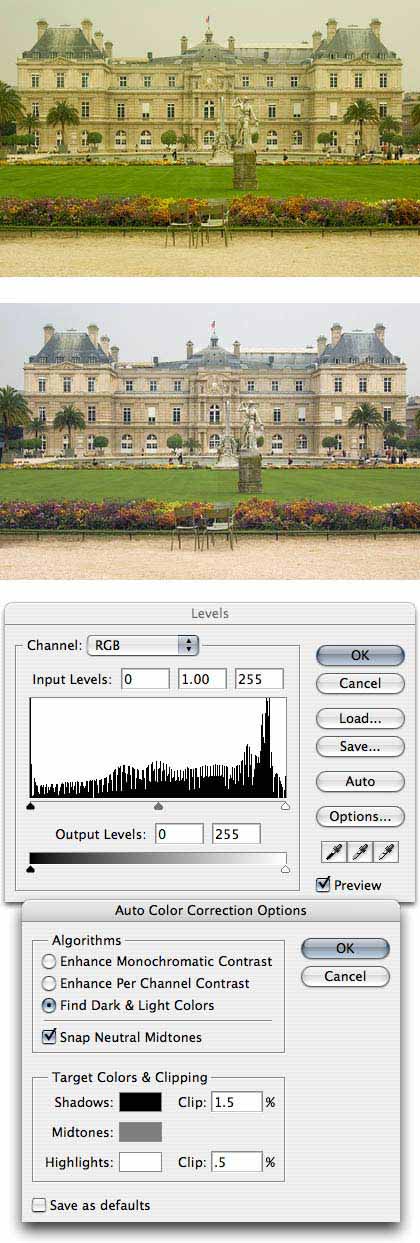
Figure 4.6. Original image (top), fixed version (second from top), and the Auto Color Correction Options that neutralized the color cast. You can monitor the Levels histogram as you adjust the options.
Create a new Levels adjustment layer.
Click the Options button in the Levels dialog box.
In the Auto Color Correction Options dialog box, select the Find Dark & Light Colors and Snap Neutral Midtones options. If the image doesn’t look right, try other Algorithm options. Turning off Snap Neutral Midtones may improve the image if there aren’t any neutral gray tones in the image.
Fine-tune the Clipping values. Default clipping values should be set to between 0 and 0.5% as a starting point. Then you can move up from there in small increments by pressing the up arrow and down arrow keys on the keyboard. Back off when the image starts to lose highlight or shadow detail. As an alternative, you can click the Shadow and Highlight boxes to set their target values with eyedroppers. If the adjustments you’ve made so far have not corrected the color balance, click the Midtones swatch and adjust the values; equal values in all three RGB channels neutralize a typical image.
Click OK. Photoshop might ask you if you want to save the current settings as the defaults. You can do so if you’re going to work on more images that will need similar corrections. It’s a good idea to save defaults that have Find Dark & Light colors selected and Snap Neutral Midtones turned on, because you’re going to want those options to be on for most images.
Using Auto Color may not take care of every color problem, but if neutral shadows, midtones, and highlights existed in the original subject of the image, Auto Color can quickly give you a huge head start compared to using other methods. And because you applied this using an adjustment layer, you can always remove it or tweak it without degrading the image further.
The Curves Dialog Box in Five Minutes or Less
The Curves dialog box is intimidating at first, but mastering Curves is the key to many advanced techniques. To help you get there, we put together this cheat sheet to help you figure out which way is up in the Curves dialog box.
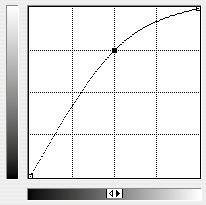
At the bottom of the Curves dialog box is a gradient that tells you which side is white and which side is black. You can switch the orientation of black and white by clicking the gradient. All of the tips below show the RGB curve where white is on the right by default.
The default curve is a 45-degree line because which indicates that no changes have been made (all of the output values equal all of the input values). When you steepen a segment of the curve above a 45-degree angle, you add contrast. Combine that knowledge with the figures on this page, and you’ll know which way to drag points in the Curves dialog box.
It’s useful to know that the Levels and Curves dialog boxes do the same thing; the main difference is that Curves gives you more control points to work with so that you can make more subtle changes. The Curves dialog box doesn’t offer the histogram that’s included in the Levels dialog box, but that’s easy to address: simply leave the Histogram palette open and in view as you work in the Curves dialog box.

The default Curves dialog box for an RGB image. The 45-degree angle of the curve shows that no changes have been made. You can adjust the curve for each of the RGB color channels by selecting a channel from the Channel popup menu at the top of the dialog box. A grayscale image has only one channel, while a CMYK image has four.
To brighten a tone in an image, click a point (usually a midpoint) and drag it up. Drag the point down if you want to darken that tone.
You can add a point for any exact tone in an image: While the Curves dialog box is open, Command/Ctrl-click the image to add a point on the curve precisely at that tone. Then drag the point around.

Where the curve rises more than 45 degrees, contrast goes up. This is a classic S-curve that increases contrast in midtones, but that means the highlights and shadows lose some contrast.

The curve above does the same thing as the positions of the Levels sliders on the right. The settings clip the shadows and highlights significantly.

The curve above limits the final shadow and highlight values, just like the Levels sliders on the right.
This curve is the opposite of the one on the left. It decreases contrast in the midtones, and increases it in the shadows and highlights.
![]() What can I do when most of the important tones in an image are in the very light and very dark areas? Any move I make in Levels or Curves either blows out the highlights, plugs up the shadows, or flattens the midtones.
What can I do when most of the important tones in an image are in the very light and very dark areas? Any move I make in Levels or Curves either blows out the highlights, plugs up the shadows, or flattens the midtones.
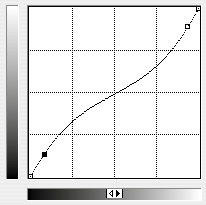
![]() Some images have detail across such a large dynamic range that it’s time-consuming or difficult to make both the shadows and the highlights look good using Levels and Curves. The Shadow/Highlight command uses advanced blending techniques that can’t be duplicated using Levels or Curves alone, and Shadow/Highlight can often get you where you want in one step:
Some images have detail across such a large dynamic range that it’s time-consuming or difficult to make both the shadows and the highlights look good using Levels and Curves. The Shadow/Highlight command uses advanced blending techniques that can’t be duplicated using Levels or Curves alone, and Shadow/Highlight can often get you where you want in one step:
Choose Image > Adjustments > Shadow/Highlight (Figure 4.7).
If there’s detail in the shadows that you want to lighten, increase the Shadow value. While the dialog box defaults to 50, for many images we recommend starting at a low value like 5. Many digital cameras and scanners are noisy in the shadows, and pushing shadows too far can emphasize existing noise.
If there’s detail in the highlights that you want to darken, increase the Highlights value.
If the changes to the shadows and highlights are good, but midtones are now flat, enable the Show More Options checkbox and increase the Midtone Contrast value.
![]() I’m a little confused about blending modes. There’s a long list of them and they’re everywhere—in palettes, dialog boxes, and the Options bar—yet I still don’t know why most of them exist. Got an answer for that?
I’m a little confused about blending modes. There’s a long list of them and they’re everywhere—in palettes, dialog boxes, and the Options bar—yet I still don’t know why most of them exist. Got an answer for that?
![]() Blending modes can be hard to understand because their effect depends on the layers you apply them to. If you try them out, it’s obvious that they can radically alter the appearance of an image in “cool” ways, but they can appear to be unpredictable and their practical uses aren’t apparent at first.
Blending modes can be hard to understand because their effect depends on the layers you apply them to. If you try them out, it’s obvious that they can radically alter the appearance of an image in “cool” ways, but they can appear to be unpredictable and their practical uses aren’t apparent at first.
It can help to understand how a blending mode works. To use a blending mode, you need at least two layers. You apply the blending mode to any layer other than the bottom layer. The blending mode compares a pixel on the upper layer to a pixel on the lower (base) layer, and applies some math to the color or tone values of both pixels. Sometimes the math is as easy as adding, subtracting, multiplying, or dividing. For RGB images, pixels get lighter when the pixel values increase, and get darker when the pixel values decrease, and that’s how the blending mode affects the appearance of the image. Color changes result when the math changes the values in each color channel.
Tip
Blending modes are most prominent in the Layers palette, but are also available for painting tools, some filters, and for some commands that combine layers or images. You can use blending modes in different parts of Photoshop simultaneously; for example, it’s possible to paint with the Brush tool in Screen mode on a layer that’s set to Multiply mode. However, note that you may temporarily go insane.
We can tell that you’re already recoiling from this page because we used the word “math”. Relax... it’s possible to understand blending modes without touching any numbers at all. Use the sidebar “Blending Modes: Justify Your Existence,” on the next page, to help figure out if a blending mode can help solve a problem for you.
![]() Is there a way to change blending modes using the keyboard?
Is there a way to change blending modes using the keyboard?
![]() If you’re not sure which blending mode to use, you can quickly cycle through every one of them using keyboard shortcuts. Press Shift-+ (plus sign) to apply the next blending mode in the blending mode popup menu, or Shift-– (minus sign) to apply the previous blending mode. Every blending mode also has its own direct shortcut—such as Option/Alt-Shift-S for Screen or Option/Alt-Shift-M for Multiply. To learn them all, open Photoshop Help and search for “blending mode keys”.
If you’re not sure which blending mode to use, you can quickly cycle through every one of them using keyboard shortcuts. Press Shift-+ (plus sign) to apply the next blending mode in the blending mode popup menu, or Shift-– (minus sign) to apply the previous blending mode. Every blending mode also has its own direct shortcut—such as Option/Alt-Shift-S for Screen or Option/Alt-Shift-M for Multiply. To learn them all, open Photoshop Help and search for “blending mode keys”.
Blending Modes: Justify Your Existence
The differences between blend modes in Photoshop often come down to variations in color intensity and contrast. The modes are divided into groups, marked by dividing lines in the blend mode popup menu you see throughout the program.
Normal and Dissolve
Normal mode simply displays applied colors, unchanged, over the base layer. Layers behind the applied colors show through transparent pixels on that layer. Dissolve expresses transparency using a random dither pattern.
Modes that Lighten
Lighten, Screen, Color Dodge, and Linear Dodge lighten image areas. No part of the base image becomes darker, and black is the neutral color for these modes—black areas don’t change the underlying color. When experimenting, start with Lighten and Screen. Lighten compares the applied and base pixels and keeps the lighter pixel. Screen produces a more intense version of Lighten because it multiplies the inverse of the two pixels’ color values. Color Dodge colorizes lighter base pixels with the applied color; darker base pixels don’t change as much. If Color Dodge is too extreme, try Linear Dodge, which is a lower-contrast version of Color Dodge.

The upper (applied) and lower (base) layers used in the examples. Watch what happens to white, black, 50% gray, color, and the semi-transparent circle in the lower right corner of the top layer.

Modes that Darken
Darken, Multiply, Color Burn, and Linear Burn modes darken image areas. This mode group has the opposite effect of the modes that lighten. For example, Color Dodge colorizes lighter base pixels with the applied color, while Color Burn colorizes darker base pixels. The neutral color for these modes is white, not black.
Difference and Exclusion modes amplify differences between applied and base color values. The bigger the difference, the more intense the color. Exclusion is a lower-contrast version. You get a neutral result (black) if the applied and base pixels are identical.
Light Source Modes
Overlay, Soft Light, Hard Light, Vivid Light, Linear Light, and Pin Light modes alter color based on whether the applied or base pixels are lighter or darker than 50 percent gray—the neutral color for these modes. The main differences among these modes have to do with the amount of contrast they produce. Overlay and Soft Light are frequently used because they’re the least extreme modes in this group.
Color Component Modes
Hue, Saturation, Color, and Luminosity transfer specific color components of the applied pixel to the base pixel. Hue replaces the base color’s hue with the applied color’s hue, but preserves the base color’s lightness and saturation. Saturation replaces the base color’s saturation without affecting its hue and lightness. Color replaces the base color’s hue and saturation without affecting lightness. Luminosity replaces the base color’s lightness without affecting hue and saturation.
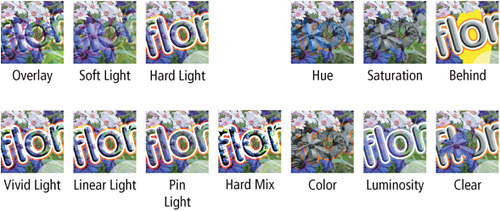
Painting Modes
You only see the Behind and Clear modes in the blending modes popup menu when you use painting tools.
The Behind mode creates the illusion of painting the applied color behind the base color, by painting only the transparent pixels on a layer. Clear let you “paint transparency”. Any pixels it touches become clear, revealing any layers behind. For these modes to work, Lock Transparency must be turned off in the Layers palette. The Replace mode is used only by the Healing Brush tool, to help preserve details like texture and grain.
In the Behind and Clear examples below, we painted the top layer with the Brush tool and a yellow color.
![]() I usually do touch up with the clone stamp tool, but Photoshop keeps adding more touch-up tools. When’s the best time to use the Clone Stamp tool versus the other, newer healing tools?
I usually do touch up with the clone stamp tool, but Photoshop keeps adding more touch-up tools. When’s the best time to use the Clone Stamp tool versus the other, newer healing tools?
![]() The pattern we’ve observed is that each new touch-up tool the Photoshop team adds has a bit more smarts than the older tools.
The pattern we’ve observed is that each new touch-up tool the Photoshop team adds has a bit more smarts than the older tools.
The Clone Stamp tool is the oldest and most literal of the touch-up tools. You Option/Alt-click to set a source point on the image and then click or drag to paint a copy of the source point. This direct cloning makes no attempt to adjust the clone to the new area, so you have to set your source point carefully.
For isolated defects like a dust speck, click or drag the Spot Healing Brush. For example, if you click the Spot Healing Brush on a dust speck, it tries to fill the spot you clicked with whatever surrounds it (Figure 4.8). If the surrounding area is uniform like a sky, this works great. If not, the results may not match properly.

Figure 4.8. Original image (top left), blue spot removed by clicking with Spot Healing Brush tool (highlighted top right), and crack repaired with Clone Stamp tool (highlighted bottom right).
When the Spot Healing Brush doesn’t do the job, move on to the Healing Brush tool. Like the Clone Stamp tool, you Option/Alt-click to define the source point and then click or drag to paint over the defect. Unlike the Clone Stamp tool, the Healing Brush tool attempts to blend the source and the destination. The Spot Healing Brush and Healing Brush tools are often best for removing skin blemishes.
The Patch Tool is like the Healing Brush except it works with selected areas instead of brush strokes. You draw a selection with the Patch tool and drag the selection to another area. The Patch Tool can work in one of two directions. If Destination is selected in the Options bar for the Patch tool, the selection you drag patches the location you drag it to. If Source is selected in the Options bar, the selection you drag picks up the area you drag to and uses it to patch the original selection location.
Tip
If you have a scroll wheel mouse, you can use the scroll wheel to move up and down in a document. Want to go left and right? Press Command/Ctrl as you turn the scroll wheel. If your scroll wheel zooms instead, press Option/Alt to scroll. Scrolling vs. zooming is controlled by the Zoom with Scroll Wheel preference in the General Preferences dialog box; pressing Option/Alt temporarily switches to the other behavior.
![]() I sometimes try to control where a filter is applied by selecting an area first, but it doesn’t always match up with the surroundings very well. How can I make a filtered area blend into its surroundings more seamlessly?
I sometimes try to control where a filter is applied by selecting an area first, but it doesn’t always match up with the surroundings very well. How can I make a filtered area blend into its surroundings more seamlessly?
![]() Selections are certainly a quick, easy way to limit a filter, although not quite as reversible as using a layer mask. These tips can help you get exactly the selection you need:
Selections are certainly a quick, easy way to limit a filter, although not quite as reversible as using a layer mask. These tips can help you get exactly the selection you need:
After you make your selection, choose Select > Feather to blur the selection edge. This helps to avoid an obvious visual break where the filtered area meets the original (non-selected) area.
If the result of a filter significantly changes the overall texture of the selection, the filtered selection will no longer match its surroundings. If this happens, right after applying the filter choose Edit > Fade with its Preview option on and see if you can reduce the opacity to a point where defect removal is balanced with maintaining a match with the surroundings. Don’t forget to try the modes in the Fade dialog box; start with the Luminosity mode.
If you’re not handy with the lasso tool, you can make selections by painting over defects in Quick Mask mode. See “Edit a Selection as a Quick Mask” in Chapter 3, Image Editing Basics.
![]() I’ve played with the Dodge and Burn tools, but they seem hard to control. Is there a better way to lighten and darken specific areas of an image?
I’ve played with the Dodge and Burn tools, but they seem hard to control. Is there a better way to lighten and darken specific areas of an image?
![]() The Dodge and Burn tools in Photoshop are like the proverbial crazy aunt—they’re there, but we prefer not to talk about them. Why? Because they’re hard to control, difficult or impossible to reverse later, and they make it a little too easy to overwork an image.
The Dodge and Burn tools in Photoshop are like the proverbial crazy aunt—they’re there, but we prefer not to talk about them. Why? Because they’re hard to control, difficult or impossible to reverse later, and they make it a little too easy to overwork an image.
Instead, you can apply reversible and precisely adjustable dodging and burning with a new layer filled with 50-percent gray, then painting with white or black to dodge and burn, respectively. This technique is made possible by the Overlay blending mode (Figure 4.9).

Figure 4.9. Original image (top left); setting up the new layer (left); painting over the walkway with black and painting over the mossy rock with white on the Dodge & Burn layer (top right).
Option/Alt-click the Create a New Layer button in the Layers palette.
In the New Layer dialog box, choose Overlay from the Mode popup menu, and also turn on the Fill with Overlay—neutral color (50% gray) checkbox. This automatically fills the layer with the layer color that doesn’t alter the image in this mode.
Enter a layer name (such as “Dodging and Burning”) and click OK.
Now, in the Tool palette, select the Brush tool.
Click the Default Foreground and Background Colors icon, or just press the D key which does the same thing.
Paint on your new Overlay layer. To dodge an area, paint it with white. To burn an area, paint it with black. To restore the original image levels to an area, paint it with 50-percent gray.
If the effect is too strong or hard-edged, use the Options bar to reduce brush opacity, and use the Brushes palette to adjust the brush Hardness and Shape. Press X to switch between the foreground and background colors.
![]() What are layer masks good for? They seem somewhat complex to use, so I’m not sure if I want to learn about them.
What are layer masks good for? They seem somewhat complex to use, so I’m not sure if I want to learn about them.
![]() Layer masks have two great advantages. First, they make it easy to apply changes to very specific areas of a layer. Second, they make it easy to reverse any changes you later don’t like. You can restore all of the layer’s original appearance, even if you’re unable to do so in the History palette. The disadvantage of layer masks is that they consume quite a bit of disk space and memory, because the document has to carry around that extra layer and layer mask. Here’s one way to use layer masks (Figure 4.10):
Layer masks have two great advantages. First, they make it easy to apply changes to very specific areas of a layer. Second, they make it easy to reverse any changes you later don’t like. You can restore all of the layer’s original appearance, even if you’re unable to do so in the History palette. The disadvantage of layer masks is that they consume quite a bit of disk space and memory, because the document has to carry around that extra layer and layer mask. Here’s one way to use layer masks (Figure 4.10):
Apply the correction on a separate layer. Use an adjustment layer if possible. If not (for example, you’re applying a filter), duplicate the original layer and apply the change to the duplicate.
With the new, edited layer selected, Option/Alt-click the Add Layer Mask button in the Layers palette. This adds a layer mask filled with black; the filtered layer will seem to go away but don’t be alarmed about that. The black layer mask has simply made the entire duplicate layer transparent.
Select the Brush Tool and set the foreground color to white.
Zoom into an area where you want the change to be visible.
With the layer mask active in the Layers palette, paint the area where you want the change to be visible. Painting white on the layer mask makes that portion of the layer opaque, revealing the edited pixels on the duplicate layer.
To reverse corrections at any time, set the foreground to black.
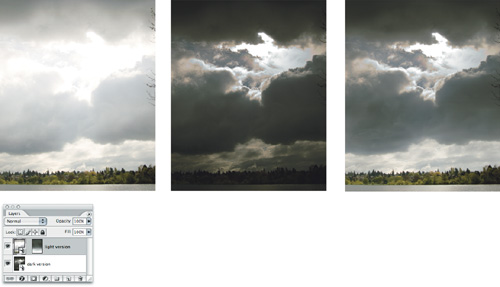
Figure 4.10. Camera raw file converted to show shadow detail (top left), and a second conversion added to the same file, showing highlight detail (center) placed on a lower layer. We added a layer mask to the upper layer (left), then applied a simple gradient and other touch-up brushwork in the layer mask to merge the best of both images.
![]() I’m not really into planning ahead with layers and masks—it doesn’t fit my creative style. Is there a less structured way to apply filters interactively, maybe with a brush?
I’m not really into planning ahead with layers and masks—it doesn’t fit my creative style. Is there a less structured way to apply filters interactively, maybe with a brush?
![]() A popular and very interactive technique involves time travel: painting between two history states in the History palette. You apply the filter, back up one history state (undo), and then use the History Brush and the History palette to paint back the filtered version in only the areas you want to fix. Here’s how (Figure 4.11):
A popular and very interactive technique involves time travel: painting between two history states in the History palette. You apply the filter, back up one history state (undo), and then use the History Brush and the History palette to paint back the filtered version in only the areas you want to fix. Here’s how (Figure 4.11):
Apply an edit (like a filter or tonal change) at the maximum strength you want in the image.
In the History palette, click on the state one step back (the one just before applying the filter).
Click in the column to the left of the history state for the edit you applied. This sets the source state of the History Brush tool.
In the document window, paint with the History Brush to apply the corrections only in the areas where they’re needed.

Figure 4.11. Original (left). Smart Sharpen was applied using settings perfect for the lighthouse (center) but otherwise too strong. By moving back a History step and setting the History Brush source to the Smart Sharpen state (right), the sharpened version could be painted on just the lighthouse using the History Brush.
When painting in corrections with the History brush or a layer mask, use brush options for finer control. For example, reduce the Opacity in the Options bar to allow more gradual application of the brush. If you use a pressure-sensitive stylus, you may also be able to control brushstroke opacity and width through stylus pressure, depending on the settings in the Brushes palette.
![]() Sometimes when I apply a filter or sharpen, I notice color fringing or color shifts. How can I avoid these?
Sometimes when I apply a filter or sharpen, I notice color fringing or color shifts. How can I avoid these?
![]() Image processing can sometimes introduce color artifacts or distortion, which you might not want if you’re trying to keep an image looking realistic. To avoid causing color problems, try these tips:
Image processing can sometimes introduce color artifacts or distortion, which you might not want if you’re trying to keep an image looking realistic. To avoid causing color problems, try these tips:
Always start from a color-balanced image. If you manipulate an image before you’ve color-balanced it, image manipulations can exaggerate any unresolved imbalances in the image and make them harder to correct.
Use the Fade command. If an effect creates unwanted color artifacts, choose Edit > Fade immediately after applying the effect, then choose Luminosity from the Mode popup menu. Luminosity applies the effect by changing only the brightness of pixels, not their colors. Because the colors are left alone, they don’t go out of control. If you don’t want to completely apply the results of the effect, lower the Fade percentage.
Tip
People often ask for “filter layers” in Photoshop—layers that apply but which can be made visible or hidden at will. While Photoshop doesn’t yet offer this, you can simulate it by duplicating a layer and applying a filter to it. Or hold down the Option/Alt key while selecting Layer > Merge Visible to create a new layer that merges all the visible layers in your document.
Convert to LAB color mode and edit in the L channel only. The LAB color mode separates lightness from color. If you apply an effect or other change to just the L (lightness) channel, the change won’t affect the red-green (A) and blue-yellow (B) channels, leaving the image colors alone. when you’re done, you’ll probably need to convert the image back to RGB or CMYK for your final output. This is a pain, so we’d rather just use the Luminosity fade mode.
![]() I’ve used a third-party plug-in to reduce digital camera noise. I see that Photoshop CS2 has a Reduce Noise filter. Is this a reasonable alternative to third-party noise filters?
I’ve used a third-party plug-in to reduce digital camera noise. I see that Photoshop CS2 has a Reduce Noise filter. Is this a reasonable alternative to third-party noise filters?
![]() The new Reduce Noise command (Filter > Noise > Reduce Noise) in Photoshop CS2 is designed to help minimize noise in digital camera images. Reduce Noise tries to identify typical noise patterns so that it can isolate and remove them. Film grain is different than digital noise, so if it’s grain you want to remove, you’ll probably get better results using a plug-in such as Grain Surgery (visinf.com). Here are some tips that can help you get the most out of the Reduce Noise filter (Figure 4.12).
The new Reduce Noise command (Filter > Noise > Reduce Noise) in Photoshop CS2 is designed to help minimize noise in digital camera images. Reduce Noise tries to identify typical noise patterns so that it can isolate and remove them. Film grain is different than digital noise, so if it’s grain you want to remove, you’ll probably get better results using a plug-in such as Grain Surgery (visinf.com). Here are some tips that can help you get the most out of the Reduce Noise filter (Figure 4.12).
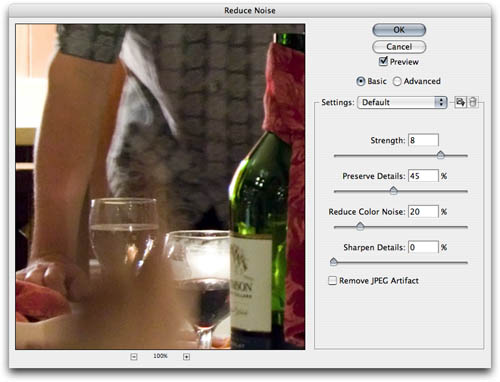
Figure 4.12. The Reduce Noise filter can minimize both noise in image brightness and noise in color channels. It’s especially useful for photos taken with digital cameras at high ISO settings.
Make basic tone and color corrections before you apply Reduce Noise.
When you turn up the settings, aim to reduce noise as much as possible without obscuring actual details in the image. Use the Preview checkbox to watch how the filter affects the image as a whole.
As you increase the Reduce Color Noise value, watch out for color shifts in highlights—especially a decrease in saturation. Lower the value if you start to see color shifts.
If you have trouble working out the right settings, click the Advanced radio button and click the Per Channel tab to see if the noise is particularly pronounced in one channel or another (the blue channel is usually the worst). After you take care of a particularly noisy channel, the remaining noise may be easier for you to fix.
Applying noise reduction may soften the image a little, but you can try gently applying Smart Sharpen after Reduce Noise. Compare the History Palette states before applying Reduce Noise and after applying Smart Sharpen to make sure your Smart Sharpen settings aren’t too strong. If you apply sharpening too strongly after noise reduction, you may end up recreating the noise.
![]() Some of the commands on the Image > Adjustments submenu are repeated on the Layer > New Adjustment Layer submenu. Which should I use?
Some of the commands on the Image > Adjustments submenu are repeated on the Layer > New Adjustment Layer submenu. Which should I use?
![]() The commands on the Image > Adjustments submenu are ordinary commands. Once you apply them, they permanently alter the image. The commands on the Layer > New Adjustment Layer submenu are only adjustment layers—they keep corrections on a separate layer so that you can edit, turn off, or remove them at any time without altering the original image (Figure 4.13). The changes you make with an adjustment layer aren’t actually applied until printing or exporting, or when you flatten the image’s layers.
The commands on the Image > Adjustments submenu are ordinary commands. Once you apply them, they permanently alter the image. The commands on the Layer > New Adjustment Layer submenu are only adjustment layers—they keep corrections on a separate layer so that you can edit, turn off, or remove them at any time without altering the original image (Figure 4.13). The changes you make with an adjustment layer aren’t actually applied until printing or exporting, or when you flatten the image’s layers.
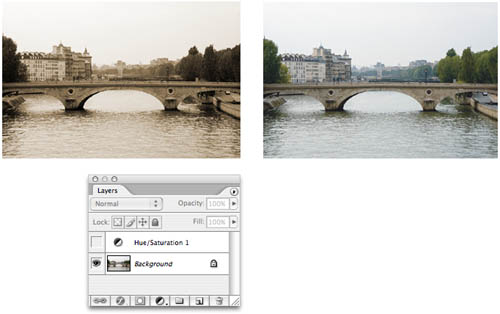
Figure 4.13. An image with an adjustment layer that applies sepia-tone colorization (top, left), and the original version restored simply by turning off the adjustment layer (left, and top right).
Adjustment layers have another advantage: unlimited undo. While Photoshop has multiple undo, it’s limited by the number of history states you’ve allowed in the History palette, and you can’t recover undo steps after you’ve closed a document. But with an adjustment layer, you can change the adjustment at any time, even weeks later. You can even keep multiple versions of adjustments in the same file and turn them on or off as needed; for example, in one image you could store different tone and color correction adjustment layers for the various printers and papers you use.
If you have a choice between applying an adjustment as a regular command or as an adjustment layer, it’s typically best to apply the change as an adjustment layer.
![]() If adjustment layers are so great, and the Shadow/Highlight command is so useful, why isn’t Shadow/Highlight an adjustment layer?
If adjustment layers are so great, and the Shadow/Highlight command is so useful, why isn’t Shadow/Highlight an adjustment layer?
![]() The Shadow/Highlight command is so effective and useful that Adobe gets this question a lot. The reason Shadow/Highlight isn’t an adjustment layer is that it would cause long delays in screen updates. An adjustment layer compares a pixel on the adjustment layer to the same pixel on the layer(s) behind it. However, Shadow/Highlight compares a layer’s pixel to the pixels around it—it’s really more like a filter in this way. The amount of calculation involved if Shadow/Highlight were an adjustment layer would slow down screen redraw, even with just a small number of layers.
The Shadow/Highlight command is so effective and useful that Adobe gets this question a lot. The reason Shadow/Highlight isn’t an adjustment layer is that it would cause long delays in screen updates. An adjustment layer compares a pixel on the adjustment layer to the same pixel on the layer(s) behind it. However, Shadow/Highlight compares a layer’s pixel to the pixels around it—it’s really more like a filter in this way. The amount of calculation involved if Shadow/Highlight were an adjustment layer would slow down screen redraw, even with just a small number of layers.
Until computers become a lot faster, if you want a little more flexibility with Shadow/Highlight you can apply the command to a duplicate layer.
![]() I perfected corrections to an image. Yay! But now I want to apply those same corrections to a bunch of other images without starting from scratch. How can I do that?
I perfected corrections to an image. Yay! But now I want to apply those same corrections to a bunch of other images without starting from scratch. How can I do that?
![]() If you apply corrections using adjustment layers, you can save time by correcting one image and then transferring the corrections to any number of other images.
If you apply corrections using adjustment layers, you can save time by correcting one image and then transferring the corrections to any number of other images.
Open an image that’s representative of the set you want to correct.
Create a new adjustment layer for the correction you want to apply. You can use the Create New Fill or Adjustment Layer button in the Layers palette, or choose an adjustment from the Layer > New Adjustment Layer submenu.
Make the adjustment and click OK.
Open another image, and choose Window > Arrange > Tile Horizontally or Tile Vertically.
Drag the adjustment layer from the Layers palette in the first document and drop it on the second (Figure 4.14).

![]() What if I want to apply the same adjustment layer to a large numbers of images automatically? I sure don’t want to process 100 images by hand!
What if I want to apply the same adjustment layer to a large numbers of images automatically? I sure don’t want to process 100 images by hand!
![]() You can’t automate dragging adjustment layers to other documents, but there is another way. When you’re happy with the settings in an adjustment dialog box (such as Curves), click the Save button in the adjustment dialog box, and save the corrections to a file on disk. Then record an action that adds a new adjustment layer of the same type and loads the file you just saved. You can now use the File > Automate > Batch command to run that action on as many images as you want.
You can’t automate dragging adjustment layers to other documents, but there is another way. When you’re happy with the settings in an adjustment dialog box (such as Curves), click the Save button in the adjustment dialog box, and save the corrections to a file on disk. Then record an action that adds a new adjustment layer of the same type and loads the file you just saved. You can now use the File > Automate > Batch command to run that action on as many images as you want.
Tip
If you’re working on Camera Raw images, transferring settings among images is even easier. In Adobe Bridge, you can copy and paste settings from one Raw image to any number of others by using the commands Edit > Apply Camera Raw Settings > Copy Camera Raw Settings or Paste Camera Raw Settings. In Camera Raw itself, you can use the Synchronize button if you opened multiple images.
![]() I’d like to save some adjustment layers as files for future use, but I can’t seem to find a way to delete everything but the adjustment layer. What am I missing?
I’d like to save some adjustment layers as files for future use, but I can’t seem to find a way to delete everything but the adjustment layer. What am I missing?
![]() You’re not really missing anything. You can’t store an adjustment layer alone in its own file—Photoshop wants a background or at least one layer in the document. However, you can create a Photoshop document with a small image size and store as many adjustment layers in it as you want. However, if you want to store adjustment layers with masks, you’ll need to store them in a Photoshop document with a big enough image size to accommodate the size of the largest mask.
You’re not really missing anything. You can’t store an adjustment layer alone in its own file—Photoshop wants a background or at least one layer in the document. However, you can create a Photoshop document with a small image size and store as many adjustment layers in it as you want. However, if you want to store adjustment layers with masks, you’ll need to store them in a Photoshop document with a big enough image size to accommodate the size of the largest mask.
Note that the Save button in an adjustment layer dialog box only saves the settings inside the dialog box. The Save button can’t save layer options such as opacity, blending mode, or masks.
![]() I always get clients who send me web images that they want in their print jobs. When I ask for a higher-resolution version, they either tell me that the one on the web site looks sharp enough to them, or they don’t know where the higher-resolution versions are. Is it possible to make web images look good in print?
I always get clients who send me web images that they want in their print jobs. When I ask for a higher-resolution version, they either tell me that the one on the web site looks sharp enough to them, or they don’t know where the higher-resolution versions are. Is it possible to make web images look good in print?
![]() When you are forced to prepare low-resolution images for high-resolution output, use the following tips to try to rescue them. Not all of the tips work in all cases, and these tips will never make a low-resolution image look as good as an image at the proper resolution, size, and color depth. But if these tips keep your project going, they can be well worth the effort.
When you are forced to prepare low-resolution images for high-resolution output, use the following tips to try to rescue them. Not all of the tips work in all cases, and these tips will never make a low-resolution image look as good as an image at the proper resolution, size, and color depth. But if these tips keep your project going, they can be well worth the effort.
If you were given a GIF, convert it from Indexed Color to RGB (Image > Mode > RGB Color). Once a GIF image is in 8-bit RGB mode, you can easily resample and apply all kinds of filters and effects that aren’t available in Indexed Color mode. Many of the following tips won’t work unless the image uses at least 8 bits per channel.
Apply noise reduction (Filter > Noise > Reduce Noise). If the image contains dithering, Reduce Noise may help smooth it out. For low-resolution images, start with Strength set to 10 and Preserve Details and Sharpen Details both set to 0. For JPEG images, try selecting the Remove JPEG Artifact box. You can also try the Despeckle or Median filters.
Resample to print resolution. Choose Image > Image Size, select the Resample Image box, and enter the final dimensions you want.
Apply Smart Sharpen (Filter > Sharpen > Smart Sharpen). Start with an Amount of 100% and a Radius of 1 pixel, and find a combination that makes the image crisper without bringing back the original pixelation.
If photorealism isn’t required, try resampling to print resolution and then applying a creative filter to it, such as Filter > Distort > Diffuse Glow, or Filter > Noise > Add Noise. Applying a filter at the new, higher resolution can help hide the evidence of resizing.
Instead of printing the image as a normal halftone, consider printing it using a diffusion dither or stochastic screening (also called FM screening). Stochastic screening usually requires much less resolution than a normal halftone. To print with this method, you’ll likely need a special utility (such as Isis Imaging’s Icefields), or a special setting on the imagesetter’s RIP.
![]() Is there any way to save history states with a document?
Is there any way to save history states with a document?
![]() One of the few shortcomings in the very powerful History palette is that you lose all of your history states when you close the document. In earlier versions of Photoshop, there was nothing you could do about that. In Photoshop CS, Adobe added a preference for keeping a history log you can review at any time. You can study how an image got to its current state, particularly with features that involve numerical settings. It’s a great way to look up what values you entered into a filter you applied, for example.
One of the few shortcomings in the very powerful History palette is that you lose all of your history states when you close the document. In earlier versions of Photoshop, there was nothing you could do about that. In Photoshop CS, Adobe added a preference for keeping a history log you can review at any time. You can study how an image got to its current state, particularly with features that involve numerical settings. It’s a great way to look up what values you entered into a filter you applied, for example.
You’ll find the History Log preferences in the General panel of the Preferences dialog box (Figure 4.15). You can save the history log to the document’s metadata, to a separate text file, or both. If you store the history log in metadata, you can read it in the Edit History panel in Adobe Bridge when the document is selected. You can also inspect the same history log by choosing File > File Info and clicking History. Although it doesn’t say so anywhere, you can click in the History panel where the log is, press Command/Ctrl-A, switch to a text editor, and paste the log there for printing or easier reading.

Figure 4.15. Options at the bottom of the General pane in the Preferences dialog box let you record the History Log to the document’s metadata, a text file, or both.
Unfortunately, the history log doesn’t actually save the history states with the document; you still can’t go backwards after closing it. The history log also can’t record mouse movements such as brush strokes. But we still find it useful.
![]() What’s the Measure tool good for? Is it just a ruler on the screen?
What’s the Measure tool good for? Is it just a ruler on the screen?
![]() The Measure tool doesn’t get a lot of air time, because it doesn’t do anything flashy. However, like many Photoshop tools, the Measure tool does have some hidden talents, which we point out in these tips:
The Measure tool doesn’t get a lot of air time, because it doesn’t do anything flashy. However, like many Photoshop tools, the Measure tool does have some hidden talents, which we point out in these tips:
The Measure tool doesn’t work alone. You use the Measure tool together with the Info palette. After you drag the Measure tool, the Info palette reports the measuring line’s position, distance, and angle for your convenience.
After you drag the Measure tool, the resulting measuring line remains in place. Choosing another tool makes the measuring line disappears, but choosing the Measure tool again displays the measuring line again.
The Measure tool provides a cool way to quickly straighten an image. Drag the Measure tool along an edge in the image that should be perfectly horizontal or vertical, then immediately choose Image > Rotate Canvas > Arbitrary. Photoshop automatically fills in the Angle field from the measuring line you drew. All you have to do is click OK, and your document is perfectly straightened.
You can create a second measurement segment by Option/Alt-dragging from either end of an existing measurement line. This is useful as a protractor—you can easily measure angles this way (Figure 4.16). When you have two measurement lines, their distances are listed as D1 and D2 in the Options bar and in the Info palette.

![]() Everyone says to use Unsharp Mask to sharpen, but I don’t quite understand what the sliders do. Can you enlighten me?
Everyone says to use Unsharp Mask to sharpen, but I don’t quite understand what the sliders do. Can you enlighten me?
![]() Sharpening is a tricky subject, even for those of us who have been doing it for years. Unsharp masking works by enhancing your perception of edges. Unsharp masking emphasizes the contrast along that edge where two tones meet. The name comes from traditional prepress, where a slightly blurred (unsharp) negative copy of an image created the necessary emphasis along image edges.
Sharpening is a tricky subject, even for those of us who have been doing it for years. Unsharp masking works by enhancing your perception of edges. Unsharp masking emphasizes the contrast along that edge where two tones meet. The name comes from traditional prepress, where a slightly blurred (unsharp) negative copy of an image created the necessary emphasis along image edges.
The Unsharp Mark dialog box has just three options: Amount, Radius, and Threshold. Here’s our quick cheat sheet for unsharp masking (Figure 4.17):
Begin by adjusting the Radius. For a good starting point, divide the image’s output resolution by 200. Back off if ugly halos appear.
Increase the Amount value, but back off when sharpening starts to look unnatural.
Set Threshold high enough so that you’re only sharpening details. If you see that noise or grain is being sharpened, you’re probably set Threshold too low. When sharpening faces, try starting at 4 to 8 levels to avoid sharpening skin blemishes.
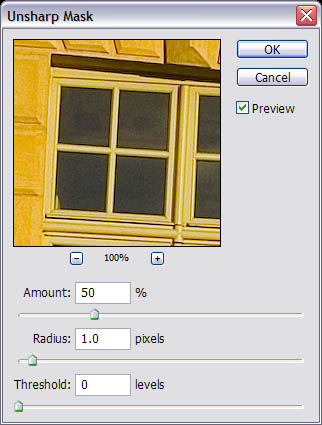
When you’re done, use these tips to check your work:
View your results in Actual Pixels magnification (View > Actual Pixels). Zooming in or out won’t show sharpening accurately.
To change the preview, click on the image outside the dialog box.
Monitors don’t always show sharpness accurately for print, so test your sharpening settings on a press proof if available.
You may need (and you can get away with) somewhat stronger sharpening settings if the image will be viewed at a distance, such as on a poster or billboard.
![]() Tell me about the new Smart Sharpen command. How is it different than Unsharp Mask? Do I use it with Unsharp Mask, or instead of it?
Tell me about the new Smart Sharpen command. How is it different than Unsharp Mask? Do I use it with Unsharp Mask, or instead of it?
![]() The Smart Sharpen command, new to Photoshop CS2, could be considered a more intelligent version of Unsharp Mask. If you want, you can use Smart Sharpen to apply different amounts of sharpening to highlights and shadows, and you can even remove special types of blur. Here are a few pointers (Figure 4.18):
The Smart Sharpen command, new to Photoshop CS2, could be considered a more intelligent version of Unsharp Mask. If you want, you can use Smart Sharpen to apply different amounts of sharpening to highlights and shadows, and you can even remove special types of blur. Here are a few pointers (Figure 4.18):
Set Amount and Radius using the same guidelines as in the “Basic Sharpening with Unsharp Mask” topic.
In the Remove popup menu, you’ve got three choices. Gaussian Blur is basically the same as Unsharp Mask. Lens Blur is a new, smarter version of Unsharp Mask. It tries to preserve detail and suppress halos, so you might be able to get away with higher sharpening values than with Gaussian Blur or the Unsharp Mask command. You can use Motion Blur and Angle to try to remove blur caused by camera or subject movement.
For best results, turn on the More Accurate option. More Accurate improves the sharpening by repeating it in stages. However, More Accurate makes the sharpening process take much longer.
Click Advanced to independently control the amount of sharpening in very light and very dark areas.
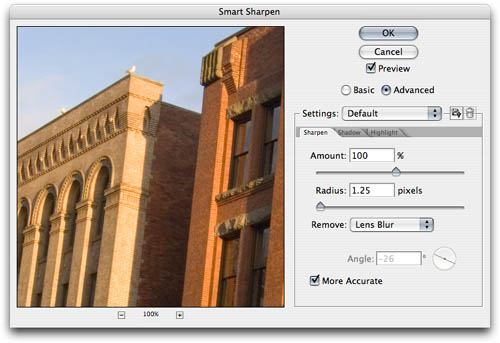
Figure 4.18. The Smart Sharpen dialog box, including the tabs made available by clicking the Advanced button.
Smart Sharpen has an Advanced mode that activates Shadow and Highlight tabs. Here’s how those work:
Increase the Fade Amount to preserve more of the original, non-sharpened image.
Increase the Tonal Width to extend the range of sharpening toward the midtones.
Adjust the Radius value in the same way you would for the Sharpen tab or Unsharp Mask command; it’s available in the Shadow and Highlight tabs so that you can assign a different Radius value for sharpening those tonal ranges.
![]() I need to sharpen a digital camera image, but the noise is sharpened, too! How can I keep the noise from being sharpened along with the details?
I need to sharpen a digital camera image, but the noise is sharpened, too! How can I keep the noise from being sharpened along with the details?
![]() You’ve got a couple of options. You can use the Advanced mode in Smart Sharpen to help keep shadow areas smooth. In Smart Sharpen, click the Shadow tab and increase the Fade amount until the noise level goes down. Sharpness in dark areas is usually not critical.
You’ve got a couple of options. You can use the Advanced mode in Smart Sharpen to help keep shadow areas smooth. In Smart Sharpen, click the Shadow tab and increase the Fade amount until the noise level goes down. Sharpness in dark areas is usually not critical.
You can also try applying the Reduce Noise filter before applying Smart Sharpen, so that there’s less noise there to be sharpened in the first place!
![]() There are some commands I can’t record as an action—they don’t even register when I record them. An example are the zoom commands. Is there a way to include those menu commands in an action?
There are some commands I can’t record as an action—they don’t even register when I record them. An example are the zoom commands. Is there a way to include those menu commands in an action?
![]() There is a way. You can add any menu command to an action by choosing Insert Menu Item from the Actions palette menu (Figure 4.19).
There is a way. You can add any menu command to an action by choosing Insert Menu Item from the Actions palette menu (Figure 4.19).
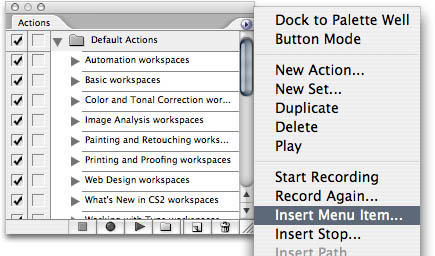
Figure 4.19. Using the Insert Menu Item command, you can add any menu command to an action... even the commands that aren’t recordable.
The Insert Menu Item command is also useful when you want to play back a command that opens a dialog box, and you want the dialog box to open without being influenced by whatever settings were in effect when the action was recorded.
![]() I’m having fun putting actions together; I can see how they’d save time. But in the Actions palette, I’m not seeing where I can run an action on multiple images. Where is that?
I’m having fun putting actions together; I can see how they’d save time. But in the Actions palette, I’m not seeing where I can run an action on multiple images. Where is that?
![]() To process multiple images with an action, you need to use the Batch command. And for some odd reason, the Batch command is nowhere near the Actions palette. But we know where it is:
To process multiple images with an action, you need to use the Batch command. And for some odd reason, the Batch command is nowhere near the Actions palette. But we know where it is:
Choose File > Automate > Batch. Or, from Adobe Bridge, choose Tools > Photoshop > Batch (Figure 4.20).
In the Play section popup menus, choose the Set containing the action you want, then choose the Action itself.
From the Source popup menu, choose the location of the images you want to process. Note that a source can be the images currently selected in the active Adobe Bridge window, if you choose Bridge.
Choose a Destination and set options. It’s best to choose Folder; see the topic “Protect Originals From a Few Bad Actions”.
Click OK.

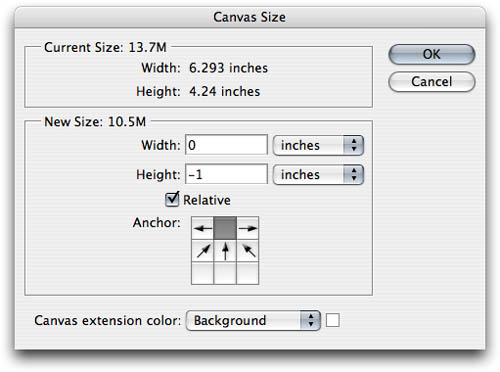
![]() I’ve got a bunch of images and I need to clip one inch off of the bottom of each one. Can I avoid carpal tunnel syndrome by having Photoshop do them all?
I’ve got a bunch of images and I need to clip one inch off of the bottom of each one. Can I avoid carpal tunnel syndrome by having Photoshop do them all?
![]() Try the following procedure. It’ll work great if you can crop from the center, a corner, or an edge.
Try the following procedure. It’ll work great if you can crop from the center, a corner, or an edge.
Tip
To resize many images to the same size, include the File > Automate > Fit Image command in a Photoshop action. You’ll find the details in the topic “Resizing a Batch of Variously Sized Images” in Chapter 3, Image Editing Basics.
In the Actions palette, click the Create New Action button, name it, and click Record. The action begins recording.
Choose Image > Canvas Size.
Enable the Relative checkbox.
Enter how much you want to crop the Width or Height. In the example you asked about, you’d enter 0 for Width and -1 inches for Height (Figure 4.21).
In the proxy, click the edge or corner where you want to anchor the crop. If you want to crop off the bottom, click one of the squares in the top row of the proxy.
Click OK and then click Proceed.
In the Actions palette, click the Stop Recording button.
In Adobe Bridge, select all of the files you want to crop, and choose Tools > Photoshop > Batch. Select the Set and Action at the top of the Batch dialog box, specify Bridge as the source, specify options, and click OK.
Tip
If you used the Actions palette in previous versions of Photoshop to assign shortcuts to menu commands or to override the built-in menu command shortcuts, you can now use the Keyboard Shortcuts command in Photoshop CS2 to do so. The great thing about using the Keyboard Shortcuts command instead of the Actions palette is that you’re no longer be limited to the function keys for shortcuts.
![]() I guess I should have spent a little more time testing an action before running it, because it processed a whole folder of images the wrong way, and the changes can’t be undone. Help!
I guess I should have spent a little more time testing an action before running it, because it processed a whole folder of images the wrong way, and the changes can’t be undone. Help!
![]() Actions blindly do what you tell them to do, and when the results aren’t quite what you anticipated, you can end up with a folder full of ruined images. For example, an action that works great on your test image might do something unexpected on an image of a different size or color mode. Here are a few tips that can help ensure that if one of your actions does go haywire, it won’t be your originals that are irreversibly mangled.
Actions blindly do what you tell them to do, and when the results aren’t quite what you anticipated, you can end up with a folder full of ruined images. For example, an action that works great on your test image might do something unexpected on an image of a different size or color mode. Here are a few tips that can help ensure that if one of your actions does go haywire, it won’t be your originals that are irreversibly mangled.
Run actions on duplicates of the originals in a separate folder from the originals, or back up the originals before you start.
Always check all of the resulting images after running an action for the first time.
In the Destination popup menu in the Batch dialog box, don’t choose the Save and Close option. Instead, choose Folder and specify a folder that isn’t the original folder so that the processed documents don’t replace or get mixed up with the originals.
If the action creates a copy of the original, such as the way Save for Web exports in a different format, it may be acceptable to open original files if you add a step at the end that closes each document without saving changes.
Tip
If you use the Batch command all the time, you might get tired of digging through submenus to get there. To make the Batch command more accessible, you can use the Edit > Keyboard Shortcuts command to assign a keyboard shortcut to the Batch command.
You can also put the Batch command on the Actions palette—just use the Insert Menu Item on the Actions palette menu.
Consider setting up an Input and Output pair of folders that you use solely for actions. Put copies of your originals in the Input folder, and point the action or the Batch dialog box to the Output folder for the processed images. After you approve the processed images, move them to their final destination.
![]() What can I do to prevent batch-processing errors? I get them far more often than I want to. I guess I don’t want to get them at all!
What can I do to prevent batch-processing errors? I get them far more often than I want to. I guess I don’t want to get them at all!
![]() Batch processing can go astray in an astounding number of ways. The cause can be something as easy to overlook as a missing color profile that generates an alert dialog box. Here are a few tips you can follow to prevent common errors and even speed up actions processing.
Batch processing can go astray in an astounding number of ways. The cause can be something as easy to overlook as a missing color profile that generates an alert dialog box. Here are a few tips you can follow to prevent common errors and even speed up actions processing.
Read and verify the whole Batch dialog box and verify the selected action, source, and destination before clicking OK. The defaults may not be what you want.
When recording actions, don’t touch anything that you don’t want to change. Options that aren’t changed during recording respect each individual image’s values for those options when you run the action, and changing a value will affect every image in the action.
Add steps that standardize and streamline the documents before the steps that make up the main part of the action. For example, Conrad’s action for generating Web images flattens documents, converts them to sRGB, and resizes them before opening Save for Web. Before he added these steps, high-resolution documents or documents with many layers took much longer to process, had the wrong colors on the Web, or errors would stop the process.
Tip
If you want to leave notes for other people who may need to edit a Photoshop document when you’re not around, such as a client, use the Notes tool in Photoshop. These notes are persistent: If you save the document in Photoshop PDF format and open it in Adobe Reader or Acrobat, you’ll see the notes you entered, and the notes won’t affect the output.
If something does go wrong, use the error-reporting feature at the bottom of the Batch dialog box to help debug actions. Also, you can monitor action testing more closely by choosing Playback Options from the Actions palette menu and selecting Step by Step or Pause to slow down the action for observation.
If you’re trying to record an Open step for Adobe Camera Raw, enable the Override Action Open Commands checkbox in the Batch dialog box. Otherwise, the action will always open the same image you used to build the action.