WHEN YOU HEAR THE PHRASE “POWERHOUSE OF TYPOGRAPHY”, photo and painting programs aren’t usually the first to come to mind. But several years ago—after Adobe developed advanced typographical features for its other products (like Adobe In Design and Adobe Illustrator)—a light went on over someone’s head and they said, “Hey, why don’t we throw some of this great code into Photoshop?” The result? Photoshop can now hold its own against other professional graphics programs, offering a wide variety of professional, precise, and versatile type features.
Photoshop has full-featured Character and Paragraph palettes, hanging punctuation, kerning, and other advanced spacing options. Want something a little flashier? Jazz things up with layer effects or type warping. People may still gloss over Photoshop type features on their way to the program’s overwhelming graphics capabilities, but if you take a closer look and get to know how type works in Photoshop, you could just gain that extra little edge that makes your Photoshop work stand out a little more, or gain the flexibility that makes graphics production go a little more smoothly for you.
![]() Photoshop is an image editor. Is there a reason I should set type in Photoshop, since it’s all going to be jaggy bitmaps anyway?
Photoshop is an image editor. Is there a reason I should set type in Photoshop, since it’s all going to be jaggy bitmaps anyway?
![]() Actually, type in Photoshop isn’t always just a bitmap. In fact, when you use one of the Type tools to add text to a Photoshop document, it’s maintained as a separate layer of vector type until you manually rasterize it or save in a format that doesn’t support vectors. Type layers share many characteristics of vector shape layers (layer clipping paths). For example, you can apply layer effects to type layers, and the effects stay up to date as you edit the type.
Actually, type in Photoshop isn’t always just a bitmap. In fact, when you use one of the Type tools to add text to a Photoshop document, it’s maintained as a separate layer of vector type until you manually rasterize it or save in a format that doesn’t support vectors. Type layers share many characteristics of vector shape layers (layer clipping paths). For example, you can apply layer effects to type layers, and the effects stay up to date as you edit the type.
Because each text object is its own layer, you can work with a text object in exactly the same way you would use any other layer (Figure 6.1). You can transform, mask, group, link, or rasterize a layer, and you can add adjustment layers to type.

![]() Why is it that sometimes I get a single line of type that won’t wrap at the edge of the image?
Why is it that sometimes I get a single line of type that won’t wrap at the edge of the image?
![]() What you’re seeing is point type, one of the two kinds of type objects you can create (Figure 6.2). With point type, the text doesn’t wrap unless you type a new line character (Shift-Return/Shift-Enter) or type Return/Enter. (See “Make Your Exit,” later in this section for more details.) With area type, text appears inside a bounding rectangle, and the text rewraps when you resize the bounding rectangle—just like adjusting the size of a text frame in InDesign or QuarkXPress.
What you’re seeing is point type, one of the two kinds of type objects you can create (Figure 6.2). With point type, the text doesn’t wrap unless you type a new line character (Shift-Return/Shift-Enter) or type Return/Enter. (See “Make Your Exit,” later in this section for more details.) With area type, text appears inside a bounding rectangle, and the text rewraps when you resize the bounding rectangle—just like adjusting the size of a text frame in InDesign or QuarkXPress.
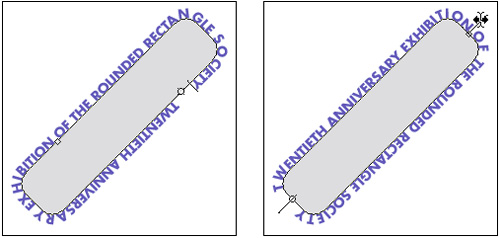
Figure 6.2. Dragging the Type tool creates area type (left), and clicking the Type tool creates point type (right).
You create point type by clicking the document when the Type tool is active, and you create area type by dragging the Type tool. If you aren’t aware of this difference, you may not realize that dragging is different than clicking.
![]() The handles on a type layer sometimes don’t do what I want. If I drag one, it sometimes scales both the type box and the type, and other times it only scales the box. Is there a pattern to this?
The handles on a type layer sometimes don’t do what I want. If I drag one, it sometimes scales both the type box and the type, and other times it only scales the box. Is there a pattern to this?
![]() When you click a Type tool in a text layer that contains area type (see previous solution for how this is different than point type), control handles appear around the type layer. They look like the same handles that you see on other layers or when the Free Transform feature is enabled, but they have a slightly different function. You can tell that the handles work differently because the layer bounding box has a dashed line instead of a solid line.
When you click a Type tool in a text layer that contains area type (see previous solution for how this is different than point type), control handles appear around the type layer. They look like the same handles that you see on other layers or when the Free Transform feature is enabled, but they have a slightly different function. You can tell that the handles work differently because the layer bounding box has a dashed line instead of a solid line.
In an area text layer, dragging a control handle resizes the area in which text will flow, but doesn’t stretch the contents. If the text contains multiple lines, dragging a handle can rewrap the text. To resize the contents, Command/Ctrl-drag the handle. (Holding down the Command/Ctrl key is like temporarily turning on Free Transform.) Watch the cursor carefully when you position it over a text layer handle: When you see a double-headed arrow, dragging the handle rewraps the text; when you see a arrowhead, dragging the handle stretches the text.
![]() How can I import text into Photoshop? I tried pasting, but all I got was an ugly bitmap.
How can I import text into Photoshop? I tried pasting, but all I got was an ugly bitmap.
![]() Copying and pasting text is the only way to get text into Photoshop other than typing it in. That part might be obvious, but what isn’t obvious is that you don’t want to simply paste the text into the Photoshop document. By default, text pastes as a new bitmap layer using the Times font in a particularly ugly way, and because it pastes as a bitmap, you can’t edit the text or change its attributes. If you want to be able to edit the pasted text, use this procedure instead:
Copying and pasting text is the only way to get text into Photoshop other than typing it in. That part might be obvious, but what isn’t obvious is that you don’t want to simply paste the text into the Photoshop document. By default, text pastes as a new bitmap layer using the Times font in a particularly ugly way, and because it pastes as a bitmap, you can’t edit the text or change its attributes. If you want to be able to edit the pasted text, use this procedure instead:
Copy the text from the application.
Switch to Photoshop
Drag the Type tool to create a new text layer. Leave the blinking text cursor active.
Choose Copy > Paste.
When you paste text when the blinking text cursor is active, the pasted text takes on the type attributes of the type layer, as if you typed it in yourself. You can then edit the type or its formatting however you want.
![]() When I copy and paste text from one Photoshop document to another, I lose attributes of the text, such as effects I applied. I’m guessing there’s a better way to do this?
When I copy and paste text from one Photoshop document to another, I lose attributes of the text, such as effects I applied. I’m guessing there’s a better way to do this?
![]() You guessed right. There’s another way, and it’s an easier way, too. You don’t have to go through Copy and Paste steps when transferring text between Photoshop documents. Just drag the whole layer from one document window to another. You can drag the type layer from the Layers palette, or you can drag using the Move tool from one document to the other. Even better, hold down the Shift key when you drag the layer: If the two documents are the same pixel dimensions, the type layer will end up in the same place in the new document; if they have different dimensions, the layer will end up centered.
You guessed right. There’s another way, and it’s an easier way, too. You don’t have to go through Copy and Paste steps when transferring text between Photoshop documents. Just drag the whole layer from one document window to another. You can drag the type layer from the Layers palette, or you can drag using the Move tool from one document to the other. Even better, hold down the Shift key when you drag the layer: If the two documents are the same pixel dimensions, the type layer will end up in the same place in the new document; if they have different dimensions, the layer will end up centered.
![]() Do I have to drag over the text I want to select? That’s really annoying if I want a whole paragraph or something.
Do I have to drag over the text I want to select? That’s really annoying if I want a whole paragraph or something.
![]() All the Adobe Creative Suite application let you double-click to select a word, triple-click for a line, or click four times for a paragraph. But if you want to select all the text on a type layer, it’s much easier just to double-click on the layer thumbnail in the left column in the Layers palette.
All the Adobe Creative Suite application let you double-click to select a word, triple-click for a line, or click four times for a paragraph. But if you want to select all the text on a type layer, it’s much easier just to double-click on the layer thumbnail in the left column in the Layers palette.
![]() When I create a new type object, everything’s wrong: The alignment, the font, the size, and so on. I have to format everything. How do I control the default settings for the Type tool?
When I create a new type object, everything’s wrong: The alignment, the font, the size, and so on. I have to format everything. How do I control the default settings for the Type tool?
![]() To change the default type settings, first make sure nothing is selected in the document window and that there isn’t a blinking text cursor anywhere in the document. Once you’ve ensured that nothing is selected, change the type settings. That sets the defaults for all new type objects.
To change the default type settings, first make sure nothing is selected in the document window and that there isn’t a blinking text cursor anywhere in the document. Once you’ve ensured that nothing is selected, change the type settings. That sets the defaults for all new type objects.
However, if you use two or more type formatting styles a lot, you should set up tool presets for each. Set the type formatting while no text is selected, then save a new Type tool preset (in the Tool Presets menu in the Options bar or in the Tool Presets palette; see “Give Tools a Memory” in Chapter 1, Photoshop Essentials). Now, when you need that formatting for some new text, just choose the tool preset from the popup menu or palette and you’re good to go.
![]() Is there a way to commit text changes using the keyboard? In dialog boxes, I press the Return key to do that, but when I’m entering text, the Return key creates a new paragraph. I guess that makes sense, but I’d still like to commit text changes without reaching for the mouse every time.
Is there a way to commit text changes using the keyboard? In dialog boxes, I press the Return key to do that, but when I’m entering text, the Return key creates a new paragraph. I guess that makes sense, but I’d still like to commit text changes without reaching for the mouse every time.
![]() You’ve almost got it. To avoid the ambiguity of the Return/Enter key, add the Command/Ctrl key. In other words, press Command-Return/Ctrl-Enter to exit a type object while committing changes. To exit without saving your changes, press Esc instead. By the way, the Enter key on the numeric keypad also works by itself, because technically the Enter key and the Return key are not the same. On laptops, the keypad Enter key may be in a different location; on Apple PowerBooks the Enter key is along the bottom row next to the arrow keys.
You’ve almost got it. To avoid the ambiguity of the Return/Enter key, add the Command/Ctrl key. In other words, press Command-Return/Ctrl-Enter to exit a type object while committing changes. To exit without saving your changes, press Esc instead. By the way, the Enter key on the numeric keypad also works by itself, because technically the Enter key and the Return key are not the same. On laptops, the keypad Enter key may be in a different location; on Apple PowerBooks the Enter key is along the bottom row next to the arrow keys.
![]() I used to be able to see fonts in their actual typeface in the font menu, but for some reason it isn’t doing it anymore. Do you know what happened?
I used to be able to see fonts in their actual typeface in the font menu, but for some reason it isn’t doing it anymore. Do you know what happened?
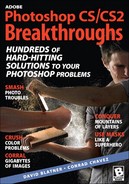
![]() Font previewing (Figure 6.3) is controlled by a preference, and that preference may have gotten turned off by accident. (Or perhaps a co-worker?) Choose Photoshop > Preferences > Type (Mac OS) or Edit > Preferences > Type (Windows), and enable the Font Preview Size checkbox. While you’re working with fonts, here are some tips to make font selection even easier:
Font previewing (Figure 6.3) is controlled by a preference, and that preference may have gotten turned off by accident. (Or perhaps a co-worker?) Choose Photoshop > Preferences > Type (Mac OS) or Edit > Preferences > Type (Windows), and enable the Font Preview Size checkbox. While you’re working with fonts, here are some tips to make font selection even easier:
If the font menu preview size is too large or too small for your monitor resolution, choose a size from the Font Preview Size popup menu, which is next to the Font Preview Size checkbox.
If you click on the font menu to open it, you don’t need to scroll manually; just start typing the font name and the menu scrolls right to that font.
You don’t have to open the Character palette every time you want to change type settings. Some type settings are available from the Options bar when the Type tool is active.
![]() Does Photoshop have text styles or another way to apply the same formatting to lots of text at once?
Does Photoshop have text styles or another way to apply the same formatting to lots of text at once?
![]() Photoshop doesn’t have text styles of the kind you’d find in a word processor or layout program, but you can at least apply the same formatting to an entire type layer. Instead of selecting all the text with the Type tool, you can simply select a type layer in the Layers palette. Now any type settings you change are applied to all the text on that layer. When you’re editing text with the Type tool, the Options bar displays type formatting options because the Type tool is selected. But when you select a layer in the Layers palette, you may be using a tool other than the Type tool and the Options bar won’t include type options. Simply switch to the Type tool to see the formatting controls in the Options bar.
Photoshop doesn’t have text styles of the kind you’d find in a word processor or layout program, but you can at least apply the same formatting to an entire type layer. Instead of selecting all the text with the Type tool, you can simply select a type layer in the Layers palette. Now any type settings you change are applied to all the text on that layer. When you’re editing text with the Type tool, the Options bar displays type formatting options because the Type tool is selected. But when you select a layer in the Layers palette, you may be using a tool other than the Type tool and the Options bar won’t include type options. Simply switch to the Type tool to see the formatting controls in the Options bar.
![]() How can I stroke the outline of a type character like I can in other graphics applications? I don’t see any stroke commands in the type controls, and the Edit > Stroke command isn’t available for text.
How can I stroke the outline of a type character like I can in other graphics applications? I don’t see any stroke commands in the type controls, and the Edit > Stroke command isn’t available for text.
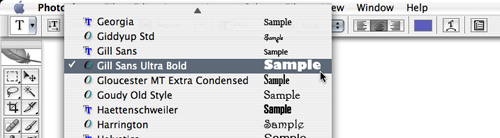
![]() Yeah, well we never said Photoshop was perfect. It’s true that applying a color to text applies only to the text’s fill. But there’s always a workaround: If you want to control the color and width of character outlines, apply a Stroke effect to a type layer (Figure 6.4):
Yeah, well we never said Photoshop was perfect. It’s true that applying a color to text applies only to the text’s fill. But there’s always a workaround: If you want to control the color and width of character outlines, apply a Stroke effect to a type layer (Figure 6.4):
Select a type layer.
In the Layers palette, click the Add a Layer Style button and choose Stroke from the popup menu.
In the Layer Style dialog box, the Stroke option is selected along the left side. Change the stroke options as needed, and click OK.
Note that in the Stroke effect panel, even though it says “Fill Type,” it refers to “filling” the stroke—not the fill of the characters. The effect always applies to all the text on a layer, so you can’t stroke just one or two characters.
![]() I’m setting type that’s going to be exported as a bitmap for Web display, but I’m not happy with the way Photoshop renders the characters. What are my options?
I’m setting type that’s going to be exported as a bitmap for Web display, but I’m not happy with the way Photoshop renders the characters. What are my options?
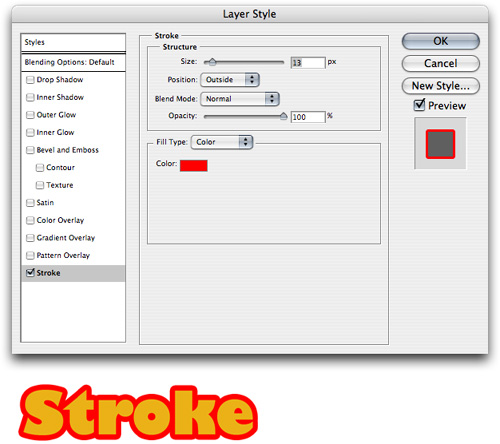
![]() By default, Photoshop always anti-aliases text—simulating higher resolution by using shades and tones along edges. However, there’s more than one way to anti-alias type, so Photoshop gives you a choice of several popular methods. To change the anti-aliasing, select a type layer and then choose an anti-aliasing option from one of the following:
By default, Photoshop always anti-aliases text—simulating higher resolution by using shades and tones along edges. However, there’s more than one way to anti-alias type, so Photoshop gives you a choice of several popular methods. To change the anti-aliasing, select a type layer and then choose an anti-aliasing option from one of the following:
The Layer > Type submenu
The anti-aliasing popup menu in the Options bar (available when the Type tool is selected) or in the Character palette (Figure 6.5)
The context menu accessible by Ctrl-clicking/right-clicking the type
![]() I’m trying to design a web page, but the type spacing looks uneven no matter what anti-alias setting I choose.
I’m trying to design a web page, but the type spacing looks uneven no matter what anti-alias setting I choose.
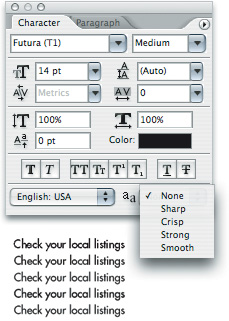
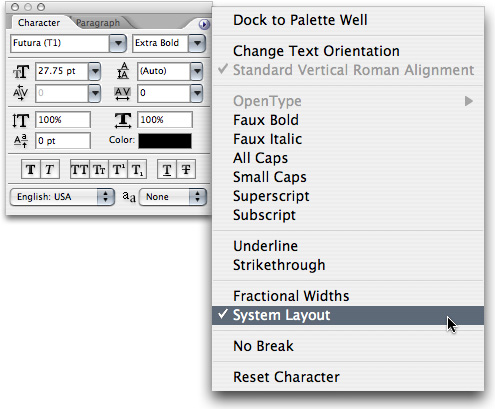
![]() Try choosing System Layout from the Character palette menu (Figure 6.6). The default display mode for type is Fractional Widths, which is more appropriate for high-resolution printed typography. System Layout uses the default type layout method used by your operating system, which is more appropriate for low-resolution screen display. However, this also turns off anti-aliasing.
Try choosing System Layout from the Character palette menu (Figure 6.6). The default display mode for type is Fractional Widths, which is more appropriate for high-resolution printed typography. System Layout uses the default type layout method used by your operating system, which is more appropriate for low-resolution screen display. However, this also turns off anti-aliasing.
![]() I want to paint with the brush tool inside text shapes. How can I use text outlines as a selection?
I want to paint with the brush tool inside text shapes. How can I use text outlines as a selection?
![]() There’s more than one way to create a selection from type outlines:
There’s more than one way to create a selection from type outlines:
Command/Ctrl-click a text layer thumbnail (not the layer name) to create a selection from the character shapes. Then, to use the selection, choose the layer you want to affect. (Not the type layer because you can’t paint or adjust a type layer.)
Enter text using the Horizontal Type Mask or Vertical Type Mask tools. Clicking or dragging these tools puts the document window into Quick Mask mode. As soon as you commit the changes, the document returns to standard mode and the type becomes a selection.
Press Q to jump into the Quick Mask mode, then use the regular Type tool. When you press Command-Return/Ctrl-Enter, you can manipulate the text (move it, scale it, and so on). Then press Q to leave Quick Mask mode.
You should also consider using type as a clipping mask, so that you can always go back and edit or change the text later. Using this method, you would paint on the layer above the type layer, then Option/Alt-click between the two layers. For more on setting up a clipping mask layer, see “When a Layer is a Mask” in Chapter 5, Working with Layers.
![]() How can I make type follow a path? It seems like it should be easy, but I’m baffled.
How can I make type follow a path? It seems like it should be easy, but I’m baffled.
![]() You’re right that it is quite easy, but only after you’ve done it once or seen how it’s done. Just follow these steps:
You’re right that it is quite easy, but only after you’ve done it once or seen how it’s done. Just follow these steps:
Select a path or shape tool. For example, if you want to set type along a circle, use the Ellipse tool.
In the Options bar, click the Paths button (the second button from the left).
Create the path. It appears as the Work Path in the Paths palette in case you want to edit the path you created.
Now select the Type tool, position it over the path where you want to start the text, and click to insert a blinking text cursor. Type the text, and when you’re done, press Ctrl-Enter (Figure 6.7).
If you later want to move the text to a different location along the path, switch to the Path Selection tool (the black arrow tool) and drag the text.
Tip
Don’t like how punctuation like quotation marks push their way into a line of text in a paragraph? Open the Paragraph palette (Window > Paragraph), and choose Roman Hanging Punctuation from the Paragraph palette menu. No, “Roman” doesn’t mean that it only works in Italian; it refers to the fact that this doesn’t apply to punctuation in non-roman languages such as Japanese.
![]() I’m making a label for a soft drink can, and I need to simulate how the type will look when it’s wrapped around a can. I have a photo of the can. How can I warp the type around the can?
I’m making a label for a soft drink can, and I need to simulate how the type will look when it’s wrapped around a can. I have a photo of the can. How can I warp the type around the can?
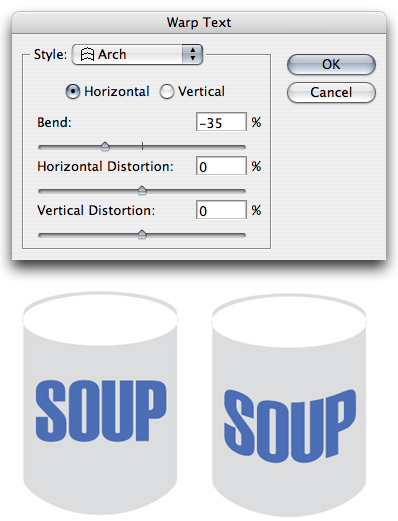
![]() To be honest, we like the 3D tools in Adobe Illustrator more for this kind of thing. However, the Warp Text feature in Photoshop can do the trick in some cases. Try these steps:
To be honest, we like the 3D tools in Adobe Illustrator more for this kind of thing. However, the Warp Text feature in Photoshop can do the trick in some cases. Try these steps:
In the Layers palette, select the type layer you want to distort.
Select the Type tool and then choose Layer > Type > Warp Text.
Choose a warp (Figure 6.8). For a cylinder like the can example, start with the Arch warp.
Set options and click OK.
You can change the warp at any time by opening the Warp Text dialog box again, or—faster—by choosing Edit > Transform > Warp, which puts warp options on the Options bar and displays one or more handles on the warp envelope.
However, our colleagues Steve Werner and Sandee Cohen (authors of Real World Creative Suite) pointed out a way to warp some text in ways the Warp Text dialog box won’t (this only works in CS2): While you can’t use the cool Edit > Transform > Warp feature on normal text layers, you can on Smart Objects. So select one or more text layers and convert them into a smart object by choosing Layer > Smart Objects > Group Into New Smart Object. Now you can warp to your heart’s content.
![]() Where are the options that control letter and word spacing?
Where are the options that control letter and word spacing?
![]() Photoshop contains some of the typographical controls also found in sophisticated layout applications like Adobe In Design, giving you more precision. For example, you can apply letter and word spacing in smaller increments than a space character, and you can apply line spacing in increments smaller than a carriage return. Try these tips to make your type look even more professional.
Photoshop contains some of the typographical controls also found in sophisticated layout applications like Adobe In Design, giving you more precision. For example, you can apply letter and word spacing in smaller increments than a space character, and you can apply line spacing in increments smaller than a carriage return. Try these tips to make your type look even more professional.
To add or remove space between a range of characters, use a Type tool to select them, and then adjust the Tracking value in the Character palette (Figure 6.9). Faster, hold down Option/Alt and press the left or right arrows on the keyboard. For larger changes, hold down both Option/Alt and Command/Ctrl.
To add or remove space between two characters, use a Type tool to click an insertion point between the characters and adjust the Kerning value in the Character palette. The keyboard shortcuts are exactly the same as tracking.
To adjust line spacing, select lines or a text layer and adjust the Leading value in the Character palette. The keyboard shortcut is Option/Alt and the up or down arrows on the keyboard. For larger changes, add the Command/Ctrl key.
To adjust spacing between paragraphs, select paragraphs or an entire text layer, and then adjust the Add Space Before Paragraph value in the Paragraph palette.
To stop text such as a headline from hyphenating, select the text and disable the Hyphenation checkbox in the Paragraph palette.
To try different methods for spacing words throughout a paragraph, choose the Justification or Hyphenate controls in the Paragraph palette menu.

![]() You say type is vector-based in Photoshop, and I can see that. However, when I save a Photoshop file as a TIFF, I can clearly see that the type is bitmapped. Is there a way to preserve vector type when I use a Photoshop image in another program?
You say type is vector-based in Photoshop, and I can see that. However, when I save a Photoshop file as a TIFF, I can clearly see that the type is bitmapped. Is there a way to preserve vector type when I use a Photoshop image in another program?
![]() Technically, the vector type is retained in the TIFF (or in a PSD file) as long as you save the layers (as opposed to flattening the file). But unfortunately, every other program—even In Design CS2—rasterizes the text in these file formats. Therefore, the only way to export a Photoshop file with type layers and preserve the vectors when you import the file into another application is to save the file as Photoshop PDF or an EPS file. Choose File > Save As, select Photoshop PDF or EPS from the Format popup menu. (We prefer PDF to EPS, partly because the text is converted to outlines in an EPS while it remains an embedded font in the PDF.) You can use the resulting PDF document in any program that can import PDF files, such as Adobe In Design. When you print there, the text will still be vector.
Technically, the vector type is retained in the TIFF (or in a PSD file) as long as you save the layers (as opposed to flattening the file). But unfortunately, every other program—even In Design CS2—rasterizes the text in these file formats. Therefore, the only way to export a Photoshop file with type layers and preserve the vectors when you import the file into another application is to save the file as Photoshop PDF or an EPS file. Choose File > Save As, select Photoshop PDF or EPS from the Format popup menu. (We prefer PDF to EPS, partly because the text is converted to outlines in an EPS while it remains an embedded font in the PDF.) You can use the resulting PDF document in any program that can import PDF files, such as Adobe In Design. When you print there, the text will still be vector.
![]() When I look in the font menu in Photoshop, I see fonts that I don’t see in any other applications. When I check Font Book (Mac OS X) or the Fonts control panel (Windows XP), the fonts just aren’t there!
When I look in the font menu in Photoshop, I see fonts that I don’t see in any other applications. When I check Font Book (Mac OS X) or the Fonts control panel (Windows XP), the fonts just aren’t there!
![]() Adobe is sneaky: When you install Photoshop (or the Creative Suite), it adds fonts to your system. However, these fonts aren’t placed where you’d expect them. Instead, they show up in a special font folder where only Adobe programs look, and that’s why you don’t see them in the font menus of other programs.
Adobe is sneaky: When you install Photoshop (or the Creative Suite), it adds fonts to your system. However, these fonts aren’t placed where you’d expect them. Instead, they show up in a special font folder where only Adobe programs look, and that’s why you don’t see them in the font menus of other programs.
On Mac OS X, you can find Adobe-installed fonts in the following folder:
Macintosh HD/Library/Application Support/Adobe/Fonts
Tip
The more fonts you have, the longer it can take for Photoshop and other programs to start up. You may want to use a font manager—such as Font Agent Pro for Mac OS X—to maximize performance by disabling fonts that you don’t always use.
In Windows, you can find Adobe-installed fonts in the following folder:
C:Program FilesCommon FilesAdobeFonts
If you want to use any of the fonts in other programs, you can move them to the fonts folder for your entire system. On Mac OS X, fonts for the entire system are stored in the following folder:
Macintosh HD/Library/Fonts
In Windows, they’re here:
C:WindowsFonts