
5 Quick Fixes
Lesson overview
In this lesson, you’ll learn how to do the following:
Remove red eye.
Brighten an image.
Adjust the features of a face.
Combine images to create a panorama.
Crop and straighten an image and fill in any resulting empty areas.
Blur the background of an image using Iris Blur.
Merge two images to extend depth of field.
Apply optical lens correction to a distorted image.
Remove an object and seamlessly fill the empty space.
Adjust the perspective of an image to match another image.

This lesson will take about an hour to complete. To get the lesson files used in this chapter, download them from the web page for this book at www.adobepress.com/PhotoshopCIB2020. For more information, see “Accessing the lesson files and Web Edition” in the Getting Started section at the beginning of this book.
As you work on this lesson, you’ll preserve the start files. If you need to restore the start files, download them from your Account page.
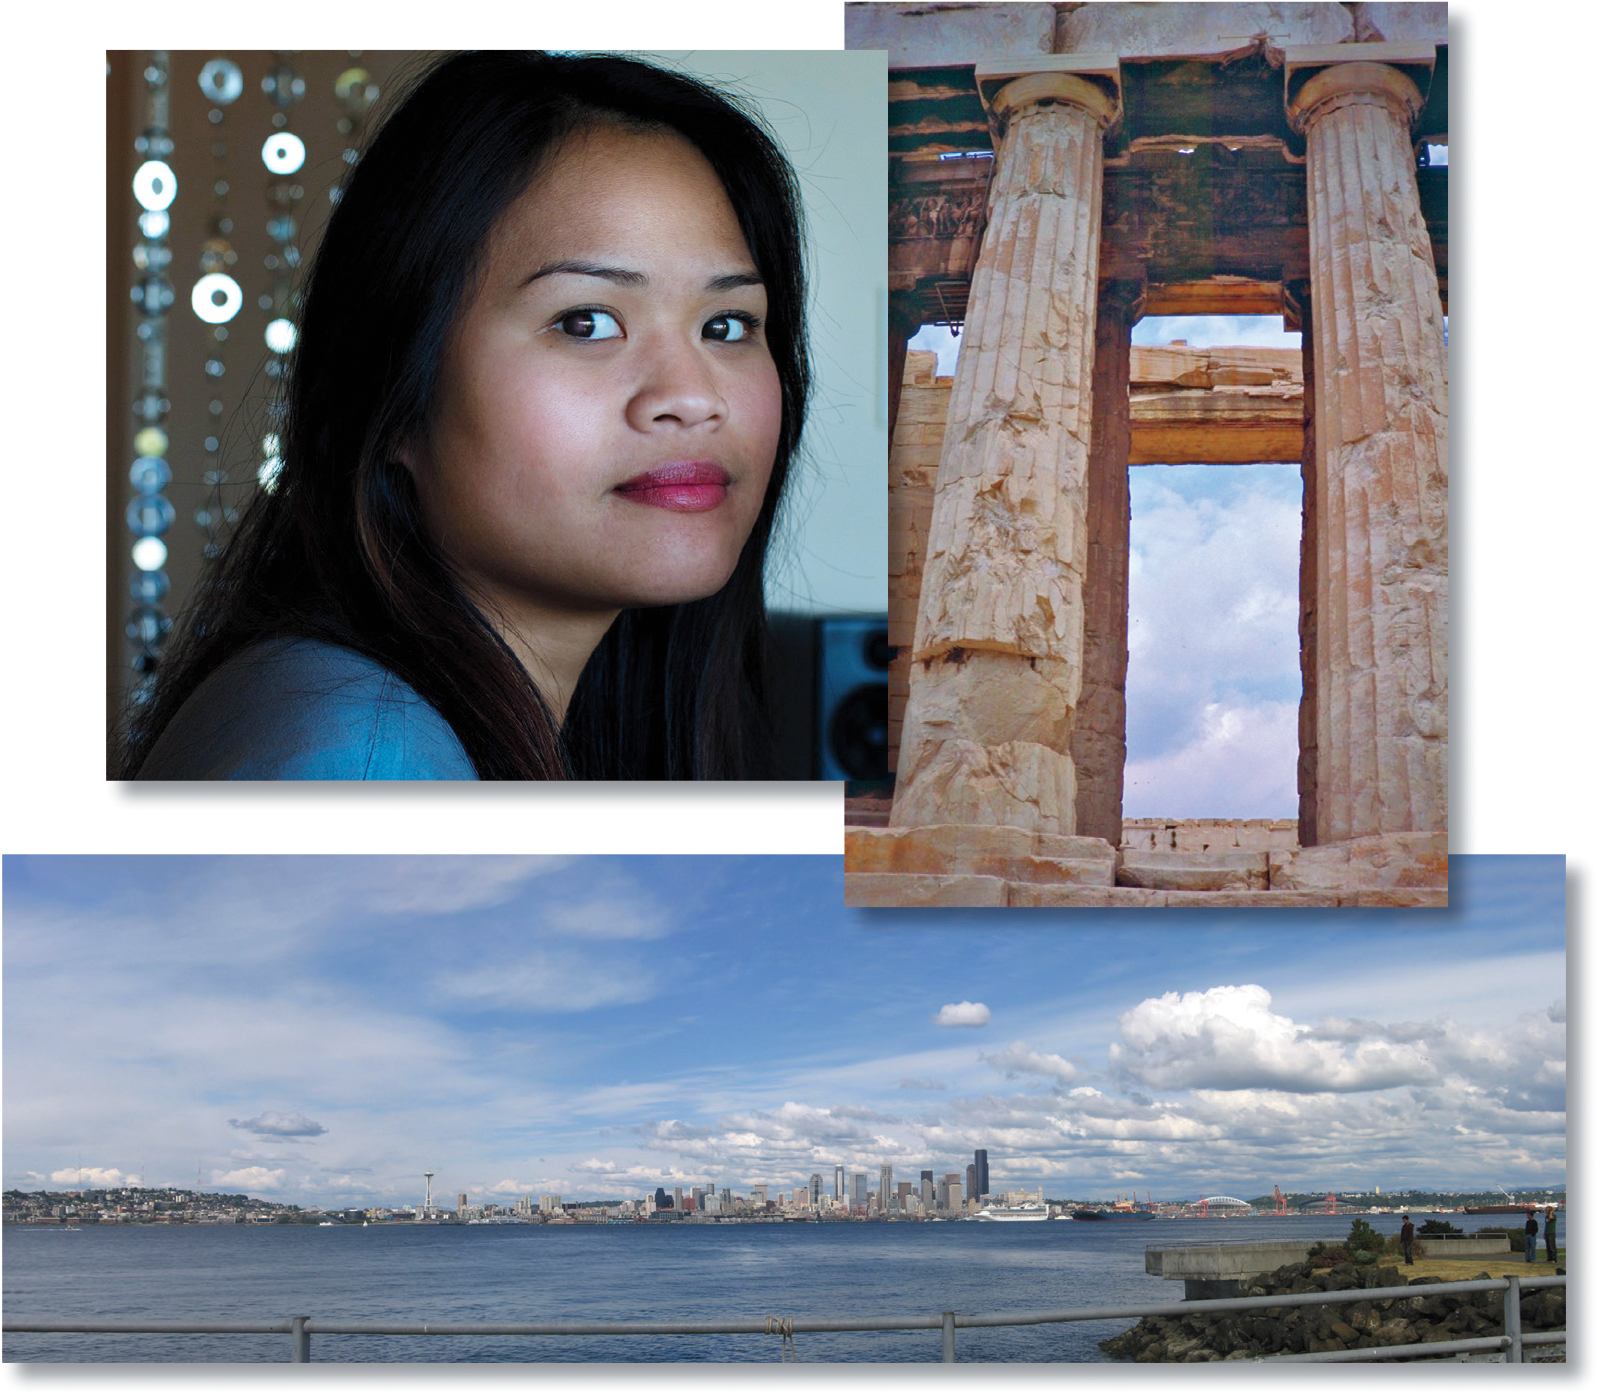
PROJECT: RED EYE REDUCTION
PROJECT: CORRECTING IMAGE DISTORTION
PROJECT: PANORAMA FROM MULTIPLE IMAGES
Sometimes just one or two clicks in Photoshop can turn an image from so-so (or worse) to awesome. Quick fixes get you the results you want without a lot of fuss.
Getting started
Not every image requires a complicated makeover using advanced features in Photoshop. In fact, once you’re familiar with Photoshop, you can often improve an image quickly. The trick is to know what’s possible and how to find what you need.
In this lesson, you’ll make quick fixes to several images using a variety of tools and techniques. You can use these techniques individually, or team them up when you’re working with an image that needs just a little more help.
Start Photoshop, and then immediately hold down Ctrl+Alt+Shift (Windows) or Command+Option+Shift (Mac) to restore the default preferences. (See “Restoring Default Preferences” on page 5.)
When prompted, click Yes to delete the Adobe Photoshop Settings file.
Improving a snapshot
If you’re sharing a snapshot with family and friends, you may not need it to look professional. But you probably don’t want glowing eyes, and it would be good if the picture isn’t too dark to show important detail. Photoshop gives you the tools to make quick changes to a snapshot.
Correcting red eye
Red eye occurs when the retina of a subject’s eye is reflected by the camera flash. It commonly occurs in photographs taken in a dark room, because the subject’s irises are wide open. Fortunately, red eye is easy to fix in Photoshop. In this exercise, you will remove the red eye from the woman’s eyes in the portrait.
![]() Note
Note
If you haven’t installed Bridge, you’ll be prompted to do so when you choose Browse In Bridge. For more information, see page 3.
You’ll start by viewing the before and after images in Adobe Bridge.
Choose File > Browse In Bridge to open Adobe Bridge.
![]() Note
Note
If Bridge asks you if you want to import preferences from a previous version of Bridge, click No.
In the Favorites panel in Bridge, click the Lessons folder. Then, in the Content panel, double-click the Lesson05 folder to open it.
Adjust the thumbnail slider, if necessary, so that you can see the thumbnail previews clearly. Then look at the RedEye_Start.jpg and RedEye_End.psd files.

Not only does red eye make an ordinary person or animal appear unusual, but it can distract from the subject of the image. It’s easy to correct red eye in Photoshop, and you’ll quickly lighten this image too.
Double-click the RedEye_Start.jpg file to open it in Photoshop.
![]() Note
Note
If Photoshop displays a dialog box telling you about the difference between saving to Cloud Documents and Your Computer, click Your Computer. You can also select Don’t Show Again, but that setting will deselect after you reset Photoshop preferences.
Choose File > Save As, choose Photoshop for the Format, name the file RedEye_Working.psd, and click Save.
Select the Zoom tool (
 ), and then drag to zoom in to see the woman’s eyes. If Scrubby Zoom isn’t selected, drag a marquee around the eyes to zoom in.
Select the Red Eye tool (
 ), hidden under the Spot Healing Brush tool (
 ).
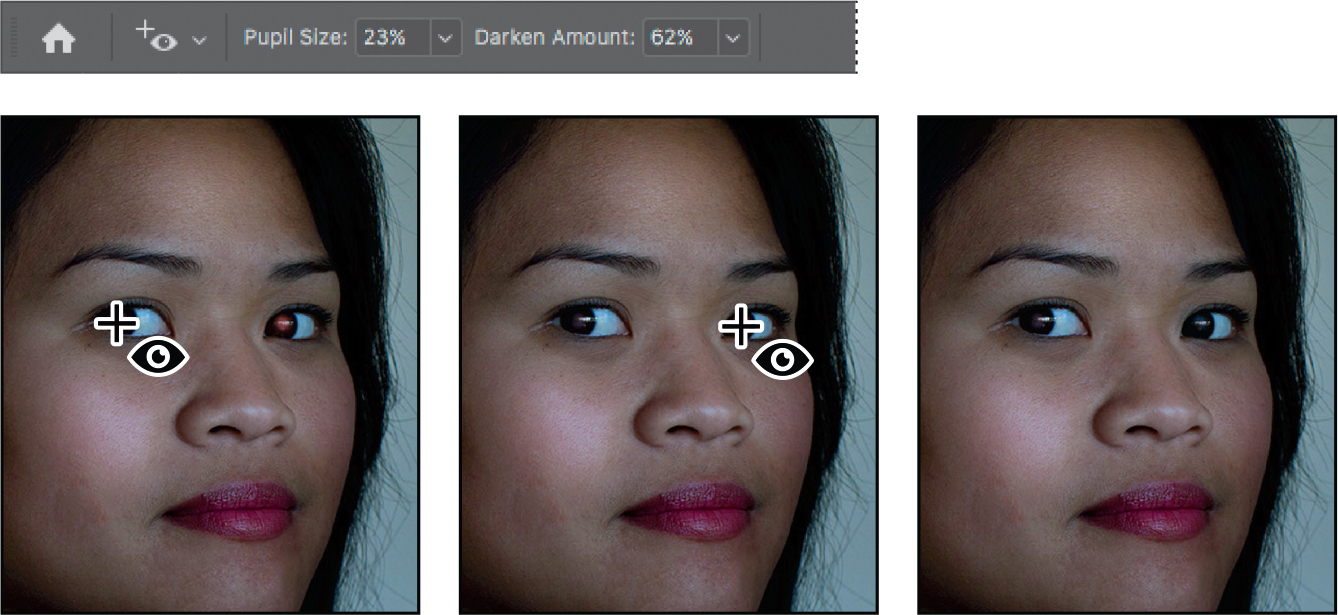
).In the options bar, reduce the Pupil Size to 23% and the Darken Amount to 62%.
The Darken Amount specifies how dark the pupil should be.
Click the pupil in the woman’s left eye. The red reflection disappears.
Click the pupil in the woman’s right eye to remove the red reflection there, too.
If the red reflection is directly over the pupil, clicking the pupil usually removes it. If it doesn’t, you can try clicking the highlight, or try dragging the Red Eye tool around the entire pupil.
Choose View > Fit On Screen to see the entire image.
Choose File > Save.
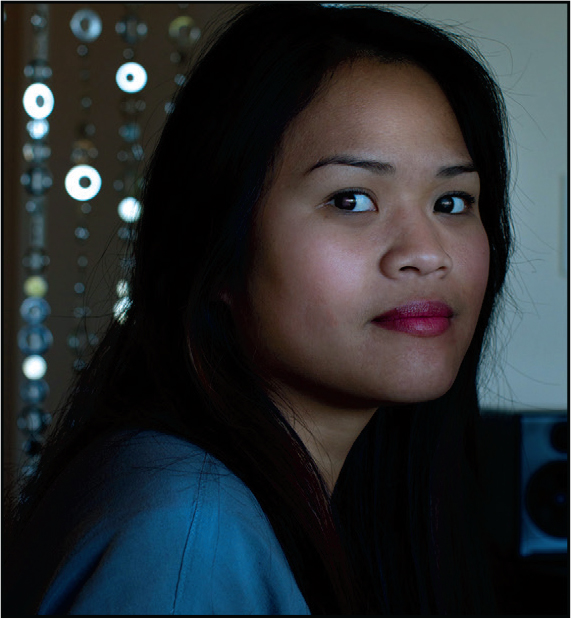
Brightening an image
The woman’s eyes no longer glow red, but the overall image is a bit dark. You can brighten an image in several different ways, as you’ve already seen. You can try adding adjustment layers for Brightness/Contrast, Levels, and Curves, depending on the degree of adjustment you want to make. For a quick fix or a good starting point, try the Auto button or the presets, which are available in both the Levels and Curves adjustments. Let’s try a Curves adjustment layer for this image.
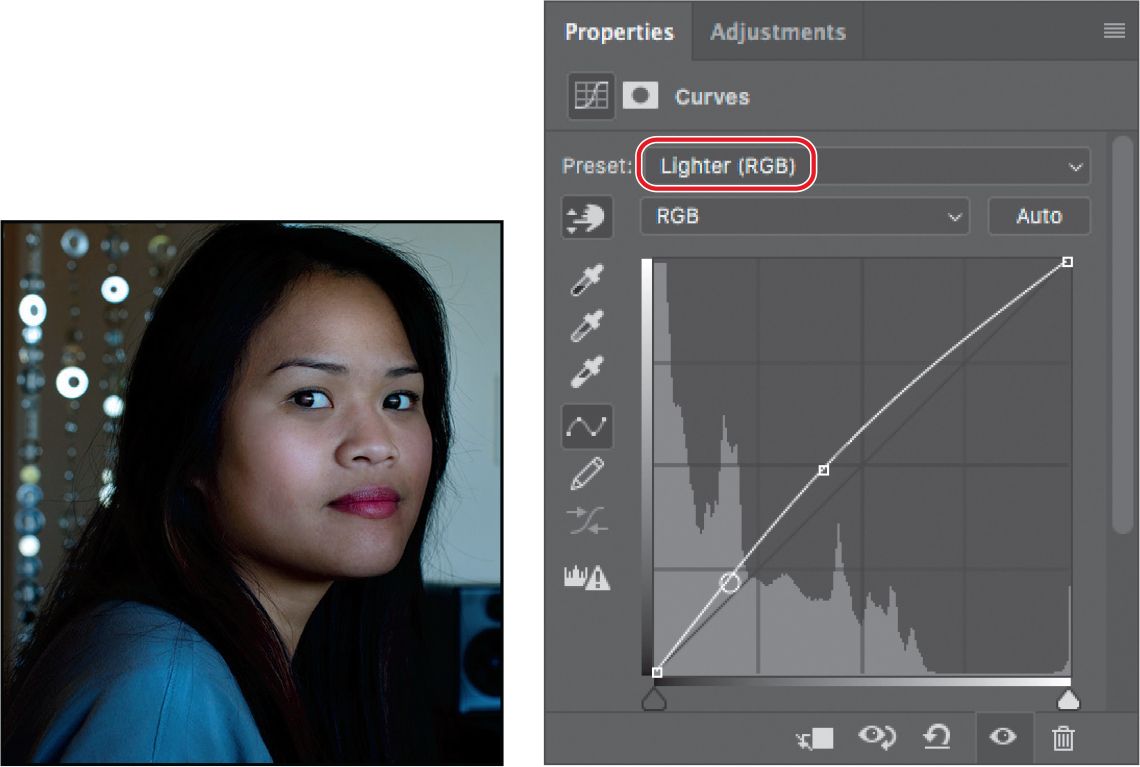
Click Curves in the Adjustments panel.
Click Auto to apply an automatic correction. The image brightens.
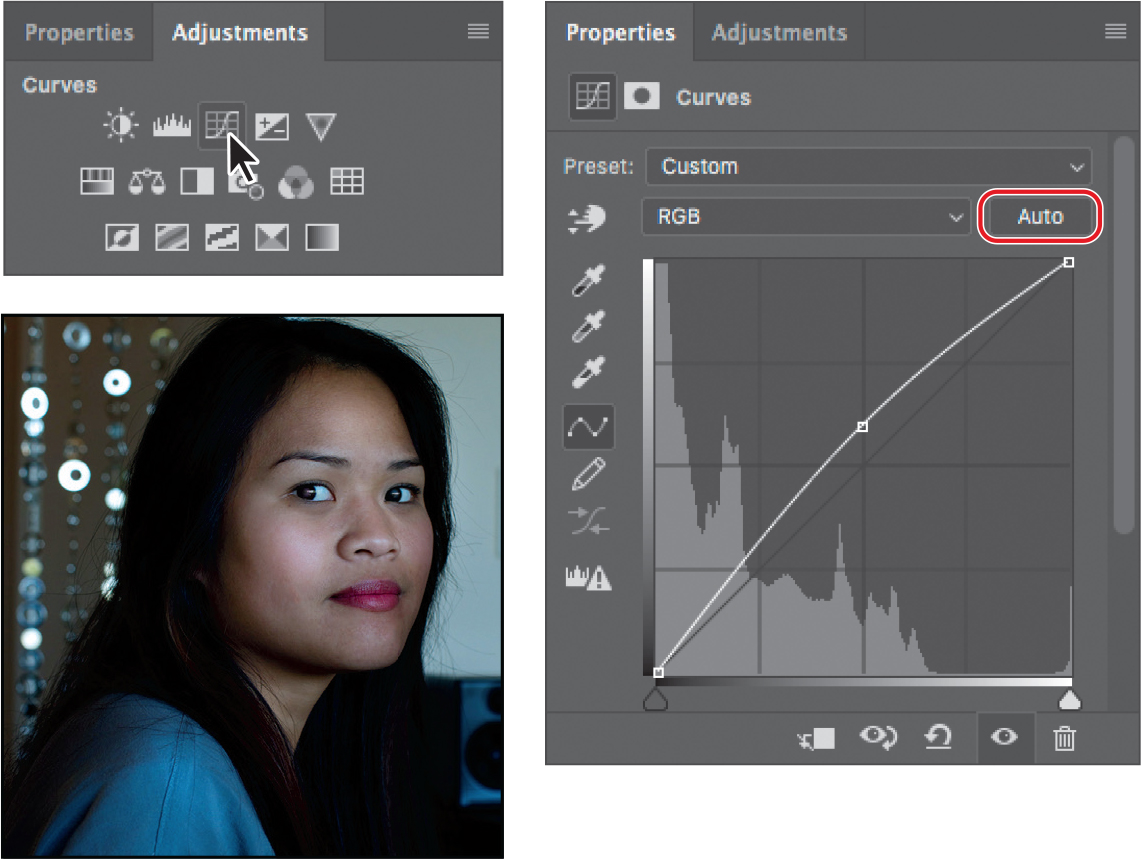
Choose Lighter from the Preset menu. The curve changes slightly. The difference between the two curves is that a preset applies the same curve to every image, while Auto customizes the curve after analyzing an individual image.
Click the Reset to Adjustment Defaults button (
 ) at the bottom of the Properties panel to revert back to the unadjusted image.
![]() Tip
Tip
If you want to use the Auto button or the white point or black point samplers (eyedropper icons) in the Curves or Levels adjustments, use them before applying manual adjustments. Like presets, adjustments by those tools replace manual adjustments.
Select the on-image adjustment tool (
 ) in the Curves panel, and then click the center of the forehead and drag up. Clicking with that tool adds a curve point that corresponds to the tonal level you clicked in the image. When you drag up, you raise that point and the curve, brightening the image from that tonal level.
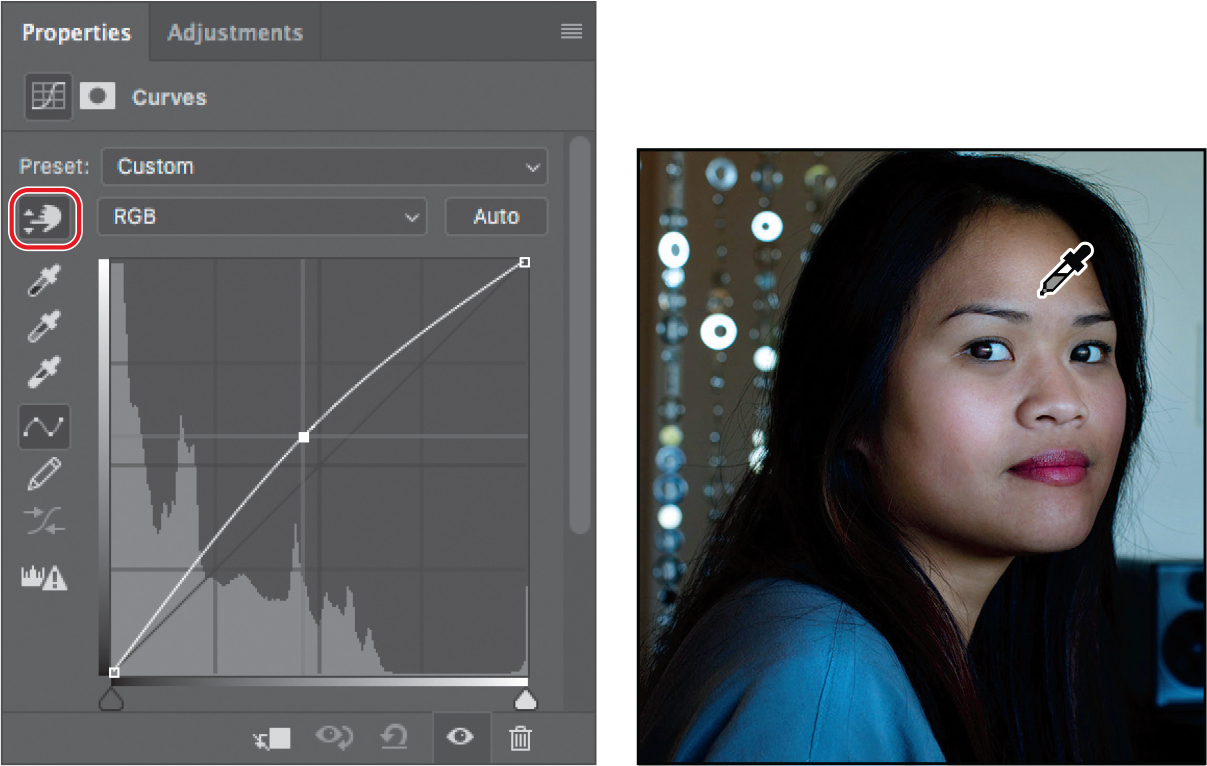
![]() Tip
Tip
To see how much you’ve brightened the image, hide the Curves layer, and then show it again.
Choose Layer > Flatten Image.
Save the file.
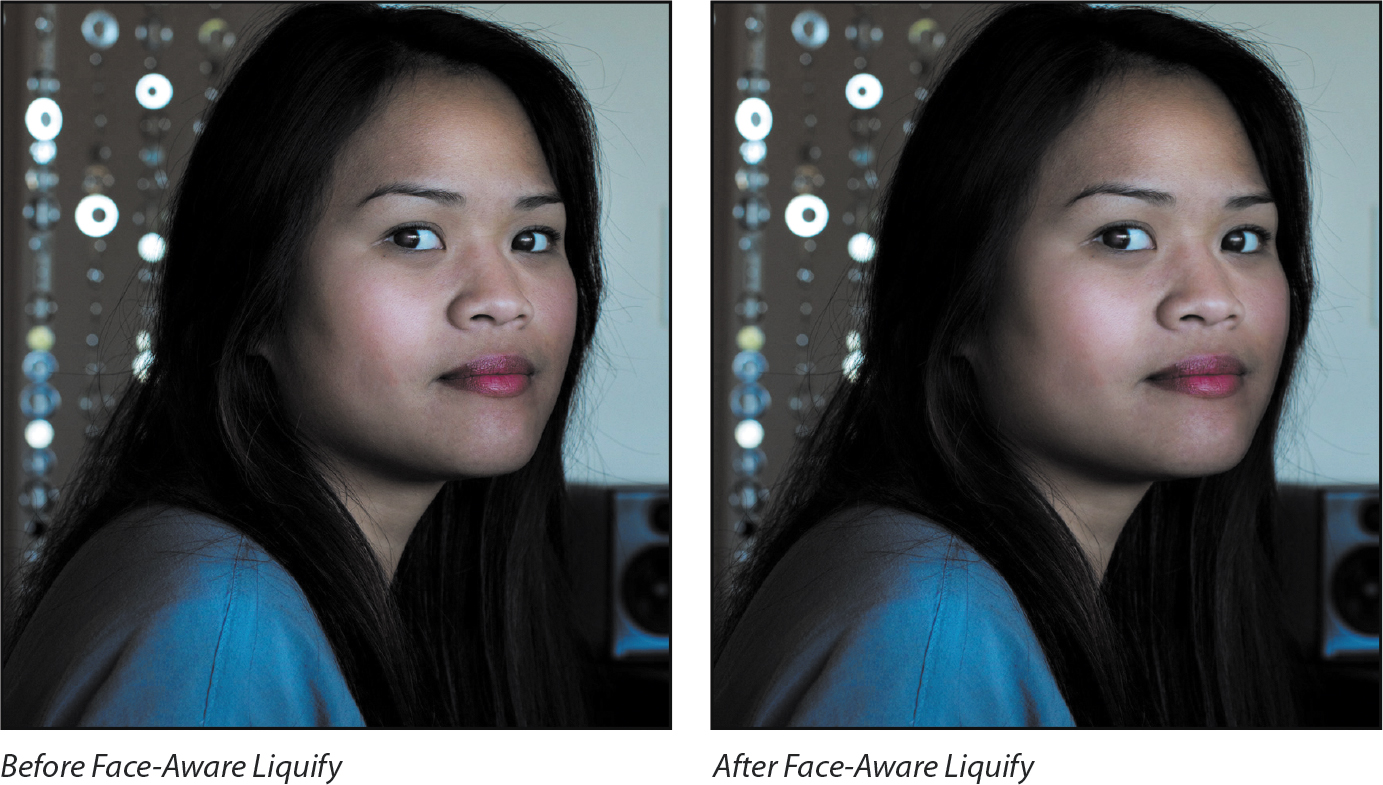
Adjusting facial features with Liquify
The Liquify filter is useful when you want to distort only part of an image. It includes Face-Aware Liquify options that can automatically recognize faces in images, and then lets you easily adjust facial features such as the eyes, nose, and mouth. For example, you can adjust the size of or distance between the eyes. Being able to adjust facial features can be useful for photos used in advertising and fashion, when portraying a certain look or expression may be more important than faithfully representing a specific person.
With RedEye_Working.psd still open, choose Filter > Liquify.
In the Properties panel, if the Face-Aware Liquify options are collapsed (hidden), expand them.

![]() Tip
Tip
When the Face tool (![]() ) is selected in the Liquify toolbar, handles appear as you hover the pointer over different parts of the face. You can drag those handles to adjust different parts of the face directly, as an alternative to dragging the Face-Aware Liquify sliders.
) is selected in the Liquify toolbar, handles appear as you hover the pointer over different parts of the face. You can drag those handles to adjust different parts of the face directly, as an alternative to dragging the Face-Aware Liquify sliders.
Make sure the Eyes section is expanded and that the link icon is selected for both Eye Size and Eye Height; then enter 32 for Eye Size and 10 for Eye Height.
When the link icon is not selected for an Eyes option, you can set different values for the left and right eyes.
Make sure the Mouth section is expanded, and then enter 5 for Smile and 9 for Mouth Height.
Make sure the Face Shape section is expanded, and then enter 40 for Jawline and 50 for Face Width.
Deselect and reselect the Preview option to compare the image before and after your changes.
![]() Tip
Tip
The Face-Aware Liquify options have a limited range because they’re designed for subtle, believable distortions. If you want to exaggerate faces into caricatures or extreme expressions, you may want to use the more advanced manual tools along the left side of the Liquify dialog box.
Feel free to experiment with any of the Face-Aware Liquify options to get a better sense of the possibilities for quick, easy alterations.
Click OK to exit Liquify. Close the document and save your changes.
The Face-Aware Liquify features are available only when Photoshop recognizes a face in an image. It may not recognize a face that is turned too far away from the camera or when a face is partially covered by hair, sunglasses, or a hat shadow.
Blurring a background
The interactive blurs in the Blur Gallery let you customize a blur as you preview it on your image. You’ll use an iris blur to blur the background in an image, focusing the viewer’s attention on the main attraction—in this case, the egret. You’ll apply the blur as a Smart Filter so that you have the option of changing it later.
You’ll start by looking at the start and end files in Bridge.
Choose File > Browse In Bridge to open Adobe Bridge.
In the Favorites panel in Bridge, click the Lessons folder. Then, in the Content panel, double-click the Lesson05 folder to open it.
Compare the Egret_Start.jpg and Egret_End.psd thumbnail previews.
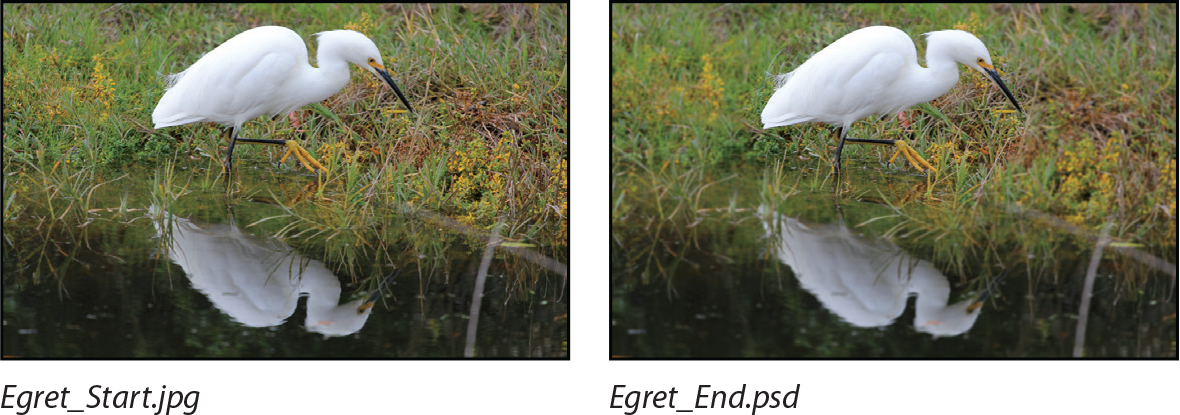
In the final image, the egret appears sharper, as its reflection and the grass around it have been blurred. Iris Blur, one of the interactive blurs in the Blur Gallery, makes the task an easy one—no masking required.
Choose File > Return To Adobe Photoshop, and choose File > Open As Smart Object.
Select the Egret_Start.jpg file in the Lesson05 folder, and click OK or Open.

Photoshop opens the image. There is one layer in the Layers panel, and it’s a Smart Object, as indicated by the badge on the layer thumbnail icon.
Choose File > Save As, choose Photoshop for the Format, name the file Egret_Working.psd, and click Save. Click OK in the Photoshop Format Options dialog box.
Choose Filter > Blur Gallery > Iris Blur.
![]() Tip
Tip
If you have an iPhone camera that produces an HEIF depth map, such as an iPhone Plus or iPhone X, you can create a more realistic background blur effect by loading the depth map into the Lens Blur filter (Filter > Blur > Lens Blur).
A blur ellipse is centered on your image. You can adjust the location and scope of the blur by moving the center pin, feather handles, and ellipse handles. At the top right corner of the Blur Gallery task space, you also see the expandable Field Blur, Tilt-Shift Blur, Path Blur, and Spin Blur panels; those are additional types of blur you can apply.
Drag the center pin so that it’s at the bottom of the bird’s body.
Click the ellipse, and drag inward to tighten the focus around the bird.
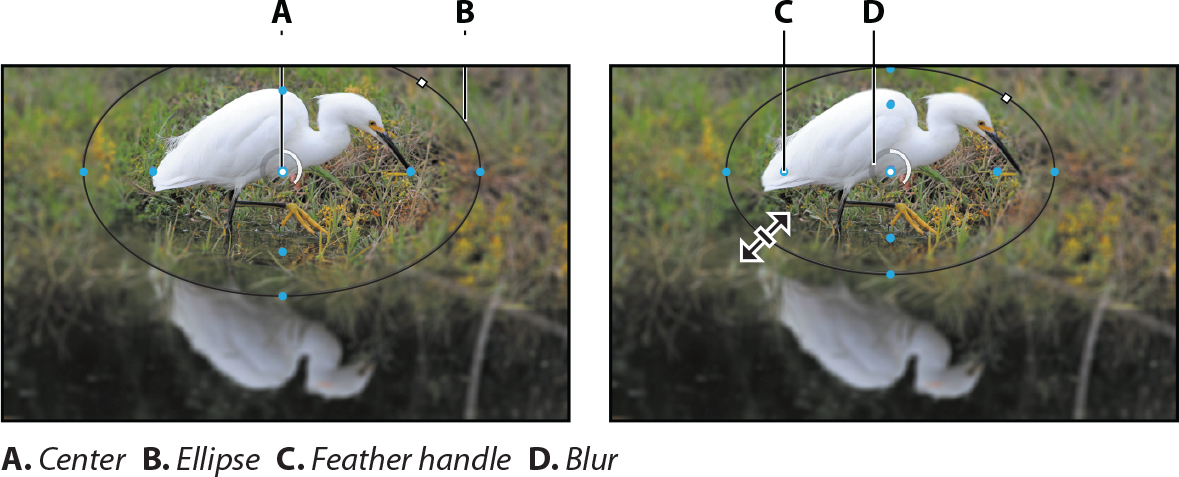
Press Alt (Windows) or Option (Mac) as you click and drag the feather handles to match those in the first image below. Pressing Alt or Option lets you drag each handle separately.
Click and drag on the Blur ring to reduce the amount of blur to 5 px, creating a gradual but noticeable blur. You can also change the same value by moving the Blur slider in the Iris Blur area of the Blur Tools panel.

Click OK in the options bar to apply the blur.
The blur may be a little too subtle. You’ll edit the blur to increase it slightly.
Double-click Blur Gallery in the Egret layer in the Layers panel to open it again. Adjust the blur to 6 px, and click OK in the options bar to apply it.
The egret is accentuated by blurring the rest of the image. Because you applied the filter to a Smart Object, you can hide or edit the effect without altering the original image.
Save the file, and then close it.
Blur Gallery
The Blur Gallery includes five interactive blurs: Field Blur, Iris Blur, Tilt-Shift, Path Blur, and Spin Blur. Each gives you on-image selective motion blur tools, with an initial blur pin. You can create additional blur pins by clicking on the image. You can apply a single blur or a combination of blurs, and you can create a strobe effect for path and spin blurs.
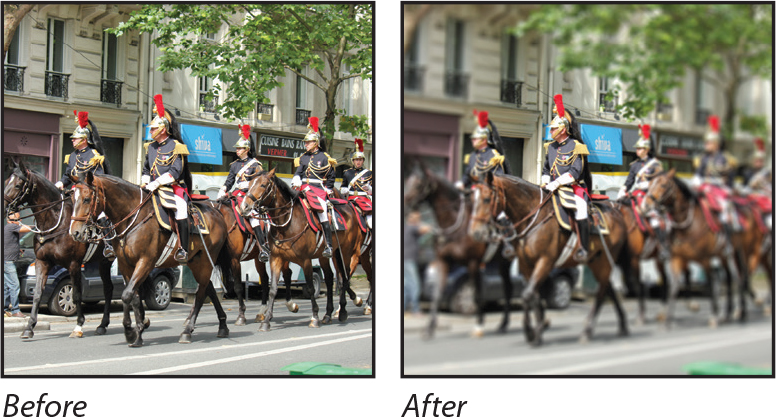
Field Blur applies a gradient blur to areas of the image, defined by pins you create and settings you specify for each. When you first apply Field Blur, a pin is placed in the center of the image. You can adjust the blur relative to that point by dragging the blur handle or specifying a value in the Blur Tools panel; you can also drag the pin to a different location.
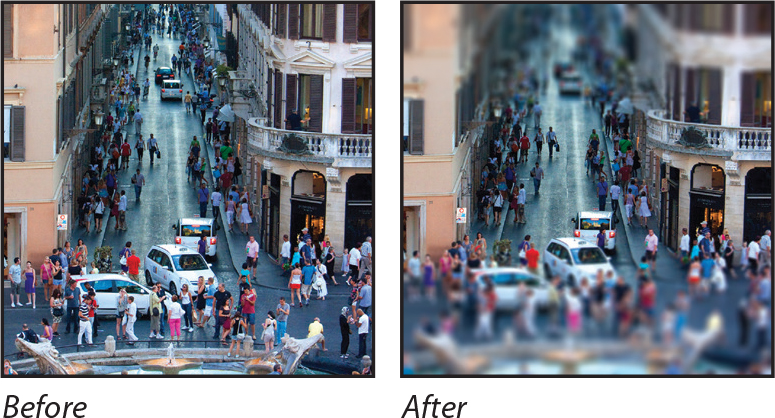
Tilt-Shift simulates an image taken with a tilt-shift lens, where the image has very shallow depth of field with the focus point in the distance. This blur defines areas of sharpness and then fades to a blur at the edges. You can use this effect to simulate photos of miniature objects.

Iris Blur simulates a shallow depth-of-field effect, gradually blurring everything outside the focus ring. Adjust the ellipse handles, feather handles, and blur amount to customize the iris blur.

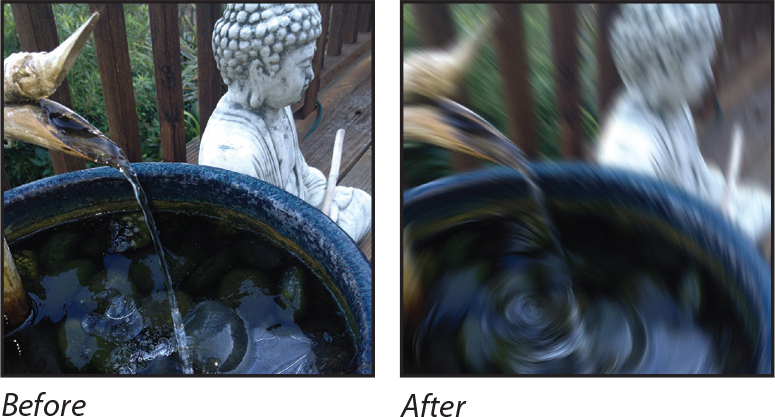
Spin Blur is a radial-style blur measured in degrees. You can change the size and shape of the ellipse, re-center the rotation point by pressing Alt or Option as you click and drag, and adjust the blur angle. You can also specify the blur angle in the Blur Tools panel. Multiple spin blurs can overlap. Can be useful for illustrating the rotation of propellers, wheels, or gears.
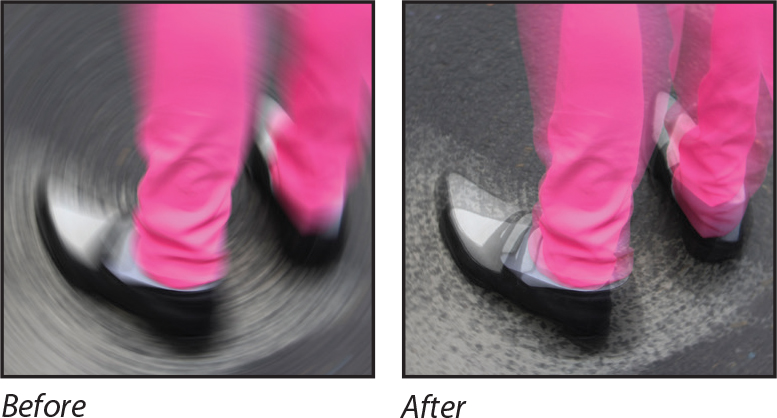
Path Blur creates motion blurs along paths you draw. You control the shape and amount of the blur.
When you first apply a Path Blur, a default path appears. Drag the end point to reposition it. Click the center point and drag to change the curve. Click to add additional curve points. The arrow on the path indicates the blur’s direction.
You can also create a multiple-point path or a shape. Blur shapes describe the local motion blurs, similar to camera shake (see “Camera Shake Reduction” on page 142). The Speed slider in the Blur Tools panel determines the speed for all the path blurs. The Centered Blur option ensures that the blur shape for any pixel is centered on that pixel, resulting in more stable-feeling motion blurs; to make the motion appear more fluid, deselect this option.
If you wanted to illustrate the blurs of individual animal legs moving in different directions, you could add a separate instance of Path Blur to each leg.
Some blur types provide additional options in the Effects tab, where you specify the bokeh parameters to control the appearance of blurred areas. Light Bokeh brightens the blurred areas; Bokeh Color adds more vivid colors to lightened areas that aren’t blown out to white; Light Range determines the range of tones that the settings affect.
You can add a strobe effect to spin and path blurs. Select the Motion Effects tab to bring its panel forward. The Strobe Strength slider determines how much blur shows between flash exposures (0% gives no strobe effect; 100% gives full strobe effect with little blur between exposures). Strobe Flashes determines the number of exposures.

Applying a blur will smooth out visible digital image noise or film grain that’s in the original image, and this mismatch between the original and blurred areas can make the blur appear artificial. You can use the Noise tab to restore noise or grain so that blurred areas match up with unblurred areas. Start with the Amount slider, and then use the other Noise options to match the character of the original grain. Increase the Color value if the original has visible color noise, and lower the Highlights value if you need to balance the noise level in the highlights compared to the shadows.
Creating a panorama
Sometimes a vista is just too large for a single shot. Photoshop makes it easy to combine multiple images into a panorama so that your viewers can get the full effect.
Once again, you’ll take a look at the end file first, to see where you’re going.
Choose File > Browse In Bridge.
![]() Tip
Tip
In Bridge, you can preview a selected image in full screen mode by pressing the spacebar. This is useful for previewing detailed or large images such as a panorama. Press the spacebar again to close the preview.
Navigate to the Lesson05 folder, if you’re not there already. Then, look at the Skyline_End.psd thumbnail preview.

You’ll combine four shots of the Seattle skyline into a single wide panorama image so that viewers get a sense of the whole scene. Creating a panorama from multiple images requires only a few clicks. Photoshop does the rest.
![]() Tip
Tip
You can also open selected images from Bridge directly into Photomerge by choosing Tools > Photoshop > Photomerge.
Return to Photoshop.
With no files open in Photoshop, choose File > Automate > Photomerge.
In the Source Files area, click Browse, and navigate to the Lesson05/Files For Panorama folder.
Shift-select all the images in the folder, and click OK or Open.
In the Layout area of the Photomerge dialog box, select Perspective.
The best option for merging photos isn’t always Perspective; it depends on how the originals were photographed. If you’re not completely happy with the result of a particular merge, you can always try again with a different Layout option. If you’re not sure which one to use, you can simply click Auto.
At the bottom of the Photomerge dialog box, select Blend Images Together, Vignette Removal, Geometric Distortion Correction, and Content Aware Fill Transparent Areas. Then click OK.
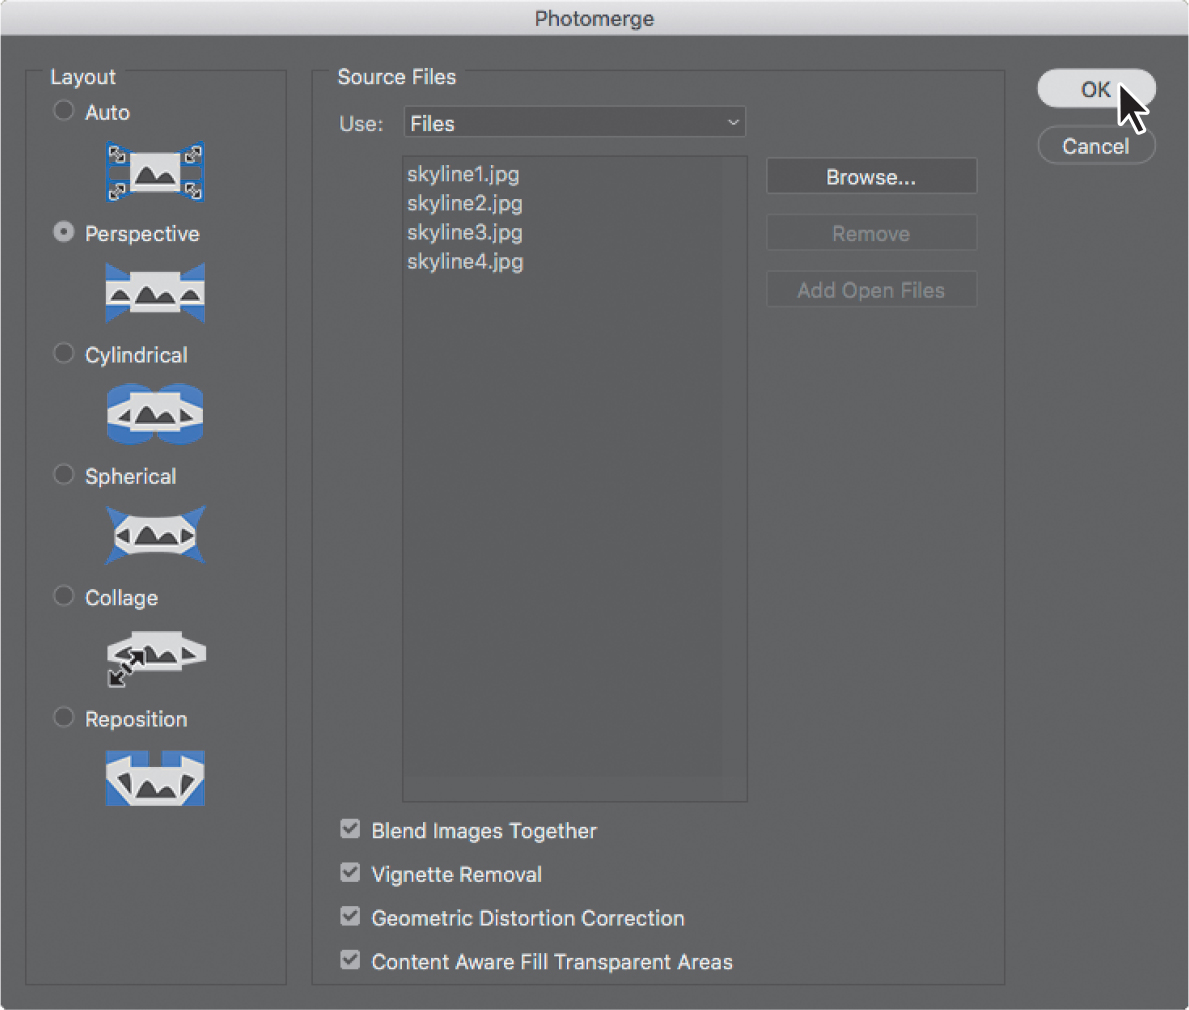
Blend Images Together blends images based on the optimal borders between them, instead of just creating a simple rectangular blend. Vignette Removal performs exposure compensation in images with darkened edges. Geometric Distortion Correction compensates for barrel, pincushion, or fisheye distortion. Content Aware Fill Transparent Areas automatically patches the empty areas between the merged image edges and the sides of the canvas.
![]() Note
Note
Photomerge will require more time when you merge more images, or images with large pixel dimensions. Photomerge works faster on computers that are newer or that have more RAM.
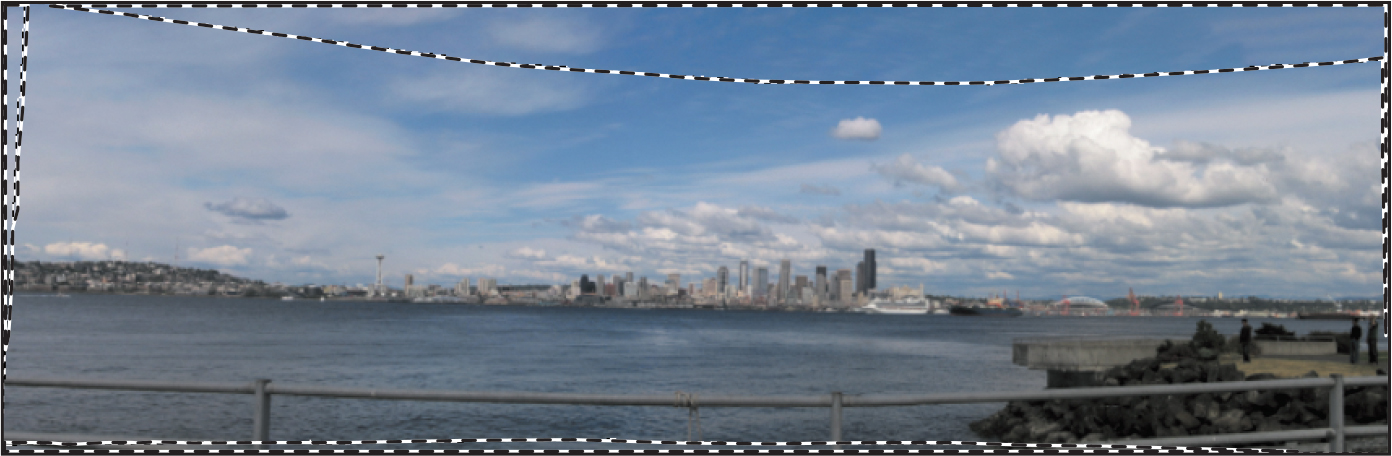
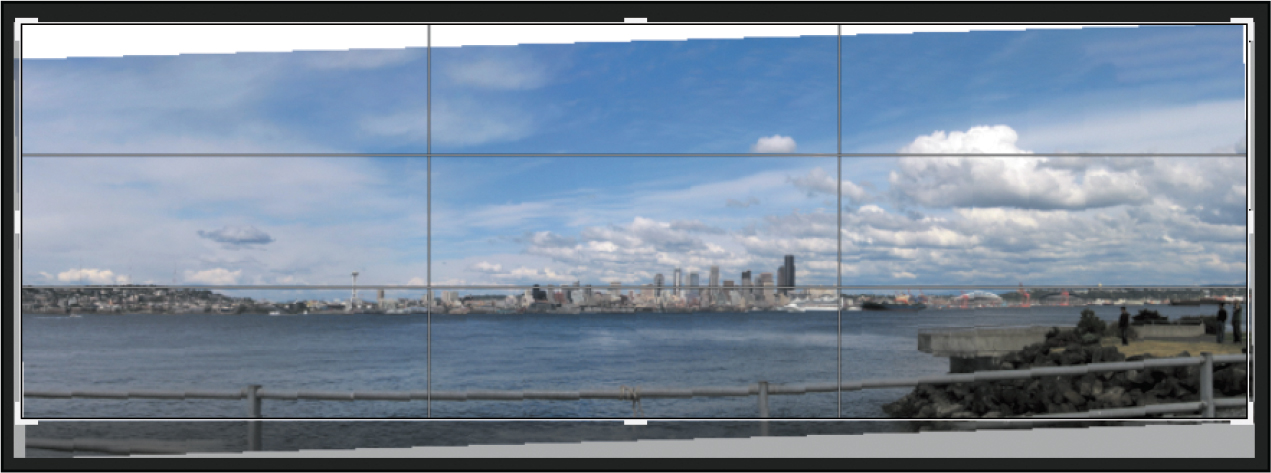
Photoshop creates the panorama image. It’s a complex process, so you may have to wait a few moments while Photoshop works. When it’s finished, you’ll see the full vista in the image window with five layers in the Layers panel. The bottom four layers are the original four images you selected. Photoshop identified the overlapping areas of the images and matched them, correcting any angular discrepancies. The top layer, containing “(merged)” in the layer name, is a single panorama image blended from all of the images you selected, combined with formerly empty areas filled in by Content Aware Fill. Those areas are indicated by the selection.
![]() Tip
Tip
If you want to see how the panorama looks without the areas created by Content Aware Fill, hide the top layer
Choose Select > Deselect.
![]() Tip
Tip
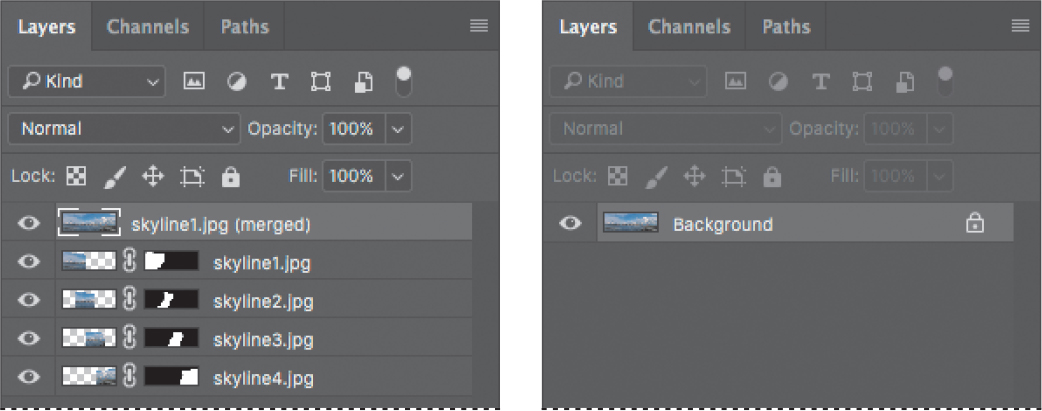
In the finished panorama files, the layers created from the original images have masks. Photoshop created the masks to blend the edges where adjacent images match. You can edit those masks, but if you won’t need to, flattening the image results in a smaller file size.
Choose Layer > Flatten Image.
Choose File > Save As. Choose Photoshop for the Format, and name the file Skyline_Working.psd. Save the file in the Lesson05 folder. Click Save.
The panorama looks great, but it’s a little dark. You’ll add a Levels adjustment layer to brighten it a little bit.
Click the Levels icon in the Adjustments panel to add a Levels adjustment layer.
![]() Note
Note
Step 13 works when you click an area that is close to, but not exactly, pure white. If an image doesn’t change when you click it with the White Point eyedropper, you probably clicked an area that can’t become any whiter and there is no color cast to correct. That happens when the pixel values where you clicked are already pure white in all color channels (such as RGB 255,255,255).
Select the White Point eyedropper in the Properties panel, and then click on a white area of the clouds.
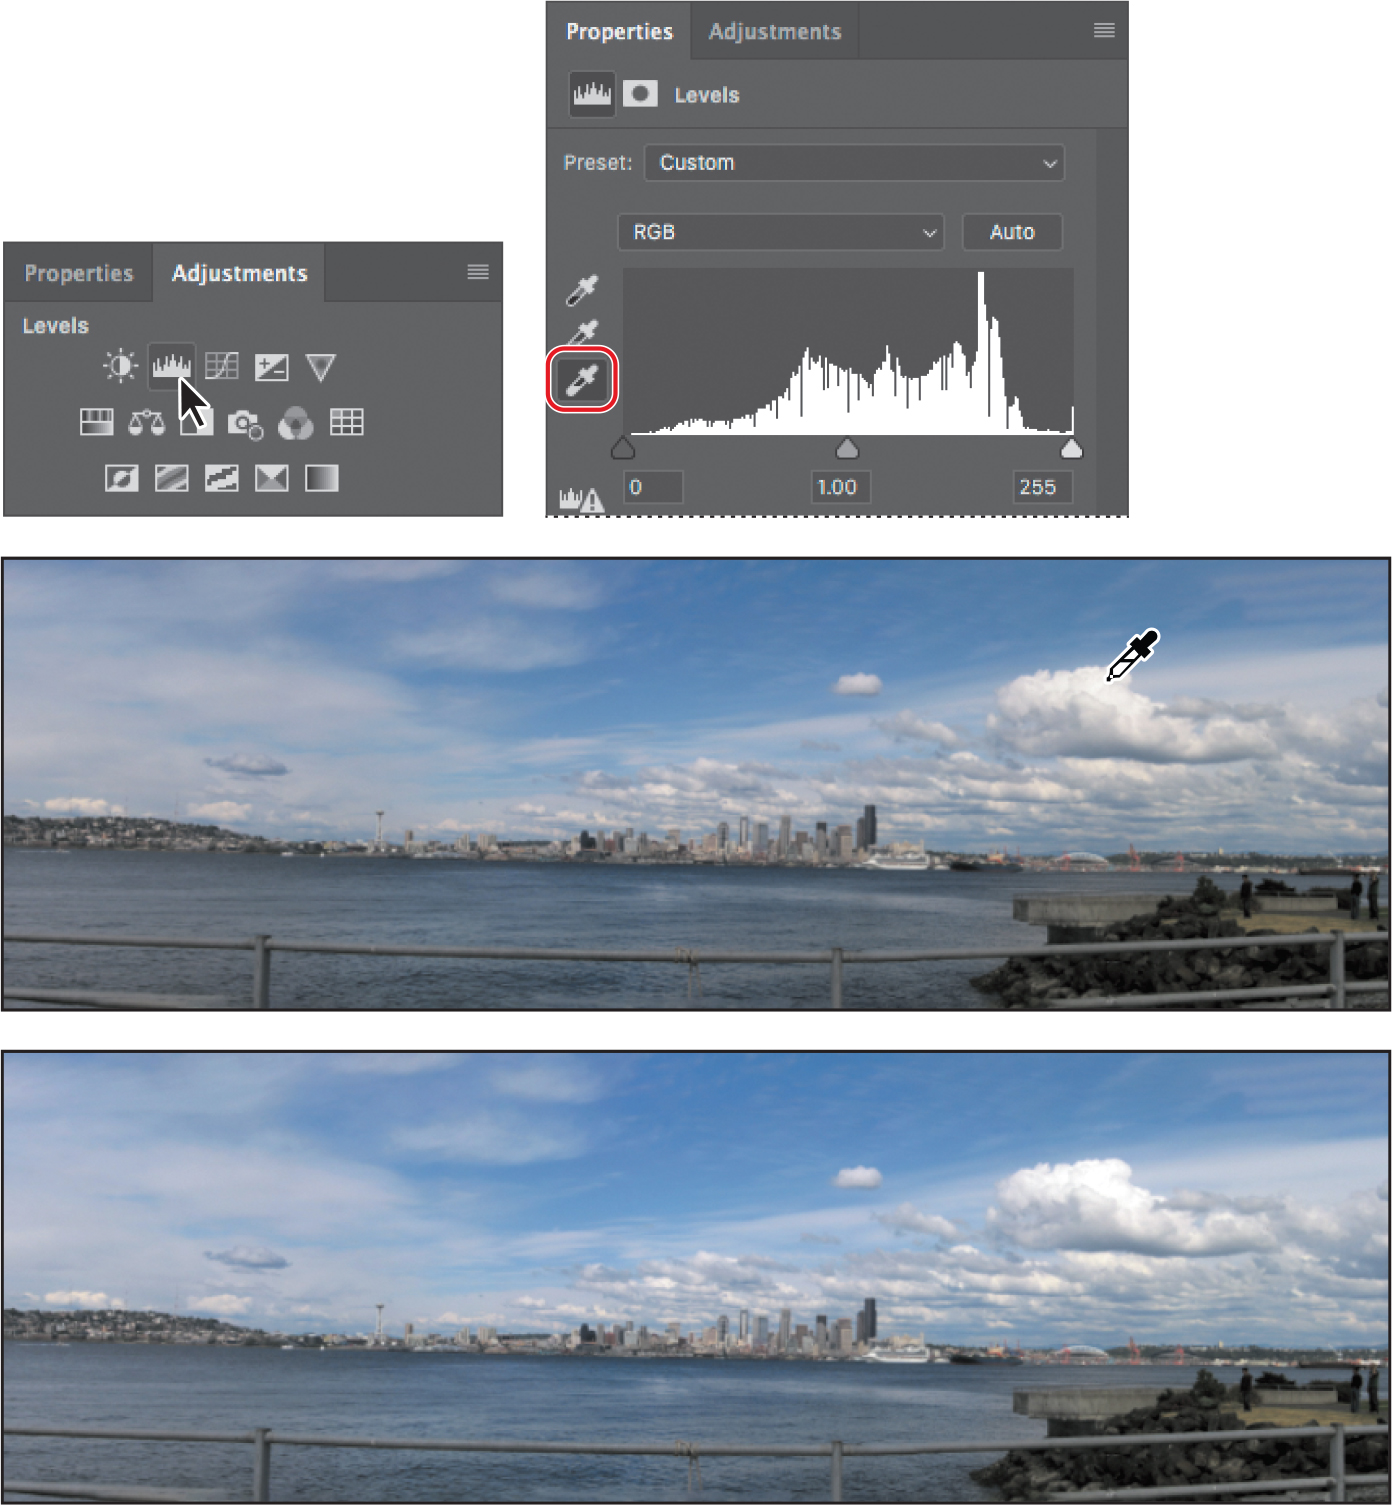
The entire image brightens. The sky appears more blue, because the image was originally a little warm. The White Point eyedropper neutralized the warm cast.
![]() Note
Note
In step 14, the Photoshop Format Options alert may appear because a layer was added. The Photoshop Format Options dialog box usually won’t appear for Photoshop documents containing only a Background layer.
Save your work. Click OK in the Photoshop Format Options dialog box.
It’s that easy to create a panorama!
Filling empty areas when cropping
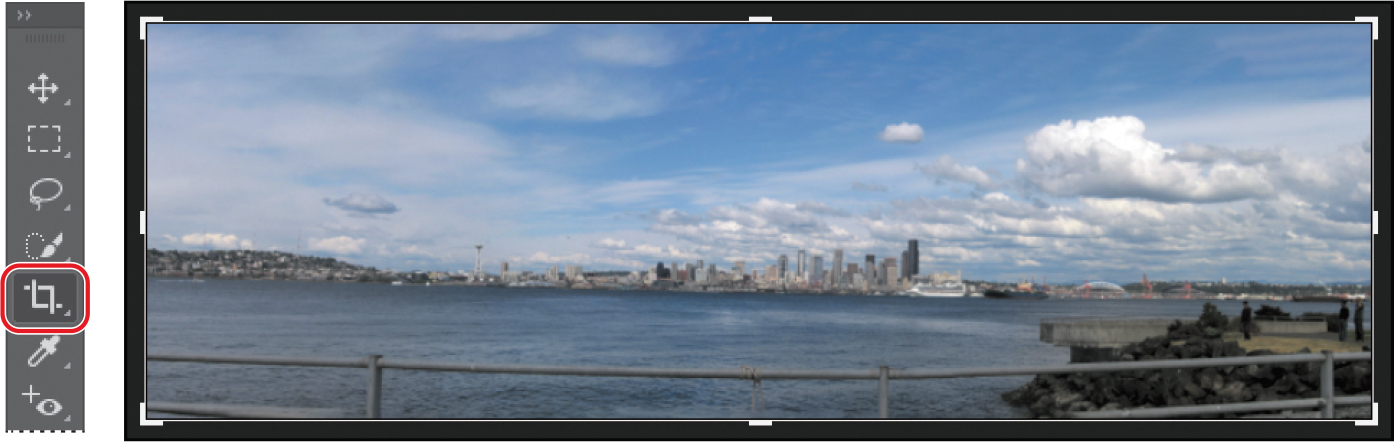
The panorama image looks great except for two things: The horizon is slightly tilted, and the lower handrail is incomplete where the rocks on the right descend into the water. If you were to rotate the image, empty areas might appear at the corners, requiring a tighter crop and losing parts of the image. Fortunately, the same Content-Aware technology that filled in empty areas resulting from the panorama merge can also fill in empty areas that can result from straightening and cropping.
Make sure Skyline_Working.psd is open, and make sure the Background layer is selected in the Layers panel.
Choose Layer > Flatten Image.
In the Tools panel, select the Crop tool. The crop rectangle and its handles appear around the image.
In the options bar, select the Straighten button (
 ), and make sure Content-Aware is selected.
Position the Straighten pointer on the horizon at the left edge of the image, and drag to the right to create a Straighten line that’s aligned with the horizon; release the mouse button when you reach the end of the horizon at the right edge of the image.
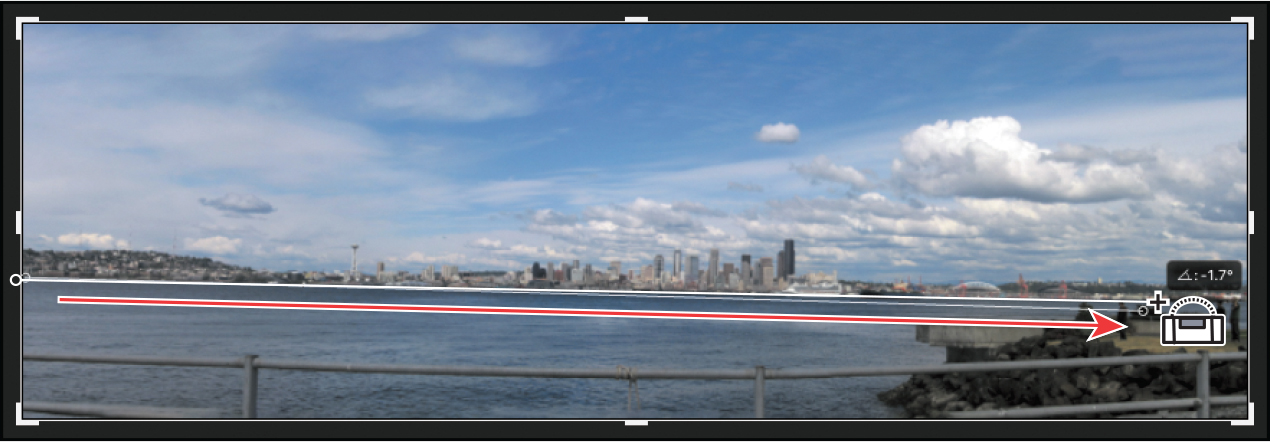
Notice there is now white space that needs to be filled near the corners.
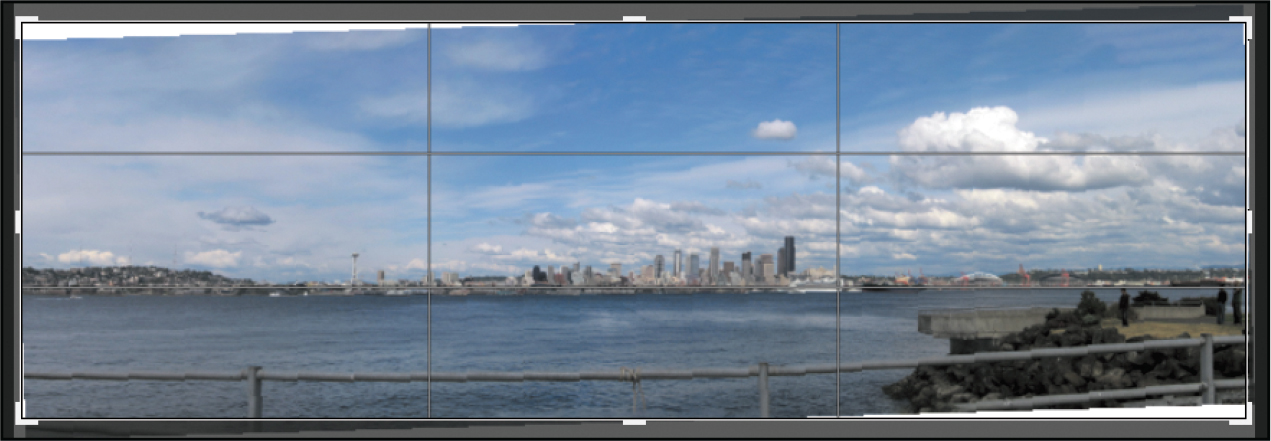
With the crop rectangle still active, drag the image down until the incomplete part of the lower guardrail is outside the crop rectangle.
Click the Commit button in the options bar (
 ) to apply the current crop settings. Content-Aware Crop fills in the empty areas at the top and sides of the image.
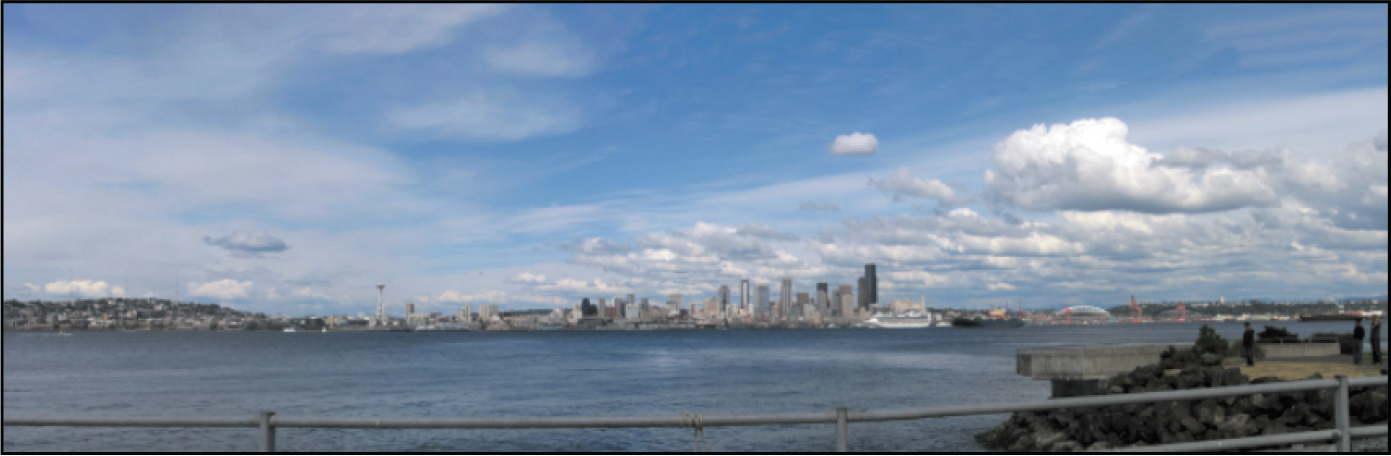
Save your changes, and close the document.
Correcting image distortion
The Lens Correction filter fixes common camera lens flaws, such as barrel and pincushion distortion, chromatic aberration, and vignetting. Barrel distortion is a lens defect that causes straight lines to bow out toward the edges of the image. Pincushion distortion is the opposite effect, causing straight lines to bend inward. Chromatic aberration appears as a color fringe along the edges of image objects. Vignetting occurs when the edges of an image, especially the corners, are darker than the center.
Some lenses exhibit these defects depending on the focal length or the f-stop used. The Lens Correction filter can apply settings based on the camera, lens, and focal length that were used to make the image. The filter can also rotate an image or fix image perspective caused by tilting a camera vertically or horizontally. The filter’s image grid makes it easier and more accurate to make these adjustments than using the Transform command.
Choose File > Browse In Bridge.
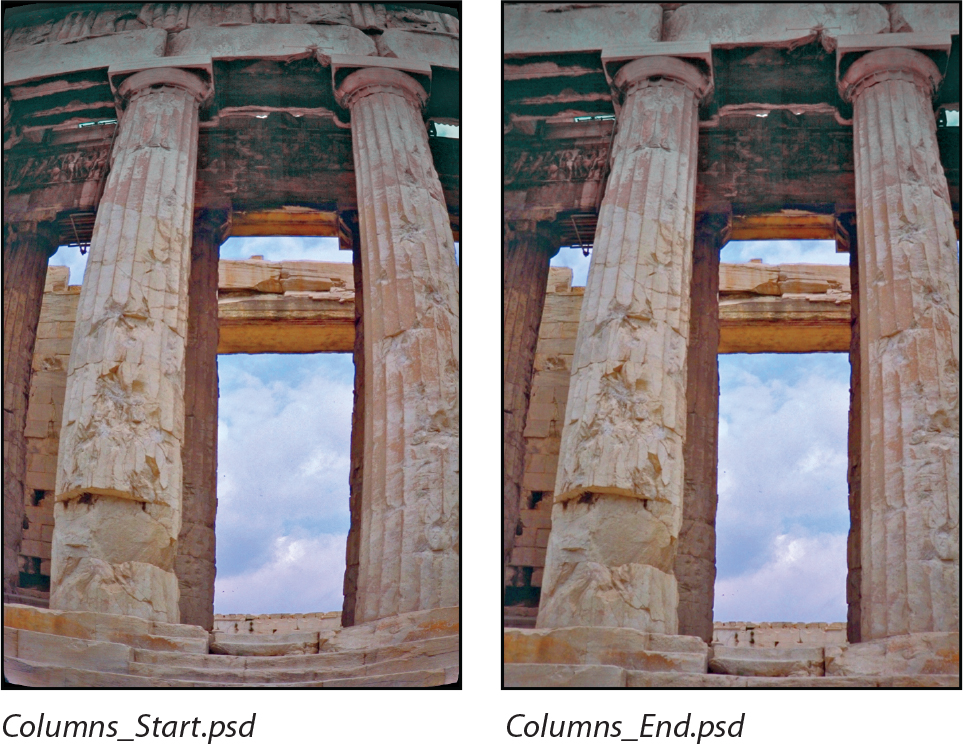
Navigate to the Lesson05 folder if you’re not already there, and then look at the Columns_Start.psd and Columns_End.psd thumbnail previews.
![]() Tip
Tip
If the crop rectangle from the previous exercise is still visible and distracting, switch to a tool such as the Hand tool.
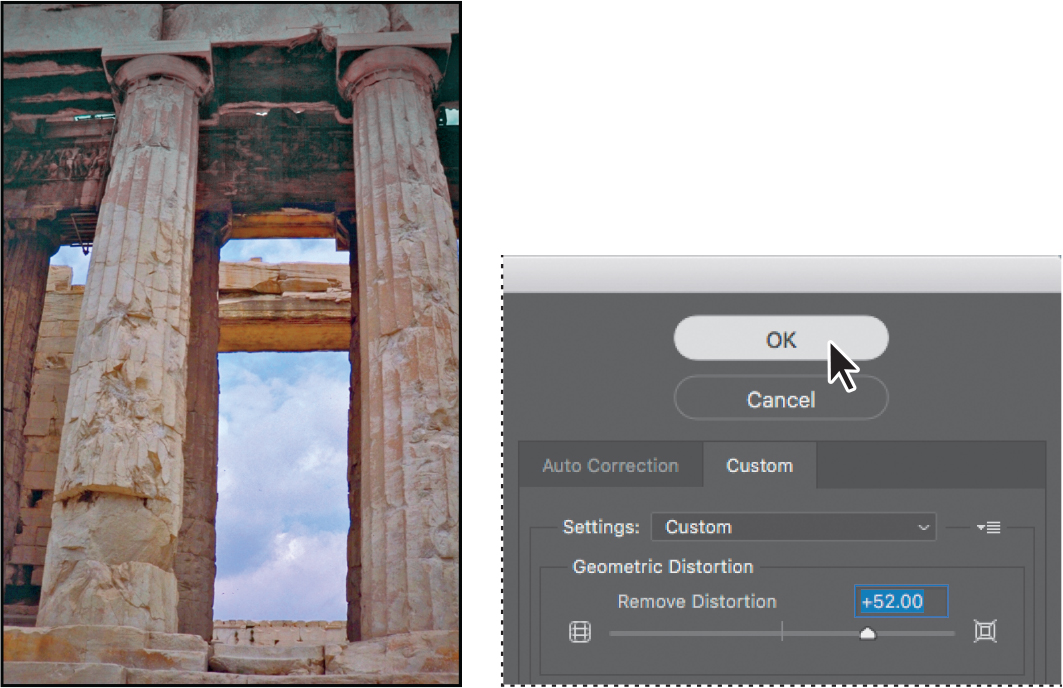
In this case, the original image of a Greek temple is distorted, with the columns appearing to be bowed. This photo was shot at a range that was too close with a wide-angle lens. You’ll quickly correct the lens barrel distortion.
Double-click the Columns_Start.psd file to open it in Photoshop.
Choose File > Save As. In the Save As dialog box, name the file Columns_Working.psd, and save it in the Lesson05 folder. Click OK if the Photoshop Format Options dialog box appears.
Choose Filter > Lens Correction. The Lens Correction dialog box opens.
Select Show Grid at the bottom of the dialog box, if it’s not already selected.
An alignment grid overlays the image. To the right are options for automatic corrections based on lens profiles. In the Custom tab are manual controls for correcting distortion, chromatic aberration, and perspective.
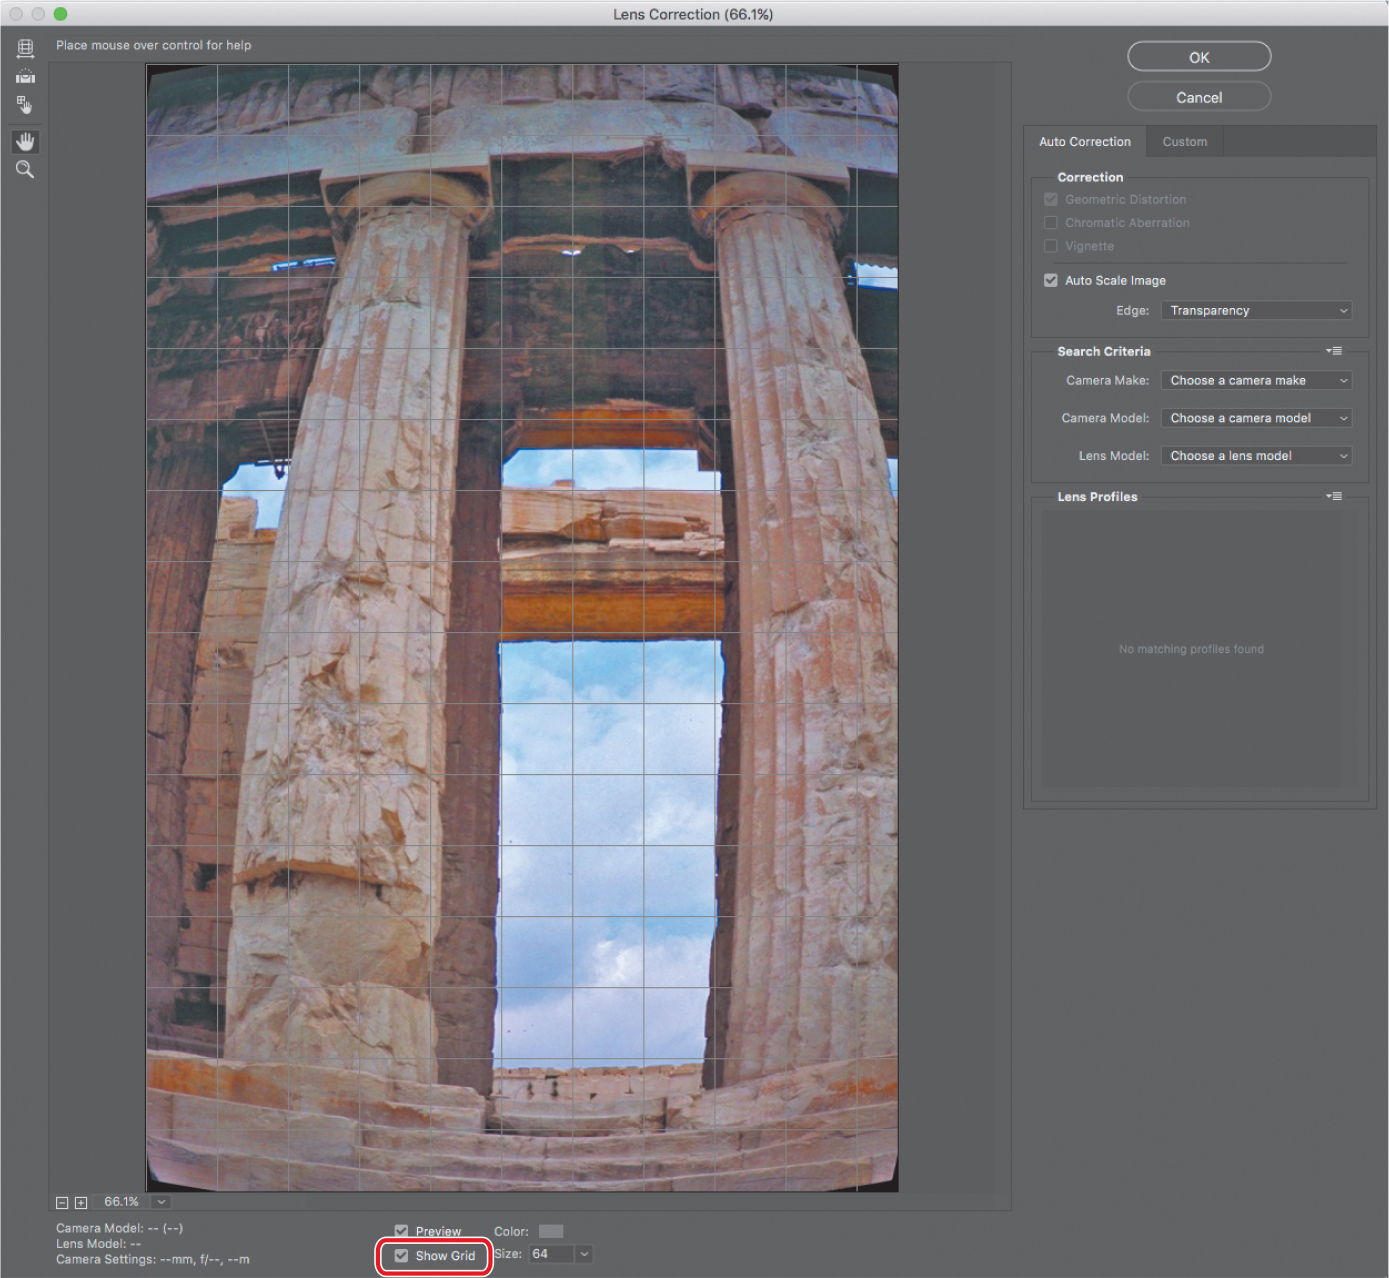
The Lens Correction dialog box includes auto-correction options. You’ll adjust one setting in the Auto Correction tab and then customize the settings.
In the Correction area of the Auto Correction tab, make sure Auto Scale Image is selected, and that Transparency is selected from the Edge menu.
Select the Custom tab.
![]() Tip
Tip
Watch the alignment grid as you make these changes so that you can see when the vertical columns are straightened in the image.
In the Custom tab, drag the Remove Distortion slider to about +52.00 to remove the barrel distortion in the image. Alternatively, you could select the Remove Distortion tool (
 ) and drag in the image preview area until the columns are straight. The adjustment causes the image borders to bow inward. However, because you selected Auto Scale Image, the Lens Correction filter automatically scales the image to adjust the borders.
Click OK to apply your changes and close the Lens Correction dialog box.
The curving distortion caused by the wide-angle lens and low shooting angle is eliminated.
(Optional) To compare the image before and after the last change, press Ctrl+Alt+Z (Windows) or Command+Option+Z (Mac) to undo the filter, and then press the same keys to redo the filter. That’s a keyboard shortcut for the Edit > Toggle Last State command, so you can press it repeatedly to go back and forth between the last two states of the document.
Choose File > Save to save your changes, click OK if the Photoshop Format Options dialog box appears, and then close the image.
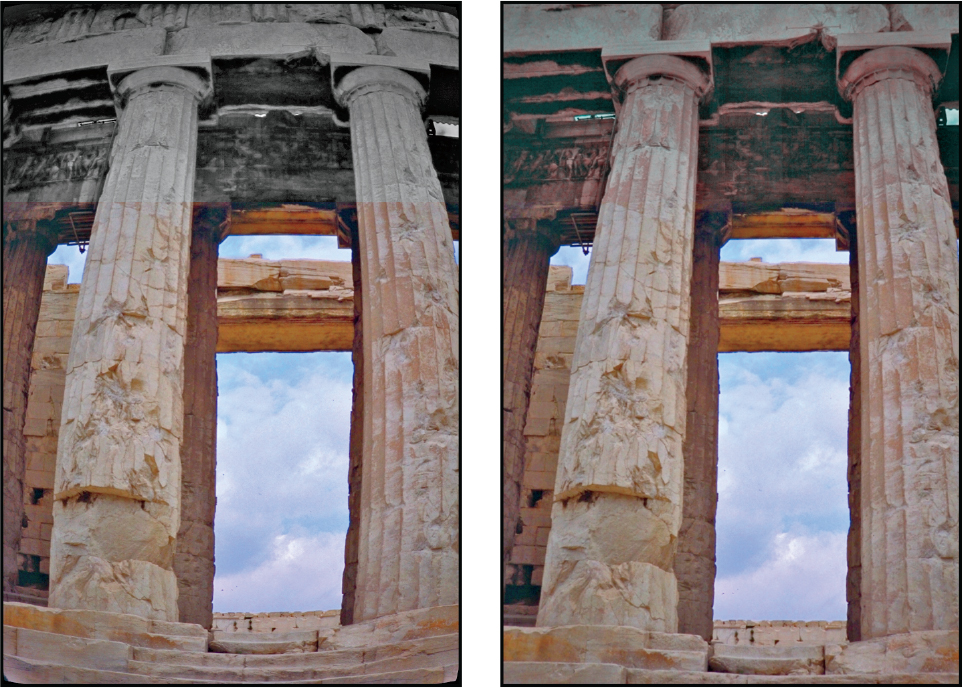
The temple looks much more stable now!
Extending depth of field
When you’re shooting a photo, you often have to choose to focus on either the background or the foreground. If you want the entire image to be in focus, you can take two photos—one with the background in focus and one with the foreground in focus—and then merge the two in Photoshop.
Because you’ll need to align the images exactly, it’s helpful to use a tripod to keep the camera steady. However, you may be able to get good results with a handheld camera if you pay attention to framing and alignment. In this exercise, you’ll add depth of field to an image of a wine glass in front of a beach.
Choose File > Browse In Bridge.
Navigate to the Lesson05 folder, if you’re not there already, and then look at the Glass_Start.psd and Glass_End.psd thumbnail previews.
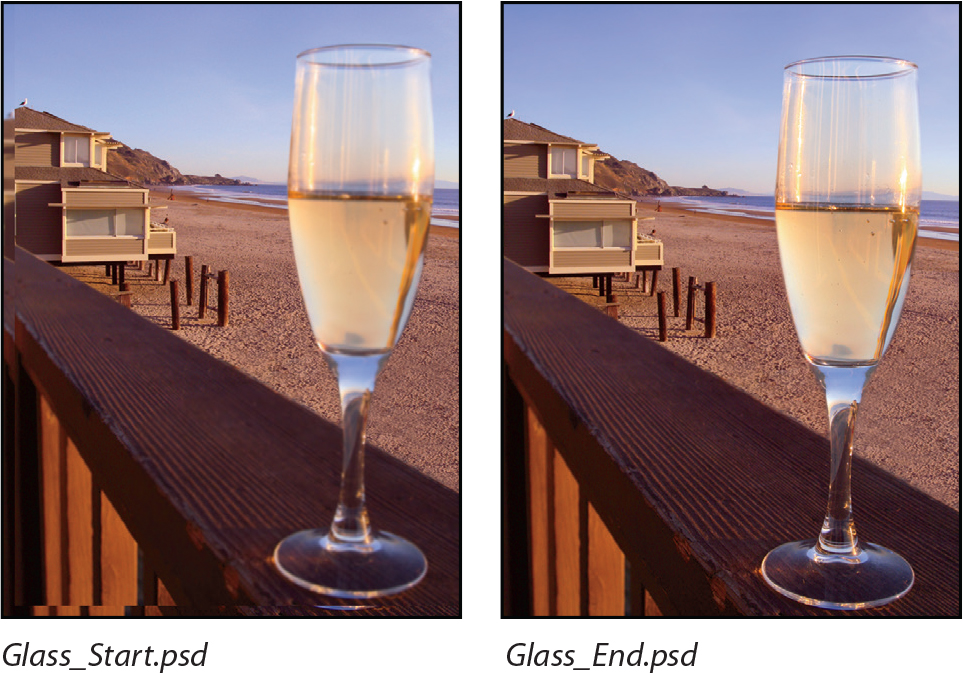
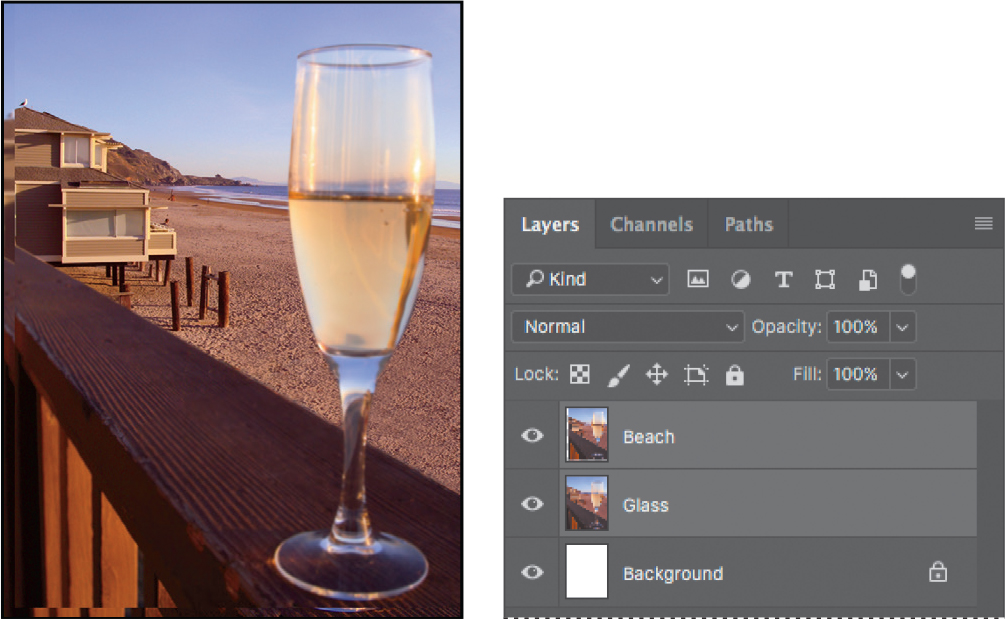
The first image has two layers. Depending on which layer is visible, either the glass in the foreground or the beach in the background is in focus. You’ll extend the depth of field to make both clear.
Double-click the Glass_Start.psd file to open it.
Choose File > Save As. Name the file Glass_Working.psd, and save it in the Lesson05 folder. Click OK if the Photoshop Format Options dialog box appears.
In the Layers panel, hide the Beach layer, so that only the Glass layer is visible. The glass is in focus, but the background is blurred. Then, show the Beach layer again. Now the beach is in focus, but the glass is blurred.
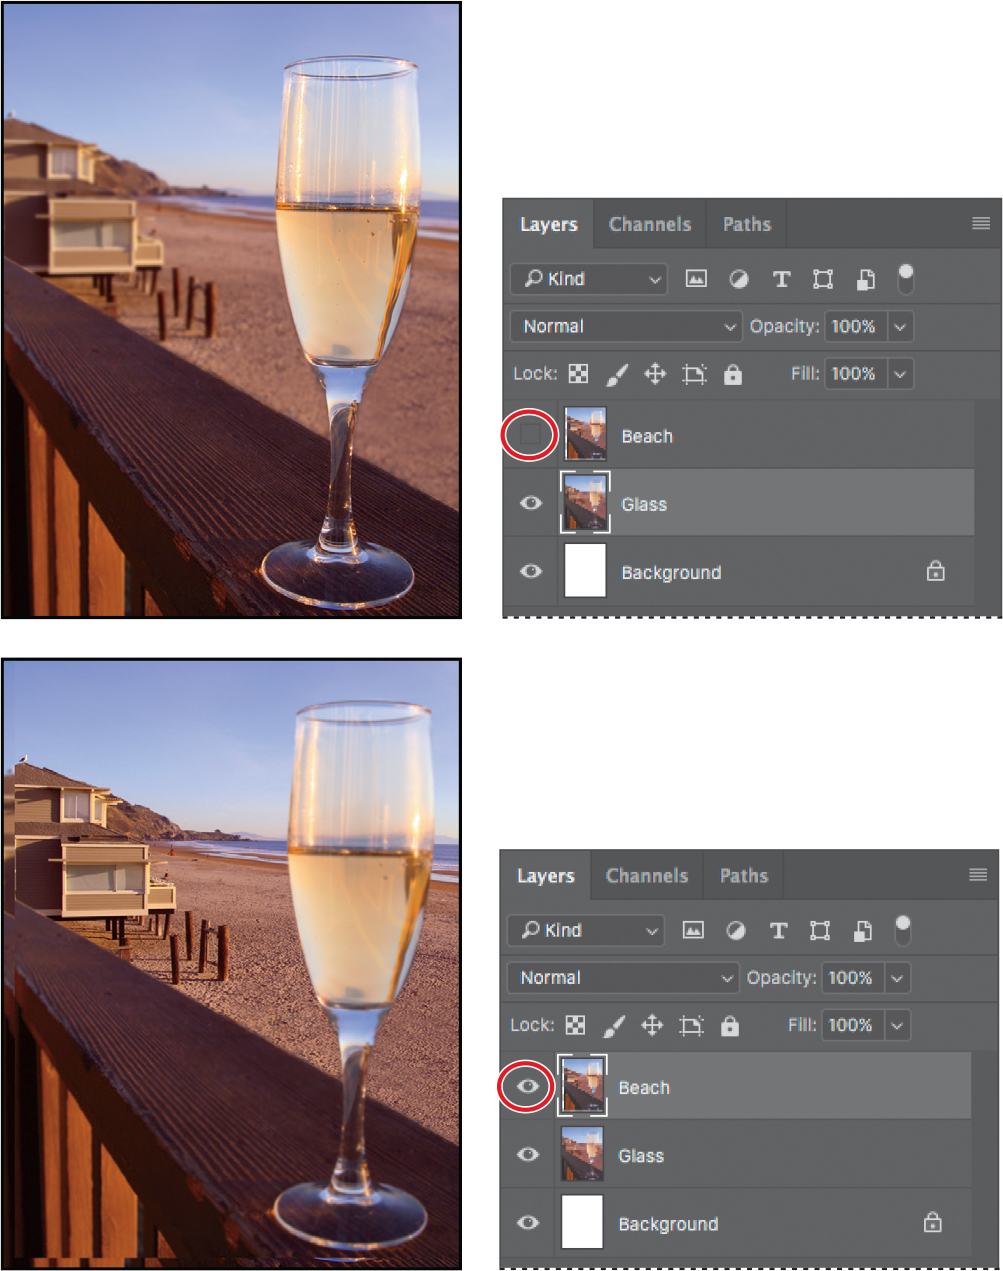
You’ll merge the layers, using the part of each layer that is in focus. First, you need to align the layers.
Shift-click to select both of the layers.
Choose Edit > Auto-Align Layers.
Because these images were shot from the same angle, Auto will work just fine.
![]() Tip
Tip
When aligning layers that are not involved in a panorama, Reposition is often the best alignment option to use. In this exercise, Reposition is the projection that the Auto option chose.
Select Auto, if it isn’t already selected. Make sure neither Vignette Removal nor Geometric Distortion is selected. Then click OK to align the layers.

Now that the layers are perfectly aligned, you’re ready to blend them.
Make sure both layers are still selected in the Layers panel. Then choose Edit > Auto-Blend Layers.
![]() Tip
Tip
The technique in this exercise, called focus stacking, is useful for macro photography, where depth of field is typically very shallow. Multiple images with shallow depth of field are shot at different focus distances, and then merged.
Select Stack Images and Seamless Tones And Colors, if they aren’t already selected. Make sure Content Aware Fill Transparent Areas is not selected, and then click OK.
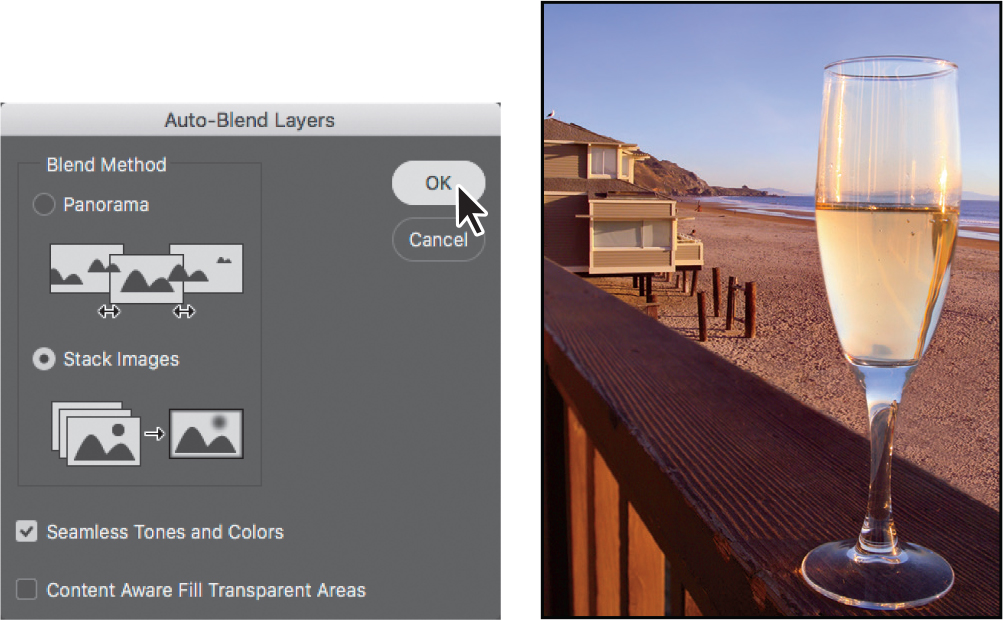
Both the wine glass and the beach behind it are in focus.
Save your work, and close the file.
Removing objects using Content-Aware Fill
You’ve used the content-aware features in some pretty impressive ways in earlier lessons, and to fill in the sky in the panorama project in this lesson. Now you’ll use Content-Aware Fill to remove an unwanted object and have Photoshop convincingly fill in the area instead of leaving a blank space.
Choose File > Browse In Bridge.
Navigate to the Lesson05 folder, if you’re not there already, and then look at the JapaneseGarden_Start.jpg and JapaneseGarden_End.jpg thumbnail previews.
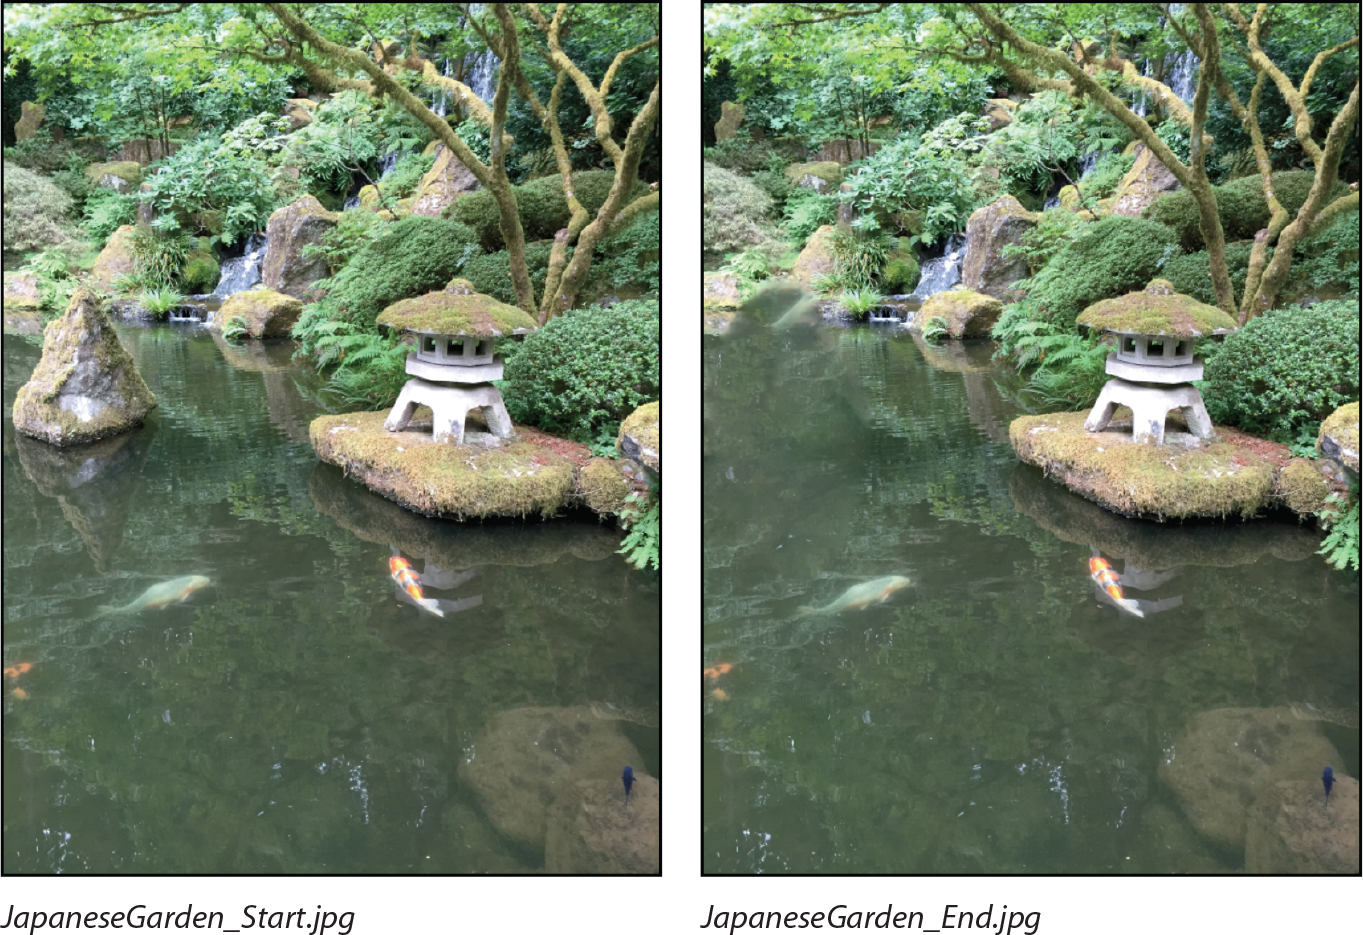
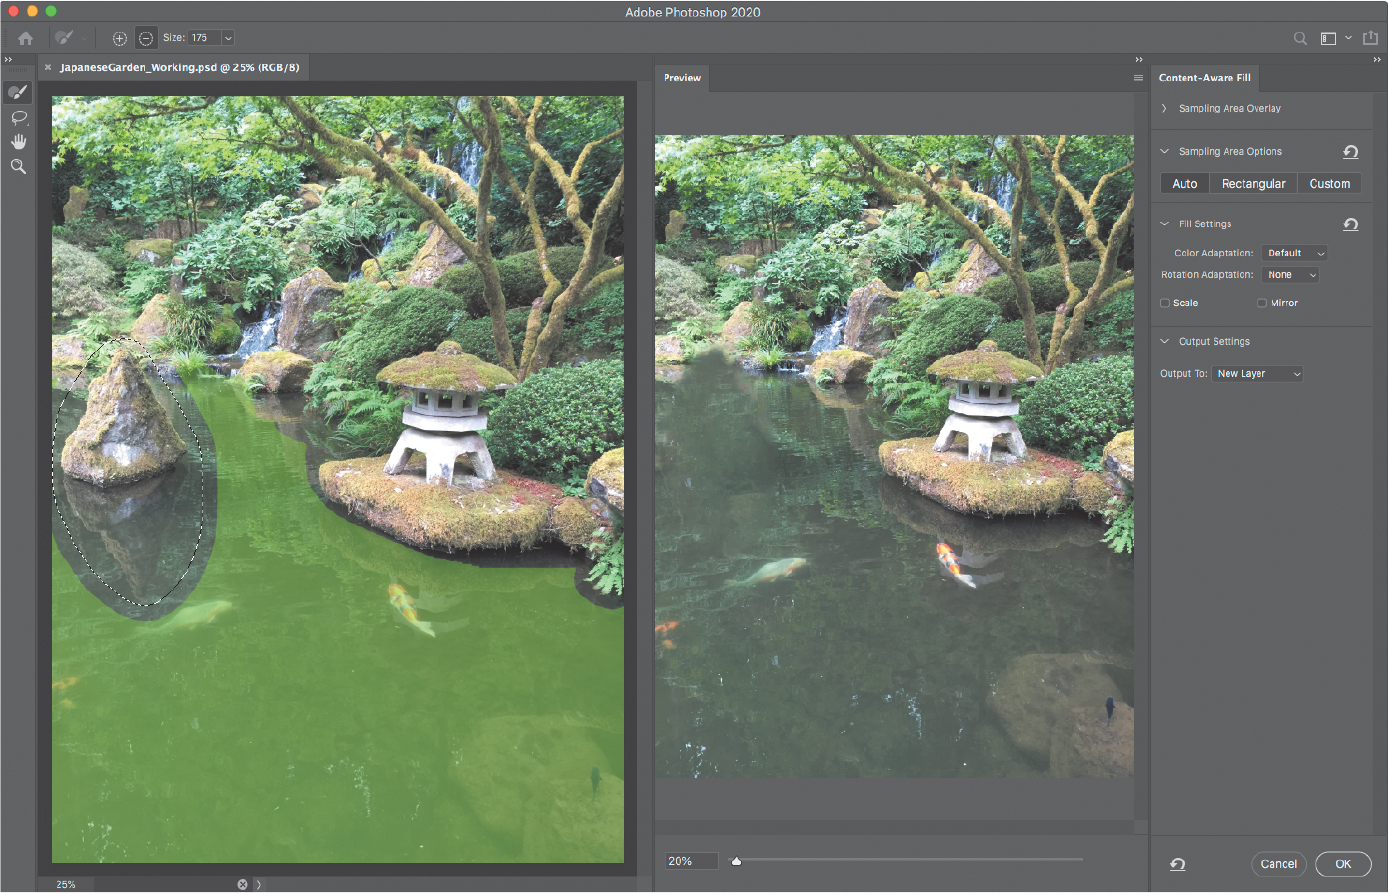
You’ll use the Content-Aware Fill tool to simplify the composition by removing the cone-shaped rock near the left edge of the photo, and its reflection.
Double-click the JapaneseGarden_Start.jpg file to open it in Photoshop.
Choose File > Save As, choose Photoshop for the format type, and name the new file JapaneseGarden_Working.psd. Click Save. Click OK if the Photoshop Format Options dialog box appears.
Select the Lasso tool, and in the options bar, set Feather to 25px.

Drag a selection marquee around the rock on the left and the rock’s reflection below it, including some of the water around it. The selection can be approximate.

Choose Edit > Content-Aware Fill.
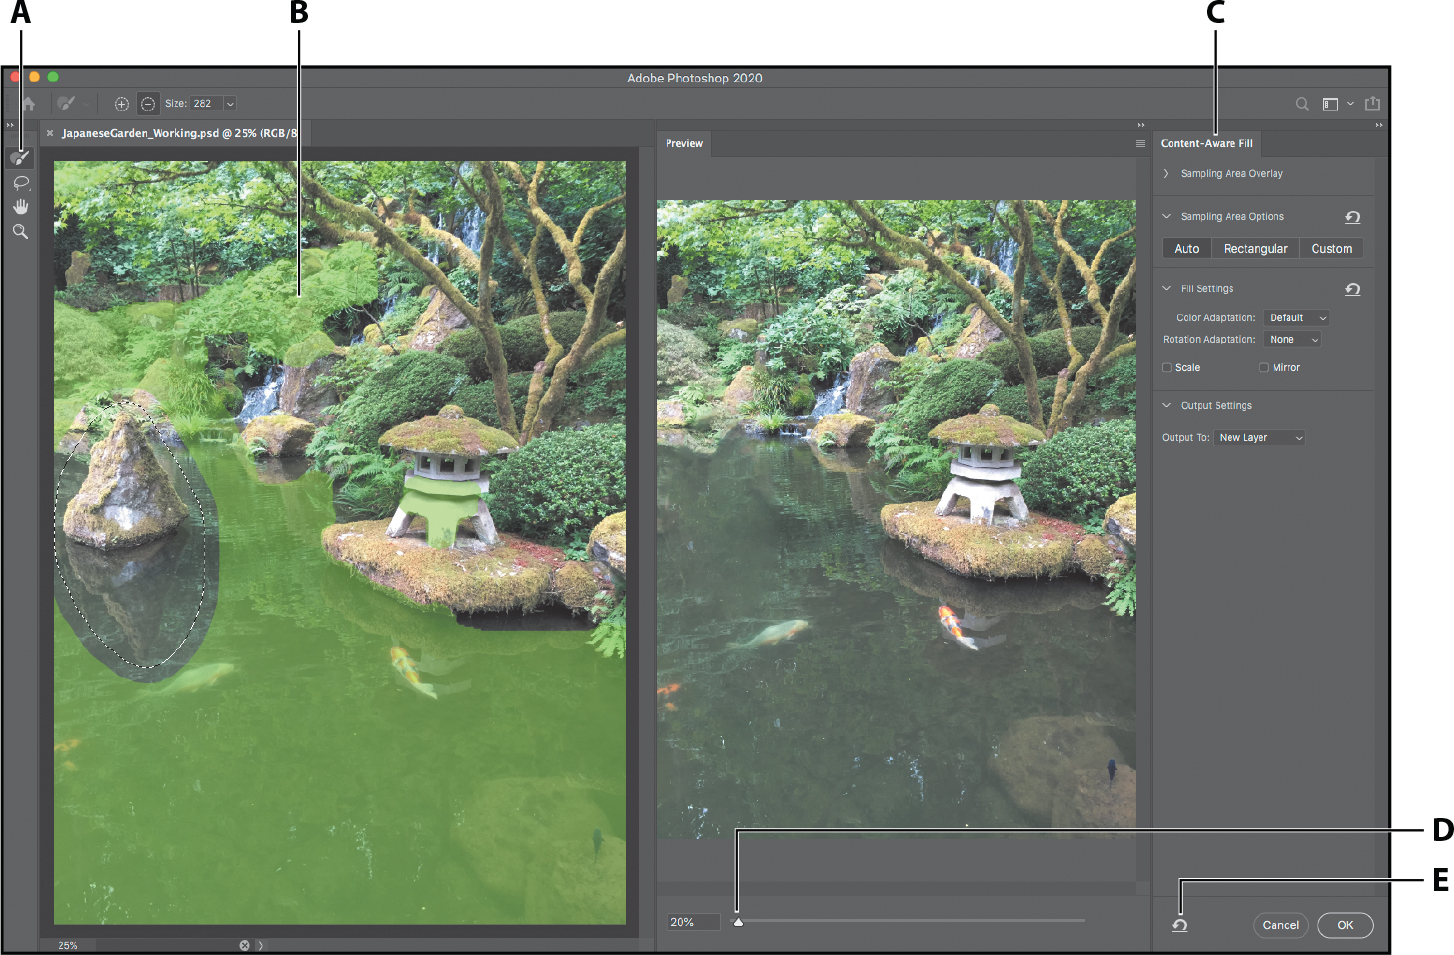
A. Sampling Brush tool B. Sampling area C. Content-Aware Fill options D. Preview zoom E. Reset
![]() Tip
Tip
Preview is a panel. You can drag the divider between the image and the Preview panel. You can drag the Preview panel tab to undock it, making Preview a floating panel. This Preview panel is available only when using Content-Aware Fill.
The left side of the Content-Aware Fill dialog box displays the image and the selection you made. The colored area (displayed in green by default) indicates areas Content-Aware Fill will sample (use as a source) for filling the removed area.
The right side previews the fill you get from the sampling area, combined with the settings in the Content-Aware Fill options panel. The most important settings to look at first are the Sampling Area Options.
Auto is selected by default. It analyzes the image to try and improve the sampling area, and excludes areas that it thinks are dissimilar to the selection. Notice that the trees are not covered in the sampling area color; that’s because Auto decided that tree areas should not be used to fill in the water area you selected.
Rectangular uses the entire image as the sampling area, except the selection.
Custom doesn’t apply an initial sampling area. You use the Sampling Brush tool to manually paint the parts you want Photoshop to use as the sampling area.
How do you choose which one to use? Choose the option that gives you the best starting point, requiring the least amount of manual retouching. In most cases, Auto is the best starting point, and that’s why it’s the default. Try the other options when Auto doesn’t make a very good first try.
If there are still parts of the selection that aren’t sufficiently convincing, you can use the Sampling Brush to customize the sampling area some more. The Sampling Brush is the first tool in the toolbar along the left side of the Content-Aware Fill task space, and it’s selected by default. (If you think the image is already convincing enough, you can skip steps 8–10. Results can vary based on your initial selection.)
Press the [ key to reduce the Sampling Brush tool until the options bar indicates that the brush size is around 175 pixels. The Sampling Brush tool is selected by default when you open the Content-Aware Fill dialog box.

Notice that a minus sign (–) appears in the Sampling Brush pointer. This is because the tool is set to Subtract mode, which is indicated in the options bar.
Paint over unwanted areas (such as foliage, or the edge where the water meets the foliage) to exclude it from the sampling area. Areas you exclude no longer appear with the green sampling color. As you do this, the fill is recalculated, and you can evaluate the updated results in the Preview panel.
As soon as the fill looks like it consists only of water and believable reflections, you can stop painting.
It may take some trial and error for the results to be successful. You may be able to improve the results using the following techniques:
Use the Sampling Brush in Subtract mode to exclude more areas, to stop them from contributing incorrect content to the fill. For example, it might help to also exclude the edges where the water meets the lantern base and other leaves.
![]() Tip
Tip
To quickly switch the Lasso tool between the Add and Subtract modes, press the E key.
Use the Lasso tool to change the original selection. For example, try using the Lasso tool in Subtract mode to trim the selection where unwanted foliage is included, while still including all of the rock.
![]() Tip
Tip
Content-Aware Fill randomizes results to make fixes look more natural, but if you want more consistent results, select the Enable Repeatability option. This will cause the preview to take longer to calculate and display.
Adjust the Fill Settings. For this exercise, adjusting the Color Adaptation setting should be the most useful. You probably won’t use the other options, although they are useful in other situations. Rotation Adaptation is useful for re-creating missing areas of content that are radial (such as flower petals) or along an arc. Scale helps adapt a fill for patterned content. The Mirror option can be useful for symmetrical content.
When you’re satisfied with the result, click OK, and then choose Select > Deselect.
![]() Tip
Tip
If you don’t want Content-Aware Fill to create the fill as a new layer, before closing Content-Aware Fill, change the Output To option in Output Settings.
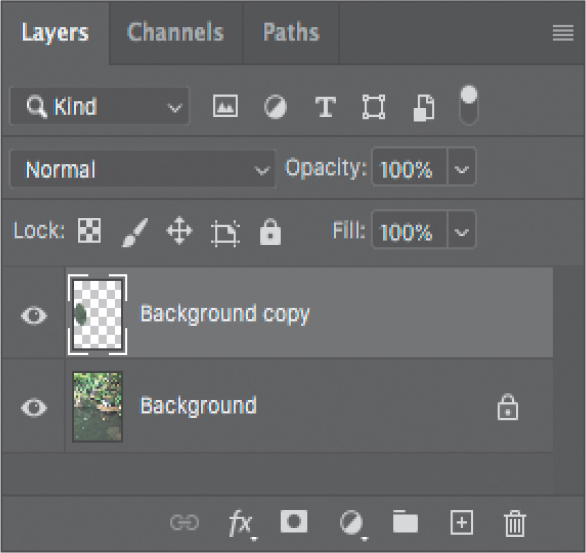
In the Layers panel, notice that by default, the fill is created as a new layer named Background Copy. If you hide the new layer, you can see the entire original image in the Background layer.
Save your work as a Photoshop document, and then close it.
Extra credit
Transformations with the Content-Aware Move tool
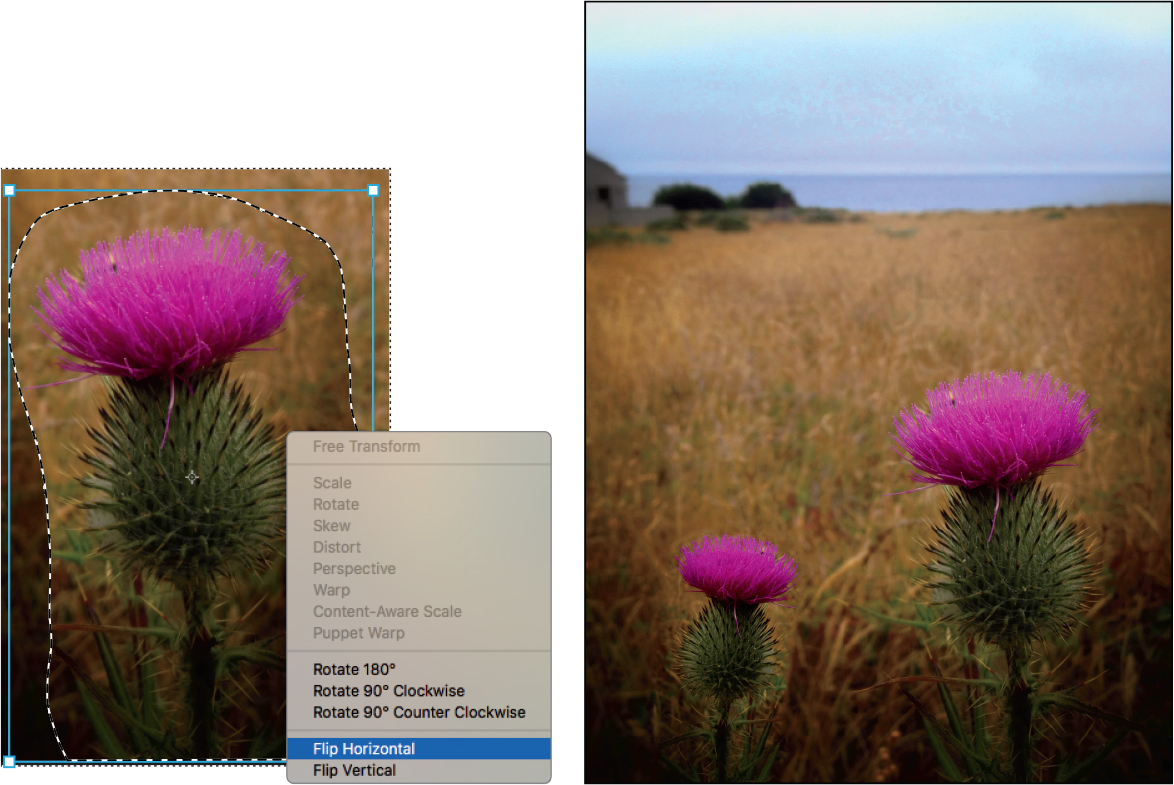
With the Content-Aware Move tool, you need only a few quick steps to duplicate a thistle so that it combines seamlessly with the background, and is also different enough that it doesn’t look like an exact copy of the original.
Open Thistle.psd in your Lesson05/Extra Credit folder.
Select the Content-Aware Move tool (
 ) (grouped with the healing brush and Red Eye tools).
In the options bar, choose Extend from the Mode menu. Choosing Extend duplicates the thistle; if you just want to reposition the single thistle, you would choose Move.

With the Content-Aware Move tool, draw a selection marquee around the thistle, with a margin large enough to include a little of the grass around it.
Drag the selection to the left, and drop it in the empty area of grass.
Right-click (Windows) or Control-click (Mac) the dragged thistle, and choose Flip Horizontal.
Drag the top left transformation handle to make the thistle smaller. If you think the copy of the thistle should be farther from the original, position the pointer inside the transformation rectangle and drag the thistle copy slightly to the left.
Press Enter or Return to make the transformations permanent, leaving the content selected so you can adjust the Structure and Color options in the Options bar to improve how the new thistle blends with the background.
Choose Select > Deselect, and save your changes.
Adjusting perspective in an image
The Perspective Warp feature lets you adjust the way objects in your image relate to the scene. You can correct distortions, change the angle from which an object appears to be viewed, or shift the perspective of an object so that it merges smoothly with a new background.
Using the Perspective Warp feature is a two-step process: defining the planes and adjusting them. You start in Layout mode, drawing quads to define two or more planes; it’s a good idea to align the edges of the quads so that they are parallel with the lines of the original object. Then you switch to Warp mode, and manipulate the planes you defined.
You’ll use Perspective Warp to merge images with different perspectives.
Choose File > Browse In Bridge.
Navigate to the Lesson05 folder, if you’re not there already, and then look at the Bridge_Start.psd and Bridge_End.psd thumbnail previews.
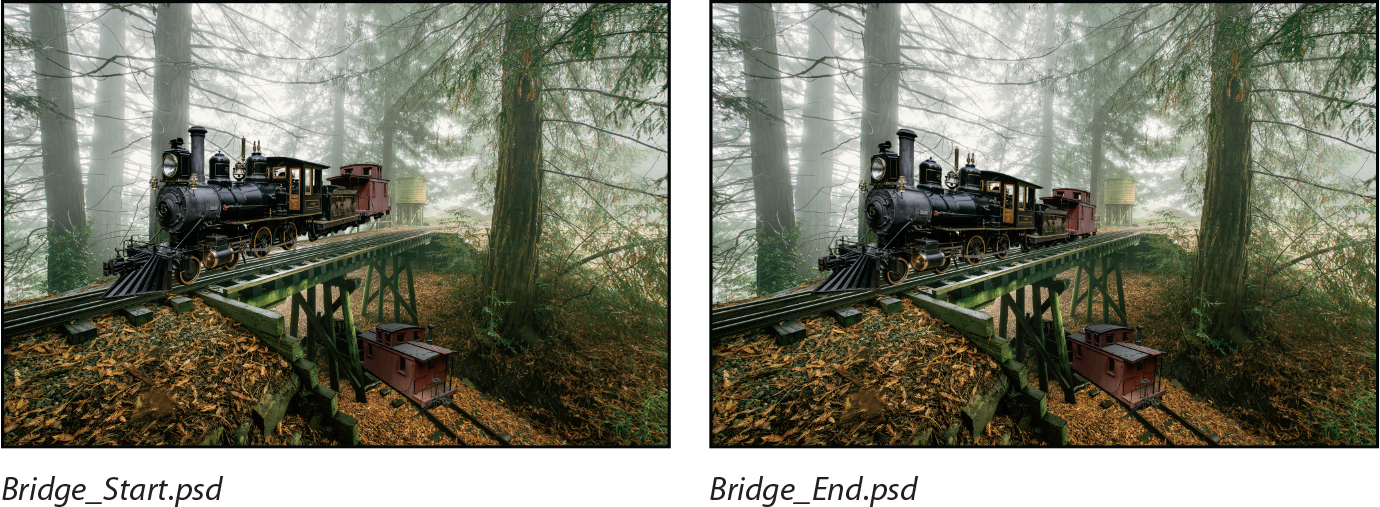
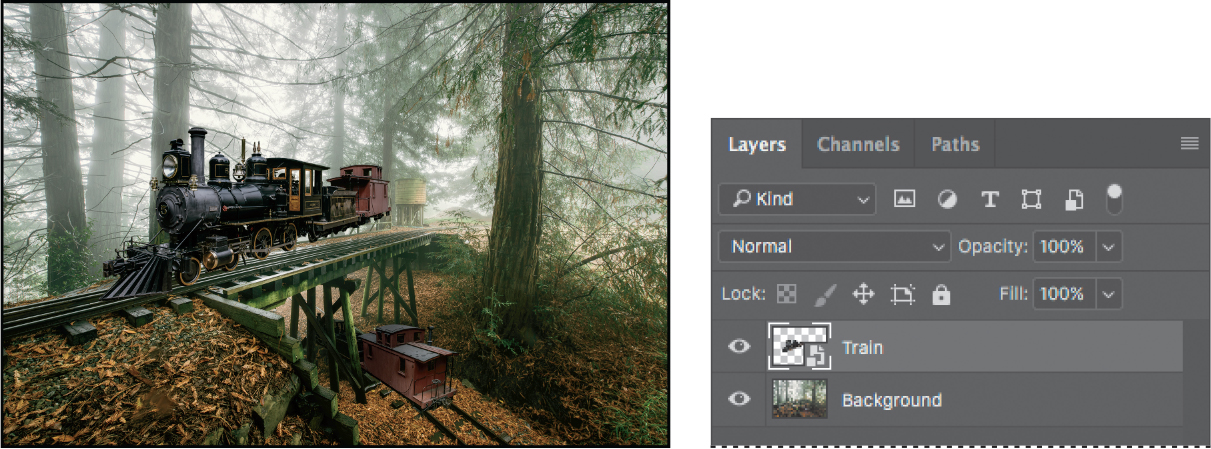
In the Bridge_Start.psd file, the image of the train has been combined with the image of a trestle bridge, but their perspectives don’t match. If you’re illustrating a story about a flying train that is making a landing on a trestle bridge, this might be perfect. But if you want a more realistic image, you’ll need to adjust the perspective of the train to put it firmly on the tracks. You’ll use Perspective Warp to do just that.
Double-click the Bridge_Start.psd file to open it in Photoshop.
Choose File > Save As, and rename the file Bridge_Working.psd. Click OK in the Photoshop Format Options dialog box.
Select the Train layer.
![]() Note
Note
Perspective Warp can work faster on a computer that qualifies for graphics acceleration. To see if your computer qualifies, see the Getting Started chapter for a link to the Photoshop system requirements.
The tracks are on the Background layer. The train is on the Train layer. Because the Train layer is a Smart Object, you can apply Perspective Warp and then modify the results if you’re not satisfied.
Choose Edit > Perspective Warp.
A small animated tutorial appears, showing you how to draw a quad, which defines a plane.
Watch the animation, and then close it.
Now you’ll create quads to define the planes of the train image.
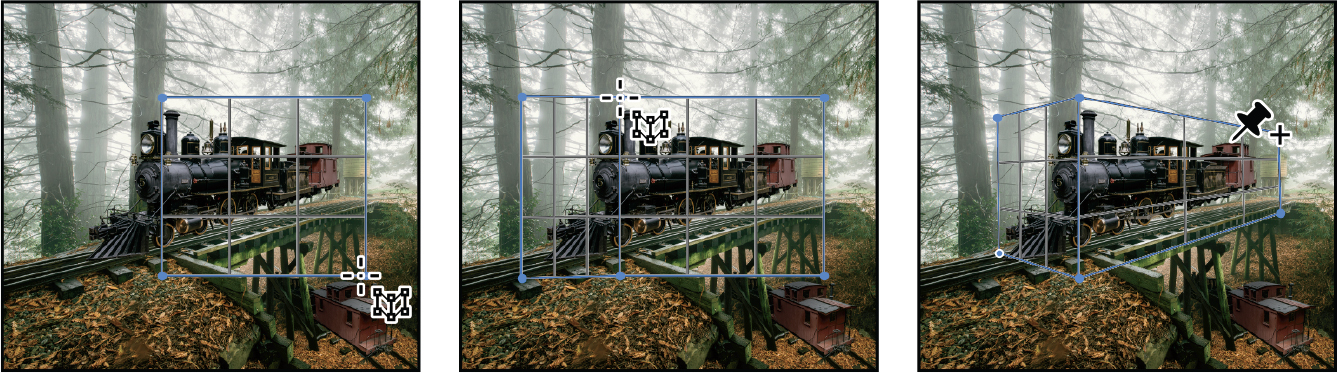
Draw the quad for the side of the train: Click above the top of the smokestack, drag down to the railroad tie below the front wheel, and then drag across to the end of the caboose.
![]() Tip
Tip
Not sure if you’ve properly drawn the perspective of quads around a subject? They should look like a shipping container fitted to the subject.
Drag a second quad for the front of the train, dragging across the cowcatcher at the bottom and into the trees at the top. Drag it to the right until it attaches to the left edge of the first quad.
Drag the corners of the planes to match the angles of the train. The bottom line of the side plane should run along the bottom of the train wheels; the top edge should border the top of the caboose. The front plane should mirror the lines of the cowcatcher and the top of the light.
Now that the quads are drawn, you’re ready for the second step: warping.
Click Warp in the options bar. Close the tutorial window that appears.
Click the Automatically Straighten Near Vertical Lines button, next to Warp in the options bar.

Lines close to vertical are made vertical, making it easier to adjust its perspective.
Drag the handles to manipulate the planes, moving the back end of the train down and into perspective with the tracks. Exaggerate the perspective toward the caboose for a more dramatic result.
Warp other parts of the train as needed. You may need to adjust the front of the train. Pay attention to the wheels; make sure you don’t distort them as you warp the perspective.

While there are precise ways to adjust perspective, in many cases you may need to trust your eyes to tell you when it looks right. Remember that you can return to tweak it again later, because you’re applying Perspective Warp as a Smart Filter.
When you’re satisfied with the perspective, click the Commit Perspective Warp button (
) in the options bar.To compare the changed image with the original, hide the Perspective Warp filter in the Layers panel. Then show the filter again.
If you want to make further adjustments, double-click the Perspective Warp filter in the Layers panel. You can continue to adjust the existing planes, or click Layout in the options bar to reshape them. Remember to click the Commit Perspective Warp button to apply your changes.
Save your work, and close the file.
Changing the perspective of a building
In the exercise, you applied Perspective Warp to one layer to change its relationship with another. But you can also use Perspective Warp to change the perspective of an object in relationship to others in the same layer. For example, you can shift the angle from which you view a building.
In this case, you apply Perspective Warp the same way: In Layout mode, draw the planes of the object you want to affect. In Warp mode, manipulate those planes. Of course, because you’re shifting angles within a layer, other objects on the layer will move too, so you need to watch for any irregularities.
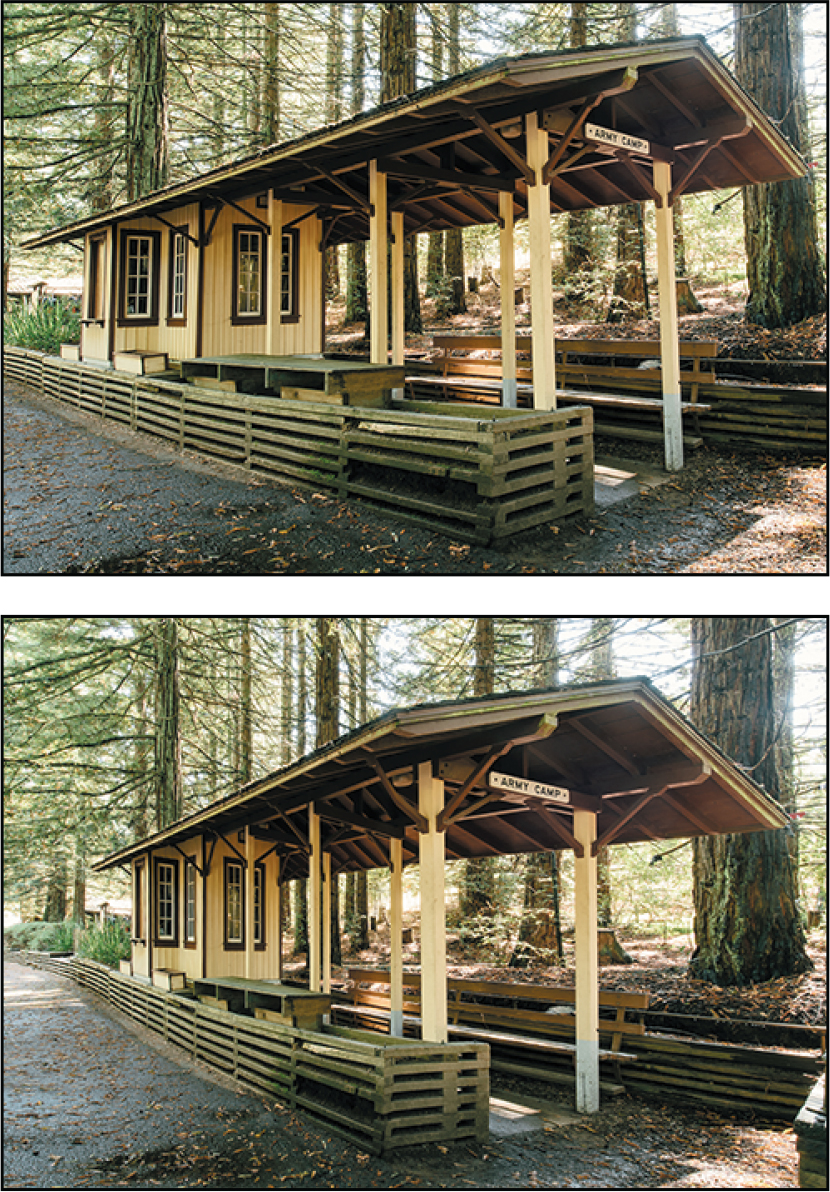
In this image, as the perspective of the building shifted, so did the perspective of the trees surrounding it.
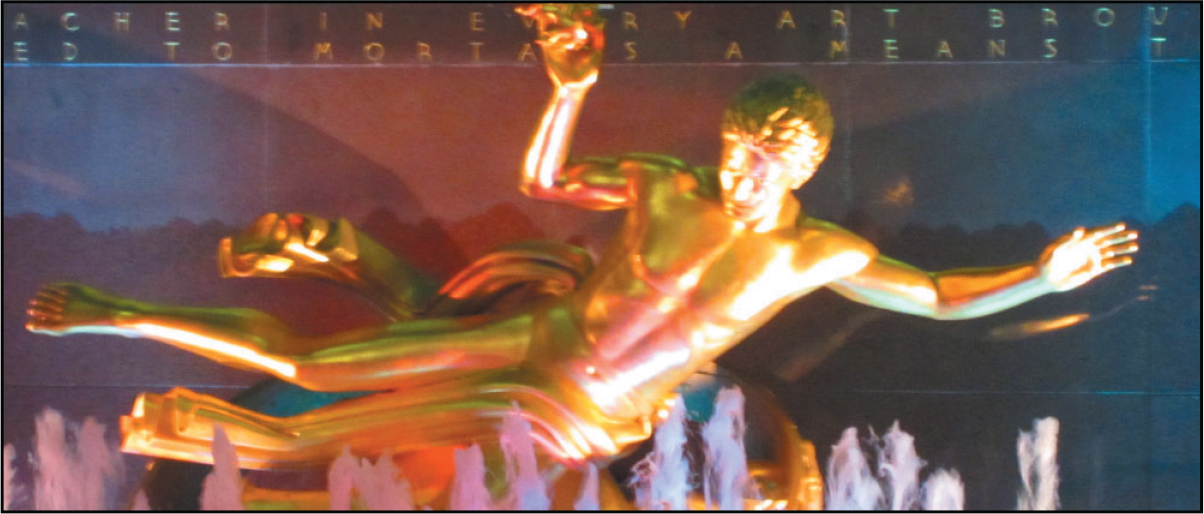
Camera Shake Reduction
Even with a steady hand, unintended camera motion can occur with slow shutter speeds or long focal lengths. The Camera Shake Reduction filter reduces the resulting camera shake, giving you a sharper image.
Before applying the Camera Shake Reduction filter
You’ll get the best results if you apply the filter to a particular part of an image, rather than the entire image. It can be especially useful if text has become illegible due to camera shake.
To use the Camera Shake Reduction filter, open the image, and choose Filter > Sharpen > Shake Reduction. The filter automatically analyzes the image, selects a region of interest, and corrects the blur. Use the Detail loupe to examine the preview. That may be all you need to do. If so, click OK to close the Shake Reduction dialog box and apply the filter.

After applying the Camera Shake Reduction filter
You can adjust how Photoshop interprets the Blur Trace, which is the shape and size of the camera shake that Photoshop identified. You can change the region of interest or adjust its size, adjust the Smoothing and Artifact Suppression values, and more. For full information about the Camera Shake Reduction filter, see Photoshop Help.
Review questions
1 What is red eye, and how do you correct it in Photoshop?
2 How can you create a panorama from multiple images?
3 Describe how to fix common camera lens flaws in Photoshop. What causes these defects?
4 What conditions provide the best results when using the Content-Aware Move tool?
Review answers
1 Red eye occurs when a camera flash is reflected in the retinas of a subject’s eyes. To correct red eye in Photoshop, zoom in to the subject’s eyes, select the Red Eye tool, and then click each eye.
2 To blend multiple images into a panorama, choose File > Automate > Photomerge, select the files you want to combine, and click OK.
3 The Lens Correction filter fixes common camera lens flaws, such as barrel and pincushion distortion, in which straight lines bow out towards the edges of the image (barrel) or bend inward (pincushion); chromatic aberration, where a color fringe appears along the edges of image objects; and vignetting at the edges of an image, especially corners, that are darker than the center. Defects can occur from incorrectly setting the lens focal length or f-stop, or by tilting the camera vertically or horizontally.
1 The Content-Aware Move tool works best in images that have consistent backgrounds so that Photoshop can seamlessly replicate the patterns.