
4. Organizing Your Content
Lesson overview
Fast and efficient movie production requires organization before and during the edit. When you’re working with content from multiple sources and dates, Adobe Organizer is a very powerful tool for categorizing content and quickly finding video, audio clips, and pictures to use in your projects. In this lesson, you’ll learn how to do the following:
• Create places in the Organizer and associate your content with those places
• Use Smart Events to quickly find content from specific dates
• Create events in the Organizer and associate your content with those events
• Rate your clips and find clips based on those ratings
• Create and use keyword tags to find your content
• Use the Auto-Analyzer to split your video into scenes and rate it qualitatively
• Transfer clips from the Organizer to Adobe Premiere Elements
This lesson will take approximately two hours. Download the project files for this lesson from the Lesson & Update Files tab on your Account page at www.peachpit.com and store them on your computer in a convenient location, as described in the Getting Started section of this book. Your Account page is also where you’ll find any updates to the chapters or to the lesson files. Look on the Lesson & Update Files tab to access the most current content.
Geotagging content in the Organizer
Getting started
![]() Note
Note
If you have not already downloaded the project files for this lesson to your computer from your Account page, make sure to do so now. See “Getting Started” at the beginning of the book.
Before you start working with the footage, let’s review a final version of the movie you’ll be creating. Make sure that you have correctly copied the Lesson04 folder from your Account page onto your computer’s hard drive. See “Copying the Classroom in a Book files” in the Getting Started section at the beginning of this book.
1. Launch Adobe Premiere Elements. If it is already open, choose Help > Welcome Screen in the Adobe Premiere Elements main menu to return to the Welcome screen.
2. In the Welcome screen, click Video Editor, select Existing Project, and click the Open icon.
3. In the Open Project dialog box, navigate to the Lesson04 folder you copied to your hard drive. Within that folder, select Lesson04_Start_Win.prel (Windows) or Lesson04_Start_Mac.prel (Mac OS), and then click Open. If a dialog box appears asking for the location of rendered files, click the Skip Previews button.
Your project file opens.
4. Choose Window > Restore Workspace to ensure that you start the lesson with the default panel layout.
Viewing the completed movie before you start
To see what you’ll be creating in this lesson, take a look at the completed movie. You must be in Expert view to open the Project Assets panel to view the movie; if you are not, click Expert at the top of the Monitor panel (![]() ) to enter that view.
) to enter that view.
1. At the upper left side of the Adobe Premiere Elements window, click the Project Assets button (![]() ) to open that panel. Locate Lesson04_Movie.mov (which should be the only file), and then double-click it to open the video into the preview window.
) to open that panel. Locate Lesson04_Movie.mov (which should be the only file), and then double-click it to open the video into the preview window.
2. Click the Play button to watch the video about a boat ride in the bayou, which you’ll build in this lesson.
3. When you’re finished, close the preview window.
Working in the Project Assets panel
The Project Assets panel contains all the content that you’ve input into your project, and is available only in Expert view. As with all panels, you click the Project Assets button (![]() ) to open it, and then click the button again to close it.
) to open it, and then click the button again to close it.
The Project Assets panel’s role is to help you organize and find files using different search methods. Let’s load some files into the project so you can work with them in the Project Assets panel.

Loading files in the Project Assets panel
Again, if you don’t see the Project Assets panel, click Expert at the top of the Monitor panel (![]() ) to enter that view.
) to enter that view.
1. Click Add Media (![]() ) to open the Add Media panel.
) to open the Add Media panel.
2. Click Files And Folders (![]() ) to open the Add Media dialog box.
) to open the Add Media dialog box.
3. Navigate to the Lesson04 folder. While pressing the Ctrl key (Windows) or Command key (Mac OS), select the movie clips Gator01.mp4 to Gator16.mp4, all digital pictures from Picture 1.jpg to Picture 8.jpg, and the single audio clip, narration.wav. Then click Open (Windows) or Import (Mac).
Controls in the Project Assets panel
You can use controls in the Project Assets panel to create titles, black videos, bars and tones, and color mattes. In this section, you’ll learn how to use the basic tools in the Project Assets panel to find the desired file.
You can do either of the following in the Project Assets panel to view your files:
• Grab the handle on the extreme lower right of the panel to expand it vertically and horizontally.
• Browse through the entire catalog by using the scroll bar at the right side of Project Assets panel.
![]() Note
Note
Ignore minor differences between this image and what you’re seeing onscreen. In particular, the duration of the narration will almost certainly be different. This won’t affect the information you’ll learn in this lesson or the functionality of the exercises.

A. Show/Hide Video
B. Show/Hide Still Image
C. Show/Hide Audio
D. Search
E. Go up one folder level
F. Clear
G. Pin view
H. Project Assets menu
Let’s work through some of the most common functions of the Project Assets panel.
1. At the upper left of the Project Assets panel, experiment by clicking the Show/Hide Video (![]() ), Show/Hide Still Image (
), Show/Hide Still Image (![]() ), and Show/Hide Audio (
), and Show/Hide Audio (![]() ) buttons. For example, click the Hide Still Image and Hide Audio buttons so only video files appear in the Project Assets panel. This is a very simple technique for quickly finding the video content that you’re looking for.
) buttons. For example, click the Hide Still Image and Hide Audio buttons so only video files appear in the Project Assets panel. This is a very simple technique for quickly finding the video content that you’re looking for.
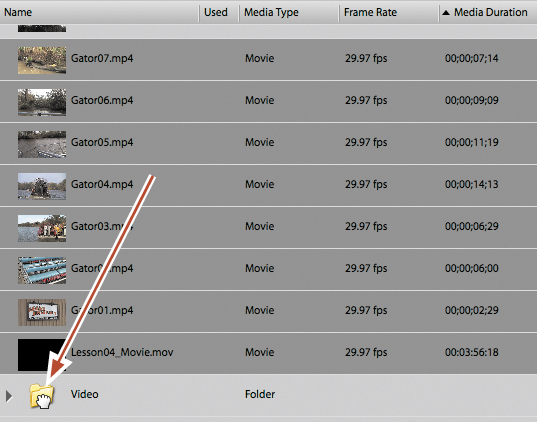
2. From the Project Assets panel menu, choose View > List View to display the content in this view. Once in List view, click and drag the bottom right corner to expand the window so all the columns are visible. You can sort your content by clicking the column head of any column. The arrow in the column you choose shows whether the data is sorted in ascending or descending order. For example, click the Name column head to see how it sorts the content, and then click the Media Duration column head. The column with the arrow showing is the column currently being used to sort the content.

3. In the Project Assets panel menu, choose New Folder to create a folder to organize your videos. Adobe Premiere Elements creates a folder named Folder 01, with the text highlighted so it’s easy to change the name. Type in the word Video and press Enter or Return, replacing the default name Folder 01.
4. Select all video files, and drag them into the new folder. Click the triangle next to the Video folder to close it. Now your Project Assets panel is a whole lot tidier. When you’re working with large projects with multiple video, still image, and audio files, creating folders is the best strategy for organizing your content and making it easy to find.
![]() Note
Note
On Windows, you can also create a Universal Counting Leader—a vestigial feature typically used only when writing video back to analog tape.
5. From the Project Assets panel menu, choose New Item to view the new items that you can create from this menu. We’ll cover adjustment layers in Lesson 6 and titles in Lesson 8. Bars And Tone is a vestigial concept that is useful for analog projects but has little application for most digital video-based projects. Creating black video and color mattes is useful when you need colored or black backgrounds for titles or other movie elements. When you choose any of these items, Adobe Premiere Elements will open a format-specific dialog box for creating the content and inserting it into the Project Assets panel.

6. Double-click Gator01.mp4 in the Videos folder of the Project Assets panel to open it in the preview window. (If necessary, click and drag the bottom-right corner of the Project Assets panel to make the preview window visible.) The preview window lets you play your content using VCR-like controls before you add it to your project. You can also trim frames from the start and end of a video before adding it to your project. Although you can also trim frames in the timeline, you may prefer to do this in the preview window.
7. Trim a few frames from the clip: In the Preview window, drag the current-time indicator (CTI) to the right until the timecode beneath the video reads 00;00;00;22, which is 22 frames in from the start of the clip and the point at which the zoom-in starts. Note that you can also use the Left and Right Arrow keys on your keyboard for precise positioning of the current-time indicator.
![]() Note
Note
Rather than moving the CTI to the desired location and choosing Set In point or Set Out point, you can simply drag the In point handle or Out point handle to the desired location.
8. Click the Set In icon (![]() ) to set the In point, or press the letter I on your keyboard. In essence, you’ve told Adobe Premiere Elements to ignore the first 22 frames when you add the clip to the project, and to start at frame 23. Of course, the edit is nondestructive, so you haven’t actually deleted any frames from the video file on your disk. You can always undo this later and show the frames that you just trimmed.
) to set the In point, or press the letter I on your keyboard. In essence, you’ve told Adobe Premiere Elements to ignore the first 22 frames when you add the clip to the project, and to start at frame 23. Of course, the edit is nondestructive, so you haven’t actually deleted any frames from the video file on your disk. You can always undo this later and show the frames that you just trimmed.

A. Current-time indicator
B. In point handle
C. Current time in movie
D. Rewind
E. Set In point (I)
F. Step Back (Left Arrow key)
G. Play/Pause toggle (spacebar)
H. Step Forward (Right Arrow key)
I. Set Out point (O)
J. Fast-Forward
K. Clip duration
L. Out point handle
9. In the Preview window, drag the current-time indicator to the right until the timecode beneath the video reads around 00;00;02;15, which is where the zoom-in ends. Click the Set Out icon (![]() ) to set the Out point, or press the letter O on your keyboard. You’ve just set the Out point, essentially trimming out all video frames to the right of that point of the video.
) to set the Out point, or press the letter O on your keyboard. You’ve just set the Out point, essentially trimming out all video frames to the right of that point of the video.
10. Click and drag Gator01.mp4 in the preview window to the start of the Video 1 and Audio 1 tracks on the timeline as shown below, and release. You’ve just added the trimmed video to the timeline. Click No if Adobe Premiere Elements asks if you want to fix any quality issues in the clip or any other questions.

![]() Note
Note
When you set In and Out points in the preview window, they’re automatically applied when you drag the clip into the timeline; they aren’t retroactively applied to clips already in the timeline. You’ll learn how to trim clips in the timeline in the next lesson.
11. Close the preview window, and click the Project Assets button (![]() ) to close the Project Assets panel. Make sure that the current-time indicator in the timeline is at the start of the clip, click anywhere in the timeline, and then press the spacebar to play the clip. Note that it starts and ends on the trimmed frames.
) to close the Project Assets panel. Make sure that the current-time indicator in the timeline is at the start of the clip, click anywhere in the timeline, and then press the spacebar to play the clip. Note that it starts and ends on the trimmed frames.
Tagging in the Organizer
The Project Assets panel is great for quickly finding clips, but the Organizer is the best tool in Adobe Premiere Elements for serious organization and search-and-retrieval work. You can open the Organizer by clicking the Organizer icon (![]() ) in Adobe Premiere Elements Action bar. In this exercise, you’ll learn how to perform manual tagging and Smart Tagging in the Organizer, and then how to search for clips using those tags in the Organizer.
) in Adobe Premiere Elements Action bar. In this exercise, you’ll learn how to perform manual tagging and Smart Tagging in the Organizer, and then how to search for clips using those tags in the Organizer.
Note that the contents of the Organizer will depend upon many circumstances, including which lessons you’ve performed, whether you’ve imported content into the Organizer from Photoshop Elements, and other factors. To make your Organizer look like the next figure, take the following steps:
1. On the extreme lower left of the Organizer, click the Show icon (![]() ), which reveals the folders on the upper left. (If Show is already selected, you’ll see the Hide icon in this location.) Click Folder 4, which opens just the contents from that folder in the Organizer. Make sure that you have the Media tab selected on the top to see what’s showing in the figure below.
), which reveals the folders on the upper left. (If Show is already selected, you’ll see the Hide icon in this location.) Click Folder 4, which opens just the contents from that folder in the Organizer. Make sure that you have the Media tab selected on the top to see what’s showing in the figure below.
2. On the extreme lower right of the Organizer, click the Tags/Info icon (![]() ), which opens the Tags and Information panels on the right of the Organizer’s interface.
), which opens the Tags and Information panels on the right of the Organizer’s interface.
3. Choose View > Media Types, and make sure Photos, Video, and Audio are all selected.
4. Choose View > Details.
5. Choose View > File Names.
6. In the Sort By menu at the top of the Media browser, choose Name.
![]() Note
Note
Your screen may not match perfectly what’s shown on the page, but the minor differences shouldn’t keep you from completing any exercises.

![]() Note
Note
You can play any video file, or view any still image, in the Organizer by double-clicking the video or still image in the browser and then clicking the Play button in the Preview window that appears. Close the window to return to the Media Browser. Still images are displayed in an expanded window in the Media Browser; click Grid (![]() ) on the left of the toolbar immediately above the image to return to the Media Browser.
) on the left of the toolbar immediately above the image to return to the Media Browser.
The Adobe Organizer can display all clips in a Timeline view (in Media view, choose View > Timeline) that displays content by date, which can be a convenient way to find some clips. In this view you can click any clumps of sequential clips in the timeline, and they appear in the Media Browser. Of course, you need clips in the Organizer for there to be any clumps, so until you populate the Organizer, this view won’t provide that much value.
There are three ways that the Adobe Organizer helps you organize your clips: by categorizing them into People, Places, and Events; by giving them star ratings on a scale from 1 to 5; and by manually tagging them with keywords and via smart tags. We’ll give you a quick introduction to each technique, and then you’ll learn how to use them all.
In Adobe Premiere Elements 12, the Organizer’s interface has been optimized for three views, as shown on the top toolbar: People, Places, and Events. By associating your video clips with one or more of these categories, you can easily find all clips associated with a person, place, or event. We’ll demonstrate how to associate your clips with a place or an event, but not a person, primarily because face recognition—a great feature that the Organizer uses to automate the process of people tagging your still images—is not available for video.
The star ratings system allows you to review and rate all your clips on a scale from 1 to 5; you can later search for only those clips that you rated 4 or higher, for example—an easy way to find high-quality clips and/or eliminate poor-quality clips.
Keyword tagging allows you to tag a clip by person, location, event, or other classifications, and includes customizable categories.
When you run the Auto-Analyzer on a clip, Adobe Premiere Elements analyzes the video to detect scenes based on content, and rates the content qualitatively, a process known as Smart Tagging. This allows you to hunt for scenes that contain faces and identify scenes that are out of focus, shaky, underexposed, or overexposed. Using this qualitative data, Adobe Premiere Elements then categorizes all clips as high, medium, or low quality. This serves a valuable triage function that later helps you search for the best clips for your movie. This analysis is also used for features like Smart Trimming and Smart Fix, as discussed in Lesson 6.
For example, if you shot an hour of video on your last vacation, Smart Tagging allows you to identify medium-and-higher quality clips containing faces (presumably family members) and to produce a movie containing only these clips. What would literally take you hours to accomplish manually, Smart Tagging can produce in a few moments.
Using all these tags in any combination, you can hunt for clips to manually add to your projects, or you can create an InstantMovie, which is a professional-looking edited movie complete with titles, soundtrack, effects, and transitions. You’ll create an InstantMovie in the last exercise in this lesson.
Tagging clips to Places
The content we’re using in this book was shot in two different places: The still images are from New Orleans; the videos from Airboat Adventures in Lafitte, Louisiana.
You’ll use this content to create two Places in the Organizer—one for the videos, the other for the still images—and associate some content with each Place. Then, working from the Organizer’s Google Maps view, you can click a place and see all clips associated with that place.
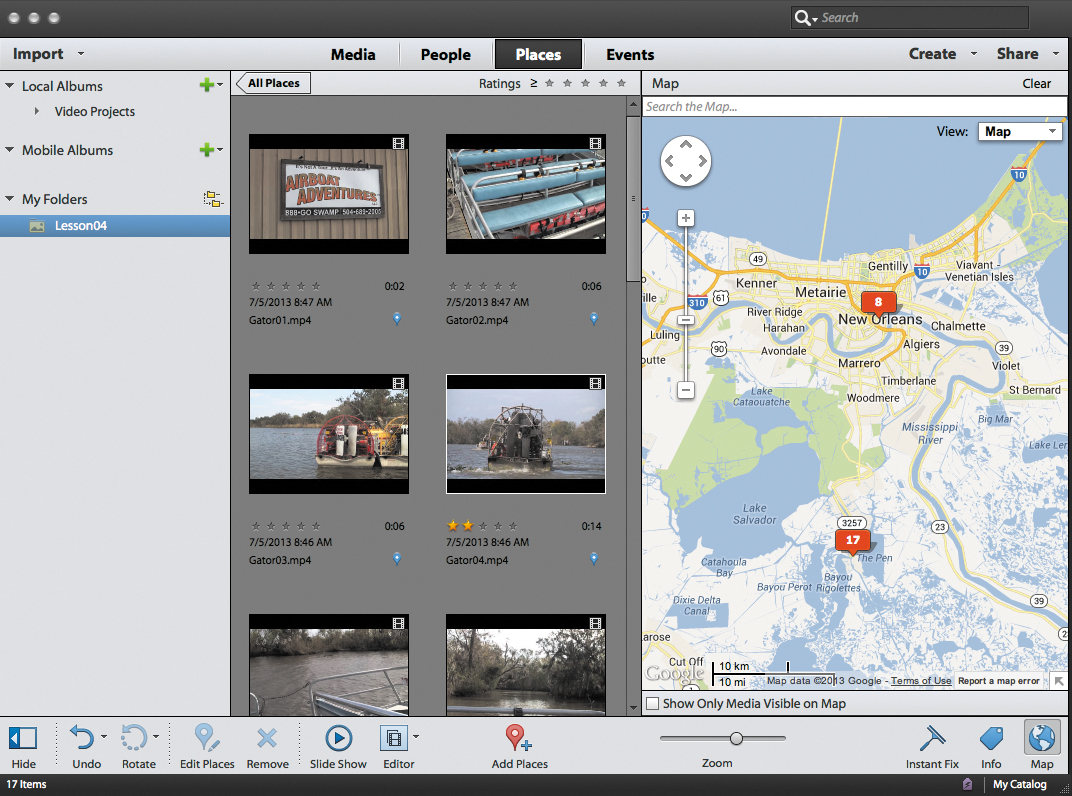
1. On the Organizer’s top toolbar, click Places (![]() ).
).
2. On the Organizer’s bottom toolbar, click Add Places (![]() ).
).
3. In the Add Places Search field, type Lafitte Louisiana, and click Search. Note that if you were typing in a street address, you would type in the address as you would on an envelope. For example, if you shot video at the White House in Washington, DC, you could either type in The White House or 1600 Pennsylvania Avenue, NW Washington, DC 20500.
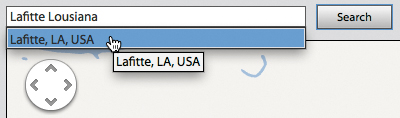
4. In the Organizer, click Lafitte, LA, USA.
5. Hold down the Ctrl key (Windows) or Command key (Mac OS) and, in the media bar at the top of the Add Places dialog box, click all the videos associated with that location. This should total 17 videos: 16 Gator clips and Lesson4_Movie.mov.
6. Release the Ctrl or Command key, and click the green checkmark. Adobe Premiere Elements will associate the selected content with that place.

7. At the bottom right of the Add Places dialog box, click Done. The Organizer creates the place.
![]() Note
Note
In addition to the Map view, Places has a List view, which might provide better precision for certain search functions.
8. Repeat the process for the images. Click Add Places again, type New Orleans in the Search field, and click the location that the Organizer finds. Hold down the Ctrl key (Windows) or Command key (Mac OS), select all the images, and then click the green checkmark. Click Done when you’re finished.
You should now have at least two places identified and content associated with each. Let’s see how this will help you find your content for future projects.
In the Organizer’s top toolbar, click Media (![]() ) to exit Places view, and then click Places (
) to exit Places view, and then click Places (![]() ) to return to that view. If the map isn’t displayed on the right, click the Map icon (
) to return to that view. If the map isn’t displayed on the right, click the Map icon (![]() ) in the lower right corner of the Organizer window.
) in the lower right corner of the Organizer window.

You may have to adjust the navigational and sizing controls on the upper left of the map, but you should be able to approximate the view shown above. Double-click either icon, and the Organizer will display the content from that location in the Media browser. Single-click the icon, and the Organizer will display all content, with the content from that location highlighted. If you hover your pointer over the blue icon in each video or still image, you’ll notice that it’s been tagged to the respective places.
Tagging clips to Events
The Organizer has a Smart Events feature that you can use to find content without any tagging on your part. To see this function in action, click Events (![]() ), and then select Smart Events in the Events top toolbar. This shows all content grouped by date in the Media browser, which you can navigate through using the vertical scroll bar on the right. Or you can narrow your search by choosing a year, month, and/or day using the calendar.
), and then select Smart Events in the Events top toolbar. This shows all content grouped by date in the Media browser, which you can navigate through using the vertical scroll bar on the right. Or you can narrow your search by choosing a year, month, and/or day using the calendar.

Sometimes, however, you’ll want to manually organize clips into Events—perhaps because, like our trip to New Orleans, the event took place over multiple days. Or maybe you shot video and pictures at more than one event on a particular day and need to break them into multiple events, like a wedding ceremony and wedding reception. Here, we’ll manually create Events with the Adobe Organizer.
1. Click Events (![]() ) to enter Event view. Make sure Events is selected in the top toolbar, not Smart Events.
) to enter Event view. Make sure Events is selected in the top toolbar, not Smart Events.
2. On the Organizer’s bottom toolbar, click Add Event (![]() ). The Add New Event dialog box appears on the right.
). The Add New Event dialog box appears on the right.
3. Complete the information in the Add New Event dialog box:
• In the Name field, type Trip to New Orleans.
• Use the calendar controls to input a Start Date of 12/30/2012 and an End Date of 1/12/2013. It’s easiest if you choose the year first and then the date.
• In the Description field, type New Year’s Celebration in New Orleans.
4. Assuming that you still have Lesson04 selected in the panel on the left, all content in the Media Browser should relate to this trip. Click anywhere in the media window to select that window, and then press Ctrl+A (Windows) or Command+A (Mac OS) to select all the content in the Media browser, drag it into the window beneath the description, and release your pointer. The Organizer adds this content to the event.
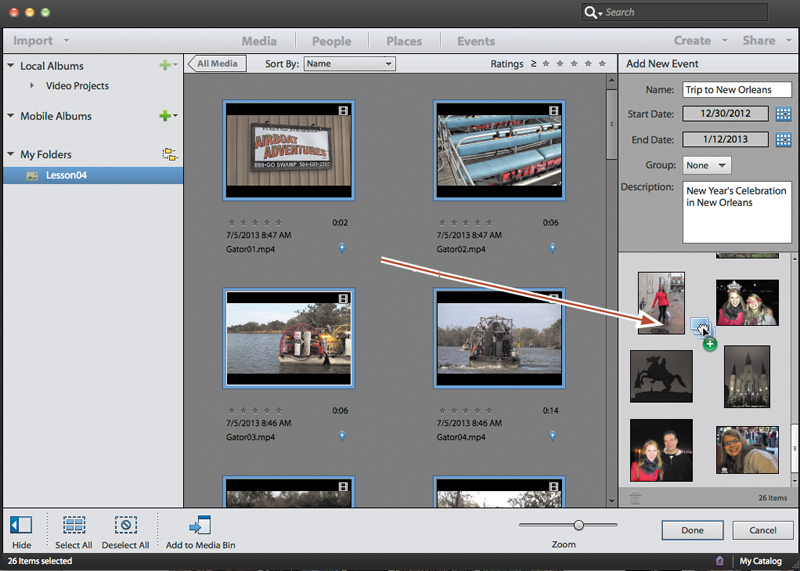
5. At the bottom right of the Add New Event dialog box, click Done. The Organizer creates the event.
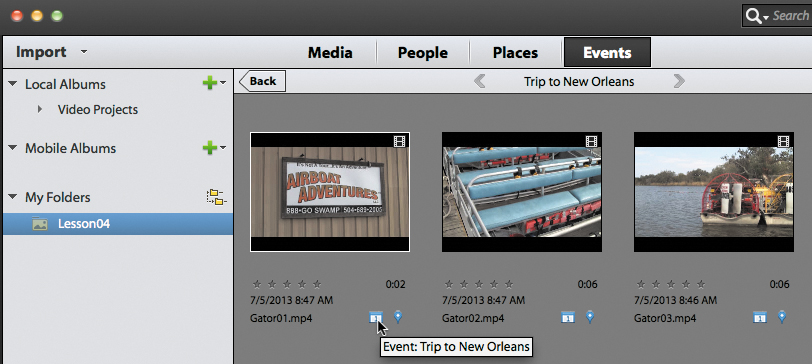
To find your content later on, in the Organizer’s top toolbar, click Media (![]() ) to exit Events view, and then click Events (
) to exit Events view, and then click Events (![]() ) to return to that view. You should see the Trip to New Orleans event in the Media browser window. If you double-click it, the clips that you associated with the event will appear in the Media Browser. If you hover your pointer over the calendar icon for a particular clip in the Media browser, you’ll see the event with which it has been associated.
) to return to that view. You should see the Trip to New Orleans event in the Media browser window. If you double-click it, the clips that you associated with the event will appear in the Media Browser. If you hover your pointer over the calendar icon for a particular clip in the Media browser, you’ll see the event with which it has been associated.
Working with star ratings
As mentioned earlier, star ratings allow you to manually rate your clips on a scale from 1 to 5 (left to right) and then search for clips based on those ratings.
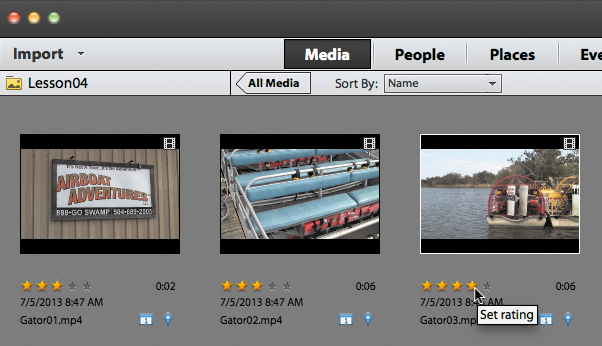
1. Click Media to return to Media view. If you don’t see the star ratings for your clips, choose View > Details from the Organizer main menu bar.
2. Hover your pointer over the star ratings beneath any clip, and click the star that corresponds to the desired rating for that clip. Go ahead and rate a few clips. These are all five-star clips as far as I’m concerned, but go ahead and rate some across the board.
3. To change a rating, use the same procedure, and choose a different rating.
4. To delete the star rating, click the last selected star on the right (e.g., the fourth star in a clip rated four stars).
5. To find clips based on their assigned ratings, click the number of target stars in the Ratings bar on the top right, and in the pull-down menu beneath the ratings, choose how to apply the rating. For example, in the figure below, we elected to show all clips with a four-star rating or higher.

6. To stop sorting by star rating and show all clips in the Organizer, delete the star rating on the upper right by clicking the last selected star.
Working with keyword tags
Adobe Premiere Elements includes general categories of keyword tags that you can apply as is or customize with your own categories or subcategories. You can also supplement your entries in the People, Places, and Events tagging structure with manual keywords following this same procedure.
In this exercise, you’ll create and apply a custom keyword in the Organizer, and then search for clips based on that keyword. To ensure that you’re looking at the same content as appears in this book, make sure you’ve selected the Lesson04 folder in the My Folders section of the Albums And Folders panel on the left of the Organizer. See the first few steps of the earlier section “Tagging in the Organizer” to accomplish this.
1. On the bottom right of the Organizer, click Tags/Info (![]() ) to open the Tags/Information panel.
) to open the Tags/Information panel.
2. Below Keywords, click Other.
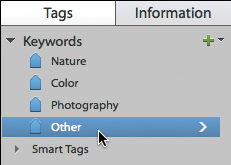
3. Next to Keywords, click the Create New button (![]() ), and choose New Sub-Category.
), and choose New Sub-Category.

4. In the Create Sub-Category dialog box, type Boat Rides in the Sub-Category Name field. Then click OK.
Adobe Premiere Elements creates the new subcategory.

![]() Note
Note
The screen on your computer may differ slightly from what’s shown here, but the differences shouldn’t interfere with completing the lesson.
5. Click the blue tag next to Boat Rides, and drag it onto any of the videos in the Media browser. In this example, I’ve already applied the tag to Gator01.mp4 and Gator02.mp4 and am applying it to Gator03.mp4.
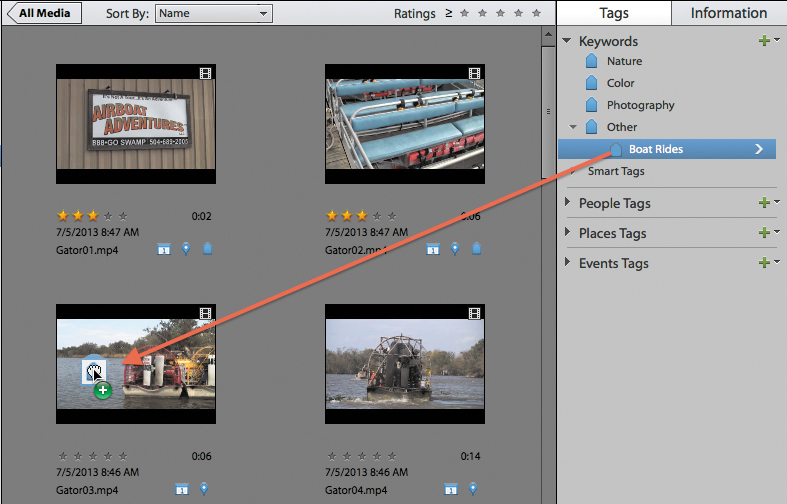
6. To view the clips that you’ve just tagged, click the greater than icon (>) to the right of Boat Rides, which opens the Tagging Search window that shows Keywords on the upper left and the clips that you just tagged in the Media browser (you may have to click the Tags/Info toggle to expose those fields). This window shows all tags created via keywords as well as the People, Places, and Events that you’ve set up. You can select any options in any of these categories or combination of categories to include content from these sources in the Media Browser. You can even apply star ratings to further refine your search.

7. In the upper left toolbar in the Tagging Search window, click the Back button (![]() ) to close that search window.
) to close that search window.
About the Auto-Analyzer
As mentioned earlier, the Auto-Analyzer evaluates your video clips for content and quality, and is integral to a number of functions, including Smart Tagging, Smart Trimming, and creating InstantMovies (which you’ll learn to do later in this lesson). You can run the Auto-Analyzer manually or run it automatically as a background process. In fact, by default, any time your system is running and idle, the Auto-Analyzer will run on clips that you import, so when you’re ready to edit, you won’t have to wait for the Auto-Analyzer to run.
To control the Auto-Analyzer behavior, in the Organizer, choose Edit > Preferences > Media-Analysis (Windows) or Elements Organizer > Preferences > Media Analysis (Mac OS).
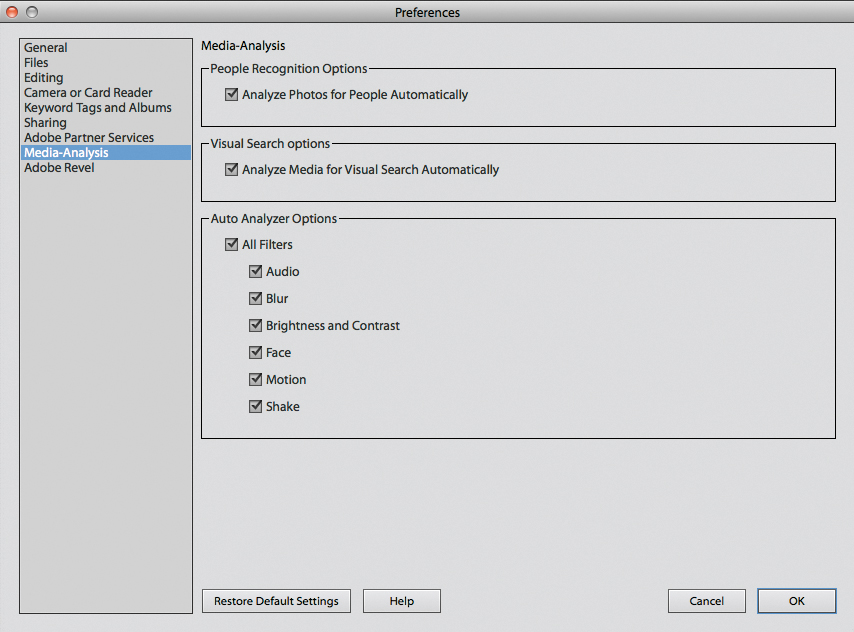
In most instances on most computers, background operation should work just fine. On older, less powerful computers, and those configured with the minimum RAM, background operation may cause a noticeable drag on foreground operations, particularly when you’re working with H.264-based, high-definition formats like AVCHD and video shot by DSLRs. If you notice any sluggishness in your foreground operations after importing footage or experience any system instability, try disabling the Auto-Analyzer as a background operation by deselecting Analyze Media For Smart Tags Automatically.
Running the Auto-Analyzer manually
We’ll manually run the Auto-Analyzer and apply Smart Tags to the project clips. Again, to ensure that you’re looking at the same content that appears in the book, make sure you’ve selected the Lesson04 folder in the My Folders section of the Albums And Folders panel on the left of the Organizer. See the first few steps of the earlier section “Tagging in the Organizer” to accomplish this.
1. If the Organizer isn’t open, click the Organizer icon (![]() ) on the Action bar. If it’s already open, press Alt+Tab (Windows) or Command+Tab to switch to the Organizer.
) on the Action bar. If it’s already open, press Alt+Tab (Windows) or Command+Tab to switch to the Organizer.
2. Press Ctrl+A (Windows) or Command+A (Mac OS) to select all clips, and then right-click and choose Run Auto-Analyzer. This can take a while, so you might want to try one or two clips first.

3. The Organizer starts analyzing the clips and displays a progress bar. The duration of the process will vary by clip length, clip format, and the speed of your computer. After completion, Adobe Premiere Elements will display a status message letting you know that the analysis is complete.

4. In the Organizer, if necessary, press Ctrl+D (Windows) or Command+D (Mac OS) to display file details. A purple tag beneath the clip’s thumbnail indicates that Smart Tagging has been applied; hover your pointer over the tag to see which quality-related tags were applied.

5. To remove a tag, right-click the tag in the Organizer, and choose Remove. Repeat as necessary for other tags.

Working with clips after Smart Tagging
Let’s take a moment to understand what happens to clips after Smart Tagging has occurred. To review, during Smart Tagging, Adobe Premiere Elements breaks the clip into different scenes based on content changes (as opposed to timecode, like DV files); finds different types of content, such as faces; and rates the quality of each clip based on factors like exposure, focus, and stability.
In the Organizer, you’ll know that the clip has been split into multiple scenes if there is a Step Forward icon (![]() ) to the right of the clip. Click that icon, and Adobe Premiere Elements displays all scenes separately in the Organizer, surrounded by a border that’s a different shade of gray from the rest of the Organizer. This lets you know that all the scenes are part of a single clip.
) to the right of the clip. Click that icon, and Adobe Premiere Elements displays all scenes separately in the Organizer, surrounded by a border that’s a different shade of gray from the rest of the Organizer. This lets you know that all the scenes are part of a single clip.
You should see separate scenes in the Gator12.mp4 clip, where the Organizer separated sections where the alligator was on land and then in the water. In the Organizer, you can treat each scene as a separate clip—for example, double-clicking it to play it in the preview window. You can consolidate all scenes back into a single frame by clicking the Step Backward icon to the right of the final scene (![]() ).
).

From the Organizer to Adobe Premiere Elements
After you’ve collected the clips you want to use in the Organizer, you have several options for transferring them to Adobe Premiere Elements:
• Send them all to Adobe Premiere Elements to start a new project or for insertion at the end of the timeline in an open project. Briefly, you select the desired clips, right-click, and choose Edit With Premiere Elements Editor. Note that you can select complete clips or segments of clips identified by the Auto-Analyzer. The full procedure is documented in “Working in the Organizer” in Lesson 1. This option works well for simple projects, because it adds all content to the timeline quickly.
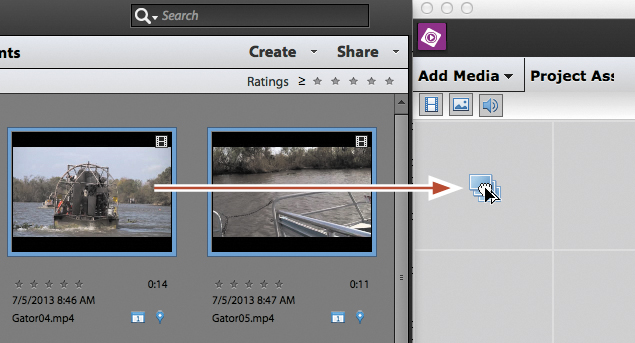
• Drag the clips into the Project Assets panel. (Remember, you must be in Expert view to see the Project Assets panel.) This option gives you the most flexibility, because you can add the content to the timeline in any order and at any time.
• Create an InstantMovie from the content by selecting it in the Organizer and sending it to Adobe Premiere Elements. This is the option explored in the next exercise.
Creating an InstantMovie
In this exercise, you’ll create an InstantMovie from the bayou boatride clips that you tagged previously. Again, an InstantMovie is a professional-looking edited movie complete with titles, soundtrack, effects, and transitions that you create by following a simple wizard.
![]() Note
Note
You can create InstantMovies from within Adobe Premiere Elements by adding the desired clips to the timeline in either Quick or Expert view and clicking the Instant Movie button on the Action bar. From there, the procedure is virtually identical to what’s described here. When creating an InstantMovie, Adobe Premiere Elements removes all effects, transitions, and titles that you’ve added to the project, so trim the excess content from your clips, but don’t add these elements because they will all be eliminated.
You’ll start in the Organizer, using the video clips from the Lesson04 folder. Make sure these clips are the only ones present in the Media browser. In addition, close Adobe Premiere Elements to start with a clean slate in that program. Do not overwrite the file Lesson04_Start_Win.prel (Windows) or Lesson04_Start_Mac.prel (Mac OS): If you want to save your work, save it under a different name.
1. Remove audio and photos from display in the browser: Choose View > Media Types > Photos, and then choose View > Media Types > Audio to remove these media types from the Media browser.

2. Press Ctrl+A (Windows) or Command+A (Mac OS) to select all clips in the Media browser, click the Create button (![]() ) in the upper right corner of the Organizer, and choose InstantMovie (
) in the upper right corner of the Organizer, and choose InstantMovie (![]() ).
).
Adobe Premiere Elements launches. If the Format Mismatch dialog box opens, click Yes to change the project preset to match the clips.
3. If a Save Project dialog box opens, name the file Lesson04_InstantMovie.prel, and save it in the Lesson04 folder.
4. If a dialog box opens asking if you want to fix problems in the clips, click No.
![]() Note
Note
The Apply To options become active only when you apply a theme to clips already inserted into the timeline, not when you create an InstantMovie from the Organizer.
5. In the Choose A Movie Theme dialog box, select Extreme Sports, and click Next. (If this theme is not available, choose another theme.)

6. Customize the theme as desired. Accept the options as is, or do any or all of the following:

• Customize the opening and closing titles.
• Select the Auto Edit option to have Adobe Premiere Elements analyze your clips and edit them to fit the selected theme. It’s recommended you do this; if you don’t select Auto Edit, Adobe Premiere Elements uses the clips as is. Also, choose whether or not to apply the Auto-Analyzer to clips that you haven’t previously analyzed.
• Click the triangle next to Music to show the Music options. There, select Theme Music to use the background music from the chosen theme, or select No Music. To use your own background music, click My Music, and then click the Browse button to choose the song you want. Then drag the Music/Sound FX slider to the desired setting—to the right to prioritize audio captured with the video clips and to the left to prioritize the selected background music. If you have dialogue in your project that you want to retain (which these clips don’t), select the SmartMix option; Adobe Premiere Elements will reduce the volume of the music track when it detects dialogue.
• Click the triangle next to Speed And Intensity to show the Speed And Intensity options. Adjust the Effects and Cuts sliders as desired.
• Click the triangle next to Duration and then choose the desired option. Match Music produces a movie that matches the duration of the selected music and is recommended. Or, you can specify a duration or choose Use All Clips, which uses all clips at their original duration with no background music.
• Click the triangle next to Sequence to show the Sequence options. Choose Theme Order (recommended), which allows Adobe Premiere Elements to use clips as they best match the theme, or Time/Date, which uses the clips in the order in which they were shot.
• Click the triangle next to Theme Content to show the Theme Content options. Choose the content to incorporate into the InstantMovie and whether to replace any existing content with theme-based content. If a content type is grayed out (like the Intro/Closing Movie for the Pan and Zoom theme), it is not included in that theme.
• Click the triangle next to Render Preview, and then click Yes to render a preview of the InstantMovie after completion or No to preview it in real time from the Timeline (recommended).
7. After selecting your options, click Apply to create the InstantMovie and then do the following:
• Click No if asked if you want to select more clips.
• Click Yes if asked whether you want to replace user-applied effects.
• Click No when Adobe Premiere Elements asks if you want to render the movie.
Adobe Premiere Elements creates the InstantMovie and inserts it into the timeline in consolidated form.
8. To separate the InstantMovie into its components to edit them, click to select the new InstantMovie in the timeline, right-click, and choose Break Apart InstantMovie.
9. Use the playback controls in the Monitor panel to preview the InstantMovie. If Adobe Premiere Elements asks if you’d like to render effects before playing the movie, click Yes if you’d like to see a perfect rendition, although this may take a good bit of time, depending on your system. Click No if you have a fast system and/or just want to get a quick idea of how the movie looks.
A. Preview area
B. Add Marker
C. Current time
D. Go to Previous Edit Point (Page Up)
E. Rewind
F. Step Back (left)
G. Play/Pause toggle (spacebar)
H. Step Forward (right)
I. Fast-Forward
J. Go to Next Edit Point (Page Down)
K. Render Timeline
L. Fit to Visible Timeline ()
M. Zoom Out (-)
N. Zoom control
O. Zoom In (=)
Review questions
1. What view must you be in to see the Project Assets panel?
2. What’s the difference between the Organizer that ships with Adobe Premiere Elements and the Organizer that ships with Adobe Photoshop Elements?
3. What are the three main content categories in the Organizer?
4. What is Smart Tagging? Are there any situations in which you wouldn’t want to apply Smart Tagging?
5. After creating an InstantMovie, how do you break up the movie to edit it further?
Review answers
1. You must be in Expert view. The Project Assets panel does not appear in Quick view.
2. This is a trick question; there is no difference. If you have Adobe Premiere Elements and Adobe Photoshop Elements installed, both programs can insert content into the same shared database and sort through and retrieve data from that database.
3. The main content categories in the Organizer are People, Places, and Events.
4. When you apply Smart Tagging to a clip, Adobe Premiere Elements analyzes the clip to detect scenes based on content; searches for specific content types, like faces; and ranks the quality of your clips. Other than processing time, there’s very little downside to applying Smart Tagging. Your video clips will be divided into useful scenes, and you can find high-quality clips much faster than you could manually.
5. Click the clip with your pointer to select it, and then right-click and choose Break Apart InstantMovie.