
8. Adding Titles and Credits
Lesson overview
In this lesson, you’ll learn how to create original titles and rolling credits for the bayou boat ride movie you’ve been working on. You’ll be adding still titles and rolling titles, placing images, and using drawing tools. Specifically, you’ll learn how to do the following:
• Add and stylize text
• Superimpose titles and graphics over video
• Use graphics elements like speech bubbles
• Create and customize rolling titles
• Use title templates
This lesson will take approximately two hours. Download the project files for this lesson from the Lesson & Update Files tab on your Account page at www.peachpit.com and store them on your computer in a convenient location, as described in the Getting Started section of this book. Your Account page is also where you’ll find any updates to the chapters or to the lesson files. Look on the Lesson & Update Files tab to access the most current content.

It’s easy to create and customize speech bubbles in Adobe Premiere Elements.
Working with titles and title-editing mode
![]() Note
Note
If you have not already downloaded the project files for this lesson to your computer from your Account page, make sure to do so now. See “Getting Started” at the beginning of the book.
Within Adobe Premiere Elements, you can create custom graphics and titles. When you add a title over one of your video clips, it’s also added to the Project Assets panel as a new clip. As such, it’s treated much like any other clip in your project—it can be edited, moved, deleted, and have transitions and effects applied to it.
Adobe Premiere Elements allows you to create original titles using text, drawing tools, and imported graphics. However, to help you quickly and easily add high-quality titles to your project, Adobe Premiere Elements also provides a number of templates based on common themes, such as sports, travel, and weddings.
Note that there is a guided edit that describes how to add a title to your video. This chapter will cover everything in that tutorial and more, but if you want a quick overview of the process, go ahead and run through the guided edit.
Getting started
You’ll modify scenes in this lesson’s project by adding titles and graphics to various clips in the project. But first, you’ll open the Lesson08 project and prepare your Adobe Premiere Elements workspace.
1. Make sure that you have correctly copied the Lesson08 folder from your Account page onto your computer’s hard drive. See “Copying the Classroom in a Book files” in the Getting Started section at the start of this book.
2. Launch Adobe Premiere Elements. If it is already open, choose Help > Welcome Screen to return to the Welcome screen.
3. In the Welcome screen, click Video Editor, select Existing Project, and click the Open folder.
4. In the Open Project dialog box, navigate to the Lesson08 folder.
5. Within the Lesson08 folder, select the file Lesson08_Start_Win.prel (Windows) or Lesson08_Start_Mac.prel (Mac OS), and then click Open. If a dialog box appears asking for the location of rendered files, click the Skip Previews button.
Your project file opens.
6. Choose Window > Restore Workspace to ensure that you start the lesson in the default panel layout.
Viewing the completed movie before you start
To see what you’ll be creating in this lesson, you can take a look at the completed movie. You’ll have to be in Expert view to open the Project Assets panel to view the movie, so if you are not, click Expert (![]() ) to enter that view.
) to enter that view.
1. At the upper left side of Adobe Premiere Elements, click the Project Assets button (![]() ) to open the Project Assets panel. Locate the file Lesson08_Movie.mov, and then double-click it to open the video in the preview window.
) to open the Project Assets panel. Locate the file Lesson08_Movie.mov, and then double-click it to open the video in the preview window.
2. Click the Play button (![]() ) to watch the bayou boat ride video, which you’ll build in this lesson.
) to watch the bayou boat ride video, which you’ll build in this lesson.
3. When you’re done, close the preview window and close the Project Assets panel.
Titles and text overview
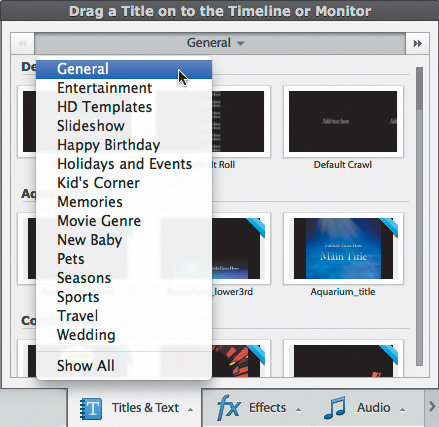
Adding titles in Quick and Expert views is very similar, but let’s discuss titles in general before learning that procedure. Adobe Premiere Elements contains a number of title templates that you can access by clicking the Titles & Text button (![]() ) in the Action bar to open the Titles & Text panel, which contains identical content in both Quick and Expert views. All of the text and title content is separated into themed folders that match the categories that you will use as DVD menus in Lesson 10. Click the folder pull-down menu to view the categories, many of which contain multiple options.
) in the Action bar to open the Titles & Text panel, which contains identical content in both Quick and Expert views. All of the text and title content is separated into themed folders that match the categories that you will use as DVD menus in Lesson 10. Click the folder pull-down menu to view the categories, many of which contain multiple options.
Title templates are a great way to add a nice creative touch to your videos; after all, no one but you will know that you didn’t create the professional-looking title from scratch. If you’re creating a DVD from your video, you should review the available DVD themes while choosing your title templates, so you can choose the matching title template and theme that you like best. Once you learn how to create your own titles, customizing a title template is a snap, and that’s what we’ll do here.
Adobe Premiere Elements offers two basic kinds of titles: full screen and overlay. A full-screen title has no video underneath, so it usually takes up the entire frame. In contrast, overlay titles are superimposed over a video or videos. In this lesson you’ll learn how to create both kinds of titles and also how to use speech bubbles, which are a graphic element that you complete using Adobe Premiere Elements text tools.
Although you can create a title by choosing File > New > Title, it’s simplest to just drag a title template where you want it; if you want a full-screen title, you drag it to the desired location on the video track (Quick view) or Video 1 track (Expert view), making sure that the Insert icon (![]() ) appears before you release your mouse. This tells Adobe Premiere Elements to push all content on the timeline to the right to fit the content that you just added.
) appears before you release your mouse. This tells Adobe Premiere Elements to push all content on the timeline to the right to fit the content that you just added.
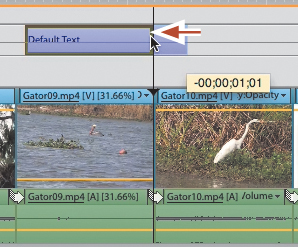
As you’ll see in the figure below, I’ve added the default title to the start of the project, which you’ll do in Expert view in a moment. You can see the Insert icon, so all other content will be pushed back by the duration of the title. You set title duration in the Preferences dialog box by choosing Edit > Preferences > General (Windows) or Adobe Premiere Elements Editor > Preferences > General (Mac OS). Titles aren’t specifically mentioned in this dialog box, but rest assured, Still Image Default Duration controls the length of titles as well as still images.
Changing the Still Image Default Duration preference takes effect only after closing Adobe Premiere Elements and reopening it. It also affects only titles you created or images you import after you’ve changed the preference. It will not change the duration of any images in the project or titles created before you change the preference, whether they are in the Project Assets folder or deployed on the timeline.

To create an overlay title, drag the title to the Text track in Quick view or any video track over your primary video track in Expert view. If you think you’ll be switching between Quick and Expert views, you should place titles inserted in Expert view in the Video 3 track so they’ll appear in the Title track in Quick view; otherwise, you won’t see them in Quick view. If you use Expert view exclusively, you can place titles in any video track.
If you add an overlay title in Quick view over a clip that’s shorter than the default title duration, Adobe Premiere Elements will cut off the title at the right edge of the clip. This is not a big deal, because you can click and drag the edge of the clip to any duration. However, in Expert view, Adobe Premiere Elements will insert the title at its full duration.
Once the title is added to your project, you edit it the same way in either view: Adobe Premiere Elements opens the title you just added in title-editing mode, which uses the Monitor panel as a WYSIWYG editing tool.
To exit title-editing mode, simply click anywhere in the timeline that’s not the location of a title. Adobe Premiere Elements saves all changes automatically. To reenter title-editing mode, double-click any title.
Now that you know what to expect in Quick view, we’ll look at the rest of the lesson in Expert view.
Creating a simple full-screen title
If you were following along with the previous discussion by making the actual edits, congrats; that’s a great way to learn, and much more fun than reading dry words on a page. To return to a clean slate, either click Undo (![]() ) until it grays out or reload Lesson08_Start_Win.prel (Windows) or Lesson08_Start_Mac.prel (Mac OS).
) until it grays out or reload Lesson08_Start_Win.prel (Windows) or Lesson08_Start_Mac.prel (Mac OS).
In this exercise, you’ll add a title clip at the beginning of the movie, and then customize the title. Remember, you’ll be working in Expert view, so if you’re not in that view, click Expert (![]() ) at the top of the Monitor panel.
) at the top of the Monitor panel.
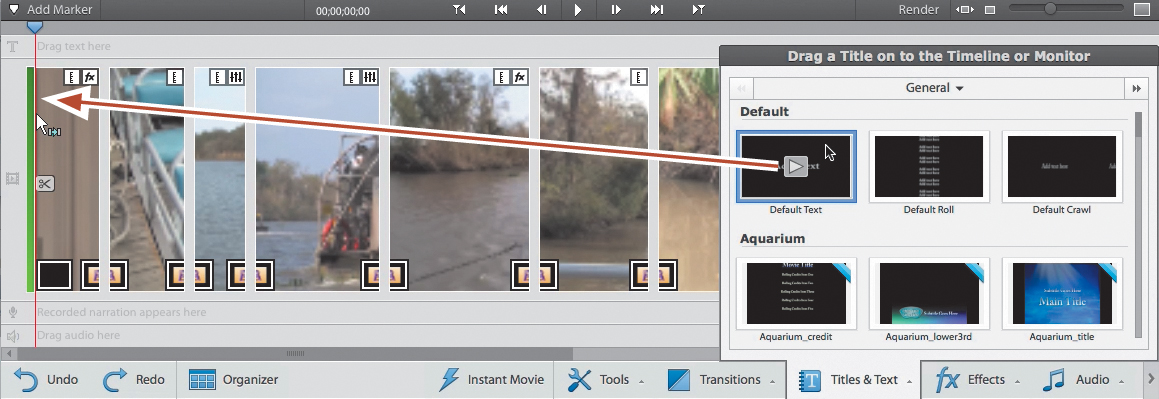
1. In the Action bar, click Titles & Text (![]() ) to open the Titles & Text panel. Make sure that the General category is selected.
) to open the Titles & Text panel. Make sure that the General category is selected.
2. Click and drag the Default Text title template to the beginning of the project, and then release the pointer. Adobe Premiere Elements inserts the title at the start of the project and opens the title in title-editing mode with the text active. The text and drawing tools are visible in the Adjustments panel on the right, with tabs for Text, Style, Animation, and Shapes. You will visit all these tabs during your work in this lesson.

![]() Tip
Tip
You can add multiple text entries to a single title, or you can create multiple titles, each containing a unique text string.
3. The Horizontal type tool should be selected by default. If it’s not, click the Horizontal type tool button (![]() ) in the Adjustments panel to select it now.
) in the Adjustments panel to select it now.

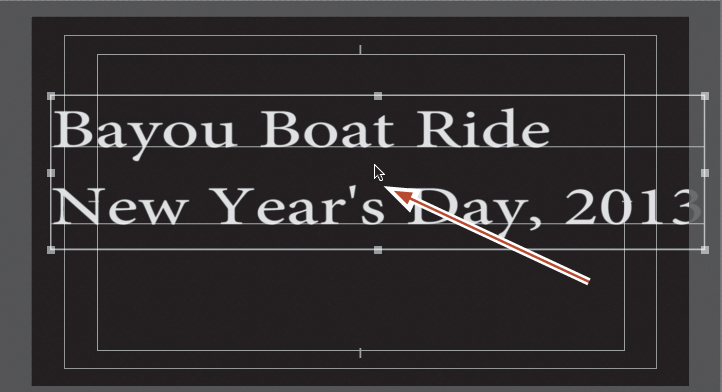
4. Click in the text box, and drag your pointer over the default text to select it. Type the words Bayou Boat Ride, and then press the Enter (Windows) or Return (Mac OS) key to create a new line. Next, type the words New Year’s Day, 2013. The text will disappear to the right, but we’ll fix that in a moment.
5. To reposition the text, click the Selection tool (![]() ), and then click anywhere on the text to select the text block. Drag to reposition the text so it appears centered in the upper third of the Monitor panel. Don’t worry about the size or exact position for now; you’ll reposition the text later in this lesson.
), and then click anywhere on the text to select the text block. Drag to reposition the text so it appears centered in the upper third of the Monitor panel. Don’t worry about the size or exact position for now; you’ll reposition the text later in this lesson.
6. Choose File > Save As. Then, in the Save As dialog box, name the file Lesson08_Work.prel, and click Save to save it in your Lesson08 folder.
Adobe Premiere Elements treats basic titles, such as the one you just created, like still image files. After you’ve created a title, the application automatically adds an image file to the Project Assets panel.
Modifying title text
After creating and adding a title to the project, you can change text or its appearance at any time, much as you would in a word processor or page layout program. In this exercise, you’ll learn how to adjust the alignment of your type as well as its style, size, and color.
Changing text alignment, style, and size
Let’s fine-tune the default title that you just inserted. You should be in the Text view of the Adjustments panel; if not, click the Text tab (![]() ) on the top of the panel to enter that view.
) on the top of the panel to enter that view.
1. To center the text within the text box, use the Selection tool (![]() ) to select the title text box, and then click the Center Text button (
) to select the title text box, and then click the Center Text button (![]() ). You don’t have to select the actual text, just the box.
). You don’t have to select the actual text, just the box.
2. In the Monitor panel, choose the Horizontal type tool, and drag it in the text box to select the second line of text. From the Font pull-down menu, choose Adobe Garamond Pro; choose Bold from the menu next to it. Choose another font and style if you don’t have this font on your system.
3. With the second line of text still selected, to change its font size, do the following:
• Place the pointer over the Size value field. The pointer changes to a hand with two black arrows (![]() ).
).
• Drag to change the Size value to 75. If you have difficulties getting a precise value by dragging, click the size value once, type 75 into the text field, and press Enter (Windows) or Return (Mac OS).
Now that you’ve changed the size of the first line, you can see that the text is, in fact, centered.

4. At the top of the Adjustments panel, click the Style tab (![]() ) to enter Style view. Scroll down until you can see the Lithos Gold Strokes 52 style near the bottom. Then select the first line of text—the words “Bayou Boat Ride”—with the Horizontal Type tool, and choose Lithos Gold Strokes 52. This changes the style for the selected text.
) to enter Style view. Scroll down until you can see the Lithos Gold Strokes 52 style near the bottom. Then select the first line of text—the words “Bayou Boat Ride”—with the Horizontal Type tool, and choose Lithos Gold Strokes 52. This changes the style for the selected text.
5. At the top of the Adjustments panel, click the Text tab (![]() ) to enter that view. With the words “Bayou Boat Ride” still selected, change the font size to 85, either by dragging the Size value to the right or by clicking the Size value once, typing 85 into the text field, and pressing Enter (Windows) or Return (Mac OS).
) to enter that view. With the words “Bayou Boat Ride” still selected, change the font size to 85, either by dragging the Size value to the right or by clicking the Size value once, typing 85 into the text field, and pressing Enter (Windows) or Return (Mac OS).

6. Choose File > Save to save your work.
Centering elements in the Monitor panel
At this point, your title probably isn’t precisely centered horizontally within the frame. You can fix this manually, or you can let Adobe Premiere Elements do the work for you.
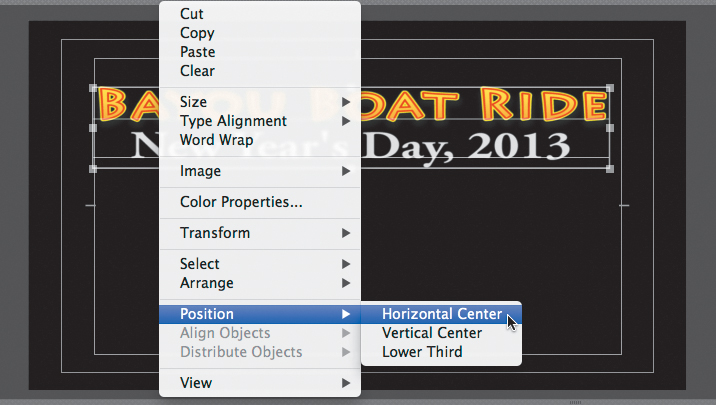
1. Using the Selection tool, click the text box to select the title.
2. Choose Text > Position > Horizontal Center. Or right-click the text box, and then choose Position > Horizontal Center. Adobe Premiere Elements centers the text box horizontally within the frame. Depending on how you positioned the box earlier in this lesson, you might see little or no change.
3. Choose File > Save to save your work.

Changing the color of type
As you’ve seen, changing type style and size is easy. You can change all text within a text box equivalently by first selecting the text box using the Selection tool and then applying the change. Or you can restrict a change to only portions of the text by selecting them using the Horizontal Type tool. Now you’ll change the color of the words “New Year’s Day, 2013” to match the Bayou Boat Ride text.
You should be in Text view for this exercise, so if you’re not, click the Text tab (![]() ) near the top of the Adjustments panel to enter that view.
) near the top of the Adjustments panel to enter that view.
1. Select the Horizontal type tool (![]() ), and then drag over the words “New Year’s Day, 2013” to highlight the text.
), and then drag over the words “New Year’s Day, 2013” to highlight the text.
Next, you’ll change the gradient and color of the type. Note that any changes you make will apply to only the selected type.
2. Click the Color Properties button (![]() ) in Text view to open the Color Properties dialog box.
) in Text view to open the Color Properties dialog box.

3. In the middle of the dialog box, note the Gradient pull-down menu. Experiment with the different options on that menu, and notice how they change the appearance of the text. Choose 4 Color Gradient (which means that the gradient is composed of the four colors in the boxes at the corners of the rectangle beneath the Gradient menu).

4. Click the box at the top left of the gradient rectangle to select it. Set the RGB values to R: 253, G: 232, and B: 73. Note that after you enter the first value, you can switch to the next values by pressing the Tab key. Then click the box on the upper right, and insert the same values: R: 253, G: 232, and B: 73. One at a time, click the two boxes on the bottom, and set the values for both at R: 242, G: 174, and B: 54.

![]() Tip
Tip
How did I know that these RGB values would match the colors in the Bayou Boat Ride text? I selected the Bayou Boat Ride text, opened the Color Properties dialog box, and copied down the RGB values used for that style (of course). If you want to maintain consistent colors among the various design elements in your project, isolate a single set of RGB values and use them consistently.
5. Click OK to close the Color Properties dialog box. Using the Selection tool, click outside the text box in the Monitor panel to deselect the text and review your work.
6. Choose File > Save to save your work.
Adding an image to your title files
To add an extra element of depth and fun to your titles, you can import and insert images from any number of sources. For instance, you can use photos from your digital still camera as elements in your title file. In this exercise, you’ll place a shot of the baby alligator in the lower half of the title image.
1. With the Monitor panel still in title-editing mode, right-click the Monitor panel, and then choose Image > Add Image.
The Open dialog box appears.
![]() Tip
Tip
If you have overlapping frames, you can change the stacking order by right-clicking on a selected frame and then choosing one of the Arrange commands from the context menu. To align multiple frames, select the frames you want to align, right-click, and then choose any of the Align Objects commands.
2. In the Open dialog box, navigate to the Lesson08 folder. Within that folder, select the file marquee.psd, and then click Open (Windows) or Open (Mac OS) to import the image into your title.
3. The image appears stacked in front of the text box in your title. Use the Selection tool to drag the placed image downward, making sure that the bottom of the image stays above the action-safe area. (If this were text, you’d have to make sure it was within the title-safe zone.)

![]() Tip
Tip
How long should your titles appear onscreen? Long enough for your viewers to read them, of course. Want more specificity? The rule of thumb is that your title should be twice as long as it takes to read the title out loud. So start your timer, read the title twice, stop the timer, and that’s your duration.
4. If you’re unhappy with the size of the image you’ve inserted, drag any anchor point to resize the placed image. Hold down the Shift key while dragging to maintain the proportions of the image.
5. To make sure that the image is centered perfectly, right-click the image, and choose Position > Horizontal Center.
6. Choose File > Save to save your work.
Applying fade-in and fade-out effects
Any transition that you use on video clips can also be added to title clips. In this exercise, you’ll add a fade-in and fade-out effect to the title clip.
1. With the title selected, click Applied Effects to open the Applied Effects panel.
2. Click the disclosure triangle next to Opacity to view the Opacity controls.
3. Under Opacity, click the Fade In button. The title image seems to disappear from the Monitor panel. Drag the current-time indicator in the timeline to the right to see the image fade in.

If you adjusted the default transition duration to five frames (as detailed in Lesson 7), after five frames the clip’s opacity reaches 100% and becomes fully visible again. Although five frames is an appropriate length for interscene dissolves, fade-ins should be one full second. Let’s fix that (if necessary).
4. In the timeline, drag the second keyframe in the Video 1 track to the 00;00;01;00 mark, as shown in the little yellow box beneath the pointer. That extends the fade-in from five frames to one full second. Note that this step is easier if you’re zoomed in on the timeline and if the Video 1 track is taller than the default size.

5. Back in the Applied Effects panel, click the Fade Out button to fade out the title. If necessary, drag the third keyframe to the left to the 00;00;04;00 mark to extend the fade out to one second.
6. If the current-time indicator isn’t at the start of the project, press Home to move it there. Then press the spacebar to play the title you just created. Press the spacebar to stop playback when you’re finished.

7. Choose File > Save to save your work.
To apply an animation, you must be in title-editing mode; the easiest way to enter this mode is to double-click a title in the timeline. Select the text element that you want to animate, and click the Animation tab (![]() ) to open that view in the Adjustments panel. Preview any animation by hovering your pointer over the animation until the Play button appears and then clicking Play. Click Apply at the bottom of the Animation view to apply the selected animation to the selected text.
) to open that view in the Adjustments panel. Preview any animation by hovering your pointer over the animation until the Play button appears and then clicking Play. Click Apply at the bottom of the Animation view to apply the selected animation to the selected text.

Superimposing a title over video clips
Now you know how to build a full-screen title. Next, you’ll create an overlay title. In this exercise, you’ll add an overlay title over Gator09.mp4 (which as you’ll see isn’t a gator at all but a pelican). The fun new skills you’ll learn here are how to create a background for your title text so that it’s readable over the background video and how to use shapes to highlight critical elements in your video content.
1. Move the current-time indicator to the start of Gator09.mp4, just after the end of the cross-dissolve transition from Gator08.mp4.
2. In the Action bar, click Titles & Text (![]() ) to open the Titles & Text panel. Make sure that the General category is selected.
) to open the Titles & Text panel. Make sure that the General category is selected.
![]() Note
Note
Because this title is on Video 2, not Video 3, you won’t see it if you enter Quick view.
3. Click and drag the Default Text title template to the Video 2 track, right where it intersects with the current-time indicator, and release the pointer. Adobe Premiere Elements inserts the title and opens the title in title-editing mode.

4. Click in the text box, and drag the pointer over the default text to select it. Type the word Pelican.
You can see right away that this text will be hard to read without some kind of a background. Let’s get the text squared away, and then you’ll create the background.
5. Drag the text you just added to select it. In the Text tab, click the Font pull-down menu, choose Adobe Garamond Pro, and change the Size to 100. Then click the Selection tool, and position the text so it’s in the bottom center of the frame.
6. Click elsewhere in the title to deselect the text that you just created.
Now let’s add a background.

7. Click the Shapes tab (![]() ) to open that view. Select the Rectangle tool (
) to open that view. Select the Rectangle tool (![]() ); the cursor changes to a cross-hair. Drag to create a rectangle over the text you just created. Don’t worry about obscuring the text; in a moment, you’ll position the rectangle behind the text.
); the cursor changes to a cross-hair. Drag to create a rectangle over the text you just created. Don’t worry about obscuring the text; in a moment, you’ll position the rectangle behind the text.

8. Click the Color Properties button (![]() ) to open the Color Properties dialog box. Set the color to black by clicking the large black color chip in the upper right of the Color Properties dialog box. Click OK to apply the color to the rectangle you created and to close the Color Properties dialog box.
) to open the Color Properties dialog box. Set the color to black by clicking the large black color chip in the upper right of the Color Properties dialog box. Click OK to apply the color to the rectangle you created and to close the Color Properties dialog box.

9. Soften the black color by making the background slightly transparent. Right-click the rectangle, and choose Transform > Opacity. The Opacity panel opens. Type 60 into the Opacity % field, and click OK to close the panel.

10. Now you’ll shift the new rectangle behind the text. Right-click the rectangle, and choose Arrange > Send To Back to place the rectangle behind the white type. The white text is now clearly visible over the rectangle. If necessary, you can edit the size of the rectangle by clicking it to make it active and then dragging any edge to a new location. If necessary, you can also trim the right edge of the title so that it doesn’t extend over to the next clip.
![]() Tip
Tip
When you add multiple elements, such as text, squares, or circles, to a title, you create a stacking order. The most recent item added (in this case, the rectangle) is placed at the top of the stacking order. You can control the stacking order—as you did here—using the Arrange commands from the context menu or the Text menu.
11. Let’s add a pointer to the pelican. Click elsewhere in the title to deselect the box you just created. Then select the Line tool (![]() ), and draw a line from the text title to the pelican.
), and draw a line from the text title to the pelican.

12. You want to match the duration of the title to the length of the pelican clip. The title is five seconds long, while the clip is just under 4 seconds long. Trim the title to the right edge of the Gator09.mp4 clip by grabbing the edge and dragging it just over one second to the left.
13. Following the instructions in the earlier “Applying fade-in and fade-out effects” section, fade the title that you just created in and out. In this case, the fade-in and fade-out effect should be fairly short—say, about five frames. You want to soften its appearance and disappearance, not make it noticeable or memorable.
14. Move the current-time indicator a few moments before the title you just created. Then press the spacebar to view the title. Press the spacebar to stop playback when you’re finished.
15. Choose File > Save to save your work.
Using graphics
Graphics are a great way to add a polish to your productions, whether for a touch of whimsy or for a more comic element. We’ll add the latter, staying in Expert view because there are many more graphics elements to work with, although you can access a subset in Quick view.
1. Move the current-time indicator to the start of Gator15.mp4, right after the short cross-dissolve transition.
2. On the far right of the Action bar, click Graphics (![]() ) to open the Graphics panel. Click the pull-down menu, and choose the Thought And Speech Bubbles category.
) to open the Graphics panel. Click the pull-down menu, and choose the Thought And Speech Bubbles category.
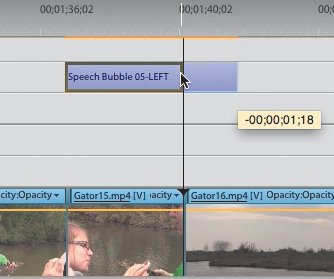
3. Use the scroll bar on the right of the Graphics panel to scroll down to Speech Bubble 05-LEFT. Click and drag it to the Video 3 track right where it intersects the current-time indicator.
Note that if you haven’t used this graphic before, Adobe Premiere Elements may have to download it, which means you need to be connected to the Internet.
4. Double-click the graphic on the timeline to open it in title-editing mode.
5. Click in the text box, and drag your pointer over the default text to select it. Press the spacebar once, and type Yuch!. Then drag the pointer over the text again, and increase the font size to 120 to make the text fill the speech bubble.

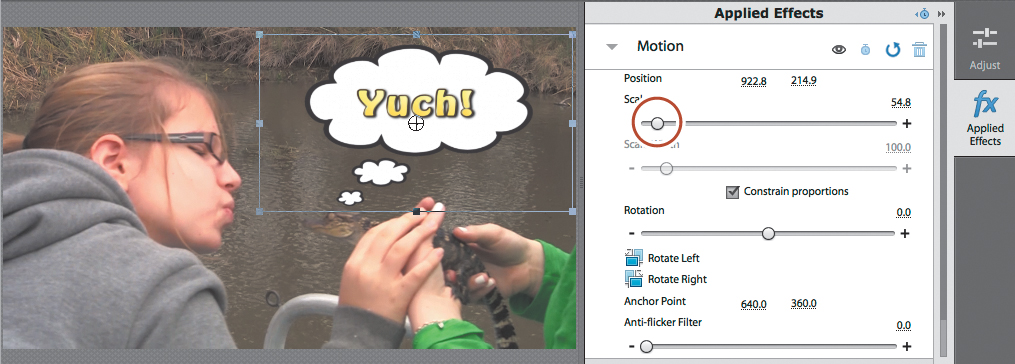
6. Click the Applied Effects icon to open that panel; then click the disclosure triangle next to the Motion adjustment to expose those configuration options. Click and drag the Scale slider to the left to make the speech bubble smaller, and then click and drag the speech bubble upwards and to the right so it looks like it’s coming from the baby alligator.
7. Shorten the speech bubble on the timeline so that it doesn’t extend past Gator15.mp4. Click and drag the right edge of the speech bubble to the left until it reaches the right edge of Gator15.mp4.
![]() Note
Note
The speech bubble will always appear in the project where you first apply it. However, the speech bubble did not reliably reappear in subsequent projects created for later lessons from this project. For some reason, it doesn’t seem to travel well to different projects in different folders, particularly on different systems. So don’t be shocked if you don’t see the speech bubble graphic in later projects, despite our best efforts.
8. Again following the instructions in the “Applying fade-in and fade-out effects” section, fade the title that you just created in and out. As with the title, in this case the fade-in and fade-out effects should again be about five frames, a subtle softening.
9. Move the current-time indicator a few moments before the title you just created. Then press the spacebar to view the title. Press the spacebar to stop playback when you’re finished.
10. Choose File > Save to save your work.
OK, you’re almost home. Let’s add rolling credits, and you’ll be done.
Working with animated titles
The titles you have created to this point have been static, but Adobe Premiere Elements can create animated titles as well. There are two types of animated titles: rolls and crawls. A rolling credit is defined as text that moves vertically up the screen, like the end credits of a movie. A crawl is text that moves horizontally across the screen, like a news ticker. In the following exercise, you’ll create a rolling credit at the end of the project.
Creating a rolling credit
1. Press the End key to move to the end of the project.
2. In the Action bar, click Titles & Text (![]() ) to open the Titles & Text panel. Make sure that the General category is selected.
) to open the Titles & Text panel. Make sure that the General category is selected.
3. Click and drag the Default Roll title template to the Video 1 track, adjacent to Picture 8.jpg.
4. Using the Horizontal Type tool, select the Main Title text at the top of the Monitor panel. In the text options area of the Adjustments panel, click the Center Text (![]() ) icon to center the text. That way, whatever you type will continue to be centered. Make sure that the Main Title text is still selected, and type Credits.
) icon to center the text. That way, whatever you type will continue to be centered. Make sure that the Main Title text is still selected, and type Credits.
5. Click the other text box, press Ctrl+A (Windows) or Command+A (Mac OS) to select all text, and then click the Center Text icon again to center the text.
6. In the second text box, if necessary, press Ctrl+A (Windows) or Command+A (Mac OS) to select all text, and do the following:
• Type Filmed on location in the Louisiana Bayou: and press Enter (Windows) or Return (Mac OS) twice.
• Type Narration: Eleanor Rose and press Enter (Windows) or Return (Mac OS) twice.
• Type Eyeroll video: Elizabeth Whatley and press Enter (Windows) or Return (Mac OS) twice.
• Type Baby Alligator: Himself and press Enter (Windows) or Return (Mac OS) nine times.
• Type The End and press Enter (Windows) or Return (Mac OS) seven times.

7. From the Adobe Premiere Elements main menu, choose Text > Roll/Crawl Options. The first few options are self-explanatory; here are descriptions of what the others specify (from Adobe Premiere Elements Help):
• Start Off Screen—The roll begins out of view and scrolls into view
• End Off Screen—The roll continues until the objects are out of view
• Preroll—The number of frames that play before the roll begins
• Ease-In—The number of frames through which the title rolls at a slowly increasing speed until the title reaches the playback speed
• Ease-Out—The number of frames through which the title scrolls at a slowly decreasing speed until the roll completes
• Postroll—The number of frames that play after the roll completes

8. Set up your page so that the credits start offscreen, quickly come into view, slow at the end, and then The End stays onscreen until the title fades out (which you’ll do in the next exercise). To accomplish this, do the following:
• Select the Start Off Screen check box (if not already selected).
• Leave the End Off Screen check box deselected (or deselect it).
• Set Preroll and Ease-In at 0 to make the title appear as quickly as possible.
• Set Ease-Out at 80 so the title slows as The End is rising.
• Set Postroll at 60 so The End stays static before it fades out.
9. Click OK to close the Roll/Crawl Options dialog box and apply your changes.
10. Place the current-time indicator just before the beginning of the rolling credits. Press the spacebar to play the rolling credits clip. If playback is too jerky, render the rolling credit title work area first.
When you play the clip, the text box with the credits will move—in the five-second default length of the title—from bottom to top across the monitor. This is a bit fast; we’ll slow it down in the next exercise.
Changing the speed of a rolling title
When Adobe Premiere Elements creates a rolling title, it spreads the text evenly over the duration of the title. The only way to change the speed of a rolling title is to increase or decrease the length of the title clip. If you want the text to move more slowly across the screen, you need to increase the clip length.
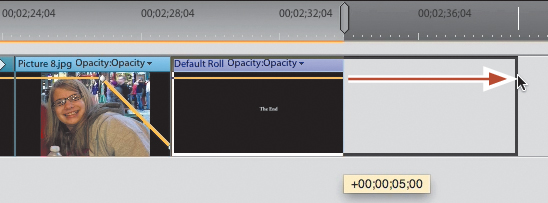
1. In the timeline, place your pointer over the right end of the rolling title you just created, and click and drag the clip to the right. Note that as you drag, a small context menu shows you how much time you are adding to the clip. Add about five seconds to the length of the clip, and then release the pointer.
2. Following the instructions in the “Applying fade-in and fade-out effects” section, fade the title that you just created in and out. In this case, the fade-in and fade-out effects should each be about five frames in duration.
3. Place the current-time indicator just before the beginning of the rolling credits. Press the spacebar to play the rolling credits clip. Notice how your titles are now moving more slowly on the monitor and how The End stays onscreen until it fades out at the end. Pretty sweet, eh?
4. You’re done here, so save your project as Lesson08_End.prel.
Exploring on your own
To increase your skill and versatility with titles, experiment with the different templates Adobe Premiere Elements provides. Keep in mind that you can modify elements like the color of text and the position of graphics. Here are a few steps to follow as you discover what’s available:
1. Replace the custom title you created with a title created from a template.
2. Explore the drawing tools available to you when you’re in title-editing mode.
3. Create an animated title. Remember that you can animate only titles with one line of text.
4. Place different transitions between your title clips and your video clips to view the various effects you can achieve.
Congratulations; you have completed the lesson. You’ve learned how to create a simple still title with text and graphics. You changed the style, size, alignment, and color of text. You’ve positioned and aligned text and graphic frames in the Monitor panel, and you’ve used one of the Arrange commands to change the stacking order of overlapping frames. You applied fade-in and fade-out effects to your titles. You know how to create rolling credits and how to use and customize title templates. It’s time for a well-earned break. But before you stop, review the questions and answers that complete this lesson.
Review questions
1. How do you create a new title?
2. How do you exit title-editing mode, and how can you reenter it to make adjustments to a title clip?
3. How do you change the color of title text?
4. How do you add a fade-in or fade-out effect to a superimposed title clip?
5. What is a rolling credit, and how do you speed it up or slow it down?
Review answers
1. The easiest way to create a new title is to drag a title template to the desired location.
2. To exit title-editing mode, click anywhere in the timeline except on a title clip. To reenter title-editing mode, double-click any title on the timeline.
3. Double-click a title to enter title-editing mode in the Monitor panel. Select the text using the Horizontal Type tool. Then click the Color Properties button, and pick a new color in the Color Properties dialog box.
4. Select the title, and then click the Applied Effects button to open that panel. Under Opacity in Properties, click the Fade In or Fade Out button.
5. A rolling credit is text that scrolls vertically across your screen. Duration on the timeline controls scrolling speed. To slow scrolling speed, click and drag the title to make it longer. To increase scrolling speed, click and drag the title to make it shorter.