12. Working with Adobe Photoshop Elements
Lesson overview
Adobe Photoshop Elements and Adobe Premiere Elements are designed to work together and let you seamlessly combine digital photography and video editing. You can spice up your video projects with title images created in Adobe Photoshop Elements, or select images in the Elements Organizer and send them to Adobe Premiere Elements to create a slide show.
To work on the following exercises, you must have Adobe Photoshop Elements installed on your system. In this lesson, you will learn several techniques for using Adobe Photoshop Elements together with Adobe Premiere Elements. Specifically, you’ll learn how to do the following:
• Add single and multiple images from the Elements Organizer to an Adobe Premiere Elements project
• Create a Photoshop file optimized for video
• Edit a Photoshop image from within Adobe Premiere Elements
This lesson will take approximately one hour. Download the project files for this lesson from the Lesson & Update Files tab on your Account page at www.peachpit.com and store them on your computer in a convenient location, as described in the Getting Started section of this book. Your Account page is also where you’ll find any updates to the chapters or to the lesson files. Look on the Lesson & Update Files tab to access the most current content.
A cool title created in Adobe Photoshop Elements for use in Adobe Premiere Elements
Viewing the completed movie before you start
To see what you’ll be creating, let’s take a look at the completed movie.
![]() Note
Note
If you have not already downloaded the project files for this lesson to your computer from your Account page, make sure to do so now. See “Getting Started” at the beginning of the book.
1. Before you begin, make sure that you have correctly copied the Lesson12 folder from your Account page onto your computer’s hard drive. See “Copying the Classroom in a Book files” in the Getting Started section at the start of this book.
2. Navigate to the Lesson12 folder, and double-click Lesson12_Movie.mov to play the movie in your default application for watching QuickTime files.
Getting started
You’ll open Adobe Photoshop Elements 12 and import the files needed for the Lesson12 project. Then you’ll create an Adobe Premiere Elements project from images, much like you created a video project using videos back in Lesson 1. Let’s review that procedure quickly.
![]() Note
Note
To sort images in the Organizer, Adobe Photoshop Elements uses the date and time information embedded in the image file by the digital camera. In the Organizer menu, choose Sort By: Newest to show new files first, and to enable you to create a slide show in chronological order when transferring the photos to Adobe Premiere Elements.
If you have a project open in Adobe Premiere Elements when you use this technique, the Organizer will add the selected files to the current project at the end of the current timeline. If no project is open, the Organizer will create a new project, which is the workflow you’ll follow in this exercise. Accordingly, if you have a project open in Adobe Premiere Elements, please close it (after saving if necessary) before starting this exercise.
1. Launch Adobe Photoshop Elements. If it is already open, choose Help > Welcome screen to open the Welcome screen.
2. In the Welcome screen, click the Organizer button to open the Elements Organizer.

3. If you’ve previously used Adobe Photoshop Elements, your Organizer may be displaying the photos in your current catalog. If this is the first time you’ve launched Adobe Photoshop Elements, you may receive a message asking if you want to designate a location to look for your image files. Click No to close the dialog box.
4. Choose File > Get Photos And Videos > From Files And Folders. Navigate to your Lesson12 folder and select—but do not open—the Images subfolder. Then click Get Media. Adobe Photoshop Elements imports the photos.
![]() Note
Note
If you’ve worked through previous projects from this book, there’s a good chance that Adobe Premiere Elements will refuse to reimport some or all of these images. In this case, you can work with any eight images already in the Elements Organizer. Or, if you click the Show Panel icon (![]() ) at the extreme lower left, you should see folders from previous lessons, which may contain the images previously imported. Select the various folders, and you may see the images as they’re shown in this book’s figures. Either way, the content of the images shouldn’t impact the skills you’ll learn in this lesson; any eight should do.
) at the extreme lower left, you should see folders from previous lessons, which may contain the images previously imported. Select the various folders, and you may see the images as they’re shown in this book’s figures. Either way, the content of the images shouldn’t impact the skills you’ll learn in this lesson; any eight should do.
5. If a message appears telling you that only the newly imported files will appear, click OK. In the Organizer, you should see eight images from the bayou boat ride project. Thumbnail images are small versions of the full-size photos. You’ll be working with the full-size photos later in this lesson.
6. Take these steps to make sure your Organizer looks the same as the figure:
• Choose View > Media Types. Make sure Photos is selected and all other media types are deselected.
• Choose View > Details and View > File Names to show these elements.
• In the Sort By menu on top of the Organizer’s media browser, make sure Name is selected.
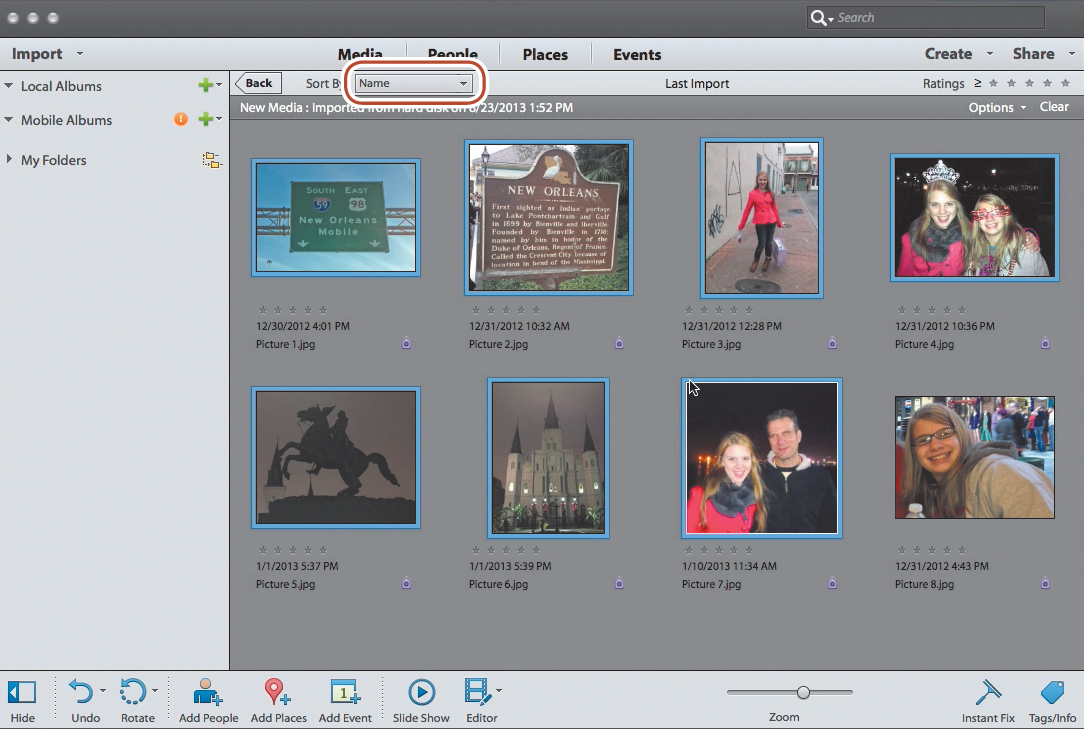
7. Press and hold the Ctrl (Windows) or Command (Mac OS) key, and then, in the Photo Browser, click the first seven images to select them (Picture 1.jpg–Picture 7.jpg). The Organizer highlights the gray area around the thumbnail to indicate a selected image.
8. In the Tools panel at the bottom of the Organizer, click the triangle next to the Editor icon, and choose Video Editor. A dialog box may appear informing you that the files will be inserted at the end of your timeline and that the Adobe Premiere Elements defaults will be used. Click OK. If Adobe Premiere Elements is not already open, it will launch automatically. If Adobe Premiere Elements opens the Smart Fix dialog box and asks if you want to fix quality problems in the clips, click No.

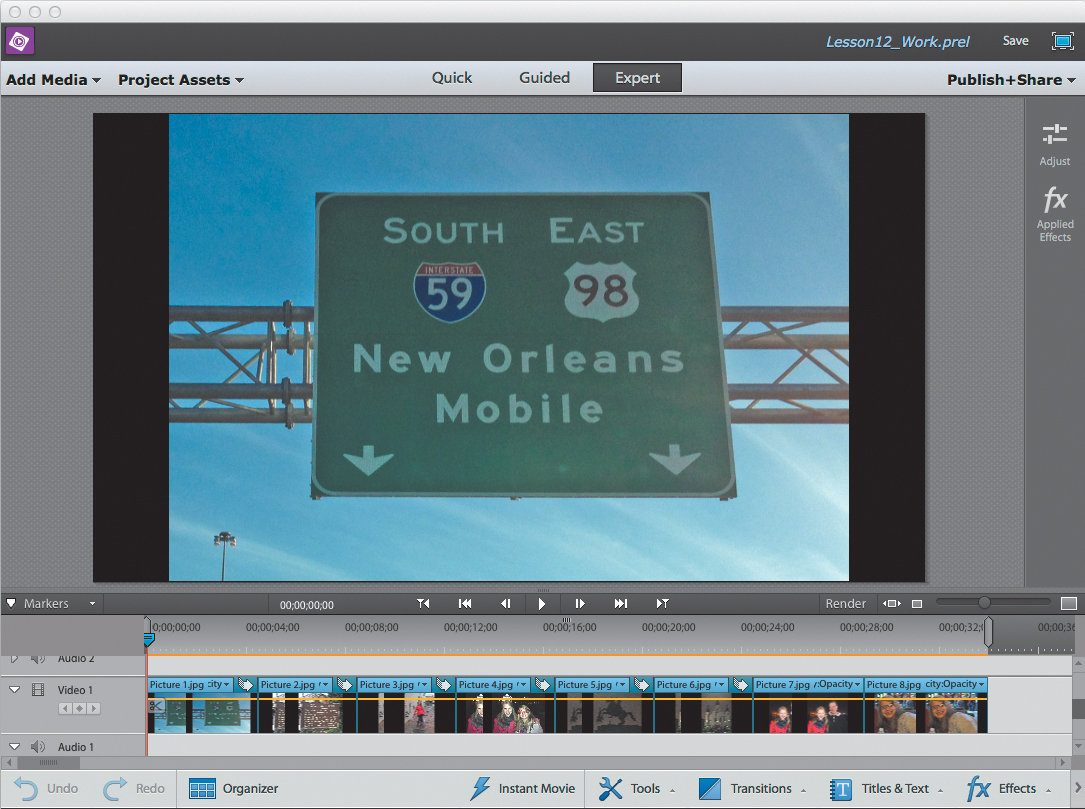
An Adobe Premiere Elements project is created, and the images you selected in Adobe Photoshop Elements are now visible in the timeline. The first image is displayed in the Monitor panel. If desired, click the Backslash key () to spread the images over the open timeline.
![]() Note
Note
Because you’re sending only a single image from Adobe Photoshop Elements to Adobe Premiere Elements, no transition has been placed on the image. In this case, if you wanted to add a transition, you would have to do so manually, but do not add one at this time. See Lesson 7 for more information about adding transitions.
9. Select all scenes in the timeline, and choose Clip > Group to place the entire group onto one target that can be moved as a single clip. Then choose Clip > Ungroup to treat each still image as its own scene in the timeline.
10. Press the spacebar to play your project. Adobe Premiere Elements uses the default duration of five seconds for each still image, and applies a cross-dissolve as the default transition between each clip.
11. Return to the Organizer by clicking the Organizer button at the lower left of the workspace or by holding down Alt (Windows) or Command (Mac OS) and pressing Tab until you see the icon for the Elements Organizer. Release the Alt (Windows) or Command (Mac OS) key. The Elements Organizer opens.
12. Click to select only one image, the one named Picture 8.jpg, and then choose Edit > Edit With Premiere Elements Editor. Click OK to close the Edit With Premiere Elements dialog box if it appears. If the Smart Fix dialog box appears, Click No and do not fix the quality problems. Adobe Premiere Elements becomes your active application, and the image is placed at the end of your timeline.
13. Choose File > Save As, and save this project file in your Lesson12 folder as Lesson12_Work.prel.
Creating a new Photoshop file optimized for video
The first part of this lesson focused on importing image files from the Organizer into Adobe Premiere Elements. In this exercise, you’ll create a new still image and modify it in Adobe Photoshop Elements, and then use it in your Adobe Premiere Elements project.
1. In Adobe Photoshop Elements, choose File > New > Blank File. In the New dialog box, type Title. Then click the Preset menu, and choose Film & Video.
2. Click the Size pull-down menu, and choose HDTV 1080p, which matches the resolution of the project you should have open in Adobe Premiere Elements. If you’re working on a different project, choose the size that matches the resolution of your current Adobe Premiere Elements project. If you don’t know or have forgotten the resolution of the project, in Adobe Premiere Elements click Edit > Project Settings > General to view your project settings.

3. Click OK to create the file.
4. Save the file in the Lesson12 folder. Choose File > Save As, and in the Save As dialog box, check to make sure that you named the file Title.psd; then navigate to your Lesson12 folder, and click Save.
Customizing a title in Adobe Photoshop Elements
Now that you have your Photoshop file, you’ll add the background that you captured in the previous lesson, customize the background, and then add some text.
1. Still in Adobe Photoshop Elements, at the top of the Editor, make sure Expert (![]() ) is selected.
) is selected.
2. If necessary, choose View > Guides to hide the title- and action-safe guides, which you don’t need because you’re not producing a DVD with this project or otherwise producing a file that will be viewed on a television set.
3. In Adobe Photoshop Elements, choose File > Open. The Open dialog box opens. Navigate to the Lesson12 folder on your hard drive, choose gator.bmp, and click Open to load the image into Adobe Photoshop Elements.
4. Choose Select > All to select the image, and then choose Edit > Copy to copy the image to the clipboard.
5. Click Title.psd to make it active, and choose Edit > Paste to paste the copied gator.bmp image into Title.psd. If you see an error message about the background of the image being locked, click OK to enable the procedure.
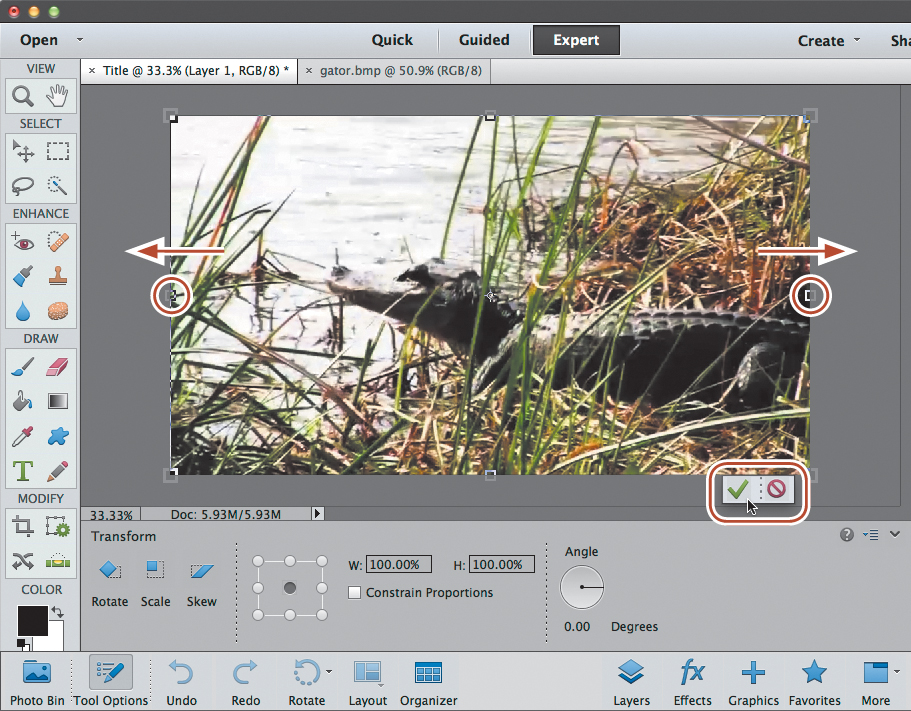
6. To adjust the size of the pasted image to fit Title.psd, click and drag any of the eight small squares on the edges and sides of the bounding box.
If you don’t see the squares, click to select the Move tool in the Select area in the upper left of the Tools panel. Position the image so that it fills the white area of Title.psd. Then click the Commit Current Operation check mark on the lower right to set the adjustment.
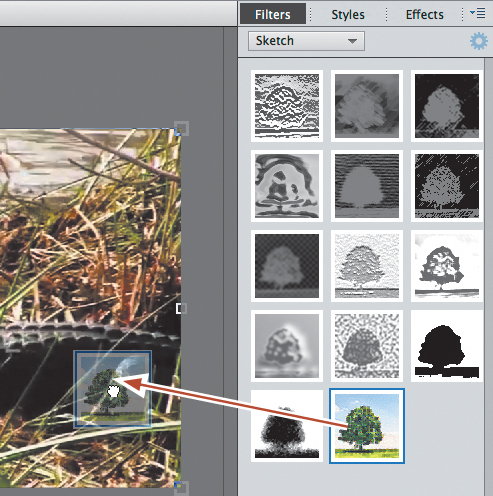
7. At the bottom right of the Adobe Photoshop Elements workspace, click Effects (![]() ) to open that panel. At the upper right, click Filters, and choose Sketch from the pull-down menu.
) to open that panel. At the upper right, click Filters, and choose Sketch from the pull-down menu.
8. Drag the Water Paper effect onto Title.psd, and release the mouse button. Adobe Photoshop Elements applies the effect to the image.
Next, we’ll add a text title to Title.psd.

9. Click the Horizontal Type tool (![]() ) in the Draw section of the Tools panel on the extreme left.
) in the Draw section of the Tools panel on the extreme left.
10. In the Text tool options bar, choose Rockwell Extra Bold. Type 150 into the font size field, and center the text alignment. If you don’t have that font on your system, choose a different font that’s very wide, like Cooper Std or Impact. If the font isn’t wide, you’ll have a hard time seeing some of the effects you’ll apply below.

Now let’s change the font color.
11. Click the Text Color chip, and then click the Bring Up Color Picker icon in the Color Swatches dialog box to open the color picker.

12. In the Select A Color To Add To The Palette dialog box, you see RGB values on the lower right. Type R: 242, G: 174, B: 54, which is the orange color you used when creating the opening title. Then click OK to close the Select A Color To Add To The Palette dialog box.

13. Click the image on the top left, and type Bayou Boat Ride.
14. Click the Move tool (![]() ) in the Tools panel to return to the selection arrow. Position the text to approximately where it’s shown in the figure (if necessary). Now let’s make the text more legible. To do this, right-click the text box, and choose Edit Layer Style. The Style Settings dialog box opens.
) in the Tools panel to return to the selection arrow. Position the text to approximately where it’s shown in the figure (if necessary). Now let’s make the text more legible. To do this, right-click the text box, and choose Edit Layer Style. The Style Settings dialog box opens.
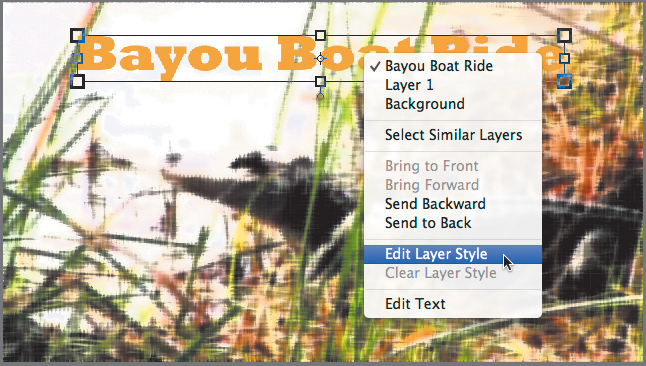

15. Make the following adjustments in the Style Settings dialog box:
• Select the Drop Shadow option to add a drop shadow.
• Select the Stroke option to add a stroke, and drag the size to 8px, as shown in the figure.
• Click OK to close the Style Settings dialog box.
The text is much more legible and distinctive. Now let’s warp the text.
16. Double-click the text box to select all text, and then click the Create Warped Text icon in the Type Tools panel.
17. In the Warp Text dialog box, click the Style pull-down menu, and choose Arc Upper. Make sure that Bend is set to +50. Click OK to close the dialog box.
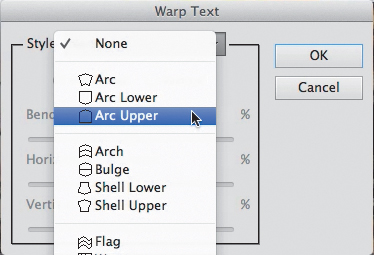
18. Click the Move tool (![]() ) in the Tools panel to return to the selection arrow. Position the text to approximately where it’s shown in the figure (if necessary).
) in the Tools panel to return to the selection arrow. Position the text to approximately where it’s shown in the figure (if necessary).

19. Choose File > Save to save Title.psd.
20. Switch to Adobe Premiere Elements by holding down the Alt (Windows) or Command (Mac OS) key and pressing Tab until you see the icon for Adobe Premiere Elements. Release the Alt (Windows) or Command (Mac OS) key; Adobe Premiere Elements opens.
Now you’re in position to import the file into Adobe Premiere Elements.
21. Make sure that you’re in Expert view. Then click the Add Media button, and choose Files And folders. The Add Media dialog box opens. Navigate to the Lesson12 folder, click to select Title.psd, and then click Open (Windows) or Import (Mac OS). Adobe Premiere Elements imports the file and displays it in the Project Assets panel, although you may need to scroll down to see the imported file.
22. Drag Title.psd from the Project Assets panel to the beginning of the movie, waiting for about two seconds for the other images to shift to the right. Then release the pointer. If Adobe Premiere Elements opens the Smart Fix dialog box, click No.
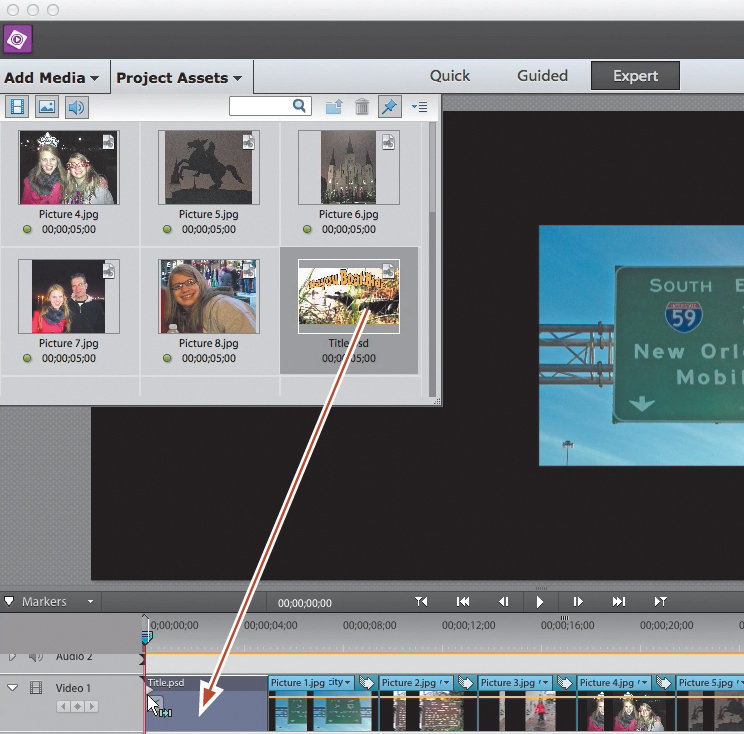
Adobe Premiere Elements inserts Title.psd at the start of the movie and shifts all other content to the right.
23. Save your work.
Editing a Photoshop image in Adobe Photoshop Elements
You can edit an Adobe Photoshop Elements image (or any image, for that matter) while you’re working in Adobe Premiere Elements by using the Edit In Photoshop Elements command. Once you save your image, changes you make to the image in Adobe Photoshop Elements will be updated in Adobe Premiere Elements, even if the clip is already placed in your timeline.
1. Right-click the Title.psd clip in the timeline, and choose Edit In Adobe Photoshop Elements. The Title.psd file opens in Adobe Photoshop Elements.
2. If necessary, click the Move tool (![]() ) in the Tools panel to choose the selection arrow. Then right-click the text box, and choose Edit Layer Style.
) in the Tools panel to choose the selection arrow. Then right-click the text box, and choose Edit Layer Style.
3. In the Style Settings dialog box, click the color chip next to the stroke controls to open the Select Stroke Color dialog box. Change the RGB values to R: 255, G: 0, B: 0. Then click OK to close the Select Stroke Color dialog box, and click OK again to close the Style Settings dialog box.
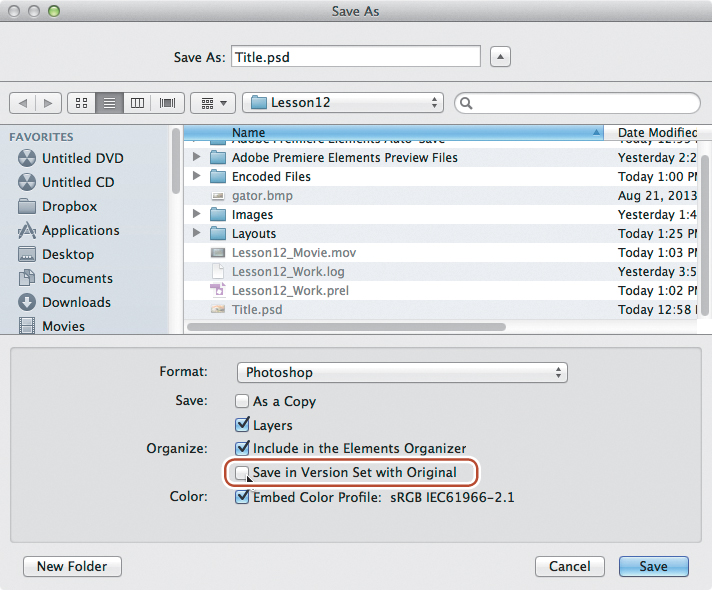
4. Choose File > Save As. Click the file Title.psd in the Lesson12 folder. In the Save As dialog box, deselect Save In Version Set With Original. Click Save, and then click OK (Windows) or Replace (Mac OS) to overwrite Title.psd.
5. Switch to Adobe Premiere Elements.
The changes made to the Title.psd file in Adobe Photoshop Elements have automatically been updated in the Adobe Premiere Elements project. This is very useful because it eliminates the need to re-import an image file every time a change is made.
6. Click the top of the timeline to select it, and then press the Home key to place the current-time indicator at the beginning of the timeline. Press the spacebar to play your project. When you’re finished reviewing, save your work.

Congratulations! You’ve finished the lesson on working with Adobe Photoshop Elements. You’ve discovered how to get photos from the Organizer to Adobe Premiere Elements and how to enhance them using Adobe Photoshop Elements. You’ve also learned how to create a title in Adobe Photoshop Elements for use in Adobe Premiere Elements.
This is the last lesson in this book. We hope that you have gained confidence in using Adobe Premiere Elements 12, developed some new skills, and increased your knowledge of the product and the many creative things you can accomplish with it.
But this book is just the beginning. You can learn more by studying the Adobe Premiere Elements 12 Help system that is built into the application. Simply choose Help > Adobe Premiere Elements Help, and browse or use the search functionality to find what you need. Also, don’t forget to look for tutorials, tips, and expert advice on the Adobe Systems website at www.adobe.com.
Review questions
1. What’s the best way to make sure that an image you create in Adobe Photoshop Elements matches the video that you’ll be adding it to?
2. How can you edit an image included in an Adobe Premiere Elements project in Adobe Photoshop Elements?
3. What are the advantages of creating your titles and editing your images in Adobe Photoshop Elements compared to Adobe Premiere Elements?
Review answers
1. Make sure that you create the file using the same dimensions as your video project.
2. Right-click the image in the Adobe Premiere Elements timeline, and choose Edit In Adobe Photoshop Elements from the contextual menu.
3. Adobe Photoshop Elements has many more still-image effects and several more advanced text-related adjustments than Adobe Premiere Elements.

