
6. Working with Effects
Lesson overview
In this lesson, you’ll learn how to apply effects and adjustments to the bayou boat ride clips that you used in previous lessons, as well as several new clips. Specifically, you’ll learn how to do the following:
• Apply video effects to single and multiple clips
• Change effects and settings
• Improve the contrast and saturation of your videos
• Copy effects and settings from one clip to another
• Animate a still image using the Pan and Zoom effect
• Render your entire project and a work area within a project
• Control visual effects with keyframes
• Create a picture-in-picture effect
• Composite one video over another with Videomerge
• Track an object and add a graphic with Motion Tracking
This lesson will take approximately two hours. Download the project files for this lesson from the Lesson & Update Files tab on your Account page at www.peachpit.com and store them on your computer in a convenient location, as described in the Getting Started section of this book. Your Account page is also where you’ll find any updates to the chapters or to the lesson files. Look on the Lesson & Update Files tab to access the most current content.
You add a Pan and Zoom effect with the Pan And Zoom tool.
Getting started
![]() Note
Note
If you have not already downloaded the project files for this lesson to your computer from your Account page, make sure to do so now. See “Getting Started” at the beginning of the book.
Before you begin the exercises in this lesson, make sure that you have correctly copied the Lesson06 folder from your Account page onto your computer’s hard drive. For more information, see “Copying the Classroom in a Book files” in the Getting Started section at the start of this book.
Now you’re ready to begin working with the Lesson06 project file.
1. Launch Adobe Premiere Elements. If it is already open, choose Help > Welcome Screen in the Adobe Premiere Elements menu to return to the Welcome screen.
2. In the Welcome screen, click Video Editor, select Existing Project, and click the Open folder.
3. In the Open Project dialog box, navigate to the Lesson06 folder you copied to your hard drive. Within that folder, select Lesson06_Start_Win.prel (Windows) or Lesson06_Start_Mac.prel (Mac OS), and then click Open. If a dialog box appears asking for the location of rendered files, click the Skip Previews button.
Your project file opens.
4. Choose Window > Restore Workspace to ensure that you start the lesson with the default panel layout.
Viewing the completed movie before you start
To see what you’ll be creating in this lesson, you can take a look at the completed movie. You must be in Expert view to open the Project Assets panel to view the movie, so if you’re not, click Expert (![]() ) to enter that view.
) to enter that view.
1. In the upper left side of the Adobe Premiere Elements window, click the Project Assets button (![]() ) to open that panel. Locate Lesson06_Movie.mov, and then double-click it to open the video into the preview window.
) to open that panel. Locate Lesson06_Movie.mov, and then double-click it to open the video into the preview window.
2. Click the Play button (![]() ) to watch the video about powering the bayou boat ride, which you’ll build in this lesson.
) to watch the video about powering the bayou boat ride, which you’ll build in this lesson.
3. When you’re done, close the preview window.
![]() Note
Note
Adobe Premiere Elements offers a large selection of diversified effects. Check out the gallery of video effects in Adobe Premiere Elements Help to get a quick overview of all those effects actually applied to an image.
Using effects
The tools that you’ll work with in this lesson are located in four different panels. All four panels are different in Quick and Expert views. Quick view contains the most widely used tools or effects in each category, and Expert view contains all these plus a broad selection of other tools and effects.

Effects in the Adjust (![]() ) and Applied Effects (
) and Applied Effects (![]() ) panels are automatically applied to each clip in the timeline. To adjust these, click the clip in the timeline, and then click the respective panel button to open the adjustments.
) panels are automatically applied to each clip in the timeline. To adjust these, click the clip in the timeline, and then click the respective panel button to open the adjustments.
You’ll go through these procedures in various exercises in this chapter. You apply tools by selecting a clip on the timeline, clicking the Tools button (![]() ) to open that panel, and clicking the desired tool. Adobe Premiere Elements will apply the tool to that clip and open a customization window unique to the selected tool.
) to open that panel, and clicking the desired tool. Adobe Premiere Elements will apply the tool to that clip and open a customization window unique to the selected tool.
You apply an effect from the Effects panel (![]() ) by clicking the Effects panel button to open the panel, finding the desired effect, and then dragging it onto the target clip or clips. You adjust the parameters of the effect that you just applied by clicking the Applied Effects button (
) by clicking the Effects panel button to open the panel, finding the desired effect, and then dragging it onto the target clip or clips. You adjust the parameters of the effect that you just applied by clicking the Applied Effects button (![]() ) to open that panel, which contains all effects that you applied from the Effects panel, plus the Motion and Opacity adjustments.
) to open that panel, which contains all effects that you applied from the Effects panel, plus the Motion and Opacity adjustments.
Now let’s take a closer look at the adjustments in each panel.
The Adjust panel
The Adjust panel (![]() ) contains the most common adjustments that you’ll make to your clips in your projects. In essence, these adjustments are effects, but because they’re so commonly used, they’re not stored with the other effects that you have to apply manually; instead, Adobe Premiere Elements applies them to every clip automatically, which saves you a step.
) contains the most common adjustments that you’ll make to your clips in your projects. In essence, these adjustments are effects, but because they’re so commonly used, they’re not stored with the other effects that you have to apply manually; instead, Adobe Premiere Elements applies them to every clip automatically, which saves you a step.
When you’re working in Quick view, Adobe Premiere Elements provides access to the one-step Smart Fix control, as well as Auto Smart Tone, Color, Lighting, and Temperature and Tint adjustments for video, and Volume and Balance for audio. Note that if you click the Entire Movie button (![]() ) at the upper right of the panel, any adjustment that you make to any single clip will be applied to the entire movie. You’ll learn more about applying adjustments to the entire movie in “Sharing Adjustments via the Entire Movie Button” later in this lesson.
) at the upper right of the panel, any adjustment that you make to any single clip will be applied to the entire movie. You’ll learn more about applying adjustments to the entire movie in “Sharing Adjustments via the Entire Movie Button” later in this lesson.
In Expert view, the adjustments mentioned above are supplemented by Color (RGB) and Gamma Correction for video and Treble, Bass, and Audio Gain for audio. The other major difference between the two views is that Expert view lets you animate effects by adding keyframes, which you accomplish via controls accessed by clicking the Show/Hide Keyframe Controls icon (![]() ) at the upper right of the Adjustments panel. You’ll learn how to use keyframes in “Working with keyframes” later in this lesson.
) at the upper right of the Adjustments panel. You’ll learn how to use keyframes in “Working with keyframes” later in this lesson.

The Applied Effects panel
The Applied Effects panel (![]() ) contains any effects that you’ve manually applied to the selected clip, plus the very commonly used Motion and Opacity adjustments for video, and Channel Volume, which lets you adjust the volume of each audio channel individually, for audio. The Motion effect, in particular, is one that you’ll use in many projects for many different purposes: to customize a picture-in-picture, to zoom in on or out of a video, or to rotate a video. Remember that it’s automatically applied for you and always ready for adjustment in the Applied Effects panel.
) contains any effects that you’ve manually applied to the selected clip, plus the very commonly used Motion and Opacity adjustments for video, and Channel Volume, which lets you adjust the volume of each audio channel individually, for audio. The Motion effect, in particular, is one that you’ll use in many projects for many different purposes: to customize a picture-in-picture, to zoom in on or out of a video, or to rotate a video. Remember that it’s automatically applied for you and always ready for adjustment in the Applied Effects panel.
The Applied Effects panel has the same two differences as the Adjust panel: The Quick view has the Entire Movie button, while the Expert view enables keyframes. In Quick view, the Entire Movie function works only on applied effects, not Motion, Opacity, or Channel Volume. To use the function, you must apply an effect to all clips in the movie; then you can customize the effect, and Adobe Premiere Elements will apply your customizations to all clips.

The Tools panel
The Tools panel contains a range of useful tools that you’ll use in many projects. To open the panel, click Tools (![]() ) in the Action bar at the bottom of the Adobe Premiere Elements window. To close the panel, click Tools again. In Quick view, the Tools panel contains the following tools that we’ll discuss in this lesson:
) in the Action bar at the bottom of the Adobe Premiere Elements window. To close the panel, click Tools again. In Quick view, the Tools panel contains the following tools that we’ll discuss in this lesson:
• Pan & Zoom is used for adding pan and zoom effects to pictures and videos, which you’ll learn to use in “Creating a Pan & Zoom effect” later in this lesson.
• Time Remapping is used for fine control of fast and slow motion effects applied to your clips, described later in this lesson in “Working with Time Remapping.”
• Motion Tracking is used to follow objects in the footage and attach graphics to them, described later in this lesson in “Working with Motion Tracking.”
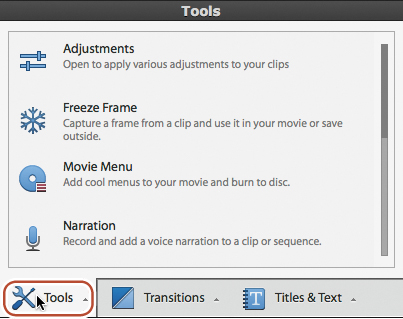
In Expert view, you also have access to the Time Stretch tool, which is covered later in this lesson in “Changing playback speed.”
The Effects panel
The Effects panel shows video (in Expert and Quick views) and audio effects (in Expert view only), and FilmLooks you can use in your movie by dragging them onto any clip or clips in the timeline. Quick view offers roughly 40 of the most commonly used effects and FilmLooks, whereas Expert view offers dozens more in well-defined categories. In addition, when you’re in Expert view, you can search for an effect by clicking the magnifying lens (![]() ) at the upper right of the panel. This opens a search box, where you can type the name of the effect that you’re looking for. This search function is not available in Quick view.
) at the upper right of the panel. This opens a search box, where you can type the name of the effect that you’re looking for. This search function is not available in Quick view.

Recommended workflows
From a workflow perspective, it’s helpful to think about effects in the following categories. All effects listed are available in Expert view; some are also available in Quick view:
• Curative effects correct problems in your video footage, including footage that’s too bright or too dark, backlighted video, video that’s too shaky because it was shot without a tripod, and even video that’s a bit blurry. You should start with the color- and brightness-related curative effects in the Adjustments panel. Beyond these, you can find other curative effects in the Effects panel in the Advanced Adjustments folder, the Color Correction folder, the Blur & Sharpen folder, the Image Control folder, and the Video Stabilizer folder.
• Overlay effects allow you to composite one image over another. You can find overlay effects in the Keying and Videomerge folders.
• The Pan & Zoom effect enables you to pan around and zoom in on and out of still images and videos, allowing you to animate still images and add additional motion to videos. You can find this tool by clicking the Pan & Zoom icon (![]() ) in the Tools panel.
) in the Tools panel.
• Artistic effects let you create a different look or feel for a clip, or add a Lens Flare (Generate folder) or Vignetting (Advanced Adjustments). Most artistic effects are found in the Effects panel, and they can be quite powerful, like the NewBlue Cartoonr Plus effect that converts your videos to cartoons. Other artistic effects let you add lightning to a clip (Lightning Effects in the Render folder), create an earthquake (Earthquake effect in the NewBlue Art Effects Elements folder), place a spotlight on a subject (Lighting Effects in the Advanced Adjustments folder), or apply a range of other looks and characteristics.
• The FilmLooks folder in the Effects panel contains a number of presets that let you quickly and easily add a certain look or feel to your project, like Newsreel, Summer Day, or Vintage.
• Speed controls enable you to speed up, slow down, or reverse your clips by using the Time Stretch and Time Remapping tools in the Tools panel.
• Motion effects allow you to zoom in on and around your original video clip or still image, and are used to adjust the framing of a video. You adjust these parameters using the Motion controls in the Applied Effects panel.
Although you can apply any and all of these effects at any time during the course of a project, the recommended workflow is to apply curative filters first, then adjust speed and motion, and then add other artistic effects. You can add an effect to any clip and even apply the same effect numerous times to the same clip but with different settings. By default, when you add an effect to a clip, it applies to the entire clip. To apply an effect to only part of a clip, split it first, and then apply the effect to the desired clip segment.
Working with Smart Fix
Unless you disable the Auto-Analyzer application in the Organizer, at some point Adobe Premiere Elements will analyze your clips, either in the background while you’re performing other edits or after capture or import. While analyzing the clips, Adobe Premiere Elements looks for problems in the video.
As you saw with Smart Trim in the previous lesson, Adobe Premiere Elements uses some of this information to recommend which clips to trim away. In addition, if your video or still image is too dark, Adobe Premiere Elements will apply the Shadow/Highlight effect, as you’ll see in this exercise. If a standard definition (SD) video is too shaky, Adobe Premiere Elements will apply the Stabilizer effect. If you’re working with shaky high-definition (HD) video, Adobe Premiere Elements won’t apply the Stabilizer effect automatically because it’s too processor-intensive, although you can apply the effect manually, as you’ll learn in a subsequent exercise.
Applying Smart Fix to the Gator videos in this project won’t find anything to fix. Even though many are shaky (being shot on a boat and all), the clips are HD, so Smart Fix won’t automatically stabilize them.
Since all the videos in this project were shot outside, Adobe Premiere Elements didn’t find any that were too dark, so here we’ll use a clip from a previous project.
1. If necessary, click the Expert button (![]() ) to enter Expert view.
) to enter Expert view.
2. At the bottom right of the Monitor panel, just to the right of the Render button (![]() ), click the Fit To Visible Timeline button (
), click the Fit To Visible Timeline button (![]() ), or press the Backslash key ().
), or press the Backslash key ().
3. In the upper left of the Adobe Premiere Elements window, click the Project Assets button to open that panel.
4. Right-click Video 4.mp4, and choose Run Auto Analyzer. Note that this is a file from a previous book, courtesy of NASA.
5. Click and drag Video 4.mp4 into the Video 1 track on the timeline, about an inch after the last picture on that track. Adobe Premiere Elements opens the Smart Fix window. If Smart Fix doesn’t run automatically, click Adjust in the Monitor panel, select Smart Fix in the Adjustments panel, and click Apply.
6. In the Smart Fix dialog box, click Yes to fix the quality problem in the clip.
7. Click the Project Assets button to close that panel.
![]() Tip
Tip
Toggling the effect off (![]() ) and on (
) and on (![]() ) is a great way to see how the effect is modifying your clip. You’ll use this toggle frequently with most curative effects.
) is a great way to see how the effect is modifying your clip. You’ll use this toggle frequently with most curative effects.
8. In the timeline, click the copy of Video 4.mp4 you just added to the timeline to select it (if it’s not already selected), and then click the Applied Effects button to open that panel. You’ll see that Adobe Premiere Elements has applied the Shadow/Highlight effect to the clip.
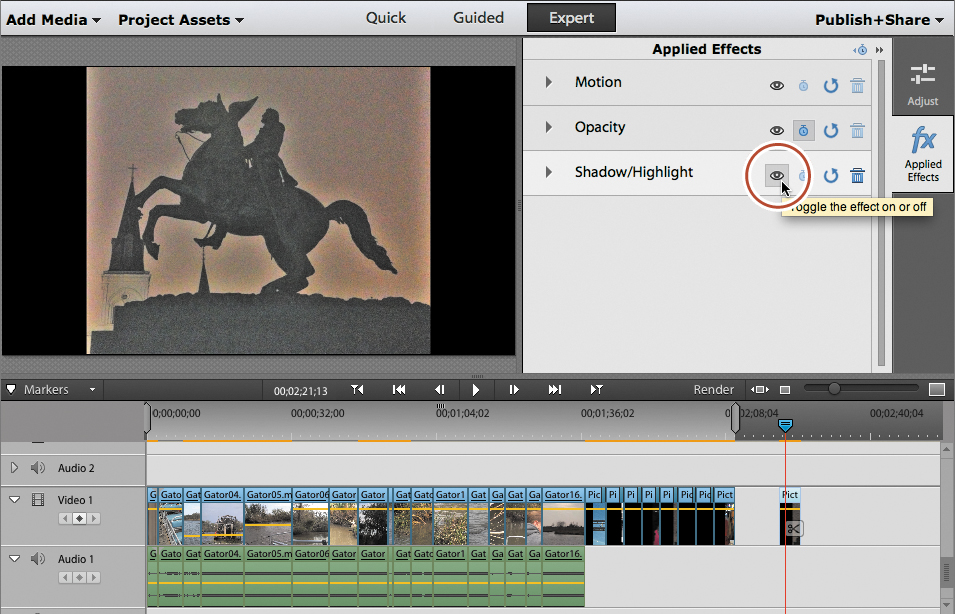
Drag the current-time indicator over Video 4.mp4. Then click the eye icon (![]() ) next to the Shadow/Highlight effect (officially called the “Toggle the effect on or off” icon) to turn the effect on and off, and you’ll see that the Shadow/Highlight effect does a nice job of brightening the shadows without “blowing out” the lighter regions. Although the clip looks a bit pixelated once brightened, this is a function of the compression applied to the clip so that it would fit on the DVD, not a result of applying the effect.
) next to the Shadow/Highlight effect (officially called the “Toggle the effect on or off” icon) to turn the effect on and off, and you’ll see that the Shadow/Highlight effect does a nice job of brightening the shadows without “blowing out” the lighter regions. Although the clip looks a bit pixelated once brightened, this is a function of the compression applied to the clip so that it would fit on the DVD, not a result of applying the effect.
![]() Tip
Tip
To apply Smart Fix to a clip on the timeline, click the clip to select it, click Adjust in the Monitor panel, select Smart Fix in the Adjustments panel, and click Apply.
9. Delete the Video 4.mp4 video you added to the end of the timeline by right-clicking the clip and choosing Delete.
![]() Tip
Tip
If you’re shooting in HD, the only clips that Adobe Premiere Elements will fix are those that are too dark (since it won’t automatically apply the Stabilizer effect to SD clips). The more I use Adobe Premiere Elements, the more I prefer the Gamma Correction effect to the Shadow/Highlight effect, because they accomplish the same function (boosting the brightness of pixels in the middle of the brightness spectrum, without boosting the lightest or darkest pixels), and Shadow/Highlight can cause pulsing in the edited video. So while Smart Fix is good for a quick fix, it may not be the best fix. You’ll learn about Gamma Correction in the next section.
Perfecting your clips

If you’re serious about perfecting your clips, you should work in Expert view, which provides the most options. Of course, more options can cause confusion, particularly when controls are fairly similar, like Color and Color (RGB). Dig a bit deeper, however, and you’ll see that all controls have one or two unique features that make them invaluable for a very specific problem (or two). We’ll run through exercises with all effects but Temperature and Tint, so if the purpose isn’t obvious from the brief description below, it will be once you finish the exercises.
• Auto Smart Tone addresses brightness and contrast issues in your clips, and learns from how you’ve adjusted clips previously. This should be the first effect you try for addressing these issues.
• Color provides separate adjustments for hue, lightness, saturation, and vibrance, but not separate controls for red, green, and blue. The most typical use for this function is to adjust saturation or vibrance.
• Color (RGB) provides specific controls for red, green, and blue. Use this to fix clips where one color is dominating.
• Gamma Correction differs from Brightness and Contrast in that it lets you adjust just those pixels in the middle of the brightness spectrum instead of all those in the frame. This is useful for fixing backlighting or similar problems.
• Lighting provides separate controls for brightness, contrast, exposure, black, and white. The adjustments are similar to those in Auto Smart Tone, but more useful to those who want individual control over these options. Unlike Auto Smart Tone, the Lighting adjustment does not “learn,” so you’ll start from scratch each time you apply it.
• Temperature And Tint provides separate adjustments for temperature and tint. Use these to give your footage a distinct look or feel, or to fix white balance issues that you can’t quite fix with Color (RGB).
In terms of workflow, it’s almost always best to address brightness and contrast first, and then color. Accordingly, over the next few exercises, we’ll take a look at the brightness and contrast adjustments, and then the color adjustments. Pay close attention to the workflow presented in the Auto Tone section, because much of the workflow will be identical for the other adjustments.
Working with Auto Smart Tone
Auto Smart Tone is an effect that corrects brightness and contrast issues in your clips. It’s also a smart adjustment that learns as you customize the controls for your various clips. For example, if you demonstrate a tendency to boost the contrast and brightness to the max on your clips, when you apply Auto Smart Tone to new clips, Adobe Premiere Elements will anticipate your customization proclivities and automatically boost brightness and contrast. If your next project demands a more muted and understated look, you can reset the learning process to start anew. You’ll learn how below.
Once you apply the effect, Adobe Premiere Elements divides the clip into scenes with similar footage. If you choose to customize the effect, you can move through the video clip, scene by scene, and make your adjustments.
Applying the Auto Smart Tone effect
We don’t have a lot of problem clips in this project, and most are so short that they contain only one scene. So we’ll work through this effect with one of the few clips where Auto Smart Tone finds multiple scenes, even though the benefit isn’t very dramatic.
1. Click to select Gator04.mp4, and position the current-time indicator over that clip.
2. Click the Adjust button to open that panel.
3. Click the triangle to the left of the Auto Smart Tone adjustment to reveal its controls. Click Apply to apply the effect. You’ll see the Applying Auto Smart Tone dialog box, with a progress bar, open momentarily and then close. Premiere Elements adjusts the brightness and contrast of your clip.

4. Click Custom to open the Auto Smart Tone dialog box.

5. Keeping in mind that the four corners represent different extremes in brightness and contrast, click the joystick controller in the middle of the image, and drag it around the box to achieve the desired look. Note that you can use the playback controls beneath the clip to move through the clip. Leave the controller in approximately the same position that you see in the figure to achieve the same look.
6. In the control panel beneath the preview window, click the Next Scene (![]() ) and Previous Scene (
) and Previous Scene (![]() ) buttons to move from scene to scene within the clip. Gator04.mp4 contains two scenes, so you should be able to click ahead and adjust both.
) buttons to move from scene to scene within the clip. Gator04.mp4 contains two scenes, so you should be able to click ahead and adjust both.
7. To check your work against the original clip, click the Effect Visible option on the bottom left of the Auto Smart Tone window to toggle the effect on and off.
8. If you don’t want Adobe Premiere Elements to learn from this adjustment (if the clip has unique problems), deselect the Learn From This Correction option on the bottom left of the window.
9. When your adjustments are complete, click Done at the bottom right of the Auto Smart Tone window to complete the edit.
The next time you apply Auto Smart Tone, it will apply the lesson “learned” from this and previous edits to the selected clip. For example, we brightened Gator04.mp4 significantly. Follow the steps outlined above to apply Auto Smart Tone to Gator05.mp4. If this was the first time you’ve used Auto Smart Tone, and there are no other “lessons” influencing the behavior of this effect, Adobe Premiere Elements will brighten that clip as well. Then click Undo to undo that adjustment.
You can “unlearn” all previous lessons in the Preferences dialog box. Choose Edit > Preferences > General (Windows) or Adobe Premiere Elements 12 > Preferences > General (Mac OS) to open the Preferences dialog box to the General tab. Click Clean Auto Smart Tone Learning to reset the “learned” effect.

Adjusting brightness and contrast with Lighting Effects
Auto Smart Tone is great for quick adjustments, particularly when you need to make similar changes to multiple clips. However, some editors prefer more precise control over specific adjustments like brightness and contrast or the black and white pixels in a clip—and these are some of the controls available in the Lighting Effects found in the Adjustments panel.
Briefly, when you adjust brightness, you adjust the brightness of all pixels in a frame by an even amount. This is useful when the entire frame is just too dark.
When you adjust contrast, you increase the difference between the brightest and darkest pixels in a frame, making the brightest pixels even brighter, and the darkest pixels even darker. As you’ll see, this is useful when the video looks slightly dingy.
When you adjust black, you increase the number of black pixels in the video by converting an increasing number of pixels that are close to black to absolute black, which usually cures fading. The white adjustment works the same way for white pixels. Let’s see how these adjustments can work together to make a video “pop” visually.
1. In Expert view, click to select Gator10.mp4, and position the current-time indicator over that clip.
2. Click the Adjust button to open that panel.
3. Click the disclosure triangle to the left of the Lighting effect to reveal its controls. At the bottom right of the panel, click More to expose all the individual controls shown in the figure.
4. Adjust the controls to the values shown in the figure.

Truth be told, it’s a very rare clip that can’t use some contrast improvement. Try this on your own clips and you’ll see what I mean.
5. At the top right of the Adjust dialog box, next to the Auto Fix checkbox, click the eye icon (![]() ). Do you see how these adjustments seem to remove a layer of gray from over the clip? That’s the dinginess mentioned above. You removed this by increasing the brightness of all the pixels in the video, increasing the contrast between the brightest and darkest pixels, and then slightly increasing the number of black pixels in the frame.
). Do you see how these adjustments seem to remove a layer of gray from over the clip? That’s the dinginess mentioned above. You removed this by increasing the brightness of all the pixels in the video, increasing the contrast between the brightest and darkest pixels, and then slightly increasing the number of black pixels in the frame.
![]() Tip
Tip
You probably noticed the Auto Fix checkbox to the right of the Lighting control. Sometimes this works really well, sometimes not. To try it, just click the checkbox. If it doesn’t improve the video, click it again to disable it.
![]() Tip
Tip
If you push contrast too far, you can lose details in the darkest and lightest regions of the video. For example, watch the heron closely as you enable and disable the effect. Note the loss of some fine detail along the neck and body. Watch the brightest and darkest regions for loss of detail when adjusting contrast.
What about the exposure control? I knew you were going to ask. Basically, exposure is very similar to brightness, but slightly different; I would adjust one, but not both. For more information, check out Lightroom Adjustments: Exposure vs Brightness, at bit.ly/exposure_brightness.
Adjusting the midtones with Gamma Correction
Move your current-time indicator over Gator08.mp4 in the timeline, and drag through the entire clip. The sky is certainly bright enough, but the shadows beneath the fabulous Spanish moss are just too dark, particularly around 00;00;48;20. Here, you want an effect that will boost just these shadows while not affecting the brightest or darkest pixels. That’s precisely what Gamma Correction is designed to do.
The classic use for the Gamma Correction effect is a backlighting situation, when the light behind the subject is brighter than the subject itself, resulting in a face that’s too dark in footage shot with automatic exposure. In essence, that’s what we have in Gator08.mp4. I was trying to capture the Spanish moss, but my Canon Vixia, shooting in automatic mode, darkened the video because the sky behind the Spanish moss was so bright. Let’s fix that.
1. If necessary, click the Expert button (![]() ) to enter Expert view.
) to enter Expert view.
2. Click to select Gator08.mp4, and position the current-time indicator over that clip.
3. Click the Adjust button to open that panel.
4. Click the disclosure triangle to the left of the Gamma Correction effect to reveal its controls. At the bottom right of the panel, click More to expose the numeric slider.
5. Adjust the controls to the values shown in the figure.

![]() Tip
Tip
If you prefer, you can use the tic-tac-toe-like presets board to choose values for each of these configurations, choosing a different item to configure by clicking the various tabs across the top.
6. At the top right of the Adjust dialog box, click the eye icon (![]() ). Do you see how the effect boosts the brightness in the shadowed regions without totally blowing out the whites in the sky? That’s the desired effect.
). Do you see how the effect boosts the brightness in the shadowed regions without totally blowing out the whites in the sky? That’s the desired effect.
OK, we’ve looked at three ways to address brightness and contrast issues in our clips; let’s move on to color-related issues.
Boosting saturation with the Color Effect
As much as I would have wished that our bayou boat trip occurred on a sunny, breezy day, the fact of the matter was that the weather was cloudy and slightly dreary, and the water was gray and unappealing. Move your current-time indicator over Gator03.mp4 and you’ll see what I mean.
We could accept and share this reality with all who watch our video, or we could fix it in post (as they say). Let’s explore one effect you can use to do the latter—specifically, the Color adjustment. This effect lets you modify the Hue, Lightness, Saturation, and Vibrance values of a clip.
The hue adjustment modifies the intrinsic colors in the clip. I almost never use this adjustment, preferring the Red/Green/Blue controls discussed in the next section. Lightness modifies the brightness of a clip; I prefer to use the Brightness, Contrast, and Gamma controls to address these issues. Saturation adjusts the strength of the colors within a clip, and is the Color adjustment I use most frequently. Vibrance is similar to saturation, but protects skin tones, which can quickly become too neon-ish when you push saturation too far. So, use saturation when there are no faces in the video, and vibrance where there are faces. Let’s see how boosting saturation can make the weather for our boat ride look better than it actually was.
1. In Expert view, click to select Gator03.mp4, and position the current-time indicator over that clip.
2. Click the Adjust button to open that panel.
3. Click the disclosure triangle to the left of the Color effect to reveal its controls. At the bottom right of the panel, click More to expose the numeric sliders.
4. Adjust the controls to the values shown in the figure.
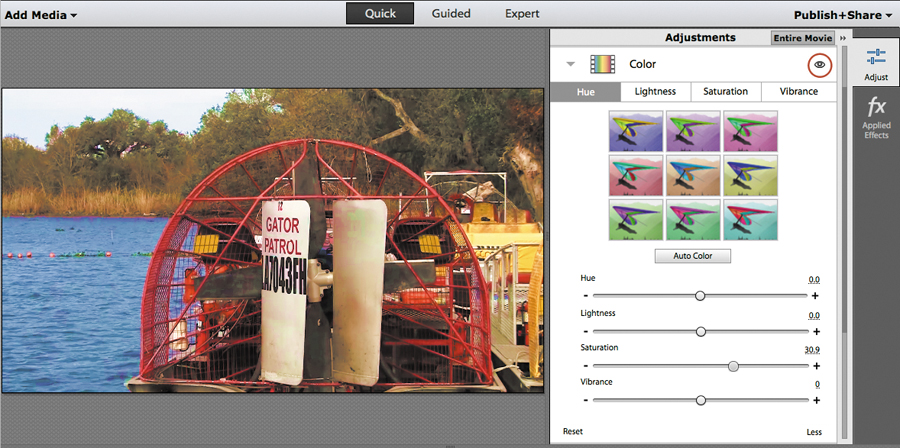
![]() Tip
Tip
If you apply too much saturation, colors can bleed from one object to another, which is close to happening in the red bars in the propeller cage in this clip. You can also see something funky going on at the distant shoreline. In real life, I probably would have adjusted saturation to about 20 and left it at that.
5. At the top right of the Adjust dialog box, click the eye icon (![]() ). Now, the water in the harbor looks blue, the boat looks freshly painted, and everything else looks brighter and more interesting.
). Now, the water in the harbor looks blue, the boat looks freshly painted, and everything else looks brighter and more interesting.
Adjusting a single color with the Color (RBG) effect
Sometimes you want to adjust only a single color, which you can’t do with the Color effect. For example, move your current-time indicator over Gator09.mp4, which is predominantly comprised of water that I wish were blue. If you boost saturation as demonstrated in the previous exercise, you very quickly see distortion at the shoreline. As you’ll learn in this exercise, you can avoid that problem by using the Color RGB effect, which lets you separately adjust red, green, and blue values.
Separate adjustments are also useful when correcting white-balance issues, which often manifest as overly blue tones caused by white balancing for incandescent bulbs for indoor shooting and shooting outside. In these cases, you can use the Color (RGB) effect to eliminate the blue tone. Here’s how. Note that you have to be in Expert view to access the Color (RGB) effect.
1. Click to select Gator09.mp4, and position the current-time indicator over that clip.
2. Click the Adjust button to open that panel.
3. Click the disclosure triangle to the left of the Color (RGB) effect to reveal its controls. At the bottom right of the panel, click More to expose the numeric sliders.
4. Adjust the controls to the values shown in the figure.

5. At the top right of the Adjust dialog box, click the eye icon (![]() ). Now, the water in the harbor looks blue, with minimal effect on the other colors in the frame.
). Now, the water in the harbor looks blue, with minimal effect on the other colors in the frame.
![]() Tip
Tip
For serious white balance issues, try the Three-Way Color Corrector effect, which you can access in Expert mode. See Adobe Premiere Elements Help for assistance with this effect.
6. Choose File > Save As, and save your project as Lesson06_Work.prel.
Stabilizing shaky footage
One common problem with vacation video footage is excessive shakiness, which can occur any time you don’t use a tripod (or when you’re shooting from a speeding airboat). Via the Smart Fix function, Adobe Premiere Elements stabilizes the worst of the SD clips, but for HD clips like those we’re using in this project, you’ll have to do it manually. The worst of the clips in this project is Gator05.mp4, which was shot while we were moving at full speed across the harbor.
Note that the Stabilizer effect is available in the Effect panel in both Quick and Expert views. In Quick view it’s in the Video Effects folder; in Expert view it’s in the Video Stabilizer folder.
1. In the Action bar at the bottom of the main window, click the Effects button (![]() ) to open the Effects panel.
) to open the Effects panel.
2. From the pull-down menu at the top of the panel, choose the Video Effects folder (Quick view) or Video Stabilizer folder (Expert view). In Quick view, use the slider on the right of the panel to scroll down to the Stabilizer effect on the fourth row.
3. Drag the Stabilizer effect from the Effects panel onto the fifth clip in the timeline, and drag the current-time indicator over the fifth clip.
4. Click the Applied Effects button (![]() ) at the top right of the Monitor panel to open the Applied Effects panel.
) at the top right of the Monitor panel to open the Applied Effects panel.
5. In the Applied Effects panel, click the disclosure triangle to the left of the Stabilizer effect to open the parameter settings.
6. Click the eye icon (![]() ) next to the Stabilizer effect to toggle it off and on (
) next to the Stabilizer effect to toggle it off and on (![]() ). Note how Adobe Premiere Elements zoomed in on the frame when it stabilized the video.
). Note how Adobe Premiere Elements zoomed in on the frame when it stabilized the video.
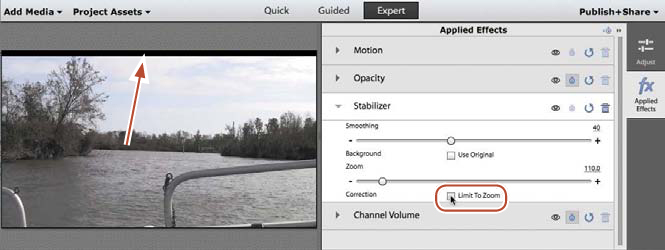
7. Drag the current-time indicator to 00;00;26;25. Notice the black bar atop the video where the adjustment was too strong and extended beyond the frame’s edge. To eliminate this, select Limit To Zoom. Notice how Adobe Premiere Elements zooms further into the clip to eliminate the black bar.
8. Scrub through the other portions of the clip to see if any bars appear.
9. Click the Play button beneath the Monitor panel. Even on a very fast computer, it’s likely that you’ll see the message shown in the figure below. Let’s eliminate that by rendering this effect.

Previewing and rendering effects
When you apply an effect or configure an adjustment, Adobe Premiere Elements will show a very close approximation of the result when you preview in the Monitor panel. In most instances, this is good enough to allow you to perfect your configuration options and move on to the next edit.

If the quality isn’t sufficient, right-click the frame in the Monitor panel, and choose Playback Quality > Highest. This tells Adobe Premiere Elements to prioritize frame quality over playback speed. As a result, on slower computers, playback may be jerky, but frame quality should be very good.
On the other hand, if playback speed isn’t sufficient—as it isn’t with the Stabilization effect you just applied—right-click in the Monitor panel, and make sure that Automatic is selected. This tells Adobe Premiere Elements to prioritize smoothness over frame quality. With Automatic selected, you might see some blurriness or pixelation in the frame, but playback should be smooth.
If neither setting gives you the preview quality that you need to finalize the edit, you’ll have to render the clip.
If you made the adjustments in the previous exercise, you should see an orange line above multiple clips in the timeline, including Gator05.mp4. In general, the orange line indicates that some adjustment has been made to the clip that must be rendered before final production. For example, if you apply a title above a clip, you’ll see the orange line. If you insert a clip into a project that doesn’t match the Project Setting—like the JPEG images inserted into the slide show at the end of the project—you’ll see the orange line as well. You don’t have to render to preview your work; however, rendering will show you exactly how the final video will look. Unless you’re running on a very slow computer, the rendered video will also play back at full speed.
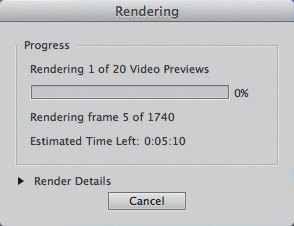
To render the entire project, click Enter (Windows) or Return (Mac OS), or press the Render button (![]() ) at the bottom right of the Monitor panel. Adobe Premiere Elements opens the Rendering dialog box, which tells you how many previews need to be rendered and how long it will take. After rendering, Adobe Premiere Elements turns the orange bar to green, and you can start previewing your clips from the beginning.
) at the bottom right of the Monitor panel. Adobe Premiere Elements opens the Rendering dialog box, which tells you how many previews need to be rendered and how long it will take. After rendering, Adobe Premiere Elements turns the orange bar to green, and you can start previewing your clips from the beginning.
Rendering a work area
In most instances, it’s not necessary to render every edit, and sooner or later you’ll have lots of orange lines over your timeline. At some point, you’ll apply an effect that you do want to render, again, particularly with CPU-intensive effects like the Stabilizer. If you press Enter (Windows) or Return (Mac OS) to render, you render the entire timeline, which can be time-consuming. As an alternative, you can simply render the work area that you’re interested in.
The work area is a region of the project defined by two vertical markers (![]() ) that live in the time scale above the timeline. By default, the work area starts at the beginning of the project and ends with the last content on the timeline, and expands with your project as you add more content. However, you can drag the work area bars to define any region in the timeline, so that you can render only that region. In this exercise, you’ll learn how.
) that live in the time scale above the timeline. By default, the work area starts at the beginning of the project and ends with the last content on the timeline, and expands with your project as you add more content. However, you can drag the work area bars to define any region in the timeline, so that you can render only that region. In this exercise, you’ll learn how.
1. Choose Timeline > Delete Rendered Files. If that option isn’t available, choose Delete Rendered Files For All Projects. Click OK in the Confirm Delete dialog. This deletes the files that you previously rendered, and should turn the green bars above the timeline to orange.
2. Press the Backslash key () to show the entire project in the timeline.
3. Drag the left work area marker (![]() ) from the very front of the timeline to the start of Gator05.mp4.
) from the very front of the timeline to the start of Gator05.mp4.
4. Drag the right work area marker (![]() ) from the very end of the timeline to the end of Gator05.mp4.
) from the very end of the timeline to the end of Gator05.mp4.
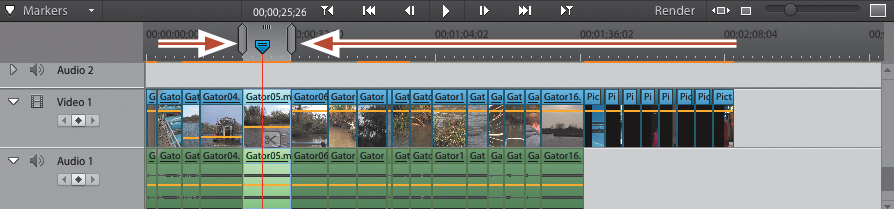
5. Press Enter (Windows) or Return (Mac OS) to render the work area. When it’s done rendering, Adobe Premiere Elements will start previewing at the start of Gator05.mp4. When ready, press the spacebar to stop video playback.
6. Choose File > Save As, and save your project as Lesson06_Work.prel. Replace file as needed.
Working with Time Remapping
Time Remapping lets you adjust the speed of a clip—forward or backward—and then return to the original speed of the clip. This can produce very elegant, TV- and movie-like results. We’ll return to the bayou boat ride project to apply a global speed change to several clips; in this exercise, you’ll use Time Remapping to analyze the author’s golf swing. After you’ve done this, you’ll reframe the clip using Motion controls to center the video.
Loading the project
1. Launch Adobe Premiere Elements, if it isn’t already running.
2. Choose File > Open Project. If you haven’t saved the previous project, do so as Lesson06_Work.prel now.
3. In the Open Project dialog box, navigate to the Lesson06 folder you downloaded to your hard drive. Within that folder, select Lesson06_Driver_Win.prel (Windows) or Lesson06_Driver_Mac.prel (Mac OS), and then click Open (Windows) or Choose (Mac OS). If a dialog box appears asking for the location of rendered files, click the Skip Previews button.
The project opens.
4. Choose Window > Restore Workspace to ensure that you start the lesson with the default panel layout.
Time Remapping is available in Quick and Expert views, so you can work in either view.
Time-Remapping your clips
The original clip is a little less than eight seconds long; the first four seconds are the setup, and then the swing and transition. In this exercise, you’ll use reverse motion to create an instant replay, and then slow down the swing to painful slow motion to analyze the flaws.
As with many Adobe Premiere Elements tools, Time Remapping has a dedicated workspace for configuring and resetting the effect. In fact, it resembles Quick view to a great degree because it has a very similar Monitor panel and timeline. However, instead of the Action bar, you’ll find configuration options for the Time Remapping function.
Operationally, you’ll create one or more TimeZones, which produce the desired speed changes. You don’t have the option to slow or accelerate audio, so you can either keep the original audio, which obviously won’t match the video, or remove the audio, which seems like the right decision in most applications.
Note that there are many variables affecting the timecode and duration field in this exercise, and you can drive yourself nuts trying to reproduce the precise times in the figures. Instead, focus on the high-level task, which is adding two time zones: one at 50% speed and the other at 25% speed. If the times on your screen are within a half second or two of those shown in the figures, you will accomplish that task.
1. Click to select driver.mp4 in the timeline.
2. In the Action bar at the bottom of the window, click the Tools button (![]() ) to open the Tools panel.
) to open the Tools panel.
3. Use the slider on the right of the panel to scroll down to the Time Remapping tool, which is at or near the bottom in both Quick and Expert views. Then click Time Remapping in the Tools panel to apply the tool to the selected clip and to open the Time Remapping panel.
4. Drag the current-time indicator to about 00;00;04;05 in the Monitor panel, and then click the plus sign (![]() ) next to the current-time indicator to create a TimeZone. By default, Adobe Premiere Elements creates a 17-frame TimeZone.
) next to the current-time indicator to create a TimeZone. By default, Adobe Premiere Elements creates a 17-frame TimeZone.

5. Click and drag the right edge of the TimeZone to about 00;00;07;00. This applies the effect to the selected 2.8 seconds in the clip. If you know the duration to which you want to apply the effect, you can enter the desired time in the Duration field on the lower right rather than dragging the edge of the TimeZone.

6. Note the Forward/Reverse toggle in the Action bar area. Select Reverse, and then click the 8x button on the Time Control slider to move the speed selector to 8 times faster than real time. You could also click and drag the speed selector to that location.

7. Press the Home key to return the current-time indicator to the start of the clip, and then press the spacebar to play the clip. The video will play at normal speed until it reaches the end of the TimeZone, return at 8x speed to the 4:05 mark, and then play the swing again at full speed.
Creating variable-speed, slow-motion effects
OK, let’s focus on forward action and really analyze that swing. You’ll slow down the takeaway to 50% speed, and then, at the top of the backswing, slow the speed to 25% during the critical downswing. At the end, you’ll return the clip to 100% speed.
1. To start, click the Reset button (![]() ) on the lower left, and click Yes to remove all TimeZones.
) on the lower left, and click Yes to remove all TimeZones.
2. Drag the current-time indicator to about 00;00;04;05 in the Monitor panel, or click the monitor timecode, enter 405, and then press Enter (Windows) or Return (Mac OS). Then click the plus sign (![]() ) next to the current-time indicator to create a TimeZone.
) next to the current-time indicator to create a TimeZone.
3. Click and drag the right edge of the TimeZone to about 00;00;05;00, just before the downswing begins. In the prerelease versions used to create the files for this lesson, I had to drag the edge to 00;00;05;02 to make the current-time indicator stay at 00;00;05;00 once I released the edge.
4. Make sure that Forward is selected in the Forward/Reverse toggle. Then click the 1/2x button on the Time Control slider. You could also click and drag the speed selector to that location. This slows the clip to half speed.
5. On the bottom right of the Time Remapping panel, select the Easing In check box, which smooths the shift from 1x to 1/2x speed at the start of the effect. Because you want to transition directly from 1/2x speed to 1/4x speed in the next TimeZone, you don’t want to select Easing Out, which will ease out to the original 1x speed.

6. Click and drag the current-time indicator as close to the right edge of the previous TimeZone as possible while still seeing the plus sign (![]() ), which should be around 00;00;05;16. If you drag it so that it touches the right edge of the first TimeZone, the plus sign will disappear.
), which should be around 00;00;05;16. If you drag it so that it touches the right edge of the first TimeZone, the plus sign will disappear.
![]() Note
Note
When not selected, TimeZones with forward motion are light green; TimeZones with reverse motion are light orange. All TimeZone speed and direction indicators are on the upper right.
7. Click the plus sign to create another TimeZone, and drag the right edge to about 00;00;06;18. Again, you may have to drag a bit past this timecode to make the timecode stop at 00;00;06;18 when you release the TimeZone edge.
Make sure that Forward is selected in the Forward/Reverse toggle. Then click the 1/4x button on the Time Control slider to move the speed selector to that value, and select the Easing In and Easing Out options. These will smooth the transition from 1/2x to 1/4x speed at the start of the effect and then transition from 1/4x to 1x at the very end.

8. Press the Home key to return the current-time indicator to the start of the clip, and then press the spacebar to play the clip. The video will play at normal speed to the 4:05 mark, ease to 1/2 speed, then ease into 1/4 speed, and then ease back to full speed at the very end.
9. At the bottom left of the Time Remapping panel, click the Remove Audio button (![]() ) to remove audio from the clip. Click Yes to confirm that you do want to remove the audio.
) to remove audio from the clip. Click Yes to confirm that you do want to remove the audio.
![]() Note
Note
When you apply Time Remapping to a clip in the timeline, Adobe Premiere Elements adjusts all subsequent clips on the timeline accordingly. If you slow down the clip, all subsequent clips will be pushed to the right. If you accelerate the clip, Adobe Premiere Elements will shift subsequent clips to the left to close any gap.
10. At the bottom left of the Time Remapping panel, click the Frame Blending button (![]() ) to apply frame blending to the slow motion effect. Frame blending can smooth the appearance of slow motion but sometimes can introduce blurriness in the clip. Click the Render button (
) to apply frame blending to the slow motion effect. Frame blending can smooth the appearance of slow motion but sometimes can introduce blurriness in the clip. Click the Render button (![]() ) on the bottom right of the Monitor panel in the Time Remapping tool to render the effect; then play back the clip with and without Frame Blending, and choose the option that you prefer.
) on the bottom right of the Monitor panel in the Time Remapping tool to render the effect; then play back the clip with and without Frame Blending, and choose the option that you prefer.
11. At the bottom right of the Time Remapping panel, click Done to apply Time Remapping, close the panel, and return to the main interface.
![]() Tip
Tip
To change any Time Remapping options or to remove Time Remapping from a clip, follow steps 1–3 of the previous exercise to open the Time Remapping panel, and click Reset (![]() ) on the bottom left. When you close the panel, Adobe Premiere Elements removes the effect.
) on the bottom left. When you close the panel, Adobe Premiere Elements removes the effect.
Reframing content with Motion controls
Time Remapping is working, but the framing of the shot is off; there’s too much space over the subject’s head, and he needs to be more centered in the frame. You can improve both problems using the Motion controls. In this exercise, you’ll learn how to use Motion controls to reframe a video; later in the lesson, you’ll learn how to use these controls to reframe still images.
Motion controls are available in Quick and Expert views; you can work in the view in which you feel most comfortable.
Reframing video with Motion controls
Let’s start by reframing some video.
1. Click driver.mp4 to select the clip in the timeline.
2. Click the Applied Effects button (![]() ) on the top right of the Monitor panel to open the Applied Effects panel.
) on the top right of the Monitor panel to open the Applied Effects panel.
3. In the Applied Effects panel, click the disclosure triangle to the left of the Motion effect to open the parameter settings.
![]() Note
Note
If you zoom too far into a clip, you can create blurriness or softness in the clip. If blurriness results from your reframing efforts, you can minimize it to some degree by applying the Sharpen effect.
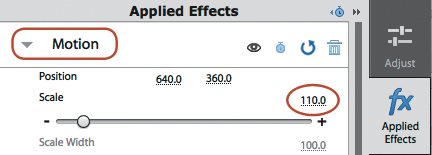
4. Zoom in on the video and make it larger. Do any of the following:
• Drag the Scale slider to the right to a value of 110.
• Click the numeric entry to make it active, type 110, and then press Enter (Windows) or Return (Mac OS).
• Hold the pointer over the numeric value until it becomes the pointer with arrows (![]() ). Click and drag to the right to 110.
). Click and drag to the right to 110.
Now you’ll reframe the image.

5. In the Monitor panel, right-click the frame, and choose Magnification > 50%. If you’re working on a notebook computer or very small monitor, choose Magnification > 25%.
6. Click the frame in the Monitor panel to make the center crosshair active. You should see a white box outside the visible frame in the Monitor panel. (If you can’t see the top and bottom outlines of the box, expand the entire Adobe Premiere Elements window, or if you don’t have room on your screen, decrease the magnification following the instructions in step 5.)
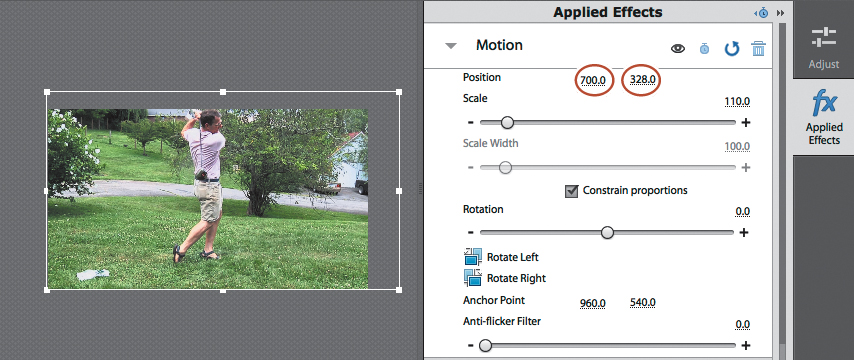
As you’ve probably guessed, this is an outline of the entire video, which you can drag around to optimize positioning within the preview area in the Monitor panel. As you drag the frame, note that the numeric Position parameters on the right update as you move it. You can position the frame either by dragging it directly, as you just did, or by typing in new numeric parameters. I typed in 700 and 328, which shifted the video to the right and up a bit.
7. In the Monitor panel, right-click the frame, and choose Magnification > Fit. This sets your preview to the largest possible size while showing all the pixels in the video, which is helpful when you’re previewing Motion control adjustments.
8. Click the eye icon next to the Motion effect to toggle it off (![]() ) and on (
) and on (![]() ). You’ll see that you’ve increased the size of the subject of the video and moved him toward the center. It’s not a huge difference, but even a small improvement is welcome.
). You’ll see that you’ve increased the size of the subject of the video and moved him toward the center. It’s not a huge difference, but even a small improvement is welcome.
9. Press the Home key to return the current-time indicator to the start of the clip, and then press the spacebar and watch the entire clip.
Whenever you adjust the size or positioning of a video, as you’ve done here, you might push other critical content located elsewhere in the clip out of the viewing window. Either preview the entire clip that you’ve adjusted or, for longer clips, drag the current-time indicator through the clip slowly to identify any problem areas.
10. Let’s review some of the other options and controls in the Motion effect:
• Constrain proportions: By default, Adobe Premiere Elements constrains the proportions of your size adjustments, adjusting horizontally and vertically to preserve the aspect ratio of your video. That’s why the Scale Width slider and numeric entry are grayed out. If you deselect Constrain Proportions, the Scale Width slider will become active, and the Scale slider will convert to a Scale Height slider. You can then adjust the two controls separately. This can distort your video or still images, so be careful if this isn’t the look you’re seeking.
• Rotation: These controls allow you to level out videos shot a bit off-kilter and easily shift still images shot in portrait mode to landscape, and vice versa.
• Anchor Point: This is the point around which all Motion controls, including positioning and rotation controls, operate. By default, it’s set to the center of the image or video.
• Anti-flicker Filter: This filter reduces flicker in pan-and-zoom effects created using the Motion controls. If you’re using the Motion controls to create a pan-and-zoom effect and see flicker in the result, try dragging the Anti-flicker Filter slider to the right. Always render and gauge the results before applying the filter, because it can cause blurriness.
11. If you want to save your work, now would be a good time, although you won’t be returning to this project.
Reframing an image with Motion controls
Although we’re sure that you’d love to work on that golf swing for a few more exercises, it’s time to add some finishing touches to the bayou boat ride clip.
1. Launch Adobe Premiere Elements, if it isn’t already running.
2. Choose File > Open Project. If asked, click No, and don’t save any changes to the existing project.
![]() Note
Note
Motion controls operate identically in Quick and Expert views, but we’ll be working in the latter, so you should work there too if you want your screen to match what you see in the book.
3. In the Open Project dialog box, navigate to the Lesson06 folder you copied to your hard drive. Within that folder, select the file Lesson06_Work.prel, and then click Open (Windows) or Choose (Mac OS). If a dialog box appears asking for the location of rendered files, click the Skip Previews button.
The project opens.
4. Move the current-time indicator over the first picture in the slide show at the end of the videos, which should be Picture 1.jpg. Notice in the Monitor panel that the picture has black vertical bars, or letterboxes, on the sides. This often happens when you add images shot using a 4:3 aspect ratio to 16:9 projects.
5. Click Picture 1.jpg to select it.
6. Click the Applied Effects button (![]() ) at the top right of the Monitor panel to open the Applied Effects panel.
) at the top right of the Monitor panel to open the Applied Effects panel.
7. In the Applied Effects panel, click the disclosure triangle to the left of the Motion effect to open the parameter settings.
8. Zoom in to the picture to make it larger. Do any of the following:
• Drag the Scale slider to the right to a value of 125.
• Click the numeric entry to make it active, type 125, and then press Enter (Windows) or Return (Mac OS).
• Hold the pointer over the numeric value until it becomes the pointer with arrows (![]() ). Press your left mouse button, and drag to the right to 125.
). Press your left mouse button, and drag to the right to 125.

9. Choose File > Save to save your project.
Changing playback speed
Time Remapping is an awesome feature, but sometimes you just want to quickly change the speed of a clip, and there’s a simpler way to get that done. In this project, for example, Gator01.mp4 and Gator09.mp4 are just too short, and there’s a turtle in Gator11.mp4 that you can see only if you slow the video way down. We’ll use Time Stretch to get more out of those shots.
1. In Expert view, right-click Gator01.mp4, and choose Time Stretch. Adobe Premiere Elements opens the Time Stretch dialog box. (Time Stretch is also available in the Tools panel.)

![]() Note
Note
As you can probably guess, the Reverse Speed option, when selected, will reverse the clip, making the video play backward.
2. Type 50 in the Speed box (where it will appear as 50%), and select Maintain Audio Pitch.
3. Click OK to close the dialog box. Adobe Premiere Elements extends the clip to its new duration and pushes back all subsequent files.

4. Right-click Gator09.mp4, and choose Time Stretch. Hover your pointer over the Duration field until it becomes the pointer with arrows (![]() ). Drag to the right until the duration is 00;00;04;00. Or click the duration field to make it active, and type 400. Adobe Premiere Elements changes the duration to 4:00. Select Maintain Audio Pitch, and click OK to close the dialog box.
). Drag to the right until the duration is 00;00;04;00. Or click the duration field to make it active, and type 400. Adobe Premiere Elements changes the duration to 4:00. Select Maintain Audio Pitch, and click OK to close the dialog box.
5. Right-click Gator11.mp4, and choose Time Stretch. Type 10 in the Speed box (where it will appear as 10%), and select Maintain Audio Pitch. Click OK to close the dialog box. Preview the clip.
Now we have a better view of the turtle, but the clip is way too long, and it also takes too long to first see the turtle. Let’s fix that.
6. Hover your pointer over the left edge of the Gator11.mp4 until it becomes the drag pointer (![]() ). Click and drag the edge to the right to remove about 3:28 from the start of the clip.
). Click and drag the edge to the right to remove about 3:28 from the start of the clip.

7. Hover your pointer over the right edge of the Gator11.mp4 until it becomes the drag pointer (![]() ). Click and drag the edge to the left to remove about 35:24 from the end of the clip.
). Click and drag the edge to the left to remove about 35:24 from the end of the clip.

8. Choose File > Save to save your project.
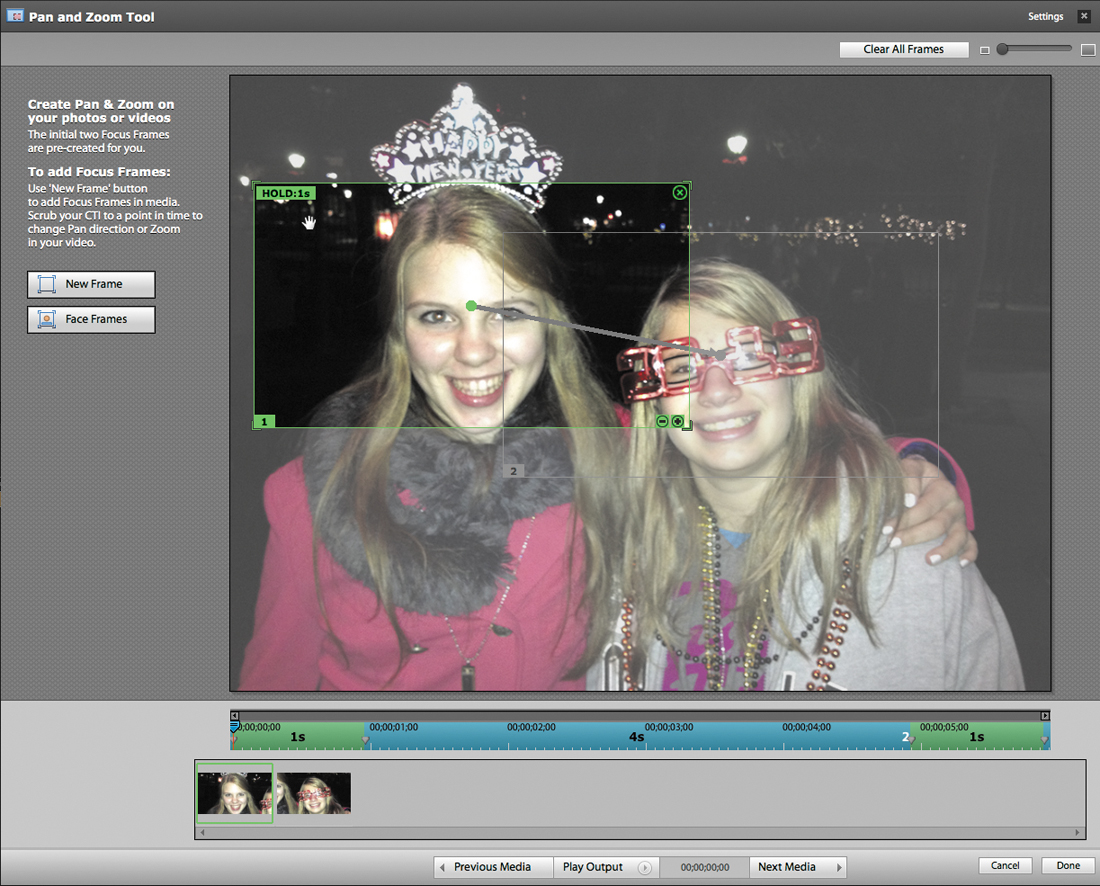
Creating a Pan & Zoom effect
If you use a lot of still images in your productions, you’ve probably wanted to add motion to those images. The Adobe Premiere Elements Pan & Zoom tool is great for doing just that.
The basic unit of operation of the Pan & Zoom tool is the focus frame, and the tool creates motion by moving from focus frame to focus frame. You control three basic variables: the size and location of each focus frame, its duration (how long the frame stays at that location), and how long it takes to move from focus frame to focus frame.
Any timing changes made in the Pan & Zoom tool are reflected in the timeline, with all subsequent content on that track adjusted accordingly. For example, in the customization exercise below, you’ll increase the duration of the image from 4 seconds to 12 seconds, and the pictures on the timeline after Picture 4.jpg will be pushed back.
For pictures with faces, there’s a Face Frames option (![]() ) that tells Adobe Premiere Elements to create a project that inserts a focus frame on each face and pans to all faces in the project. If there are no faces, Adobe Premiere Elements starts with a wide shot, and then zooms into the center of the image for a close-up.
) that tells Adobe Premiere Elements to create a project that inserts a focus frame on each face and pans to all faces in the project. If there are no faces, Adobe Premiere Elements starts with a wide shot, and then zooms into the center of the image for a close-up.
The focus frames in an image are presented in the thumbnail view at the bottom of the tool’s dialog box. To choose a focus frame and edit any parameters, click the focus frame in the thumbnail view. When you hover your pointer over the focus frame, as the pointer is hovering over the first focus frame in the figure on the next page, its parameters will appear.
You can change the order of focus frames by dragging the thumbnails into the desired order. Click Play Output to preview the Pan & Zoom effect at any time, after which you must click Exit Preview (![]() ) to exit the effect.
) to exit the effect.
In the timeline above the thumbnail view, the green area is hold time and the blue area is pan time. The duration of each is shown in seconds.
Let’s apply the Pan & Zoom tool to Picture 4.jpg and have a look at the interface; in the next exercise you’ll customize the Pan & Zoom effect. You can be in either Quick or Expert view for the following exercises.
Applying the Pan & Zoom effect
1. Click Picture 4.jpg to select it.
2. In the Action bar at the bottom of the window, click the Tools button (![]() ) to open the Tools panel.
) to open the Tools panel.
3. Use the slider on the right of the panel to scroll down to the Pan & Zoom tool (![]() ), which is near the middle in both Quick and Expert views. Then click Pan & Zoom in the Tools panel to apply the tool to Picture 4.jpg and open the Pan & Zoom tool.
), which is near the middle in both Quick and Expert views. Then click Pan & Zoom in the Tools panel to apply the tool to Picture 4.jpg and open the Pan & Zoom tool.
4. At the bottom of the Pan & Zoom tool window, click Play Output (![]() ) to watch the effect.
) to watch the effect.
5. In the upper right corner of the tool window, click Exit Preview (![]() ). Then, in the thumbnail view across the bottom of the Pan & Zoom tool, click the second thumbnail.
). Then, in the thumbnail view across the bottom of the Pan & Zoom tool, click the second thumbnail.

A. New frame
B. Face frames
C. Preview area
D. Resize handle for focus frame
E. Hold time
F. Delete frame
G. Clear all frames
H. Zoom controls for focus frame
I. Focus frame markers
J. Focus frame thumbnails
K. Focus frame number
L. Pan & Zoom timeline
M. Focus frame size controls
Customizing the Pan & Zoom effect
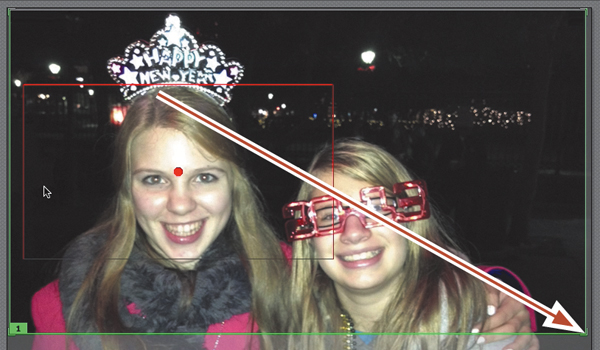
Now that you have a bit of background, let’s create our own Pan & Zoom effect. While you can try to work around the faces found by the program, it’s often easier to start fresh and create the effect from scratch. Adobe Premiere Elements does a great job finding faces, but hey, we humans are pretty good at that too, particularly when it’s our daughters in the picture.
In this festive picture, I want to create an effect that starts with the full wide shot for two seconds, takes one second to transition to a two-second close-up of the girl on the left, one second to transition to a two-second close-up of the girl on the right, then one second to transition to a two-second wide shot similar to the starting point.
1. If you’re still in Preview mode, click the Exit Preview button at the top of the preview window (or press Esc on your keyboard) to exit Preview mode. At the top right of the Pan & Zoom tool, click Clear All Frames (![]() ).
).
2. Drag the current-time indicator to the start of the clip.
3. On the left toolbar, click New Frame (![]() ). The Pan & Zoom tool creates a new focus frame at the start of the clip.
). The Pan & Zoom tool creates a new focus frame at the start of the clip.
4. Hover your pointer over the lower right corner of the focus frame; it becomes a drag pointer (![]() ). Click and drag the edge until it’s as large as possible. You can click and drag the frame to the upper-left corner to make room to expand the frame.
). Click and drag the edge until it’s as large as possible. You can click and drag the frame to the upper-left corner to make room to expand the frame.
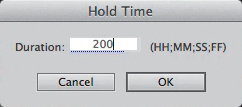
5. To set the hold time to 2 seconds, hover your pointer over the focus frame until HOLD: 1s appears at the upper left. Click that to open the Hold Time dialog box.

6. Increase the duration to 2 seconds. As with most Adobe Premiere Elements controls, you can either click and drag the time to the right, or click the time to make the field active and type 200. Click OK to close the dialog box.
7. Set the second focus frame. To create a pan time of 1 second, you’ll need to create it one second after the end of the first focus frame. To do this, while watching the timecode located immediately to the right of the Play Output button (![]() ), drag the current-time indicator to 00;00;03;00.
), drag the current-time indicator to 00;00;03;00.

8. On the left toolbar, click New Frame (![]() ). The Pan & Zoom tool creates a new focus frame at the 3-second mark.
). The Pan & Zoom tool creates a new focus frame at the 3-second mark.

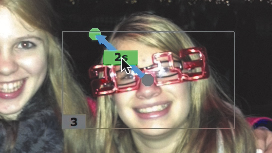
9. Use the resize handles on the focus frame to frame the face of the girl on the left. To move the frame, click the pointer within the frame. A hand symbol (![]() ) will appear. Click and drag the frame to the desired location.
) will appear. Click and drag the frame to the desired location.
![]() Note
Note
The time over the blue line linking the center of the two frames is the pan time. We’re setting pan time by dragging the current-time indicator to the desired position before creating a new frame. If you were editing an existing set of focus frames, you would reset pan time by clicking the pan time number, which would open a Pan Time dialog box. We’ll experiment with that below.
10. Set the hold time to 2 seconds. Hover your pointer over the focus frame until HOLD: 1s appears at the upper left. Click that to open the Hold Time dialog box, and then set the time to 2 seconds.
11. Set the third focus frame, again with a one-second pan time. Watching the timecode located immediately to the right of the Play Output button (![]() ), drag the current-time indicator to 00;00;06;00.
), drag the current-time indicator to 00;00;06;00.
12. On the left toolbar, click New Frame (![]() ). The Pan & Zoom tool creates a new focus frame at the 6-second mark.
). The Pan & Zoom tool creates a new focus frame at the 6-second mark.

13. Use the resize handles to frame the face of the girl on the right.
14. Set the hold time to 2 seconds. Hover your pointer over the focus frame until HOLD: 1s appears on the upper left. Click that to open the Hold Time dialog box, and then set the time to 2 seconds.
15. Set the fourth focus frame, this time with a two-second pan time. Watching the timecode located immediately to the right of the Play Output button (![]() ), drag the current-time indicator to 00;00;10;00.
), drag the current-time indicator to 00;00;10;00.
16. On the left toolbar, click New Frame (![]() ). The Pan & Zoom tool creates a new focus frame at the 10-second mark.
). The Pan & Zoom tool creates a new focus frame at the 10-second mark.
17. Use the resize handles and the grab control to make the frame as large as possible and position it at the top of the frame.
18. Set the hold time to 2 seconds. Hover your pointer over the focus frame until the HOLD: 1s hold time appears on the upper left. Click that to open the Hold Time dialog box, and then set the time to 2 seconds.
![]() Note
Note
The Pan & Zoom tool doesn’t currently support the Face Frames option in video.
![]() Note
Note
If the Pan & Zoom tool creates extra frames at the end of the clip, you can just trim them off as you normally would on the timeline.
19. Click the 2 second (2s) pan time between the two images to open the Pan Time dialog box. Set the pan time to 1 second, and click OK to close the dialog box.
20. Drag the current-time indicator to the start of the timeline, and then, at the bottom of the Pan & Zoom tool, click Play Output (![]() ) to watch the effect. Then click Done on the bottom right to close the Pan & Zoom tool dialog box. If necessary for smooth preview, click the Render button (
) to watch the effect. Then click Done on the bottom right to close the Pan & Zoom tool dialog box. If necessary for smooth preview, click the Render button (![]() ) at the lower right of the Monitor panel.
) at the lower right of the Monitor panel.
21. Choose File > Save to save your project.
Working with keyframes
Every clip in the timeline, and most effects and adjustments that you apply to them, can be modified over time. This involves a concept called keyframing. A keyframe is essentially a location in the timeline where you specify a value for a specific property. When you set two keyframes, Adobe Premiere Elements interpolates the value of that property over all frames between the two keyframes, effecting a progressive change over the given time range and basically creating an animated effect.
Keyframes give you significant flexibility and creativity in your projects. Although they sound challenging at first, if you work through the next few exercises, you’ll quickly grasp their operation and utility.
Using keyframes to animate effects
![]() Note
Note
Keyframing is available only in Expert view.
Animating an effect using keyframes is a very powerful capability: Essentially, it lets you create custom transitions using any Adobe Premiere Elements effect. In this exercise, you’ll use keyframes to animate the appearance of an effect.
Note that this section is more advanced than some users of Adobe Premiere Elements may need. You may choose to skip this lesson—but before you do, you should know that keyframing unlocks an immense well of creativity in Adobe Premiere Elements, and a few minutes of focused time here could quickly pay dividends in more creative projects. Of course, if you do choose to skip it now, you can always revisit it later.
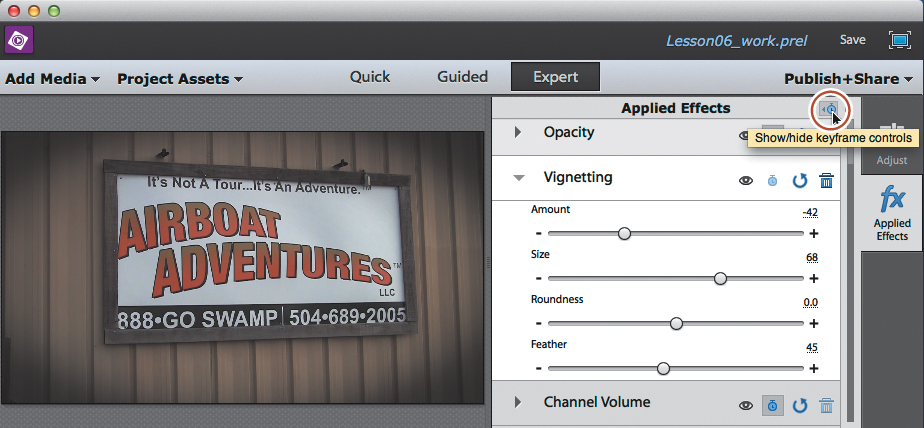
In this exercise, you’ll animate the Vignetting effect to add a unique visual transition to the start of the project. The Vignetting effect is a great tool for focusing the viewer’s attention on a specific portion of the video; think of a soft hazy circle surrounding the happy bride or graduate in portraits you’ve seen. Our use here isn’t quite so classic a case, but it should serve to illustrate the effect.
![]() Tip
Tip
On the Mac, in the Applied Effects panel, the Show/Hide Keyframe toggle works only when the disclosure triangle for a particular effect has been clicked and those parameters are displayed. If it seems like nothing is happening when you click this button, check to make sure you’ve completed step 5.
1. If the Lesson06_Work.prel project is not open, open it by choosing File > Open Recent Project and choosing it from the menu that appears.
2. In the Action bar on the bottom of the Adobe Premiere Elements window, click the Effects button (![]() ) to open the Effects panel.
) to open the Effects panel.
3. From the pull-down menu at the top of the panel, choose the Advanced Adjustments folder. If necessary, use the slider on the right of the panel to scroll down to the Vignetting effect, which is the last one in the folder.
4. Drag the Vignetting effect from the Effects panel onto the first clip in the timeline (Gator01.mp4).
5. Click the Applied Effects button (![]() ) on the top right to open the Applied Effects panel.
) on the top right to open the Applied Effects panel.
6. In the Applied Effects panel, click the disclosure triangle to the left of the Vignetting effect to open the parameter settings.
7. In the upper right corner of the Applied Effects panel, click the Show/Hide Keyframe Controls icon (![]() ).
).
![]() Note
Note
Be sure to click the stopwatch icon only once when you’re animating a property. If you accidentally click it twice, a dialog box will appear asking you if you want to delete existing keyframes for the clip. Click Cancel, and continue with the exercise.
8. Note the mini-timeline at the top of the Vignetting effect, which has the same values as the main timeline for the selected clip and has a matching current-time indicator. Move the current-time indicator to the start of the clip, and click the small stopwatch icon (![]() ) to the left of the Amount control to animate this property.
) to the left of the Amount control to animate this property.
After you click the stopwatch, a small diamond appears in the mini-timeline within the Applied Effects panel to the right of the configurable properties in the Amount control. This is the initial keyframe for the Amount value for this effect.
9. Drag the Amount slider all the way to the left to a value of –100.
Next we’ll configure two other properties in the effect.
10. Click the stopwatch to the left of the Size option, and drag the slider to the left to the 0 value.
11. Click the stopwatch to the left of the Roundness option, and drag the slider to the right to 100. You should now have a focused, round vignette around the Airboat Adventures sign.
![]() Tip
Tip
Keyframes allow you to apply specific values to specific regions of the clip; when you have no keyframes, the selected values apply to the entire clip. Because we didn’t create a keyframe for the Feather option, the default 45 configuration is applied universally over the entire clip. If you changed from 45 to 100, the new value would be applied universally.
Now you’ll set the second keyframe.
12. In the mini-timeline in the Applied Effects panel, drag the current-time indicator to the right, about two seconds into the clip.
13. Drag the Amount slider to the middle to a value of 0, which essentially turns off the effect.
Changing the value automatically adds a second keyframe, which is represented as a second diamond in the mini-timeline in the Applied Effects panel. After you turn on the animation, Adobe Premiere Elements automatically animates the effect between the two values. Note that Adobe Premiere Elements didn’t create a new keyframe for the Size or Roundness parameters, because you did not adjust either option.
![]() Tip
Tip
With many (if not most) effects, you’ll have to adjust all the options that you initially keyframed to completely remove the effect. Just repeat step 12 for each option, finding the value that zeroes out the effect.
![]() Tip
Tip
Clicking the universal toggle animation button for an effect creates a keyframe at the location of the current-time indicator for every keyframable value in the effect. This becomes a hassle if you want to adjust any particular value universally for the entire clip. It’s usually simpler to click the stopwatches next to the configuration options that you want to keyframe, as you did in the exercise.

A. Initial keyframes
B. Mini-timeline
C. Current-time indicator
D. Universal toggle animation button (enables keyframes for all options in effect)
E. Show/Hide keyframes
F. Keyframable configuration options in the Vignetting effect
G. Second keyframe
![]() Note
Note
If you hadn’t set the second set of keyframes, the Vignetting effect would have continued without change through the end of the clip, but wouldn’t continue on to subsequent clips.
14. Drag the current-time indicator to the start of the timeline, and then press the spacebar to play the clip. The clip starts out with the vignette in full effect and returns to a normal appearance at the 00;00;04;00 mark. Press the spacebar again to stop playback.
15. Choose File > Save As, and save your project as Lesson06_Work.prel. Replace if necessary.
• The stopwatch icon (officially, “Toggle Animation”) lets you animate the effect with keyframes—covered later in this lesson in “Working with keyframes.”
• The Reset icon resets the effect to its default parameters.
• The trash can icon deletes the effect.

Creating a fade-out using keyframes
Fading to black is one of the most common effects producers use at the end of their projects. Adobe Premiere Elements makes this simple to do with a control in the Applied Effects panel, although often you’ll want to customize the effect. In this exercise, you’ll learn how to fade to black and how to control keyframes in two locations in Adobe Premiere Elements: the Applied Effects panel and the timeline.
1. Click to select the Picture 8.jpg image, which is the last image in the timeline. You may need to scroll to the right in the timeline to fully see the image.
Let’s make the video tracks as large as possible to provide some working space.

2. To the right of the Picture 8.jpg clip, right-click a blank area on the timeline, and choose Track Size > Large. You may have to adjust the scroll bars on the right of the timeline to see the clip after adjusting the track size.
3. Drag the current-time indicator to about two seconds from the end of the project.
4. If necessary, click the Zoom In tool (![]() ) in the Monitor panel to increase your view of the clip.
) in the Monitor panel to increase your view of the clip.
The orange line spanning horizontally across the clip is the connector line (or graph) between keyframes. As you’ll see, you can access any keyframable value for any applied effect via this graph, although by default, the graph controls the Opacity property. You can tell because the text right after the name Picture 8 in the Video 1 track says Opacity: Opacity. This means that the orange line represents the Opacity value in the Opacity effect, which has only that one value.
5. To the right of the Monitor panel, click the Applied Effects button to open that panel, and then click the disclosure triangle next to the Motion effect.
6. Back in the timeline, click the Opacity: Opacity disclosure triangle above Picture 8.jpg to open the menu. Choose Motion > Position, and hold your pointer there. Notice that the parameters that you can choose on the timeline are identical to those in the Applied Effects panel. In essence, although you can apply and adjust keyframes to only one parameter at a time on the timeline, you can access any parameter available in the Applied Effects panel. Most of the time, it’s most convenient to adjust these options in the Applied Effects panel. One notable exception is the Opacity value, which is used to fade to black.

7. In the timeline, in the menu next to the Picture 8.jpg title, choose Opacity > Opacity. Now the orange keyframe graph controls Opacity, or the transparency values of the picture. To fade to black, you’ll adjust from 100% opacity to 0%.

8. Working with the Picture 8.jpg file, place your pointer over the orange connector line. The pointer now includes a double-arrow icon (![]() ).
).
9. Click and drag the connector line down toward the bottom of the clip. As you drag, you’ll see a small window with changing numbers that represent the Opacity values. Drag the Opacity value to 0%; the Monitor panel fades to black. When you finish experimenting, drag the connector line back up toward the top of the clip to restore the clip’s opacity to 100%.
Now you’ll add keyframes to help Adobe Premiere Elements create a fade to black at the end of the movie.
At this point, the current-time indicator should be positioned about two seconds from the end of the clip.
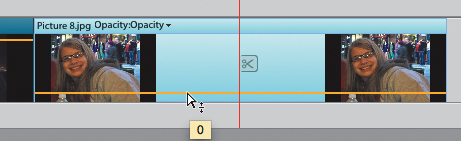
10. Press the Ctrl key (Windows) or Command key (Mac OS), and position your pointer on the orange connector line where it intersects with the current-time indicator line. Your pointer will change to a small cross icon (![]() ), which is the Create Keyframe pointer.
), which is the Create Keyframe pointer.
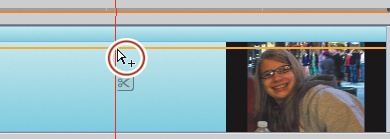
11. Click the connector line once, right at the current-time indicator. You should see a small yellow diamond added to the orange connector line, representing your first keyframe.
12. Press the Page Down key to move the current-time indicator to the end of the movie. Repeat step 11 to create a keyframe at that location.
13. Click the keyframe at the end of the movie clip, and drag it down to the bottom of the track. The number on the right of the yellow box next to the pointer is the Opacity value; drag it until that value equals 0.00.
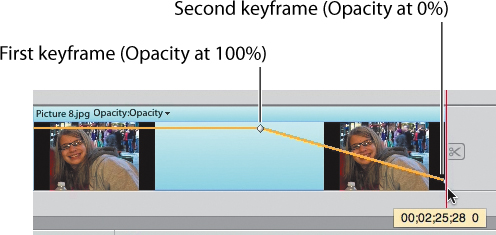
14. To view the Opacity fade-out, move your current-time indicator to the beginning of the Picture 8.jpg clip, and then press the spacebar.
15. Save your project as Lesson06_Work.prel.
In Lesson 7, you’ll learn how to create a similar effect using the Dip To Black transition. Although the visual effect is similar, working with keyframes lets you customize the effect to a much greater degree.

![]() Note
Note
Sometimes when you use this technique to fade to black at the end of a clip, the clip doesn’t seem to fade completely to black by the end. To fix this, using the technique described above, create another keyframe about one quarter of a second before the end of the clip, and drag that down to 0 opacity. Or, if you prefer, you can click and drag the keyframe at the end of the clip about one quarter of a second to the left. This will ensure that the clip fades completely to black by the end of the video.
Adjusting keyframes
After you’ve set a keyframe, you can modify it by dragging it to a new location or value. To delete a keyframe, right-click it, and choose Delete.
As mentioned earlier, you can access all keyframes inserted on the timeline in the Applied Effects panel. For example, try selecting Picture 8.jpg, and then clicking the Applied Effects button to open the Applied Effects panel (if it’s not already open). If keyframes are not displayed, click the disclosure triangle to the left of the Opacity effect to open the parameter settings, and then click the Show/Hide Keyframe Controls icon (![]() ) at the top right in the Applied Effects panel to view the keyframes.
) at the top right in the Applied Effects panel to view the keyframes.
You can set and modify opacity-related keyframes in either or both the timeline or the Applied Effects panel. In general, the timeline is best for fast and simple adjustments, like the fade-out that you just applied, whereas the Applied Effects panel is a better choice for complicated, more precise adjustments.
The other keyframe-related controls shown in the context menu in the figure below are advanced options that control the rate and smoothness of change applied by Adobe Premiere Elements. For more on those options, search for “Controlling change between keyframes” in Adobe Premiere Elements Help.
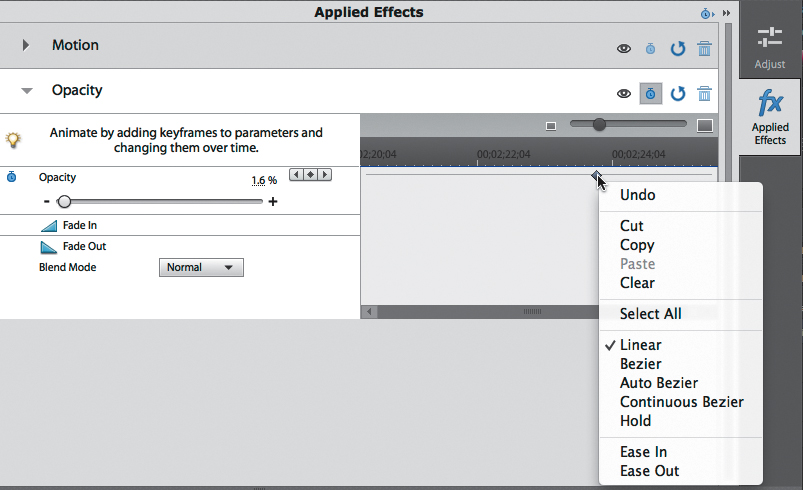
Applying effects to multiple clips
You may often find that you would like to apply adjustments made to a single clip to multiple clips. For example, if you shot 100 clips under identical lighting conditions, you may want to apply all color and brightness adjustments to all of those clips. If you’ve applied and configured a cool effect like NewBlue Cartoonr Plus (available only in Expert view) to a clip, you may want to apply the same effect in the same way to another clip, or to multiple clips. If you plan to use a FilmLook, you might want to apply the same one to all clips in your project.
Adobe Premiere Elements offers many options for applying a single effect to multiple clips:
• Sharing applied effects by copying and pasting: In both Quick and Expert views, you can copy and paste an Applied Effect from one clip to another in the Applied Effects panel.
• Sharing applied effects by creating presets: In Expert view, you can save an Applied Effect to a preset that you can apply to additional clips like any other effect.
• Copying and pasting all effects and adjustments: In both Quick and Expert views, you can copy and paste all effects and adjustments applied to a clip to another clip in the timeline.
• Sharing adjustments via the Entire Movie button: Although you can’t save adjustments as presets, or copy and paste them individually, in Quick view you can apply adjustments made to any single clip to the entire movie via the Entire Movie button (![]() ).
).
• Sharing Applied Effects via the Entire Movie button: You can use the Entire Movie button to apply adjustments made to any Applied Effect to all clips, as long as that effect has been applied to all clips.
• Applying an effect to multiple clips: If you select one or more clips on the timeline, you can apply any effect to all selected clips by dragging the effect onto any of the selected clips. Once you’ve applied the effect, however, if you need to modify or delete it, you’ll have to do so individually for each clip.
• Applying an effect to multiple clips via an adjustment layer: In Expert view, you can create an adjustment layer over the target clips. Then you can apply an effect to the adjustment layer, and Adobe Premiere Elements will apply that effect to all clips under the layer. If you need to customize or delete the effect, you can customize the settings on the adjustment layer, or delete the effect on the adjustment layer, or delete the adjustment layer itself.
Sharing Applied Effects via copy and paste
We’ve already applied and customized the Vignetting effect to the start of the production. Let’s copy and paste that effect to the first picture in the slide show so the slide show opens with that same effect.
1. Click Gator01.mp4 in the timeline to select it.
2. If necessary, click the Applied Effects button to open that panel.
![]() Note
Note
You can also click to select the effect and choose Edit > Copy, or press Ctrl+C (Windows) or Command+C (Mac OS) to copy the selected effects.
3. Right-click the Vignetting effect, and choose Copy.

4. In the timeline, navigate to Picture 1.jpg. If necessary, click the Applied Effects button to open that panel.
5. Right-click in the blank area beneath the Opacity effect in the Applied Effects panel, and then choose Paste. Adobe Premiere Elements applies the Vignetting effect to this clip with the same properties, including the keyframes.
6. Grab the current-time indicator, and scroll through Picture 1.jpg on the timeline. You’ll see the Vignetting effect at the start of the image, disappearing in two seconds.
![]() Note
Note
This copy-and-paste function works well because we wanted the same effect to operate identically on the new clip. When pasting an applied effect with keyframes from one clip to another, the keyframes transfer as well. The next exercise addresses keyframes in the context of presets.
Saving a preset
Suppose you wanted to reuse the Vignetting intro again—not only within this project, but also for future projects. Because it’s an Applied Effect (as opposed to an adjustment), you can save the effect, including all configuration options and keyframes, as a preset. Once saved, you apply it by dragging the preset onto any clip, just like any effect.
1. Click Gator01.mp4 in the timeline to select it. If necessary, click the Applied Effects button to open that panel.
2. In the Applied Effects panel, right-click the Vignetting effect, and choose Save Preset. The Save Preset dialog box opens.
3. Type Vignetting transition-in preset in the Name field.
4. Select Anchor To In Point as the Type.
The Type option controls how keyframes are handled when you apply the new preset to a clip with a duration different from the original clip. Scale scales the keyframes proportionally to the length of the target clip, and deletes existing keyframes on the target clip. Anchor To In Point positions the preset’s first keyframe at the same distance from the target clip’s In point as it was from the original clip’s In point. This is the option to select with all “transition in” type effects like the Vignetting effect. Anchor To Out Point positions the preset’s last keyframe at the same distance from the target clip’s Out point as it was from the original clip’s Out point. This is the option to select with all “transition out” type effects.
5. If desired, enter a description for your preset.

6. Click OK to save the preset.
7. To view a custom preset, choose the My Presets folder from the pull-down menu in the Effects panel, which is visible only in Expert view. From there, you apply a preset by dragging the effect onto a clip or clips, just like any other effect.

Copying and pasting all effects and adjustments
The benefit of the above two techniques is precision: You can copy and paste a single effect or create a preset from a single effect. However, you can use these techniques only with effects, not with adjustments. In this exercise, you’ll learn how to share adjustments.
As you’ll see, however, it’s a tradeoff; you must copy and paste all adjustments and effects, not any single adjustment—so you lose the precision of the previously discussed techniques. That’s OK if the adjustment you’re trying to copy to one or more other clips is the only adjustment made to the source clip, or, of course, if you wanted to copy all adjustments and effects to one or more other clips anyway. But if there are multiple adjustments and effects applied to the source clip—some that you want and some that you don’t—they all will be transferred to the target clip or clips.
Let’s copy the lighting effects that we applied to the heron in Gator10.mp4 to the alligator in both Gator12.mp4 clips.
1. Click Gator10.mp4 in the timeline to select it.
2. Right-click, and then choose Copy.

3. Click the first Gator12.mp4 clip in the timeline, and then press and hold the Shift key and click the second Gator12.mp4 clip. Right-click either clip, and choose Paste Effects And Adjustments.
Premiere Elements applies the Lighting Adjustment to both clips, which you can verify in the Adjust panel.
4. Save your project as Lesson06_End.prel. We’ll do some additional work in this project, but this completes the edits that will make their way into the next chapter.
Sharing adjustments via the Entire Movie button
In Quick view, you can share adjustments to all clips in the movie using the technique described below. Note that when I say all clips, I mean all clips; there’s no way to exclude any clips. Typically, this makes this technique most useful when adjusting multiple clips from the same source.
1. Click Gator01.mp4 in the timeline to select it.
You can use any clip, but this was first, so it’s the clip that I selected.
2. Click the Adjust button to open the Adjustments panel.
3. At the top right of the Adjustments panel, click the Entire Movie button (![]() ). If you don’t see the Entire Movie button, it’s because you’re not in Quick view.
). If you don’t see the Entire Movie button, it’s because you’re not in Quick view.
4. Click the disclosure triangle next to Color to reveal those controls.
5. Click More to reveal the discrete slider-based controls for the Color adjustment.
6. Drag the Saturation value all the way to the right to 100. We’re not looking for subtlety here—just trying to illustrate how this control works.
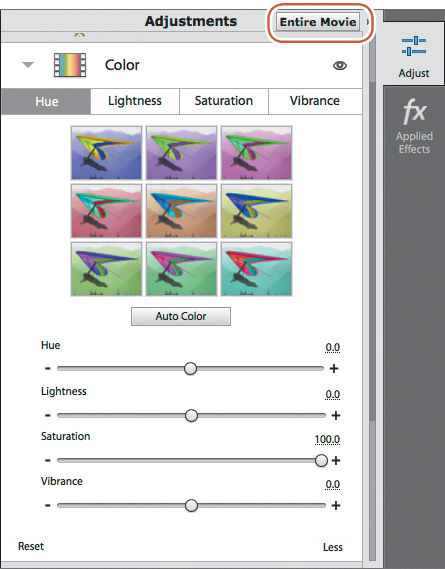
7. Drag the current-time indicator through the movie; you’ll see that Adobe Premiere Elements applied the adjustment to all clips and pictures in the movie.
8. At the bottom left of the window, click Undo to undo the adjustment.
You can use the same technique to share adjustments made to all Applied Effects that are applied to all clips in the movie. Without applying any effects, for example, you can adjust the Motion and Opacity controls of all clips in the movie by clicking the Entire Movie button (![]() ) and then making your adjustments as described in the previous exercise.
) and then making your adjustments as described in the previous exercise.
Applying an effect to multiple clips
Adobe Premiere Elements makes it easy to apply an effect to one clip, a selected group of clips, or all clips in the project, as you’ll learn now. In the next exercise, you’ll learn how to use an adjustment layer to apply an effect to multiple clips, which is faster, more flexible, and easier to customize. In both exercises, we’ll work with FilmLooks.
Briefly, FilmLooks are configured effects or collections of configured effects that give your video a certain look or feel. They’re available in both Quick and Expert views, and are very easy to apply. Because FilmLooks remove all applied effects and reset all adjustments, they’re best used early in the project design process, or via adjustment layers. Let’s apply a FilmLook to the entire project.
1. Click the timeline to select it, and press Ctrl+A (Windows) or Command+A (Mac OS) to select all content in the timeline.
2. In the Action bar at the bottom of the timeline window, click the Effects button (![]() ) to open the Effects panel.
) to open the Effects panel.
3. From the pull-down menu at the top of the panel, choose the FilmLooks folder.
4. Drag the Summer Day effect from the Effects panel onto any clip in the timeline.

5. Click Yes when Adobe Premiere Elements asks if you want to remove all applied effects and adjustments.
When you click Yes, all applied effects will be removed and all adjustments reset. If you click No, the FilmLook won’t be applied.
6. Press the Home key to move the current-time indicator to the start of the project, and then press the spacebar to preview the project. If playback isn’t smooth enough to gauge the quality of the FilmLook, render the project by pressing Enter (Windows) or Return (Mac OS) or by clicking the Render button (![]() ) on the bottom right of the Monitor panel.
) on the bottom right of the Monitor panel.
7. Click the Applied Effects button (![]() ) on the top right to open the Applied Effects panel. Click any clip in the timeline to select it.
) on the top right to open the Applied Effects panel. Click any clip in the timeline to select it.
8. In the Applied Effects panel, click the disclosure triangle to the left of the Split Tone effect to open the parameter settings.
The Summer Day FilmLook is a preconfigured version of the Split Tone effect, plus some customized parameters for the Color, Lighting, and Temperature and Tint adjustments, which you can see by opening the Adjustments panel. Beyond removing your applied effects and adjustments, applying a FilmLook directly to multiple clips makes it very time-consuming to customize, since you have to modify each clip individually. That’s why using an adjustment layer is a better option.
9. Click Undo to remove the FilmLook effect from the project.
Using adjustment layers
Adjustment layers are project elements that you add to a project like any other clip. However, when you apply effects or adjustments to an adjustment layer, these are applied to all clips below the adjustment layer. We’ll create one now.
1. If necessary, click the Expert button (![]() ) to enter that view.
) to enter that view.
2. Click the Project Assets button (![]() ) to open that panel. In the panel menu on the top right, choose New Item > Adjustment Layer. Adobe Premiere Elements creates the adjustment layer and inserts it in the Project Assets panel.
) to open that panel. In the panel menu on the top right, choose New Item > Adjustment Layer. Adobe Premiere Elements creates the adjustment layer and inserts it in the Project Assets panel.

3. Drag the new adjustment layer onto the Video 2 track.
4. Click the Project Assets button to close that panel.
5. Click and drag the adjustment layer until it covers all the content on the Video 1 track.

6. Drag the Summer Day effect from the Effects panel onto the adjustment layer.
7. Drag the current-time indicator through the movie. Adobe Premiere Elements has applied the FilmLook to all clips in the project without removing all applied effects or adjustments.
8. Click the adjustment layer to select it, and then click the Applied Effects button (![]() ) on the top right to open the Applied Effects panel. Click the disclosure triangle to the left of the Split Tone effect to open the parameter settings.
) on the top right to open the Applied Effects panel. Click the disclosure triangle to the left of the Split Tone effect to open the parameter settings.
As you learned in the previous exercise, the Summer Day FilmLook is a preconfigured version of the Split Tone effect, plus some customized parameters for the Color, Lighting, and Temperature and Tint adjustments, which you can see by opening the Adjustments panel. However, since you applied the FilmLook to an adjustment layer, you can customize the FilmLook for the entire project by modifying the adjustments and Applied Effects in the adjustment layer. Plus, you don’t lose all the other effects and adjustments that you previously made to your clips.
Creating a Picture-in-Picture overlay
![]() Note
Note
Picture-in-Picture overlay is accessible only in Expert view.
Adobe Premiere Elements can superimpose multiple tracks of video over other tracks. In this exercise, you’ll superimpose one video clip in a small frame over a preexisting background clip that covers the entire screen. This effect is called a Picture-in-Picture (PiP) overlay.
This project was derived from a French report prepared by my eldest daughter. I couldn’t use the images that she originally used, because I didn’t know their origin, and didn’t want to trigger any copyright issues. So I grabbed some images from the CIA website that were copyright-free and in the public domain. If the images don’t precisely match the description, you’ll know why. Of course, as you’ll discover, you’ll have to speak French to tell.
1. To load the project file containing the new content, choose File > Open Project, and then navigate to the Lesson06 folder you copied to your hard drive.
2. Within that folder, select the file Lesson06_Videomerge_Win.prel (Windows) or Lesson06_Videomerge_Mac.prel (Mac OS), and then click Open (Windows) or Open (Mac OS). If you want to save the project you were working on, you know the drill. If a dialog box appears asking for the location of rendered files, click the Skip Previews button.
3. Choose Window > Restore Workspace to ensure that you start the lesson with the default panel layout.
4. If necessary, press the Home key to move the current-time indicator to the start of the project. Then drag the current-time indicator about one second to the right so that the Preview monitor looks like the figure below.
![]() Note
Note
If you need room in the Monitor panel, grab the bottom right edge of the Project Assets panel, and drag it upward and to the left to minimize the panel as much as possible, as you see in the figure.
5. Click the Project Assets button to open that panel, and locate Greenscreen.mp4. Click once to select the clip, hold down the Shift key, and drag the clip toward the lower left corner of the clip in the Monitor panel.

6. Release the pointer, and choose Picture In Picture from the menu that appears.
7. Click No in the Videomerge panel (if it appears).
The superimposed clip will have handles on the edges, indicating that the clip is active.
8. Click anywhere in the clip, and drag it to a position that approximates that shown in the figure below.

9. Click the Applied Effects button to open the Applied Effects panel.
10. In the Applied Effects panel, click the disclosure triangle to the left of Motion to reveal its properties. Make sure Constrain Proportions is selected.
11. Place your pointer over the Scale value, and drag the value to 45. As you change the scale, the Greenscreen.mp4 clip scales to 45% of its original size.
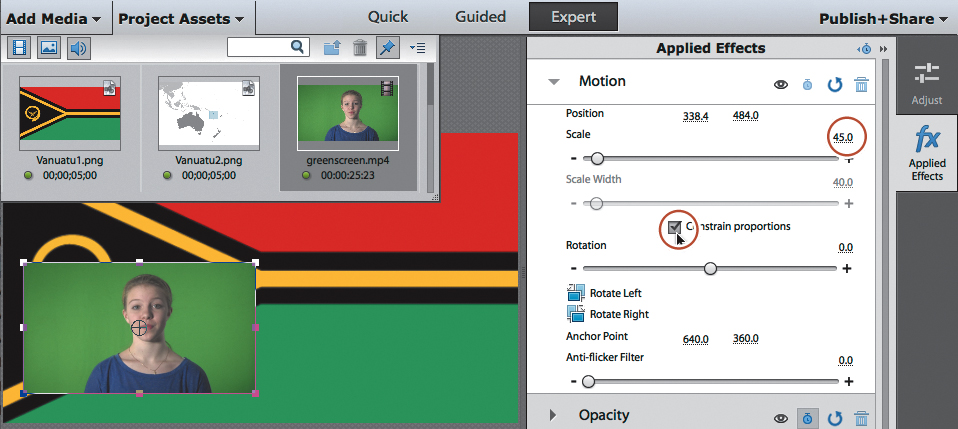
If necessary, you can reposition the clip using the Position controls, or simply drag the clip to the desired position in the Monitor panel.
12. With Greenscreen.mp4 still selected, click the disclosure triangle to the left of the Opacity effect to reveal those properties. Click the Fade Out icon to fade the Greenscreen.mp4 clip at the end.
13. We want to fade out the background image as well. In the Video 1 track in the timeline, select the Vanuatu6.gif clip. In the Applied Effects panel, click the disclosure triangle to the left of the Opacity effect to reveal those properties. Click the Fade Out icon to fade the Vanuatu6.gif clip at the end.
14. Press the Home key to go to the start of your project, and then click the Play button or press the spacebar to review your work.
15. Save your project as Lesson06_pip.prel.
Compositing two clips using Videomerge
Compositing is the process of merging two clips together, one on top of the other, while removing the background color of the top clip to reveal the second. This process allows you to place your subject in a variety of environments, both real and simulated.
The Adobe Premiere Elements Videomerge effect makes compositing as easy as dragging and dropping. Videomerge automatically determines the background of the top clip and makes it transparent. Video or image clips on the tracks below it become visible through the transparent areas. You’ll get the best results with Videomerge if you shoot the clip to be composited using the following rules:
• Create a strong (preferably dark or saturated) solid, uniform-color background to shoot against.
• Make sure the background is brightly and uniformly lit to avoid shadows.
• In choosing a background color, avoid skin tones and colors that are similar to the subject’s clothing or hair color. (Otherwise, the skin, clothes, or hair will become transparent, too.) Bright green and blue are the best choices.
With this information in mind, reload the Lesson06_Videomerge_Win.prel (Windows) or Lesson06_Videomerge_Mac.prel (Mac OS) project file (you should have already saved the first project as Lesson06_pip.prel); we’re going to take this feature for a spin.
1. In the timeline, press the Home key to make sure that the current-time indicator is at the beginning of the video.
![]() Note
Note
If you need room in the Monitor panel, grab the bottom right edge of the Project Assets panel, and drag it upward and to the left to minimize the panel as much as possible.
2. Click the Project Assets button to open that panel, and locate Greenscreen.mp4. Click once to select the clip, hold down the Shift key, and drag the clip toward the center of the Monitor panel.
3. Release the pointer, and choose Place On Top And Apply Videomerge from the menu that appears.
Adobe Premiere Elements inserts Greenscreen.mp4 in the Video 2 track over Video 1, automatically detects the green background, and makes it transparent. The results are good, but this is a good opportunity to look at Videomerge’s configuration options in case any of your projects ever need a bit of tweaking.
4. In the timeline, click Greenscreen.mp4 to select it, and then click the Applied Effects button to open that panel. If necessary, click Project Assets to close the Project Assets panel to make the entire Monitor panel visible.
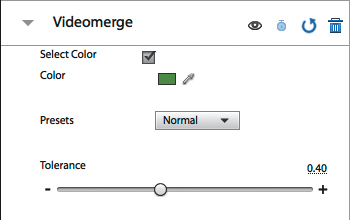
5. In the Applied Effects panel, click the disclosure triangle to the left of the Videomerge effect to display the configuration options.
6. If you’re not achieving a clean effect and you see residue of greenscreen in the background video or the background video showing through the subject, try any or all of the following:
• Reselect the background color. Make sure the Select Color option is enabled, and then click the eyedropper (![]() ) to select it. The background behind the subject will reappear. Press Ctrl (Windows) or Command (Mac OS), and then click the background close to the subject’s head. This tells Videomerge which color to eliminate, and pressing Ctrl (Windows) or Command (Mac OS) averages a 5x5-pixel block surrounding the pixel that you clicked to achieve a smoother result. If you’re having problems around the edges, try clicking there, but the middle region of the clip is typically the most important.
) to select it. The background behind the subject will reappear. Press Ctrl (Windows) or Command (Mac OS), and then click the background close to the subject’s head. This tells Videomerge which color to eliminate, and pressing Ctrl (Windows) or Command (Mac OS) averages a 5x5-pixel block surrounding the pixel that you clicked to achieve a smoother result. If you’re having problems around the edges, try clicking there, but the middle region of the clip is typically the most important.
• Cycle through the Presets, which are Soft, Normal, and Detailed.
• Adjust the Tolerance slider in both directions.
7. If you’re having trouble getting clean edges, try experimenting with one of the Garbage Mattes in the Keying folder in the Effects panel. Search for Garbage Matte in Adobe Premiere Elements Help for more information.
![]() Note
Note
If you’re uncomfortable with the subject obscuring some of the content behind her, you could always use Motion controls to scale the frame to about 45% of its original size, and move it to the bottom left or right.
8. Repeat steps 12 and 13 from the previous exercise to apply a Fade Out effect to both clips.
9. Press the Home key to go to the start of your project, and then click the Play button to review your work. If the video doesn’t play smoothly, click the Render button (![]() ) on the bottom right of the Monitor panel to render the clip.
) on the bottom right of the Monitor panel to render the clip.
10. If you want, save your project as Videomerge_end.prel.
Working with Motion Tracking
Motion Tracking gives you the ability to automatically track moving objects in a project so you can add labels, thought bubbles, or other effects to the moving object. This exercise teaches you how to use this function, which is demonstrated in Expert view.
1. To load the project file containing the new content, click File > Open Project, and then navigate to the Lesson06 folder you copied to your hard disk.
2. Within the Lesson06 folder, select the file Motion_Tracking_Win.prel (Windows) or Motion_Tracking Mac.prel (Mac OS), and then click Open. If a dialog box appears asking for the location of rendered files, click the Skip Previews button.
3. Click to select the clip in the My Project panel, Alfie.mov, and make sure the current-time indicator is at the start of the clip.
4. Click the Tools icon (![]() ) to open the Tools panel, and then choose Motion Tracking. The Motion Tracking panel opens.
) to open the Tools panel, and then choose Motion Tracking. The Motion Tracking panel opens.

5. At the left of the Motion Tracking panel, click Select Object (![]() ). A bounding box appears in the preview window.
). A bounding box appears in the preview window.
6. Click and drag the edges of the bounding box around the head of the (always hungry) dog.
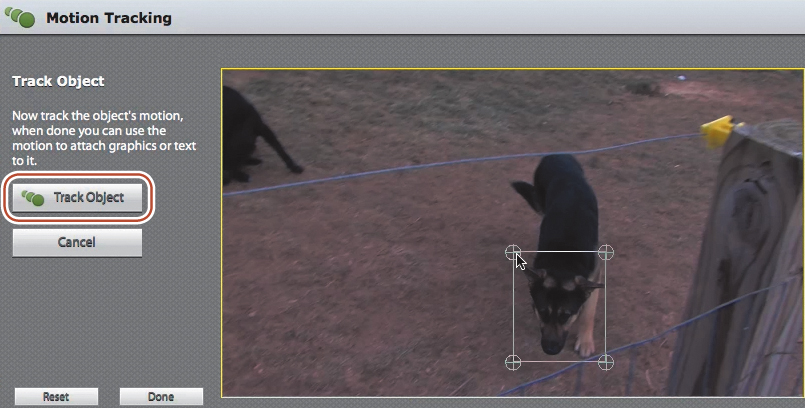
7. At the left of the Motion Tracking panel, click Track Object (![]() ). The Motion Tracking dialog box appears as Adobe Premiere Elements tracks the object.
). The Motion Tracking dialog box appears as Adobe Premiere Elements tracks the object.
8. Click the Graphics icon (![]() ), and select the Thought And Speech Bubbles folder on top. Drag the Speech Bubble 05-RIGHT onto the box in the preview window.
), and select the Thought And Speech Bubbles folder on top. Drag the Speech Bubble 05-RIGHT onto the box in the preview window.

9. In the Change Text dialog box, type Feed me! Then click OK to close the dialog box.

10. Drag the Position controls to finalize placement of the thought bubble over Alfie’s head.
11. Press the Home key to move to the start of your project, and then click the Play button to review your work. Watch how the thought bubble moves with Alfie.
12. Save your project as Lesson06_Alfie.prel.
Exploring on your own
Congratulations! Now you know how to apply video settings, change effects and settings, copy effects from one clip to another, create an image pan, animate an effect with keyframes, create a Picture-in-Picture effect, and composite one video over another with Videomerge. Here are some effects that you can experiment with on your own:
• Create a PiP effect using two or more clips on the same screen.
• Get a sense of the different effects available in Adobe Premiere Elements by choosing Help > Premiere Elements Help, or by pressing F1 to access Online Help. The Applying Effects section includes a gallery of video effects.
• Experiment with the various effects presets located in the Presets folder in the Effects panel, including the Horizontal and Vertical image pans.
Review questions
1. What are curative effects, and when should you apply them?
2. What’s the quickest way to apply identical effects and settings to multiple clips?
3. What is a keyframe, and what does it contain?
4. How do you modify keyframes once they’ve been added to a clip?
5. How do you apply the same effect to multiple clips on the timeline?
6. Why is using an adjustment layer more efficient than applying an effect to multiple clips?
Review answers
1. Curative effects improve one or more aspects of a clip, such as exposure, backlighting, or excessive shakiness. You should apply curative effects to a clip before applying artistic and other effects.
2. There are two ways to copy effects from one clip to another. To copy a single effect from one clip to another, click the source clip in the timeline to select it, open the Applied Effects panel, right-click the effect, and choose Copy. Then click the target clip in the timeline, open the Applied Effects panel, right-click in the gray area beneath other effects, and choose Paste. To copy multiple effects from one clip to another or to multiple clips, right-click the source clip on the timeline, and choose Copy. Then select the target clip or clips, right-click, and choose Paste Effects And Adjustments.
3. A keyframe contains the values for all the controls in an effect and applies those values to the clip at the specific time.
4. Once you’ve added keyframes to a clip, you can adjust them by clicking and dragging them along the connector line. If there are two keyframes, moving one farther away from the other extends the duration of the effect; moving a keyframe closer to another shortens the effect.
5. Select all target clips in the timeline, and apply the effect to any single clip.
6. The adjustment layer is more efficient because you can modify all clips by making changes to the adjustment layer. Plus, with FilmLooks, you don’t delete all existing effects and adjustments.