
Chapter 5. Editing Video
In Lesson 4, you learned to organize your video in the Organizer and Project views. In this lesson, you’ll learn how to take that footage and shape it into a refined final version. You’ll apply these basic editing techniques:
• Insert, delete, and rearrange clips in the Sceneline and Timeline
• Trim and split clips
• Use Smart Trim mode to quickly remove lower-quality segments from your videos
Over the course of this lesson, you’ll piece together a short video showing some kids playing basketball. You’ll be working with video and audio clips provided on the DVD that accompanies this book.
![]()
This lesson will take approximately two hours.

Working in the Sceneline.
Getting Started
To begin, you’ll launch Adobe Premiere Elements, open the Lesson05 project, and review a final version of the movie you’ll be creating.
- Make sure that you have correctly copied the Lesson04 and 05 folder from the DVD in the back of this book onto your computer’s hard disk. For more information, see “Copying the Classroom in a Book Files” in the Getting Started section at the start of this book.
- Launch Premiere Elements.
- In the Welcome screen, click the Open Project button, and then click the Open folder.
- In the Open Project dialog, navigate to the Lesson04 and 05 folder you copied to your hard disk.
- Within that folder, select the file Lesson05_Start_Win.prel (Windows) or Lesson05_Start_Mac.prel (Mac OS), and then click Open. Make sure that you don’t select Lesson04_Start_Win.prel or Lesson04_Start_Mac.prel, which are in the same folder. If a dialog appears asking for the location of rendered files, click the Skip Previews button.
Your project file opens with the Monitor, Tasks, and My Project panels open.
- Choose Window > Restore Workspace to ensure that you start the lesson with the default panel layout.
Viewing the Completed Movie Before You Start
To see what you’ll be creating in this lesson, you can take a look at the completed movie.
- In the Organize tab of the Tasks panel, click Project (
 ). In Project view, locate the file Lesson05_Movie.mov, and then double-click it to open the video in the Preview window.
 - In the Preview window, click the Play button (
 ) to watch the video about some kids shooting hoops, which you will build in this lesson.
 - When you’re done, close the Preview window by clicking the Close button (
 ) in the upper-right corner of the window.
Working with the Monitor Panel
When you open the project for this lesson, you’ll see multiple clips in the My Project panel, in either Timeline or Sceneline view. Regardless of which view you choose, you’ll preview your work in the Monitor panel. The Timeline and Sceneline are different panels for arranging clips and applying effects, and can show different views of the project.
In contrast, the Monitor panel shows one frame of the project, and one frame only. The displayed frame is at the location of the current-time indicator (![]() ). In the Sceneline, the current-time indicator is in the mini-timeline just below the preview area. In the Timeline, the current-time indicator is positioned directly on the Timeline.
). In the Sceneline, the current-time indicator is in the mini-timeline just below the preview area. In the Timeline, the current-time indicator is positioned directly on the Timeline.
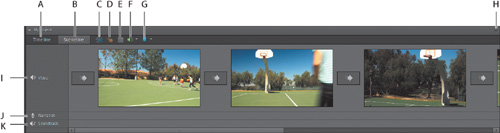
Now let’s explore the functions of the Monitor panel, particularly the multiple ways that you can move around the content presented in the My Project panel. This initial presentation will be in Sceneline view, so click the Sceneline button on the top left of the My Project panel to make sure that you’re in that view.
A. Docking Header. B. Preview area. C. Panel menu. D. Current-time Indicator. E. Current Time. F. Clip Representation in Mini-Timeline. G. Playback controls.
- In the mini-timeline beneath the Monitor panel, select the first clip in the Sceneline, and then click the Play button () in the Monitor panel to begin playback. As the movie is playing, notice that the timecode in the lower-left corner of the Monitor panel is advancing. To pause playback, press the spacebar, or once again click the Play button, which becomes the Pause button (
 ) during playback.
 - You can locate a specific frame in your movie by changing your position in time. Place your pointer over the timecode in the lower-left corner of the Monitor panel, and your Selection tool (
 ) will change to a hand with two arrows (
 ).
). - Drag the hand with two arrows icon to the right, advancing your video. The pointer will disappear while you’re dragging and reappear when you stop. As long as you keep holding down the mouse button you can move backward and forward through the video. This is known as scrubbing through your video.

- The Shuttle control located in the lower-right corner of the Monitor panel lets you navigate through the movie in a similar fashion. To move forward through your video, drag the Shuttle control to the right. The farther to the right you move the Shuttle control, the faster you move through the video. This method is useful for quickly scanning a project for edit points.

A. Go to Previous Edit Point (Page Up). B. Rewind. C. Step Back (left). D. Play/Pause Toggle (Space). E. Step Forward (right). F. Fast-Forward. G. Go to Next Edit Point (Page Down). H. Shuttle. I. Split Clip (Ctrl+K/Command+K). J. Add Default Text. K. Freeze Frame.
- You can move to a specific point in your movie by entering the time in the Timecode control. Click the timecode in the lower-left corner of the Monitor panel, and it will change to an editable text field. Type the number 900 and then press Enter to move to the nine-second point of your project.
- Click the Step Forward (
 ) button (right arrow key) repeatedly to advance your video one frame at a time. Video is simply a series of frames shown at a rate of approximately 30 frames per second. Using the Step Forward () or Step Back (
 ) button (left arrow key) enables you to locate moments in time very precisely. You also can use the right and left arrow keys on the keyboard to accomplish the same functions.
 - Click the Go to Next Edit Point button (
 ) to jump to the first frame of the next clip. Notice in the mini-timeline that the current-time indicator (
 ) jumps to the beginning of the next clip representation. Click the Go to Previous Edit Point (
 ) to jump to the previous edit. Or, you can use the Page Up and Page Down keys on your keyboard to accomplish the same functions.
 - Reposition the current-time indicator in the mini-timeline by clicking and dragging it to the left or to the right.

- The Zoom control, located just above the mini-timeline in the Monitor panel, enables you to zoom in to get a more detailed view of the clips, zoom out to see more of the entire movie in the mini-timeline, or scroll through the mini-timeline to find a clip. To work with the Zoom control, do any of the following:
• To zoom in, drag the left Zoom Claw (
 ) to the right, or drag the right Zoom Claw to the left.
• To zoom out, drag the left Zoom Claw to the left, or drag the right Zoom Claw to the right.

• Scroll through the mini-timeline by clicking and dragging the gray center bar of the Zoom control.

- Press the Home key on your keyboard to position the current-time indicator at the beginning of the movie. Press the End key on your keyboard to position the current-time indicator at the end of the movie. This is useful when you want to add content to the existing sections of your movie.
Working with the My Project Panel in the Sceneline
As mentioned, the My Project panel has two views: a Sceneline for basic movie editing and a Timeline for more advanced techniques. You can switch between the two views by clicking either the Sceneline or the Timeline button in the upper-left corner of the My Project panel.
Adding Clips in the Sceneline
In the Sceneline, each clip is represented by its first frame. This display makes it easy to arrange clips into coherent sequences without regard for clip length. This technique is referred to as storyboard-style editing.
The Sceneline: A. Switch to Timeline. B. Switch to Sceneline. C. Smart Trim mode. D. Motion Tracking mode. E. Properties. F. Audio tools. G. Markers. H. Panel menu. I. Change Track Volume (Scenes). J. Change Track Volume (Narration). K. Change Track Volume (Soundtrack).
- If the My Project panel is not already in the Sceneline, click the Sceneline button.
- To add clips in the Sceneline, do any of the following:
• To add a clip at the end of the movie:Use the scroll bar at the bottom of the My Project panel to scroll to the end of the movie (or press the End key). In Media view, click any clip, and then drag it onto the empty clip target at the end of the movie. If the SmartFix dialog opens and asks if you want to fix quality problems in the clip, click No.
• To add a clip before another:In Project view, click a clip, and then drag it onto an existing clip in the Sceneline. If the SmartFix window opens and asks if you want to fix quality problems in the clip, click No. Premiere Elements will insert the new clip before the clip it was dropped onto and will push the clip it was dragged onto and all subsequent clips to the right.

• To add a clip after another in the Sceneline:Select the clip after which you want to add the new clip. To do so in Media view, click the clip you want, and then drag it onto the Monitor panel. If the SmartFix window opens and asks if you want to fix quality problems in the clip, click No. Premiere Elements will insert the new clip after the clip currently selected in the Sceneline and will push all subsequent clips to the right.

- Choose Edit > Undo three times to remove the clips that you added to the project during this exercise, or just reopen the project.
Moving Clips in the Sceneline
Working in the Sceneline makes it easy to move clips in your movie. Here’s how it works.
- To move a clip to a new position in the movie, click the clip in the Sceneline, and then drag it to a position before or after another clip. Release the pointer when a vertical blue line appears at the desired position.

- To move several adjacent clips to a new position in the movie, Ctrl-click/Command-click to select multiple clips in the Sceneline, and then drag them before or after another clip. Release the pointer when a vertical blue line appears at the desired position.

- Choose Edit > Undo twice to undo the changes you made in this exercise.
Deleting Clips in the Sceneline
You may find, as your project develops, that you want to remove scenes you’ve imported into the Sceneline.
- To delete a scene, right-click it in the Sceneline, and then choose one of the following from the context menu:
• Delete Scene and its objects:This option deletes the scene and any overlays it might have. Overlays are any items included above the scene, like a title, graphic, or a picture-in-picture video. Note that the sample project that you’re working with doesn’t have any scenes with objects, so choose the next option, Delete just Scene.
• Delete just Scene:This option deletes the clip but leaves the overlays in place.
Note
When a clip is deleted from the Sceneline, the transition following the clip is also deleted; when a clip is deleted from the Timeline, the preceding and following transitions are deleted.
The clips following the deleted clip move to the left to close the gap. This is the default behavior when deleting clips in Premiere Elements and is called a ripple deletion.

- Choose Edit > Undo to restore the Scene that you just deleted.
Trimming Clips in the Sceneline
Although deleting unnecessary clips and thoughtfully rearranging the order of clips will make a better video, you will inevitably want to shorten the length of some clips to create a more compelling movie. Here’s how you’ll accomplish this task.
Every clip has a beginning and an end. In editing terminology these are referred to as the In points and Out points. Setting In and Out points does not actually delete frames from the hard disk but instead isolates a portion of the clip for use in your movie. When you trim a clip in Premiere Elements, you are simply changing the In and Out points.
- In the Monitor panel, click Clip 9.mov in the Project Task Area to open the Preview pane. Then press the spacebar to play the clip. You want to trim the first few frames from the start of this clip and the excessive celebration at the end.
- Watching the timecode in the bottom left of the Monitor panel, drag the In point handle (
 ) to the right until you see the 00;00;01;02 mark, which means that you’re trimming one second and two frames from the start of the clip. Notice that your Monitor panel has changed to a split screen: On the left, the Monitor displays the final frame of the scene before the one that you’re trimming, and on the right, the Monitor displays the first frame of the scene that you’re trimming. This gives you an ideal view of the transition from the first scene to the second.

- Watching the timecode in the bottom left of the Monitor panel, click the Out point handle (
 ) located on the right side of the current clip representation in the mini-timeline, and then drag it to the left until you see the 00;00;02;17 mark, which means that you’re trimming two seconds and 17 frames from the end of the clip. The Monitor panel stays in split-screen view: On the left it displays the final frame of the clip you’re trimming, and on the right it displays the initial frame of the next clip on the Sceneline.

- Click Clip 9.mov again in the Sceneline. If necessary, click the Go To Previous Edit Point () button in the playback controls (or press the Page Up key on your keyboard) to move the current-time indicator to the start of the clip, and then press the spacebar to play the clip. Notice that you’ve trimmed away frames from the start and end of the clip, and have isolated the most usable segment.
Using the Split Clip Tool in the Sceneline
The Split Clip tool allows you to cut single clips into multiple clips. You can use this tool to split a clip into sections so you can delete one of them, which sometimes is more convenient than trimming. You can also use it to split a long clip into separate clips to edit them individually.
- Click Clip 5.mov, and then press the spacebar to play the clip. Although the pants up front are certainly stylish, let’s get rid of the first few frames so we can start with a more striking visual.
- In the monitor panel, position the current-time indicator at the 00;00;36;05 mark, which marks the beginning of the section that we want to use after splitting.
- To split the clip at the position of the current-time indicator, click the Split Clip button (
 ) located near the right end of the Monitor panel just below the mini-timeline. You might have to resize the Monitor panel to its full width to see this icon. Or, choose Timeline > Split Clip. Premiere Elements will split the clip into two segments, both named Clip 5.mov.

- Delete the first clip. Click the first Clip 5.mov clip, right-click the clip representation, and choose Delete.

- When you’re finished reviewing the movie, choose File > Save As.
- In the Save Project dialog, name the file Lesson05_Win_work (Windows) or Lesson05_Mac_work (Mac) and save it in your Lesson04 and 05 folder.
Working with the My Project Panel in the Timeline
Although most basic editing tasks can be performed in the Sceneline together with the Monitor panel, you’ll use the Timeline for many advanced editing tasks, especially those that involve layering, which means having multiple clips in the project at the same location.
The Timeline graphically represents your movie as video and audio clips arranged in vertically stacked tracks. Before beginning to work with the Timeline, follow the instructions at the start of this lesson to load Lesson05_Start_Win.prel (Windows) or Lesson05_Start_Mac (Mac OS).
- In the My Project panel, click the Timeline button to switch to the Timeline. Depending on your monitor size, you might want to increase the height of the My Project panel to have more space to display additional video and audio tracks.

The Timeline: A. Switch to Timeline. B. Switch to Sceneline. C. Selection tool (V). D. Time Stretch tool. E. Smart Trim mode. F. Motion Tracking mode. G. Properties. H. Audio tools. I. Markers. J. Zoom slider. K. Panel menu. L. Time ruler. M. Video track. N. Audio track. O. Set Video Track Display Style. P. Set Audio Track Display Style. Q. Narration track. R. Soundtrack.
The Timeline displays time horizontally. Clips that fall earlier in time appear to the left, and clips that come later in time appear to the right. Time is indicated by the time ruler near the top of the Timeline.
The Zoom controls in the Timeline let you change the timescale, allowing you to zoom out to see your entire video or zoom in to see time in more detail.
- Click the Zoom In button (
 ) once to zoom into the Timeline. Drag the Zoom slider to the right to zoom in farther.
Zooming in enables you to make precise edits in the Timeline. In doing so, however, you cannot see the entire Timeline at once.
- To see other parts of your project, drag the scroll bar at the bottom of the Timeline to scroll through the Timeline.
- Premiere Elements has keyboard shortcuts that enable you to quickly zoom in and out. Press the equals sign (=) to zoom in one step per keystroke; press the minus sign (-) to zoom out one step per keystroke. Press the backslash () key to fit the entire video into the Timeline.
Adding and Deleting Tracks
As mentioned previously, the Timeline consists of vertically stacked tracks where you arrange media clips. Tracks let you layer video or audio and add compositing effects, picture-in-picture effects, overlay titles, soundtracks, and more.
You’ll perform most of your editing in the Video 1 and the Audio 1 tracks. Directly above these are the Video 2 and Audio 2 tracks. Note that the stacking order of video tracks is important. The Monitor panel displays (and Premiere Elements produces) the tracks from the top down. Accordingly, any opaque areas of the clip in the Video 2 track will cover the view on the clip in the Video 1 track.
Conversely, the clip in the Video 1 track will show through any transparent areas of the clip in the Video 2 track. Below the Video 1 and Audio 1 tracks are two more audio tracks, Narration and Soundtrack. Audio tracks are combined in playback, and their stacking order is not relevant.
Premiere Elements starts with three open video tracks (Video 1, 2, and 3) and five open audio tracks (Soundtrack; Narration; and Audio 1, 2, and 3), which should be sufficient for most projects. Should you need additional video or audio tracks, you can add them by choosing Timeline > Add Tracks. You can delete any empty tracks by choosing Timeline > Delete Empty Tracks.
Changing the Height of Tracks
You can change the height of each track in the Timeline for better viewing and easier editing of your projects. As a track enlarges, it displays more information. Let’s adjust the height of the Video 1 track.
- If necessary, scroll down in the Timeline to see the Video 1 track.
- At the left side of the Timeline, place your pointer between the Audio 2 and the Video 1 tracks. Your pointer should change to two parallel lines with two arrows (
 ). Drag up to expand the height of this track.

- Right-click anywhere in the My Project panel, and choose Track Size > Small, Track Size > Medium, or Track Size > Large to change the track size for all tracks in the Timeline at the same time.
Customizing Track Views
You can display clips in the Timeline in different ways, depending on your preference or the task at hand. You can choose to display a thumbnail image at just the beginning of the clip; at the head and tail of the clip; or along the entire duration of the clip, as shown in the previous figure. For an audio track, you can choose to display or hide the audio waveform of the audio contents. Toggle through the various views of the video and audio tracks until you find the one that best suits your eye and working style.
- By default, Premiere Elements displays all the frames in a video clip. However, at times you may find that you want to work with fewer visual distractions in your clip. Click the Set Display Style button (
 ) to the left of the Video 1 track to set the display style to Show Head and Tail. This will show you the first frame and last frame of all the clips in Video 1.

- Click the Set Display Style button again to view only the head of the clip.
- Click the Set Display Style button again to view the clip by its name only. No thumbnails will be displayed on the clip.
- Click the Set Display Style button one more time to view the default style of all the frames.
Editing in the Timeline
Editing in the Timeline is very similar to editing in the Sceneline, although several controls are in different places. Most notably, when you switch to Timeline view, the mini-timeline beneath the Monitor panel moves to the Timeline, as does the current-time indicator. Other than that, all playback controls are identical.
Beyond the interface issues, most of the basic clip-related operations are also identical. For example, you add clips to the Timeline the same way you add them to the Sceneline. You move clips around the same way, and you delete clips the same way. If you repeat the exercises you’ve already completed in this chapter using the Timeline rather than Sceneline, you’ll quickly become adept at all of these operations.
Trimming and splitting clips is also very similar, but because these operations are so critical to everyday editing, let’s run through them again in the Timeline.

A. Docking Header. B. Preview area. C. Panel menu. D. Playback controls. E. Current Time. F. Time ruler. G. Current-time Indicator.
Trimming Clips in the Timeline
Every clip has a beginning and an end. In editing terminology these are referred to as the In points and the Out points, as described earlier in this lesson. Setting In and Out points does not actually delete frames from the hard disk but instead isolates a portion of the clip for use in your movie. When you trim a clip in Premiere Elements, you are simply changing the In and Out points.
- Press the Home key to move the current-time indicator to the first frame of the project.
- Press the Page Down key eight times to move to the start of Clip 9.mov. Let’s trim the same frames that we trimmed in the Sceneline a few lessons ago.
- Click the Zoom In button () at the top of the Timeline to magnify your view, and if necessary, drag the scroll bar on the bottom of the Timeline to center Clip 9.mov in the Timeline. Zooming in and out to make these adjustments will feel awkward at first but will quickly become second nature.
- Let’s trim away unnecessary frames from the start of the clip. Hover the pointer over the left edge of Clip 9.mov in the Timeline. The pointer changes to a two-headed drag pointer (
 ) with the direction depending on the direction of your trim. Watching the current timecode in the bottom left of the Monitor panel, or in the text box that appears beneath the drag pointer, drag the edge of the clip to the right until you see the 00;00;01;02 mark, which means that you’re trimming one second and two frames from the start of the clip. Notice that your Monitor panel has changed to a split screen: On the left, the Monitor displays the final frame of the scene before the one that you’re trimming, and on the right, the Monitor displays the first frame of the scene that you’re trimming. This gives you an ideal view of the transition from the first scene to the second.

- Now let’s trim the unnecessary frames from the end of the clip. Hover the pointer over the right edge of Clip 9.mov in the Timeline. The pointer changes to a two-headed drag pointer (
 ). Watching the current timecode in the bottom left of the Monitor panel, or the text box that appears beneath the drag pointer, drag the edge of the clip to the left until you see the 00;00;02;17 mark, which means that you’re trimming two seconds and 17 frames from the end of the clip. The Monitor panel stays in split-screen view: On the left it displays the final frame of the clip you’re trimming, and on the right it displays the initial frame of the next clip on the Timeline.

- Click the Clip 9.mov clip again in the Timeline. If necessary, click the Go To Previous Edit Point () button in the playback controls (or press the Page Up key on your keyboard) to move the current-time indicator to the start of the clip, and then press the spacebar to play the clip. Notice that you’ve trimmed away frames from the start and end of the clip, and have isolated the most usable segment.
Using the Split Clip Tool in the Timeline
The Split Clip tool allows you to cut single clips into multiple clips. You can use this tool to split a clip into sections so you can delete one of them, an alternative to trimming that you’ll perform in this exercise. You can also use it to split a long clip into separate clips to edit them individually, although if you elect to Auto Analyze your clips, Premiere Elements will split most longer clips into separate scenes for you.
- Press the Home key, and then press the Page Down key four times, which should take you to the start of Clip 5.mov. Then press the spacebar to play the clip. Although the pants up front are certainly stylish, let’s get rid of the first few frames so we can start with a more striking visual.
- Click the Zoom In button () at the top of the Timeline to magnify your view, and (if necessary) drag the scroll bar on the bottom of the Timeline to center the Clip 5.mov clip in the Timeline.
- Position the current-time indicator at the 00;00;36;06 mark, which marks the beginning of the section that we want to use after splitting.
- To split the clip at the position of the current-time indicator, click the Split Clip button () located near the right end of the Monitor panel. You might have to resize the Monitor panel to its full width to see this icon. Or, choose Timeline > Split Clip. Premiere Elements will split the clip into two segments, both named Clip 5.mov.


- Delete the first clip. Click the Clip 5.mov clip, right-click the clip, and choose Delete and Close Gap.
- When you’re finished reviewing the movie, choose File > Save As.
- In the Save Project dialog, name the file Lesson05_Win_work1 (Windows) or Lesson05_Mac_work1 (Mac) and save it in your Lesson04 and 05 folder.
Working in Smart Trim Mode
Smart Trim is an editing mode that can help you identify suboptimal regions within your videos so that you can either fix or delete them. Smart Trim relies on information gathered while Premiere Elements analyzes your clips, so you must Auto-Analyze your clips before entering Smart Trim mode. You can operate Smart Trim either automatically or manually, although I recommend that you use Smart Trim manually until you understand how it works.
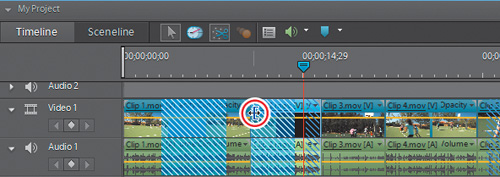
You can work with Smart Trim in either the Timeline or Sceneline; this exercise will demonstrate how it works in Timeline view. If necessary, to make your screen look like the figures in this exercise, click the Timeline button (![]() ) on the top left of the My Project panel to view the Timeline. Then adjust the size and positioning as necessary to place the Trafalgar Square clip in the Video 1 track below the Monitor, as shown in the following figure. Once the clip is positioned, click the Smart Trim icon (
) on the top left of the My Project panel to view the Timeline. Then adjust the size and positioning as necessary to place the Trafalgar Square clip in the Video 1 track below the Monitor, as shown in the following figure. Once the clip is positioned, click the Smart Trim icon (![]() ) atop the My Project panel to enter Smart Trim mode. If you haven’t run the Auto-Analyzer, Premiere Elements will run it now.
) atop the My Project panel to enter Smart Trim mode. If you haven’t run the Auto-Analyzer, Premiere Elements will run it now.

As you can see in the preceding figure, Smart Trim identifies problem areas via a zebra pattern. If you hover your mouse over the zebra pattern, a tool tip will detail the problems with the clip. You have multiple options regarding any clip, or portion of a clip, that Premiere Elements flags as a problem area.

You can right-click the clip, and choose Trim, Keep, or Select All. Trim will delete the selected portion; Keep will retain it and turn off the zebra striping; and Select All will select multiple suboptimal regions within the same clip so you can trim or keep them all. In addition to these options, you can trim away any or all of the suboptimal portions of your clip by clicking and dragging an edge to the desired new starting point, just as you would trim any other clip in the Timeline.
How Smart Trim Works
Another approach to trimming a scene is to choose Smart Trim Options and adjust these options. Let’s view the choices available by right-clicking Clip 2.mov (or another clip identified as having problems) and choosing Smart Trim Options.

As you can see, atop the Smart Trim Options window Premiere Elements uses two variables to identify suboptimal clips: Quality Level and Interest Level. Quality is simple to understand: If a clip is shaky, blurry, has poor contrast or lighting, or has other deficits that mar quality, Premiere Elements identifies the clip in Smart Trim mode as being below the Quality Level threshold, depending on how flawed the clip is and where you positioned the Quality Level slider.
By contrast, Interest Level analyzes qualities such as the amount of motion in a clip, the presence or absence of dialog, and other criteria that tend to identify clips that are interesting to watch. If you shot a picture of a blank wall that was sharp, well lit, and completely stable, the Quality Level would be perfect, but Premiere Elements would flag it as lacking in the Interest Level department. That doesn’t do much for those boring conversations with Uncle Harold, so you’ll still have to delete those manually.
You can adjust the sliders to set the tolerance levels for either criteria: Moving the slider to the left will increase the threshold for suboptimal clips, so that fewer and fewer clips will be flagged. Moving it to the right reduces the threshold so that more clips will be flagged.
For example, if you examine the clips in your project and find that most clips flagged by Premiere Elements look good to you, move the slider to the left and Premiere Elements will set the threshold higher and flag fewer clips. If clips left unflagged in Smart Trim mode look suboptimal to you for either Quality Level or Interest Level reasons, move the slider to the right.
Operating Modes
Note that there are two operating modes in the Smart Trim Options window: Manual and Automatic. In Manual mode, which is the default, Premiere Elements will display all suboptimal regions via the zebra stripes shown and discussed previously. If you opt for Automatic mode, Premiere Elements will immediately delete all suboptimal regions present on the Timeline. Thereafter, when you drag clips with suboptimal regions to the My Project panel, Premiere Elements will present a dialog asking if it’s OK to remove Smart Trim sections.
There’s an awful lot of bad video out there, and Smart Trim mode presents a very efficient way to identify it. Unfortunately (or perhaps fortunately, depending on your point of view), given the fixed capacity of the DVD accompanying this book, I was unable to pack a lot of boring and/or problem-filled video on the DVD for Smart Trim mode to identify.
In a real project, however, when you’ve shot 30–60 minutes of footage and want to quickly isolate the best 3–5 minutes to include in your movie, Smart Trim mode can be a godsend. So check it out on your own projects and see how it works for you.
Two final points: First, when Smart Trim flags quality-related problems, you can either delete the offending sections or try to fix them, which we’ll attempt to do in Lesson 6. So even if you decide to leave suboptimal clips in the project, Smart Trim helps by identifying sequences you can improve with corrective effects.
Second, to reiterate a comment I made earlier, I recommend that you not use Smart Trim in Automatic mode. Lots of “must have” sequences in your movies—such as your son blowing out the candles on his birthday cake or your daughter accepting her diploma—may not meet Premiere Elements’ quality thresholds, but you still don’t want to delete them. In Automatic mode, you don’t get that choice.
Creating a Slide Show
If you’re like me, you like to shoot video and still-image shots of your events and travels, and it’s fun to combine them into a single movie. Fortunately, Premiere Elements makes this very simple. Although you can add images in both the Sceneline and Timeline views, let’s work in the former because it’s more visual.
- On the top left of the My Project panel, click Sceneline (
 ) (if necessary) to switch to the Sceneline view.
 - Press the End key on your keyboard to move to the end of the movie.
- In the Organize workspace, click the Get Media (
 ) icon, and then click the Files and Folders button (
 ). Premiere Elements opens the Add Media panel.

- Navigate to the Lesson04 and 05 folder.
- Select all JPEG files in the folder.
- Click Open to import the files.
- Click the Media icon (
 ) to enter Media view.

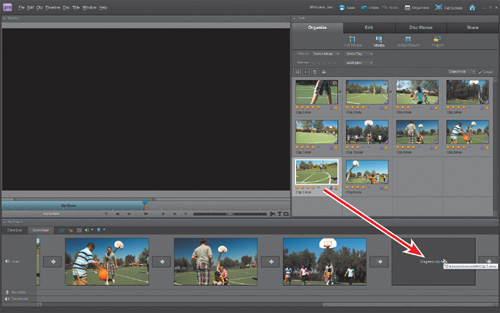
- Ctrl-click/Command-click the photos in the order you want them to appear in the slide show (in this project, I’m selecting them in the order that they appear in the Media view). Drag the selected group to the first open scene in the Sceneline, release the mouse button, and choose Add as Grouped Slideshow, which opens the Create SlideShow dialog.
- In the Create SlideShow dialog, leave all options at their default settings, and click OK. Premiere Elements adds each photo to the project with a duration of 150 frames and a transition between each photo of 30 frames.
- In the Save Project dialog, name the file Lesson05_Final and save it in your Lesson04 and 05 folder.
Wonderful! You’ve finished another lesson and learned how to cut, trim, split, and arrange your raw video into a cohesive movie. Over the next few chapters, you’ll polish it into a fine-tuned production.
Review questions
1. What are the key differences between the Timeline and Sceneline?
2. What is an In point and what is an Out point, and what can you do with each?
3. What are two methods of shortening your video clips?
4. How does Premiere Elements combine video tracks at the same position on the Timeline?
5. What are the two criteria assessed by Premiere Elements in Smart Trim mode?
Review answers
1. Premiere Elements offers two views in the My Project panel: Sceneline and Timeline. The Sceneline shows each clip as a separate thumbnail without regard to duration and doesn’t show all available video tracks. The Timeline graphically represents your movie project as video and audio clips arranged in vertically stacked tracks with clip duration represented by the length. There are many common activities that you can perform in both views, including arranging clips, trimming frames from the beginning or end of a clip, splitting and deleting clips, and adding titles and effects. Many producers use both views in the course of a project; for example, adding and sequencing content in the Sceneline, and then switching over to the Timeline to add background music, titles, and other clips. Once you start working with multiple video clips at the same location, the Timeline becomes the superior view.
2. The In point is the first frame of your clip as seen in the Sceneline or Timeline, and the Out point is the last frame. Both the In and Out points can be moved to create a shorter or longer clip.
3. You can shorten your clips by trimming their In points and Out points or by splitting the clip and deleting unwanted portions.
4. Premiere Elements renders the tracks from the top down. Any opaque areas of the clip in the Video 2 track will cover the view on the clip in the Video 1 track. Conversely, the clip in the Video 1 track will show through any transparent areas of the clip in the Video 2 track or if you reduce the Opacity of the clip in the Video 2 track.
5. Quality Level and Interest Level. The former concerns Premiere Elements’ assessment of picture and audio quality on a technical level; the latter assesses multiple qualities such as dialog and motion that tend to indicate whether or not a clip is interesting.