6. Using Quick Develop
What You’ll Do
Crop Photos with Quick Develop
Convert Photos to Grayscale with Quick Develop
Apply Preset White Balance Adjustments with Quick Develop
Adjust Color Temperature with Quick Develop
Apply Tint Adjustments with Quick Develop
Apply Quick Develop Auto Tone Adjustments
Adjust Exposure with Quick Develop
Apply Quick Develop Recovery Adjustments
Apply Quick Develop Fill Light Adjustments
Adjust Blacks with Quick Develop
Adjust Brightness with Quick Develop
Adjust Contrast with Quick Develop
Adjust Clarity with Quick Develop
Adjust Vibrance with Quick Develop
Introduction
In general, it is best to apply Lightroom develop settings to your images on an individual basis. This can be done by using the controls available in the Develop module. However, it is also possible to apply initial develop settings to multiple selected images at once using the Quick Develop options in the Library module.
It’s important to understand that develop settings are never permanent, no matter where or how they are applied. Therefore, you can always open your images individually in the Develop module later and fine-tune any settings applied with Quick Develop.
Note also that any Quick Develop settings that you apply to your images in the Library module are automatically updated in the Develop module. You can also remove the develop settings at any time and return the images back to their original state. This can be done by clicking the Reset All button, which is located at the bottom of the Quick Develop panel.
In this chapter, you learn how to apply saved develop settings to multiple selected images via the Quick Develop Saved Preset drop-down list. You also learn how to use Quick Develop to crop photos and convert them to grayscale. In addition, you learn how to use the controls in the Quick Develop panel to perform white balance adjustments and make tonal corrections.
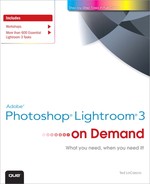
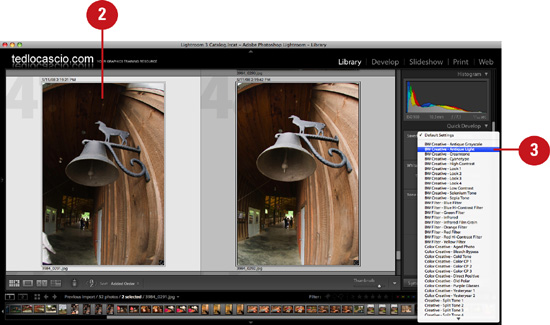
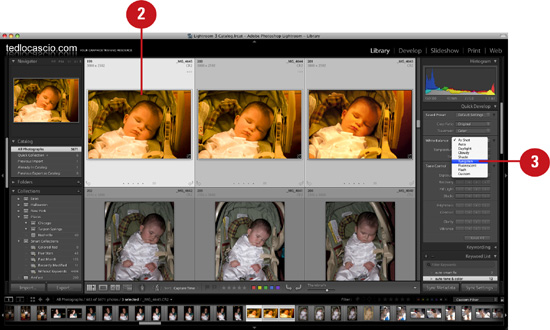
Applying Quick Develop Presets
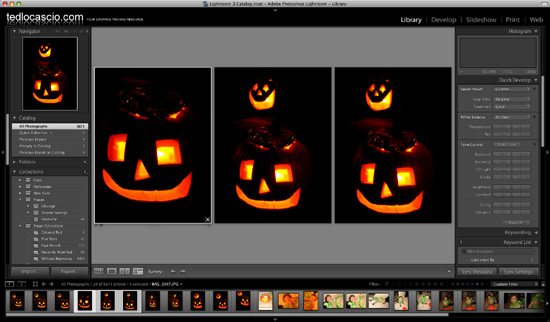
At the top of the Quick Develop panel is a Saved Preset drop-down list, which gives you access to some useful saved develop settings. The presets are grouped into eight categories: BW Creative, BW Filter, Color Creative, Creative, Edge Effects, General, Grain, and Tone Curve. Choose a preset from any of the creative groups to quickly apply a creative effect, such as antique lighting or a sepia tone. Choose a preset from the General category to apply a basic adjustment, such as auto tone correction or grayscale conversion. There are also two Tone Curve presets: one that applies a flat adjustment and one that creates a medium plus contrast.
Apply saved develop settings to selected images
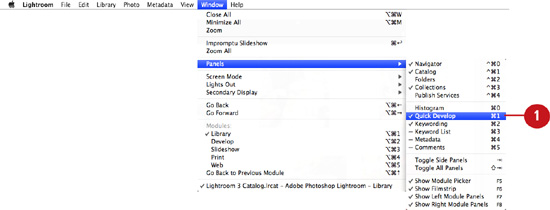
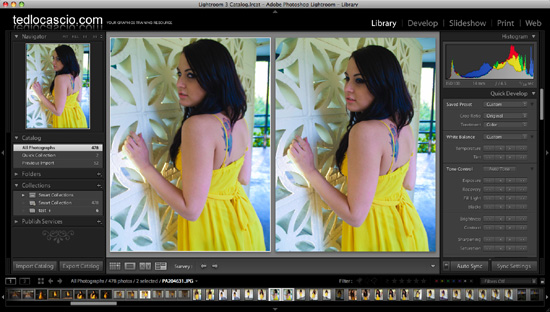
![]() To display the Quick Develop panel, choose Window > Panels > Quick Develop.
To display the Quick Develop panel, choose Window > Panels > Quick Develop.

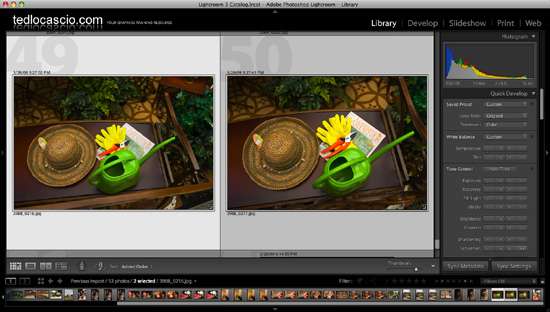
![]() From the Library Grid or Filmstrip, select the images to which you would like to apply Quick Develop settings.
From the Library Grid or Filmstrip, select the images to which you would like to apply Quick Develop settings.
Timesaver
Shift+click to select multiple adjacent photos; Cmd+click (Mac) or Ctrl+click (Win) to select multiple non-adjacent photos.
![]() Choose a Quick Develop preset from the Saved Preset drop-down list. The preset options are divided into eight categories: BW Creative, BW Filter, Color Creative, Creative, Edge Effects, General, Grain, and Tone Curve.
Choose a Quick Develop preset from the Saved Preset drop-down list. The preset options are divided into eight categories: BW Creative, BW Filter, Color Creative, Creative, Edge Effects, General, Grain, and Tone Curve.
Lightroom applies the Quick Develop settings to all the selected images.
Lightroom applies the develop settings to the selected photos.
Cropping Photos with Quick Develop
By choosing a setting from the Quick Develop Crop Ratio drop-down list, you can apply the same crop ratio to multiple selected photos at once. The Crop Ratio list includes all the most commonly used print sizes, such as 4”x5”, 5”x7”, and 8”x10”, but you can also choose Custom to apply a specific aspect ratio to the crop. Note that the Quick Develop crop ratio commands will allow you to trim only the selected photos evenly.
Apply a preset crop ratio to selected photos
![]() To display the Quick Develop panel, choose Window > Panels > Quick Develop.
To display the Quick Develop panel, choose Window > Panels > Quick Develop.

![]() From the Library Grid or Filmstrip, select the images to which you would like to apply the same crop ratio.
From the Library Grid or Filmstrip, select the images to which you would like to apply the same crop ratio.

Timesaver
Shift+click to select multiple adjacent photos; Cmd+click (Mac) or Ctrl+click (Win) to select multiple non-adjacent photos.
![]() In the Saved Preset section of the Quick Develop panel, choose a Quick Develop crop ratio setting from the Crop Ratio drop-down list. To apply a custom aspect ratio, choose Enter Custom. Enter the preferred settings in the Enter Custom Aspect Ratio dialog box and click OK.
In the Saved Preset section of the Quick Develop panel, choose a Quick Develop crop ratio setting from the Crop Ratio drop-down list. To apply a custom aspect ratio, choose Enter Custom. Enter the preferred settings in the Enter Custom Aspect Ratio dialog box and click OK.
Lightroom evenly trims the selected photos at either side.

Lightroom applies the crop ratio evenly to the selected photos.
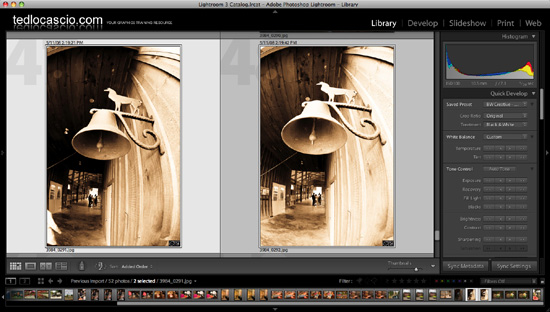
Converting Photos to Grayscale with Quick Develop
By choosing Black & White from the Quick Develop Panel Treatment drop-down list, you can desaturate any color images that you currently have selected and make them black and white. Keep in mind that when you do this, Lightroom does not actually convert the images to Grayscale mode. You can revert the images back to full-color mode at any time by choosing Color from the Treatment list.
Convert color images to grayscale using Quick Develop
![]() To display the Quick Develop panel, choose Window > Panels > Quick Develop.
To display the Quick Develop panel, choose Window > Panels > Quick Develop.

![]() From the Library Grid or Filmstrip, select the images that you would like to convert to grayscale.
From the Library Grid or Filmstrip, select the images that you would like to convert to grayscale.
Timesaver
Shift+click to select multiple adjacent photos; Cmd+click (Mac) or Ctrl+click (Win) to select multiple non-adjacent photos.
![]() Choose Black & White from the Treatment drop-down list.
Choose Black & White from the Treatment drop-down list.
Lightroom converts the selected images to black and white.
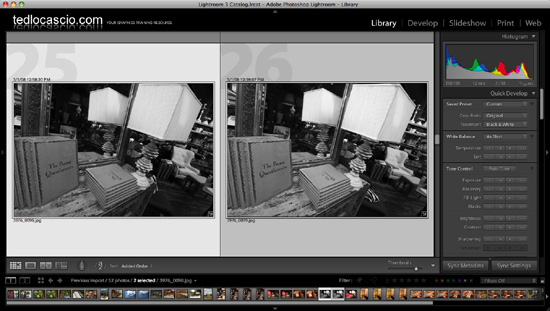
Lightroom desaturates the selected photos.
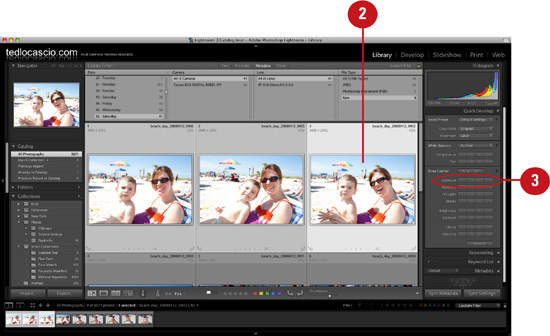
Applying Preset White Balance Adjustments with Quick Develop
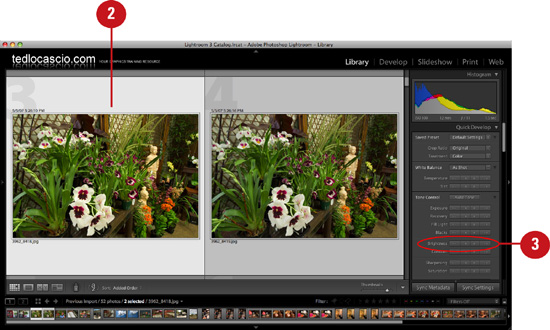
Whenever you take photos with the white balance set incorrectly on your camera, the images usually contain an undesirable color cast (a predominant color in the overall image). To correct this, you can choose a white balance preset from the Quick Develop panel. For JPEGs, TIFFs, and PSDs, the only available white balance preset options are As Shot (the original camera setting), Auto, or Custom (manual adjustments made with the Quick Develop Temperature and Tint controls). For DNG and proprietary raw files, there are many more presets, including Auto, Daylight, Cloudy, Shade, Tungsten, Fluorescent, and Flash.
Apply white balance presets with Quick Develop
![]() To display the Quick Develop panel, choose Window > Panels > Quick Develop.
To display the Quick Develop panel, choose Window > Panels > Quick Develop.

![]() From the Library Grid or Filmstrip, select the images to which you would like to apply a white balance adjustment.
From the Library Grid or Filmstrip, select the images to which you would like to apply a white balance adjustment.
Timesaver
Shift+click to select multiple adjacent photos; Cmd+click (Mac) or Ctrl+click (Win) to select multiple non-adjacent photos.
![]() Choose a white balance setting from the White Balance drop-down list. For JPEGs, TIFFs, and PSDs, the only available white balance preset option, other than As Shot or Custom, is Auto. For DNG and proprietary raw files, there are many more presets, including Auto, Daylight, Cloudy, Shade, Tungsten, Fluorescent, and Flash.
Choose a white balance setting from the White Balance drop-down list. For JPEGs, TIFFs, and PSDs, the only available white balance preset option, other than As Shot or Custom, is Auto. For DNG and proprietary raw files, there are many more presets, including Auto, Daylight, Cloudy, Shade, Tungsten, Fluorescent, and Flash.
Lightroom applies the white balance preset to all the selected images.
Lightroom applies the white balance settings to the selected photos.
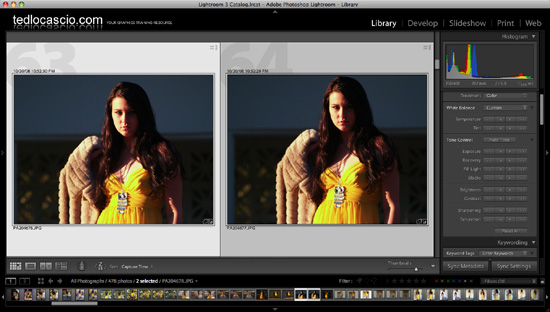
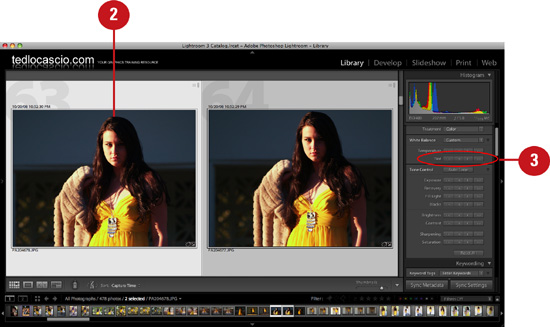
Adjusting Color Temperature with Quick Develop
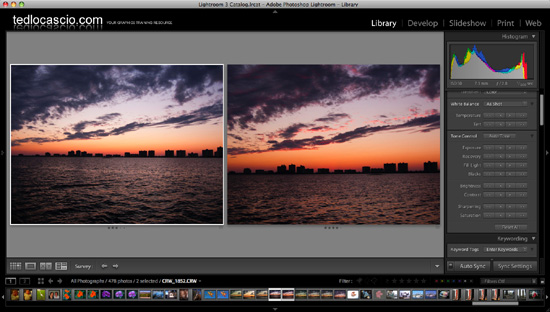
In most instances, the Auto White Balance feature does a good job of correcting images that contain an undesirable color cast. However, if you’d like hands-on control when applying a white balance adjustment, you can do so manually by clicking the Temperature arrows. Clicking the arrows on the right makes the image appear warmer; clicking the arrows on the left makes it appear cooler. Keep in mind that you can also use these temperature controls to create a desirable color cast. For example, applying a slight blue color cast to a snowy winter image can add to the visual impact of the photo.
Make your images appear warmer or cooler
![]() To display the Quick Develop panel, choose Window > Panels > Quick Develop.
To display the Quick Develop panel, choose Window > Panels > Quick Develop.

![]() From the Library Grid or Filmstrip, select the images to which you would like to apply a color temperature adjustment.
From the Library Grid or Filmstrip, select the images to which you would like to apply a color temperature adjustment.

Timesaver
Shift+click to select multiple adjacent photos; Cmd+click (Mac) or Ctrl+click (Win) to select multiple non-adjacent photos.
![]() In the White Balance section of the Quick Develop panel, click the Temperature arrows on the right to make the image appear warmer. Click the arrows on the left to make the image appear cooler.
In the White Balance section of the Quick Develop panel, click the Temperature arrows on the right to make the image appear warmer. Click the arrows on the left to make the image appear cooler.
Important
By clicking the single arrow buttons, you can apply smaller shifts in color. Clicking the double arrow buttons produces a more pronounced adjustment.
Lightroom applies the color temperature adjustment to all the selected images.
Lightroom applies the cooler temperature settings to the selected photos.
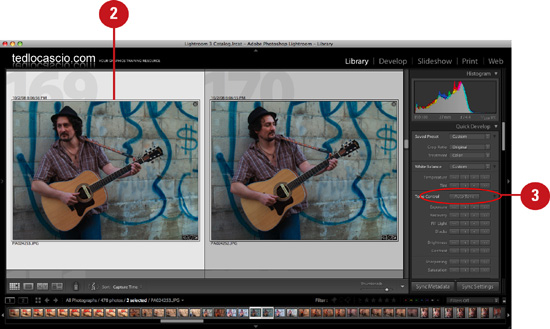
Applying Tint Adjustments with Quick Develop
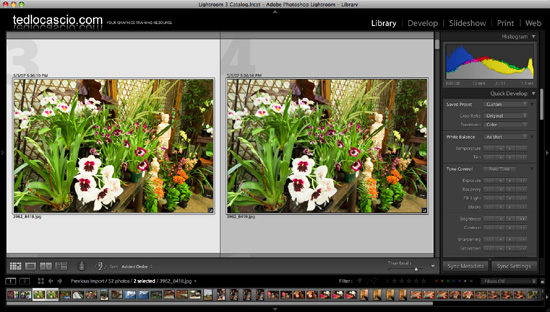
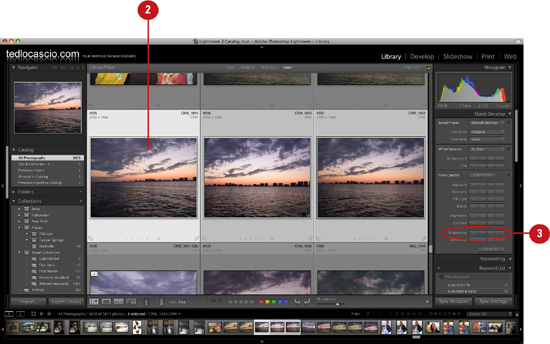
You can use the Tint controls in Quick Develop to slightly offset any drastic color temperature adjustments you may have applied to your images. For example, a severe yellow color cast was removed from the images below by clicking the far-left Temperature arrow button. After making this adjustment, the images looked much better, but the shadow areas conatined too much magenta. By clicking the single arrow tint button on the left, a slight green tint was applied, adding back some of the warmth to the image.
Use the Tint arrows to offset color temperature adjustments
![]() To display the Quick Develop panel, choose Window > Panels > Quick Develop.
To display the Quick Develop panel, choose Window > Panels > Quick Develop.

![]() From the Library Grid or Filmstrip, select the images to which you would like to apply a tint adjustment.
From the Library Grid or Filmstrip, select the images to which you would like to apply a tint adjustment.
Timesaver
Shift+click to select multiple adjacent photos; Cmd+click (Mac) or Ctrl+click (Win) to select multiple non-adjacent photos.
![]() In the White Balance section of the Quick Develop panel, click the Tint arrows on the right to apply a magenta tint. Click the arrows on the left to apply a green tint.
In the White Balance section of the Quick Develop panel, click the Tint arrows on the right to apply a magenta tint. Click the arrows on the left to apply a green tint.
Important
By clicking the single arrow buttons, you can apply smaller shifts in color. Clicking the double arrow buttons produces a more pronounced adjustment.
Lightroom applies the tint adjustment to all the selected images.

Lightroom applies the green tint settings to the selected photos.
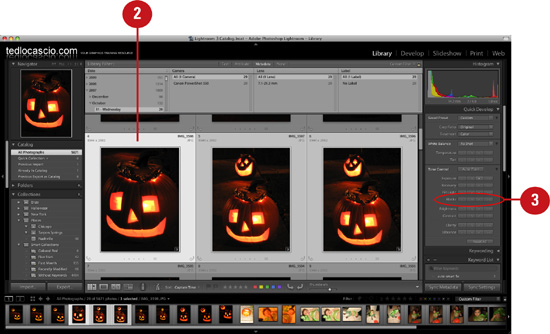
Applying Quick Develop Auto Tone Adjustments
By clicking the Auto Tone button in the Tone Control portion of the Quick Develop panel, you can apply an automatic correction to all the following develop settings: Exposure, Recovery, Blacks, Brightness, and Contrast. As it is with most auto adjustments, Auto Tone may not always give you the results you want. Although the Auto Tone logic in Lightroom 3 is greatly improved, you can’t always expect to get a flawless correction from it. More often than not, Auto Tone is a good starting point for making further Quick Develop edits.
Apply auto tone adjustments to selected images
![]() To display the Quick Develop panel, choose Window > Panels > Quick Develop.
To display the Quick Develop panel, choose Window > Panels > Quick Develop.
![]() From the Library Grid or Filmstrip, select the images to which you would like to apply an auto tone adjustment.
From the Library Grid or Filmstrip, select the images to which you would like to apply an auto tone adjustment.
Timesaver
Shift+click to select multiple adjacent photos; Cmd+click (Mac) or Ctrl+click (Win) to select multiple non-adjacent photos.
![]() Click the Auto Tone button in the Tone Control section of the Quick Develop panel.
Click the Auto Tone button in the Tone Control section of the Quick Develop panel.
Lightroom applies the Auto Tone adjustment to all the selected images.
Lightroom applies the Auto Tone adjustment to the selected photos.
Adjusting Exposure with Quick Develop
The Exposure control is the best place to start when applying manual tonal adjustments with Quick Develop. This is because the Exposure setting determines the clipping point (where detail starts to get lost) in the highlight areas of an image. By clicking the Exposure arrows on the right, you can increase the overall brightness in the image; by clicking the buttons on the left, you can decrease it.
Increase or decrease the overall brightness in an image
![]() To display the Quick Develop panel, choose Window > Panels > Quick Develop.
To display the Quick Develop panel, choose Window > Panels > Quick Develop.

![]() From the Library Grid or Filmstrip, select the images to which you would like to apply an Exposure adjustment.
From the Library Grid or Filmstrip, select the images to which you would like to apply an Exposure adjustment.

Timesaver
Shift+click to select multiple adjacent photos; Cmd+click (Mac) or Ctrl+click (Win) to select multiple non-adjacent photos.
![]() In the Tone Control section of the Quick Develop panel, click the Exposure arrows on the right to increase the Exposure setting. Click the arrows on the left to decrease the Exposure setting.
In the Tone Control section of the Quick Develop panel, click the Exposure arrows on the right to increase the Exposure setting. Click the arrows on the left to decrease the Exposure setting.
Important
By clicking the single arrow buttons, you can increase or decrease the exposure by 1/3 stop. Clicking the double arrow buttons increases or decreases the exposure by 1 stop.
Lightroom applies the Exposure adjustment to all the selected images.

Lightroom applies the Exposure adjustment to the selected photos.
Applying Quick Develop Recovery Adjustments
The Recovery controls in Lightroom are the same as working with the Highlights slider in Photoshop’s Shadows/Highlights dialog box. By applying a Quick Develop Recovery adjustment, you can restore detail in the overexposed highlight areas of your images. You can also use Recovery to help offset a severe Exposure adjustment and bring back some of the detail that may have gotten lost in the brightest highlight areas.
Recover detail in the highlight areas of an image
![]() To display the Quick Develop panel, choose Window > Panels > Quick Develop.
To display the Quick Develop panel, choose Window > Panels > Quick Develop.

![]() From the Library Grid or Filmstrip, select the images to which you would like to apply a Recovery adjustment.
From the Library Grid or Filmstrip, select the images to which you would like to apply a Recovery adjustment.
Timesaver
Shift+click to select multiple adjacent photos; Cmd+click (Mac) or Ctrl+click (Win) to select multiple non-adjacent photos.
![]() In the Tone Control section of the Quick Develop panel, click the Recovery arrows on the right to increase the adjustment and reveal highlight detail. Click the arrows on the left to decrease Recovery.
In the Tone Control section of the Quick Develop panel, click the Recovery arrows on the right to increase the adjustment and reveal highlight detail. Click the arrows on the left to decrease Recovery.
Important
Click the single arrow buttons to apply a 5-unit shift. Click the double arrow buttons to produce a 20-unit shift.
Lightroom applies the Recovery adjustment to all the selected images.
Lightroom applies the Recovery adjustment to the selected photos.
Applying Quick Develop Fill Light Adjustments
The Fill Light controls in Lightroom are the same as working with the Shadows slider in Photoshop’s Shadows/Highlights dialog box. By applying a Quick Develop Fill Light adjustment, you can restore detail in the underexposed shadow areas of your images. Fill Light adjustments are great for correcting images that were shot with the light source positioned behind the subject, which results in the forefront objects being engulfed in shadow.
Recover detail in the shadow areas of an image
![]() To display the Quick Develop panel, choose Window > Panels > Quick Develop.
To display the Quick Develop panel, choose Window > Panels > Quick Develop.

![]() From the Library Grid or Filmstrip, select the images to which you would like to apply a Fill Light adjustment.
From the Library Grid or Filmstrip, select the images to which you would like to apply a Fill Light adjustment.

Timesaver
Shift+click to select multiple adjacent photos; Cmd+click (Mac) or Ctrl+click (Win) to select multiple non-adjacent photos.
![]() In the Tone Control section of the Quick Develop panel, click the Fill Light arrows on the right to increase the adjustment and reveal shadow detail. Click the arrows on the left to decrease the Fill Light adjustment.
In the Tone Control section of the Quick Develop panel, click the Fill Light arrows on the right to increase the adjustment and reveal shadow detail. Click the arrows on the left to decrease the Fill Light adjustment.
Important
Click the single arrow buttons to apply a 5-unit shift. Click the double arrow buttons to produce a 15-unit shift.
Lightroom applies the Recovery adjustment to all the selected images.
Lightroom applies the Fill Light adjustment to the selected photos.
Adjusting Blacks with Quick Develop
The Blacks adjustment in the Quick Develop panel enables you to control how much detail gets clipped in the shadow areas of your images. For certain images, such as portraits taken in front of a dark backdrop, you may not want a lot of visible detail lurking in the shadow areas. In these instances, you can apply a Blacks adjustment to expand the black clipping point and hide the unwanted shadow detail.
Control shadow clipping for multiple selected images
![]() To display the Quick Develop panel, choose Window > Panels > Quick Develop.
To display the Quick Develop panel, choose Window > Panels > Quick Develop.

![]() From the Library Grid or Filmstrip, select the images to which you would like to apply a Blacks adjustment.
From the Library Grid or Filmstrip, select the images to which you would like to apply a Blacks adjustment.
Timesaver
Shift+click to select multiple adjacent photos; Cmd+click (Mac) or Ctrl+click (Win) to select multiple non-adjacent photos.
![]() In the Tone Control section of the Quick Develop panel, click the Blacks arrows on the right to increase the amount of shadow detail that gets clipped. Click the arrows on the left to decrease black clipping.
In the Tone Control section of the Quick Develop panel, click the Blacks arrows on the right to increase the amount of shadow detail that gets clipped. Click the arrows on the left to decrease black clipping.
Important
Click the single arrow buttons to apply a 1-unit shift. Click the double arrow buttons to produce a 5-unit shift.
Lightroom applies the Blacks adjustment to all the selected images.
Lightroom applies the Blacks adjustment to the selected photos.
Adjusting Brightness with Quick Develop
The Brightness adjustment in the Quick Develop panel is similar to Exposure in that it enables you to adjust the overall brightness of your images. The difference is that Exposure is a linear adjustment that affects the entire histogram, whereas Brightness adjusts the midpoint after fixing the brightest highlights and blacks. It is best to use Exposure first to set the highlight clipping point and then use Brightness to lighten your images.
Increase or decrease brightness for multiple selected images
![]() To display the Quick Develop panel, choose Window > Panels > Quick Develop.
To display the Quick Develop panel, choose Window > Panels > Quick Develop.

![]() From the Library Grid or Filmstrip, select the images to which you would like to apply a Brightness adjustment.
From the Library Grid or Filmstrip, select the images to which you would like to apply a Brightness adjustment.
Timesaver
Shift+click to select multiple adjacent photos; Cmd+click (Mac) or Ctrl+click (Win) to select multiple non-adjacent photos.
![]() In the Tone Control section of the Quick Develop panel, click the Brightness arrows on the right to increase brightness. Click the arrows on the left to decrease it.
In the Tone Control section of the Quick Develop panel, click the Brightness arrows on the right to increase brightness. Click the arrows on the left to decrease it.
Important
Click the single arrow buttons to apply a 5-unit shift in brightness. Click the double arrow buttons to produce a 20-unit shift.
Lightroom applies the Brightness adjustment to all the selected images.
Lightroom applies the Brightness adjustment to the selected photos.
Adjusting Contrast with Quick Develop
The Quick Develop Contrast arrows enable you to determine the degree of difference between darks and lights in your images. By increasing contrast, you can greatly enhance the edge detail and overall color in your photographs. Flat, lifeless images that contain a predominant amount of midtones (as evidenced by a large hump in the middle of the histogram) can benefit greatly from a strong contrast adjustment.
Increase or decrease contrast for multiple selected images
![]() To display the Quick Develop panel, choose Window > Panels > Quick Develop.
To display the Quick Develop panel, choose Window > Panels > Quick Develop.

![]() From the Library Grid or Filmstrip, select the images to which you would like to apply a Contrast adjustment.
From the Library Grid or Filmstrip, select the images to which you would like to apply a Contrast adjustment.

Timesaver
Shift+click to select multiple adjacent photos; Cmd+click (Mac) or Ctrl+click (Win) to select multiple non-adjacent photos.
![]() In the Tone Control section of the Quick Develop panel, click the Contrast arrows on the right to increase contrast. Click the arrows on the left to decrease it.
In the Tone Control section of the Quick Develop panel, click the Contrast arrows on the right to increase contrast. Click the arrows on the left to decrease it.
Important
Click the single arrow buttons to apply a 5-unit shift in contrast. Click the double arrow buttons to produce a 20-unit shift.
Lightroom applies the Contrast adjustment to all the selected images.
Lightroom applies the Contrast adjustment to the selected photos.
Adjusting Clarity with Quick Develop
The Quick Develop Clarity arrows enable you to apply a different type of contrast adjustment to your images. With Clarity, you can make your pictures appear clearer rather than sharper. This is done by increasing contrast in just the midtone areas of your photographs. The effect can be subtle depending on the amount of midtone areas in your photograph, but in general, most digital images can benefit from a slight Clarity adjustment.
Increase or decrease clarity for multiple selected images
![]() To display the Quick Develop panel, choose Window > Panels > Quick Develop.
To display the Quick Develop panel, choose Window > Panels > Quick Develop.

![]() From the Library Grid or Filmstrip, select the images to which you would like to apply a Clarity adjustment.
From the Library Grid or Filmstrip, select the images to which you would like to apply a Clarity adjustment.

Timesaver
Shift+click to select multiple adjacent photos; Cmd+click (Mac) or Ctrl+click (Win) to select multiple non-adjacent photos.
![]() In the Tone Control section of the Quick Develop panel, click the Clarity arrows on the right to increase midtone contrast and allow the midtone areas to stand out more. Click the arrows on the left to decrease clarity.
In the Tone Control section of the Quick Develop panel, click the Clarity arrows on the right to increase midtone contrast and allow the midtone areas to stand out more. Click the arrows on the left to decrease clarity.
Important
Click the single arrow buttons to apply a 5-unit shift in clarity. Click the double arrow buttons to produce a 20-unit shift.
Lightroom applies the Clarity adjustment to all the selected images.

Lightroom applies the Clarity adjustment to the selected photos.
Adjusting Vibrance with Quick Develop
Working with the Vibrance arrows in Quick Develop is similar to working with the Saturation slider in the Develop module. Both controls enable you to make colors appear more vivid. However, Vibrance, unlike Saturation, applies a nonlinear adjustment. Therefore, you can make dull colors appear more vivid without oversaturating the colors that already appear vivid in your photos.
Adjust color vibrance for multiple selected images
![]() To display the Quick Develop panel, choose Window > Panels > Quick Develop.
To display the Quick Develop panel, choose Window > Panels > Quick Develop.

![]() From the Library Grid or Filmstrip, select the images to which you would like to apply a Vibrance adjustment.
From the Library Grid or Filmstrip, select the images to which you would like to apply a Vibrance adjustment.

Timesaver
Shift+click to select multiple adjacent photos; Cmd+click (Mac) or Ctrl+click (Win) to select multiple non-adjacent photos.
![]() In the Tone Control section of the Quick Develop panel, click the Vibrance arrows on the right to increase vividness of dull colors in the selected images. Click the arrows on the left to decrease vibrance.
In the Tone Control section of the Quick Develop panel, click the Vibrance arrows on the right to increase vividness of dull colors in the selected images. Click the arrows on the left to decrease vibrance.
Important
Click the single arrow buttons to apply a 5-unit shift in vibrance. Click the double arrow buttons to produce a 20-unit shift.
Lightroom applies the Vibrance adjustment to all the selected images.
Lightroom applies the Vibrance adjustment to the selected photos.
Applying Sharpening with Quick Develop
By holding down Option (Mac) or Alt (Win), you can convert the Quick Develop Clarity control into sharpening. Working with the Shapening arrows in Quick Develop is the equivalent of working with the Sharpening Amount slider in the Develop module. Although it is best to apply sharpening to images individually in the Develop module while viewing them at a 1:1 ratio (100%), you can apply an initial Sharpening adjustment to your photos using Quick Develop, and then fine-tune them later. Quick Develop Sharpening does not give you access to the additional Sharpening sliders available in the Develop module.
Apply sharpening to multiple selected images at once
![]() To display the Quick Develop panel, choose Window > Panels > Quick Develop.
To display the Quick Develop panel, choose Window > Panels > Quick Develop.

![]() From the Library Grid or Filmstrip, select the images to which you would like to apply sharpening.
From the Library Grid or Filmstrip, select the images to which you would like to apply sharpening.
Timesaver
Shift+click to select multiple adjacent photos; Cmd+click (Mac) or Ctrl+click (Win) to select multiple non-adjacent photos.
![]() Hold down Option (Mac) or Alt (Win) to convert Clarity into Sharpening. With Option (Mac) or Alt (Win) held down, click the Sharpening arrows on the right to increase sharpening. Click the arrows on the left to decrease sharpening.
Hold down Option (Mac) or Alt (Win) to convert Clarity into Sharpening. With Option (Mac) or Alt (Win) held down, click the Sharpening arrows on the right to increase sharpening. Click the arrows on the left to decrease sharpening.
Important
Click the single arrow buttons to apply a 5-unit shift in sharpening. Click the double arrow buttons to produce a 20-unit shift.
Lightroom applies the Sharpening adjustment to all the selected images.

Lightroom applies the Sharpening adjustment to the selected photos.
Adjusting Saturation with Quick Develop
By holding down Option (Mac) or Alt (Win), you can convert the Quick Develop Vibrance control into a Saturation adjustment. Working with the Saturation arrows in Quick Develop is similar to working with the Saturation slider in the Develop module. Saturation is similar to Vibrance in that you can use it to make colors appear more vivid in your images. However, unlike Vibrance, the Saturation arrows apply a linear adjustment, which can oversaturate colors that already appear saturated.
Adjust color saturation for multiple selected images
![]() To display the Quick Develop panel, choose Window > Panels > Quick Develop.
To display the Quick Develop panel, choose Window > Panels > Quick Develop.

![]() From the Library Grid or Filmstrip, select the images to which you would like to apply a Saturation adjustment.
From the Library Grid or Filmstrip, select the images to which you would like to apply a Saturation adjustment.

Timesaver
Shift+click to select multiple adjacent photos; Cmd+click (Mac) or Ctrl+click (Win) to select multiple non-adjacent photos.
![]() Hold down Option (Mac) or Alt (Win) to convert the Vibrance control into a Saturation control. With Option (Mac) or Alt (Win) held down, click the Saturation arrows on the right to increase color saturation. Click the arrows on the left to decrease saturation.
Hold down Option (Mac) or Alt (Win) to convert the Vibrance control into a Saturation control. With Option (Mac) or Alt (Win) held down, click the Saturation arrows on the right to increase color saturation. Click the arrows on the left to decrease saturation.
Important
Click the single arrow buttons to apply a 5-unit shift in saturation. Click the double arrow buttons to produce a 20-unit shift.
Lightroom applies the Saturation adjustment to all the selected images.
Lightroom applies the Saturation adjustment to the selected photos.