7. Adjusting Images in the Develop Module
What You’ll Do
Open an Image in the Develop Module
Compare Before and After Views
Apply White Balance Corrections
Set the Highlight Clipping Point
Adjust Midtone Contrast with Clarity
Introduction
The image-processing engine in Lightroom is incredibly powerful. It enables you to apply and edit multiple image adjustments in the Develop module without harming any pixels. This is because the adjustments are applied only when you export the photo as a rendered file, such as a TIFF or JPEG.
In the Develop module, you can crop an image, rotate it, correct its white balance, apply tonal and color enhancements, and apply various other adjustments without harming the original photo. Every adjustment you apply in the Develop module can be edited or removed at any time, and your images can always be restored to their original, “as shot” state.
In this chapter, you learn how to open an image in the Develop module and apply various develop setting adjustments. You also learn how to compare before and after views of the image in the Content area.
This chapter teaches you how to crop images, and how to apply white balance corrections and tonal adjustments. You also learn how to enhance colors in your images by adjusting the Saturation, Vibrance, and HSL sliders. The last section explains how to remove color fringes, which are the result of chromatic aberration, and how to remove dark corners caused by lens vignetting.
Opening an Image in the Develop Module
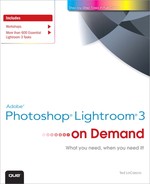
Lightroom enables you to work only with a single image at a time in the Develop module. Therefore, you must first select the image that you would like to work with from the Library module Grid and then open the image in the Develop module workspace. You can also select the image from the Filmstrip, which is always accessible in every Lightroom module. Note that when multiple photos are selected from the Grid or Filmstrip, Lightroom opens the primary selected photo in the Develop module.
Open your primary image selection in the Develop module
![]() From the Library module Grid or the Filmstrip, select the photo that you would like to apply develop settings to.
From the Library module Grid or the Filmstrip, select the photo that you would like to apply develop settings to.
![]() Choose View > Go to Develop or click the Develop button in the upper-right corner of the interface.
Choose View > Go to Develop or click the Develop button in the upper-right corner of the interface.
Lightroom displays the photo in the Content area of the Develop module.

Lightroom displays the photo in the Content area of the Develop module.
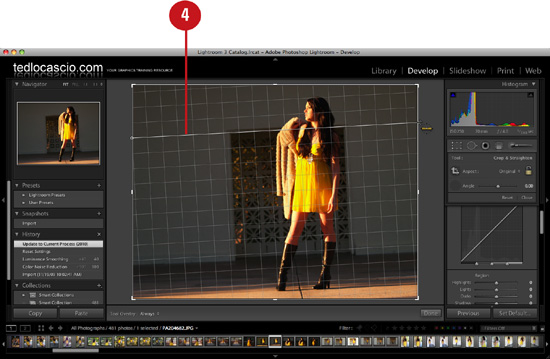
Comparing Before and After Views
You can compare before and after versions of an image as you work with it in the Develop module. Doing so enables you to weigh the effect of the develop settings on the original state of the image as you apply them. One quick way to compare before and after states is to press the backslash key (). You can also view the states side-by-side in the Content area. Press the Y key to toggle standard Left/Right view mode, and press Option+Y (Mac) or Alt+Y (Win) to toggle standard Top/Bottom view mode. Press Shift+Y to display a split-screen version of either mode.
Display before and after views side-by-side in the Content area
![]() From the Library module Grid or the Filmstrip, select the photo that you would like to apply develop settings to.
From the Library module Grid or the Filmstrip, select the photo that you would like to apply develop settings to.

![]() Choose View > Go to Develop or click the Develop button in the upper-right corner of the interface.
Choose View > Go to Develop or click the Develop button in the upper-right corner of the interface.
Lightroom displays the photo in the Content area of the Develop module.
![]() Choose Show Toolbar from the View menu.
Choose Show Toolbar from the View menu.
![]() Choose View > Before/After and choose from one of the following options: Left/Right, Top/Bottom, Before Only, and Split Screen. You can also cycle through the Before/After view options by clicking the Before/After button in the Toolbar, or choose an option from the Toolbar drop-down list.
Choose View > Before/After and choose from one of the following options: Left/Right, Top/Bottom, Before Only, and Split Screen. You can also cycle through the Before/After view options by clicking the Before/After button in the Toolbar, or choose an option from the Toolbar drop-down list.

![]() Apply any necessary develop settings to the image, as described in the various sections of this chapter.
Apply any necessary develop settings to the image, as described in the various sections of this chapter.
Lightroom displays the before and after views in the Content area.
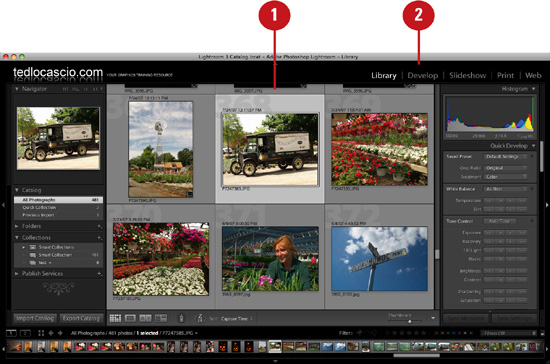
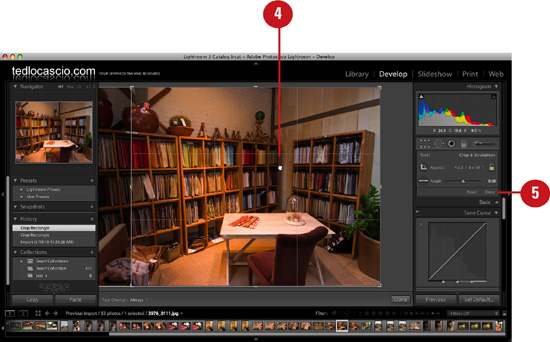
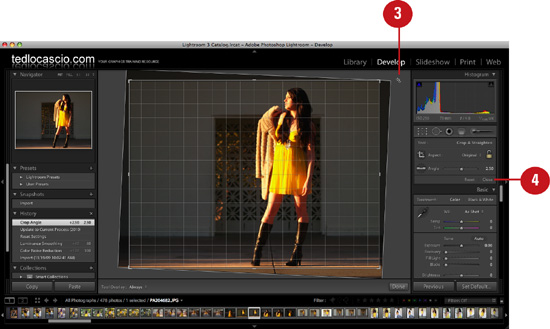
Cropping an Image
Lightroom enables you to select an image from the Library module Grid or the Filmstrip and open it directly in Crop Overlay mode in the Develop module. You can also enter Crop Overlay mode from the Develop module by clicking the Crop Overlay button in the Tools panel. The Tools panel also enables you to apply a crop ratio preset, or perform a freeform crop using the Crop Frame tool.
Use Crop Overlay mode
![]() From the Library module Grid or the Filmstrip, select the photo that you would like to crop.
From the Library module Grid or the Filmstrip, select the photo that you would like to crop.

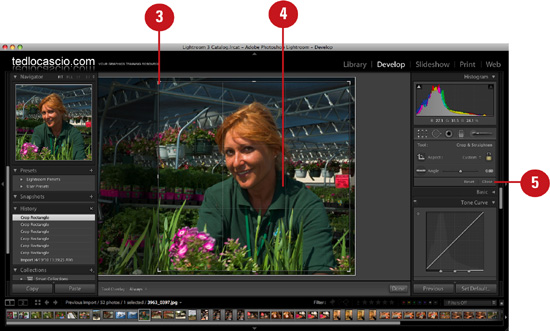
![]() Choose View > Crop.
Choose View > Crop.
Lightroom displays the Tools panel in the interface and automatically selects the Crop Overlay button. A Crop Overlay bounding box also appears over the photo.
![]() To adjust the crop edges, click and drag any corner or side bounding box handle. All adjustments are made relative to the center of the crop. The areas outside the crop bounding box appear shaded.
To adjust the crop edges, click and drag any corner or side bounding box handle. All adjustments are made relative to the center of the crop. The areas outside the crop bounding box appear shaded.
![]() Click and drag the cursor inside the bounding box to reposition the image relative to the crop.
Click and drag the cursor inside the bounding box to reposition the image relative to the crop.
![]() Click the Close button in the Tools panel to apply the crop.
Click the Close button in the Tools panel to apply the crop.
Use the Crop Frame tool
![]() From the Library module Grid or the Filmstrip, select the photo that you would like to crop.
From the Library module Grid or the Filmstrip, select the photo that you would like to crop.

![]() Choose View > Crop.
Choose View > Crop.
Lightroom displays the Tools panel in the interface and automatically selects the Crop Overlay button. A Crop Overlay bounding box also appears over the photo.
![]() To access the Crop Frame tool, click the Crop Frame tool icon in the Tools panel.
To access the Crop Frame tool, click the Crop Frame tool icon in the Tools panel.
![]() To create a freeform crop, click and drag over the image with the Crop Frame tool.
To create a freeform crop, click and drag over the image with the Crop Frame tool.

The Crop Frame tool returns to the Tools panel as soon as you finish defining the crop.
![]() Click the Close button in the Tools panel to apply the crop.
Click the Close button in the Tools panel to apply the crop.
Apply a preset crop ratio
![]() From the Library module Grid or the Filmstrip, select the photo that you would like to crop.
From the Library module Grid or the Filmstrip, select the photo that you would like to crop.
![]() Choose View > Crop.
Choose View > Crop.
Lightroom displays the Tools panel in the interface and automatically selects the Crop Overlay button. A Crop Overlay bounding box also appears over the photo.
![]() Choose a Quick Develop crop ratio setting from the Crop Ratio drop-down list in the Tools panel. To apply a custom aspect ratio, choose Enter Custom. Enter the preferred settings in the Enter Custom Aspect Ratio dialog box and click OK.
Choose a Quick Develop crop ratio setting from the Crop Ratio drop-down list in the Tools panel. To apply a custom aspect ratio, choose Enter Custom. Enter the preferred settings in the Enter Custom Aspect Ratio dialog box and click OK.

![]() If necessary, click and drag the cursor inside the bounding box to reposition the image relative to the crop.
If necessary, click and drag the cursor inside the bounding box to reposition the image relative to the crop.
![]() Click the Close button in the Tools panel to apply the crop.
Click the Close button in the Tools panel to apply the crop.
Applying a Rotated Crop
There are certain instances where you might want to rotate an image and crop it at the same time, such as when attempting to straighten a crooked landscape photo. In Lightroom, this can be achieved by dragging the cursor outside the bounding box edges in Crop Overlay mode, or by clicking and dragging along the horizon line with the Straighten tool.
Apply a rotated crop in Crop Overlay mode
![]() From the Library module Grid or the Filmstrip, select the photo that you would like to crop.
From the Library module Grid or the Filmstrip, select the photo that you would like to crop.

![]() Choose View > Crop.
Choose View > Crop.
Lightroom displays the Tools panel in the interface and automatically selects the Crop Overlay button. A Crop Overlay bounding box also appears over the photo.
![]() Click and drag the cursor outside the bounding box edges to rotate the image inside the crop area. Note that the Crop Overlay bounding box remains stationary.
Click and drag the cursor outside the bounding box edges to rotate the image inside the crop area. Note that the Crop Overlay bounding box remains stationary.
![]() Click the Close button in the Tools panel to apply the rotated crop.
Click the Close button in the Tools panel to apply the rotated crop.
Apply a rotated crop using the Straighten tool
![]() From the Library module Grid or the Filmstrip, select the photo that you would like to crop.
From the Library module Grid or the Filmstrip, select the photo that you would like to crop.

![]() Choose View > Crop.
Choose View > Crop.
Lightroom displays the Tools panel in the interface and automatically selects the Crop Overlay button. A Crop Overlay bounding box also appears over the photo.
![]() To access the Straighten tool, click the Straighten tool icon in the Tools panel.
To access the Straighten tool, click the Straighten tool icon in the Tools panel.
![]() To rotate the image, click and drag over the image with the Straighten tool.
To rotate the image, click and drag over the image with the Straighten tool.
The Straighten tool returns to the Tools panel as soon as you finish defining the rotation angle.
![]() If necessary, fine-tune the rotation angle by dragging the Angle slider in the Tools panel to the left or right.
If necessary, fine-tune the rotation angle by dragging the Angle slider in the Tools panel to the left or right.

Timesaver
Place the cursor over the Angle value to access “scrubbie” sliders. Click and drag to the left to decrease the value; click and drag to the right to increase it.
![]() Click the Close button in the Tools panel to apply the rotated crop.
Click the Close button in the Tools panel to apply the rotated crop.
Applying White Balance Corrections
When you select a white balance setting from your camera that does not match the lighting conditions of the scene you are capturing, the colors in the resulting photograph generally appear incorrect. Even if you’re a seasoned pro who is careful about the white balance settings you choose, it can be difficult to select the right one when capturing a scene that contains mixed lighting conditions. Thankfully, Lightroom provides several ways for you to correct the white balance in these types of images.
Apply a white balance adjustment using presets
![]() From the Library module Grid or the Filmstrip, select the photo that you would like to apply white balance develop settings to.
From the Library module Grid or the Filmstrip, select the photo that you would like to apply white balance develop settings to.
![]() Choose View > Go to Develop or click the Develop button in the upper-right corner of the interface.
Choose View > Go to Develop or click the Develop button in the upper-right corner of the interface.
Lightroom displays the photo in the Content area of the Develop module.
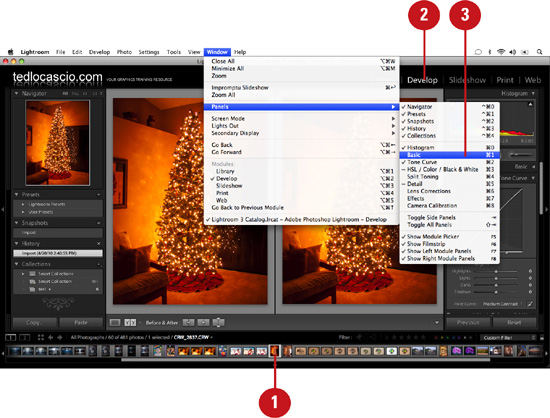
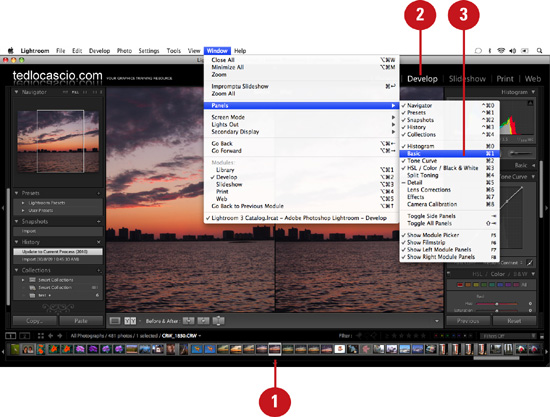
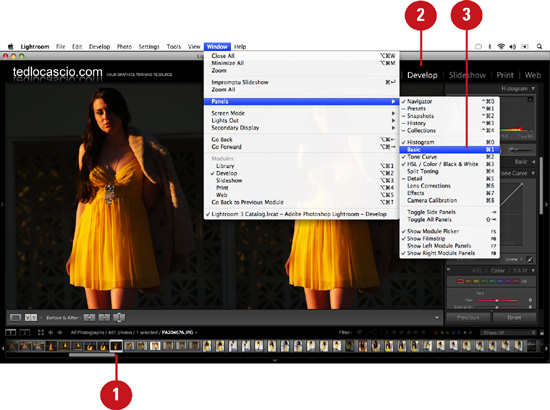
![]() Choose Window > Panels > Basic to display the Basic panel.
Choose Window > Panels > Basic to display the Basic panel.
![]() Choose a white balance setting from the Basic panel White Balance drop-down list. For JPEGs, TIFFs, and PSDs, the only available white balance preset option, other than As Shot or Custom, is Auto. For DNG and proprietary raw files, there are many more presets, including Auto, Daylight, Cloudy, Shade, Tungsten, Fluorescent, and Flash.
Choose a white balance setting from the Basic panel White Balance drop-down list. For JPEGs, TIFFs, and PSDs, the only available white balance preset option, other than As Shot or Custom, is Auto. For DNG and proprietary raw files, there are many more presets, including Auto, Daylight, Cloudy, Shade, Tungsten, Fluorescent, and Flash.

Timesaver
Press Cmd+Shift+U (Mac) or Ctrl+Shift+U (Win) to apply the Auto White Balance command quickly.
Lightroom applies the white balance preset to the image.
Apply a white balance adjustment using the Temperature and Tint sliders
![]() From the Library module Grid or the Filmstrip, select the photo that you would like to apply white balance develop settings to.
From the Library module Grid or the Filmstrip, select the photo that you would like to apply white balance develop settings to.

![]() Choose View > Go to Develop or click the Develop button in the upper-right corner of the interface.
Choose View > Go to Develop or click the Develop button in the upper-right corner of the interface.
Lightroom displays the photo in the Content area of the Develop module.
![]() Choose Window > Panels > Basic to display the Basic panel.
Choose Window > Panels > Basic to display the Basic panel.
![]() Drag the Basic panel Temp slider to the right to make the image appear warmer. Drag the slider to the left to make the image appear cooler.
Drag the Basic panel Temp slider to the right to make the image appear warmer. Drag the slider to the left to make the image appear cooler.

![]() If necessary, you can offset the temperature adjustment slightly by dragging the Basic panel Tint slider. Drag the Tint slider to the right to apply a magenta tint; drag it to the left to apply a green tint.
If necessary, you can offset the temperature adjustment slightly by dragging the Basic panel Tint slider. Drag the Tint slider to the right to apply a magenta tint; drag it to the left to apply a green tint.
Use the White Balance Selector
![]() From the Library module Grid or the Filmstrip, select the photo that you would like to apply white balance develop settings to.
From the Library module Grid or the Filmstrip, select the photo that you would like to apply white balance develop settings to.

![]() Choose View > Adjust White Balance.
Choose View > Adjust White Balance.
Important
If you already have an image open in the Develop module, choose Tools > White Balance Selector.
Lightroom displays the Basic panel in the interface and automatically selects the White Balance Selector.
![]() Click in an area of the image that should appear neutral in color. Refer to the RGB percentages displayed at the bottom of the floating pixel magnifier to determine the neutrality of a color. The closer the RGB percentages are to each other, the more neutral the color is.
Click in an area of the image that should appear neutral in color. Refer to the RGB percentages displayed at the bottom of the floating pixel magnifier to determine the neutrality of a color. The closer the RGB percentages are to each other, the more neutral the color is.
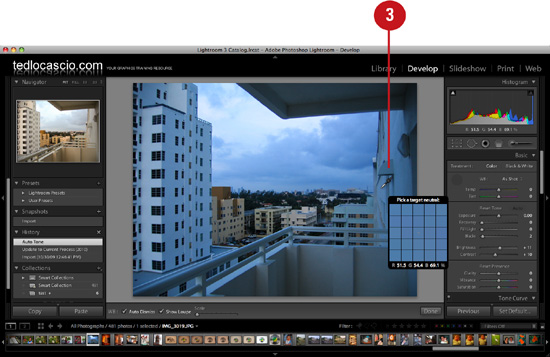
Important
When the Auto Dismiss option is enabled in the Toolbar, the tool is automatically docked in the Basic panel after you click in the image. When it is disabled, you can click continously in the image, but must click the Done button in the Toolbar to apply the adjustment.

Lightroom applies the white balance adjustment to the image.
Applying Auto Tone Adjustments
By clicking the Auto button in the Tone portion of the Basic panel, you can apply an automatic correction to all the following develop settings: Exposure, Recovery, Blacks, Brightness, and Contrast. Keep in mind that, like most auto adjustments, Auto Tone will not always give you perfect results. More often than not, Auto Tone is a good starting point for making further tonal adjustments.
Apply overall tonal adjustments with a single click
![]() From the Library module Grid or the Filmstrip, select the photo that you would like to apply an Auto Tone adjustment to.
From the Library module Grid or the Filmstrip, select the photo that you would like to apply an Auto Tone adjustment to.

![]() Choose View > Go to Develop or click the Develop button in the upper-right corner of the interface.
Choose View > Go to Develop or click the Develop button in the upper-right corner of the interface.
Lightroom displays the photo in the Content area of the Develop module.
![]() Choose Window > Panels > Basic to display the Basic panel.
Choose Window > Panels > Basic to display the Basic panel.
![]() Choose Settings > Auto Tone or click the Auto button in the Tone portion of the Basic panel.
Choose Settings > Auto Tone or click the Auto button in the Tone portion of the Basic panel.

Lightroom applies the Auto Tone adjustment to the image.
Setting the Highlight Clipping Point
When applying manual tonal adjustments to an image in the Develop module, the Exposure control is the best place to start. This is because the Exposure setting determines the clipping point (where detail starts to get lost) in the highlight areas of an image. By dragging the Exposure slider to the right, you can increase the overall brightness in the image; by dragging the slider to the left, you can decrease it. In general, you should always set the highlight clipping point and then the shadow clipping point (see following page) before making any further adjustments.
Set highlight clipping with the Exposure slider
![]() From the Library module Grid or the Filmstrip, select the photo that you would like to adjust.
From the Library module Grid or the Filmstrip, select the photo that you would like to adjust.

![]() Choose View > Go to Develop or click the Develop button in the upper-right corner of the interface.
Choose View > Go to Develop or click the Develop button in the upper-right corner of the interface.
Lightroom displays the photo in the Content area of the Develop module.
![]() Choose Window > Panels > Basic to display the Basic panel.
Choose Window > Panels > Basic to display the Basic panel.
![]() Drag the Basic panel Exposure slider to the right to increase the Exposure setting. Drag the slider to the left to decrease the Exposure setting.
Drag the Basic panel Exposure slider to the right to increase the Exposure setting. Drag the slider to the left to decrease the Exposure setting.
Important
Press Option (Mac) or Alt (Win) as you drag the Exposure slider to view the image in Threshold mode. Doing so displays any areas in the image that are being clipped as you make the adjustment.
Lightroom applies the new highlight clipping point.
Setting the Shadow Clipping Point
The Blacks slider enables you to control how much detail gets clipped in the shadow areas of your images. For certain images, such as the silhouetted city skyline in the following example, you may not want a lot of visible detail lurking in the shadow areas. In these instances, you can apply a Blacks adjustment to expand the black clipping point and hide the unwanted shadow detail. In general, you should always set the highlight clipping point first (see previous page) and then the shadow clipping point before making any further adjustments.
Set shadow clipping with the Blacks slider
![]() From the Library module Grid or the Filmstrip, select the photo that you would like to adjust.
From the Library module Grid or the Filmstrip, select the photo that you would like to adjust.
![]() Choose View > Go To Develop or click the Develop button in the upper-right corner of the interface.
Choose View > Go To Develop or click the Develop button in the upper-right corner of the interface.
Lightroom displays the photo in the Content area of the Develop module.
![]() Choose Window > Panels > Basic to display the Basic panel.
Choose Window > Panels > Basic to display the Basic panel.
![]() Drag the Basic panel Blacks slider to the right to increase the amount of shadow detail that gets clipped. Drag the slider to the left to decrease black clipping.
Drag the Basic panel Blacks slider to the right to increase the amount of shadow detail that gets clipped. Drag the slider to the left to decrease black clipping.
Important
Press Option (Mac) or Alt (Win) as you drag the Blacks slider to view the image in Threshold mode. Doing so displays any areas in the image that are being clipped as you make the adjustment.
Lightroom applies the new shadow clipping point.
Correcting an Overexposed Image
Lightroom enables you to reveal lost detail in images that contain blown-out highlights. Whenever the histogram displays a waveform pushed up against the right edge of the graph, it means that the image is clipping a considerable amount of detail in the highlight areas. You can correct overexposed images in Lightroom by reducing Exposure and increasing Recovery. Note that when working with overexposed images, these types of adjustments have a limited effect on JPEGs and TIFFs and are best used to correct raw master files.
Correct overexposure with Exposure and Recovery sliders
![]() From the Library module Grid or the Filmstrip, select the photo that you would like to correct.
From the Library module Grid or the Filmstrip, select the photo that you would like to correct.

![]() Choose View > Go to Develop or click the Develop button in the upper-right corner of the interface.
Choose View > Go to Develop or click the Develop button in the upper-right corner of the interface.
Lightroom displays the photo in the Content area of the Develop module.
![]() Choose Window > Panels > Basic to display the Basic panel.
Choose Window > Panels > Basic to display the Basic panel.
![]() Drag the Basic panel Exposure slider to the left to decrease the Exposure setting and reveal detail in the highlight areas.
Drag the Basic panel Exposure slider to the left to decrease the Exposure setting and reveal detail in the highlight areas.
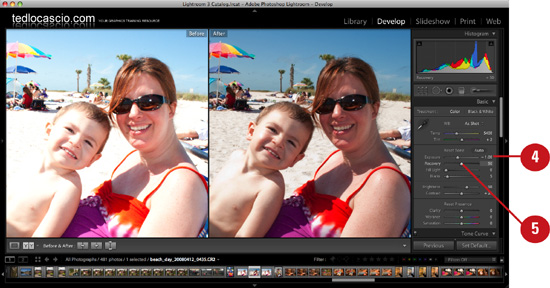
![]() Drag the Basic panel Recovery slider to the right to reveal additional highlight detail without compromising the Exposure setting.
Drag the Basic panel Recovery slider to the right to reveal additional highlight detail without compromising the Exposure setting.
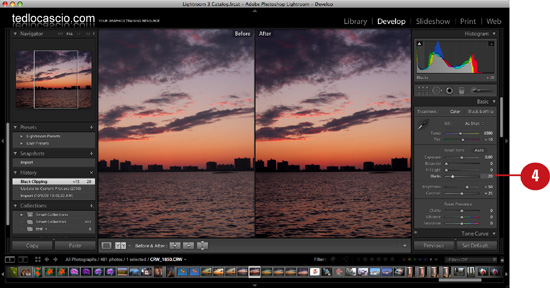
Correcting an Underexposed Image
Lightroom also enables you to reveal lost detail in the shadow areas of underexposed images. Whenever the histogram displays a waveform pushed up against the left edge of the graph, it means that the image is clipping a considerable amount of detail in the shadow areas. You can correct underexposed images in Lightroom by increasing the Exposure setting, then setting the new shadow clipping point with the Blacks slider, and finally, recovering detail in the shadow areas with a Fill Light adjustment.
Correct underexposure with Exposure, Blacks, and Fill Light
![]() From the Library module Grid or the Filmstrip, select the photo that you would like to correct.
From the Library module Grid or the Filmstrip, select the photo that you would like to correct.

![]() Choose View > Go to Develop or click the Develop button in the upper-right corner of the interface.
Choose View > Go to Develop or click the Develop button in the upper-right corner of the interface.
Lightroom displays the photo in the Content area of the Develop module.
![]() Choose Window > Panels > Basic to display the Basic panel.
Choose Window > Panels > Basic to display the Basic panel.
![]() Drag the Basic panel Exposure slider to the right to increase the Exposure setting and brighten the image overall.
Drag the Basic panel Exposure slider to the right to increase the Exposure setting and brighten the image overall.

Important
Increasing exposure for an underexposed image can reveal a large amount of noise. This can be reduced using the Noise reduction controls in the Detail panel (see Chapter 11, “Reducing Noise and Sharpening”).
![]() Drag the Basic panel Blacks slider to the left or right to determine the new shadow clipping point.
Drag the Basic panel Blacks slider to the left or right to determine the new shadow clipping point.
![]() Drag the Basic panel Fill Light slider to the right to increase the adjustment and reveal additional shadow detail.
Drag the Basic panel Fill Light slider to the right to increase the adjustment and reveal additional shadow detail.
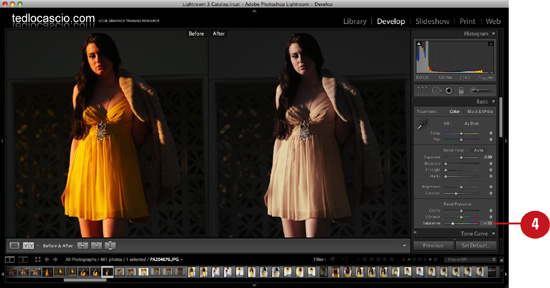
Enhancing Color with Saturation
By applying a Saturation adjustment in Lightroom, you can control how vivid the colors appear in your images. Keep in mind that, unlike Vibrance, Saturation is a linear adjustment, which can oversaturate colors that already appear saturated in your images. Saturation also does not include the built-in skin protector that Vibrance does, and therefore will not automatically filter out colors that fall within the skin tone range. In most cases, Vibrance is the better tool for increasing color vividness; however, Saturation is still useful for subduing colors to create a dramatic effect.
Adjust overall color saturation with the Saturation slider
![]() From the Library module Grid or the Filmstrip, select the photo that you would like to apply a Saturation adjustment to.
From the Library module Grid or the Filmstrip, select the photo that you would like to apply a Saturation adjustment to.
![]() Choose View > Go to Develop or click the Develop button in the upper-right corner of the interface.
Choose View > Go to Develop or click the Develop button in the upper-right corner of the interface.
Lightroom displays the photo in the Content area of the Develop module.
![]() Choose Window > Panels > Basic to display the Basic panel.
Choose Window > Panels > Basic to display the Basic panel.
![]() Drag the Basic panel Saturation slider to the right to increase color saturation. Drag the slider to the left to decrease saturation.
Drag the Basic panel Saturation slider to the right to increase color saturation. Drag the slider to the left to decrease saturation.
Lightroom applies the Saturation adjustment to the image.
Enhancing Color with Vibrance
Vibrance also enables you to control the vividness of the colors in your images. However, Vibrance, unlike Saturation, is a nonlinear adjustment. Therefore, you can use it to make dull colors appear more vivid without oversaturating the colors that already appear saturated in your images. Vibrance also includes a built-in skin protector that automatically filters out colors that fall within the skin tone range.
Adjust overall color vibrance with the Vibrance slider
![]() From the Library module Grid or the Filmstrip, select the photo that you would like to apply a Vibrance adjustment to.
From the Library module Grid or the Filmstrip, select the photo that you would like to apply a Vibrance adjustment to.

![]() Choose View > Go to Develop or click the Develop button in the upper-right corner of the interface.
Choose View > Go to Develop or click the Develop button in the upper-right corner of the interface.
Lightroom displays the photo in the Content area of the Develop module.
![]() Choose Window > Panels > Basic to display the Basic panel.
Choose Window > Panels > Basic to display the Basic panel.
![]() Drag the Basic panel Vibrance slider to the right to increase vividness of dull colors in the image. Drag the slider to the left to decrease vibrance.
Drag the Basic panel Vibrance slider to the right to increase vividness of dull colors in the image. Drag the slider to the left to decrease vibrance.
Lightroom applies the Vibrance adjustment to the image.
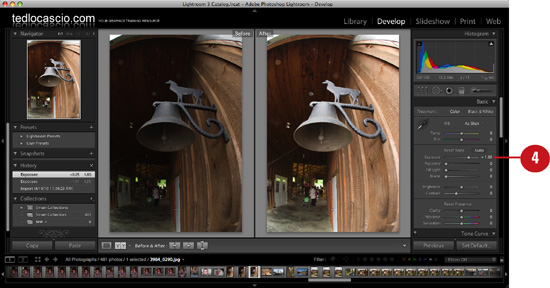
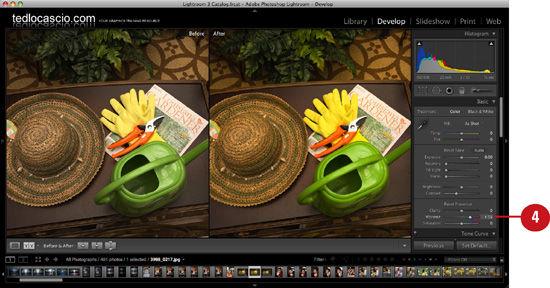
Adjusting Midtone Contrast with Clarity
The Clarity slider enables you to apply a special type of contrast adjustment. With Clarity, you can make your images appear clearer rather than sharper. This is done by increasing contrast in the midtone areas of your photographs. The effect can be subtle depending on the amount of midtone areas contained in your photos, but in general, most digital images can benefit from a slight Clarity adjustment.
Make your images appear clearer rather than sharper
![]() From the Library module Grid or the Filmstrip, select the photo that you would like to apply a Clarity adjustment to.
From the Library module Grid or the Filmstrip, select the photo that you would like to apply a Clarity adjustment to.

![]() Choose View > Go to Develop or click the Develop button in the upper-right corner of the interface.
Choose View > Go to Develop or click the Develop button in the upper-right corner of the interface.
Lightroom displays the photo in the Content area of the Develop module.
![]() Choose Window > Panels > Basic to display the Basic panel.
Choose Window > Panels > Basic to display the Basic panel.
![]() Drag the Basic panel Clarity slider to the right to increase midtone contrast and allow the midtone areas stand out more. Drag the slider to the left to decrease clarity.
Drag the Basic panel Clarity slider to the right to increase midtone contrast and allow the midtone areas stand out more. Drag the slider to the left to decrease clarity.

Lightroom applies the Clarity adjustment to the image.
Applying Tone Curve Adjustments
The parametric sliders in the Tone Curve panel enable you to make tone curve adjustments based on descriptive image criteria. The tone curve is divided into four zones: Highlights, Lights, Darks, and Shadows. Note that you can also manipulate the curve graph manually by clicking and dragging any point up or down. With the Target Adjustment tool selected, you can click anywhere in the photo and drag up or down to darken or lighten that zone.
Apply a Point Curve preset
![]() From the Library module Grid or the Filmstrip, select the photo that you would like to apply a tone curve adjustment to.
From the Library module Grid or the Filmstrip, select the photo that you would like to apply a tone curve adjustment to.

![]() Choose View > Go to Develop or click the Develop button in the upper-right corner of the interface.
Choose View > Go to Develop or click the Develop button in the upper-right corner of the interface.
Lightroom displays the photo in the Content area of the Develop module.
![]() Choose Window > Panels > Tone Curve to display the Tone Curve panel.
Choose Window > Panels > Tone Curve to display the Tone Curve panel.
![]() Choose a Tone Curve preset from the Point Curve drop-down list. Options include Linear, Medium Contrast, and Strong Contrast.
Choose a Tone Curve preset from the Point Curve drop-down list. Options include Linear, Medium Contrast, and Strong Contrast.
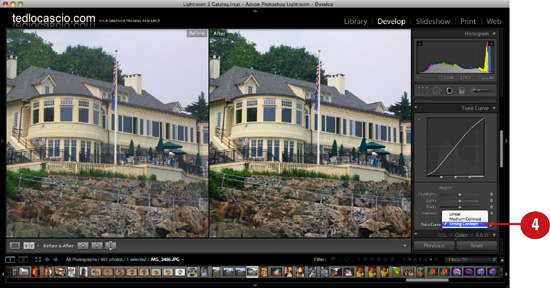
Important
By default, the Point Curve preset is set to Linear. This means that an automatic tone curve adjustment is not applied to your images upon import, as in previous versions of Lightroom.
Apply tone curve adjustments using the parametric sliders
![]() From the Library module Grid or the Filmstrip, select the photo that you would like to apply a tone curve adjustment to.
From the Library module Grid or the Filmstrip, select the photo that you would like to apply a tone curve adjustment to.

![]() Choose View > Go to Develop or click the Develop button in the upper-right corner of the interface.
Choose View > Go to Develop or click the Develop button in the upper-right corner of the interface.
Lightroom displays the photo in the Content area of the Develop module.
![]() Choose Window > Panels > Tone Curve to display the Tone Curve panel.
Choose Window > Panels > Tone Curve to display the Tone Curve panel.
![]() Drag the Darks slider to the right to lighten the quarter tone areas in the image.
Drag the Darks slider to the right to lighten the quarter tone areas in the image.

![]() Drag the Shadows slider to the left to increase contrast in the overall image.
Drag the Shadows slider to the left to increase contrast in the overall image.
![]() Drag the Lights slider to the right to lighten the three-quarter tone areas in the image.
Drag the Lights slider to the right to lighten the three-quarter tone areas in the image.
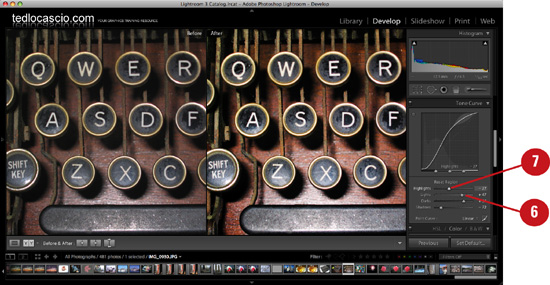
![]() Drag the Highlights slider to the left to compensate for any highlight clipping that occurs as a result of the Lights adjustment.
Drag the Highlights slider to the left to compensate for any highlight clipping that occurs as a result of the Lights adjustment.
Apply tone curve adjustments using the Target Adjustment tool
![]() From the Library module Grid or the Filmstrip, select the photo that you would like to apply a tone curve adjustment to.
From the Library module Grid or the Filmstrip, select the photo that you would like to apply a tone curve adjustment to.

![]() Choose View > Go to Develop or click the Develop button in the upper-right corner of the interface.
Choose View > Go to Develop or click the Develop button in the upper-right corner of the interface.
Lightroom displays the photo in the Content area of the Develop module.
![]() Choose Window > Panels > Tone Curve to display the Tone Curve panel.
Choose Window > Panels > Tone Curve to display the Tone Curve panel.
![]() To access the Target Adjustment tool, click the Target Adjustment icon in the Tone Curve panel or choose View > Target Adjustment > Tone Curve.
To access the Target Adjustment tool, click the Target Adjustment icon in the Tone Curve panel or choose View > Target Adjustment > Tone Curve.

Timesaver
Press Cmd+Shift+Option+T (Mac) or Ctrl+Shift+Alt+T (Win) to access the Tone Curve Target Adjustment tool quickly.
![]() Click in an area of the image that you’d like to lighten and drag up with the tool. Lightroom adjusts the Tone Curve accordingly.
Click in an area of the image that you’d like to lighten and drag up with the tool. Lightroom adjusts the Tone Curve accordingly.

![]() Click in an area of the image that you’d like to darken and drag down with the tool. Lightroom adjusts the Tone Curve accordingly.
Click in an area of the image that you’d like to darken and drag down with the tool. Lightroom adjusts the Tone Curve accordingly.

![]() Turn off the Target Adjustment tool by clicking the Target Adjustment icon in the Tone Curve panel or by choosing Tools > Target Adjustment > None. You can also turn off the Target Adjustment tool by clicking the Done button in the Toolbar.
Turn off the Target Adjustment tool by clicking the Target Adjustment icon in the Tone Curve panel or by choosing Tools > Target Adjustment > None. You can also turn off the Target Adjustment tool by clicking the Done button in the Toolbar.
Timesaver
Press Cmd+Shift+Option+N (Mac) or Ctrl+Shift+Alt+N (Win) to turn off the Target Adjustment tool.
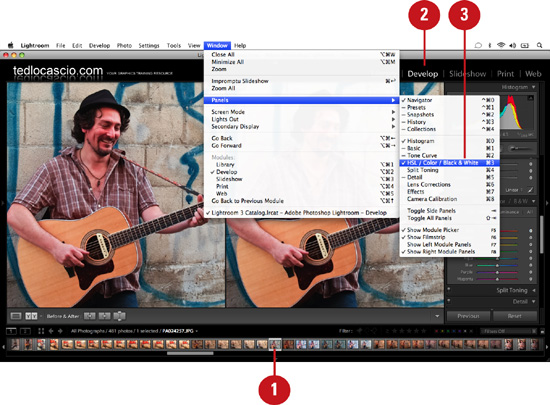
Enhancing Color with HSL Adjustments
The controls in the HSL/Color/Black & White panel enable you to apply selective color adjustments. The HSL portion of the panel contains sliders for adjusting Hue, Saturation, and Luminance. These sliders are useful for correcting skin tone. The Color portion of the panel is merely a simplified version of the same controls. The Black & White portion of the panel is used for carrying out monochrome conversions, which you will learn more about in Chapter 10, “Working in Black and White.”
Apply selective color adjustments using the Hue sliders
![]() From the Library module Grid or the Filmstrip, select the photo that you would like to apply a selective color adjustment to.
From the Library module Grid or the Filmstrip, select the photo that you would like to apply a selective color adjustment to.
![]() Choose View > Go to Develop or click the Develop button in the upper-right corner of the interface.
Choose View > Go to Develop or click the Develop button in the upper-right corner of the interface.
Lightroom displays the photo in the Content area of the Develop module.
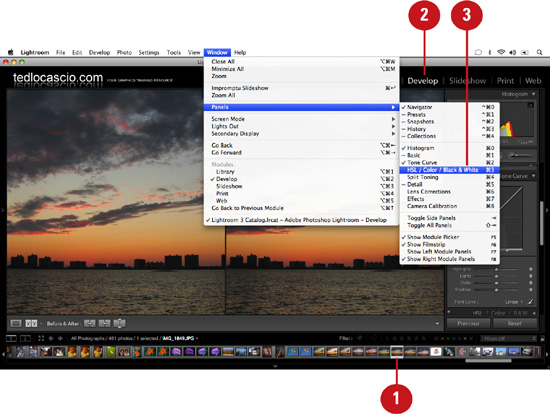
![]() Choose Window > Panels > HSL/Color/Black & White to display the HSL/Color/Black & White panel.
Choose Window > Panels > HSL/Color/Black & White to display the HSL/Color/Black & White panel.
Timesaver
Press Cmd+3 (Mac) or Ctrl+3 (Win) to show or hide the HSL/Color/Black & White panel quickly.
![]() The HSL/Color/Black & White panel displays the last set of controls used. If the HSL controls are not visible, click the HSL button at the top of the HSL/Color/Black & White panel.
The HSL/Color/Black & White panel displays the last set of controls used. If the HSL controls are not visible, click the HSL button at the top of the HSL/Color/Black & White panel.

![]() Click the Hue button in the upper-left corner of the HSL panel.
Click the Hue button in the upper-left corner of the HSL panel.
![]() In the HSL panel, drag the Hue sliders for the colors you’d like to shift in the image.
In the HSL panel, drag the Hue sliders for the colors you’d like to shift in the image.
Lightroom applies the Hue adjustment to the respective colors.
Apply selective color adjustments using the Saturation sliders
![]() From the Library module Grid or the Filmstrip, select the photo that you would like to apply a selective color adjustment to.
From the Library module Grid or the Filmstrip, select the photo that you would like to apply a selective color adjustment to.
![]() Choose View > Go to Develop or click the Develop button in the upper-right corner of the interface.
Choose View > Go to Develop or click the Develop button in the upper-right corner of the interface.
Lightroom displays the photo in the Content area of the Develop module.
![]() Choose Window > Panels > HSL/Color/Black & White to display the HSL/Color/Black & White panel.
Choose Window > Panels > HSL/Color/Black & White to display the HSL/Color/Black & White panel.
![]() The HSL/Color/Black & White panel displays the last set of controls used. If the HSL controls are not visible, click the HSL button at the top of the HSL/Color/Black & White panel.
The HSL/Color/Black & White panel displays the last set of controls used. If the HSL controls are not visible, click the HSL button at the top of the HSL/Color/Black & White panel.

![]() Click the Saturation button in the upper portion of the HSL panel.
Click the Saturation button in the upper portion of the HSL panel.
![]() In the HSL panel, drag the Saturation sliders for the colors you’d like to enhance in the image.
In the HSL panel, drag the Saturation sliders for the colors you’d like to enhance in the image.
Lightroom applies the Saturation adjustment to the respective colors.
Apply selective color adjustments using the Luminance sliders
![]() From the Library module Grid or the Filmstrip, select the photo that you would like to apply a selective color adjustment to.
From the Library module Grid or the Filmstrip, select the photo that you would like to apply a selective color adjustment to.
![]() Choose View > Go to Develop or click the Develop button in the upper-right corner of the interface.
Choose View > Go to Develop or click the Develop button in the upper-right corner of the interface.
Lightroom displays the photo in the Content area of the Develop module.
![]() Choose Window > Panels > HSL/Color/Black & White to display the HSL/Color/Black & White panel.
Choose Window > Panels > HSL/Color/Black & White to display the HSL/Color/Black & White panel.
Timesaver
Press Cmd+3 (Mac) or Ctrl+3 (Win) to show or hide the HSL/Color/Black & White panel quickly.
![]() The HSL/Color/Black & White panel displays the last set of controls used. If the HSL controls are not visible, click the HSL button at the top of the HSL/Color/Black & White panel.
The HSL/Color/Black & White panel displays the last set of controls used. If the HSL controls are not visible, click the HSL button at the top of the HSL/Color/Black & White panel.

![]() Click the Luminance button in the upper-right corner of the HSL panel.
Click the Luminance button in the upper-right corner of the HSL panel.
![]() In the HSL panel, drag the Luminance sliders for the colors you’d like to brighten or darken in the image.
In the HSL panel, drag the Luminance sliders for the colors you’d like to brighten or darken in the image.
Lightroom applies the Luminance adjustment to the respective colors.
Apply selective color adjustments using the Target Adjustment tool
![]() From the Library module Grid or the Filmstrip, select the photo that you would like to apply a selective color adjustment to.
From the Library module Grid or the Filmstrip, select the photo that you would like to apply a selective color adjustment to.

![]() Choose View > Go To Develop or click the Develop button in the upper-right corner of the interface.
Choose View > Go To Develop or click the Develop button in the upper-right corner of the interface.
Lightroom displays the photo in the Content area of the Develop module.
![]() Choose Window > Panels > HSL/Color/Black & White to display the HSL/Color/Black & White panel.
Choose Window > Panels > HSL/Color/Black & White to display the HSL/Color/Black & White panel.
![]() To access the Target Adjustment tool, click the Target Adjustment icon in the HSL/Color/B & W panel or choose Hue, Saturation, or Luminance from the Tools > Target Adjustment submenu.
To access the Target Adjustment tool, click the Target Adjustment icon in the HSL/Color/B & W panel or choose Hue, Saturation, or Luminance from the Tools > Target Adjustment submenu.

Timesaver
Press Cmd+Shift+Option+H (Mac) or Ctrl+Shift+Alt+H (Win) to access the Hue Target Adjustment tool. Press Cmd+Shift+Option+S (Mac) or Ctrl+Shift+Alt+S (Win) to access the Saturation Target Adjustment tool. Press Cmd+Shift+Option+L (Mac) or Ctrl+Shift+Alt+L (Win) to access the Luminance Target Adjustment tool.
![]() Click in the area of the image that you’d like to adjust and drag up or down with the tool.
Click in the area of the image that you’d like to adjust and drag up or down with the tool.
![]() Turn off the Target Adjustment tool by clicking the Target Adjustment icon in the HSL/Color/B & W panel or by choosing Tools > Target Adjustment > None. You can also turn off the Target Adjustment tool by clicking the Done button in the Toolbar.
Turn off the Target Adjustment tool by clicking the Target Adjustment icon in the HSL/Color/B & W panel or by choosing Tools > Target Adjustment > None. You can also turn off the Target Adjustment tool by clicking the Done button in the Toolbar.
Timesaver
Press Cmd+Shift+Opt+N (Mac) or Ctrl+Shift+Alt+N (Win) to turn off the Target Adjustment tool.
Correcting Chromatic Aberration
Chromatic aberration is caused by a camera’s inability to focus red, green, and blue light wavelengths at an equal distance along the optical axis. As a result, color fringes appear around high-contrast edges in the image. This problem is especially common when shooting with certain wide-angle lenses. You can remove any unwanted color fringes by adjusting the Chromatic Aberration sliders located in the Lens Corrections panel.
Remove any color halos that surround high-contrast edges
![]() From the Library module Grid or the Filmstrip, select the photo that you would like to correct.
From the Library module Grid or the Filmstrip, select the photo that you would like to correct.
![]() Choose View > Go to Develop or click the Develop button in the upper-right corner of the interface.
Choose View > Go to Develop or click the Develop button in the upper-right corner of the interface.
Lightroom displays the photo in the Content area of the Develop module.
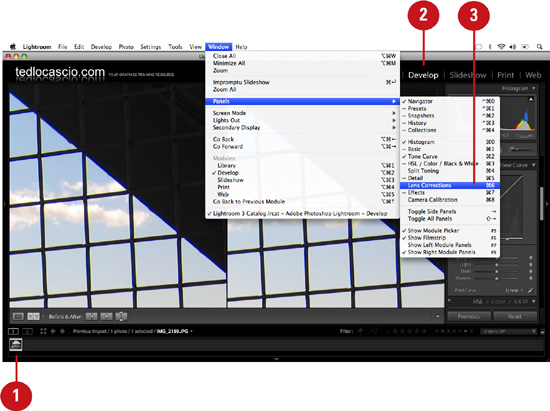
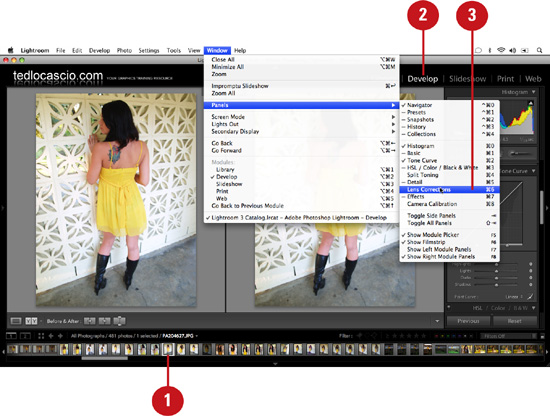
![]() Choose Window > Panels > Lens Corrections to display the Lens Corrections panel.
Choose Window > Panels > Lens Corrections to display the Lens Corrections panel.
![]() In the Chromatic Aberration portion of the Lens Corrections panel, drag the Red/Cyan or Blue/Yellow sliders in the opposite direction of the halo’s color. For example, if the halo is blue, drag the Blue/Yellow slider to the right to add yellow.
In the Chromatic Aberration portion of the Lens Corrections panel, drag the Red/Cyan or Blue/Yellow sliders in the opposite direction of the halo’s color. For example, if the halo is blue, drag the Blue/Yellow slider to the right to add yellow.

![]() If halos are still apparent throughout the high-contrast edges of the image, even after dragging the Chromatic Aberration sliders, choose All Edges from the Defringe drop-down list. If they are only apparent in extreme highlights, choose Highlight Edges. By default, the Defringe option is set to Off.
If halos are still apparent throughout the high-contrast edges of the image, even after dragging the Chromatic Aberration sliders, choose All Edges from the Defringe drop-down list. If they are only apparent in extreme highlights, choose Highlight Edges. By default, the Defringe option is set to Off.
Removing Vignettes
Vignetting is another problem that you may encounter, especially when shooting with a wide-angle lens. This is evidenced by the darkening of the corner edges where there should be an even shade of tone or color. Vignetting occurs most often when shooting a landscape that contains a large expanse of sky, or when shooting a subject against a white background. You can remove vignetting by adjusting the Lens Vignetting sliders located in the Lens Corrections panel.
Remove dark corners and edges
![]() From the Library module Grid or the Filmstrip, select the photo that you would like to correct.
From the Library module Grid or the Filmstrip, select the photo that you would like to correct.
![]() Choose View > Go to Develop or click the Develop button in the upper-right corner of the interface.
Choose View > Go to Develop or click the Develop button in the upper-right corner of the interface.
Lightroom displays the photo in the Content area of the Develop module.
![]() Choose Window > Panels > Lens Corrections to display the Lens Corrections panel.
Choose Window > Panels > Lens Corrections to display the Lens Corrections panel.
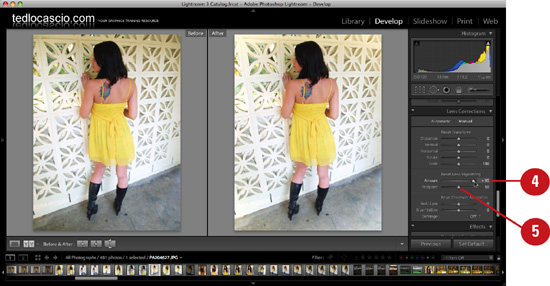
![]() In the Lens Vignetting portion of the Lens Corrections panel, drag the Amount slider to lighten the corners relative to the center.
In the Lens Vignetting portion of the Lens Corrections panel, drag the Amount slider to lighten the corners relative to the center.
![]() Drag the Midpoint slider to balance the vignette from the center to the edges.
Drag the Midpoint slider to balance the vignette from the center to the edges.
Creating Vignettes
The Post Crop Vignetting section of the Effects panel contains sliders that enable you to create a vignette relative to the proportions of a cropped photo. Post Crop vignettes can also be combined with Lens Correction vignettes to create interesting effects. Note that a photo does not need to be cropped to create a vignette with the Post Crop Vignetting sliders.
Apply a creative vignette effect
![]() From the Library module Grid or the Filmstrip, select the photo that you would like to apply a creative vignette effect to.
From the Library module Grid or the Filmstrip, select the photo that you would like to apply a creative vignette effect to.
![]() Choose View > Go To Develop or click the Develop button in the upper-right corner of the interface.
Choose View > Go To Develop or click the Develop button in the upper-right corner of the interface.
Lightroom displays the photo in the Content area of the Develop module.
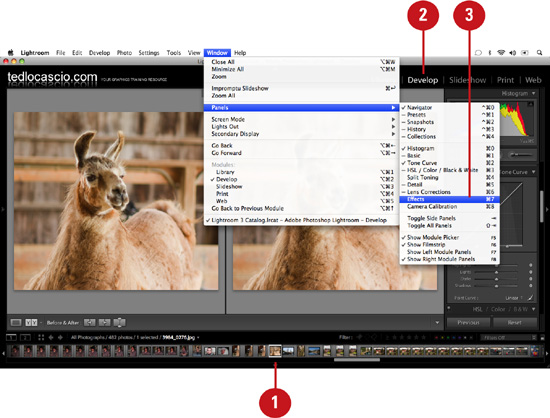
![]() Choose Window > Panels > Effects to display the Effects panel.
Choose Window > Panels > Effects to display the Effects panel.
![]() In the Post Crop Vignetting portion of the Effects panel, choose an option from the Style drop-down list.
In the Post Crop Vignetting portion of the Effects panel, choose an option from the Style drop-down list.

• Highlight Priority—Maintains highlight areas, but can also result in color shifts in darkened areas of the vignette. This option is best used with photos containing bright image areas, such as clipped specular highlights.
• Color Priority—Minimizes color shifts in darkened areas of the vignette, but cannot perform highlight recovery.
• Paint Overlay—Mixes the cropped image values with black or white pixels. This option can result in a flat appearance.
![]() In the Post Crop Vignetting portion of the Effects panel, apply the following settings:
In the Post Crop Vignetting portion of the Effects panel, apply the following settings:
• Amount—Drag this slider to darken or lighten the corners relative to the center.
• Midpoint—Drag this slider to balance the vignette from the center to the edges.
• Roundness—Drag this slider to the right to make the vignette appear circular.
• Feather—Drag this slider to the right to soften the vignette edges. Drag it to the left to harden them.
• Highlights—Drag this slider to the right to reveal highlight areas in the dark corners of the vignette.
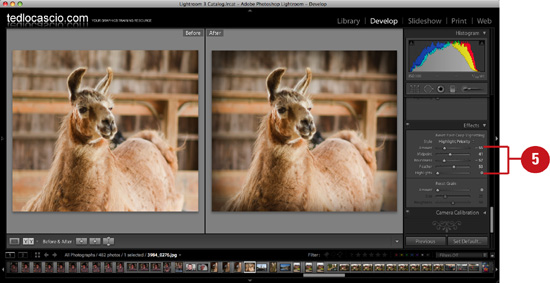
Adding Film Grain
In addition to Post-Crop Vignetting, the Effects panel also includes a Grain feature. This feature enables you to simulate film grain by adding noise to your digital images. You can use the Grain effect to apply an aged look to a black-and-white photo or to simply make a digital image appear less “perfect.”
Apply a film grain effect
![]() From the Library module Grid or the Filmstrip, select the photo that you would like to apply a creative vignette effect to.
From the Library module Grid or the Filmstrip, select the photo that you would like to apply a creative vignette effect to.

![]() Choose View > Go to Develop or click the Develop button in the upper-right corner of the interface.
Choose View > Go to Develop or click the Develop button in the upper-right corner of the interface.
Lightroom displays the photo in the Content area of the Develop module.
![]() Choose Window > Panels > Effects to display the Effects panel.
Choose Window > Panels > Effects to display the Effects panel.
![]() In the Grain portion of the Effects panel, apply the following settings:
In the Grain portion of the Effects panel, apply the following settings:
• Amount—Drag this slider to the right to increase the amount of grain added to the image; drag to the left to decrease.
• Size—Drag this slider to the right to increase the size of grain added to the image; drag to the left to decrease.
• Roughness—Drag this slider to the right to increase the roughness of the film grain texture; drag to the left to soften.