

Organizing Your Photos with Photoshop Elements
With no film or processing costs to think about each time we take a picture, it seems that many of us are pressing the shutter more frequently than we did when film was king. The results of such collective shooting frenzies are hard drives all over the country full of photos. Which is great for photography but what happens when you want to track down that once in a lifetime shot that just happens to be one of thousands stored on your machine? Well, believe it or not, being able to locate your files quickly and easily is more a task in organization, naming and camera set up than browsing through loads of thumbnails.
4.01 Add Picture Details In-Camera
Suitable for Elements – 5.0, 4.0, 3.0, 2.0, 1.0 | Difficulty level – Basic | Related techniques – 4.02, 4.03, 4.04, 4.05
Getting those pesky picture files in order starts with your camera set up. Most models and makes have options for adjusting the numbering sequence that is used for the pictures you take. Generally you will have a choice between an ongoing sequence, where no two photos will have the same number, and one that resets each time you change memory cards or download all the pictures. In addition, many models provide an option for adding the current date to the file name, with some including customized comments (such as shoot location or photographer’s name) in the naming sequence or as part of the metadata stored with the file.
To adjust the settings on your camera search through the Set Up section of the camera’s menu system for headings such as File Numbering and Custom Comments to locate and change the options. Ensure that number sequencing and date inclusion options are switched on and, where available, add these comments along with the photographer’s name and copyright statement to the metadata stored within the picture file.
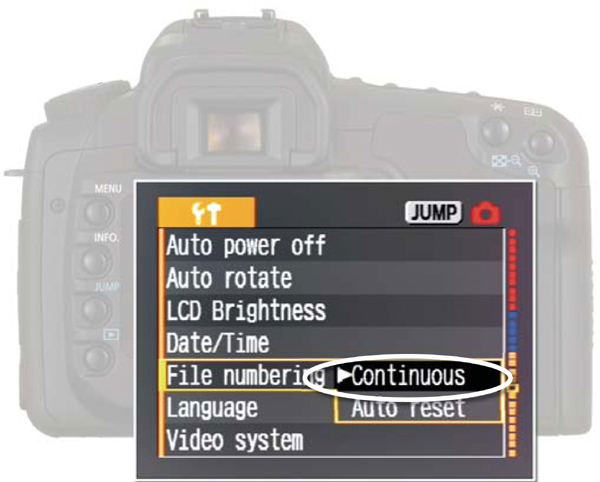
In-camera labelling >> Most cameras provide options for selecting the way in which files are numbered. The continuous option ensures that a new number is used for each picture even if memory cards are changed in the middle of a shoot.
4.02 Organize Photos Whilst Downloading
Suitable for Elements – 5.0, 4.0, 3.0 | Difficulty level – Basic | Related techniques – 4.01, 4.03, 4.04, 4.05
As we saw in the last chapter Photoshop Elements 5.0 includes the Adobe Photo Downloader utility that move pictures from your camera or memory card to the computer. As part of the download process, the user gets to select the location of the files and the way that the files are to be named and numbered, and automatically stack, tag and apply metadata to the photos.
It is at this point in the process that you need to be careful about the type of folder or directory structure that you use. Most photographers group their images by date, subject, location or client, but the approach that you employ is up to you. Once you have selected a folder structure though, try to stick with it. Consistency is the byword of photo organization.
If your camera doesn’t provide enough Automatic Naming and metadata options to satisfy your needs then use the Elements Photo Downloader feature to enhance your ability to distinguish the current images with those that already exist on your hard drive by setting the location and filename of the picture files as you transfer them.
|
Nominate and create a new directory for each session of downloaded photos. Add extra metadata captions, keywords, photographer and copyright details using the tagging options in Elements. |

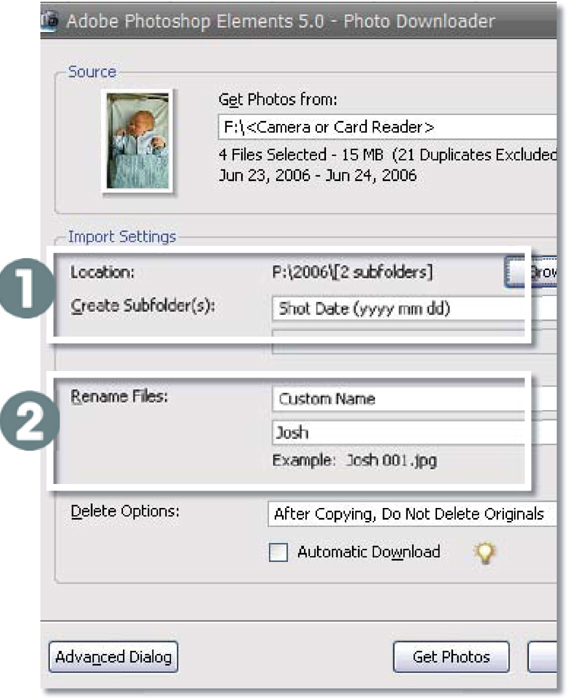
Naming via the downloader >> Use the options in the Photo Downloader to thoughtfully locate (1) and name (2), your digital photos.
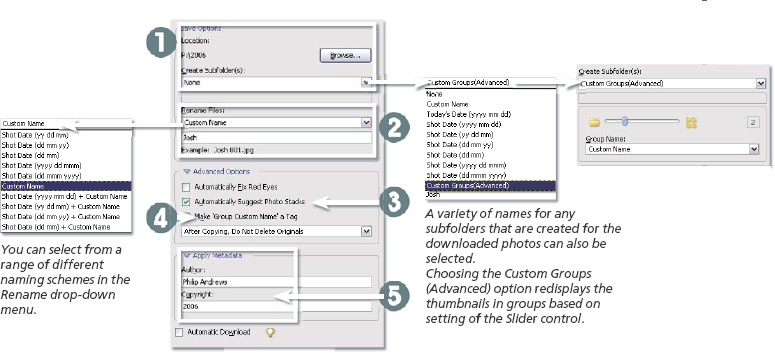
Organize as you download >> The Adobe Photo Downloader allows the user to automatically apply naming changes, metadata, group tags, suggest photo stacks and determine the location where transferred files will be saved. The downloader features provide five different ways to organize your pictures: (1) Locating existing, or creating new, folders for downloading. (2) Renaming pictures with meaningful titles. (3) Suggesting Photo Stack groupings. (4) Applying Group Custom Name as a Tag. (5) Adding custom metadata to the picture file which can be used as search criteria inside the Organizer workspace.
Organizing Using Photo Browser
The Photo Browser mode in the Organizer workspace not only provides thumbnail previews of your photos but the images can be categorized with different Tags (keywords), Notes and Caption entries, split in different collections and then searched based on the Tags and Metadata associated with each photo. Unlike a traditional browser system, which is folder based (i.e. it displays thumbnails of the images that are physically stored in the folder), the Elements Photo Browser creates a catalog version of the pictures and uses these as the basis for searches and organization. With this approach it is possible for one picture to be a member of many different collections and to contain a variety of different keywords.

Adding captions to several photos >> After multi-selecting pictures in the Photo Browser workspace press the Change Caption option located in the Properties palette and then add the new caption in the dialog that is displayed. These captions can be added to or used to replace existing captions.
Suitable for Elements – 5.0, 4.0, 3.0 | Difficulty level – Basic | Related techniques – 4.01, 4.02, 4.04, 4.05
Captions are another way to ‘title’ your photos beyond the standard file name. Adding a meaningful caption provides yet another avenue for searching for individual photos as the Find > Find by Caption or Note feature targets the entries you make here. Captions can also be used, printed or displayed in Photo Creations (but need to be added before starting the creation process) and Photo Galleries as well as on contact sheets. In Photoshop Elements 5.0 captions can be added and used in a range of different ways.
Adding a single caption – Captions can be added in the Single Photo View of the Photo Browser, the Properties pane (General tab), via the Add Caption command or in the Caption field in the Date View.
Adding multiple captions – Multi-select the images to be captioned and press the Change Caption button in the Properties palette, add in the caption details and click OK.
Suitable for Elements – 5.0, 4.0, 3.0 | Difficulty level – Basic | Related techniques – 4.02, 4.03, 4.04, 4.05
Along with captioning, adding logical file names to photos is probably the most popular way that photographers organize their pictures. If the downloading utility that you use doesn’t provide the opportunity to rename on-the-fly, the file titles can be changed either individually, via the Name section of the Properties palette, or as a group, using the Editor: File > Rename feature. Be sure to use a unique name for your photos and preferably one that will help you locate them later.
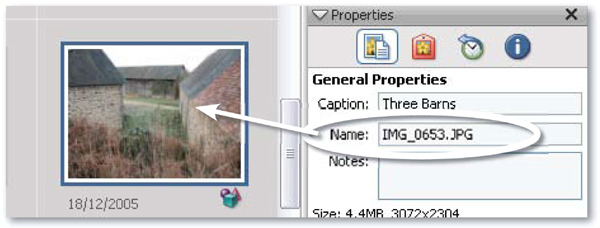
Changing names >> Rename a file by selecting its thumbnail in the Photo Browser workspace and then clicking on the General tab in the Properties palette. Type in the new title for the file in the Name section of the dialog that is displayed.
Suitable for Elements – 5.0, 4.0, 3.0 | Difficulty level – Basic | Related techniques – 4.01, 4.02, 4.03, 4.05
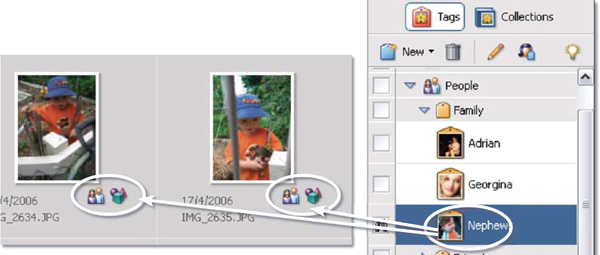
In Elements 5.0 keywords are added to your photos in the form of Tags. The Tags pane stores the Tags, provides an easy drag and drop approach to adding tags to selected photos and sits to the right of the main thumbnail area in the Photo Browser workspace. The pane is grouped together with the Collections and Properties panes in the Organize Bin.
Tags are applied to a picture by selecting and dragging them from the pane onto the thumbnail or alternatively the thumbnail can be dragged directly onto the Tags pane. Multiple Tags can be attached to a single picture by multi-selecting the Tags first and then dragging them to the appropriate thumbnail.
Feature Summary
To add a Tag to a single image click-drag the tag from the Tags pane to the thumbnail image in the browser (Organizer) workspace.
To add a single Tag to multiple thumbnails, multi-select the thumbnails in the images and then drag the Tag from the Tags pane onto one of the selected thumbnails.
Creating New Tags
New Tags are created and added to the pane by selecting the New Tag option from the menu displayed after pressing the New button at the top left of the pane. Next, fill out the details of the new entry in the Create Tag dialog, select a suitable icon for the Tag label and click OK. The first picture that you drag to the new tag determines the thumbnail you see on the Tag. This is the quickest way to add an image to the Tag icon.
Tags and Collections >> Tags and Collections are used to organize the pictures in the Organizer workspace. One photo can belong to many different collections and contain multiple Tags.
Feature Summary
To create a new Tag, select the New Tag option from the New Button menu at the top of the Tags pane.
In the File Tag dialog that is displayed select a category for the Tag, add in a name and include any explanatory notes.
Next press the Edit Icon button and import for a picture to include the Tag label before sizing and cropping the photo in the Edit Tag Icon dialog.
Click OK to close both dialogs and add the new Tag to the Tag list.
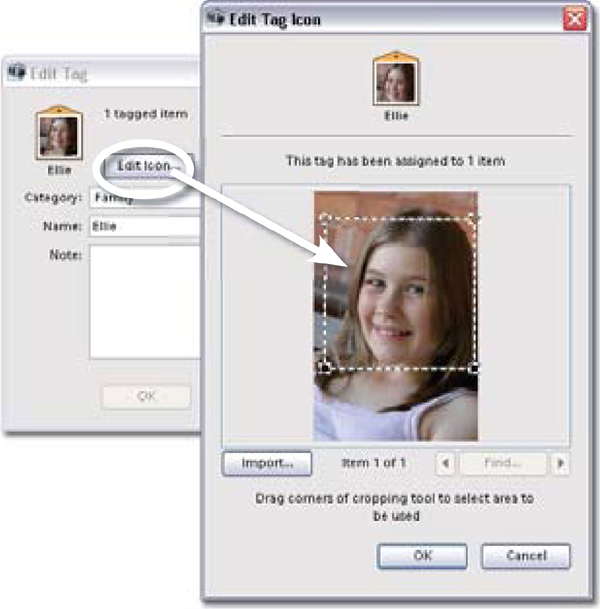
Make a new Tag >> You can add to the existing set of Tags using the New Tag option. There is even an option to add your own pictures as the Tag icon.
Suitable for Elements – 5.0, 4.0, 3.0 | Difficulty level – Basic | Related techniques – 4.05
Brand new for Elements 5.0 is the ability to search through a group of photos and automatically select those that contain faces. Using this feature makes it much easier to locate and tag photos of family and friends in the batches of pictures that you import. Start by selecting a group of photos from inside the Organizer workspace. Next, click the Find Faces for Tagging button in the Tags pane. The faces identified will be displayed in a new dialog box which also includes the Tags pane. From here your Tags can be quickly dragged onto individual or groups of selected face photos.
Feature Summary
Multi-select a group of images from inside the Organizer workspace.
Either choose Find > Find Faces for Tagging or press the Find Faces for Tagging button at the top of the Tags pane.
Drag Tags onto the pictures that are displayed in the Face Tagging dialog. Click Done to return to the Photo Browser workspace.
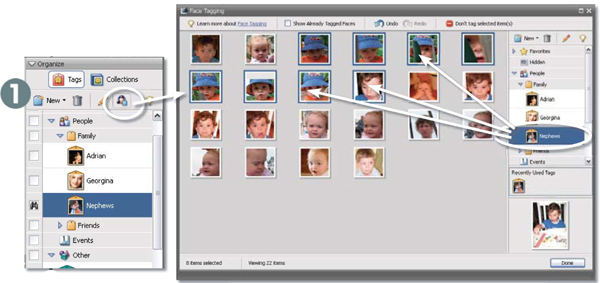
Tagging by faces >> The Face Tagging option in Elements 5.0 quickly scans a group of selected photos and identifies those pictures that contain faces then displays these in a separate dialog ready for tagging. (1) Organizer pane.
4.07 Collections and How to Group Photos
Suitable for Elements – 5.0, 4.0, 3.0 | Difficulty level – Basic | Related techniques – 4.11, 4.12
Apart from tagging, Photoshop Elements also uses Collections as a way to organize your photos. Collections allow you to group images of a similar theme together in the one place making it easier to locate these images at a later date. After creating a collection in the Collections pane, photos can be dragged from the Photo Browser workspace to the Collection heading to be added to the group, or alternatively the Collection entry can be dragged to the photo to produce the same result.
The Collections feature allows you to allocate the same image to several different groups. Unlike in the old days, this doesn’t mean that the same file is duplicated and stored multiple times in different folders. Instead the picture is only stored or saved once and a series of collection associations is used to indicate its membership in different groups.
When you want to display a group of images based on a specific subject, taken at a particular time or shot as part of a certain job, the program searches through its database of collection keywords and only shows those images that meet your search criteria.
The Collections pane is the pivot point for all your collection activities. Here you can view, create, rename and delete collections. If the pane is not displayed in the Photo Browser workspace then click the Organize Bin at the bottom right of the browser and then choose the Collections tab.
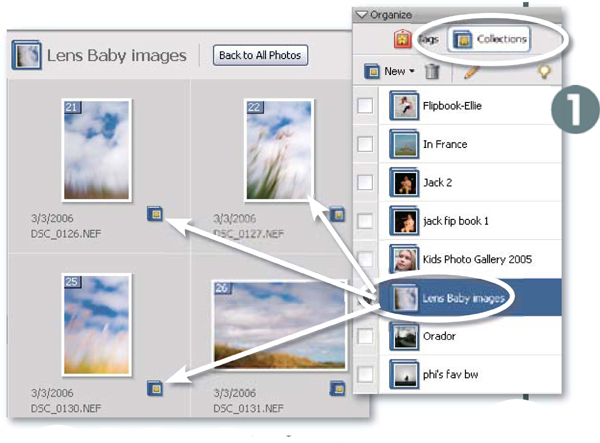
Grouping with Collections >> Sort your pictures into groups of the same subject or theme using the Elements’ Collections feature. (1) Collection Pane.
Adding Photos to a Collection
To start using Collections make a new collection first and then add it to your photos.
Feature Summary
Start making a new collection by clicking on the New button in the Collections pane and select the New Collection menu item.
In the Create Collection dialog choose the group that the new collection will belong to, add the name and include any explanation details for the group. Click OK.
Select the photos to be included in the collection in the Photo Browser and drag them to the Collection heading in the Collections pane.
To view all the pictures contained in a collection double-click on the Collection heading or click on the column to the left of the collection. A Binoculars icon will appear.
Single photos or even groups of pictures can be added to more than one collection at a time by multi-selecting the collection names first before dragging the images to the pane.
Different collections (and the photos they contain) can also be organized into groups that have a common interest or theme. For instance, collections that contain pictures of the kids, family vacations, birthday parties and mother- and father’s-days events can all be collated under a single ‘Family’ collection group heading. The advantage of using a collection over just viewing tagged files in the Photo Browser is that files in a collection can be reordered by dragging them. Files in the Photo Browser window cannot be reordered in this way. Create a Collection group by selecting New > New Collection Group from the Collection Pane. Next click-drag existing collection entries listed in the pane to the Group heading.
Colletions and Tagging Strategies:
The best way that you choose to make use of the Tagging and Collection features in Elements will depend a great deal on the way that you work, the pictures you take and the type of content that they include, but here a few different proven methods that you can use as a starting point.
Subject:
Photos are broken down into subject groups using headings such as family, friends, holidays, work, summer, night shots, trip to Paris, etc. This is the most popular and most applicable approach for most readers and should be the method to try first.
Time line:
Images are sorted and stored based on their capture date (when the picture was photographed), the day they were downloaded or the date that they were imported into the organizational package. This way of working links well with the auto file naming functions available with most digital cameras but can be problematic if you can’t remember the approximate dates that important events occurred. Try using the date approach as a subcategory for subjects headings, e.g. Bill’s Birthday > 2005.
File type:
Image groups are divided into different file type groups. Although this approach may not seem that applicable at first glance it is a good way to work if you are in the habit of shooting RAW files which are then processed into PSD files before use.
Project:
This organizational method works well for the photographer who likes to shoot to a theme over an extended period of time. All the project images, despite their age and file type, are collated in the one spot making for ease of access.
Client or Job:
Many working pros prefer to base their filing system around the way that their business works, keeping separate groups for each client and each job undertaken for each client.
Suitable for Elements – 5.0, 4.0, 3.0 | Difficulty level – Basic Related techniques – 4.09
Your photos can be viewed in a range of different ways in the Organizer or Photo Browser workspace. The standard view (Photo Browser View) displays the pictures as a series of thumbnails in a ‘rows and columns’ format. You can sort the sequence of the photos according to date and import batch or folder location using the drop-down menu at the bottom left of the workspace. It is also possible to display only those images with a specific associated Tag or belonging to a particular collection by double-clicking on the entry in Tags or Collections or clicking on the column on the left of the palette.
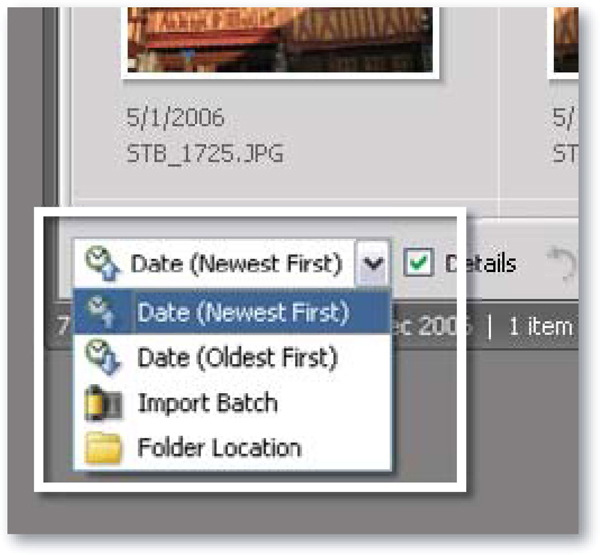
Selecting the View >> Choosing one of the options from the dropdown menu at the bottom left of the Photo Browser determines how the thumbnails are presented in the workspace.
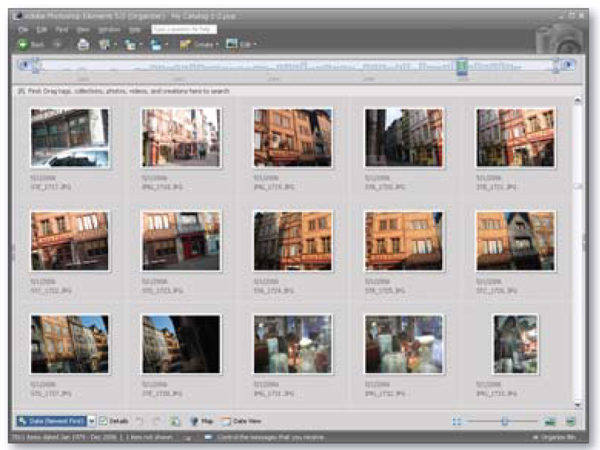
Photo Browser View >>
Another option is to view the photos in Date View mode. Here the images are also grouped and displayed based on the date they were taken, but they are shown in a calendar format. You can choose a year-, month- or day-based calendar with each view containing a slide show feature that will automatically flick through all the photos taken on a specific date. Pictures displayed in Date View can be edited, printed, shared and included in Photo Creation projects by clicking one of the shortcut buttons at the top of the screen.
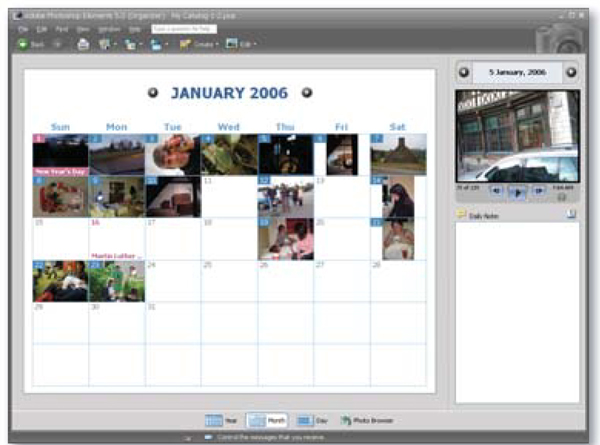
Date View >>
The View Photos in Full Screen option provides an instant slide show of the files that you have currently displayed in the Photo Browser. Seeing the photos full size on your machine is a good way to edit the shots you want to keep from those that should be placed in the ‘I will remember not to do that next time’ bin. With the provided menu you can play, pause, or advance to next or last photos, using the VCR-like controls. You can enlarge or reduce the size that the picture appears on screen with the Magnification slider (Zoom Level control). For quick magnification changes there are also ‘Fit to Window’ and ‘Actual Pixels’ buttons. But the real bonus of the feature is the list of actions that you can perform to pictures you review. You can automatically enhance, add and remove tags, mark the file for printing and add the file to a chosen collection using the choices listed under the Action menu. Specific picture properties such as Tag, History, and Metadata are available by hitting the Alt + Enter keys to display the properties window. As well as showing all the photos currently in the browser you can also multi-select the images to include in the review session before starting the feature, or even limit those pictures displayed to a particular collection. The Full Screen View options can be set when the feature is first opened or accessed via the last item on the Action menu.
View Photos in Full Screen mode >>
Closely linked to the View Photos in Full Screen feature detailed above is the Compare Photos Side by Side option which allows users to display two similar pictures side by side. This is a great way to choose between several images taken at the same time to ensure that the best one is used for printing or passed on to the Editor for enhancement. To select the images to display click onto one of the compare workspaces (left or right in the example on page 85) and then click on a thumbnail. Now select the other workspace and click the comparison image thumbnail. Pressing the X key switches the photos in the display so that you can always keep the best images on the left of the screen as you flip through other photos on the right. All the same Full Screen adjustment and organizational controls are available in the Compare Photos feature, including the Zoom Control which provides the ability to examine candidate files more closely.
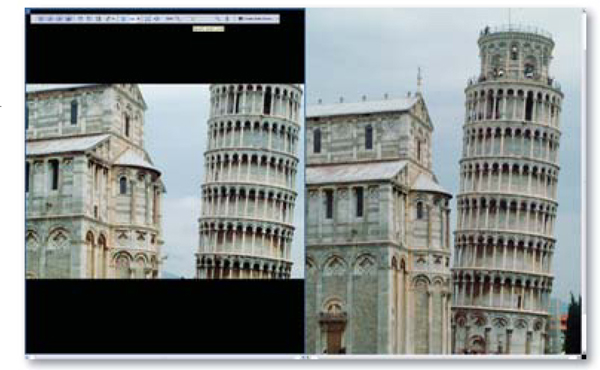
Compare Photos Side by Side mode >>
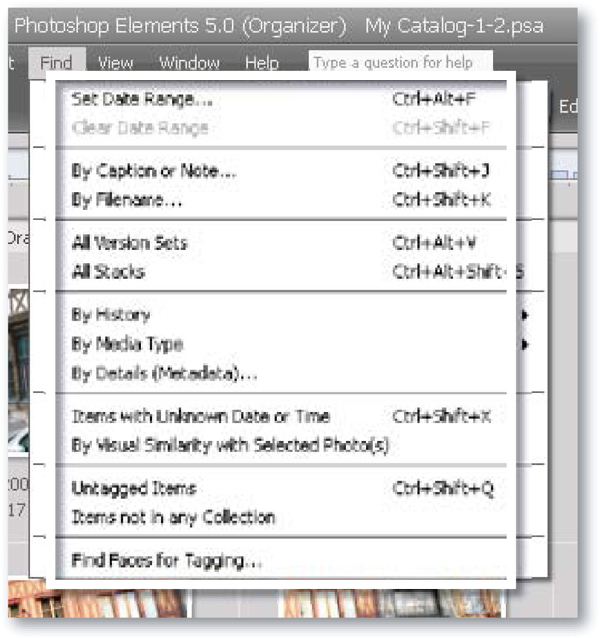
Find options >> The Find menu in the Photo Browser workspace lists the many different ways to locate images within Elements.
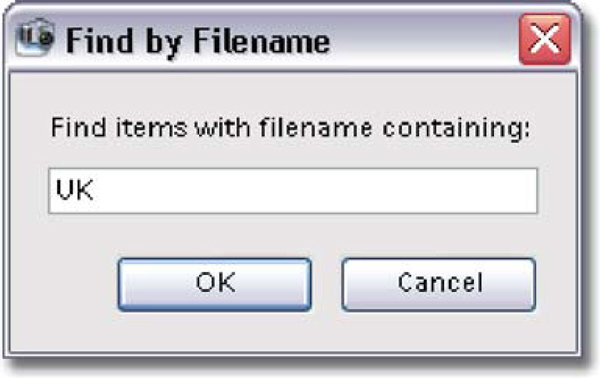
Locate by filename >> When choosing the Date Range, Caption or Note, Filename (see above), History, and Details find options Elements displays a new dialog into which your search criteria can be entered.
Suitable for Elements – 5.0, 4.0, 3.0 | Difficulty level – Basic | Related techniques – 4.08
One of the great benefits of organizing your pictures in the Photo Browser workspace is the huge range of search options that then become available to you. In fact there are so many search options that Adobe created a new menu heading ‘Find’ specifically to hold all the choices. Here you will be able to search for your photos based on a selected date range, filename, caption, media type (video, photo, audio or creation), history (when an item was emailed, printed, received, imported, used in a creation project or even shared on-line) and even by the predominant color in the photo (see above). After selecting one of the Find menu options Elements either displays files that meet the search criteria in a new window (Find by Version Sets, Media Type, Untagged Items, Items not in a Collection) or opens a new dialog where the user must enter specific details (dates, filenames, details, captions) which will be used to base the search.

Locate tagged photos >> To display all images tagged with a specific entry, doubleclick the Tag name in the Tags pane. Return the view to the whole collection by clicking the Back to All Photos button (1).
Finding Tagged Photos or Those Contained in a Collection
As well as the search options located in the Organizer: Find menu, you can make use of the Tags and Collections features to quickly locate and display sets of photos from your catalog.
To find tagged photos: Double-click the Tag entry in the Tags pane.
To display all the images in a collection: Double-click on the Collection entry in the Collections pane or click on the column on the left of the pane. This will display the Binoculars icon.
To return the browser back to the original catalog of thumbnails: Click on the Back to All Photos button at the top of the thumbnail group.

Find collections of photos >> To show all the photos in a collection double-click the Collection name in the Collection Pane. Again, press the Back to All Photos button to return to the catalog (1).
Find by Details or Metadata
Version 5.0 of Elements also contains a Find option that is designed to allow users to search the details or metadata that is attached to their picture files. Most digital cameras automatically store shooting details from the time of capture within the photo document itself. Called metadata, you can view this information by clicking the Metadata button inside the Properties palette.
The Find > By Details (Metadata) option displays a sophisticated Search dialog that allows you to nominate specific criteria to use when looking within the metadata portion of the picture file. The dialog provides a section to input the text to search for as well as two drop-down menus where you can set where to look (Filename, Camera Make, Camera Model, Capture Date, etc.) and how to match the search text (Starts with, Ends with, Contains, etc.).
Beyond camera-based metadata you can also use this dialog to search for any Captions, Notes, Tags or Collections that you have applied to your pictures.
Feature Summary
Select Find > By Details (Metadata) from the Photo Browser workspace.
Choose the type of details that you are looking for – Filename, Camera Make, Camera Model, etc. from the drop-down list in the Find by Details dialog.
Enter the text you want to search for (if needed).
Enter how the search text should appear in the located files (contained, not contained, etc.)
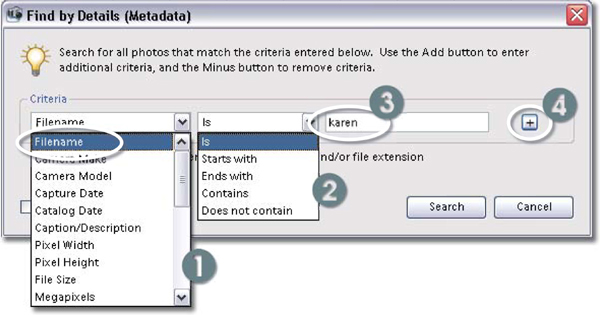
Find using details >> The Find by Details feature allows you to customize the search options used via settings within the dialog. Choosing the type of detail to look for from the drop-down list (1) determines the contents of the rest of the dialog. In this instance selecting ‘Filename’ displays a second list (2) describing how to match the text you input (3). Extra search criteria can be added or removed by pressing the Plus or Minus buttons to the right of the dialog (4).
Ensuring that you keep up-to-date duplicates of all your important pictures is one of the smartest work habits that the digital photographer can learn. Ask yourself ‘What images can’t I afford to loose – either emotionally or financially.?’ The photos you include in your answer are those that are in the most need of backing up. If you are like most image-makers then every picture you have ever taken (good and bad) has special meaning and therefore is worthy of inclusion. So let’s assume that you want to secure all the photos you have accumulated.
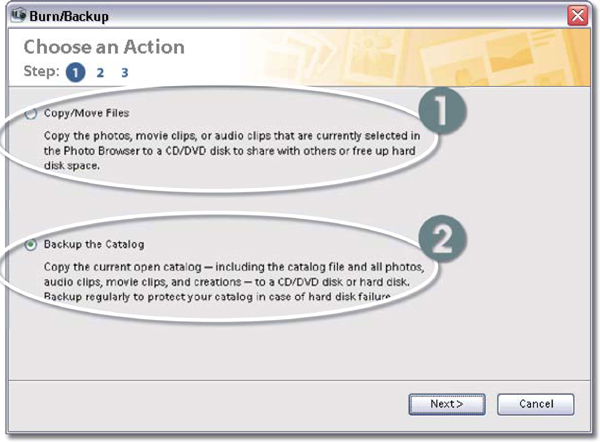
Backup/Copy files >> The first screen of the Elements’ Backup feature contains the choice of two different actions:
Copy/Move Files – use this selection to make copies of files that you have selected in the Photo Browser workspace or to permanently move files to another destination.
Backup the Catalog – this option provides a complete backup of all the files in your catalog and then the next time it is used allows you to add any files that have been changed or added since the last backup.
Suitable for Elements – 5.0, 4.0, 3.0 | Difficulty level – Basic | Related techniques – 4.11
Gone are the days when creating a backup of your work involved costly tape hardware and complex server software. Now you can archive your pictures from inside the very software that you use to enhance them – Photoshop Elements.
The Backup feature (Organizer: File > Backup the Catalog) is designed for copying your pictures (and catalog files) onto DVD, CD or an external hard drive for archiving purposes. To secure your work simply follow the steps in the wizard. The feature includes the option to backup all the photos you currently have catalogued in the Photo Browser along with the ability to move selected files from your hard disk to CD or DVD to help free up valuable hard disk space.
Feature Summary
To start the backup process select File > Backup from the Photo Browser workspace.
Next select Backup the Catalog. Click Next.
At the next screen choose Full Backup for first time archiving or Incremental Backup for all backups after the first one. Click Next.
And finally select the place where you want the backup to be stored. This may be on a series of CD or DVDs or on an internal drive. Then click Done to backup your files.
Backup Glossary:
Multi-disk archive – A process, often called spanning, by which chunks of data that are larger than one disk can be split up and saved to multiple CD-ROMs or DVDs using spanning software. The files can be recompiled later using utility software supplied by the same company that wrote the disks.
Full backup – Duplicates all files even if they haven’t changed since the last time an archive was produced (1).
Incremental – Backs up only those files that have changed since the last archive was produced. This makes for faster backups but means that it takes longer to restore files as the program must look for the latest version of files before restoring them (2).
Restore – Reinstates files from a backup archive to their original state on your hard drive.
CD-ROM or DVD writer – This option is very economical when coupled with writing software that is capable of writing large numbers of files over multiple disks. The sets of archive disks can easily be stored off site ensuring you against theft and fire problems but the backup and restore process of this approach can be long and tedious.
Internal hard drive – Adding an extra hard drive inside your computer that can be used for backing up provides a fast and efficient way to archive your files but won’t secure them against theft, fire or even some electrical breakdowns such as power surges.
External hard drive – Connect via USB or Firewire, these external self-contained units are both fast and efficient and can also be stored off site providing good all-round protection. Some, like the Maxtor One Touch models, are shipped with their own backup software. Keep in mind that these devices are still mechanical drives and that care should be taken when transporting them.
Backup hardware:

There is no point having duplicate versions of your data if they are out of date. Base the interval between backups on the amount of work you do. In heavy periods when you are downloading, editing and enhancing many images at a time backup more often; in the quieter moments you won’t need to duplicate files as frequently. Most professionals backup on a daily basis or at the conclusion of a work session.
In ensuring the security of your images you will not only need to protect you photos from the possibility of a hard drive crash but also from such dramatic events as burglary and fire. Do this by storing one copy of your files securely at home and an extra copy of your archive disks or external backup drives somewhere other than your home or office. I know that this may sound a little extreme but swapping archive disks with a friend who is just as passionate about protecting their images will prove to be less painful than losing all your hard work.
New Backup Features for 5.0
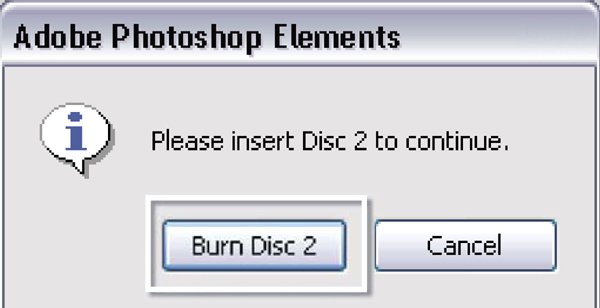
In version 5.0 the Backup Catalog feature has been enhanced so that now it is possible to archive your catalog over a series of CD or DVD disks. In previous versions, the Backup feature only allowed writing to a single disk and even with the growing use of DVD-ROMs for archive scenarios, many digital photographers have a catalog of photos that far exceeds the space available on a single disk. The feature estimates the space required for creating the backup copy of the catalog and, after selecting the drive that will be used for archiving, the feature also determines the number of disks required to complete the action. During the writing process the feature displays instruction windows at the end of writing each disk and when you need to insert a new disk. All disks need to be written for the backup to be complete. To restore a catalog from a set of backup disks use the File > Restore Catalog option in the Organizer workspace.
The revised backup feature also allows multi-session recording of archives. Multi-session DVD or CD-ROM recording means that you can add extra backup files to disks that you have already recorded to. Most Elements users will find this useful when performing incremental backups.
In addition a new online archive option is included with version 5.0, called Online Backup; the feature provides a way of storing a copy of important image files on a server on the internet. The service is provided by Iron Mountain. After registering Elements users can backup their pictures, but not their catalog, to the secure server.
Suitable for Elements – 5.0, 4.0, 3.0 | Difficulty level – Basic | Related techniques – 4.07, 4.12
Creating a good archival system goes a long way to making sure that the images you create are well protected, but what about the situation where the original photo is accidentally overwritten as part of the editing process? Embarrassing as it is, even I have to admit that sometimes I can get so involved in a series of complex edits that I inadvertently save the edited version of my picture over the top of the original. For most tasks this is not a drama as the edits I make are generally non-destructive (applied with adjustment layers and the like) and so I can extract the original file from inside the enhanced document but sometimes, because of the changes I have made, there is no way of going back. The end result of saving over the original untouched digital photo is equivalent to destroying the negative back in the days when film was king. Yep, photographic sacrilege!
So you can imagine my relief to find that in version 5.0 of Photoshop Elements Adobe has a technology that protects the original file and tracks the changes made to the picture in a series of successively saved photos. The technology is called Versioning as the software allows you to store different versions of the picture as your editing progresses. What’s more, the feature provides options for viewing and using any of the versions that you have previously saved. Let’s see how this file protection technology works in practice.
Versions and Photoshop Elements
Versioning extends the idea of Elements image stacks by storing the edited version of pictures together with the original photo in a special Version Set. All photos enhanced in the Photo Browser space using a tool like Auto Smart Fix are automatically included in a Version Set. Those images saved in the Quick and Full Edit workspaces with the Save As command can also be added to a Version Set by making sure that the Save in Version Set with Original option is ticked before pressing the Save button in the dialog.
Saving in this way means that edited files are not saved over the top of the original; instead a new version of the image is saved in a Version Set with the original. It is appended with a file name that has the suffix ‘edited’ attached to the original name. This way you will always be able to identify the original and edited files. The two files are ‘stacked’ together in the Photo Browser with the most recent file displayed on top.
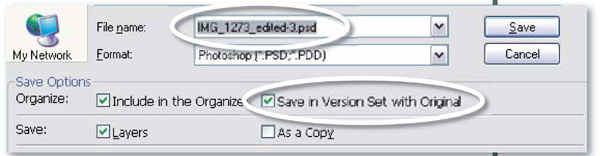
Save a version from Editor >> To create a Version Set when saving an edited file from inside the Quick Fix or Standard Editor workspace make sure that the ‘Save a Version Set with Original’ option is selected.
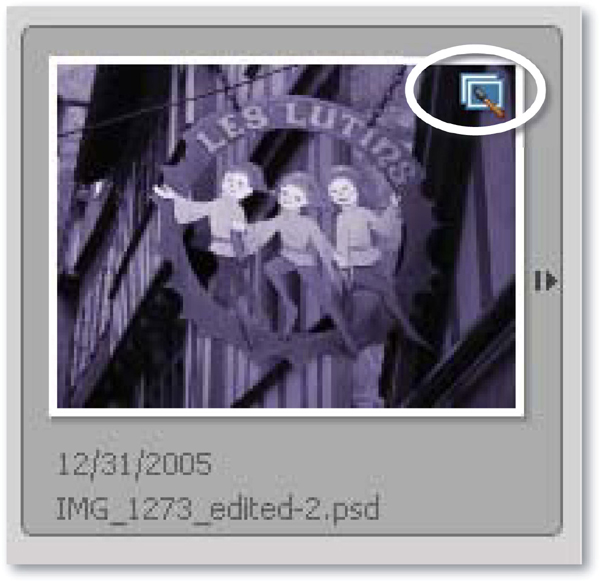
Version Set icon >> The Bundled photos icon at the top right of the thumbnail shows that the photo is part of a version set.
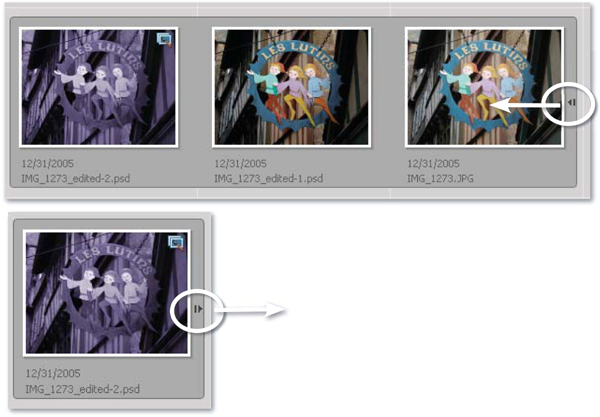
Displaying Version Set photos >> Selecting the Version Set > Expand Items in Version Set option from the right-click menu (context menu) displays the various pictures that have been bundled together in the set. Alternatively you can click the Expand/Collapse arrow on the right of the version set.
When a photo is part of a Version Set, there is a small icon displayed in the top left of the Photo Browser thumbnail. The icon shows a pile of photos and a paint brush. To see the other images in the Version Stack simply right-click the thumbnail image and select Version Set > Expand Items in Version Set or click on the Expand/Collapse arrow button on the right of the version set thumbnail.
Using the other options available in the right-click pop-up menu the sets can be expanded or collapsed, the current version reverted back to its original form or all versions flattened into one picture. Version Set options are also available via the Photo Browser Edit menu. Unlike Stacks, you cannot add other images to a Version Set as the set only contains edits of the same image.
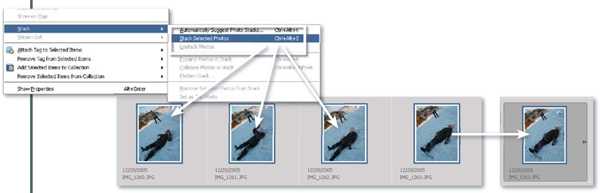
Elements’ Image Stacks >> To group alike photos into an Image Stack, multi-select the pictures in the Photo Browser workspace before choosing Stack > Stack Selected Photos from the right-click menu.
Suitable for Elements – 5.0, 4.0, 3.0 | Difficulty level – Basic Related techniques – 4.07, 4.11
An Image Stack is slightly different from a Version Set as it is a set of pictures that have been grouped together into a single place in the Organizer workspace. Most often Stacks are used to group pictures that have a common subject or theme and the feature is one way that Elements users can sort and manage their pictures. To create a Version Stack, multi-select a series of thumbnails in the workspace then right-click on one of the selected images to show the menu and from here select the Stack > Stack Selected Photos option. You can identify stacked image groups by the small icon in the top right of the thumbnail.
Auto Photo Stacking
The idea of grouping together like photos in a single stack was introduced in version 3.0 of the program. New for 5.0 is the ability to auto stack images as they are downloaded from camera, imported into Elements from folders or even when displayed in the Organizer workspace.
The feature searches for similar images, either visually similar, or multiple photos taken within a short period of time, and then assembles these in groups in the ‘automatically suggest photo stacks’ window. From here you can choose to remove selected photos from a group or even remove a group all together from the window. Once you have fine-tuned which photos to include, clicking the Stack All Groups button will create Photo Stacks from all the groups in the window.
To auto stack pictures that are already in your catalog select a group of thumbnails first and then choose Automatically Suggest Photo Stacks from either the Edit > Stack or the right-click pop-up menus. Alternatively, to stack when importing pictures from a folder, camera or card reader choose the Automatically Suggest Photo Stacks option in the Get Photos or Adobe Photo Downloader dialog.

Image Stacks icon >> Image Stacks use a Layered Photos icon in the top right of the thumbnail to indicate that the picture is one of several images that have been grouped.
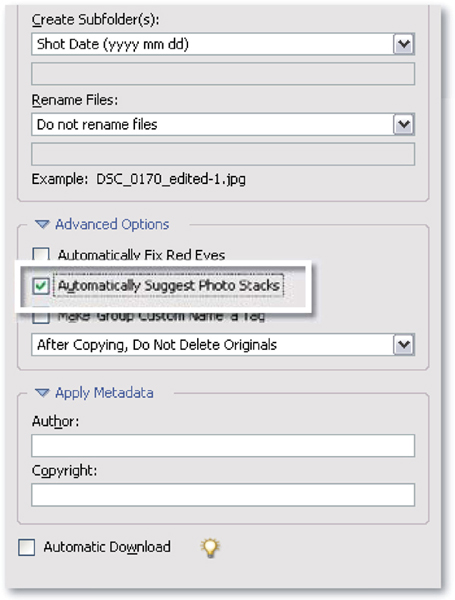
Auto stack whilst downloading >> The Advanced dialog of the Adobe Photo Downloader contains the Automatically Suggest Photo Stacks option so you can group alike images as you transfer your files from camera to computer.
Either of these two options will then display a new window with alike pictures pre-grouped. Choosing the Stack All Groups button converts the groups to stacks. The Remove Group or Remove Selected Photos buttons prevent individual images or group of pictures being made into a stack.
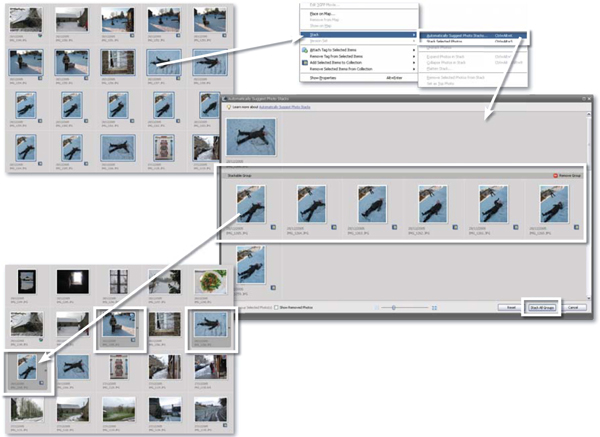
Stacking cataloged photos >> To employ the Auto Stacking feature with photos that you have already cataloged, start by multi-selecting several images in the Photo Browser workspace. Next right-click one of the pictures and choose Stack > Automatically Suggest Photo Stacks from the pop-up menu. Elements will then display a window containing groups of photos that are suitable for converting into Photo Stacks. You can remove images from groups by selecting the photo and then pressing the Remove Selected Photos button at the bottom left of the dialog. Stop specific groups from being converted to a Photo Stack by clicking on the Remove Group button at the top right of each group section. Finally, press the Stack All Groups button to convert the groups to Photo Stacks and show these in the Photo Browser.