There is no doubt that when Adobe decided to release Photoshop Elements photographers the world over rejoiced. Not content with their offerings for entry and intermediate users in the past and ever conscious of the growing digital camera user base, the Adobe boffins created the new package with you, the digital photographer, firmly in their mind. Despite the rumors spread by the ‘Photoshop Snobs’ that the product was just a cut down version of Adobe’s professional package and that any serious editing will need to be completed in Photoshop, users the world over are realizing just how well Photoshop Elements fits their needs.
A True Photographer’s Tool
Adobe had finally heard the cries of the mortals and produced an image manipulation package that has the strength of Photoshop with the price tag more equal to most budgets. Elements gives desktop image-makers top quality image editing and management tools that can be easily used for preparing pictures for printing or sharing via the web or CD. Features like the panoramic stitching option, called Photomerge, and the Photo Browser are firm favorites and were featured in this package before they ever appeared in Photoshop. The color management and vector text and shape tools are the same robust technology that drives Photoshop itself, but Adobe has cleverly simplified the learning process by providing an easier-to-use interface and options like step-by-step interactive recipes for common image manipulation tasks. These, coupled with features like Magic Selection Brush tool, Adjust Color Curves and the Convert to Black and White feature, make the package a digital photographer’s delight.
As a photographer, teacher and author I was captivated by the simplicity and strength that Adobe has crammed into the package and knew that this was just the sort of image editing program that would satisfy the demands of the digital camera users I met every day. So to accompany Elements version 1.0, I released a new book which was an introduction to the package and digital imaging in general. Titled Adobe Photoshop Elements – A visual introduction to digital imaging it quickly became a best-seller and was followed up with a series of new and revised editions to accompany ongoing versions of the program.
As Elements users became more familiar with the concepts and tools used in the program it wasn’t long before I started to receive requests for more advanced techniques than those presented in this introductory text. These were quickly followed by queries about how to position Elements as the key ‘image editing component’ in a high quality photographic workflow that encompassed capture, management, manipulation and output activities.
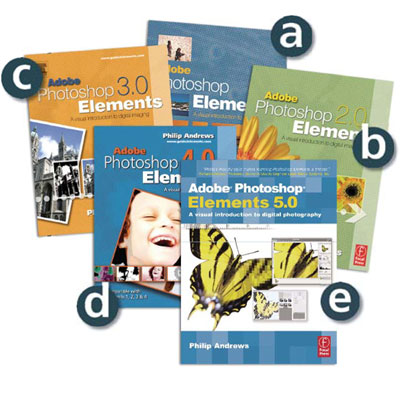
Beyond the companion introduction title >> This book is the result of many requests to provide a ‘next step’ that will take Elements users beyond the basic concepts and skills outlined in the introductory text, Adobe Photoshop Elements – A visual introduction to digital imaging. (a) Edition 1. (b) Edition 2. (c) Edition 3. (d) Edition 4. (e) Edition 5.
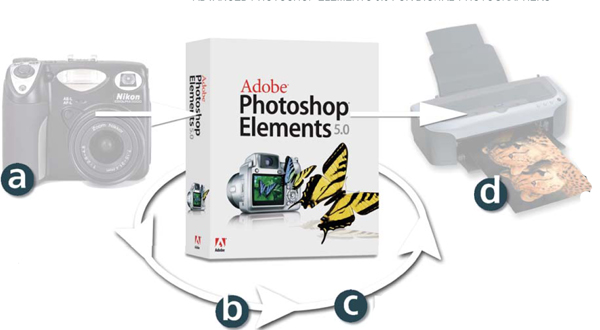
Elements is central >> Photoshop Elements is the pivot point for all editing and enhancement tasks involved in the production of quality photographic images. The digital production process involves four distinct steps – (a) capture, (b) manipulation, (c) management and (d) output.
This book is my answer to these requests. With well over 140 new techniques it provides professional tips aimed at advancing your Elements skills beyond the basics. It is presented in a series of highly illustrated step-by-step color tutorials that show you what can be achieved. The techniques are discussed in the greater context of professional quality workflows that cover camera and scanner capture, raw processing, picture management, panorama production and quality print and web production.
Each technique is cross-referenced with related skills and ideas in the book and there are on-line resources at the book’s website –
Here you can download and practise with many of the example images, video tutorials and resources used in the production of the book. Key settings for important dialog boxes are presented along with the illustrated steps needed for you to complete each technique. By working side by side with this text, your favorite image editing program and the associated web resources, you will quickly build both your Elements skills and your general understanding of the processes involved in creating quality photographic images.

Step-by-step >> The techniques in the book are presented in a highly illustrated step-by-step fashion that will progressively build your Elements skills.
(a) Cross-referenced techniques.
(b) Step-by-step illustrations.
The Comprehensive Photoshop Elements Workflow
Adobe made massive changes to the way that users worked in Elements between versions 2.0 and 3.0 of the program. These changes converted Photoshop Elements from simply being a photo editing program into a complete digital photography system.
Now in its fifth revision, Elements provides a total workflow solution from the moment you download your files from camera, scanner or the net, through organization and manipulation phases and then onto printing or outputting the pictures electronically (photo gallery, email attachments) or as print. Understanding how the various components in the system fit together will help you make the most of the software and its powerful features.
IMPORT
The Adobe Photo Downloader feature and Get Photos command allow you to preview, select and download files from a variety of different sources.
ORGANIZE
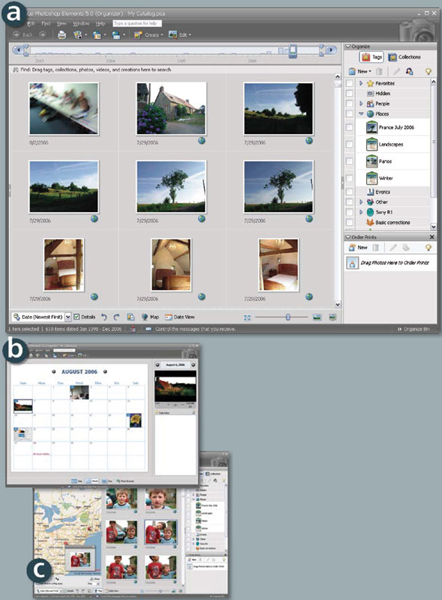
The Organizer component (a) of Elements 5.0 works like a ‘super’ file browser allowing you to import and organize pictures straight from your camera, scanner, the net or your hard drive. You can view the photographs via the file Browser window or using the date view. Pictures can be grouped into collections and you can find specific images via the unique ‘keyword tags’ that you attach to the files.
In Date View (b) images are grouped and displayed based on the date they were taken.
The new Map View (c) displays photos according to their location on a map with options to share the referenced map with others.
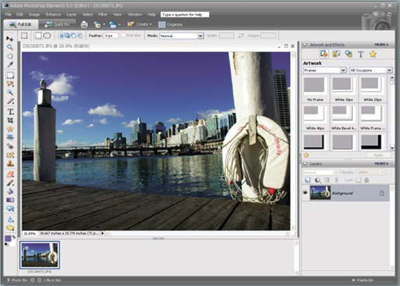
The Full editor contains all the familiar editing and enhancement tools that Elements users have come to expect. It is here that you can take full control over the manipulation and fine-tuning of your pictures. You can also add text, play with layers, create multi-picture composites and combine all manner of special effects with your original photo.
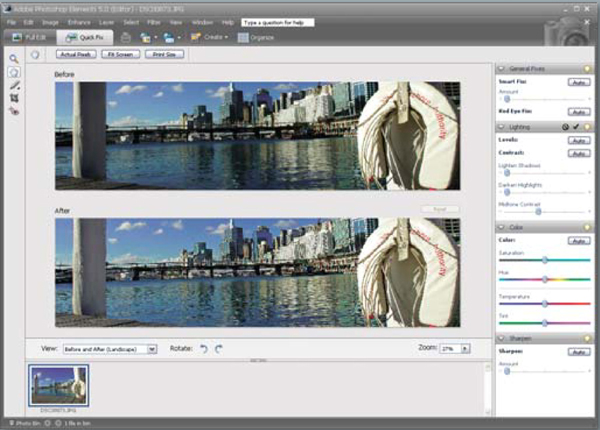
QUICK EDITS
The Quick Fix editor provides a series of one-click or semiautomatic fixes for common problems with lighting, contrast, color and sharpness. All the controls are contained in the one screen for speed and you can configure the display to show before and after versions of the photo.
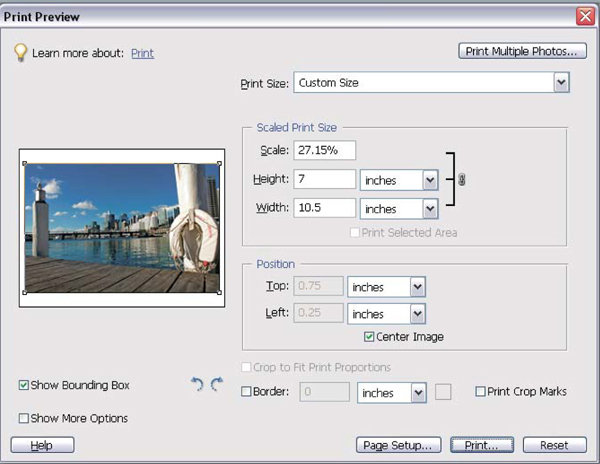
The Print options in Elements 5.0 are different from earlier versions of the program. Now you can choose to print individual photos or multiple pictures on a single sheet of paper. You can also preview and print individual pages of the new multi-page .PSE document. As an added bonus decorative frames can be added to the images right from the Print Multiple Photos dialog box.
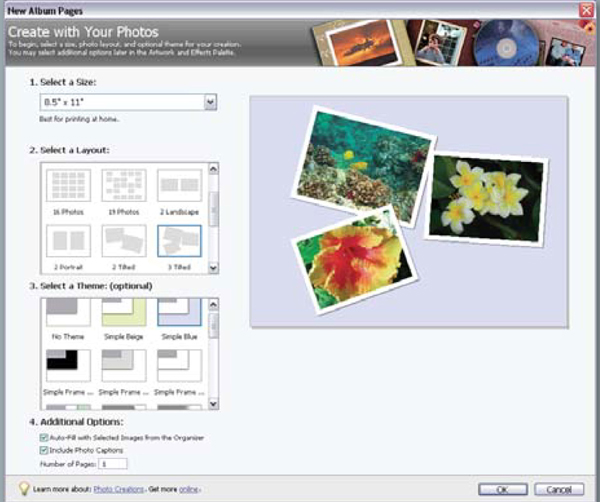
PHOTO CREATIONS
The Photo Creations projects are the way that special output options are grouped in Elements. In this workspace a step-by-step approach is used to create slide shows, VCD presentations, photo album pages, and greeting cards, calenders and photo galleries.
Most digital image-makers find that there are several enhancing steps that they always perform on a newly acquired picture. These changes are often among the first skills that the new Elements user learns. Despite the fact that this book is designed to build upon such basic techniques I thought that it would be best to revisit them briefly to ensure that we are all working from the same game plan.
For the most part these changes follow a predictable sequence:
Import, Organize, Orientate or Straighten, Crop, Adjust Tones, Alter Color, Apply Sharpness and Save.
These basic alterations take an image captured by a camera or scanner and tweak the pixels so that the resultant picture is cast-free, sharp and displays a good spread of tones.
Importing Photos
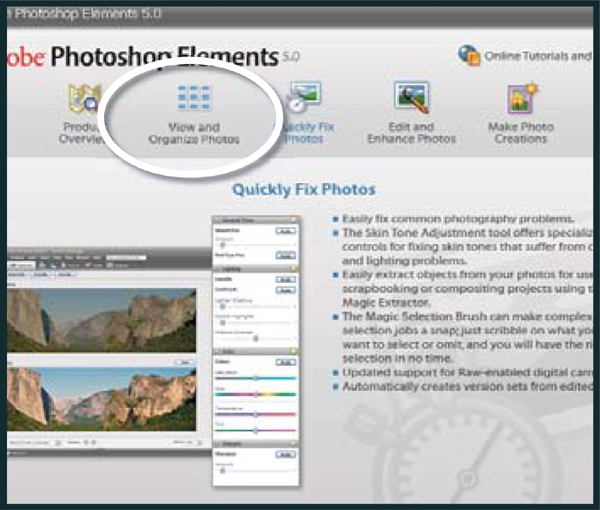
When opening Elements the user is confronted with the Quick Start or Welcome screen containing a variety of options. From this screen you can choose to organize, fix, edit or make a new Photo Creation from your pictures. The first step for most Elements users is to import their photos from a digital camera or scanner. This task is generally handled by the Adobe Photo Downloader which will automatically start when a camera or card reader is attached to the computer. The files are downloaded and cataloged in Elements with the utility.
Alternatively you can import files from other sources or activate the downloader manually from inside the Organizer workspace, which is accessed via the View and Organize selection in the Welcome screen. See Step 1. This feature provides a visual index of your pictures and can be customized to display the images in Browser, Date or Folder mode and thumbnails can be sorted by keyword tags, title, media, metadata or collection.
Step 1 >> The Quick Start screen provides simple and easy access to different parts of the Photoshop Elements system.
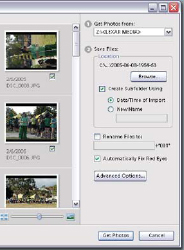
To start your first catalog simply select the Organizer: File > Get Photos menu option. Choose one of the listed sources of pictures provided and follow the steps and prompts in the dialogs that follow. See Step 2.

Step 2 >> Choose the location of the files to import from the list in the File > Get Photos menu or shortcut.
Basic Organization
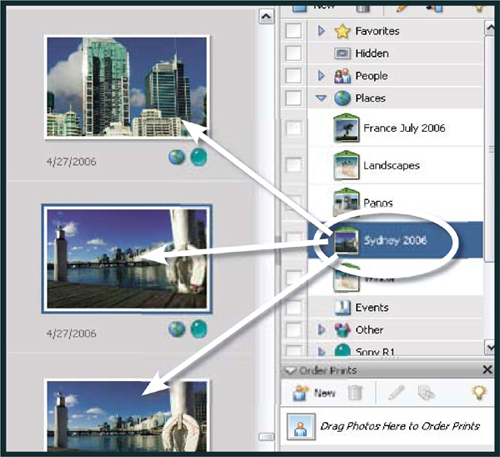
When using the Photo Downloader you can add naming, destination folder and deletion details and in the Advanced dialog you can also apply metadata, auto stack, fix red eye and add group tags to photos automatically. See Step 3. After downloading, or importing, the files are previewed as thumbnails in the Organizer workspace. At this time it is a good idea to make use of some of Elements’ brilliant organizational features to help manage the files before jumping into editing and enhancement activities. Add keywords – Tags – in Elements’ terminology, to you photos by click-dragging existing entries from the Tags pane onto your photos. See Step 4. Alternatively, add your own Tag entries or Catagories using the New option at the top of the pane. See Step 5. Adding Tags to your photos means that you can search for and locate individual files based on this association.
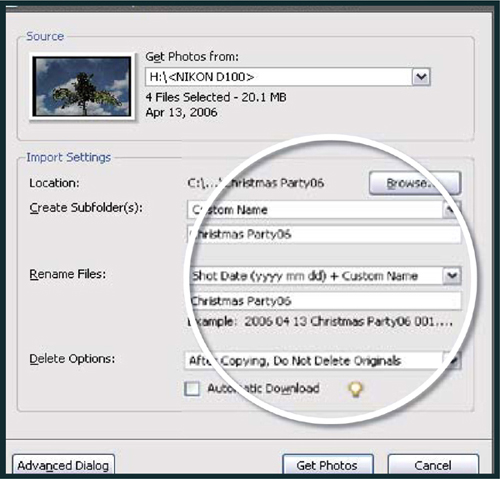
Step 3 >> Add naming, destination folder and deletion details for the transferred files in the Downloader dialog.
Step 4 >> Add Tags to the thumbnails by click-dragging the entry from the Tags pane onto the photo.
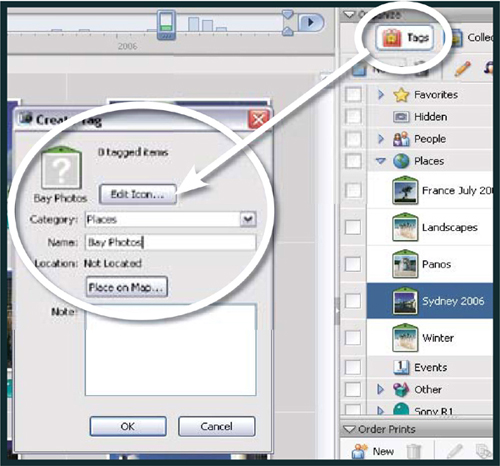
Step 5 >> Add a different Tag entry by clicking the New button and adding details in the Create Tag dialog.
Changing a Picture’s Orientation
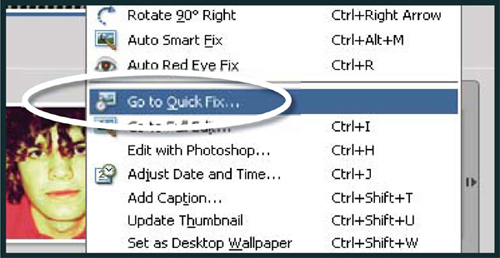
Turning your camera to shoot images in Portrait mode will generally produce pictures that need to be rotated to be viewed correctly. Elements provides a series of dedicated rotate options that are available from inside the Photo Browser workspace. Simply right-click the thumbnail and select an option from the pop-up list. See Step 6. Whilst organizational tasks and simple automatic enhancement changes are handled in the Photo Browser workspace, more complex and controllable picture edits are applied in either the Quick Fix or Full Edit workspaces. So for the next set of changes the picture is passed to the Standard Editing workspace. Do this by selecting the Go to Standard Edit option from the right-click thumbnail menu. See Step 7.

Step 6 >> Orientate the photo using one of the options in the right-click menu of the Photo Browser workspace.
Step 7 >> Pass the photo to one of the editing spaces by selecting the option from the right-click menu.
Cropping and Straightening
Most editing programs provide tools that enable the user to crop the size and shape of their images. Elements provides two such methods. The first is to select the Rectangular Marquee tool and draw a selection on the image the size and shape of the required crop. Next choose Image > Crop from the menu bar. The area outside of the marquee is removed and the area inside becomes the new image. The second method uses the dedicated Crop tool that is located just below the Magic Selection Brush in the tool box. Just as with the Marquee tool, a rectangle is drawn around the section of the image that you want to retain. The selection area can be resized at any time by click-dragging any of the handles positioned in the corners of the box. To crop the image click the Tick button at the bottom of the crop marquee or double-click inside the selected area. See Step 8.

Step 8 >> The Crop tool gives the user the ability to crop and straighten selected areas of the image.
An added benefit to using the Crop tool is the ability to rotate the selection by click-dragging the mouse when it is positioned outside the box. To complete the crop click the Tick button at the bottom of the crop marquee, but this time the image is also straightened based on the amount that the selection area was rotated.
Spreading Your Image Tones
When photographers produce their own monochrome prints they aim to spread the image tones between maximum black and white. So too should the digital image-maker ensure that their pixels are spread across the whole of the possible tonal range. In a 24-bit image (8 bits per color channel – red, green and blue), this means from a value of 0 (black) to 255 (white). Elements provides both manual and automatic techniques for adjusting tones.
The Auto Contrast and Auto Levels options are both positioned under the Enhance menu. Both features will spread the tones of your image automatically, the difference being that the Auto Levels function adjusts the tones of each of the color channels individually whereas the Auto Contrast command ignores differences between the spread of the red, green and blue components. If your image has a dominant cast then using Auto Levels can sometimes neutralize this problem. The results can be unpredictable though, so if after using the feature the colors in your image are still a little wayward, undo the changes and use the Auto Contrast feature instead. See Step 9.
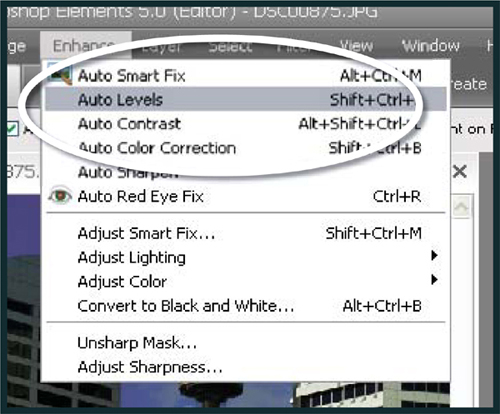
Step 9 >> The Auto Levels and Auto Contrast functions spread the tones of your image automatically.
If you want a little more control over the placement of your pixel tones then Adobe has also included the slider-based Contrast/Brightness and Levels features used in Photoshop in their entry-level software. Both these features, plus the new Adjust Color Curves feature, take back the control for the adjustment from the program and place it squarely in the hands of the user. See Step 10. Jump to the end of the chapter for more details on manual control of tones.
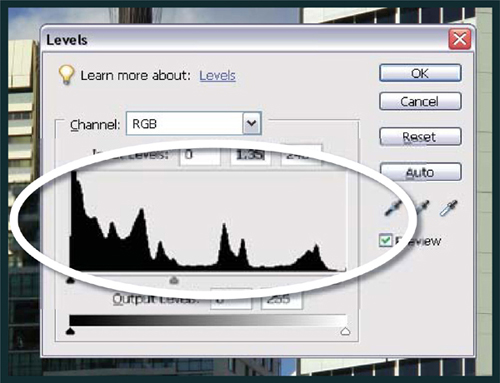
Step 10 >> The Levels feature provides manual control of the position of white, mid and black tones in your image.
Ridding Your Pictures of Unwanted Color Casts
Despite the quality of modern digital camera’s White Balance systems, images shot under mixed lighting conditions often contain strange color casts. The regularity of this problem led Adobe to include the specialized Color Cast tool (Enhance > Adjust Color > Remove Color Cast) in Elements. Simply click the eyedropper on a section of your image that is meant to be gray (an area that contains equal amounts of red, green and blue) and the program will adjust all the colors accordingly. See Step 11. This process is very easy and accurate, if you have a gray section in your picture. For those images without the convenience of this reference, the Variations feature (Enhance > Adjust Color > Variations) provides a visual ‘ring around’ guide to cast removal. See Step 12.
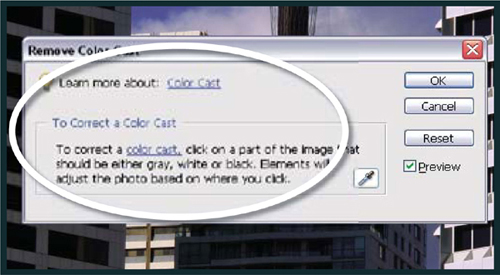
Step 11 >> The Color Cast tool uses an Eyedropper feature to neutralize color casts in your images.
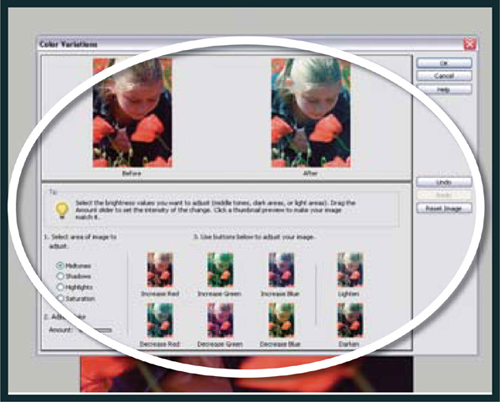
Step 12 >> The Variations control provides a ‘ring around’ approach to cast removal.
Applying Some Sharpening
The nature of the capture or scan process means that most digital images can profit from a little careful sharpening. I say careful, because the overuse of this tool can cause image errors, or artifacts, that are very difficult to remove. Elements provides several sharpening choices, most automatic, and one with a degree of manual control.
The Auto Sharpen feature found in the Enhance menu provides automatic techniques for improving the clarity of your images. The effect is achieved by altering the contrast of adjacent pixels and pixel groups. Elements also includes the Unsharp Mask filter and the Adjust Sharpness feature, which provides the user with manual control over which pixels will be changed and how strong the effect will be. The key to using these features is to make sure that the changes made by the filter are previewed in both the thumbnail and full image at 100 percent magnification. This will help to ensure that your pictures will not be noticeably over-sharpened. See Step 13.
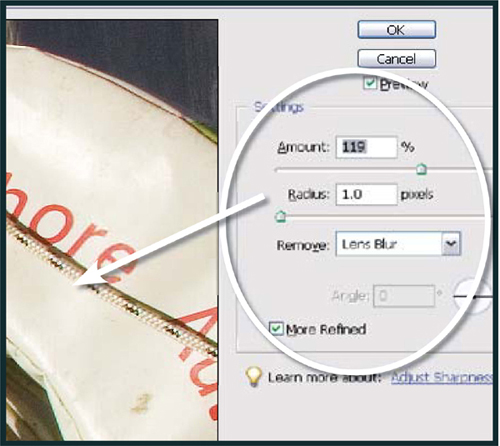
Step 13 >> Adjust Sharpness improves the overall appearance of sharpness in the image by increasing the contrast of adjacent pixels.
Saving Your Images
The final step in the process is to save all your hard work. The format you choose determines a lot of the functionality of the file. If you are unsure of your needs always use the native PSD or Photoshop format. These files maintain layers and features such as editable text and saved selections, and do not lose any picture details due to compression. If space is a premium, and you want to maintain the best quality in your pictures, then you may decide to use a compressed version of TIF or Tagged Image File Format. JPEG and GIF should only be used for web work or when you need to squeeze you files down to the smallest possible size. Both these formats lose image quality in the reduction process, so keep a PSD or TIF version as a quality backup. See Step 14.
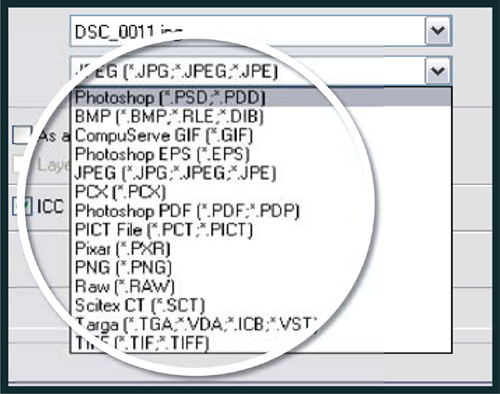
Step 14 >> Elements provides a range of file formats that can be used to save your images.
These steps should be the first changes and enhancements you make to new digital photographs. It is upon these basics that the rest of the book will build. So make sure that the sequence and skills included here are second nature before moving on to extending your Elements knowledge.

Take Manual Control of Your Tones >>
One of the most basic, yet critical, tasks for any digital photographer involves adjusting the contrast and brightness of their images. This action is often one of the first undertaken by novices and professionals alike when enhancing newly shot pictures. Well-executed contrast and brightness adjustments can take an ‘okay’ image and turn it into a dramatic picture.
Though at first glance making these changes seems like a simple task, don’t be too eager to play with the Brightness/Contrast sliders. These controls are far too coarse for quality work. Careful manipulation ofthe pixels is the key to making quality images and these features don’t allow the subtlety of adjustment that is necessary to achieve good results. Instead, employ the aid of either the Levels feature (Enhance > Adjust Lighting > Levels) or the new Adjust Color Curves feature (Enhance > Adjust Color > Adjust Color Curves) when making these changes. Professional digital photographers prefer to use tools like these as they not only provide sliders to alter brightness and contrast but also show a visual representation of the spread of the pixels or preview of the image changes.
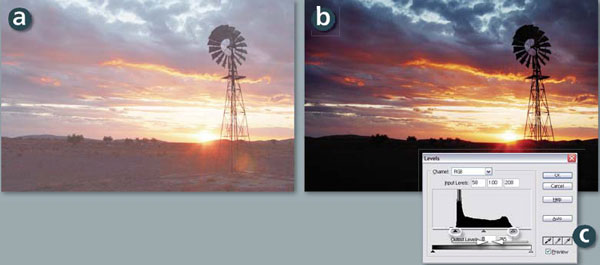
Levels adjustments >> The Levels and Adjust Color Curves features provide fine manual control over the contrast and brightness of your pictures. (a) Before. (b) After. (c) The Levels adjustment used to correct contrast and brightness.
Advanced Tonal Control
The first step in taking charge of your pixels is to become aware of where they are situated in your image and how they are distributed between black and white points. The Histogram palette (Window > Histogram) displays the same graph of your picture’s pixels as the Levels feature. Viewing the histogram can be one of the quickest ways to diagnose the source of brightness and contrast problems in your pictures.
The left-hand side represents the black values, the right the white end of the spectrum and the center area the mid tones (see Levels feature illustrations on page 12). As you may be already aware, in a 24-bit image (8 bits per color channel) there are a total of 256 levels of tone possible from black to white – each of these values are represented on the graph. The number of pixels in the image with a particular brightness or tone value is displayed on the graph by height. Where the graph is high there are many pixels of this tone present in the image. In contrast, low areas of the graph mean that few pixels of this tone can be found in the picture.
Knowing Your Images
After a little while of viewing the histograms of your images you will begin to see a pattern in the way that certain styles of photographs are represented. Overexposed pictures will display a large grouping of pixels to the right end of the graph, whereas underexposure will be represented by most pixels bunched to the left. Flat images or those taken on an overcast day will show all pixels grouped around the middle tones and contrasty pictures will display many pixels at the pure white and black ends of the spectrum.
These tonal problems can be fixed automatically by applying one of the standard correction features, such as Auto Contrast or Auto Levels, found in Elements. Both these commands re-map the pixels so that they sit more evenly across the whole of the tonal range of the picture. Viewing the histogram of a corrected picture will show you how the pixels have been redistributed. If you want to take more control of the process than is possible with the auto solutions, open the Levels dialog.
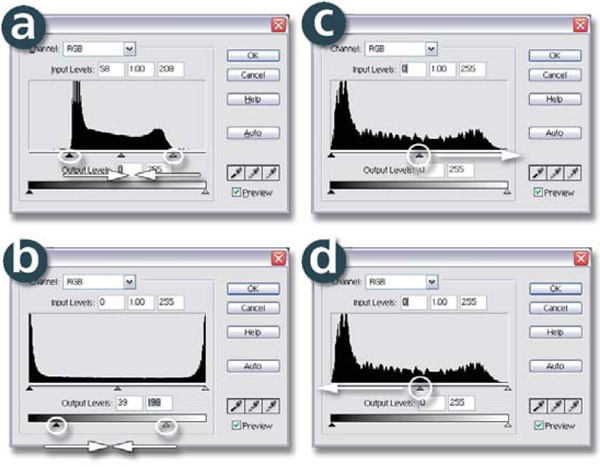
Using the Levels Control
Looking very similar to the histogram this feature allows you to interact directly with the pixels in your image. As well as a graph, the dialog contains two slider bars. The one directly beneath the graph has three triangle controls for black, mid tones and white and represents the input values ofthe picture. The slider at the bottom of the box shows output settings and contains black and white controls only.
To adjust the tones, drag the input shadow and highlight controls until they meet the first set of pixels at either end of the graph. When you click OK the pixels in the original image are redistributed using the new white and black points. Be careful though as moving the black point slider beyond the first pixels in the graph will convert these tones to straight black, losing any shadow detail that was present. Similarly, dragging the white point too far towards the middle will change delicate highlight details to pure white. Moving the mid tone slider will change the brightness of the middle values of the image without changing the black and white points in the image. Altering the output black and white points will flatten, or decrease, the picture’s contrast.
![]()
Pro’s Tip: Hold down the Alt key whilst moving the black or white input slider and you will see a reversed version of the image showing the pixels that are being converted to black or white by the action.
Basic changes >>
To add contrast drag white and black input sliders inwards.
To reduce contrast drag white and black output sliders inwards.
To darken mid tones drag mid input slider to the right.
To lighten mid tones drag mid input slider to the left.
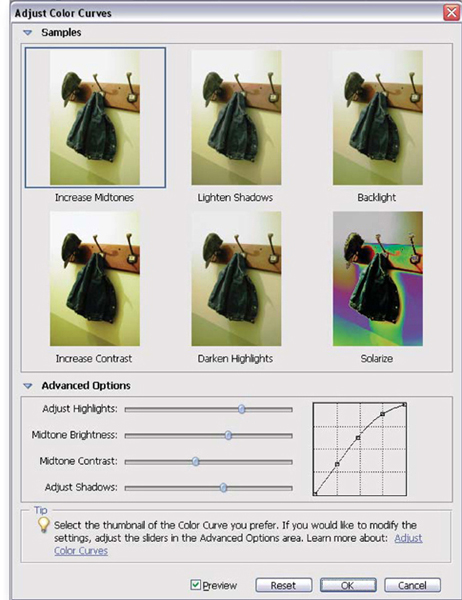
The Adjust Color Curves Control
The Adjust Color Curves option provides another way that you can alter brightness and contrast in your photo. Unlike the very basic Brightness/Contrast control, Adjust Color Curves provides separate controls for altering the brightness of highlights, shadows and midtones as well as a single slide for changing midtone contrast.
The feature is divided into two different sections – Samples and Advanced Options. Each section can be opened or closed by clicking the small triangle next to the section heading in the dialog.
The Samples area contains six thumbnail previews of your photo with standard enhancement changes applied. Clicking on a thumbnail will apply the adjustment to your photo. With the Preview option selected you will be able to see the tonal changes on the full image.
The Advanced Options section contains four slider controls plus a curves graph that plots the tonal relationships in the picture. Whereas the Samples thumbnails provided a one-click adjustment the controls contained here allow multiple, additive, fine-tuning changes.
The best approach is to apply a thumbnail version of the change that you are requiring first, e.g. Lighten Shadows, and then fine-tune the results with the sliders in the Advanced Options section.
Pressing the Reset button restores the dialog’s control to the default ‘Increase Midtones’ values.