

Versions 3.0 heralded a completely new approach to editing photos within Photoshop Elements. Whereas in previous editions all actions were centered upon the tools and features in the Full Edit workspace, the recent versions of the program provide the digital photographer with several different levels of editing.
The options can be grouped around three different approaches to the task:
Automatic,
Semi-automatic and
Manual.

The simplest tools are almost always fully automatic with the user having little control over the final results. These are the Types of color, Contrast and Brightness controls that are available in the Photo Browser either via the menu selections – Edit > Auto Smart Fix and Auto Red Eye Fix – or from the pop-up menu that is displayed when you right-click a thumbnail image in the workspace. These options provide a great place to start if you are new to digital photography and want good results quickly and easily, but experienced users will find the lack of control frustrating.
Simple control using the Auto Smart Fix and Auto Red Eye Fix
Rotate left or right
Changes applied automatically
New users start here for good, quick results
Automatic control of: contrast, color, shadow and highlight detail
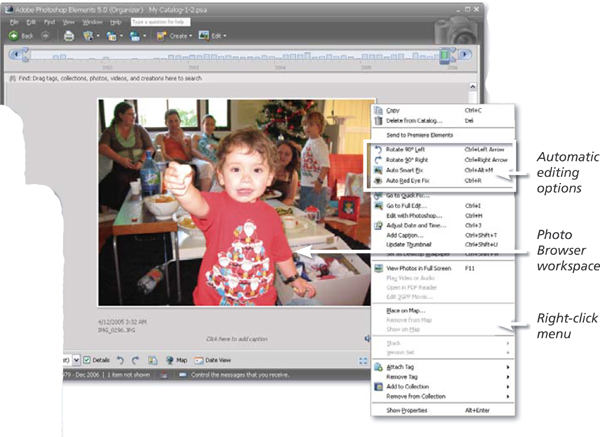
Auto-editing options >> The Auto Smart Fix, Auto Red Eye Fix and Rotate features are accessed by right-clicking on the thumbnail and then selecting the required option from the pop-up menu.
Suitable for Elements – 5.0, 4.0, 3.0 | Difficulty level – Basic Related techniques – 5.02, 5.03
The Auto Smart Fix feature enhances both the lighting and color in your picture automatically. The command is used to balance the picture hues and improve the overall shadow and highlight detail. Most images are changed drastically using this tool. In some cases the changes can be too extreme. If this occurs, the effect should be reversed using the Edit > Undo command and the more controllable version of the tool – Adjust Smart Fix – used instead. Adjust Smart Fix is located in the Editor workspace.

Auto Smart Fix >> The Auto Smart Fix feature enhances color, brightness, shadow and highlight detail automatically.
Suitable for Elements – 5.0, 4.0, 3.0 | Difficulty level – Basic Related techniques – 5.01, 5.03
The Adjust Smart Fix (Editor: Enhance > Adjust Smart Fix) version of the Auto Smart Fix feature provides the same control over color, shadow and highlight detail but with the addition of a slider control that determines the strength of the enhancement changes. Moving the slider from left to right will gradually increase the amount of correction applied to your picture. This approach provides much more control over the enhancement process and is a preferable way to work with all but the most general photos.
The Auto button, also located in the dialog, automatically applies a fix amount of 100% and provides a similar result to selecting Enhance > Auto Smart Fix.
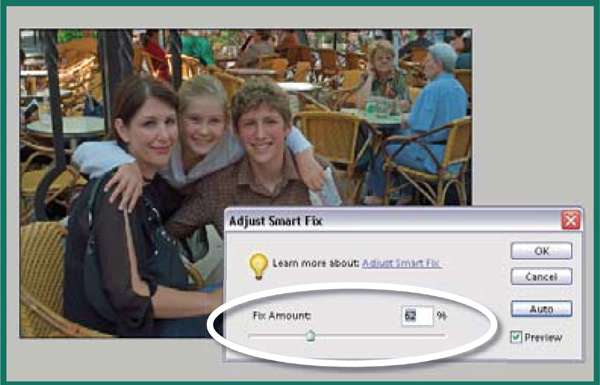
Adjust Smart Fix >> The Adjust Smart Fix option provides a slider control for the auto enhancement effects applied by the feature.
Suitable for Elements – 5.0, 4.0 | Difficulty level – Basic Related techniques – 5.01, 5.03
One of the possible side effects of using the inbuilt flash on your compact digital camera is the appearance of red eyes in the subject. Elements has always had great options for correcting this problem and the current release is no different containing a specific Red Eye Removal tool. All new for Elements 5.0 is the ability to automatically detect the presence of red eye in a photo and then correct the problem. The feature cleverly checks out the metadata attached to the photo to see if flash was used to record the image before searching for the problem eyes and automatically correcting the red hue.
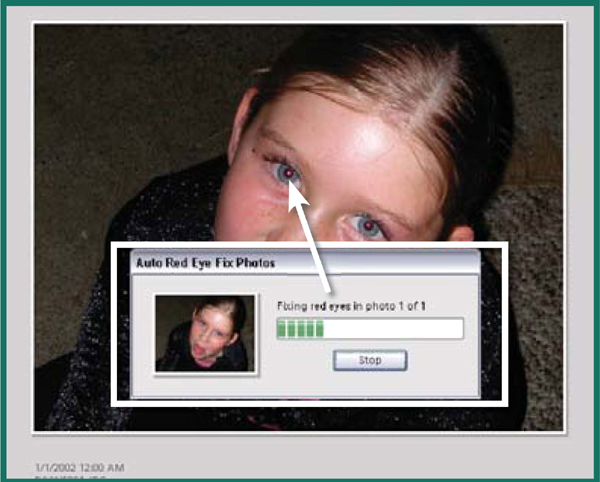
Auto Red Eye Fix >> The Auto Red Eye Fix feature searches for and corrects the red eyes caused by on-camera flash.
Automating Editing of Several Pictures at Once
It’s true that shooting digital has meant that many photographers have saved the time that they used to spend in the darkroom processing their images. The flip side to this coin is that now we while away the hours in on-screen production instead. Surely with all the power of the modern computer and flexibility of Elements there must be quicker ways to process files. Well yes there is!
5.04 Processing Multiple Files
Suitable for Elements – 5.0, 4.0, 3.0 | Difficulty level – Basic Related techniques – 5.05, 5.06
Photoshop Elements users are able to automate a variety of editing functions with the Process Multiple Files feature located in the File menu of the Full Edit workspace. The feature is like a dedicated batch processing tool that can name, size, enhance, label and save in a specific file format a group of photos stored in a folder or selected via the file browser. The dialog’s options include:
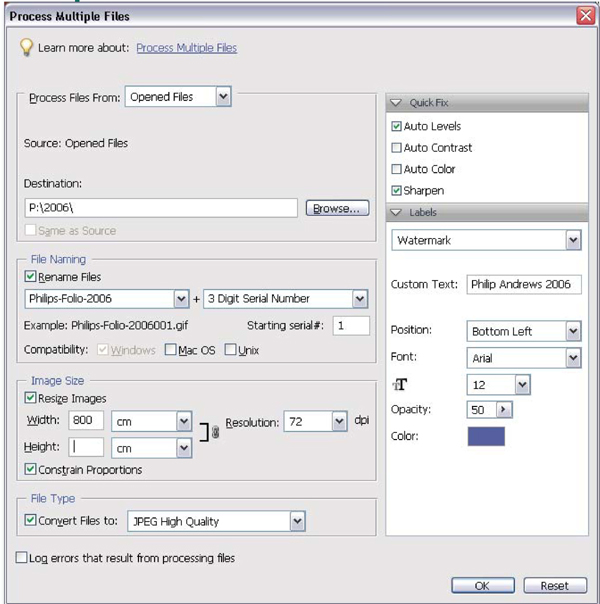
Batch processing of files >> Elements users can automate the application of basic enhancement and editing features to a group of files using the Process Multiple Files feature located in the Full Edit workspace.
Source – Files to be processed can be stored in a single folder, the files currently open in the workspace, pictures in the Photo Bin or images multi-selected in the file browser.
Destination – Sets the location where processed files will be saved.
File naming – Options for naming or renaming of selected files including a range of preset naming styles.
Image Size – Specify size and resolution changes after choosing the unit of measure to work with from the drop-down menu. Proportions can be constrained.
File type – Select the file format that processed files will be saved or converted to.
Quick Fix enhancement – Use the options here to apply automatic enhancement of the files being processed.
Add Labels – Add caption or file name labels to each of the processed files. Also contains an option for watermarking the pictures.
After setting the options for each of the sections in the dialog press the OK button to process the pictures.
Suitable for Elements – 5.0, 4.0, 3.0 | Difficulty level – Basic | Related techniques – 5.04, 5.06
Another method of applying automatic changes to several photos at once is to multi-select photos in the Photo Browser workspace then choose an editing option from the right-click pop-up menu. There are a multitude of options available in this menu with the Rotate, Auto Smart Fix and Auto Red Eye Fix features providing quick editing changes to the selected photos. For best results always apply critical edits and enhancements manually but this technique is particularly useful if you want to process a bunch of files quickly. The added bonus is that the edited versions of the pictures are not saved over the original file but rather they are kept in a Version Set so that it is always possible to extract the original file if need be.
Keystrokes for fast edits of multi-selected photos
Rotate Photos 90° Left – Ctrl + Left |
Auto Smart Fix – Ctrl + Alt + M |
Rotate Photos 90° Right – Ctrl + Right |
Auto Red Eye Fix – Ctrl + R |
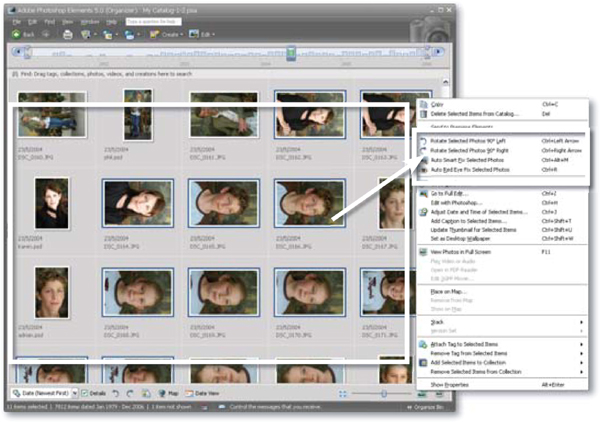
Auto enhance several files >> The editing and enhancement options located on the menu that is displayed when you right-click a thumbnail in the Photo Browser workspace can be just as easily applied to several photos that have been multi-selected as to a single picture.
This method is a quick and easy means of making automatic changes to a group of photos.
Suitable for Elements – 5.0, 4.0 | Difficulty level – Basic Related techniques – 5.04, 5.05
As well as being able to apply the Auto Red Eye Fix feature to individual photos this correction option is also available in the File > Get Photos and Adobe Photo Downloader dialogs. So now it is possible to download pictures from your camera, or import them from a folder, and at the same time be searching the images for red eye and correcting it when it is present. This is a great time saver if you regularly photograph with on-camera flash but as always for the absolute best results apply the Red Eye Fix yourself manually.
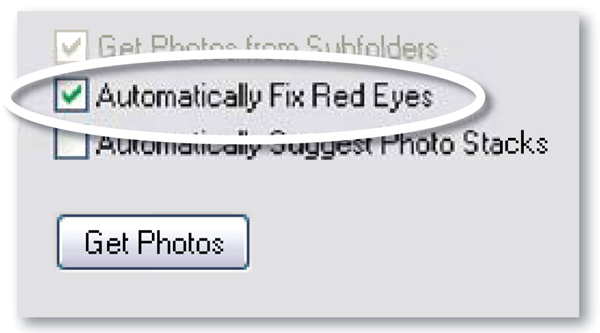
Auto Red Eye Fix >> The Auto Red Eye fix option is also available in dialogs that are used to import or download pictures onto your computer. Selecting this option instructs Elements to search and correct any occurrence of red eye in the photos you are loading into the Organizer workspace.
The second level of features sits in the middle ground between total user control and total program control over the editing results. The tools in this group are primarily available in the Quick Fix editor but also encompass some of the more automatic or easy-to-use controls available in the Full Edit workspace. Move to these tools once you feel more confident with the digital photography process as a whole (downloading, making some changes, saving and then printing) and find yourself wanting to do more with your pictures. Again, for the advanced user the tools listed here will provide a degree of frustration as the amount of control over the results is still limited.
Middle-level control using the features in the Quick Fix and Full Edit
Some changes applied automatically, others via a user controlled slider
New users progress here with experience and understanding
Control of: cropping, rotation, contrast, color, saturation, hue, temperature, tint, shadow and highlight detail, red eye, mid tone contrast and sharpening
5.07 Using the Quick Fix Editor
Suitable for Elements – 5.0, 4.0, 3.0 | Difficulty level – Basic Related techniques – 5.08, 5.09
The Quick Fix Editor contains a reduced tool, feature set designed to facilitate the fast application of the most frequent of all enhancement activities undertaken by the digital photographer.
The Zoom, Hand, Crop and Red Eye Removal tools and the Magic Selection Brush and Selection Brush are located in a small toolbar to the left of the screen and are available for standard image editing changes; the fixed Palette Bin, to the right, contains the necessary features to alter and correct the lighting, color and sharpness of your pictures. Rotate buttons are located at the bottom of the dialog.
One of the best aspects of the Elements 5.0 version of this editing option is the fact that the user can choose to apply each image change automatically, via the Auto button, or manually using the supplied sliders. This approach provides both convenience and speed when needed, with the option of a manual override for those difficult editing tasks.
The adjustment features are arranged in a fashion that provides a model enhancement workflow to follow – simply move from the top to the bottom of the tools starting with smart fixing and red eye correction, working through lighting and color alterations and, lastly, applying sharpening.
There is no doubt that for making speedy adjustments of your favorite images with the option of some override control, the Quick Fix editor is a great place to start. And the best thing of all is you can see the before and after results of your changes on screen via the zoomable preview windows.
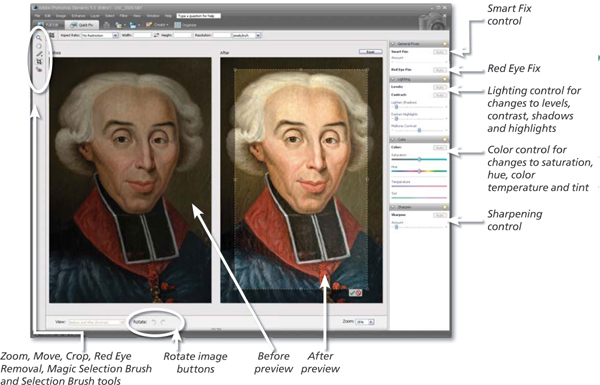
The Quick Fix Editor >> The Quick Fix editor combines the major automatic enhancing tools with great before and after preview pictures.
5.08 Semi-Auto Full Edit Features
Suitable for Elements – 5.0, 4.0, 3.0, 2.0, 1.0 Difficulty level – Basic | Related techniques – 5.07, 5.09
Slightly different versions of the many options found in the Quick Fix Editor workspace are also available in the Full Edit as menu selections in the Enhance menu.
Unlike the Auto Smart Fix option which enhances several different image characteristics in the one action, features like Auto Levels, Auto Contrast, Auto Sharpen, Auto Red Eye Fix and Auto Color Correction generally concentrate on adjusting just one aspect of the photo, providing more specific and controllable changes to your photo.
Quick guide to the Auto features in the Full Edit workspace
Correction needed |
Feature to use |
|---|---|
Low contrast problem |
Enhance > Auto Contrast |
High contrast problem |
Enhance > Auto Contrast |
Color cast problem |
Enhance > Auto Color Correction or Enhance > Auto Levels |
Color cast and contrast problem |
Enhance > Auto Levels |

Auto options in the Full Edit >> The first features listed in the Enhance menu of the Full Edit apply changes to specific aspects of your photo automatically.
Auto Contrast is designed to correct images that are either too contrasty (black and white) or too flat (dull and lifeless). Unlike the Auto Levels feature, Auto Contrast ensures that the brightest and darkest pixels in the picture (irrespective of their colors) are converted to pure white and black. In doing so all the tones in between are expanded or contracted to fit.
Auto Color Correct concentrates on correcting the color in the mid tones of the picture and adjusting the contrast by reassigning the brightest and darkest pixels to white and black.
Auto Levels is similar to Auto Contrast in that it maps the brightest and darkest parts of the image to white and black but differs in that each individual color channel is treated separately.
In the process of mapping the tones (adjusting the contrast) in the red, green and blue channels, dominant color casts can be neutralized.
Sometimes such automatic fixes do not produce the results that you expect. In these scenarios use the Undo (Edit > Undo) command to reverse the changes and try one of the manual correction tools detailed in the next section.
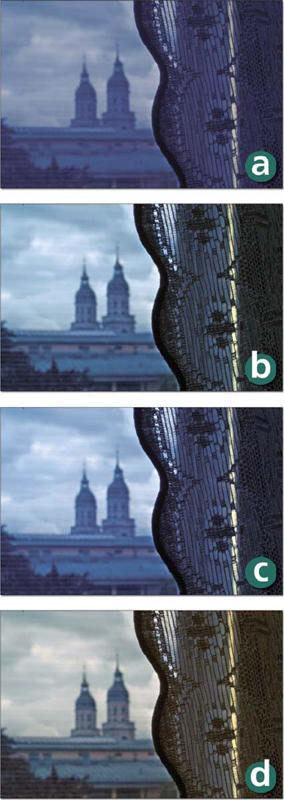
Auto options examples >>
(a) Original uncorrected image.
(b) After applying Auto Levels.
(c) After applying Auto Contrast.
(d) After applying Auto Color Correction.
The final group of tools includes those designed to give the user professional control over their editing and enhancement tasks. Many of the features detailed here are very similar to, and in some cases exactly the same as, those found in the Photoshop program itself. These tools provide the best quality changes available with Elements, but they do require a greater level of understanding and knowledge to use effectively.
The extra editing and enhancement power of these tools comes at a cost of the user bearing all responsibility for the end results. Whereas the automatic nature of many of the features found in the other two groups means that bad results are rare, misusing or over-applying the tools found here can actually make your picture worse. This shouldn’t stop you from venturing into these waters, but it does mean that it is a good idea to apply these tools cautiously rather than with a heavy hand. In fact once most users develop a good level of understanding and skill with the manual tools and features in the Full Edit workspace they seldom return to using automatic enhancement options, preferring to remain in complete control over the pixels in their pictures.
Suitable for Elements – 5.0, 4.0, 3.0, 2.0, 1.0 Difficulty level – Basic Related techniques – 5.07
The Full Edit contains the features and tools used for the most sophisticated of the three different editing pathways provided in Elements 5.0. The groups of tools included in this workspace are designed to give the user professional control over all their editing and enhancement tasks.
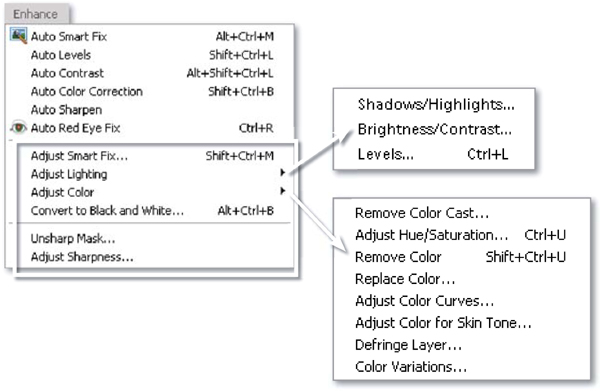
Manual options >> The manual versions of many automatic or semi-automatic enhancement features are located in the lower part of the Enhance menu.
Manual Editing Summary:
Sophisticated control using the features in the Full Edit workspace
Most editing changes applied manually via settings input by the user
Great for complex editing and enhancement tasks performed by more experienced users
The most control of all the major editing and enhancing of your digital photographs
As well as providing manual versions of all the automatic enhancement options that we have looked at so far, the Editor workspace also includes tools that enable the user to isolate where and how the editing changes are applied to photos. For this reason most advanced techniques detailed in the ensuing chapters of this book make use of the extensive tool and feature set provided in this Editor workspace.

The Full Edit >> Advanced editing and enhancement techniques are generally applied in the Full Edit workspace.
Auto/manual feature equivalents
Automatic feature |
Manual equivalent |
|---|---|
Auto Levels |
Levels or Shadows/Highlights or Brightness/Contrast or Adjust Color Curves |
Auto Color Correction |
Remove Color Cast or Color Variations or Adjust Color For Skin Tones |
Auto Contrast |
Levels or Shadows/Highlights or Brightness/Contrast or Adjust Color Curves |
Auto Red Eye Fix |
Red Eye Removal Tool |
Auto Smart Fix |
Levels or Shadows/Highlights or Brightness/Contrast or Adjust Color Curves together with Remove Color Cast or Color Variations or Adjust Color For Skin Tones |
Auto Sharpen |
Unsharp Mask or Adjust Sharpness |
Manual pathway choices >> Photoshop Elements provides manual alternatives for all its automatic and semi-automatic editing options. This table summarizes the specific manual features that can be used as alternatives.