
Chapter 6: Data Authorization and Security
Amazon Redshift provides out-of-the-box features that enable you to build data warehouses to meet the requirements of the most security-sensitive organizations. In AWS, security is the highest priority and is a shared responsibility (https://aws.amazon.com/compliance/shared-responsibility-model/) between AWS and you. Using an Amazon Redshift managed service, the data center and network architecture come out of the box to meet the requirements of security-sensitive organizations. You can now configure the data and cluster management controls to meet your organization's requirements. Data can be encrypted to keep your data secure in transit and at rest using industry-standard encryption techniques. Amazon Redshift resources are controlled in the four different levels of cluster management (creating and configuring the cluster), cluster connectivity, database access to objects, and temporary/single sign-on.
Specifically, the following topics are covered in this chapter:
- Managing infrastructure security
- Data encryption at rest
- Data encryption in transit
- Column-level security
- Loading and unloading encrypted data
- Managing superusers
- Managing users and groups
- Managing federated authentication
- Using IAM authentication to generate database user credentials
- Managing audit logs
- Monitoring Amazon Redshift
Technical requirements
Here are the technical requirements in order to complete the recipes in this chapter:
- Access to the AWS Console.
- The AWS Administrator should create an IAM user by following Recipe 1 – Creating an IAM user in the Appendix. This IAM user will be used for some of the recipes in this chapter.
- The AWS administrator should create an IAM role by following Recipe 3 – Creating an IAM role for an AWS service in the Appendix. This IAM role will be used for some of the recipes in this chapter.
- The AWS administrator should deploy the AWS CloudFormation template (https://github.com/PacktPublishing/Amazon-Redshift-Cookbook/blob/master/Chapter06/chapter_6_CFN.yaml) to create two IAM policies:
a. An IAM policy attached to the IAM user that will give them access to Amazon Redshift, Amazon S3, AWS Secrets Manager, Amazon CloudWatch, Amazon CloudWatch Logs, Amazon EC2, Amazon Simple Notification Service (SNS) AWS Identity and Access Management (IAM), AWS Key Management Service (KMS), AWS Glue, and Amazon Virtual Private Cloud (Amazon VPC)
b. An IAM policy attached to the IAM role that will allow the Amazon Redshift cluster to access Amazon S3.
- Attach the IAM role to the Amazon Redshift cluster by following Recipe 4 – Attaching an IAM role to the Amazon Redshift cluster in the Appendix. Take note of the IAM role name; we will reference it in the recipes as [Your-Redshift_Role].
- An Amazon Redshift cluster deployed in AWS Region eu-west-1.
- Amazon Redshift cluster masteruser credentials.
- Access to any SQL interface such as a SQL client or the Amazon Redshift Query Editor.
- Your AWS account number; we will reference it in recipes as [Your-AWS_Account_Id].
- An Amazon S3 bucket created in eu-west-1; we will reference it as [Your-Amazon_S3_Bucket].
- The code files referenced in the GitHub repository at https://github.com/PacktPublishing/Amazon-Redshift-Cookbook/tree/master/Chapter06.
Managing infrastructure security
Amazon VPC allows you to launch Amazon Redshift clusters in a logically isolated virtual network in which you define the IP address range and subnets and configure the infrastructure security. When you provision an Amazon Redshift cluster, it is locked down by default, so nobody has access to it. To grant inbound access to an Amazon Redshift cluster, you associate the cluster using the security group. Having your Amazon Redshift cluster by following the least access security principle is a best practice.
Getting ready
To complete this recipe, you will need the following setup:
- An IAM user with access to Amazon VPC, Amazon EC2, and Amazon Redshift
- Access to any SQL interface such as a SQL client or the Amazon Redshift Query Editor
How to do it
In this recipe, you will launch an Amazon Redshift cluster inside a custom VPC and subnet using the following steps:
- Navigate to the AWS Console and select the VPC service. Click on Launch VPC Wizard and choose the default VPC with a Single Public Subnet option. Enter the following values and click on the Create VPC button:
- IPv6 CIDR block – Amazon provided IPv6 CIDR block
- VPC name – vpc-redshift
- Subnet name – subnet-redshift
- Service endpoints – com.amazonaws.eu-west-1.s3
Choosing the service endpoints from Amazon S3 allows the traffic to and from Amazon Redshift to be within the VPC, rather than the default of transcending the internet:

Figure 6.1 – Creating a VPC and subnet for Amazon Redshift
- Navigate to Your VPCs on the left-hand menu and note the VPC ID associated with vpc-redshift. Click on the Security Group in the left-hand menu and click on the security group associated with the VPC ID. Click on the Edit inbound Rules, remove the default rules selection, and choose My IP as shown in the following screenshot:

Figure 6.2 – Editing the inbound rules for the security group
In the list of inbound Rules, instead of an individual IP's address, configuring the CIDR IP's ranges provides flexibility for allowing connections within your organization.
Note
You can learn more about setting up a VPC by using this working with VPC guide: https://docs.aws.amazon.com/vpc/latest/userguide/working-with-vpcs.html#add-ipv4-cidr.
- Navigate to the Amazon redshift console, click on the CONFIG menu and choose Subnet groups. Click on Create subnet group, choose vpc-redshift and Add all the subnets for this VPC, provide any friendly description, and click on Create cluster subnet group as shown in the following screenshot:
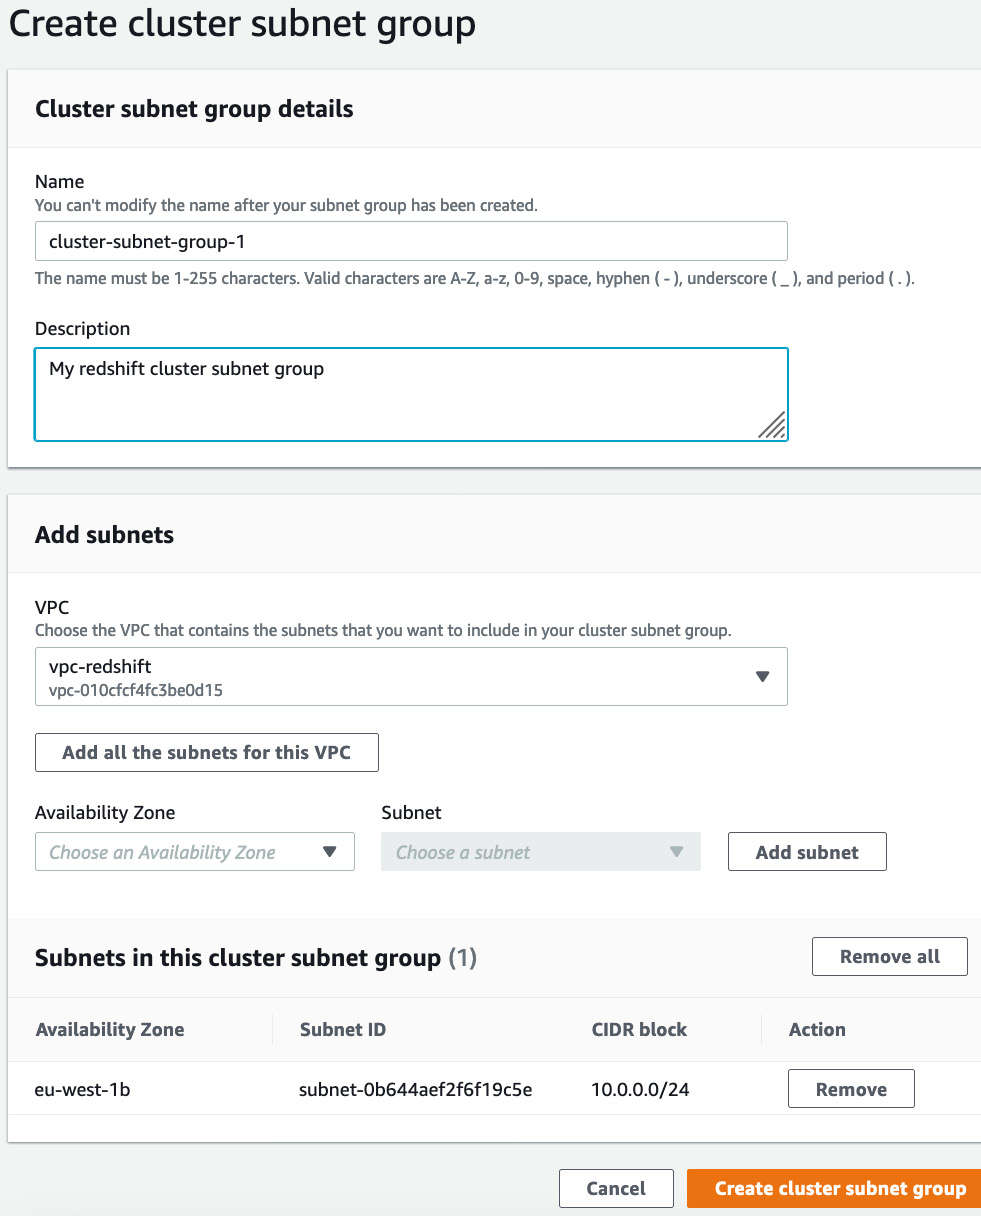
Figure 6.3 – Creating a subnet group for Amazon Redshift
- Click on the CLUSTERS menu and navigate to Amazon Redshift > Clusters > Create cluster. Navigate to the Additional configurations section and toggle off the Use default option. Choose vpc-redshift in the Virtual private cloud (VPC) dropdown as shown in the following screenshot and click on Create cluster:
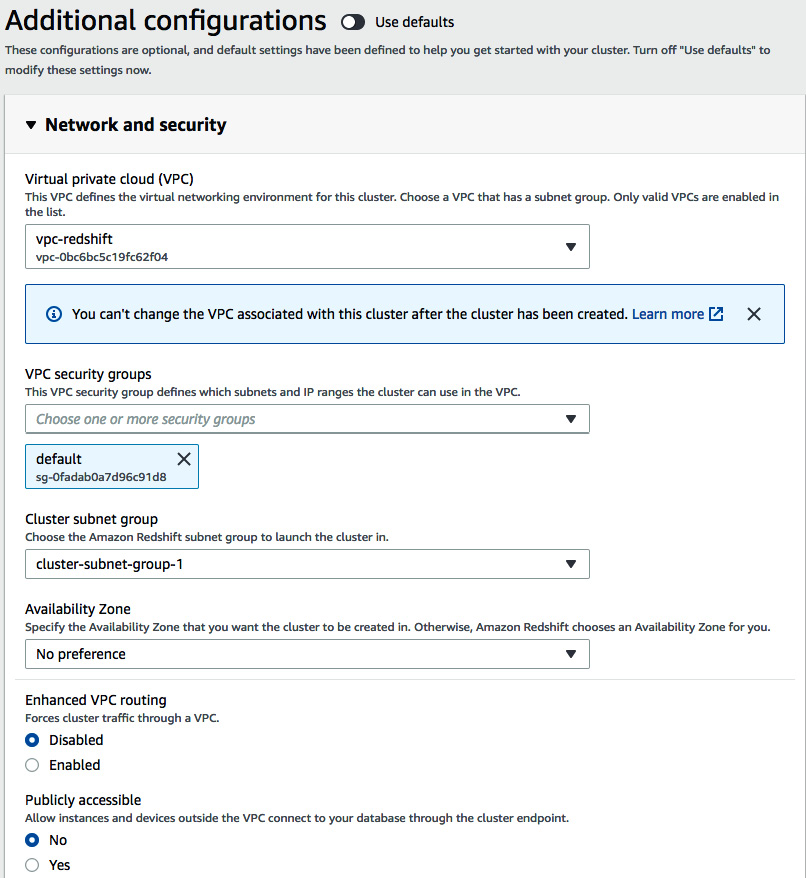
Figure 6.4 – Configuring the network and security when creating the Amazon Redshift cluster
- Connect to the SQL client using the masteruser credentials to verify the connection. You can refer to the Connecting using SQL client section in Chapter 1, Getting Started with Amazon Redshift, for step-by-step instructions.
Data encryption at rest
Amazon Redshift by default provides you with the option to encrypt the cluster at rest, using an AES algorithm with 256-bit key. Key management can be performed by AWS KMS or your hardware security module. When an Amazon Redshift cluster is encrypted at rest, it provides block-level encryption. When the cluster is encrypted, the metadata and snapshots are also encrypted. This enables you to meet your security requirements to comply with PCI, SOX, HIPAA, and GDPR, depending on your needs.
Amazon Redshift uses envelope encryption using a robust four-tier hierarchy of encryption keys: the master key, cluster encryption key (CEK), database encryption key (DEK), and data encryption keys:

Figure 6.5 – Amazon Redshift envelope encryption
Getting ready
To complete this recipe, you will need the following setup:
- An IAM user with access to Amazon KMS and Amazon Redshift
- Reference to encryption at rest in AWS documentation: https://docs.aws.amazon.com/redshift/latest/mgmt/working-with-db-encryption.html
- Reference to AWS CLI for Redshift: https://docs.aws.amazon.com/cli/latest/reference/redshift/index.html
- Reference to Amazon Redshift API: https://docs.aws.amazon.com/redshift/latest/APIReference/Welcome.html
How to do it
In this recipe, we will see options to encrypt a new and an existing Amazon Redshift cluster.
Let's see the option to turn on encryption while creating an Amazon Redshift cluster:
- Navigate to the Amazon redshift console and choose Create cluster. Scroll to Additional configurations and toggle the defaults. This will allow you to expand Database configurations. You have two options to choose from: AWS KMS or HSM. When you choose AWS KMS, you have the option to use the default Redshift key or use the key from an existing AWS account or a different AWS account:

Figure 6.6 – Enabling AWS KMS encryption in Amazon Redshift
- You can also create a cluster with encryption using the AWS CLI or Amazon Redshift API call.
Let's see the option to turn on encryption for an existing Amazon Redshift cluster.
- Navigate to the Amazon redshift console. Click on the existing cluster. Choose the Modify action:
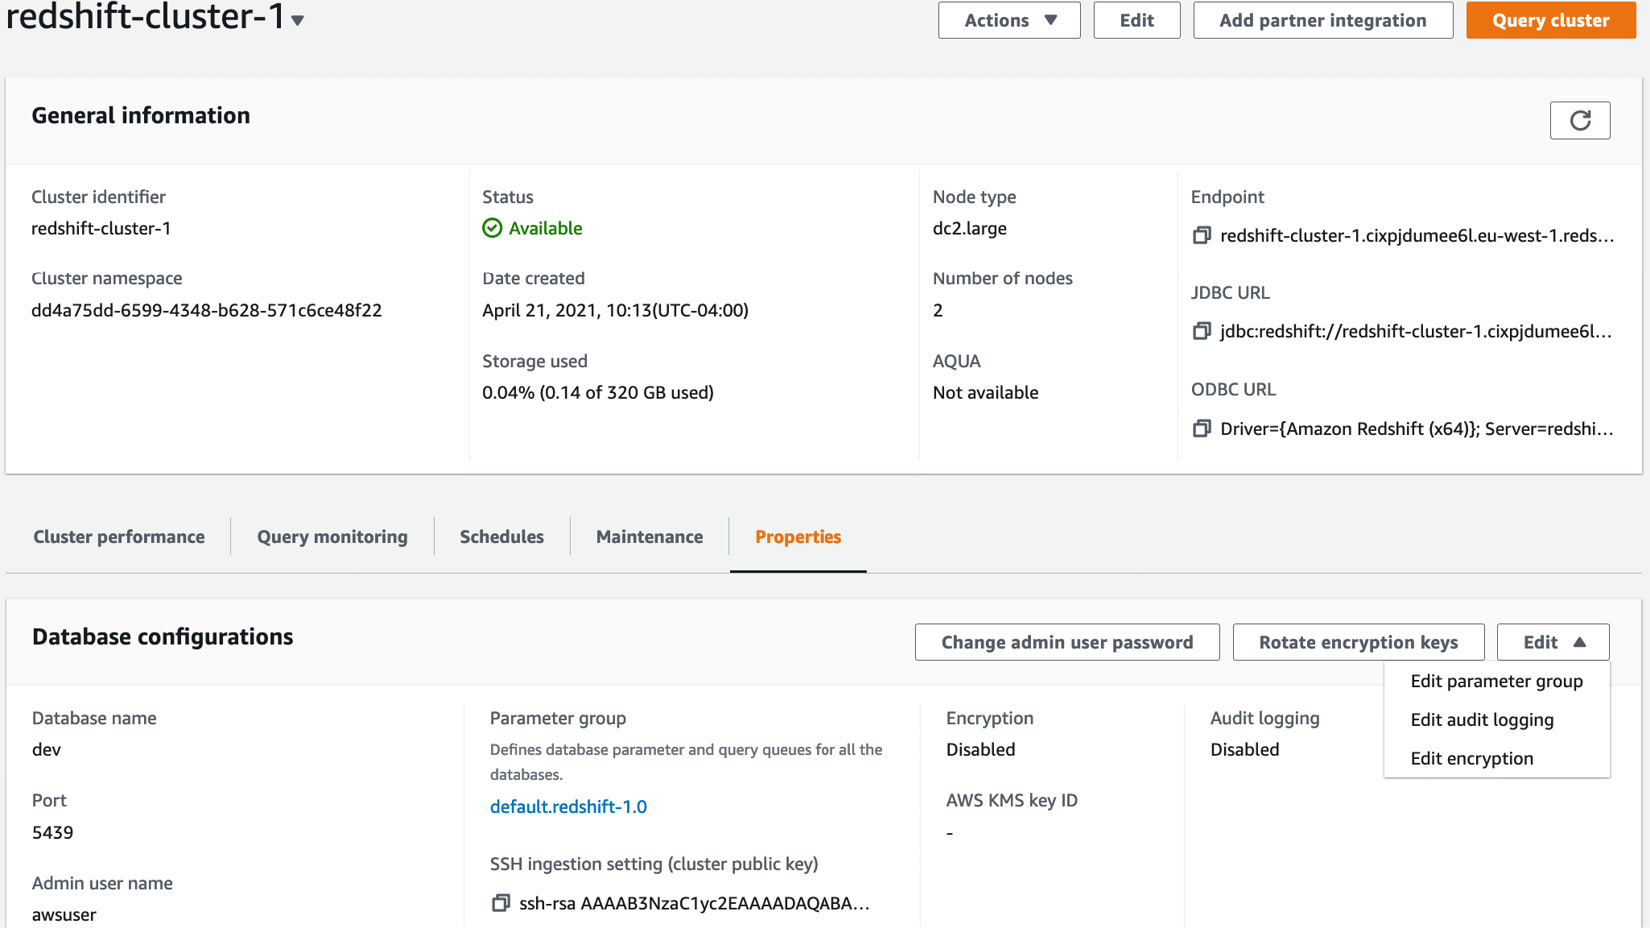
Figure 6.7 – Modifying encryption for an existing Amazon Redshift cluster
- Expand Data configurations. You can enable encryption using KMS with this one-click option. One-click conversion to HSM is not supported. To convert to HSM, you will need to create a new Amazon Redshift cluster with HSM encryption and unload and load data from the old to the new cluster:
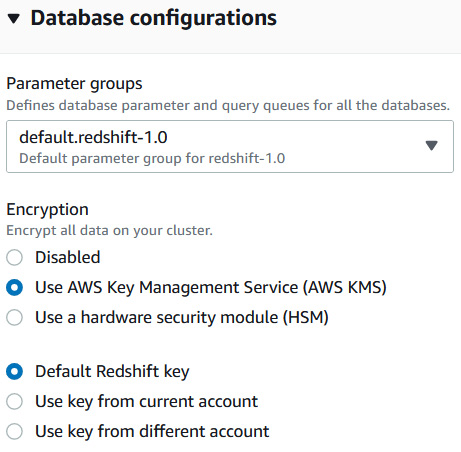
Figure 6.8 – Enabling AWS KMS encryption in Amazon Redshift
- When you modify a cluster, Amazon Redshift will provision a new cluster in the background and change the main cluster to read-only mode. Amazon Redshift will then do a binary transfer of the data from the main cluster to the newly provisioned cluster. When the transfer of the data is completed, Amazon Redshift will change the existing Domain Name Service (DNS) to point to the endpoint of the new cluster. The old cluster is then deleted. The duration of this process is dependent on the amount of data in the main cluster.
- The AWS CLI and Amazon Redshift API support conversion to a KMS-encrypted cluster.
Using the Amazon redshift console, navigate to the existing Amazon Redshift cluster. Choose Actions and select Rotate encryption:

Figure 6.9 – Clusters
- You will see the following dialog box. Amazon Redshift will rotate the Cluster Encryption Key for the cluster and the snapshot. The data encryption key (DEK) for the cluster is changed, but the DEK cannot be changed for the snapshots that are on S3. During key rotation, the cluster is put in ROTATING_KEY state until Amazon Redshift decrypts and re-encrypts the data. You can set the frequency of rotation to meet your organizational needs. You can balance the plan of rotating the keys along with availability considerations for your cluster:

Figure 6.10 – Amazon Redshift rotating the AWS KMS keys
- You can rotate the encryption keys using the AWS CLI and Amazon Redshift API.
Data encryption in transit
With Amazon Redshift, you can encrypt your data in transit. Enabling the SSL allows SQL clients to encrypt the data in transit using the certificates. In addition, the AWS CLI, SDK, and the API client can communicate using the HTTS endpoints. For communication between AWS services such as Amazon S3, DynamoDB, and so on, Amazon Redshift uses hardware-accelerated SSL.
Getting ready
To complete this recipe, you will need the following:
- An IAM user with access to Amazon Redshift.
- Download the JDBC driver from https://docs.aws.amazon.com/redshift/latest/mgmt/configure-jdbc-connection.html.
- SQL client using JDBC or ODBC connection; this recipe uses SQL Workbench/J: http://www.sql-workbench.net/.
- Create a new parameter group for your Amazon Redshift cluster: https://docs.aws.amazon.com/redshift/latest/mgmt/managing-parameter-groups-console.html.
How to do it
In this recipe, we will enable the SSL connection in Amazon Redshift and the SQL Workbench client to establish an SSL connection:
- To configure the Amazon Redshift cluster to require an SSL connection, navigate to the Amazon redshift console. Choose your Amazon Redshift cluster and select the Properties tab. Scroll to the database configuration and select the parameter group:
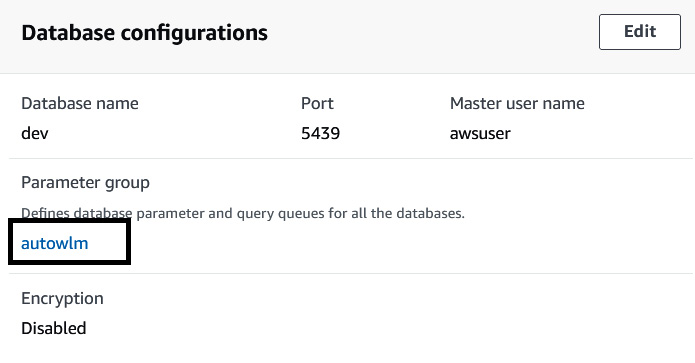
Figure 6.11 – Picking the parameter group associated with your Amazon Redshift cluster
- Clicking on the parameter group will bring you to the workload management configuration page. Set require_ssl to true. Choose Save. Navigate to the Redshift cluster, when the cluster is in the pending-reboot state, and reboot the cluster by selecting Reboot under action:
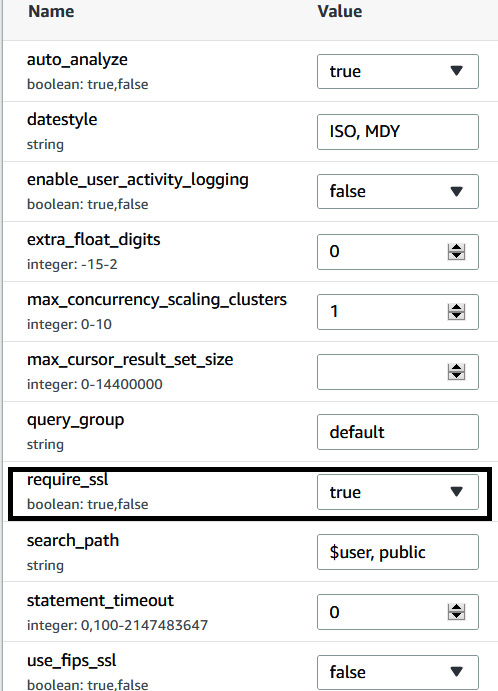
Figure 6.12 – Enabling the require_sql parameter in the parameter group
- When require_ssl is set to true, Amazon Redshift accepts connections that are TLS encrypted. When sslMode is set to verify-ca, then the server is verified by checking the certificate chain up to the root certificate bundled with the Amazon Redshift JDBC/ODBC driver. When sslMode is set to verify-full, the server hostname provided in the connection will be compared to the name stored in the server certificate. If the hostname matches, the connection is successful, else it will be rejected.
- Connect to the Amazon Redshift cluster using your SQL client; this recipe is using SQLWorkbench/J. Get the cluster connection jdbc URL from the cluster's properties tab, connection details. We are using sslMode=verify-full:
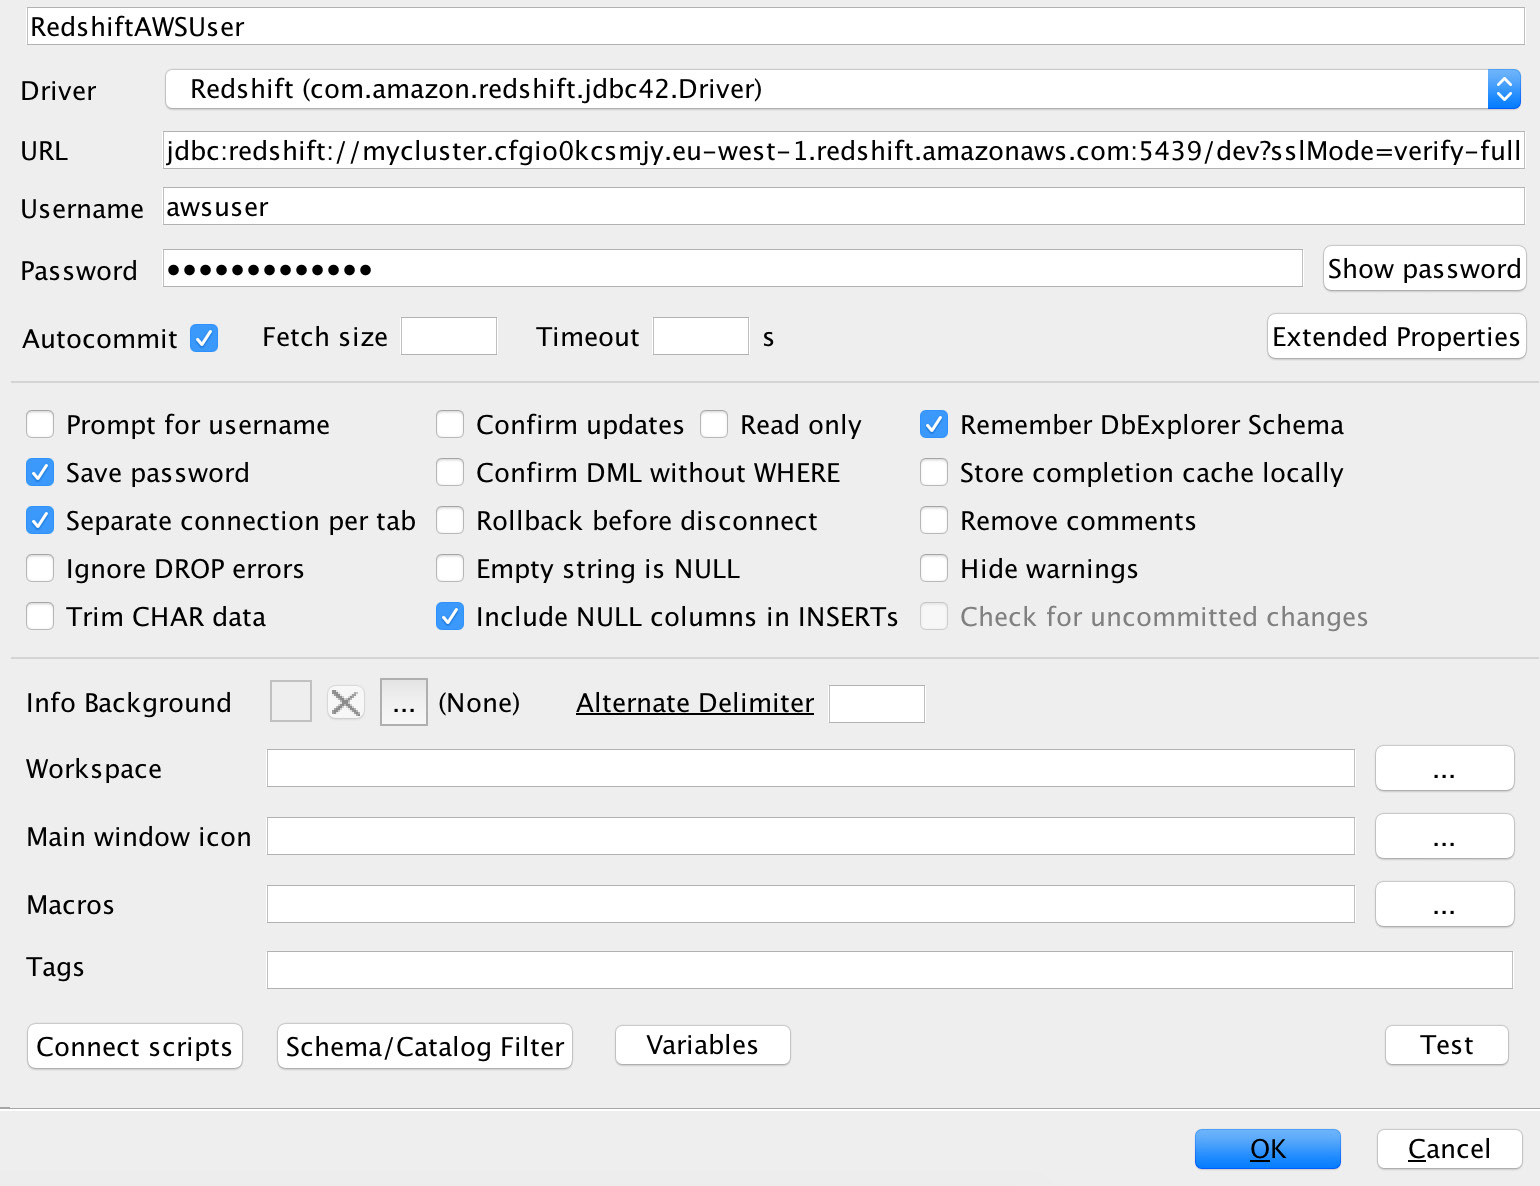
Figure 6.13 – Connecting to Amazon Redshift with SQL Workbench using SSL
- Let's validate whether the connection is using sslMode. Run the following code:
select * from stl_connection_log
order by recordtime desc
limit 2;
Here is the output of the preceding code:

Figure 6.14 – Verifying the SSL connection using the STL_CONNECTION_LOG
We have now successfully connected to Amazon Redshift using a TLS-encrypted connection.
Column-level security
Amazon Redshift supports fine-grained data security with column-level controls. Column-level security can be applied to local tables, views, and materialized views. Applying column-level security allows you to restrict access to personally identifiable information (PII) or payment card information (PCI) to selected people. For instance, you can grant the finance or human resources team access to sensitive information but restrict access to the sales and marketing team.
Getting ready
To complete this recipe, you will need the following:
- An Amazon Redshift cluster deployed in AWS Region eu-west-1
- Amazon Redshift cluster masteruser credentials
- Access to any SQL interface such as a SQL client or the Amazon Redshift Query Editor
How to do it
In this recipe, we will use a customer table. Using column-level access control, a sales user will be restricted from accessing the phone number column:
- Connect to the Amazon Redshift cluster using the SQL client or Query Editor. Create a customer table using the following code:
CREATE TABLE public.customer
(
C_CUSTKEY BIGINT NOT NULL,
C_NAME VARCHAR(25),
C_NATIONKEY BIGINT,
C_PHONE VARCHAR(15),
C_ACCTBAL DECIMAL(18,4),
C_MKTSEGMENT VARCHAR(10),
C_COMMENT VARCHAR(117)
);
- Insert the following records into the customer table:
Insert into public.customer values
(1, 'customer-0001', 1, '123-123-1234', 111.11, 'MACHINERY', 'FIRST ORDER'),
(2, 'customer-0002', 2, '122-122-1234', 222.11, 'HOUSEHOLD', 'SECOND ORDER');
- Let's create the sales user:
CREATE user sales with password 'Sales1234';
- Grant access to the sales users on all the columns in the customer table except the C_PHONE column:
GRANT SELECT (C_CUSTKEY, C_NAME, C_NATIONKEY, C_ACCTBAL, C_MKTSEGMENT, C_COMMENT) ON public.customer TO sales;
- Let's verify the column-level access for sales users. Run the following code. You will receive the error message permission denied, as sales users do not have access to the C_PHONE column:
SET SESSION AUTHORIZATION 'sales';
SELECT CURRENT_USER;
SELECT * FROM public.customer;
--output
ERROR: 42501: permission denied for relation customer
- Let's select the columns in the SELECT statement the sales users have access to:
SET SESSION AUTHORIZATION 'sales';
SELECT CURRENT_USER;
SELECT C_CUSTKEY, C_NAME, C_NATIONKEY, C_ACCTBAL, C_MKTSEGMENT, C_COMMENT FROM public.customer;
Here is the output of the preceding code:

Figure 6.15 – Verifying the successful selection of the PII columns
How it works
Using the GRANT and REVOKE statements, you can enable or disable column-level access control to Amazon Redshift users or groups on tables, views, or materialized views. You can learn about the GRANT and REVOKE syntax for fine-grained access control at https://docs.aws.amazon.com/redshift/latest/dg/r_GRANT.html and https://docs.aws.amazon.com/redshift/latest/dg/r_REVOKE.html.
Loading and unloading encrypted data
Amazon S3 allows to have your data (for example, your source data files) to be encrypted using server-side encryption with Amazon S3-managed keys (SSE-S3) or AWS KMS-managed keys (SSE-KMS). In addition, you can perform client-side encryption using a client-side symmetric master key. Amazon Redshift supports loading the encrypted data into the local table. Similarly, you can unload Amazon Redshift data to Amazon S3 as encrypted files using a customer-managed symmetric master key.
Getting ready
To complete this recipe, you will need the following setup:
- An IAM user with access to Amazon Redshift and AWS KMS.
- An Amazon Redshift cluster deployed in AWS Region eu-west-1.
- Amazon Redshift cluster masteruser credentials.
- Access to any SQL interface such as a SQL client or the Amazon Redshift Query Editor.
- An IAM role attached to the Amazon Redshift cluster that can access Amazon S3; we will reference it in the recipes as [Your-Redshift_Role].
- The AWS CLI configured on local client.
- An AWS account number; we will reference it in recipes as [Your-AWS_Account_Id].
- An Amazon S3 bucket created in eu-west-1; we will reference it as [Your-Amazon_S3_Bucket].
- Copy the customer table data to your Amazon S3 bucket using the following command, replacing [Your-Amazon_S3_Bucket] with your bucket name:
aws s3 cp s3://packt-redshift-cookbook/customer/ s3://[Your-Amazon_S3_Bucket]/Chapter6/customer/
How to do it
In this recipe, we will COPY encrypted data from Amazon S3 and also load as encrypted files:
- Let's start by creating a master encryption key using AWS KMS that will be used to encrypt and decrypt the data by Amazon S3. Navigate to AWS KMS from the AWS Console and select Configure key as shown:

Figure 6.16 – Creating an AWS KMS symmetric key
Note
AWS KMS allows you to manage the encryption key. You can create, store, rotate, and control access to them.
- Enter the name of the alias as cookbook-kms:
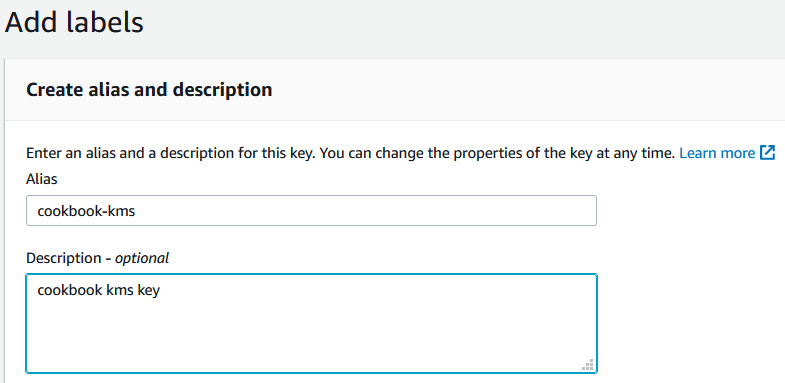
Figure 6.17 – Creating an alias for the AWS KMS encryption key
- Select the user and the Redshift customizable role that will have access to the key. Review the policy and click Finish.
- Make a note of the ARN of the KMS key and Key ID:
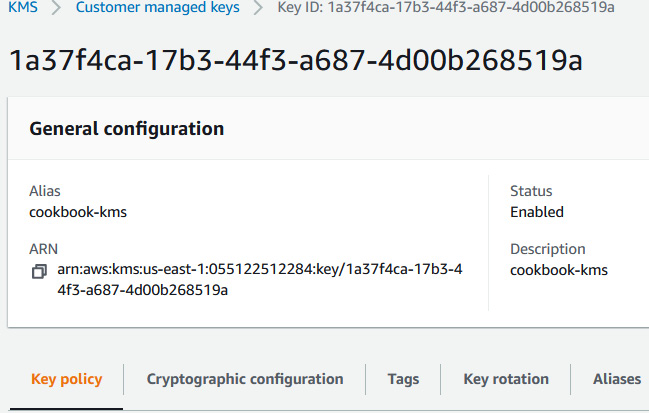
Figure 6.18 – Capturing the ARN for the AWS KMS key
- Navigate to Amazon S3 path s3://[Your_AmazonS3_Bucket]/Chapter6/customer/ and click on the Edit server-side encryption action:
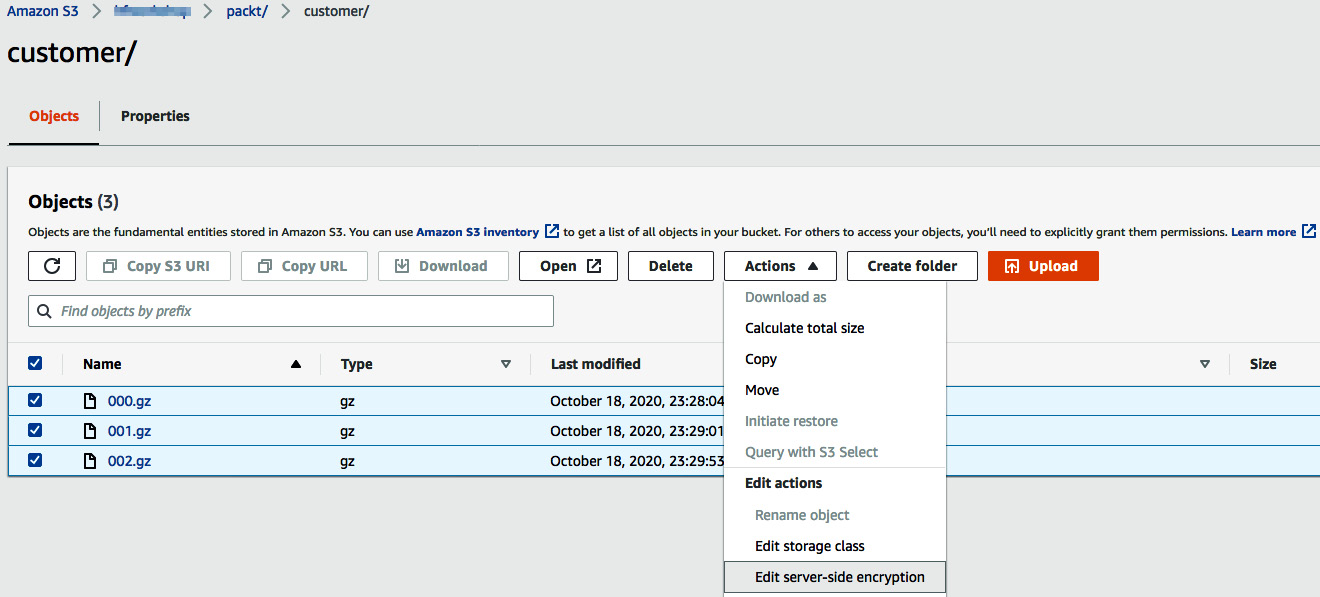
Figure 6.19 – Verifying the server-side encryption
- Click Enable server-side encryption. For Encryption key type, select SSE-KMS. Select the ARN of the cookbook-kms key. Choose Save changes. This will encrypt the customer files on S3:
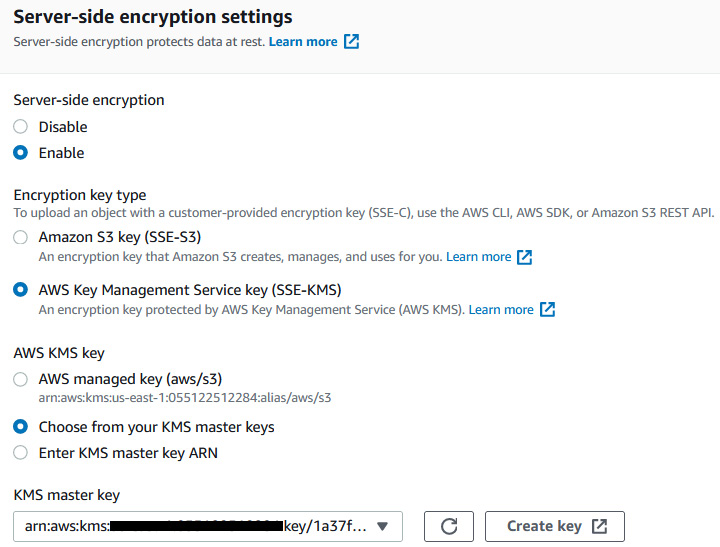
Figrue 6.20 – Encrypting the customer data using a KMS key
- Now let's connect to the Amazon Redshift cluster using a SQL client or the Query Editor and create the customer table:
CREATE TABLE public.customer
(
C_CUSTKEY BIGINT NOT NULL,
C_NAME VARCHAR(25),
C_ADDRESS VARCHAR(40),
C_NATIONKEY BIGINT,
C_PHONE VARCHAR(15),
C_ACCTBAL DECIMAL(18,4),
C_MKTSEGMENT VARCHAR(10),
C_COMMENT VARCHAR(117)
)
diststyle ALL;
- Let's now load the encrypted customer data using the COPY command using the following command:
COPY customer from 's3:// s3://[Your-Amazon_S3_Bucket]/Chapter6/customer/' iam_role 'arn:aws:iam::[Your-AWS_Account_Id]:role/[Your-Redshift_Role]' CSV gzip COMPUPDATE PRESET;
Note
Observe in the COPY command that Amazon Redshift is automatically able to identify that the file is encrypted and communicates with KMS automatically to retrieve the correct master key. This KMS key is used to decrypt the data key and is used by the COPY command for loading.
- Now let's unload the encrypted data to Amazon S3 using a user-provided master key. Execute the following command to unload the data:
unload ('select * from customer') TO 's3:// [Your-Amazon_S3_Bucket]/Chapter6/customer_encrypted/' iam_role 'arn:aws:iam::[Your-AWS_Account_Id]:role/[Your-Redshift_Role]' master_symmetric_key 'EXAMPLEMASTERKEYtkbjk/OpCwtYSx/M4/t7DMCDIK722' encrypted;
Note
Similar to the UNLOAD command, you can also copy the data that was encrypted using a master key. Please see https://docs.aws.amazon.com/redshift/latest/dg/c_loading-encrypted-files.html.
The preceding command unloads the customer table to a set of encrypted files using the specified master symmetric key.
Managing superusers
A superuser allows you to get all the access on Amazon Redshift, independent of all permission checks, and is used for administrative tasks. For example, you can create other users, execute diagnostic queries on system tables, and take action as needed. Superuser access has to be granted sparingly; do not use this for day-to-day work.
The masteruser is a special type of superuser that you set up when launching the cluster.
Getting ready
To complete this recipe, you will need the following setup:
- An IAM user with access to Amazon Redshift
- An Amazon Redshift cluster deployed in AWS Region eu-west-1
- Amazon Redshift cluster masteruser credentials
- Access to any SQL interface such as a SQL client or the Amazon Redshift Query Editor
How to do it
In this recipe, we will illustrate how to create a superuser and use it to list all the active SQL statements, and demonstrate how to terminate a particular statement:
- Connect to Amazon Redshift using the SQL client using the masteruser credentials and execute the following statement to create another superuser, replacing [masteruser_password] with the password of your choice:
create user myadmin createuser password '[masteruser_password]';
If you have forgotten the masteruser credentials, you can navigate to the Amazon Redshift AWS Console and click on your cluster-id (Amazon Redshift → Clusters → YOUR_CLUSTER) and click on the Actions dropdown and click on Change masteruser password to reset it to a new value.
- Now, use the preceding superuser myadmin to reconnect to Amazon Redshift using the SQL Workbench/J client. Execute the following statement to see the list of all the Running SQL statements:
SELECT pid,
TRIM(user_name),
starttime,
duration,
SUBSTRING(query,1,50) AS stmt
FROM stv_recents
WHERE status = 'Running';
Here is the expected sample output:
Pid btrim starttime duration stmt
18764 user_a 2021-03-28 18:39:49.355918 3000 select part_id, seller_id
18790 user_b 2021-03-28 18:39:49.355918 60 Insert into parts(
The query from user_a is taking up over 3,000 seconds to execute and is likely to consume resources (that can be confirmed using the AWS Console), so we assume you would like to terminate this query.
- Execute the following statement to terminate the query with pid = 18764:
set query_group to 'superuser';
cancel 18764;
Using the optional query_group to 'superuser' allows access to the special superuser queue and has the query execute immediately. Please also refer to https://docs.aws.amazon.com/redshift/latest/dg/cm-c-wlm-queue-assignment-rules.html.
Managing users and groups
Users and groups are the building blocks for access management of the objects in the Amazon Redshift cluster. Users get authenticated into the Amazon Redshift cluster and privileges for objects can be managed at the group level for managing access in a scalable manner. Users can be members of one of multiple groups and inherit the access privileges granted to the groups. Users can also be individually granted privileges.
Getting ready
To complete this recipe, you will need the following setup:
- An IAM user with access to Amazon Redshift
- An Amazon Redshift cluster deployed in AWS Region eu-west-1
- Amazon Redshift cluster masteruser credentials
- Access to any SQL interface such as a SQL client or the Amazon Redshift Query Editor
How to do it
In this recipe, we will illustrate how to create users and groups for the schema set up in Chapter 2, Data Management. There are two groups – finance_grp and audit_grp – that will be created and users will be added to those groups:
- Connect to Amazon Redshift using the SQL client using the masteruser or the superuser credentials and execute the following statement to create the following users, replacing [financeuser_password] and [audituser_password] with the passwords of your choice:
create user financeuser1 with password '[financeuser_password]' createdb connection limit 30;
create user audituser1 with password '[audituser_password]'syslog unrestricted;
The audituser1 user is provided syslog unrestricted access that allows visibility to system tables to list queries and transactions performed by other users, which is restricted by default.
- Create the finance schema and finance and audit groups so that object privileges can be managed separately:
create schema if not exists finance;
create group finance_grp with user financeuser1;
create group audit_grp with user audituser1;
- Grant access to objects in the finance schema to the preceding groups:
GRANT USAGE on SCHEMA finance TO GROUP finance_grp, GROUP audit_grp;
GRANT ALL ON schema finance to GROUP finance_grp;
ALTER DEFAULT PRIVILEGES IN SCHEMA finance GRANT ALL
ON tables
TO group finance_grp;
GRANT SELECT ON ALL TABLES IN SCHEMA finance TO GROUP audit_grp;
ALTER DEFAULT PRIVILEGES IN SCHEMA finance GRANT SELECT
ON tables
TO group audit_grp;
- Execute the following statement to verify the user membership to the groups:
SELECT
pg_group.groname
g,pg_group.grosysid
,pg_user.*
FROM pg_group, pg_user
WHERE pg_user.usesysid = ANY(pg_group.grolist)
ORDER BY 1,2
;
Here is the expected sample output:
groname,grosysid,usename,usesysid,usecreatedb,
usesuper,usecatupd,passwd,valuntil,useconfig
finance_grp 106 financeuser1 127 false ******* audit_grp 107
audituser1127 false ********
Hence, in the preceding setup, the users in finance_grp are able to perform all the DDL/DML (SELECT/INSERT/UPDATE/DELETE) operations, the audit_grp users are able to perform only the SELECT operations to isolate the access control managed through the individual groups. You can learn more about the GRANT access options at https://docs.aws.amazon.com/redshift/latest/dg/r_GRANT.html.
Managing federated authentication
Amazon Redshift allows easy integration of multiple Identity Providers (IdPs) such as Microsoft Azure Active Directory, Active Directory Federation Services (ADFS), Okta, Ping Identity, AWS SSO, and any SAML v2. You can manage the authentication and authorization of the users and objects using the IdPs without the need to maintain local database users. This provides seamless extension of your corporate policies to Amazon Redshift and a convenient way to govern them centrally. For example, users just use their corporate credentials to get into Amazon Redshift. In addition, Amazon Redshift also supports multi-factor authentication using the federation to provide additional security when authenticating.
Getting ready
To complete this recipe, you will need the following setup:
- An IAM user with access to Amazon Redshift and AWS IAM
- An Amazon Redshift cluster deployed in AWS Region eu-west-1
- Amazon Redshift cluster masteruser credentials
- Access to any SQL interface such as a SQL client or the Amazon Redshift Query Editor
- The latest JDBC driver AWS SDK that can be downloaded from https://docs.aws.amazon.com/redshift/latest/mgmt/configure-jdbc-connection.html#jdbc-previous-versions-with-sdk
- Your AWS account number; we will reference it in recipes as [Your-AWS_Account_Id]
How to do it
In this recipe, we will integrate the Okta idP with Amazon Redshift:
- Navigate to the Okta portal at https://www.okta.com/free-trial/ and create a 30-day free trial, by specifying a domain name of your choice. Let's call this [your-okta-domain].
- Create the following sample user and group by navigating to the Directory tab at https://mailpackt-cookbook-admin.okta.com/admin/users as follows:
- User: bob west ([email protected])
- Group: dwgroup
Add user bob west to the group dwgroup:
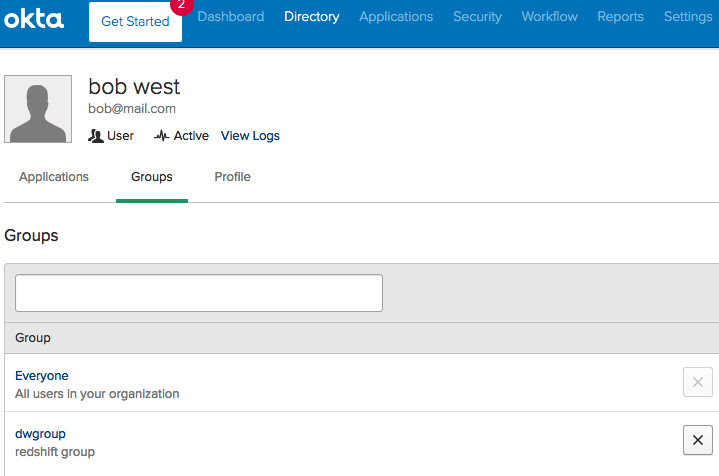
Figure 6.21 – Creating users and groups in Okta
- Log in to Okta using the user bob west, reset the one-time password and note down the new password.
- Navigate to the Applications tab, click on Add application and select Amazon Web Services Redshift as shown in the following screenshot:

Figure 6.22 – Adding an Amazon Redshift application
- Click on Amazon Web Services Redshift in Applications and navigate to the Sign on tab. Right-click on IdP metadata and save the file as metadata.xml.
- Navigate to the AWS Management Console, navigate to the AWS Identity and Access Management (IAM) Console, and click on idPs.
- Click on Add provider and type the provider's name as okta (or any meaningful name) and in the metadata document select the saved file metadata.xml as shown in the following screenshot:
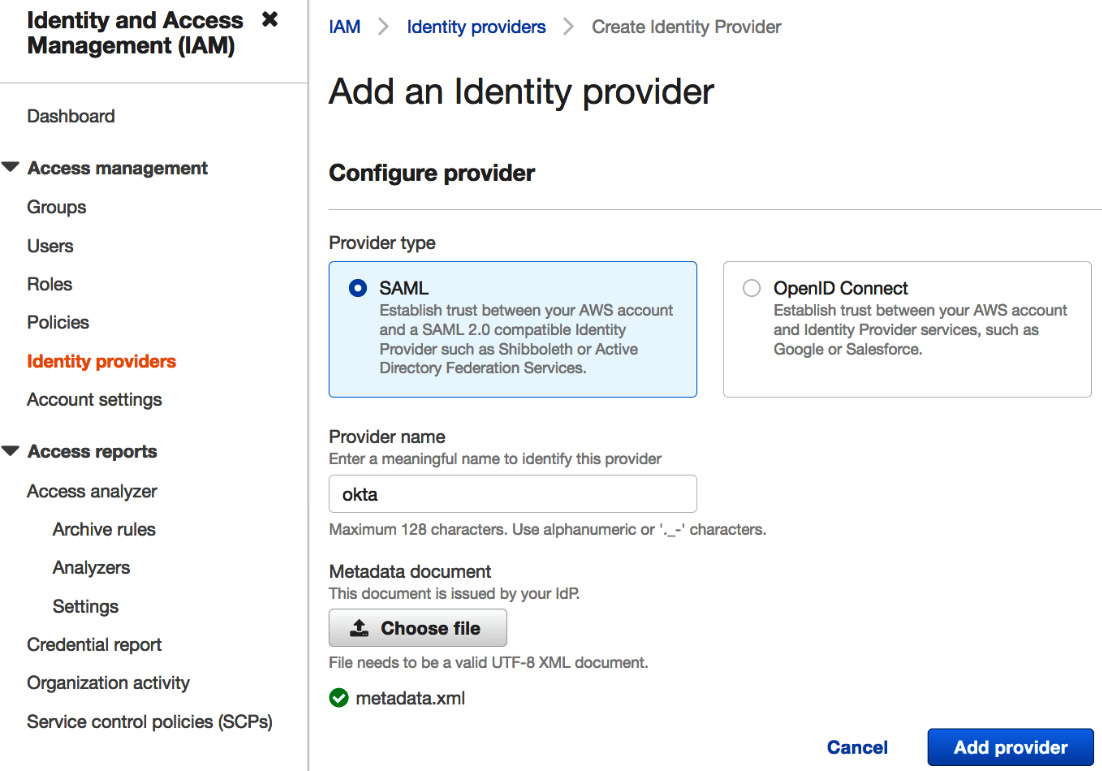
Figure 6.23 – Creating an IdP in the AWS Console
- Navigate to the IAM Console, click on Roles, and choose a new SAML 2.0 federation role. Choose the okta IdP that you created in the previous step, select Allow programmatic and AWS Management Console access and click Next: Permissions as shown in the following screenshot:
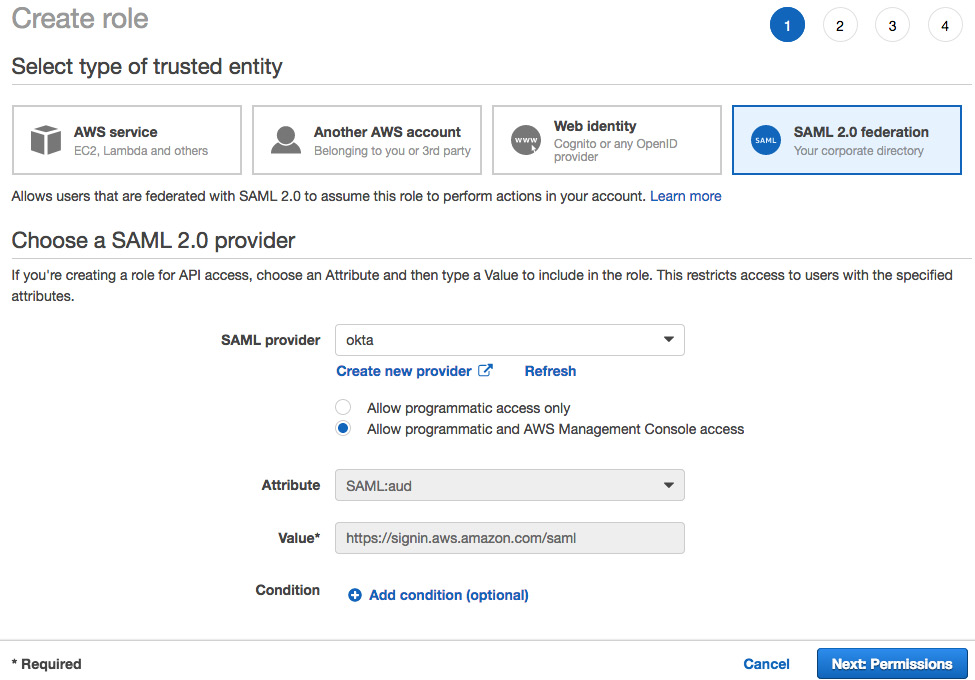
Figure 6.24 – Creating a SAML 2.0 federation role
- Locate the IdP you just created by the Provider Name in the list of IdPs. Click on the name and make a copy of the Provider ARN value. This will be in the form arn:aws:iam:[Your-AWS_Account_Id] :saml-provider/okta.
- Click on Create policy, create a policy with the name redshiftaccess (or any meaningful name), and copy and paste the following policy statement in the JSON table to allow access to the Amazon Redshift cluster replacing the [Your-AWS_Region] and [Your-AWS_Account_Id] with the values corresponding to your AWS account:
{
"Version": "2012-10-17",
"Statement": [{
"Effect": "Allow",
"Action": [
"redshift:CreateClusterUser",
"redshift:JoinGroup",
"redshift:GetClusterCredentials",
"redshift:DescribeClusters"
],
"Resource": [
"arn:aws:redshift:[Your-AWS_Region]:[Your-AWS_Account_Id]:cluster:*",
"arn:aws:redshift:[Your-AWS_Region]:[Your-AWS_Account_Id]:dbuser:[cluster]/*",
"arn:aws:redshift: [Your-AWS_Region]:[Your-AWS_Account_Id]:dbgroup:[cluster]/*"
}]
}
Note
In the preceding policy statement, the permissions allow connection to any Amazon Redshift cluster, dbuser, and dbgroups. Ideally, you can create different IAM policies to make them restrictive to the specific cluster/groups and users that you want to allow access to.
- Once the Role is created, note down the Role ARN that will be in the form arn:aws:iam:[YOUR-AWS_ACCOUNT_Id]:role/redshiftacess.
- Navigate back to Okta using the admin user and click on Applications -> Amazon Webservices Redshift → Sign on and then click Edit.
- Paste the Provider ARN and Role ARN that you made a copy of earlier in this configuration, as comma-separated values, into corresponding fields as arn:aws:iam:[Your-AWS_Account_Id]:saml-provider/okta,arn:aws:iam:[Your-AWS_Account_Id]:role/redshiftacess.
- Session Duration: Set the desired session duration for users in seconds, such as 3600.
- In Provide Redshift related configuration, do the following:
- DB User Format: ${user.username} (this is the default value).
- Auto Create: AutoCreate Redshift property (create a new database user if one does not exist) checked.
- Allowed DB Groups: This configuration determines which Okta groups (names) should be provided access to Redshift, for example db_sales_grp.
Click Save/Next.
- Now navigate to the SQL Workbench/J tool and choose the Amazon Redshift driver with AWS SDK. Use the following JDBC URL to connect to Amazon Redshift, by replacing the corresponding attributes that were set up in the Okta IDP:
jdbc:redshift:iam://[your-redshift-cluster-connection-string]?plugin_name=com.amazon.redshift.plugin.OktaCredentialsProvider&idp_host=[okta-hostname]&preferred_role=[role-arn]&user=[okta-user]&password=[okta-user-password]&app_id=[okta-redhshift-app-id]
For [okta-redhshift-app-id] and [okta-hostname], refer to the URL for the application in your web browser:
https://[okta-hostname]-admin.okta.com/admin/app/amazon_aws_redshift/instance/[okta-redhshift-app-id]
- Click the Test button to verify whether Amazon Redshift is able to federate through the Okta IdP.
How it works
The following diagram shows how Amazon Redshift is able to authenticate the user through the IdP:
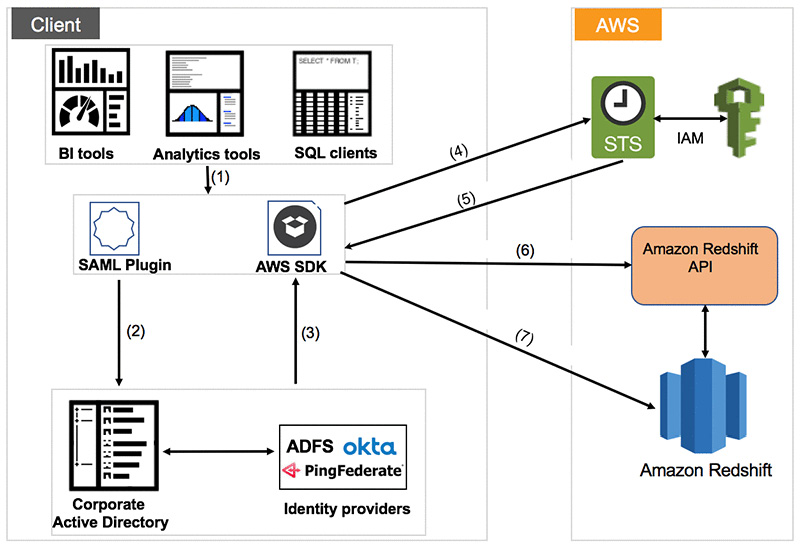
Figure 6.25 – Overall architecture for the integrated IdP
Here is the workflow for the federation with the IdP once integrated with Amazon Redshift:
- Set up the JDBC/ODBC.
- Authenticate using a corporate username/password.
- The % IdP sends SAML assertion.
- Call STS to assume role with SAML.
- STS returns temporary credentials.
- Use the temporary credentials to get the temporary cluster credentials.
- Connect to Amazon Redshift using the temporary credentials.
Using IAM authentication to generate database user credentials
Amazon Redshift allows you to programmatically generate temporary database user credentials that can be used for automated scripts connect to the cluster. Using the get-cluster-credentials command in the AWS Command Line Interface (AWS CLI) and the GetClusterCredentials in the API, you can generate the temporary credentials that can then be used in the JDBC and ODBC options.
Getting ready
To complete this recipe, you will need the following setup:
- An IAM user with access to Amazon Redshift and AWS IAM
- An Amazon Redshift cluster deployed in AWS Region eu-west-1; we will reference the cluster ID as [Your-Redshift_Cluster]
- Amazon Redshift cluster masteruser credentials
- Access to any SQL interface such as a SQL client or the Amazon Redshift Query Editor
- The AWS CLI configured on your local client
How to do it
In this recipe, we will generate temporary credentials to connect to the Amazon Redshift cluster:
- Open the command-line interface where the AWS CLI is installed. Type the following command to verify the AWS CLI installation; that should show the help manual:
aws help
- Execute the following command that will generate the temporary credentials for your Amazon Redshift cluster, replacing [Your-Redshift_Cluster] and [Your-Redshift_DB] with the respective values:
aws redshift get-cluster-credentials --cluster-identifier [Your-Redshift_Cluster] --db-user temp_creds_user --db-name [Your-Redshift_DB] --duration-seconds 3600
The result of the preceding command will produce an output like the following:
{
"DbUser": "IAM:temp_creds_user",
"Expiration": "2020-12-08T21:12:53Z",
"DbPassword": "EXAMPLEjArE3hcnQj8zt4XQj9Xtma8oxYEM8OyxpDHwXVPyJYBDm/gqX2Eeaq6P3DgTzgPg=="
}
- Connect to the SQL client with the username and password credentials, using the preceding values to verify the connection.
Note
The credentials generated using the preceding command are temporary and will expire in 3,600 seconds.
Managing audit logs
Amazon Redshift allows you to log connection and user activities by using the audit logs. Audit logs are published into Amazon S3 asynchronously and provide a mechanism to allow you to monitor the requests to the cluster, which can be used to implement security requirements as well as for troubleshooting. For example, let's say on a particular day in the past, you want to find the user who might have truncated a particular table. The audit logs can query to uncover this information.
Getting ready
To complete this recipe, you will need the following setup:
- The IAM user with access to Amazon Redshift and AWS Glue
- An Amazon Redshift cluster deployed in AWS Region eu-west-1; we will reference the cluster ID as [Your-Redshift_Cluster]
- Amazon Redshift cluster masteruser credentials
- Access to any SQL interface such as a SQL client or the Amazon Redshift Query Editor
- An IAM role that can access Amazon S3; we will reference it in the recipes as [Your-Redshift_Role]
- Your AWS account number; we will reference it in recipes as [Your-AWS_Account_Id]
How to do it
In this recipe, we will illustrate how to turn on the audit logging in Amazon S3 (which is turned off by default) and easily query it:
- Connect to the Amazon redshift console and navigate to Amazon Redshift > Clusters > [YOUR_CLUSTER]. Click on the Maintenance and monitoring tab and scroll down to the Audit logging option as shown in the following screenshot:
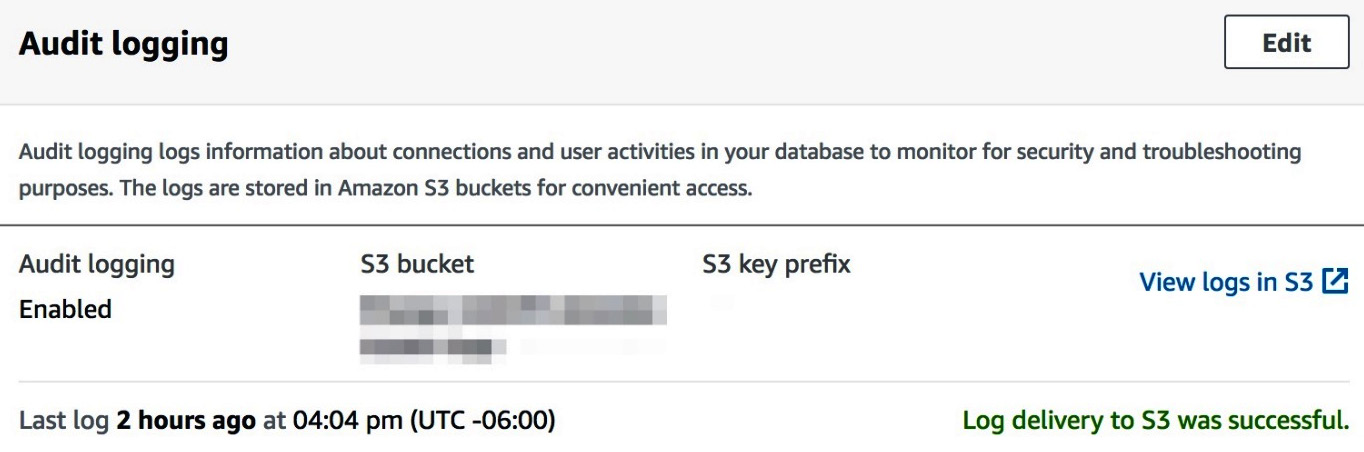
Figure 6.26 – Enabling Amazon Redshift audit logging
- Click on the Edit button in Audit logging and set Enable audit logging to Yes and select (or create) an Amazon S3 bucket as shown in the following screenshot:
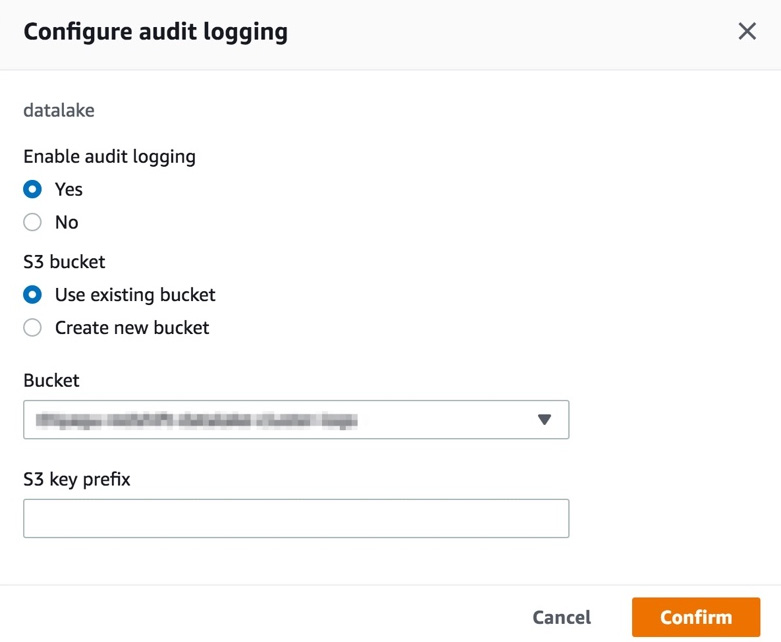
Figure 6.27 – Configuring the target S3 buckets for logging
The previous option turns on the connection logging that will start capturing the connection information such as client host IP, username, and so on, as detailed in https://docs.aws.amazon.com/redshift/latest/mgmt/db-auditing.html#db-auditing-logs. Logs will be delivered asynchronously, organized into hourly S3 prefix locations.
- Once the user connections are made in the Amazon Redshift cluster, connection logs are delivered into previously specified target Amazon S3 location that can be verified used the AWS Console for Amazon S3 or the AWS CLI using the aws s3 ls [AWS S3 Target bucket] command.
The log files are organized as <AWS Account #>/redshift/<Region>/<Year>/<Month>/<Day>/<Hour>.
- Create a new crawler called audit_crawl with the database name audit_logs_db and the table name auditawslogs using the Amazon S3 location configured in the preceding step and choosing Add crawler under Tutorials. See Chapter 9, Lake House Architecture, for step-by-step instructions to configure the AWS Glue crawler.
- Run audit_crawl and after the crawler has run, you should have a new table, auditawslogs, under Data catalog > Databases > Tables as shown in the following screenshot:

Figure 6.28 – AWS Glue
- Connect to the SQL client using the superuser credentials and the create audit_logs schema pointing to the AWS Glue audit_logs_db database created previously:
create external schema audit_logs
from data catalog
database 'audit_logs_db'
iam_role 'arn:aws:iam::[Your-AWS_Account_Id]:role/[Your-Redshift_Role]'
create external database if not exists;
- Use the following query to retrieve the audit information:
SELECT col0 AS event,
col1 AS recordtime,
col2 AS remotehost,
col3 AS remoteport,
col4 AS pid,
col5 AS dbname,
col6 AS username,
col7 AS authmethod,
col8 AS duration,
col9 AS sslversion,
col10 AS sslcipher,
col11 AS mtu,
col12 AS sslcompression,
col13 AS sslexpansion,
col14 AS iamauthguid,
col15 AS application_name,
col16 AS driver_version,
col17 AS os_version,
col18 AS plugin_name
FROM audit_logs.auditawslogs
WHERE partition_5 = 25
AND partition_4 = 12
AND partition_3 = 2020 LIMIT 10;
Here is the output of the preceding code:
event,recordtime,remotehost,remoteport,pid,dbname,
username,authmethod,duration,sslversion,sslcipher,
mtu,sslcompression,sslexpansion,iamauthguid,
application_name,driver_version,os_version,plugin_name
authenticated Fri, 25 Dec 2020 09:02:04:228
[local] 49050 dev rdsdb Ident 0 0
initiating session Fri, 25 Dec 2020 09:02:04:228[local] 49050 dev rdsdb Ident 0 0
disconnecting session Fri, 25 Dec 2020 09:02:04:346 [local] 49050 dev rdsdb Ident 118856 0
authenticated Fri, 25 Dec 2020 09:02:40:156 [local] 49238 dev rdsdb Ident 0 0
As observed in the preceding output, all the session activity is logged as part of the audit trail and can be easily queried using a SQL query.
How it works
Audit logs are also available in system log tables, STL_USERLOG and STL_CONNECTION_LOG, but retention is limited in the system tables.
For longer retention and convenient sharing of the audit information, Amazon Redshift logs can be enabled that asynchronously send the logs into Amazon S3. The user activity log can be enabled by setting the enable_user_activity_logging parameter to true in the database parameter group in addition to the connection logs.
Monitoring Amazon Redshift
Monitoring the cluster performance metrics allows you to ensure the cluster is operating healthily. Amazon Redshift publishes metrics such as CPU, disk utilization, query workloads, and so on continuously. These metrics can be automatically monitored for anomalies to trigger notification events. Amazon Redshift publishes the cluster performance metrics to AWS CloudWatch as well, which allows you to monitor all your AWS services in a centralized location.
Getting ready
To complete this recipe, you will need the following setup:
- An IAM user with access to Amazon Redshift and Amazon SNS.
- An Amazon Redshift cluster deployed in AWS Region eu-west-1.
- Create an Amazon SNS topic (called AmazonRedshiftHealthNotification) to receive the alarm notifications using https://docs.aws.amazon.com/sns/latest/dg/sns-create-topic.html.
How to do it
In this recipe, we will illustrate how to watch the cluster and query monitoring metrics and also set up a health check alarm:
- Connect to the Amazon redshift console and navigate to Amazon Redshift > Clusters > [YOUR_CLUSTER]. Click on Cluster performance to view the metrics such as CPU, disk utilization, and so on, as shown in the following screenshot:

Figure 6.29 – Monitoring cluster performance
- Click on the Query monitoring tab, which shows the list of queries that have executing/completed queries, as shown in the following screenshot:
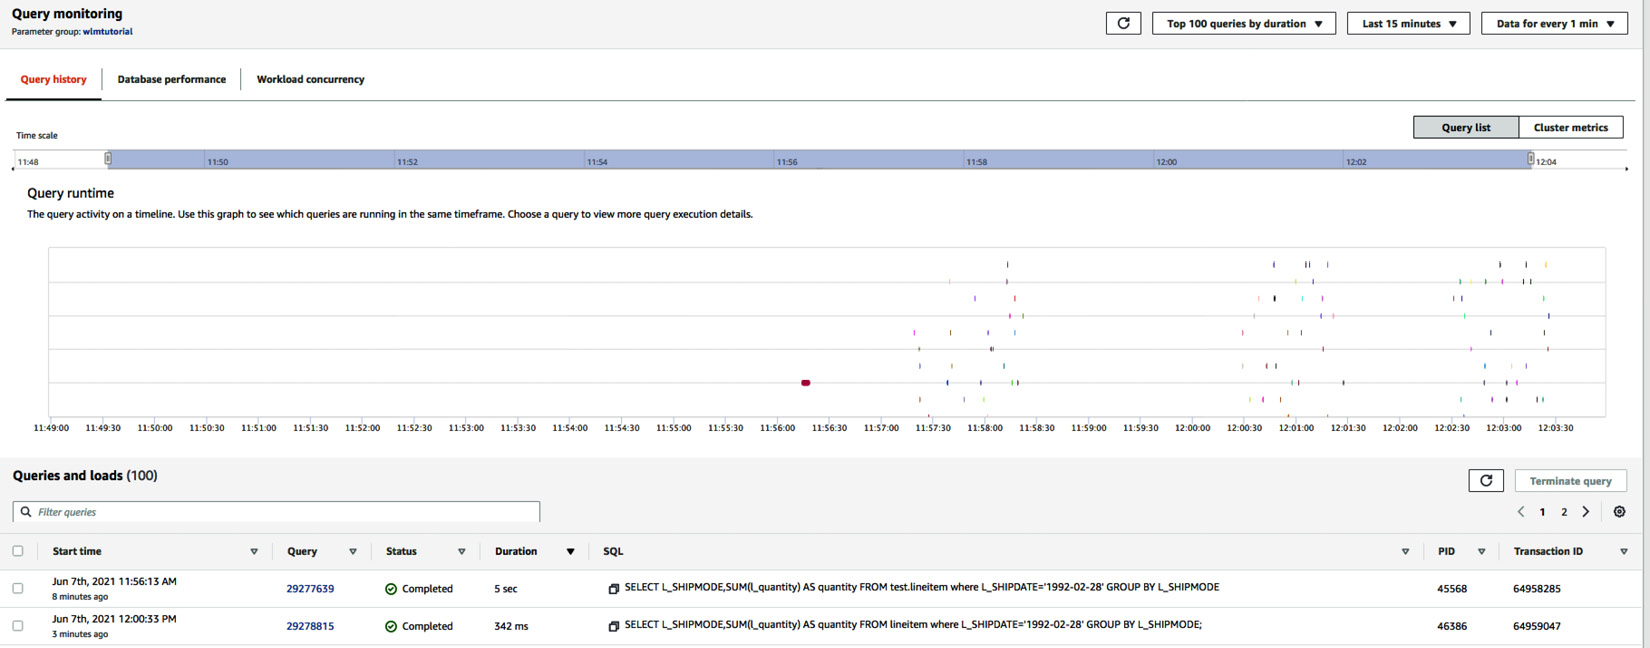
Figure 6.30 – Monitoring query execution history
Query monitoring also provides the ability to get insights into the overall workload in the cluster using the Database performance tab and also break down the time query spends into queue versus execution using the Workload concurrency tab.
- Click on Amazon Redshift > Alarms > Create alarm and choose the following options to set up a health check alarm for the cluster:
- Cluster identifier: Choose the Amazon Redshift cluster for which you want to set up the alarm.
- Alarm for metric: Choose maximum for all nodes.
- When metric value is: Less than (<) 1.
- If the alarm state is maintained for: 10 consecutive periods of 5 minutes.
- In the alarm details, choose the following options:
a. Alarm name: Any meaningful name for the health alarm
b. Notification: Enabled
c. Notify SNS topic: Select AmazonRedshiftHealthNotification
Click on Create alarm to complete the setup for the health check alarm.
How it works
The health check alarm is a binary value where 1 indicates a healthy cluster node, while 0 indicates an unhealthy node. The health check alarm is monitoring for any value that is less than 1 for 10 consecutive times for a duration of 5 minutes to notify through the SNS topic. Similarly, other performance metrics can be configured and notified when the thresholds are breached.