
Chapter 4: Data Pipelines
Companies build modern cloud-based data warehouses to either migrate from their on-premises data warehouses or to build new workloads. To hydrate data in these modern data warehouses, users can build data pipelines based on the source data. In this chapter, we will cover the different types of data pipelines that we can design on Amazon Web Services (AWS) with Amazon Redshift as a destination data warehouse.
The following recipes are discussed in this chapter:
- Ingesting data from transactional sources using AWS Database Migration Service (AWS DMS)
- Streaming data to Amazon Redshift via Amazon Kinesis Firehose
- Cataloging and ingesting data using AWS Glue
Technical requirements
Here are the technical requirements in order to complete the recipes in this chapter:
- Access to the AWS Management Console.
- AWS administrators should create an Identity and Access Management (IAM) user by following Recipe 1 – Creating an IAM user in the Appendix section. This IAM user will be deployed to perform some of the recipes in this chapter.
- AWS administrators should create an IAM role by following Recipe 3 – Creating an IAM role for an AWS service in the Appendix. This IAM role will be deployed to perform some of the recipes in this chapter.
- AWS administrators should deploy the AWS CloudFormation template (https://github.com/PacktPublishing/Amazon-Redshift-Cookbook/blob/master/Chapter04/chapter_4_CFN.yaml) to create two IAM policies:
a. An IAM policy attached to the IAM user that will give the user access to Amazon Redshift, Amazon Relational Database Service (Amazon RDS), Amazon Kinesis, Amazon Kinesis Data Firehose, Amazon CloudWatch Logs, AWS CloudFormation, AWS Secrets Manager, Amazon Cognito, Amazon Simple Storage Service (Amazon S3), AWS DMS, and AWS Glue.
b. An IAM policy attached to the IAM role that will allow an Amazon Redshift cluster to access Amazon S3.
- Attach the IAM role to an Amazon Redshift cluster by following Recipe 4 – Attaching an IAM Role to the Amazon Redshift cluster in the Appendix section. Take a note of the IAM role name, which we will refer to in the recipes as [Your-Redshift_Role].
- An Amazon Redshift cluster deployed in the eu-west-1 AWS region.
- Amazon Redshift cluster master user credentials.
- Access to any Structured Query Language (SQL) interface such as a SQL client or the Amazon Redshift query editor.
- An Amazon RDS MySQL cluster deployed in the eu-west-1 AWS region in the same virtual private cloud (VPC) as the Amazon Redshift cluster (refer to https://aws.amazon.com/getting-started/hands-on/create-mysql-db/ for more information).
- An AWS DMS replication instance deployed in the eu-west-1 AWS region in the same VPC as the Amazon Redshift cluster (refer to https://docs.aws.amazon.com/dms/latest/sbs/CHAP_RDSOracle2Aurora.Steps.CreateReplicationInstance.html for more information).
- A command line to connect to Amazon RDS MySQL (refer to https://docs.aws.amazon.com/AmazonRDS/latest/UserGuide/USER_ConnectToInstance.html for more information).
- Access to the Kinesis Data Generator (KDG), which is a user interface (UI) that helps to send test data to Amazon Kinesis. Use this blog post to configure the open source KDG: https://aws.amazon.com/blogs/big-data/test-your-streaming-data-solution-with-the-new-amazon-kinesis-data-generator/.
- An AWS account number, which we will refer to in the recipes as [Your-AWS_Account_Id].
- An Amazon S3 bucket created in the eu-west-1 region, which we will refer to in the recipes as [Your-Amazon_S3_Bucket].
- The code files are referenced in the GitHub repository at https://github.com/PacktPublishing/Amazon-Redshift-Cookbook/tree/master/Chapter04.
Ingesting data from transactional sources using AWS DMS
When you have transactional data sources—either on-premises or on AWS RDS—and you want to replicate or migrate that data to your data warehouse in Amazon Redshift for consolidation or reporting, you can use AWS DMS. AWS DMS is a fully managed service that helps you to do full loading from your transactional source to the target data warehouse as well as near-real-time change data capture (CDC) from source to target.
In this recipe, we will do full replication of the parts table from Amazon RDS MySQL, serving as a transactional source to the Amazon Redshift database warehouse.
Getting ready
To complete this recipe, you will need the following:
- An Amazon Redshift cluster deployed in the eu-west-1 AWS region.
- Amazon Redshift cluster master user credentials.
- An IAM user with access to Amazon Redshift, Amazon RDS, and AWS DMS.
- An Amazon RDS MySQL cluster deployed in the eu-west-1 AWS region in the same VPC as the Amazon Redshift cluster (refer to https://aws.amazon.com/getting-started/hands-on/create-mysql-db/ for more information).
- An AWS DMS replication instance deployed in the eu-west-1 AWS region in the same VPC as the Amazon Redshift cluster (refer to https://docs.aws.amazon.com/dms/latest/sbs/CHAP_RDSOracle2Aurora.Steps.CreateReplicationInstance.html for more information).
- A command line to connect to Amazon RDS MySQL (refer to https://docs.aws.amazon.com/AmazonRDS/latest/UserGuide/USER_ConnectToInstance.html for more information). Open connectivity between your local client, such as Amazon Elastic Compute Cloud (Amazon EC2) Linux, to the Amazon RDS MySQL database.
- Open connectivity between Amazon RDS MySQL and AWS DMS instances.
- Note the VPC ID where Amazon Redshift and Amazon RDS are deployed.
How to do it…
This recipe will illustrate full replication of the parts table from Amazon RDS MySQL to the Amazon Redshift cluster using AWS DMS as the replication engine:
- Let's connect to the Amazon RDS MySQL database using the command line installed on the AWS EC2 instance. Enter the password to connect to the database:
mysql -h [yourMySQLRDSEndPoint] -u admin -p;
- We will create an ods database on MySQL and a parts table in the ods database:
create database ods;
CREATE TABLE ods.part
(
P_PARTKEY BIGINT NOT NULL,
P_NAME VARCHAR(55),
P_MFGR VARCHAR(25),
P_BRAND VARCHAR(10),
P_TYPE VARCHAR(25),
P_SIZE INTEGER,
P_CONTAINER VARCHAR(10),
P_RETAILPRICE DECIMAL(18,4),
P_COMMENT VARCHAR(23)
)
- On your client server, download the part.tbl file from GitHub at https://github.com/PacktPublishing/Amazon-Redshift-Cookbook/blob/master/Chapter04/part.tbl.
- We will now load this file into the ods.part table on the MySQL database. This will load 20000 records into the parts table:
LOAD DATA LOCAL INFILE 'part.tbl'
INTO TABLE ods.part
FIELDS TERMINATED BY '|'
LINES TERMINATED BY ' ';
- Let's verify the record count loaded into the ods.part table:
MySQL [(none)]> select count(*) from ods.part;
+----------+
| count(*) |
+----------+
| 20000 |
+----------+
1 row in set (0.00 sec)
- Turn on binary logging on the RDS MySQL database by executing the following command:
call mysql.rds_set_configuration('binlog retention hours', 24);
In your MySQL database instance in parameter group
Set the binlog_format parameter to ROW
Binary logging enables CDC for the AWS DMS service. You can get more details about turning on binary logging at this link: https://docs.aws.amazon.com/dms/latest/userguide/CHAP_Source.MySQL.html#CHAP_Source.MySQL.AmazonManag.
- Now, we will go to the AWS DMS landing page to create a source and target for the replication instance. Refer to https://console.aws.amazon.com/dms/v2/home? for more information on this.
- First, we will create a source endpoint for RDS MySQL. Navigate to Endpoints and click on Create endpoint. Select Source endpoint and check Select RDS DB instance. From the drop-down menu, select your RDS instance:

Figure 4.1 – Creating an AWS DMS source endpoint for MySQL database
- Enter the password for your RDS MySQL database:

Figure 4.2 – AWS DMS source endpoint for MySQL database
- Test your endpoint connection from the AWS DMS replication you created earlier on. Select a VPC and replication instance and click Run test. On completion, you will receive a successful connection message:

Figure 4.3 – AWS DMS source endpoint for MySQL database test connection
- Secondly, we will create a target endpoint for the Amazon Redshift cluster. Click on Create endpoint and select Target endpoint. Populate the details of your Amazon Redshift cluster endpoint, including user ID, password, and database name. Test the connection using the pre-created database replication instance:

Figure 4.4 – AWS DMS target endpoint for Amazon Redshift
- Now, we will create a database migration task. Navigate to Database migration tasks and click on Create task. Select a replication instance. For Source database endpoint, select mysqldb, and for Target database endpoint, select the cookbooktarget Amazon Redshift endpoint you created. For Migration type, select Migrate existing data and replicate ongoing changes. This will do a full load followed by ongoing CDC:
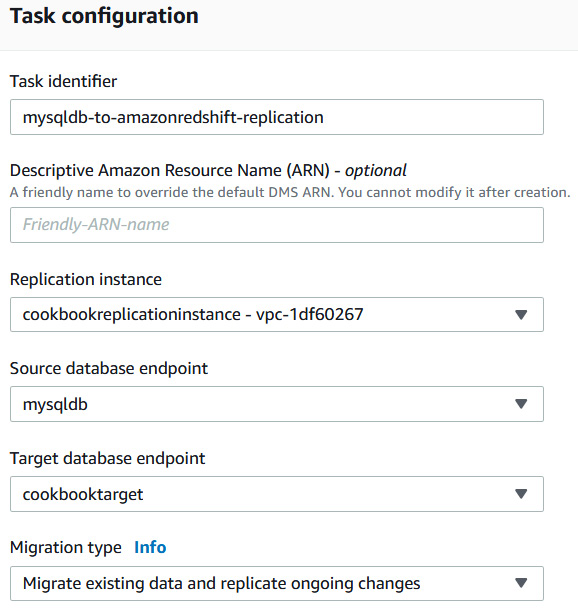
Figure 4.5 – AWS DMS migration task
- For Target table preparation mode, select Do nothing. AWS DMS assumes that the target tables have been pre-created by Amazon Redshift.
- For Table Mappings, add the following rule. Enter ods as the schema name and a % character as a wildcard table name:

Figure 4.6 – AWS DMS migration task source table mapping rules
- For transformation rules for the target, select the ods schema and table wildcard name and select an action to add a stg_ prefix to the table name on Amazon Redshift. In the DMS task, you can apply some transformation rules (for example, convert to lowercase or remove columns):

Figure 4.7 – AWS DMS migration task target transformation rule
- In the Migration task startup configuration, select the Manually later option and click on Create task.
- Once the task has a Ready status, click on the task. Then, under Action, select Restart and resume. With this, the replication instance has connected to the source and has replicated data to Amazon Redshift.
- To view the status of the replication, click on Table statistics. The load state on completion will show Table completed. The total rows on the ods.part target Amazon Redshift table are 20,000:

Figure 4.8 – AWS DMS migration task status and full mode replicated record count
- Let's insert the following records into the source MySQL database part table to see the CDC scenario:
insert into ods.part values
(20001,'royal red metallic dim','Manufacturer#2','Brand#25','STANDARD BURNISHED NICKEL',48,'SM JAR',920.00,'sts-1');
insert into ods.part values
(20002,'royal red metallic dim','Manufacturer#2','Brand#26','STANDARD BURNISHED NICKEL',48,'SM JAR',921.00,'sts-2');
insert into ods.part values
(20003,'royal red metallic dim','Manufacturer#2','Brand#27','STANDARD BURNISHED NICKEL',48,'SM JAR',922.00,'sts-3');
insert into ods.part values
(20004,'royal red metallic dim','Manufacturer#2','Brand#28','STANDARD BURNISHED NICKEL',48,'SM JAR',923.00,'sts-4');
insert into ods.part values
(20005,'royal red metallic dim','Manufacturer#2','Brand#29','STANDARD BURNISHED NICKEL',48,'SM JAR',924.00,'sts-5');
- On the database migration task, let's check the CDC of the five newly inserted five records. The Inserts column shows 5, and the Total rows column on the target now has 20,005 records:
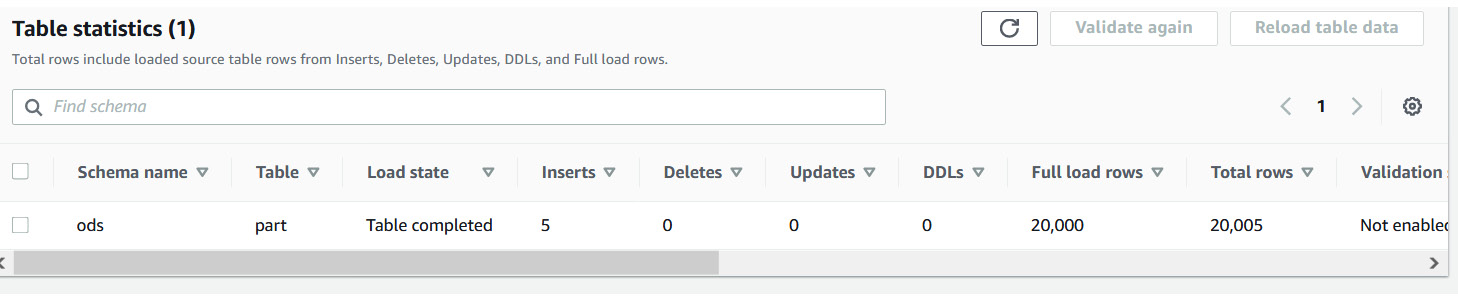
Figure 4.9 – AWS DMS migration task status and CDC replicated record count
- Let's confirm the record count on the ods.stg_part Amazon Redshift table. Execute the following query in the SQL client, and the output will be 20,005 records:
select count(*) from ods.stg_part;
- You can choose to stop the database migration task by navigating to Database migration tasks > Actions > Stop.
How it works…
AWS DMS provides the capability to do homogenous (same database platform—for example, on-premises MySQL to Amazon RDS MySQL) and heterogeneous (different database platform) replication. In this recipe, we saw the scenario of heterogeneous replication, whereby the source is MySQL and the target is Amazon Redshift. Using an AWS DMS task, it first fully migrated the data to Amazon Redshift, and the task captured changes from the source transactional logs that got replicated to Amazon Redshift in near real time.
Streaming data to Amazon Redshift via Amazon Kinesis Firehose
Streaming datasets are continuous datasets that can originate from sources such as internet of things (IoT) devices, log files, gaming systems, and so on. Ingesting streamed data into Amazon Redshift allows the running of near-real-time analytics that can be combined with the historical/operational data to produce actionable reporting—for example, in a manufacturing shop, analyzing the data from several IoT sensors can help predict the failure of machinery and enable you to take preventive action.
In this recipe, we will simulate a streaming dataset using the www.amazon.com product review data to be ingested into Amazon Redshift using Amazon Kinesis Firehose. Amazon Kinesis Firehose provides out-of-the-box integration to capture the streaming dataset and land it into an Amazon Redshift table.
Getting ready
To complete this recipe, you will need the following:
- An Amazon Redshift cluster deployed in the eu-west-1 AWS region.
- Amazon Redshift cluster master user credentials.
- An IAM user with access to Amazon Redshift, Amazon Kinesis, Amazon Cognito, and Amazon S3.
- Access to any SQL interface such as a SQL client or the Amazon Redshift query editor.
- An Amazon S3 bucket created in the eu-west-1 region, which we will refer to as [Your-Amazon_S3_Bucket].
- An IAM role attached to an Amazon Redshift cluster that can access Amazon S3, which will refer to in the recipes as [Your-Redshift_Role].
- Access to the KDG, which is a UI that helps to send test data to Amazon Kinesis. Use this blog post to configure the open source KDG: https://aws.amazon.com/blogs/big-data/test-your-streaming-data-solution-with-the-new-amazon-kinesis-data-generator/.
- An AWS account number, which we will refer to in the recipes as [Your-AWS_Account_Id].
How to do it…
This recipe will stream the www.amazon.com customer product review dataset and ingest it into Amazon Redshift using Amazon Kinesis Firehose.
- Navigate to the AWS Management Console and pick the AWS Kinesis service. In the left menu, choose Data Firehose and click on the Create delivery stream button, as shown in the following screenshot:

Figure 4.10 – Creating a Kinesis Data Firehose stream
- Provide a delivery stream name (such as product_reviews_stream) and click Next until you get to the Choose a destination option.
- Choose Amazon Redshift as the destination and configure the Amazon Redshift destination parameters, as shown in the following screenshot:

Figure 4.11 – Configuring destination Amazon Redshift cluster
Here, provide the following respective parameters:
- Cluster—Choose an Amazon Redshift cluster to land the streaming dataset
- User name—Type the username that you chose when you set up the Amazon Redshift cluster
- Password—Type the password that you chose when you set up the Amazon Redshift cluster
- Database—Type the database name
- Table—Type product_reviews_stg
- Columns - optional—Leave this field empty
- Intermediate S3 bucket—Choose an existing S3 bucket or create a new one where data will be staged before being copied into Amazon Redshift ([Your-Amazon_S3_Bucket])
- Backup S3 bucket prefix – optional—Type /product_review_stg/
- In the COPY options – optional section, type the following script:
COPY product_reviews_stg (marketplace,customer_id,review_id,product_id,product_parent,product_title,star_rating,helpful_votes,total_votes,vine,verified_purchase,review_headline,review_body,review_date,year) FROM 's3://[Your-Amazon_S3_Bucket/product_review_stg/manifest' CREDENTIALS 'aws_iam_role=arn:aws:iam::[Your-AWS_Account_Id]:role/[Your-Redshift_Role]' MANIFEST JSON 'auto';
- Navigate to the Review option and create an Amazon Kinesis Firehose stream.
- Log in to the Amazon Redshift cluster using the SQL client tool and create a product_reviews_stg table that will hold the incoming streaming data:
CREATE TABLE product_reviews_stg
(
marketplace VARCHAR(2),
customer_id VARCHAR(32),
review_id VARCHAR(24),
product_id VARCHAR(24),
product_parent VARCHAR(32),
product_title VARCHAR(512),
star_rating INT,
helpful_votes INT,
total_votes INT,
vine CHAR(1),
verified_purchase CHAR(1),
review_headline VARCHAR(256),
review_body VARCHAR(MAX),
review_date DATE,
YEAR INT
)
DISTSTYLE KEY DISTKEY (customer_id) SORTKEY (review_date);
- Now, let's use the Amazon KDG to produce streaming data and send it to the product_reviews_stream Kinesis Firehose stream, as follows:
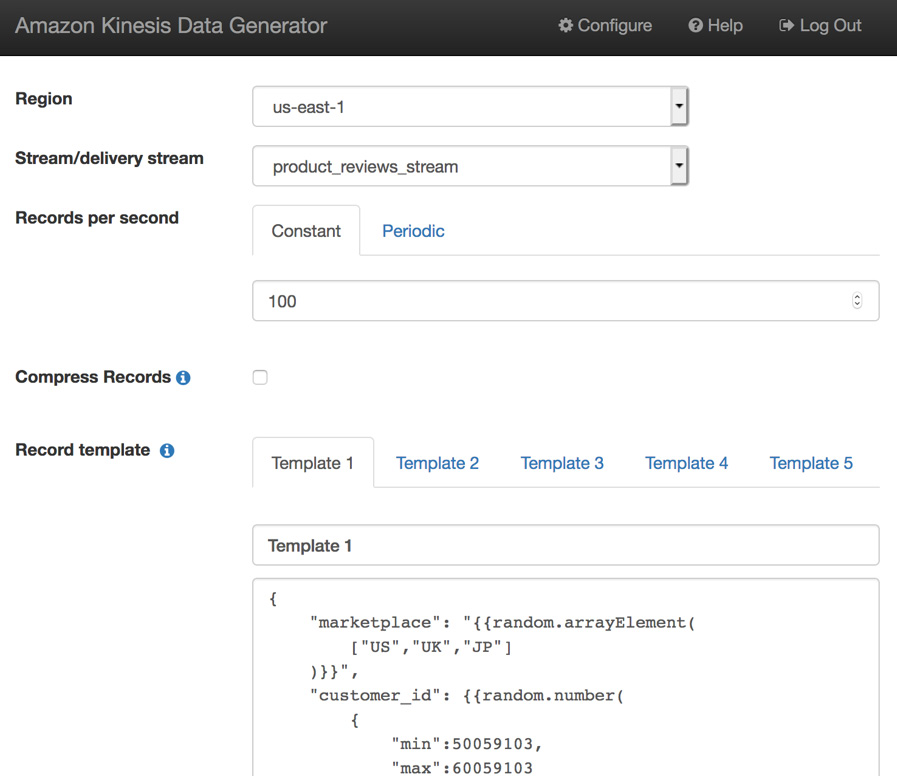
Figure 4.12 – Amazon KDG
Here, you will use the product_review_stream stream/delivery stream to send the streaming data and copy and paste the template from https://github.com/PacktPublishing/Amazon-Redshift-Cookbook/blob/master/Chapter04/kinesis_data_generator_template.json to generate the product review data:
{
"marketplace": "{{random.arrayElement(
["US","UK","JP"]
)}}",
"review_headline": "{{commerce.productAdjective}}",
"review_body": "{{commerce.productAdjective}}",
"review_date": "{{date.now("YYYY-MM-DD")}}",
"year":{{date.now("YYYY")}}
}
- After a while, the streamed data should start landing into Amazon Redshift and can be verified by using the following code:
SELECT *
FROM product_reviews_stage;
How it works…
Amazon KDF allows data to be sourced and streamed into multiple destinations. It can capture, transform, and loadstreaming data into Amazon S3, Amazon Redshift, Amazon Elasticsearch Service, and Splunk destinations. KDF, being a fully managed service, can automatically scale to meet the growth of the data.
Cataloging and ingesting data using AWS Glue
Data that is staged in Amazon S3 can be cataloged using the AWS Glue service. Cataloging the data allows metadata to be attached and the AWS Glue Data Catalog to be populated. This process enriches the raw data, which can be queried as tables using many of the AWS analytical services—such as Amazon Redshift, Amazon Elastic MapReduce (Amazon EMR), and so on—for analytical processing. It is easy to perform this data discovery using the AWS Glue crawlers that can create and update the metadata automatically.
In this recipe, we will enrich the data to catalog and enable ingestion into Amazon Redshift.Getting ready
To complete this recipe, you will need the following:
- An Amazon Redshift cluster deployed in the eu-west-1 AWS region
- Amazon Redshift cluster master user credentials
- An IAM user with access to Amazon Redshift, Amazon S3, and AWS Glue
- An IAM role attached to an Amazon Redshift cluster that can access Amazon S3, which we will refer to in the recipes as [Your-Redshift_Role]
- Access to any SQL interface such as a SQL client or the Amazon Redshift query editor
- An Amazon S3 bucket for staging and unloading the data in specific recipes, which we will refer to in the recipes as [Your-Amazon_S3_Bucket]
- An AWS account number, which we will refer to in the recipes as [Your-AWS_Account_Id]
How to do it…
This recipe will use the Amazon.com customer product review dataset to be cataloged and ingested into Amazon Redshift:
- Navigate to the AWS Management Console and pick the AWS Glue option, verifying you are in the same AWS region as the Amazon Redshift cluster. In the left menu on AWS Glue, choose Add crawler and type any crawler name, such as product reviews dataset crawl, and click Next.
- In the data source, copy and paste the s3://packt-redshift-cookbook/amazon-reviews-pds/parquet/ path into the Include path option, as shown in the following screenshot, and click Next:
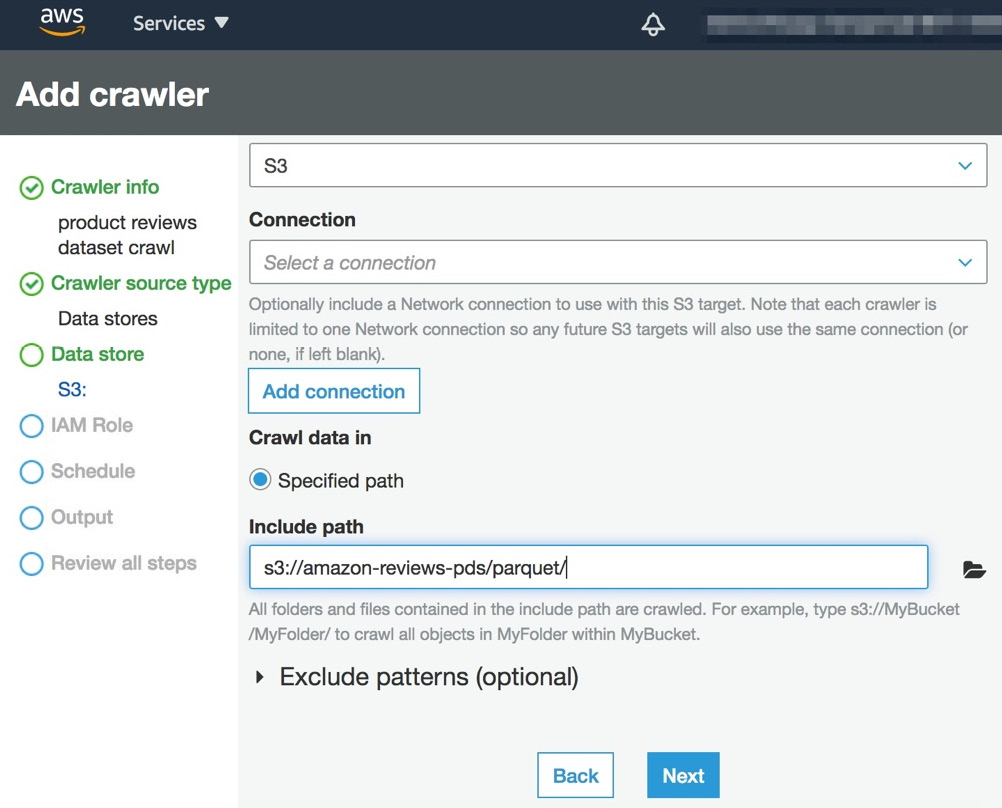
Figure 4.13 – Add crawler screen
- Choose an IAM role to allow AWS Glue access to crawl and update the AWS Glue Data Catalog, and click on the Next button.
- In the Output option, add a reviews database and a product_reviews_src prefix for the Prefix added to tables option, and then click Next and Submit to create a product reviews dataset crawl crawler:

Figure 4.14 – Configuring the crawler output
- Navigate to the Crawlers menu and pick the product reviews dataset crawl crawler and click Run crawler, as shown in the following screenshot, and wait until the status changes to Success:

Figure 4.15 – Monitoring the crawler status
- Now, AWS Glue has crawled the product review dataset and discovered the table automatically. You can verify the table by navigating to the Tables option to view the product_reviews_srcparquet table in the list:

Figure 4.16 – Viewing the table created by crawler
- Open any SQL client tool and connect to Amazon Redshift, and create a schema to point to the reviews AWS Glue catalog database using the following command, by replacing the [Your-AWS_Account_Id] and [Your-Redshift_Role] values:
CREATE external SCHEMA review_ext_sch FROM data catalog DATABASE 'reviews' iam_role 'arn:aws:iam::[Your-AWS_Account_Id]:role/[Your-Redshift-Role]' CREATE external DATABASE if not exists;
- Create a product_reviews_stage table that will hold the incoming crawled data:
CREATE TABLE product_reviews_stage
(
marketplace VARCHAR(2),
customer_id VARCHAR(32),
review_id VARCHAR(24),
product_id VARCHAR(24),
product_parent VARCHAR(32),
product_title VARCHAR(512),
star_rating INT,
helpful_votes INT,
total_votes INT,
vine CHAR(1),
verified_purchase CHAR(1),
review_headline VARCHAR(256),
review_body VARCHAR(MAX),
review_date DATE,
YEAR INT
)
DISTSTYLE KEY DISTKEY (customer_id) SORTKEY (review_date);
- Now, let's insert Automotive data from the crawled data into the product_reviews_stage table:
INSERT INTO product_reviews_stage
(
marketplace,
customer_id,
review_id,
product_id,
product_parent,
product_title,
star_rating,
helpful_votes,
total_votes,
vine,
verified_purchase,
review_headline,
review_body,
review_date,
year
)
SELECT marketplace,
customer_id,
review_id,
product_id,
product_parent,
product_title,
star_rating,
helpful_votes,
total_votes,
vine,
verified_purchase,
review_headline,
review_body,
review_date,
year
FROM review_ext_sch.reviewparquet
WHERE product_category = 'Automotive';
- The public.product_reviews_stage table is now ready to hold the incoming Automotive dataset, which can be verified by using the following command:
SELECT *
FROM product_reviews_stage;
How it works…
AWS Glue provides a crawler that can automatically figure out the structure of data in Amazon S3. AWS Glue maintains the metadata catalog that can be accessed across other AWS analytical services, such as Amazon Redshift. Amazon Redshift can query the data in Amazon S3 directly using the Amazon Redshift Spectrum feature, which allows data to be ingested into local Redshift tables.