Using Multiple Flashes
The Basics of Multiple Flash Control
The best way to learn about using multiple flashes is to start with just one or two flashes and build up from there. This is true not only in mastering the mechanics of setting up multiple flashes, but also in building up the light in an image.

Having a Plan
As a photographer, you will be taking a very big step to go from using the flash on the camera to shooting with off-camera flashes. In the past, you needed studio strobe lights and a way to trigger them, usually a cord or a set of radio triggers. Nikon changed all that with the Advanced Wireless Lighting (AWL) built into the CLS.
You still need to have a plan of how you want to light the scene and where you want the light to come from. Starting with just one flash off camera, you can create some great photos. The first step is to set up the remote flash, then you set up the Master flash, take a test shot, and adjust the remote from the Master.
Setting the Remote
You need to adjust two settings on the remote flash: the channel and the group. When using just one remote flash, you don’t need to worry much about either. The main thing is to know what you set so that the Master flash can control it.
When I use a single remote, I use Channel 1 and Group A. This is easy to remember, and when I start adding more remote lights, it’s easy to keep everything organized.
• SB-600: The SB-600 is one of the most difficult flashes to set up. You first need to access the Flash menu system. To do this, you hold the Zoom and – buttons down at the same time. Pressing the – and + buttons rotates through the menu choices. You want the AWL menu, which looks like an arrow going from the left to the right. You then press the mode button to turn this on or off. Because the SB-600 cannot be used as a Master flash, turning the AWL menu to On makes it a remote flash. Press the Power button to exit the menu and you will see Channel and Group on the screen. Press the Mode button to select the Channel and then the + and – buttons to select the 1. Then press the Mode button to select the Group and again use the + and – to select Group A (A).
• SB-700: The SB-700 is very similar to the SB-900/910 when it comes to setting the flash to remote usage. Turn the flash on and rotate the power switch to the remote position. You will see the word Remote on the top left with the Group and Channel below it. Press the SEL button to highlight the Group, select A with the dial, then press the OK button. Press SEL again to select the Channel, use the dial to select 1, then press the OK button (B).
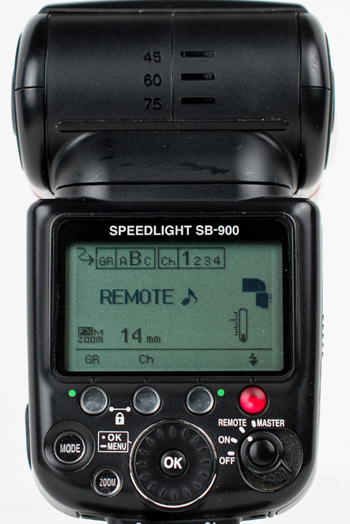
• SB-800: Press and hold the SEL button until the menu system opens. Select the AWL menu and press SEL. Use the rocker switch to select Remote and press SEL. Press the On/Off button. The screen on the back of the flash displays REMOTE across the center with the Channel on the top left and Group on the bottom right. Press the SEL button to switch between the Group and Channel and use the up and down buttons on the rocker switch to select the channel and group (C).
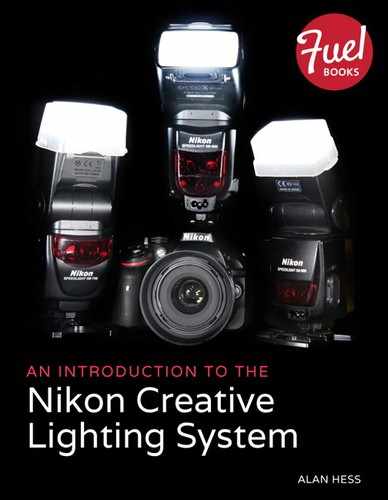
• SB-900 / SB-910: Turn the flash on, then press the lock button and rotate the switch to Remote. Across the top of the screen you will see the group (GR) and then the channel (Ch). On the back of the flash, there are two buttons. The first button changes the group, and the second changes the channel. Just press the button until it shows Group A and Channel 1 (D).
• SB-200: There are two dials on the top of the flash: The top dial sets the group and the bottom dial sets the channel. Just turn the dials so that they point to Group A and Channel 1.

A
The SB-600 in Remote mode.

B
The SB-700 in Remote mode.

C
The SB-800 in Remote mode.
D
The SB-900 in Remote mode.
You can now place the remote flash where you want it. You don’t need to go back to the flashes now as they will be controlled by the Master flash. You do need to make sure the sensor on the flash is facing where the Master flash will be firing. The system works on line of sight, so the remote flashes need to see the Master flash.
Setting the Master
The Master flash is the center of the system. You need to set it up correctly to fire the remote flash by first setting the channel, then the group, and finally the mode used to control the output of the remote flash. You can choose from five different Master flash options for triggering the remote flash.
SU-800
As a dedicated Master unit, the SU-800 is the easiest unit to set up. You first need to set the Channel and Group. Because the remote flash is using Channel 1 and Group A, you need to match those settings on the SU-800. Once you turn on the SU-800, press the SEL button until the Channel starts to flash, then press the arrows until it is set to Channel 1. You will see A, B, and C on the left side of the flash. Press the SEL button until the information next to the A starts to flash; you can now set the mode that Group A will use when triggered. The options are TTL, AA, M, and ---. Pick the mode you want to use, then press the left and right arrow buttons to control the output power. Because we are just using one group, you do not have to worry about the B and C.

The SU-800 is set to trigger Group A in TTL mode on Channel 1. Group B and C are turned off.
SB-700
The SB-700 can be used as a Master flash, but it has some limitations. It can only control two groups of flashes and both groups need to be the same mode. The two groups can, however, have different power adjustments.
Turn the power button to Master while pressing in the lock release. This puts the SB-700 in Master mode so you can set the Channel and Group mode. Press the SEL button until the Channel is highlighted, then rotate the dial until Channel 1 is shown, then press the OK button. The next step is to set the mode for the groups. Slide the Mode selector on the right to either TTL or M. This will set the mode for all the groups and the SB-700 as well. On the back of the flash you will see M, A, and B. The M stands for the Master flash while A and B are the two groups the SB-700 can control. You can now control how much light is produced by the Master flash and both groups. More importantly, you can turn off the Master flash so that the light just comes from the remote flash.
Press the SEL button to highlight the group; it will start with M, go to A, then B. When the group you want is highlighted, use the dial to adjust the flash compensation value. When you see --- as the value, it means that group will not produce any light and is turned off. When you have the value you want, press the OK button.
SB-800
The SB-800 can control three groups of Speedlights and the light from the Master. To access the SB-800 menu, you need to press and hold the SEL button located in the middle of the rocker switch. This opens the menu system. Navigate to the AWL menu and select Master from the choices. Then press the On/Off button to leave the menu system.
Press the SEL button to select the group you want to change; the currently selected group will be highlighted. Press the Mode button to change the mode for each group. You can cycle between TTL, A, M, and --- (off). Use the up and down arrows to adjust the power output of the group.
The SB-800 is set to control Group A and B in TTL mode and Group C in Manual mode at 1/32 power.
SB-900/910
To set the SB-900/910 to Master mode, turn it on and rotate the switch to Master while pressing in the locking button. You will see the Channel in the top-right corner. To change the channel, press the Ch button (the second assignable button on the top from the left). It should have the letters Ch above it. Once the Channel is set to Channel 1, you can set the group output mode.
The SB-900/910 can control three groups of flashes and the Master flash. This is shown by the M, A, B, and C on the left side of the screen. To select which group to adjust, press the SEL button (top left).
Press the SEL button until the group you want to set is highlighted, then press the Mode button to cycle through the choices. You can select from TTL, A, M, and --- (off). You will see that the same button used to set the Channel is now used for setting the output power of the selected group. Just press the button and use the dial to adjust the output power.
Examples
I took the following photos with a single off-camera flash triggered by a Master flash on the camera. For most of the photos, I used an SB-800 as the off-camera flash and a second SB-800 on the camera as a Master. This was my favorite setup from the start and it still works exceptionally well now.
John
John is a musician I photographed backstage in a dressing room at the San Diego House of Blues while he was on tour with Citizen Cope. This was one of the first times I used the AWL capability of the Nikon CLS system on location. Before leaving for the shoot, I set up both the remote flash and the Master flash so that when I got to the venue, all I had to do was set the Master on the camera and position the remote so that it would illuminate John from off to camera left.
I set both flashes to Channel 1, Group A, and TTL mode. The remote flash had a diffuser dome attached, which reduced the amount of light reaching John and added a desirable moodiness to the image.

I photographed John Ginty using a remote SB-800 off to the left of the camera. With the CLS controls, I was able to work really fast as I only had a few minutes to shoot before he took the stage.
Sam
Sam, a friend’s son, wanted some photos for a simple portfolio. For the photograph here, I used an SB-800 on a light stand shooting through an umbrella off to camera left. (You can see the setup for this shot as the background in the chapter opener.) I placed the flash and umbrella off to the side and pretty high up so that the light looked more natural and the falloff from the bright parts of the face to the darker hands holding the football all looked more natural. I used the following flash setup:
• SB-900: I used an SB-900 as the Master set to Channel 1 and set Group A to TTL with +1 EV added to get the look I wanted.
• SB-800: I set the SB-800 as the remote set to Channel 1 and Group A.
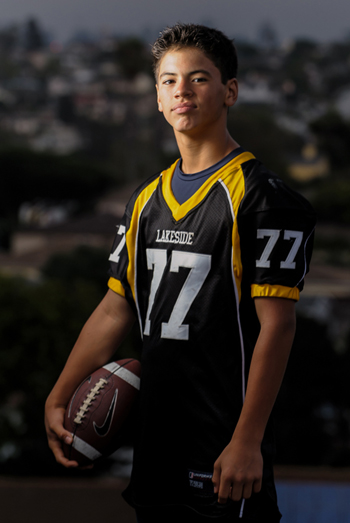
I photographed Sam using a single off-camera flash shot through an umbrella controlled by the Master flash on the camera. Because I was able to check the exposure and adjust the remote light as needed right from the camera, I could spend more time photographing and less time adjusting the lights.
Nicole
I photographed Nicole outside in the afternoon. I wanted to balance the existing daylight, so I placed an SB-900 in a larger softbox and moved it as close to her as I could while still keeping it out of the frame. The SB-900 was triggered by the pop-up flash on the Nikon D700 set to commander mode. I set the remote flash mode to TTL –1, which reduced the power of the flash by 1 EV to more closely match the existing light.
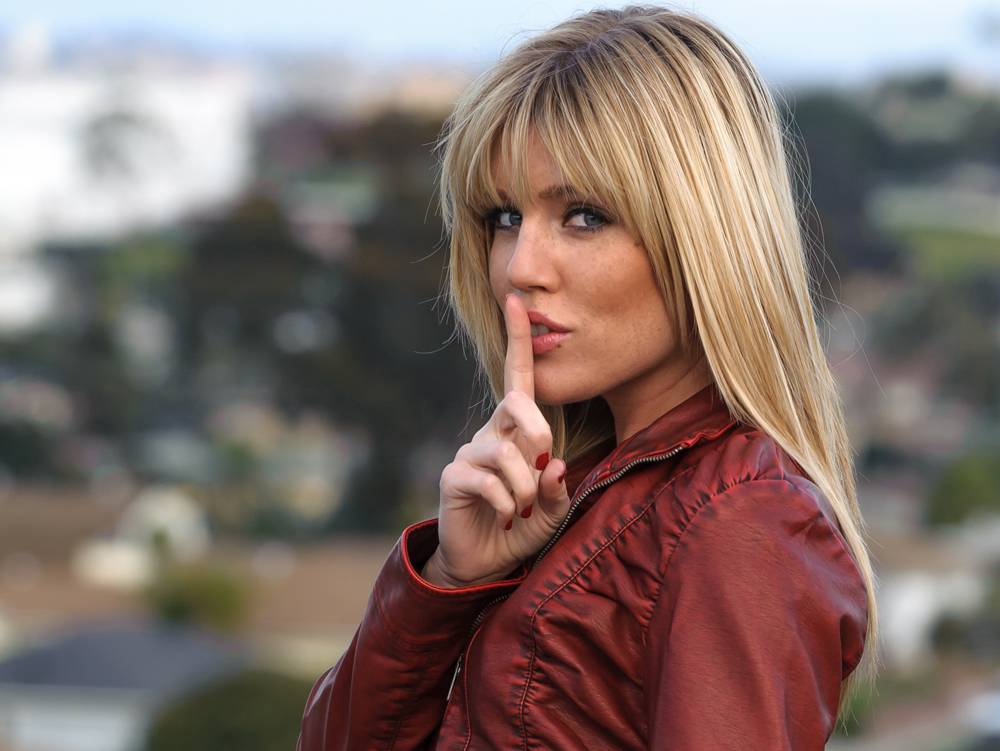
I let the camera do a lot of the thinking here as I photographed Nicole in the afternoon. The TTL function of the remote light worked great—I just needed to adjust it slightly before it gave me the exposure I wanted.