Setting Up the Camera and Flashes
Menu and Camera Settings for CLS
A big advantage of CLS is its ease of use. The controls are simple to use, especially on the newer flashes and on cameras with built-in flashes. You can easily set up the camera to use a flash to illuminate the subject or just add a little fill light. In addition, it’s easy to set up the flash as a remote or Master, select a channel, and set up the groups. In Master mode, you can set the mode and power of the remote flashes right from the camera. You can even test fire the remote flashes to make sure they are all working properly.

Flash Settings
Nikon Speedlights offer a variety of features you can set to get the best results from the flash. Some of these settings can be controlled right on the flash, while others need to be set on the camera. This section looks at the settings on the flash.
Flash Modes
The Flash mode controls how the amount of light is calculated and fired. Speedlights offer up to four different modes.
• SB-200. This flash only works as a remote, so the mode is set on the Master flash.
• SB-400. This flash only works in TTL mode and doesn’t offer any way to change the mode. It can be used in Manual mode with the Nikon D40 camera.
• SB-600. This flash offers TTL and Manual mode. Use the Mode button on the back of the flash to change the mode.
• SB-700. This flash offers TTL and Manual mode. Use the Mode button on the back of the flash to change the mode.
• SB-800. This flash offers all four modes: TTL, Manual, Aperture, and Repeat. Use the Mode button on the back of the flash to change the mode.
• SB-900. This flash offers all four modes: TTL, Manual, Aperture, and Repeat. Use the Mode button on the back of the flash to change the mode.
• SB-910. This flash offers all four modes: TTL, Manual, Aperture, and Repeat. Use the Mode button on the back of the flash to change the mode.

The Mode button on the SB-900.
Tip
Changing the mode on a Speedlight is as simple as pressing a button. The SB-600, SB-700, SB-800, SB-900, and SB-910 all have a Mode button you can press to change the mode on the flash.
TTL Mode
The Through the Lens (TTL) mode lets the camera control the flash power using the amount of light the camera sees coming in through the lens. In this mode, the flash power is fully controlled by the camera and the data the camera is receiving. The current TTL system, called i-TTL by Nikon, works very well. The flash actually fires a preflash so the camera can determine how to set the main flash power. It works like this:
1. You press the shutter release button.
2. The preflash fires.
3. The camera reads the information reflected back through the lens.
4. The camera takes that data and determines how much light the flash needs to produce in order to produce a correct exposure.
5. The shutter opens and the flash fires.
6. The shutter closes.
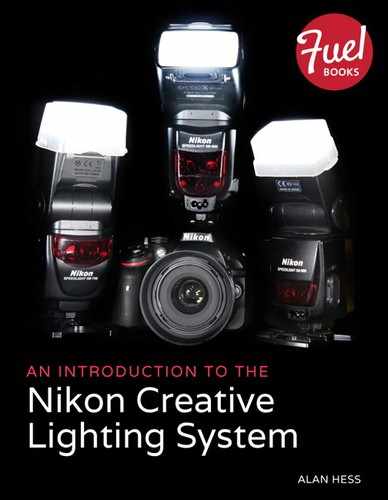
The TTL screen on the SB-900.
There is also a second TTL mode that the flash will use if supported by the camera, and that is TTL BL, which stands for balanced TTL. This mode uses the camera’s metering information to take into account the ambient light present in the scene and tries to balance the output from the flash to match the ambient light. This makes for a much more natural-looking image, one that does not look as if it has been only lit with the flash.
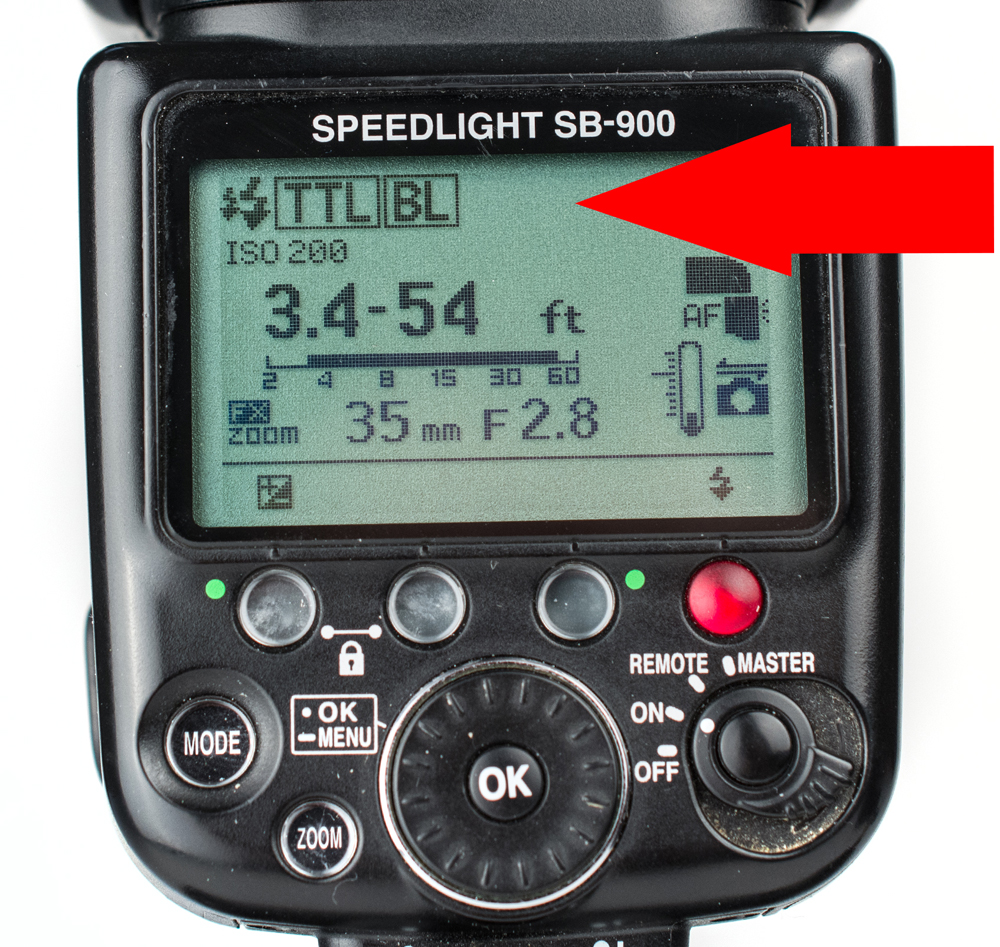
A Mode
In “A” mode, the flash power is determined by the ISO and Aperture settings on the camera. The Speedlight fires a series of preflashes to try to determine the correct amount of light needed. Depending on the camera and flash used, the aperture information is either automatically sent to the flash or entered manually (by you).
You can change the output level of the flash by dialing in from –3 to +3 EV.
The “A” screen on the SB-900.
Manual Mode
In Manual mode, you need to manually set the output of the flash. The power output of the flash is shown as a ratio with 1/1 as full power, 1/2 as half-power, going all the way down to 1/128 power. You can also adjust the power in smaller increments between each full step. As you adjust the power, the flash actually steps up or down in 1/3 increments.

The Manual screen showing 1/8 power.
Repeat Mode
Repeat mode causes the flash to fire multiple times during a single exposure, very much like a strobe light. You can enter the frequency and the number of times the flash gets to fire during the exposure. This function works best in lower-light situations due to the power loss when firing the flash multiple times.

The RPT screen showing 1/64 power, which will fire four times at 10 Hz.
Note
The Guide Number (GN) of the flash is a measurement of how powerful the flash actually is. The higher the number, the more powerful the flash.
Master Settings
The Master flash (also called the commander flash) is the unit that controls and triggers the remote flashes. It is where all the changes to mode and power take place. The Master flash allows you to set the channel all the flashes communicate on and the mode and power for up to three groups (A, B, and C). If the Master unit is also a flash, you can set the mode and power for the Master unit as well.
There are three ways to trigger the remote flashes when you press the shutter release button on the camera:
• A Speedlight in the Master flash
• A dedicated SU-800 controller
• Your camera’s built-in pop-up flash (if it has one and this is supported)
Each method has its advantages and disadvantages.
Speedlight
Setting up a Speedlight to work as a Master is relatively easy, especially on the newer flashes such as the SB-900, SB-910, and SB-700. On these flashes, you simply turn on the flash, press in the lock button, and rotate the switch to Master. It is that simple.
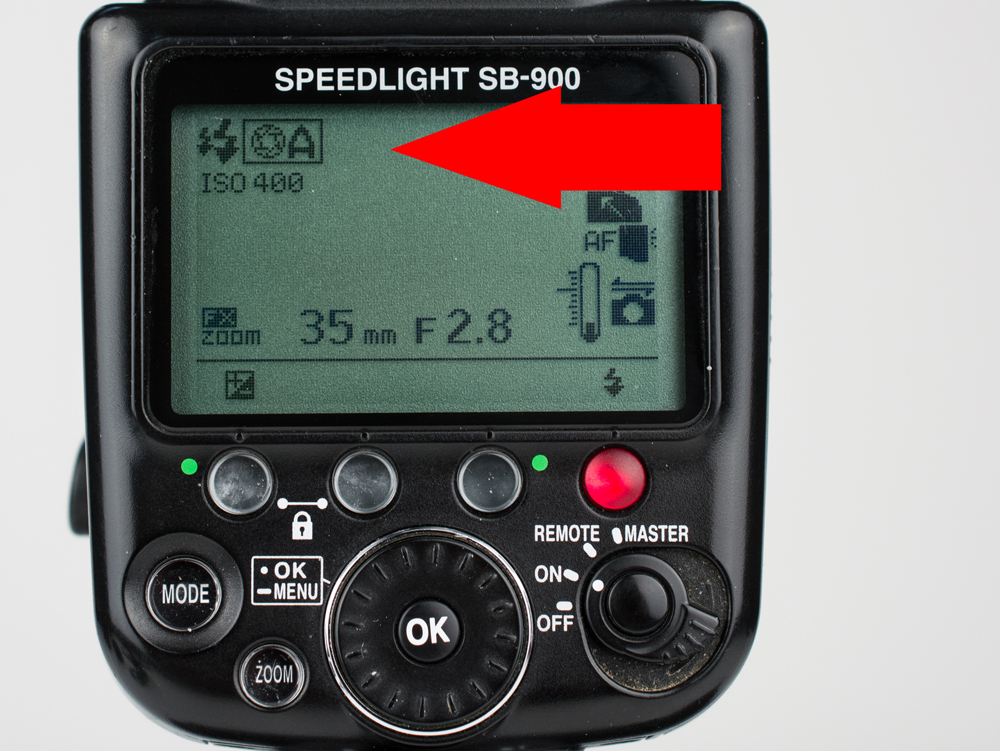
Press and hold the SB-800 SEL (select) button in the middle of the rocker switch to open the Flash menu.
On older flashes such as the SB-600 and the SB-800, it is a little more complicated. Follow these steps to set the flash to Master mode.
1. Press and hold the SEL (Select) button until the menu system opens.
2. Use the rocker switch to select the Master/Remote setting.
3. Press the SEL button and the word OFF is highlighted at right.
4. Use the rocker switch to select Master, then press the SEL button.
5. Press the On/Off button once and the flash is now set to Master mode.
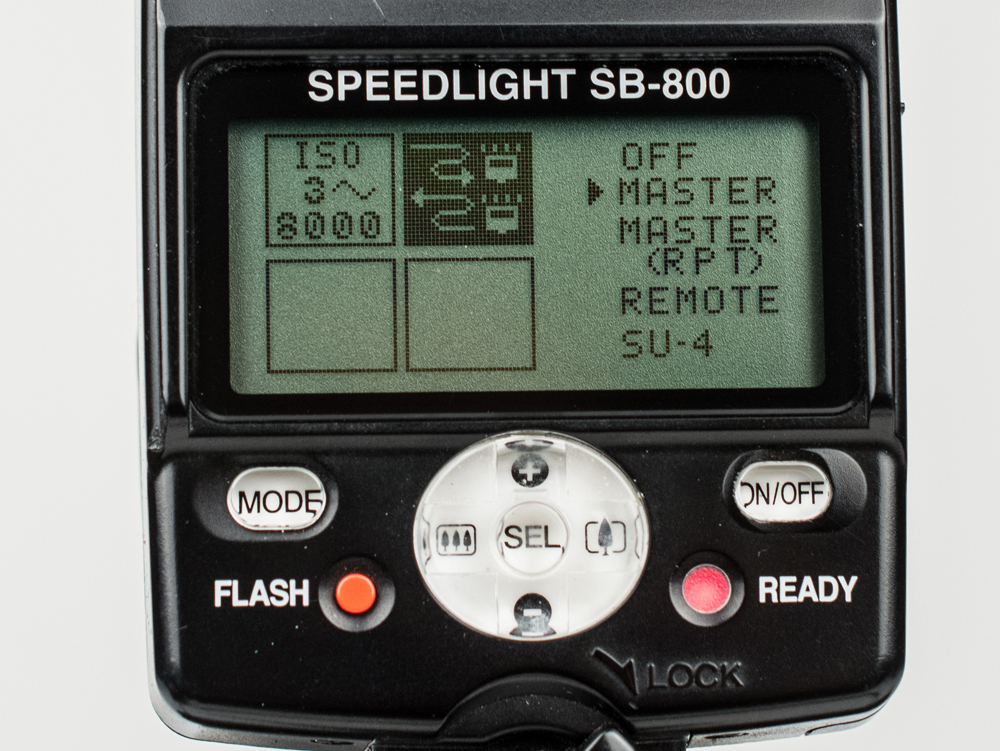
The menu on the SB-800 showing the CLS options.
SU-800
The Nikon SU-800 is a commander only and cannot be set up as a remote unit. That makes it pretty easy to configure as it is always in Master mode. Just slide it onto the camera hot shoe and turn on the SU-800. Now, the SU-800 does have one very sneaky little setting you might not even know exists: A switch inside the battery compartment changes the mode from close-up mode to straight master mode. While both modes are used to trigger the external remote flashes, the difference is that the close-up mode is designed to work with the close-up kit and the SB-200 flashes when they are mounted right on the lens.
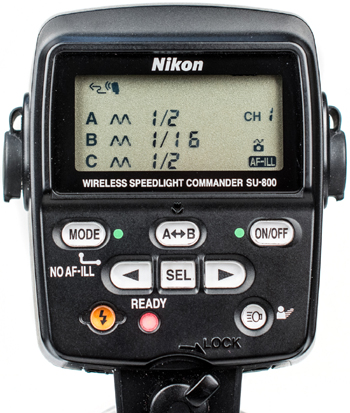
The Nikon SU-800 is always in Master mode.
On the Camera
On those cameras that have a built-in flash and the ability to set that flash to the Master mode, you can set that flash to act as a Master for the remote flashes. This is done in the menu system of the camera. Here are the current cameras that allow you to do that:
• D700 – Custom Setting e3
• D300 – Custom Setting e3
• D300s – Custom Setting e3
• D7000 – Custom Setting e3
• D7100 – Custom Setting e3
• D90 – Custom Setting e2
• D600 – Custom Setting e3
• D6100 – Custom Setting e3
• D800 – Custom Setting e3
• D800E – Custom Setting e3
Just follow these steps:
1. Press the Menu button to display the camera’s menus.
2. Select the Custom Setting Menu.
3. Navigate to the Bracketing/Flash setting and press Enter.
4. Select the Flash Cntrl for Built-in Flash.
5. Press the OK button to display the menu.
6. Use the rocker switch to select Commander (master) mode.
7. Set the mode and power for the built-in flash and external flashes on the screen that displays.
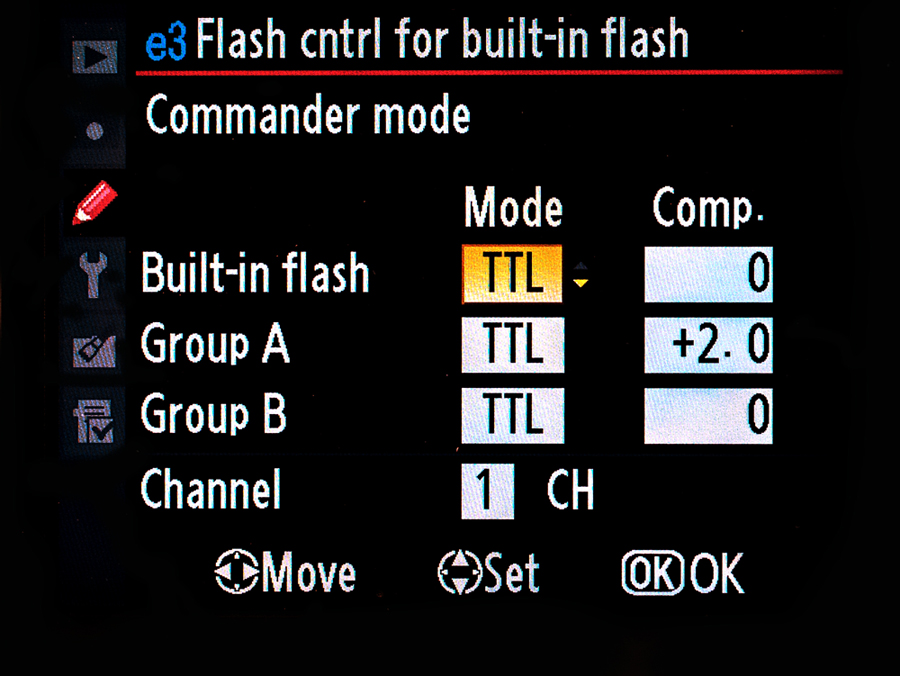
The Nikon D700’s Custom menu offers choices for the built-in flash. Here, the Commander mode is selected.
Important: For the built-in flash to work in the commander or master mode, the flash needs to be in the raised position. It will not work with the flash down, even if you don’t want any light from the built-in flash to illuminate the subject. In that case, you can turn the flash off in the menu, but it still needs to be in the raised position to fire the preflashes as the remote flashes need them in order to work.
Master Menu
The Master menu is where you set the mode and power for the remote flashes and for the flash on the camera (when not using the SU-800 controller). It is the main nerve center of the whole Advanced Wireless Lighting (AWL) functionality. You can set the following items using the Master menu:
• Channel. All the remotes and the Master need to be set to the same channel. There are four channels to choose from: 1, 2, 3, and 4. Sounds pretty simple—and it is. I have all my Masters and remotes set to Channel 1 all the time. The only time I ever even think about changing this is when working in close proximity to another photographer who is also using the AWL. At that point, we will have a discussion about using different channels.
• Flash modes per group. You can set each of the groups differently. The choices are TTL, Manual, Aperture, and Off. This allows you to decide exactly how each group of remote flashes will work. You can have one set on TTL and another on Manual, and then you can decide if you want the Master to fire or if you want to turn it off.
• Flash output per group. Once you set the mode for a group, you can control the output power. In Manual mode, you get to set the power ratio. In TTL and Aperture modes, you can adjust the flash compensation from –3 to +3.
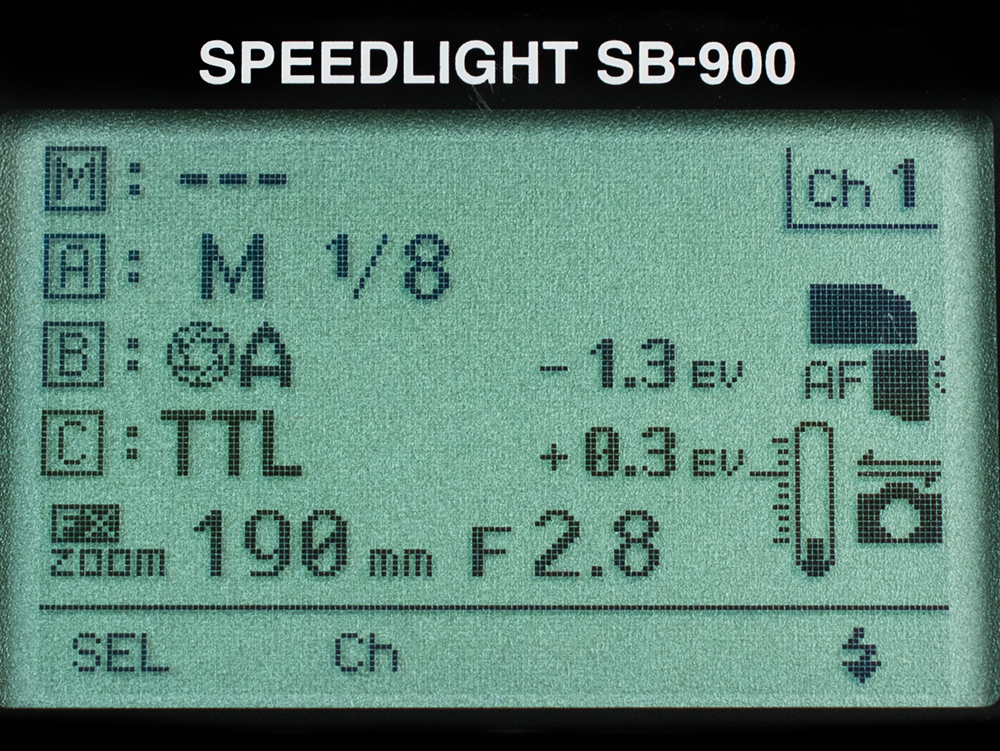
The SB-900 set up as a Master with the following settings: Channel 1, Group A: Manual at 1/8 power, Group B: Aperture mode with –1.3 power, Group C: TTL with +.3 power. The top group is the Master flash, which is set to off as indicated by the ---.
Remote Settings
Setting up a Master flash is only part of the equation; you also need to set up remote flashes. Setting the remotes is really easy. On the SB-700, SB-900, and SB-910, all you have to do is turn on the flash, press the lock button, and rotate the switch to Remote. The flash is now in remote mode and is waiting to get a signal from a Master unit.
On the SB-600 and SB-800, it is a little more complicated (but not much). It’s the same as setting the Master mode on these Speedlights except instead of selecting Master, select Remote.
1. Press and hold the SEL button until the menu system opens.
2. Use the rocker switch to select the Master/Remote setting.
3. Press the SEL button and the word OFF is highlighted at right.
4. Use the rocker switch to select Remote, then press the SEL button.
5. Press the On/Off button once and the flash is now set to Remote mode.
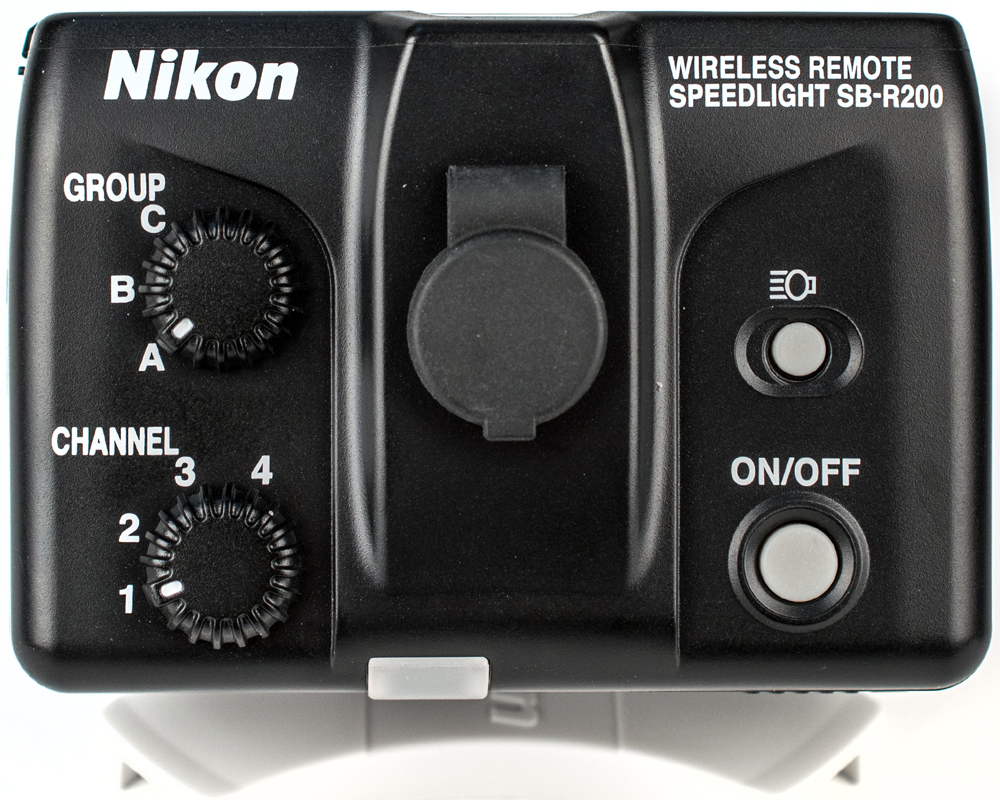
The SB-R200 only functions by remote Speedlight, so it requires no additional setup.
Remote Menu
You need to adjust two settings on the remote flashes. The first is the Channel and the second is the Group. The CLS Advanced Wireless Lighting uses one of four channels. This allows four completely different lighting setups to be used at the same time; as long as they are on different channels, they won’t trigger each other. This allows for four different photographers to set up in the same area and each will only trigger the lights on his or her specific channel.
The Master unit and ALL the remotes need to be on the same channel for the system to work properly. If the Master is set to Channel 1, then all the flashes you want the Master to trigger also need to be set to Channel 1.
The groups are a different story. You can put the remotes in one of three groups: A, B, or C. The groups are where the flexibility of the system really comes into play. Each group can have an unlimited number of remote flashes and each group can have a different mode and power output setting. The number of groups available depends on what is being used as a Master unit. If you use the SU-800, SB-800, SB-900, or SB-910, then you get three groups. If you use the built-in flash on the camera as a Master, you get two groups. All the remote flashes that are set to the same group will fire with the same settings. The examples in the later chapters will go through this in much more detail.

The SU-4 mode on the Nikon SB-900.