
Getting Acquainted with the Android Development Tools
Now that the tools of the trade are installed, I introduce you to the SDK and some of the tools that are included with it.
Navigating the Android SDK
Whoa! You find a lot of folders in the SDK! Don't worry; the folder structure of the Android SDK is pretty easy to understand when you get the hang of it. You need to understand the structure of the SDK to master it. Table 4-1 outlines what each folder is and what it contains. Open the SDK with Windows Explorer or Mac Finder.
Table 4-1 Folders in the Android SDK
| SDK Folder | Description |
| extras | Contains the drivers for Android devices. If you connect your Android device to the computer, you need to install this driver so that you can view, debug, and push applications to your phone via the ADT. |
| tools | Contains various tools that are available for use during development — debugging tools, view-management tools, and build tools, to name a few. |
| temp | Provides a temporary swap for the SDK. At times, the SDK may need a temporary space to perform some work. This folder is where that work takes place. |
| samples | Contains a bunch of sample projects for you to play with. Full source code is included. |
| platforms | Contains the platforms that you target when you build Android applications, such as folders named android-8 (which is Android 2.2), android-4 (which is Android 1.6), and so on. |
| platform-tools | Contains common tools specific to Android development. |
| docs | Contains a local copy of the Android SDK documentation. |
| add-ons | Contains additional APIs that provide extra functionality. This folder is where the Google APIs reside; these APIs include mapping functionality. This folder remains empty until you install any of the Google Maps APIs. |
Targeting Android platforms
Android platform is just a fancy way of saying Android version. At this writing, seven versions of Android are available, ranging from version 1.1 through version 3.0. You can target (use framework version) any platform that you choose.
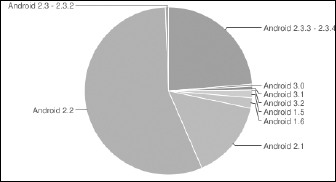
Figure 4-11 shows the percentage of each platform in use as of July 1, 2010. To view the current platform statistics, visit http://developer.android.com/resources/dashboard/platform-versions.html.
Figure 4-11: Android distribution as of July 1, 2010.
Using SDK tools for everyday development
You just installed the SDK tools. Now I introduce you to these tools so that they can work for you. The SDK tools are what you use to develop your Android apps. These tools let you develop applications easily as well as give you the ability to debug them. New features packed into every release enable you to develop for the latest version of Android.
Say hello to my little emulator
The emulator has to be my favorite tool of all. Not only does Google provide the tools you need to develop apps, but it also gives you this awesome little emulator that allows you to test your app! The emulator simulates testing environments, allowing you to test your app in a number of different screen sizes, resolutions, and platforms. The emulator comes in handy for testing your app at different screen sizes and resolutions. Having several devices connected to your computer at the same time is not always possible, but you can run multiple emulators with varying screen sizes and resolutions.
The emulator does have some limitations, however — it cannot emulate certain hardware components such as the accelerometer. When you're developing an app that uses Bluetooth, for example, use an actual device that has Bluetooth. If you develop on a speedy computer, testing on an emulator is fast, but on slower machines, the emulator can take a long time to do a seemingly simple task. When I develop on an older machine, I usually use an actual device, but when I use my newer, faster machine, I typically use the emulator because I don't notice much lag, if any. Still, these limitations are minor. Plenty of apps can be developed and tested using only an emulator. Some limitations include testing wireless connectivity, Bluetooth interaction, and various other hardware dependent features.
Get physical with a real Android device
The emulator is awesome, but sometimes you need to test on an actual device. The DDMS allows you to debug your app on an actual device, which comes in handy for developing apps that use hardware features that aren't or can't be emulated. (See the section, “Debug your work,” later in this chapter.) Suppose that you're developing an app that tracks the user's location. You can send coordinates to the device manually, but at some point in your development, you probably want to test the app and find out whether it in fact displays the correct location. Using an actual device is the only way to do this.
If you develop on a Windows machine and want to test your app on a real device, you need to install a USB driver. (If you're on a Mac or Linux machine, you can skip this section, because you don't need to install the USB driver.) To download the Windows USB driver for Android devices, follow these steps:
- In Eclipse, choose Window
 Android SDK and AVD Manager.
The Android SDK and AVD Manager dialog box opens.
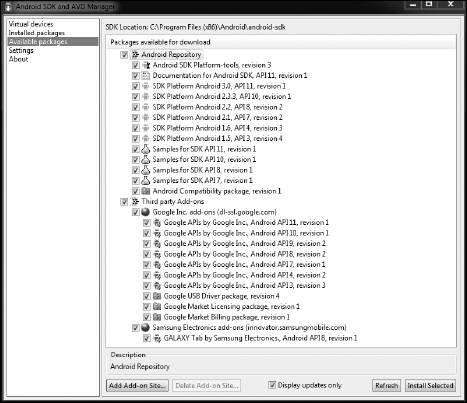
- In the left pane, select Available Packages. (See Figure 4-12.)
- Expand the Android repository and select the Third Party Add-ons package.
Figure 4-12: The available packages.
- Click the Install Selected button.
The Choose Packages to Install dialog box opens. (See Figure 4-13.)
Figure 4-13: The Choose Packages to Install dialog box.
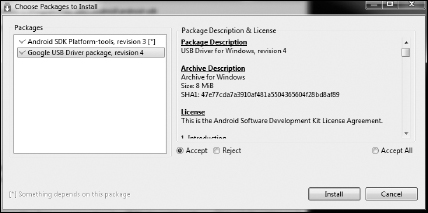
- Select the Accept radio button to accept the license and then click the Install button.
The Installing Archives dialog box opens, displaying a progress bar.
- When the package finishes downloading and installing, click the Close button.
- Exit the Android SDK and AVD Manager dialog box.
Debug your work
The DDMS equips you with the tools you need to find those pesky bugs. You can go behind the scenes as your app is running to see the state of hardware such as wireless radios. But wait. There's more! It also simulates actions that you normally need an actual device to do, such as sending Global Positioning System (GPS) coordinates manually, simulating a phone call, or simulating a text message. Get all the DDMS details at http://developer.android.com/guide/developing/tools/ddms.html.
Try out the API and SDK samples
The API and SDK samples are provided to demonstrate how to use the functionality provided by the API and SDK. If you ever get stuck and can't figure out how to make something work, visit http://developer.android.com/resources/samples/index.html. Here, you can find code samples of almost anything from using Bluetooth to making a two-way text application or a 2D game.
You also have a few samples in your Android SDK. Simply open the Android SDK and navigate to the samples directory, which contains various samples that range from interacting with services to manipulating local databases. Spend some time playing with the samples. The best way to learn Android is to look at existing working code bases and then play with them in Eclipse.
Give the API demos a spin
The API demos inside the samples folder in the SDK are a collection of apps that demonstrate how to use the included APIs. Here, you can find sample apps with a ton of examples, such as these:
- Notifications
- Alarms
- Intents
- Menus
- Search
- Preferences
- Background services
If you get stuck or just want to prep yourself for writing your next spectacular Android application, check out the complete details at http://developer.android.com/resources/samples/ApiDemos/index.html.