
Creating Launch Configurations
You're almost at the point where you can run the application. A launch configuration specifies the project to run, the activity to start, and the emulator or device to connect to. Whoa! That's a lot of stuff happening real quickly. Not to worry; the ADT can help you by automating a lot of the key steps so that you can get up and running quickly.
The Android ADT gives you two options for creating launch configurations:
- Run configuration: Used when you need to run your application on a given device. You use run configurations most of the time during your Android development career.
- Debug configuration: Used for debugging your application while it's running on a given device. (You won't need to use this now. Debugging is discussed in Chapter 7.)
 When you first run a project as an Android application by choosing Run
![]() Run, the ADT automatically creates a run configuration for you. The Android Application option is visible when you choose Run
Run, the ADT automatically creates a run configuration for you. The Android Application option is visible when you choose Run![]() Run. After the run configuration is created, it's the default run configuration, used each time you choose Run
Run. After the run configuration is created, it's the default run configuration, used each time you choose Run![]() Run from then on.
Run from then on.
Creating a run configuration
Now it's your turn to create a run configuration for your application.
If you're feeling ambitious and decide that you'd like to create a run configuration manually, follow along here. Don't worry — it's very simple. Follow these steps:
- Choose Run
 Run Configurations.
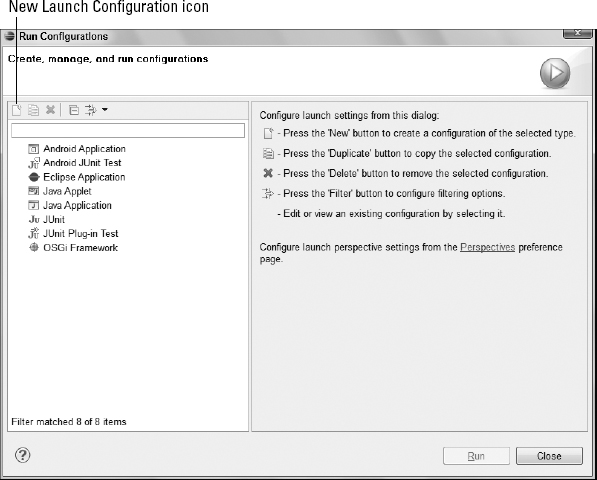
The Run Configurations dialog box opens, as shown in Figure 5-11. In this dialog box, you can create many types of run configurations. The left side of the dialog box lists many types of configurations, but the ones that apply to Android apps are as follows:
- Android Application: Used to run an Android Application
- Android JUnit Test: Used to run a jUnit Unit Test against an Android Application
- Select the Android Application item and click the New Launch Configuration icon, shown in Figure 5-11 (or right-click Android Application and choose New from the context menu).
The New Launch Configuration window opens.
- Type ExampleConfiguration in the Name field.
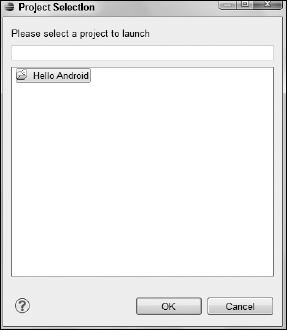
- On the Android tab, select the project you are creating this launch configuration for. To do this, first click the Browse button.
The Project Selection dialog box opens.
- Select Hello Android and click the OK button (see Figure 5-12).
Figure 5-11: The Run Configurations dialog box.
The Run Configurations dialog box reopens.
Figure 5-12: Selecting the project for the new launch configuration.
- On the Android tab, leave the Launch Action option set to Launch Default Activity.
In this case, the default activity is MainActivity, which you set up in the section “Starting a New Project in Eclipse,” earlier in this chapter.
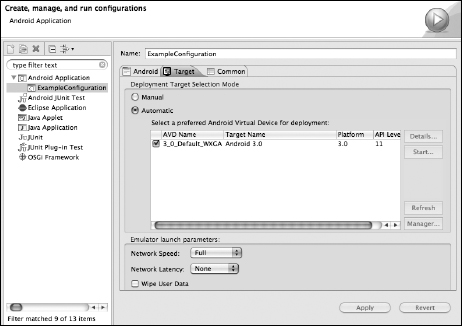
- On the Target tab (see Figure 5-13), leave Automatic selected.
- In the Select a Preferred Android Virtual Device for Deployment section, select the 3_0_Default_WXGA device.
This device is the AVD that you created previously. By selecting it, you're instructing this launch configuration to launch this AVD when a user runs the app by choosing Run
Run. This view has both manual and automatic options. The manual option allows you to choose which device to connect to when using this launch configuration. Automatic sets a predefined AVD to use when launching in this current launch configuration. - Leave the rest of the settings alone, and click the Apply button.
Congratulations! You've created your first launch configuration by hand.
Figure 5-13: A new, manually created launch configuration named ExampleConfiguration.
Duplicating your launch configuration for quick setup
At some point, during your very successful and lucrative Android development career, one of your applications may have a problem on one particular device. Launch configurations are designed to help you launch into a particular environment quickly. Setting up launch configurations can be a time-consuming task, however — which can be frustrating, especially if the new launch configuration is only slightly different from an existing launch configuration. Fortunately, the ADT has included functionality that duplicates existing launch configurations. This functionality enables you to quickly create various launch configurations that are set up independently with their own configuration in mind.
To duplicate an existing launch configuration, follow these steps:
- Choose RunRun Configurations to open the launch configuration window.
- In the left panel, right-click the configuration you want to duplicate (which, for this example, is ExampleConfiguration), and choose Duplicate from the context menu.
Doing this creates a new launch configuration that's an exact copy of ExampleConfiguration. Its name will be ExampleConfiguration (1).
- Give the new run configuration a unique name. (For this example, type DuplicateTest in the Name field near the top of the window.)
At this point you can change various settings to give the launch configuration a unique configuration.
- (Optional) For the purposes of this chapter, you won't need the DuplicateTest launch configuration; it was created only to illustrate how to duplicate an existing launch configuration. If you'd like to delete this configuration, select DuplicateTest in the left panel and click the Delete button on the toolbar, or right-click it and choose Delete from the context menu.
- Click the Close button to close the Run Configurations dialog box.