Creating a Distributable APK File
Before you jump in and create the distributable APK, you should take great care to make sure that your application is available to as many users as possible. This is done with the uses-sdk element in the AndroidManifest.xml. Your AndroidManifest.xml file currently has a uses-sdk entry that you created in Chapter 8, which is shown here:
The minSdkVersion property in this line identifies which versions of the Android platform can install this application. In this instance, level 4 has been selected. However, for your Screen Brightness Toggle application, you set the target SDK to version 11. So version 4 is the minimum SDK even though you're targeting the version 11 SDK? How can all of this madness work?
The Android platform, for the most part, is backwards compatible. Most of the features in version 11 are also in version 12. Yes, small changes — and sometimes even large components — exist between these versions, but almost everything else in the platform remains backwards compatible. Therefore, stating that this application needs a minimum of SDK version 11 only signifies that any Android operating system that is of version 11 or greater can run the application.
Using the minSdkVersion information, the Android Market is able to determine which applications to show each user of each device. If you were to release the application right now with minSdkVersion set to the value of 4, and you opened the Android Market on an Android device running version 3 (Android 1.5) or lower, you would not be able to find your application. Because you specified version 4, the Android Market filtered your app out for earlier devices. If you were to open the Android Market on a device running version 4 or above, however, you would be able to find and install your application.
 If you do not provide a minSdkVersion value in the uses-sdk element of the Android Manifest, the Android Market will not allow you to upload your application. Please be sure to provide a valid minSdkVersion prior to uploading your app to the Android Market.
You can build an Android APK file in numerous ways:
- Through the Android Development Tools (ADT) inside of Eclipse
- By using an automated build process through a continuous integration server, such as Hudson
- Through the command line with Ant
- … and other ways such as the Maven build system, and so on
The last three of these options are used in advanced scenarios. For the purposes of this chapter, you use the ADT within Eclipse to create your APK file. The ADT provides an array of tools that compiles and packages your Android application files into an APK. As it does this, the ADT “digitally signs” your app. (Digital signing is discussed in the next section.)
Digitally signing your application
The Android system requires that all installed applications be “digitally signed” with a certification that contains a public/private key pair. The private key is held by the developer. The certification is used to identify the application and the developer and for establishing the trust relationships between applications.
There are a few key important things to know about signing Android applications:
- All Android applications must be signed. The system will not install an application that is unsigned.
- You can use self-signed certificates to sign your applications. A certificate authority is not needed.
- When you are ready to release your application to the market, you must sign it with a private key. You cannot publish the application with the debug key that creates the APK when debugging the application during development.
- The certificate has an expiration date that is verified only during install time. Therefore, if the certificate expires after the application has been installed, the application will continue to operate normally.
- You don't have to use the ADT tools to generate the certificate. You can use standard tools, such as Keytool or Jarsigner to generate and sign your APK files.
 Applications signed with the same certificate can communicate with each other. This allows the applications to run within the same process, and, if requested, the system can treat these applications as a single application. With this methodology, you can create your application in modules, and users can update each module as they see fit. A great example of this would be to create a game and then to release “update packs” to upgrade the game. Users can decide to purchase only the updates they like.
The certificate process is outlined in detail in the Android documentation. The documentation includes how to generate certificates with various tools and techniques.
Creating a keystore
In Android (as well as in Java), a keystore is a container that holds your personal certificates. You can create a keystore file with a couple of different tools:
- The ADT Export wizard: This tool is installed with the ADT and allows you to export a self-signed APK file that will digitally sign the application as well as create the certificate and keystore (if needed) through a wizardlike process.
- The keytool application: This application allows you to create a self-signed keystore through the command line. This tool is located in the Android SDK tools/ directory and provides many options through the command line.
In this chapter, you use the ADT Export wizard to create your keystore.
 The keystore file contains your private certificate, which Android uses to identify your application in the Android marketplace. If you lose your keystore, you will not be able to sign the application with the same private key, which can cause problems. For one thing, this prevents you from upgrading your app — the Android Market will recognize your file as a new Android application, not as an upgrade to an existing one, and won't allow you to proceed. This also happens if you change the package name of the app — Android will not recognize your file as a valid update. To make sure this doesn't happen, back up your keystore in a safe location.
Creating the APK file
To create your APK, follow these steps:
- Open Eclipse (if it is not already open).
- Right-click on Screen Brightness Toggle, choose Android Tools, and then choose Export Signed Application.
The Project Checks window of the Export Android Application wizard appears, as shown in Figure 10-1.
- In the Project Checks window, click Next.
Doing this opens the Keystore Selection window, as shown in Figure 10-2.
- Because you have not yet created a keystore, select the second radio option, Create New Keystore. In the Location field, type the location of your keystore — I prefer to use c:/android/ (on Windows) or ~/android (for Mac OS X and Linux) — and a name for your keystore. The filename should have the. keystore extension.
My full path looks like this:
c:/android/dummies.keystore
Figure 10-1: The Project Checks window of the Export Android Application wizard.
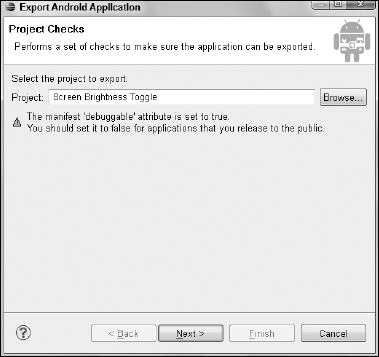
Figure 10-2: The Keystore Selection window.
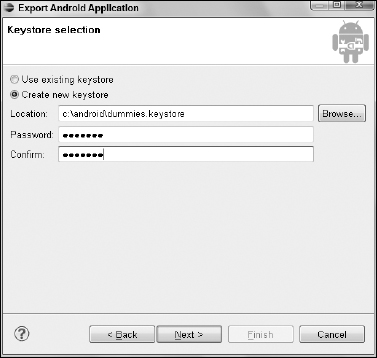
- Choose a password that you can remember and type it in the Password and the Confirm fields, and then click Next.
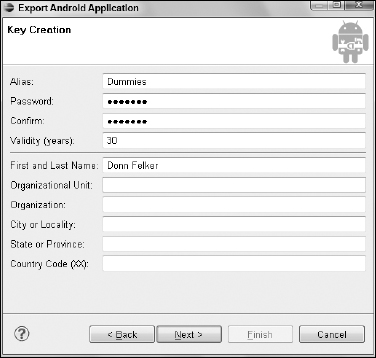
Doing this opens the Key Creation page, which allows you to create the keystore.
- In the Key Creation page, fill out the following fields and then click Next.
- Alias: This is the alias that you will use in the future to identify the key.
- Password & Confirmation: The password that will be used for the key. You can use the same password as in the Keystore selection or you can use a new one.
- Validity: The length of time this key will be valid. It is required that your key expire after 22 October of 2033. I normally plug a value of 30 years into this field to be safe.
- Complete the certificate issuer section of the dialog box by filling out at least one of these fields and then click Next:
- First and Last Name
- Organization Unit
- Organization
- City or Locality
- State or Province
- Country Code (XX)
I have chosen to provide my name as the issuer field. When you finish, your dialog box should resemble Figure 10-3.
Figure 10-3: The Key Creation window.
The final screen of the Export Android Application wizard, the Destination and Key/Certificate Checks window, appears (see Figure 10-4).
Figure 10-4: Choosing a filename and destination for your first APK.
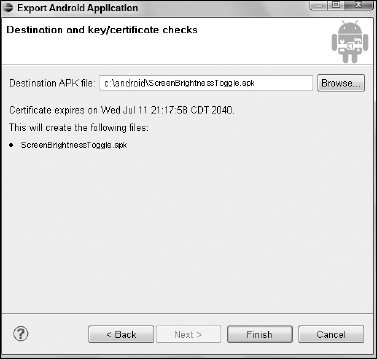
- In the Destination and Key/Certificate Checks window, you specify a destination for your APK file. Please choose a name and location for your file (with an extension of .apk), and type it in the Destination APK File field.
The name and location I chose is
c:/android/ScreenBrightnessToggle.apk
- Click Finish.
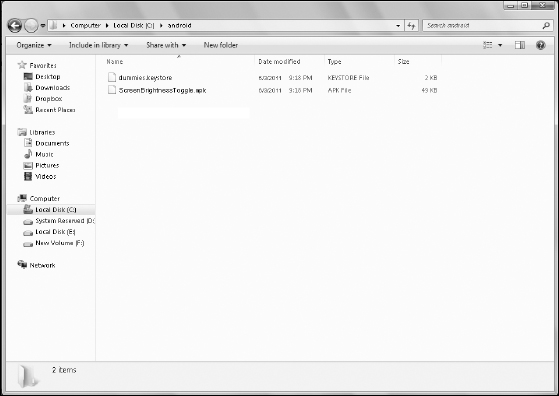
Doing this creates the .apk file in your chosen location as well as a keystore in the location you chose in Step 4. (See Figure 10-5.)
You have now created a distributable APK file and a reusable keystore for future updates.
Figure 10-5: The new APK and keystore in the same destination folder.