
Setting Up an Emulator
Aw, shucks! I bet you thought you were about to fire up your new app. Well, you're almost there. You have one final thing to cover, and then you get to see all of your setup work come to life in your Hello Android application. To see this application in a running state, you need to know how to set up an emulator through the various different launch configurations.
First, you need to create an Android Virtual Device (AVD), also known as an emulator. An AVD looks, acts, walks, and talks (well, maybe not walks and talks) just like a real Android device. AVDs can be configured to run any particular version of Android as long as the SDK for that version is downloaded and installed.
It's time to get reacquainted with your old buddy the Android SDK and AVD Manager. Follow these steps to create your first AVD:
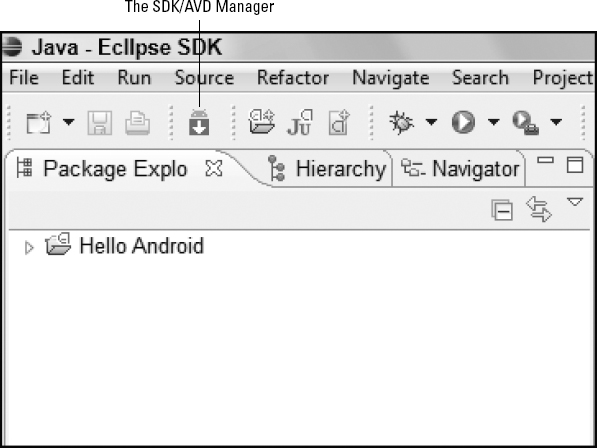
- To open the Android SDK and AVD Manager, click the icon on the Eclipse toolbar shown in Figure 5-7.
Figure 5-7: The Android SDK and AVD Manager icon on the Eclipse toolbar.
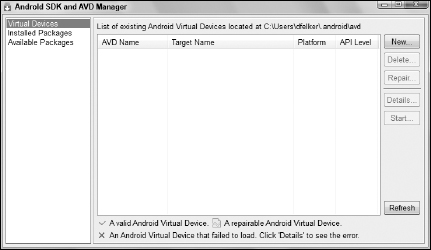
The Android SDK and AVD Manager opens. (See Figure 5-8.)
Figure 5-8: The Android SDK and AVD Manager dialog box.
- Click the New button.
The Create New Android Virtual Device (AVD) dialog box opens, as shown in Figure 5-9.
Figure 5-9: The Create New Android Virtual Device (AVD) dialog box.
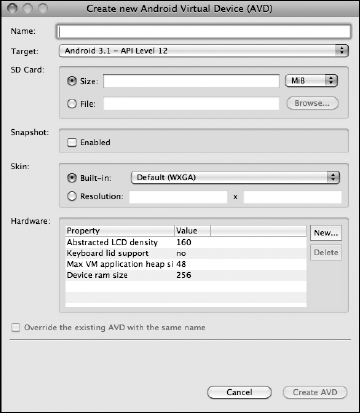
- For this AVD, in the Name field, type 3_0_Default_WXGA.
Be careful when naming your AVDs. Android is available on many devices in the real world, such as phones, e-book readers, and netbooks. A time will come when you have to test your app on various configurations; therefore, adhering to a common nomenclature when creating your AVDs can later help you recognize which AVD is for what purpose. The nomenclature I tend to follow is the following:
{TARGET_VERSION}_{SKIN}_{SCREENSIZE}[{_Options}]In the previous step, I suggest you use the name 3_0_Default_WXGA. If you do this, the AVD will have a TARGET_VERSION of Android 3.0. (The version name 3.0 is transformed into 3_0. The underscores are used in place of periods to keep the name of the AVD combined. Creating an AVD name as a single combined word helps when you're working in advanced scenarios with AVDs via the command line.)
The SKIN is the name of the skin of the emulator. Emulators can have various skins that make them look like actual devices. The default skin (Default) is provided by the Android SDK.
The SCREENSIZE value is the size of the screen with regard to the Video Graphics Array (VGA) size. The default is WXGA. Other options include QVGA and WVVGA800.
- In the Target box, select Android 3.0 — API Level 11.
- In the SD Card section, leave the fields blank.
You have no use for an SD Card in this application. You would use the SD Card option if you needed to save data to the SD Card. If you want to have an SD Card emulator in the future, insert the size of the SD Card in megabytes (MB) that you would like to have created for you. At that time, an emulated SD Card will be created and dropped in your local file system.
- Leave the Skin option set to Built-in (WXGA).
- Change the Device RAM size in the Hardware section.
The Hardware section outlines the hardware features your AVD should emulate. The Android 3.0 emulator you're building emulates an ARM Processor, and to emulate this processor on your machine takes a lot of RAM. Although the default value of 256 should suffice, if you bump this up to a larger value the emulator will run much faster. If your machine has more than 2 GB of RAM, bump this value up to 1024 (1 GB of RAM) for the emulator. Doing this makes the emulator a little more snappy and responsive.
- Click the Create AVD button.
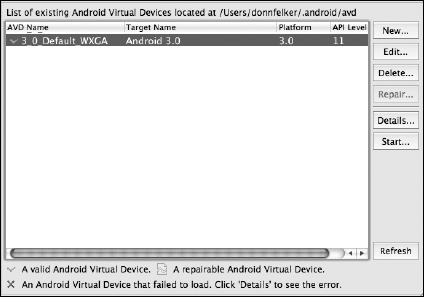
The Android SDK and AVD Manager dialog box should now display the new AVD. (See Figure 5-10.)
Figure 5-10: The recently created AVD in the Android SDK and AVD Manager dialog box.
- Close the Android SDK and AVD Manager dialog box.
You've created your first Android virtual device. Congratulations!
 If you receive an error message after you create your AVD that says Android requires .class compatibility set to 5.0. Please fix project properties., you can fix it by right-clicking the project in Eclipse and choosing Android Tools
![]() Fix Project Properties from the context menu.
Fix Project Properties from the context menu.