
Running the Hello Android App
Congratulations! You've made it! Understanding the basics of how to get an Android application up and running is a simple yet detailed process. You're now ready to see your hard work in action. You've created a launch configuration and an Android Virtual Device; now it's time for you to get the application running. Finally!
Running the application is simple. Just choose Run![]() Run or press Ctrl+F11 (but don't do that now!). Doing so causes the ADT to compile your application and launch it in an emulator using the default launch configuration you built earlier in this chapter — in this case, ExampleConfiguration.
Run or press Ctrl+F11 (but don't do that now!). Doing so causes the ADT to compile your application and launch it in an emulator using the default launch configuration you built earlier in this chapter — in this case, ExampleConfiguration.
However, the Android 3.0 WXGA emulator is huge, and unless you start the emulator first, running your app will bring up the emulator full size — a size well beyond the bounds of your screen, making the emulator impossible to use. This is because the screen density of the emulator matches that of your display. Because tablets are high density devices, the overall screen size will be very large, expanding beyond the length of your screen. When you start the emulator before running your app, however, you can define the size of its display to fit your screen. To start the emulator and launch your Hello Android app, follow these steps:
- Open the Android SDK Manager from the Eclipse menu on the toolbar.
This is the same step that you performed when you created the AVD in the “Setting Up an Emulator” section, earlier in this chapter.
- In the Android SDK Manager, select the 3_0_Default_WXGA AVD and then press the Start button.
Doing this opens the Launch Options screen, as shown in Figure 5-14.
Figure 5-14: The Launch Options dialog box.
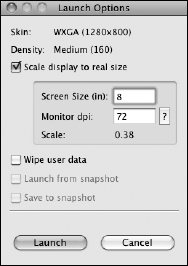
- Select the Scale Display to Real Size check box and place the value of 8 into the Screen Size (in) field. Notice the Scale label below the input fields now says 0.38, meaning that you have scaled the emulator size down to 38 percent of its original size. Press Launch and the emulator will now launch.
 As noted previously, the Android 3.0 emulator is a beast of an emulator. Because the emulator is emulating an ARM processor, it can take awhile for the emulator to boot up (especially if you have the minimum required RAM). I advise that you start the emulator when you open Eclipse so that by the time you're ready to test your application on the emulator, the emulator will be running and fully functional.
 - If you didn't create a launch configuration, you see the Run As dialog box, shown in Figure 5-15. Choose Android Application and click OK, and a launch configuration is created for you. On the other hand, if you created ExampleConfiguration by following the steps in “Creating a run configuration,” earlier in this chapter, you see the first emulator boot screen, as shown in Figure 5-16.
Figure 5-15: The Run As dialog box.
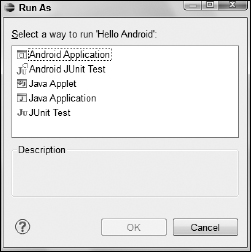
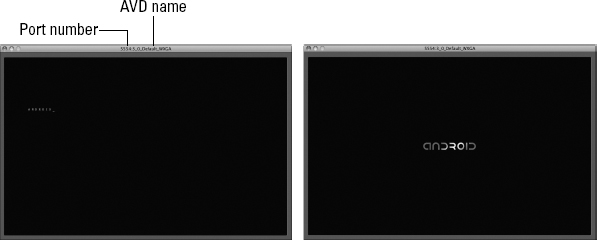
Figure 5-16: The first and second emulator boot screens.
Help! My emulator never loads! It stays stuck on one of the loading screens! No need to worry, comrade. The first time the emulator starts, the system could take upwards of 10 minutes for the emulator to finally finish loading. The reason for the lengthy loading time is that you're running a virtual Linux system in the emulator. The emulator has to boot up and initialize. The slower your computer, the slower the emulator will be in its boot process.
The emulator has two boot screens. The first contains the port number that the emulator is running on your computer (5554) and the AVD name (3_0_Default_WXGA). Roughly one half of boot time is spent on this screen. The port number is useful when you have multiple instances of the emulator running. You can use this port number as a reference to each emulator when using command-line tools. More information about this can be found here: http://d.android.com/guide/developing/tools/adb.html.
The second boot screen shows the Android logo. (Refer to Figure 5-16). This logo is the same one that default Android OS users see when they boot their phones (that is, unless a device manufacturer has installed its own user-interface customizations, as on the HTC Sense).
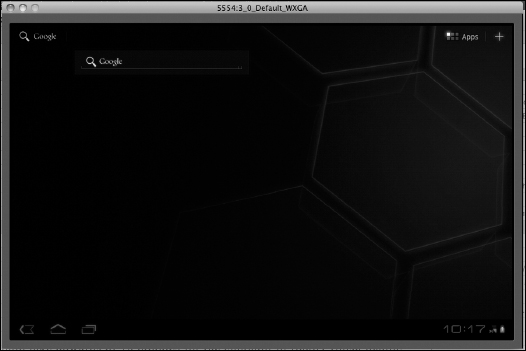
When the emulator completes its loading phase, the default home screen appears. (See Figure 5-17.)
Save valuable time by leaving the emulator running. The emulator doesn't have to be loaded each time you want to run your application. After the emulator is running, you can change your source code and then rerun your application. The ADT will find the running emulator and deploy your application to the emulator.
Figure 5-17: The loaded 3_0_Default_WXGA emulator.
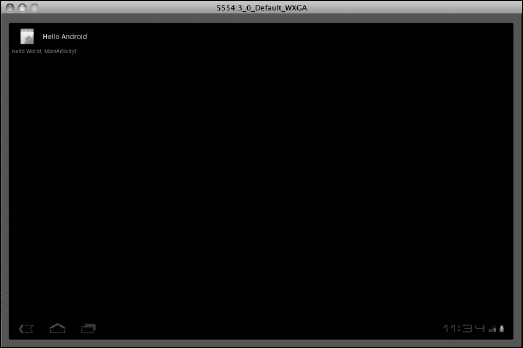
Immediately after the emulator's default home screen appears, the ADT starts the Hello Android application for you. You should see a black screen containing the words Hello World, MainActivity!, as shown in Figure 5-18. Congratulations! You just created and started your first Android application.
Figure 5-18: The Hello Android application in the emulator.
 If your application doesn't start within five to ten seconds after the emulator's default home screen appears, simply run the application from Eclipse again by choosing Run
![]() Run. The application is redeployed to the device, and it starts running. Sometimes the ADT will time out when attempting to install your application onto the emulator. Timeouts often occur when the emulator is booting. If you're not sure what's going wrong, you can view the status of the installation via the Console view in Eclipse, as shown in Figure 5-19.
Run. The application is redeployed to the device, and it starts running. Sometimes the ADT will time out when attempting to install your application onto the emulator. Timeouts often occur when the emulator is booting. If you're not sure what's going wrong, you can view the status of the installation via the Console view in Eclipse, as shown in Figure 5-19.
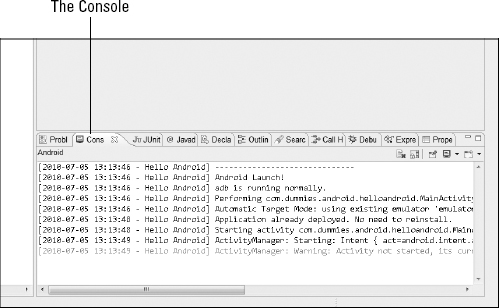
Figure 5-19: The Console view in Eclipse allows you to view what's happening behind the scenes while your app is deploying to a device.
Here's the full text of that information:
[2010-07-05 13:13:46 - Hello Android] ------------------------------
[2010-07-05 13:13:46 - Hello Android] Android Launch!
[2010-07-05 13:13:46 - Hello Android] adb is running normally.
[2010-07-05 13:13:46 - Hello Android] Performing com.dummies.android.
               helloandroid.MainActivity activity launch
[2010-07-05 13:13:46 - Hello Android] Automatic Target Mode: using existing
               emulator ‘emulator-5554’ running compatible AVD ‘3_0_Default_WXGA’
[2010-07-05 13:13:48 - Hello Android] Application already deployed. No need to
               reinstall.
[2010-07-05 13:13:48 - Hello Android] Starting activity com.dummies.android.
               helloandroid.MainActivity on device
[2010-07-05 13:13:49 - Hello Android] ActivityManager: Starting: Intent {
               act=android.intent.action.MAIN cat=[android.intent.category.
               LAUNCHER] cmp=com.dummies.android.helloandroid/.MainActivity }
[2010-07-05 13:13:49 - Hello Android] ActivityManager: Warning: Activity not
               started, its current task has been brought to the front
The Console view provides valuable information on the state of the application deployment. The content above demonstrates what happens when you try to deploy an application that has already been deployed but no changes have occurred since the last deployment. It lets you know it's launching an activity; shows what device the ADT is targeting; and shows warning information, as in the last line of the output. In that line, ADT informs you that the activity it attempted to launch in the previous line — MainActivity, in this case — hasn't been started because it was already running. Because the activity was already running, ADT brought that task to the foreground (the Android screen) for you to see.