
Creating Your First Activity
Now you can create your first activity! Well, technically speaking, you already created your first activity — the MainActivity.java file — when you created a project through the New Android Project wizard in Chapter 5. Therefore, you will not be creating a new activity; you will only be working with the MainActivity.java file you already created. Open this file now.
As you read previously, the entry point into your application is the onCreate() method. The code for your MainActivity.java file already contains an implementation of the onCreate() method. Right now, your code should look like this:
public class MainActivity extends Activity {
    /** Called when the activity is first created. */
    @Override
    public void onCreate(Bundle savedInstanceState) {                →4
        super.onCreate(savedInstanceState);                          →5
        setContentView(R.layout.main);                               →6
    }
}
You will be writing initialization code directly below the setContentView() method shortly.
Some points to note about this code:
| →4 | This line is the onCreate method, which initiates the activity. The Bundle savedInstanceState part ensures that upon initiation, a bundle containing this activity's previous state (if there was one) gets passed in. This is useful when restarting an activity that has been killed by the system, so information is not lost.
The bundle is a key value that maps between string keys and various parcelable types. A bundle gives you, the developer, a way to pass groups of information back and forth between screens (that is, between different activities). I discuss this later in Part III, when I walk you through building the Task Reminder application. |
| →5 | This line calls to the base Activity class to perform setup work for the MainActivity class.
|
| →6 | This line sets the content view for an activity — in other words, it defines the user interface layout.
By default, an activity has no idea what its UI is. UIs come in many varieties: anything from a simple user-input form to a visual camera–based augmented virtual reality application (such as Layar in the Android Market) to a drawn-on-the-fly 2D or 3D game. As a developer, your job is to tell the activity which layout to load. R.layout.main is the main.xml file that is located in the res/layouts directory. You define this layout in the previous chapter. |
Handling user input
For user interaction, your Screen Brightness Toggle application won't require much: only a single button. The user taps the button to dim the tablet's screen brightness, and then the user taps the button again to restore it to full brightness.
To respond to this tap event, you need to register what is known as an event listener. An event listener detects and responds to an event in the Android system. Android uses various types of events, but two of the most common are
- Keyboard events: These occur when a particular keyboard key has been pressed. Why would you want to know about this? Maybe you want your app to use hot keys, such as Alt+E, to change your app on the fly. By pressing Alt+E, then, the user could, say, toggle an app's view into Edit mode. Responding to keyboard events allows you to do this. I do not use keyboard events in this book, but if you need to in future applications, override the onKeyDown method, as shown here:
@Override public boolean onKeyDown(int keyCode, KeyEvent event) { // TODO Auto-generated method stub return super.onKeyDown(keyCode, event); } - Touch events (also known as touches, clicks, or taps): These occur when the user taps a widget on the screen. Examples of widgets that can respond to touch events include (but are not limited to):
- Button
- ImageButton
- EditText
- Spinner
- List Item Row
- Menu Item
 All views in the Android system can react to a tap; however, some of the widgets have their clickable property set to false by default. You can override this setting in your layout file or in code to allow a view to be clickable by setting the clickable attribute on the view or the setClickable() method in code.
Writing your first event handler
When the user touches the onscreen toggle button, a click event occurs. In order for your application to respond to the user's action, then, you must design the code to respond to the button's click event.
Type the code shown in Listing 7-1 into your editor. This code shows how to implement a click handler for the toggleButton. The listing shows the entire code — the original onCreate() method with the new code added. Feel free to either fill in the button code or overwrite your entire onCreate code.
Listing 7-1: The Initial Class File with a Default Button OnClickListener
public class MainActivity extends Activity {

    ToggleButton tb;                                            →3
    TextView tv;
                                                                →4

    @Override
    public void onCreate(Bundle savedInstanceState) {
        super.onCreate(savedInstanceState);
        setContentView(R.layout.main);

        tb = (ToggleButton)findViewById(R.id.toggleButton);     →11
        tv = (TextView)findViewById(R.id.currentBrightness);    →12

        tb.setOnClickListener(new View.OnClickListener()
           {                                                    →14

            public void onClick(View v) {                       →16

                        }
                    });
    }
}
Whoa! A lot of stuff is going on there! I'm going to break this code down, line by line, so you can understand what's happening.
| →3 | The ToggleButton instance variable tb. |
| →4 | The TextView instance variable tv.
Lines 3 and 4 declare class-level variables so that you can keep track of your ToggleButton and TextView. You'll need these variables throughout the chapter. Declaring them here at the top means that you won't have to constantly re-declare them every time you need them. |
| →11 | Retrieves a reference to the current brightness TextView from the activity. This is explained in detail below. |
| →12 | Retrieves a reference to the ToggleButton that will toggle the brightness of the screen. |
Lines 10 and 11 find views through the findViewById() method, which is available to all activities in Android. This method lets you find any view inside the activity's layout. This method always returns a View class that you must cast to the appropriate type before you can work with it. As an example, the following code (which is a snippet from the previous code) casts the returned view from findViewById() to a ToggleButton (which is a subclass of View):
tb = (ToggleButton)findViewById(R.id.toggleButton);
 If you cast the retrieved view to a different type than the one in your layout file (if you, say, cast the view to ImageButton, but you have an ImageView in the layout file), you will receive a run-time error. Be sure you're casting to the appropriate type.
As with most languages that implement inheritance, Android also allows you to return a parent object type. As an example, if your view contains a ToggleButton, you can cast this to a Button, TextView, or plain View. Look at the inheritance chain in the documentation to see what the view inherits so that you can properly cast. (For ToggleButton, check out http://d.android.com/reference/android/widget/ToggleButton.html.)
Immediately following the code on line 11, you retrieve the TextView that you will use to display the current brightness of the device back to the user. Though not used in this example, you need this object, so add it now to save time later in this chapter.
| →14 | Sets up a click listener that fires when the user taps on the ToggleButton. |
| →16 | The click event that fires when the user taps on the ToggleButton.
Line 13 creates an event handler. The event-handling code is placed inline after you retrieved the ToggleButton from the layout. Setting up the event handler is as simple as setting a new View.OnClickListener. This click listener contains an onClick() method (line 15) that is called after the button is tapped. This is where you will be placing the code to handle the screen brightness toggle. |
Importing packages
When you typed this code into your editor, you may have seen some red squiggly lines, as shown in Figure 7-2. These lines are Eclipse's way of telling you, “Hey! I don't know what this ‘Button’ thing is.” If you place your cursor over the squiggly line and leave it there for a moment, you receive a small context window that gives you several options (also shown in Figure 7-2).
Figure 7-2: When Eclipse gives you a red squiggly line, hovering your cursor over the line provides a context menu of options.
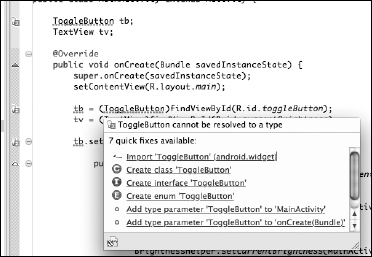
To help Eclipse understand, choose the first option from this menu, Import ‘ToggleButton’. Doing this adds the following import statement to the top of the file:
import android.widget.ToggleButton;
This import statement informs Eclipse where the ToggleButton is located in the Android packages. You may also need to import the android.view.package.
If you do not import the required libraries as just explained, the code will not compile and you will not be able to complete your application.
As you start to develop more applications, and to include many other widgets in your applications, you will notice that you have to include quite a few import statements to get your application to compile. Although this is not a huge issue, you can provide a shorthand method of including everything in a particular package. You can do this by providing an asterisk at the end of the package name, as shown here:
import android.widget.*;
The asterisk informs Eclipse to include all widgets in the android.widget package.