
Installing Your Application
You've done it! You wrote your first application. In the next couple of sections, you install your app on the emulator and then get it into action on a real device!
Installing on the emulator
Installing your app on an emulator is the next step. In Chapter 5, you set up a run configuration to run the Hello Android application. Now you will be using the same launch configuration for your new app. Because the ADT is smart enough to know about this launch configuration, it will use it by default. To install this app on the emulator, follow these steps:
- In Eclipse, choose Run
 Run or press Ctrl+F11 to run the application.
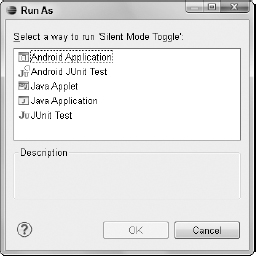
You are presented with the Run As window, as shown in Figure 7-3. Choose Android Application and click the OK button. Doing this starts the emulator.
After the emulator is running, it's running on its own. The emulator has no dependencies on Eclipse. In fact, you can close Eclipse and still interact with the emulator.
 The emulator and Eclipse speak to each other through the Android Debugging Bridge (ADB). ADB is a tool that was installed with the Android Development Tools (ADT).
Figure 7-3: The Run As configuration dialog box.
- Wait for the emulator to load and then unlock the emulator.
When the emulator starts, the screen will be in a locked state. If you're not sure how to unlock the emulator screen, simply click and drag the circular lock icon to the right. To review more about the emulator, see Chapter 5. When the emulator is unlocked, your application should start. If it does not start, rerun the application by choosing Run
Run or pressing Ctrl+F11. After the application starts, you should see the emulator running your program, as shown in Figure 7-4.You've already performed the first step in your testing process — making sure that the app starts!
- Test your device. Click the button to see the text change, as shown in Figure 7-5.
- Return to the Home screen by clicking the home button on the emulator.
Open the application (by selecting the application icon in the apps menu). Note that the application launcher icon is now present in the list of applications.
Figure 7-4: The emulator running the application.
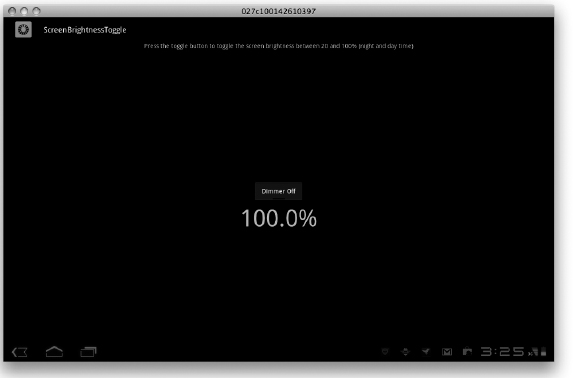
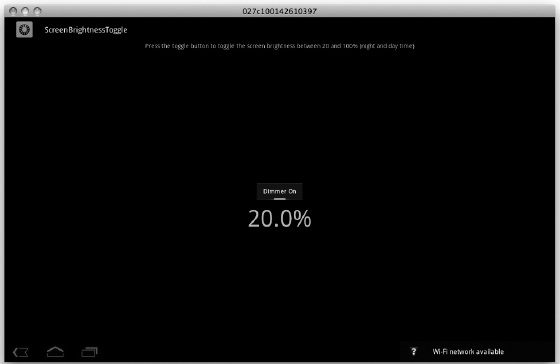
Figure 7-5: The Screen Brightness app in Dimmer On mode.
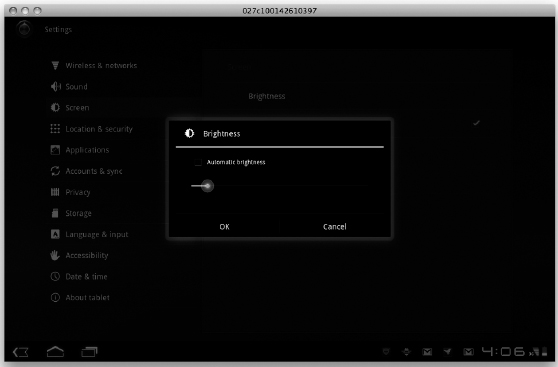
When you opened your app, you saw the onscreen text change — but is your app actually affecting the tablet's brightness? Open the app again and check to see whether the tablet is in bright or dim mode. Aha! You've just discovered one of the drawbacks of the emulator. It can't emulate screen brightness. Why not? Your computer controls the screen brightness, not your android app. Therefore, the only way to check if this app is working is to check the brightness settings. With the app open, toggle the application to dim mode (20%). Then return to the Home screen, press Apps![]() Settings, and then Screen
Settings, and then Screen![]() Brightness. You should see a screen similar to the one in Figure 7-6.
Brightness. You should see a screen similar to the one in Figure 7-6.
Now go back to your app and click the button to toggle the brightness to bright mode, and then return to the brightness settings. (Yes, I know doing this is a pain, but with the emulator's limitations, it's the only way you can be sure your app is working.) Did the brightness change?
Test your application to ensure it works as expected. If you find a flaw, use the debugging tools I discuss later in this chapter to help identify and correct the problem.
Figure 7-6: The brightness scale in the screen brightness settings.
With the rise of agile methodologies over the last decade, it's only a matter of time before you start to wonder how to perform automated testing with Android. The SDK installs Android unit testing tools that you can use to test not only Java classes but also Android-based classes and user interface interactions. You can find out more about unit testing Android from the Android documentation at http://d.android.com/guide/topics/testing/testing_android.html.
An entire book could easily be written on unit testing with Android alone; therefore, I'm going to mention the tools that are at your disposal. You can look into them when you have time:
- jUnit: The SDK installs jUnit integration with the ADT. jUnit is a very popular unit testing framework that is used in Java. You can use jUnit to perform unit testing or interaction testing. More info about jUnit can be found at www.junit.org. To make life easier, Eclipse has built-in tools to help facilitate testing in jUnit through Eclipse.
- Monkey: Monkey is a UI/application exerciser. This program runs on your emulator or device and generates pseudorandom streams of user events, including taps, gestures, touches, clicks, and a number of system events. Monkey is a great way to stress-test your application. It is installed with the Android SDK.
- Robolectric: A new type of testing framework that allows you to somewhat “mock” out various functions in the Android Framework. This library is under constant development. With each passing day, it gets better. This tool is not installed by the Android SDK. To install and for more information, go to www.robolectric.org.
- Robotium: As the tagline states “It's like Selenium for Android” (Selenium is an automated website-testing framework). Robotium features automated testing that is similar to Monkey's but in a much more friendly manner. This tool is not installed by the Android SDK. To install and for more information, go to http://code.google.com/p/robotium/.
Installing on a physical Android device
Installing the application on a device is no different than installing an application on the emulator. You just need to make a few small adjustments. You installed the driver in Chapter 4, so the rest is fairly straightforward:
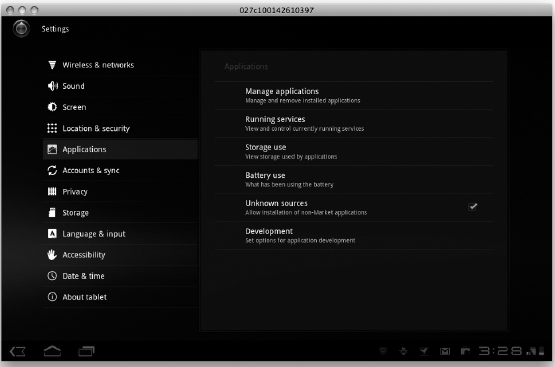
- Enable the installation of non–Android Market applications by going to SettingsApplications and selecting the Unknown Sources check box.
- From the Home screen of your tablet, access the Settings panel (choose AppsSettings). Within that panel, choose Applications.
- Select the Unknown Sources check box, as shown in Figure 7-7.
This setting allows non-Android market apps to be installed on the device.
Figure 7-7: Setting to allow the installation of non–Android Market applications.
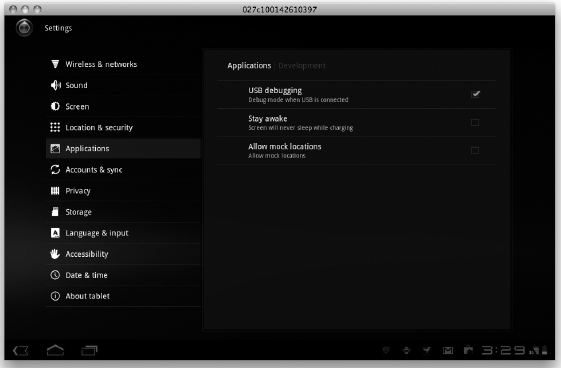
- While in the Applications Settings screen (the same screen where you made the last change), choose Development and select the USB Debugging option, as shown in Figure 7-8.
This setting allows you to debug your application on your device (more on debugging in a moment).
Figure 7-8: Enabling your device to perform USB debugging.
- Plug your tablet into the computer by using a USB cable.
- When the tablet is detected on your system, run the application by choosing RunRun or by pressing Ctrl+F11.
At this point, the ADT recognizes the device as a new option for a launch configuration (in addition to the emulator); therefore, it displays the Android Device Chooser dialog box to ask you which device it should use to run the application. In Figure 7-9, my Motorola XOOM shows up with a different icon than the emulator to help me identify which is a device and which is an emulator. Please note: The emulator won't show up in the list of available options unless the emulator is running.
Figure 7-9: The Android Device Chooser.
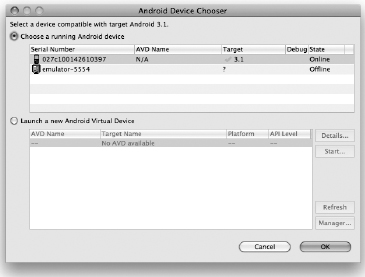
- Choose your device from the list and click the OK button.
Doing this sends the application to your tablet, and your app launches just as it would with the emulator. In a few seconds, the app should show up on your device.