
Chapter 2
Developing for Android Wear
IN THIS CHAPTER
![]() Running Android apps on wearables
Running Android apps on wearables
![]() Creating a basic wearable app
Creating a basic wearable app
![]() Creating a watch face app
Creating a watch face app
Android wearables commonly come in a single form: the watch. However, that’s the end of the commonality. The first section of this chapter gives you a brief overview of just a few ways in which wearables are used today. The diversity will amaze you!
Many of this book's concepts work on all kinds of devices. But when a person describes a particular feature, it’s easy to think “smartphone or tablet.” In this chapter, you veer briefly from that path and deal exclusively with wristwatches (known formally as Android Wear devices, or wearables for short). The apps won’t make you the next talk of the town with regard to wearables, but you’ll gain insights into the commonality of and differences among wearable app development.
Seeing Where Wearables Are Used
It’s usually helpful to have an idea of just where your apps might end up. Seeing what other people have dreamed up can give you ideas for your own amazing app. You may find yourself asking why a wearable can’t seem to do something, and then wind up creating an app to do it. The following list offers just some basic ideas of what wearables do today:
- Withings ScanWatch (
https://www.withings.com/us/en/scanwatch): Has a host of health-related features, including the ability to detect your sleep apnea and display an EKG. It’ll also help you get ready for your next fitness event by tracking your running, walking, and swimming. - Skagen Falster 3 (
https://www.skagen.com/en-us/falster3-learn-more): Looks gorgeous, and you can use it to make calls Dick Tracy–style. It also comes with 8GB of RAM to hold part of your music collection, and the 1GB of RAM ensures that you can run some hefty wearable apps. Just in case you get lost, this watch can help you find where you are by displaying a micro-map containing GPS information. - Huami Amazfit T-Rex (
https://en.amazfit.com/t-rex.html): Provides the Swiss army knife of watches with durability that even the military likes (with 12 military-grade certifications to prove it). What is amazing about this watch is that it actually does look like one of those ultra-sophisticated mechanical watches that people used to wear not long ago, but now you can change the watch face to match your personality of the day. As you might expect for such a watch, it comes with 14 sports modes that you can use to track your performance in a manner particular to your favorite sport. - Coolpad Dyno 2 (
https://coolpad.us/dyno/): Defines the wearable that children want. As you might expect, it’s a little light on features but high on durability. It also provides special kid features like an SOS button that a child can press to get in contact with Mom and Dad instantly. The parent also decides who can communicate with the child, and the watch has many other features that make the 4LTE communication safer. - TicWatch Pro 4G/LTE (
https://www.mobvoi.com/us/pages/ticwatchpro4g): Enables the rest of us to find a watch that doesn’t cater to fitness needs. This watch provides about the same level of connectivity as a standard smartphone, supports Google Pay (so that you don’t have to carry a wallet around) and an SOS mode for those creepy areas of town, and provides access to Google Assistant so that you can discover a new restaurant in your area on a whim. Of course, it does provide heart monitoring (which seems to be a somewhat standard feature), but the focus is on what most people need just to live their lives. - Motiv Ring Fitness (
https://mymotiv.com/): Works with your Android device. However, you have to write the code needed to access it, which makes this device a wearable kind of add-on. It can actually perform many of the tasks that a watch can, such as track your health and help you buy things at the store, but in a smaller format. - Jacquard Jacket (
https://atap.google.com/jacquard/collaborations/levi-trucker/): Interacts with your smartphone, the one in your pocket, through various gestures on the left sleeve. Google has created this jacket in collaboration with Levi’s. This jacket has many features that you might expect, like the ability to obtain schedule updates and (it’s not easy to envision this) take a selfie. It will also tell you when you leave your jacket behind at a restaurant and help you track down your smartphone.
 The point of the last two entries in this list is that you shouldn’t focus on equating wearables to watches. Android Studio is currently set up to work with watches unless you find a handy third-party template. Third parties are stepping up with a host of different Input Method Editor (IME) add-ons, as described at
 https://developer.android.com/training/wearables/ui/wear-ime, so the basic interactions in this chapter will likely get superseded by new innovations at some point. Eventually, you can count on the Wear OS taking off in new directions because people don’t want to be hampered by having to constantly monitor their smartphone or tablet.
Setting Up Your Testing Environment
From a coding perspective, working with a wearable project doesn’t have to be significantly different than any other Android project. However, the user interface is different because you work with a significantly smaller device. You also have to consider the emulator you use to test the app and so on. With all this in mind, the following sections tell you about a basic wearable app project using the usual Hello World example.
You may have a perfectly wonderful mobile app that you want to move to a wearable device. Android also enables you to add a wear module to your existing mobile project. The instructions at https://developer.android.com/training/wearables/apps/creating.html#add-wear-os-module tell how to perform this task.
Creating the project
Most of the classes and methods that you use to write phone apps work on Android Wear apps as well. For evidence (but not proof) of this fact, follow these steps:
-
In Android Studio, start a new project and select the Wear OS option.
You see a list of templates like the one shown in Figure 2-1.

FIGURE 2-1: The Wear OS templates focus on watches.
-
Choose the Blank Wear Activity template and click Next.
You see the Configure Your Project dialog box, shown in Figure 2-2. Most of the features don’t look any different from a standard app. However, notice that the minimum API level defaults to API 28: Android 9.0 (Pie). In looking at online offerings, you find that this is actually a good level to choose, despite the fact that it limits the smartphones you can pair with your app if you wanted to do so.
 The Pair with Empty Phone App option on this page lets you pair your wearable app with a phone. However, Android recommends against this and states outright at
 https://developer.android.com/training/wearables/apps/creatingthat a wear app should run independently of a phone app. The suggestion is to test your app on an actual watch by uploading the app using Wi-Fi or Bluetooth. This chapter uses the emulator just to make things easy and ensure that you can follow along, even if you don’t currently own a smartwatch (or other wearable device).If you check the Pair with Empty Phone App option, what you see is a dual project containing both a
mobileand awearfolder.
FIGURE 2-2: Define the basic parameters of the app you want to create.
-
Type 05_02_01 in the Name field, type com.allmycode.p05_02_01 in the Package Name field, and click Finish.
Android Studio begins creating your project for you.
 If you like to poke around in a new project before doing anything else, you may notice that the Component Tree shows an error for the
 FrameLayout, as shown in Figure 2-3, before you've touched anything. This error is tied to the app:boxedEdges="all" entry, which supposedly is missing a namespace entry, except that the namespace entry is there as part of the <androidx.wear.widget.BoxInsetLayout> element. When you see this error, you click the offending line to display a red light bulb on the left side of the editor. Click the light bulb and choose Suppress: Add tools.ignore="Missing Prefix" Attribute from the context menu.

FIGURE 2-3: Already an error and you haven't even touched anything!
Configuring a wearable device emulator
To run this chapter's example, the only thing you need is an Android Wear AVD. Here's how you get one:
-
In Android Studio's main menu, choose Tools ⇒ AVD Manager.
The AVD Manager opens.
-
In the AVD Manager window, click the Create Virtual Device button.
The Virtual Device Configuration dialog box appears. The left side of the dialog box contains a Category list, and the middle contains a list of hardware profiles.
-
In the Category list, select Wear OS.
You see a list of devices for the Wear OS that replaces the Phone device listing you normally see, as shown in Figure 2-4. Unlike the Phone category, the Wear OS category focuses on device types rather than specific device models. All these devices have the same density and slightly varying resolutions. Otherwise, the only real difference is the shape. You have a choice of these basic shapes:
- Square: A form commonly found for larger wearables that provides the most usable screen space.
- Round: A circular form commonly found with moderately sized wearable displays, often oriented toward fashion.
- Round chin: A circular form that is mostly round with a squared-off portion at the bottom. It provides a luxury look but has the least usable screen space to offer.
-
Select Android Wear Square and click Next.
This chapter relies on a specific AVD so that it’s easier for you to compare the output from your app with the screenshots in the book. However, any of the choices would likely work fine, and if you’re really determined to see a round or a round chin display instead, feel free to select it.
It's true. To run this chapter's example, any Android wear choice will do. But to run the emulator on your development computer, some choices might be better than others. Some AVDs consume too much memory. The Android Wear Square selection tends to work best.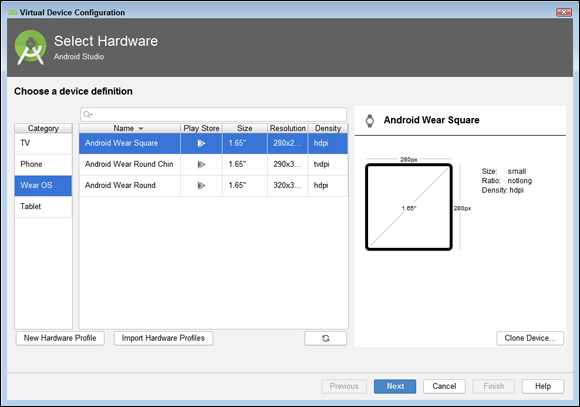
FIGURE 2-4: The Wear OS category contains only a few basic types.
-
Click Next.
You see the Select a System Image dialog box, shown in Figure 2-5. Notice the tabs at the top of the table with Recommended selected by default. The recommended options will work best on most development computers, so you should select one of them unless you have a particular need. For example, if you select the Other Images tab, you see that you can choose an armeabi-v7a processor rather than an x86 processor.
Notice that the highest available API level is 28. Because you select API level 28 in Step 2 in the “Creating the project” section, earlier in the chapter, you must choose an API level 28 device now.The Target column is also important for a system image in this situation. The option that will cause fewest problems when creating your app is the Android 9.0 (Wear OS) target.
Also remember that the previous examples in this book use API level 29, so you must download the API level 28 release.
-
Click the Download link for the Android 9.0 (Wear OS) target, shown highlighted in Figure 2-5.
You see a Component Installer dialog box appear. The progress bar shows the download process, which can take a while. It might be a good idea to read a good book or have some coffee. At some point, the download and installation process will complete.
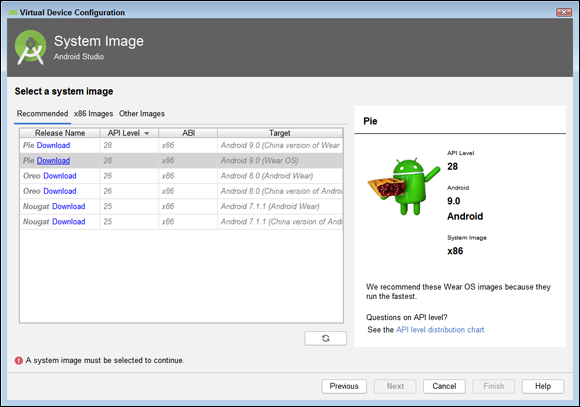
FIGURE 2-5: Select one of the recommended options for best performance.
-
Click Finish.
The Component Installer dialog box goes away. You return to the Select a System Image dialog box.
-
Click Next.
You see the Verify Configuration dialog box, shown in Figure 2-6.
-
Click Finish.
You see the new device appear in the Android Virtual Device Manager dialog. Notice that the Type column shows a watch icon, rather than a smartphone and tablet icon.
- Close the Android Virtual Device Manager dialog.
-
Choose Run⇒ Select device.
A context menu appears.
-
Click the Android Wear Square API 28 entry.
The IDE is now configured to use an appropriate device for testing.
To ensure that your configuration works, choose Run⇒ Run ‘app’. You see the default project output shown in Figure 2-7.

FIGURE 2-6: The configuration used for the examples in this chapter.
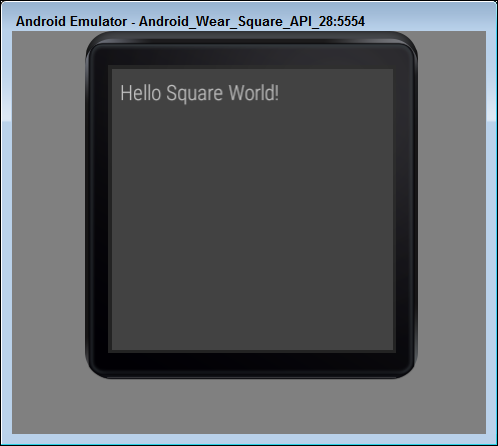
FIGURE 2-7: A quick test of your environment.
Other testing configurations
For the full Android Wear experience, you may want two devices — a wearable and a phone (modern wearables are far more capable than the offerings of the past). The obvious question is, are both of them emulated, or just one? Are they both real, or only one of them?
To help answer this question, the Android documentation provides a few scenarios:
-
Ignore the phone and use an emulated Android Wear device.
That's the scenario that we recommend for this chapter's example.
-
Connect a real phone to your development computer and use an emulated Android Wear device.
See the brief list of tips in this section.
-
Use a real phone and a real Android Wear device.
Again, see the brief list of tips.
The Android developer training pages have detailed instructions on setting up phones for testing with Android Wear, so this section of the chapter doesn’t dwell on the details. Instead, you get some of the highlights. These highlights might help you see the forest for the trees while you march step-by-step through the instructions on the Android developer site's pages.
The Android developer site's pages on testing with real devices are http://developer.android.com/training/wearables/apps/creating.html and http://developer.android.com/training/wearables/apps/bt-debugging.html. When you set up a phone for testing with Android Wear, you perform some or all of the following steps:
- Install the Android Wear app from the Google Play Store on your phone.
- Use the Developer options in the phone's Settings screen to enable USB debugging on the phone.
- (With an Android Wear emulator) Type the following command in your development computer's command prompt window or Terminal app:
adb -d forward tcp:5601 tcp:5601This command forwards your emulator's communications to the connected phone.
- (On a real wearable device) Use the Developer options in the device's Settings screen to enable ADB debugging on the Wear device.
- In the Android Wear app on the phone, pair the phone with the emulator (or with the real wearable device).
For connecting a real wearable device, you have two options:
- Connect the device to your development computer using a USB cable. Alas! Some Android wearables don't have USB ports.
- Create a Bluetooth connection between the phone and the wearable. For this option, you have to enable the Debugging over Bluetooth option on the wearable. You also have to set up Debugging over Bluetooth in the Android Wear app on the phone and type the commands
adb forward tcp:4444 localabstract:/adb-hub
adb connect localhost:4444
on your development computer.
Wearable Apps: What's the Big Deal?
The previous sections spend considerable effort to convince you that Wearable apps are very much like phone apps. But if things are so similar, why have a separate Android Wear chapter? Why not just write “Follow the steps you followed in all the other chapters” and be done with it?
The answer is, some aspects of wearable app development are different from their phone and tablet counterparts. The most obvious difference is screen size. You can't display very much on a one-inch screen, so you have to design your app accordingly. To make doing so viable, you also have access to special wearable classes:
BoxInsetLayout: Defines a layout that works well with round screens by creating a box, within which you place the display elements. The previous example in this chapter uses this layout.SwipeDismissFrameLayout: Enables a user to dismiss any view by swiping the screen from left to right. You need this ability when an app, such as a map view, needs some method for dismissing the activity as a whole. The article athttps://developer.android.com/training/wearables/ui/exittells more about this layout and its use.WearableRecyclerView: Provides a curved layout, such as the layout used for the main Wear application launcher. This view maximizes the use of screen real estate so that you don't have to create a scrolling list of options but can instead place the options around the outside circumference of the display. Obviously, short options should appear at the top and bottom of the list because the top and bottom have the least space to offer. You can see more about this interesting layout athttps://developer.android.com/training/wearables/ui/lists.AmbientModeSupport: Provides ambient mode support when used with theAmbientModeSupport.AmbientCallbackProviderinterface. Ambient mode means that your app remains displayed at all times, such as in a particular kind of watch face. You aren't actually expecting the user to do much other than look. Interactive mode is what most developers think about because the user is doing something with the app. You can read more about this app athttps://developer.android.com/training/wearables/apps/always-on.
Another difference for wearables is the specific classes in the API. Like any other Android development project, the wearable API is in a constant state of flux, and you might find that your favorite class is deprecated before you get to enjoy it fully. Of course, these changes happen for a reason. Each update supposedly makes the API better and easier to use. Given that the API will probably change sooner than later, make sure you check up on your favorite classes (and their upgrades) at https://developer.android.com/training/wearables/ui/wear-ui-library#deprecations.
Case Study: A Watch Face
In any language, the meanings of words change over time. Eventually, the original meanings fade into obscurity. Only linguists and lexicographers know how words' meanings have evolved.
Take, for example, the word telephone. In the late 1800s, this word came from tele (meaning across) and phone (meaning sound). In the 1900s, when these devices became widely available, people shortened the word from telephone to phone.
In the 2000s, phones expanded their functionality to include texting, web surfing, game playing, and other activities not directly related to sound or to sending sound across regions of space. Way back when our grandparents were young (as early as the year 2015), phones were replacing credit cards as a primary method of making point-of-sale payments. Now, in the year 2065, we use phones to wash our clothes, mow our lawns, build our cities, and raise our children. Who among us remembers even remotely that the word phone came from a root word related to sound?
The same kind of thing is true about “watches” and “wearables.” Nowadays, people wear watches to look good and to make positive impressions on other people. But in the old days, watches were about telling time. The word watch originates from workers on watch duty carrying devices to help them mark time. Even in the early 2000s, some fashion-challenged people wore watches to keep track of the current time. In fact, using the instructions in the sections that follow, you find out how to create your own watch face that will help you keep track of the time.
Defining the watch face project
As do most Android projects, this project begins at the main screen, where you define the project parameters. Because this project is a little different, use these steps to create your project:
-
In Android Studio, start a new project and select the Wear OS option.
You see a list of templates like the one shown previously in Figure 2-1.
-
Highlight the Watch Face template.
The title of this dialog box is misleading. A Watch Face isn't an activity. But the creators of Android Studio can't worry about every little detail.
When you select Watch Face in this step, you're telling Android Studio to write a lot of code for you. In later sections, you explore some of this code. For now, just keep clicking. -
Click Next.
You see the Configure Your Project dialog box, shown previously in Figure 2-2. Notice that the template actually shows a watch face icon in place of the round face icon shown in Figure 2-2. Like the previous project, you should use a minimum API level of API 28: Android 9.0 (Pie).
-
Type 05_02_02 in the Name field, type com.allmycode.p05_02_02 in the Package Name field, and click Finish.
Android Studio begins creating your project for you.
Testing the watch face app
The first thing you want to do after creating this project is to see it run. The following steps help you test the new app. However, you’ll find that this app runs differently from those you may have worked with in the past.
-
Choose Run⇒ Edit Configurations.
You see the Run/Debug Configurations dialog box, shown in Figure 2-8.
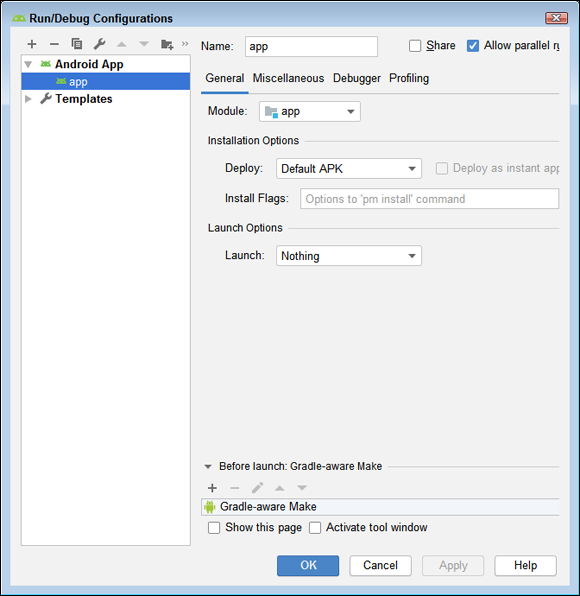
FIGURE 2-8: You must reconfigure the run conditions.
-
Choose Nothing in the Launch field, as shown in Figure 2-8, and click OK.
You’re launching a service, not an activity. This project is affecting the emulator wallpaper.
-
Choose Run⇒ Select Device and choose Android Wear Square API 28 from the context menu that appears.
For help with AVDs, refer to the “Setting Up Your Testing Environment” section, earlier in this chapter.
-
Choose Run ⇒ Run 'app'.
When you do, the wheels start churning. When the emulator appears, you see the normal watch face, but no app. However, you’re not running an app; you’re changing the watch face.
-
Click the lightning-bolt icon on the emulator and drag down.
You see a list of configuration items.
-
Click the sprocket.
The Settings menu appears, as shown in Figure 2-9.
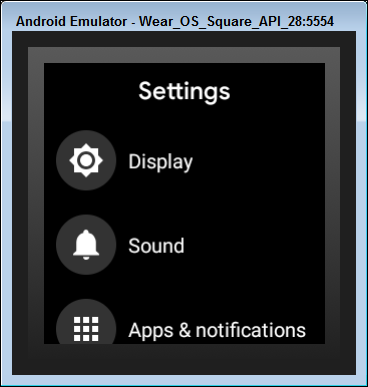
FIGURE 2-9: Access the emulator’s Settings menu.
-
Click Display.
You see the Display settings. Notice that the top item is Change Watch Face.
-
Click Change Watch Face.
The display shows two items. The first is the current watch file and the second is an option to see more watch faces, as shown in Figure 2-10.
-
Click Change Watch Faces.
One of the options in the list is My Analog. It normally appears at the bottom of the list, as shown in Figure 2-11.
-
Click My Analog.
The new watch face appears onscreen, as shown in Figure 2-12.

FIGURE 2-10: Choose to see more watch faces.

FIGURE 2-11: Locate the newly created watch face.

FIGURE 2-12: The emulator is using the new watch face.
Dissecting the skeletal watch face project
Many interesting things lurk inside a typical watch face project's code. This section describes a few of them. As you read this section, you can follow along by examining the code that Android Studio creates in the previous set of steps.
The manifest file
When Android Studio creates a skeletal app, you get an AndroidManifest.xml file. The AndroidManifest.xml file for the skeletal watch face app contains elements that don't appear in skeletal phone apps.
- The
<uses-feature>element: The following code:<uses-feature android:name="android.hardware.type.watch"/>tells the Google Play Store that your app is for wearable devices. The Google Play Store won't offer to load your app on phones, tablets, or other nonwearable gizmos.
The Google Play Store consults a manifest file's <uses-feature>element, but an Android device does not consult that element. In other words, having auses-feature … type.watchelement in your app's manifest file does not prevent an ordinary phone from installing your app. Using Android Studio's Run ⇒ Run 'app' command, you can bypass the Google Play Store and run a wearable app on a phone, a tablet, or an Android-enabled toaster oven. If you don't have an entire project (but have only a project's.apkfile), you can use Android'sadbcommand to side load the.apkfile onto a nonwearable device. We don't promise that your wearable app will run smoothly (or run at all) on a nonwearable device, but the<uses-feature>element won't prevent you from trying. -
The references to preview images: Android Studio's skeletal watch face app has an
app/res/drawablefolder. And within that folder, you find a few preview images, such asbg.pngandpreview_analog.png. Unlike most of the items in the Project tool window'sdrawablebranch, you don't display these images within the app itself. Instead, Android displays these images when the user scans the list of installed watch faces.To tell Android about these images, you put references to the images in the manifest file's
<meta-data>elements:<meta-data
android:name="android.service.wallpaper"
android:resource="@xml/watch_face"/>
<meta-data
android:name="com.google.android.wearable.watchface.preview"
android:resource="@drawable/preview_analog"/>
<meta-data
android:name=
"com.google.android.wearable.watchface.preview_circular"
android:resource="@drawable/preview_analog"/> -
The references to wallpaper: When you create this chapter's watch face app, you don't create an activity. That's fine, but if your watch face isn't an activity, what is it? The answer: Your watch face is a service. More specifically, your watch face is a live wallpaper service.
The live wallpaper feature appeared in Android version 2.1 to provide animated, interactive backgrounds for users. To establish your watch face as a live wallpaper, you put several elements in the
AndroidManifest.xmlfile. These include the following:- A
<meta-data>element pointing to your app'sres/xmlfolder - The
android.service.wallpaper.WallpaperServiceaction in an intent filter - A
<uses-permission>element with the nameandroid.permission.BIND_WALLPAPER
All these elements turn your watch face into a kind of background for the display on a wearable device.
- A
The Kotlin code
Your app's main Kotlin file extends CanvasWatchFaceService (a class in the android.support.wearable.watchface package). A full tour of the file is much more than you need for this first watch face app, but it's important to point out a few highlights.
The heart of the code is the onDraw() method. That's not surprising because the name onDraw() means “Here's what you do when you want to draw my watch face.” In Android Studio's skeletal app, the onDraw() method contains the code in Listing 2-1.
LISTING 2-1: The onDraw() Method
override fun onDraw(canvas: Canvas, bounds: Rect) {
    val now = System.currentTimeMillis()
    mCalendar.timeInMillis = now

    drawBackground(canvas)
    drawWatchFace(canvas)
}
A canvas is where the things that you draw will eventually appear. You draw on a canvas with methods such as canvas.drawLine(), canvas.drawArc(), canvas.drawBitmap(), canvas.drawRect(), and canvas.drawText(). One form of the canvas.drawText() function takes four parameters:
- The first parameter (
text) is the string of characters to be drawn on the screen. You can supply any text desired here as long as it somehow relates to the watch face. Remember that you're not creating an app; you’re working with a service that displays a watch onscreen. - The second and third parameters (
xandy) are float values. These values store measurements. One value (x) is the number of pixels from the left of the device's screen to the leftmost edge of the text. The other value (y) is the number of pixels from the top of the screen to the top of the text. - The fourth parameter (
paint) is a value of typePaint. When creating apaintobject, what you're doing is defining a kind of brush. It has a color and a width, along with many other features. Here’s how you define a basicpaintobject:var myColor = Paint()
myColor.setColor(Color.parseColor("#FFFFFF"))
myColor.strokeWidth = 30f
In the Android world, what's already been drawn is either valid or invalid, with “invalid” meaning “The drawing is obsolete.” Android calls the onDraw() function whenever the current drawing becomes invalid. And to make the drawing obsolete, your app's code calls the invalidate() function.
When the device is in ambient mode, your code's onTimeTick() function calls invalidate():
override fun onTimeTick() {
    super.onTimeTick()
    invalidate()
}
When the device is in interactive mode, your code sends itself a MSG_UPDATE_TIME message at regular intervals, and the receipt of that message triggers an invalidate() call:
fun handleUpdateTimeMessage() {
    invalidate()
    if (shouldTimerBeRunning()) {
        val timeMs = System.currentTimeMillis()
        val delayMs = INTERACTIVE_UPDATE_RATE_MS -
                timeMs % INTERACTIVE_UPDATE_RATE_MS
        mUpdateTimeHandler.sendEmptyMessageDelayed(
            MSG_UPDATE_TIME, delayMs)
    }
}
Enhancing the skeletal watch face project
Android Studio creates the skeletal app that's described in the previous section. You get the skeletal app for free simply by clicking buttons when you create a new project. Of course, freebies have disadvantages. For one thing, they seldom do exactly what you want your app to do. For another, looking at canned code isn't as satisfying as writing your own code. Here's how to add the date to the watch face (and you can use this approach for your own additions):
- Add the following two new
importstatements to the beginning ofMyWatchFace.kt.import java.time.LocalDateTime
import java.time.format.DateTimeFormatter - Create a new function for drawing the time, like this one:
private fun drawDate(canvas: Canvas) {
    val paint = Paint()
    paint.setColor(Color.WHITE)
    paint.style = Paint.Style.FILL
    canvas.drawRect(90f, 160f, 190f, 190f, paint)

    paint.setColor(Color.BLACK)
    paint.textSize = 20f
    val localDate = LocalDateTime.now()
    canvas.drawText(
        localDate.format(
            DateTimeFormatter.ofPattern("M/d/y")),
        95f, 180f, paint)
}
This function performs two tasks. First, it draws a white square on the background. Second, it adds the current time in black.
You obtain the current time using
LocalDateTime.now(). However, this time is unformatted. To format the time, you uselocalDate.format(), with a formatter, which isDateTimeFormatter.ofPattern("M/d/y"))in this case. The article athttps://developer.android.com/reference/java/time/format/DateTimeFormattertells you more about using patterns to format both time and date. - Add
drawDate()toonDraw()using the following code in bold:override fun onDraw(canvas: Canvas, bounds: Rect) {
val now = System.currentTimeMillis()
mCalendar.timeInMillis = now
drawBackground(canvas)
drawDate(canvas)
drawWatchFace(canvas)
}The order in which you draw the watch face elements is important. If you were to draw the date after the watch face, the hour and minute hands would disappear behind the data, which would look quite odd indeed!
That’s it! You're done! When you run the app, you see a display like the one in Figure 2-13.

FIGURE 2-13: The skeletal watch face app with the date display added.