
Chapter 3
Creating an Android App
IN THIS CHAPTER
![]() Creating an elementary Android app
Creating an elementary Android app
![]() Troubleshooting troublesome apps
Troubleshooting troublesome apps
![]() Testing an app on an emulator or a real device
Testing an app on an emulator or a real device
In a quiet neighborhood in south Philadelphia, you might find a maternity shop named Hello World. You can find the store on your way to Pat’s (to get a delicious Philly cheesesteak). You might even take a picture of the store’s sign as a sort of inspiration for the content of this chapter: the Hello World app.
A Hello World app is the simplest program that can run in a particular programming language or on a particular platform. (For an interesting discussion of the phrase Hello World, visit http://www.mzlabs.com/JMPubs/HelloWorld.pdf.) Authors create Hello World apps to show people how to get started writing code for a particular system.
So, in this chapter, you make an Android Hello World app. The app doesn’t do much. (In fact, you might argue that the app doesn’t do anything!) But the example shows you how to create and run new Android projects.
Creating Your First App
A typical gadget comes with a manual. The manual’s first sentence is “Read all 37 safety warnings before attempting to install this product.” Don’t you love it? You can’t get to the good stuff without wading through the preliminaries.
 Well, nothing in this chapter can set your house on fire or even break your electronic device. But before you follow this chapter’s instructions, you need a bunch of software on your development computer. To make sure that you have this software and that it’s properly configured, return to Chapter 2 of this minibook. (Do not pass Go; do not collect $200.)
When at last you have all the software you need, you’re ready to launch Android Studio and create a real, live Android app.

Starting the IDE and creating your first app
To start the IDE and create your first app, you start, naturally, at the beginning:
-
Launch Android Studio.
For details on launching Android Studio, see Chapter 2 of this minibook. To find out how to make the most of your Android Studio experience, see Book 2, Chapter 1.
When you launch Android Studio for the first time, you see the Welcome screen. (See Figure 3-1.) The Welcome screen lists any Android Studio projects that you’ve already created. (Hint: You haven’t created any projects yet.) In addition, you see the version of Android Studio you’re using, which is 3.5.1 for this book.
The Welcome screen also offers you some Quick Start options, such as Start a New Android Studio Project, Open an Existing Android Studio Project, and so on.

FIGURE 3-1: Welcome to Android Studio.
-
In the Welcome screen, select Start a New Android Studio Project.
The Create New Project dialog box appears, as shown in Figure 3-2. You consider two things when creating a new project:
- Device type: The device types appear across the top of the dialog box, such as Phone and Tablet, Wear OS, TV, Android Auto, and Android Things. Book 5 discusses each of these device types in detail, but for now all you need to know is that you can choose any of them for your app.
- Starting point: A project has a starting point — the elements that the IDE provides for you automatically. The IDE controls what appears in the initial project using a template. If you choose the right starting point, you perform less work when creating an app because you don’t have to create all the code manually. The starting points vary by device type. You see the starting points for three Phone and Tablet projects in Figure 3-2, but there are many more. The available templates vary by device.
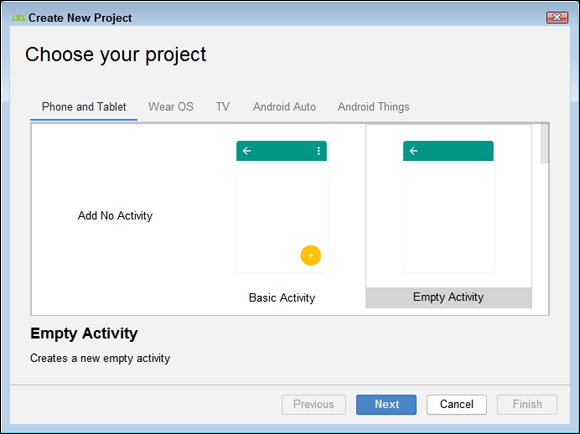
FIGURE 3-2: Select a device and associated starting point (template).
-
For this example, choose Empty Activity and click Next.
You see the Configure Your Project screen, shown in Figure 3-3. This screen is where you tell Android Studio some of the characteristics of your app, such as
- The app name
- The name of the package to use to hold your code
- The location to use to save the project
- The programming language to use (all apps in this book use Kotlin, but you can also use Java)
- The Android API level your app requires (the minimum level is 14, which is Android 4.0 [IceCreamSandwich], and the current maximum level is 29, which is Android 10.0 [Q])
- Whether your app will support instant apps (kind of a micro-app that you can use without installing it)
-
Type My First App in the Name field.
Notice that the Package Name and Save Location fields automatically change to match the name of your app. The wizard strips spaces from both the Package Name and Save Location fields because the presence of spaces would create problems when you compile the app and also causes problems when the IDE looks for the app on the hard drive.

FIGURE 3-3: Define the app configuration.
You don’t need to change the other fields for now. However, in a real app, you might. For example, the package name might need to use your domain name instead of
com.example.The section “The more things stay the same, the more they change” in Chapter 2 of this minibook tells you about API levels. Newer versions of Android generally have more functionality and sometimes fewer problems than older versions do, but more devices run the older versions. A device that currently has Android 8.0 installed can run apps that require Android 8.0 or older. The Configure Your Project screen shows the percentage of devices that are likely able to run your app based on the Minimum API Level setting that you choose.
-
Click Finish.
Android Studio creates a project that has the characteristics you chose. This process can take a while, so you need to be patient (the status bar will keep you informed as to the setup progress, but even the status bar can take a while to update). It's time to play that game of Solitaire you’ve been wanting for a while now. When the process of creating the project is finished, you see a window similar to the one shown in Figure 3-4. (If you see any informational dialog boxes, you can feel free to dismiss them.)

FIGURE 3-4: Your project is ready for editing.
 One of two things can happen the first time you create a project. If you installed the Offline Tools using the procedure in the “Installing offline tools” section of Chapter 2 of this minibook, the setup will progress rather quickly — we’re talking seconds. Otherwise, depending on your Internet speed, you can wait a l-o-n-g time for Android Studio to build the Gradle project info (whatever that is). You see a pop-up dialog box indicating that Android Studio is downloading something. The pop-up contains one of those annoying “un-progress” bars — the kind that doesn’t show you what percentage of the work is completed. (On some computers, the progress bar looks like a rotating, striped diagonal — the kind you see on old barbershop poles. On other computers, a solid bar simply moves back and forth, back and forth, back and forth. What were they thinking when they designed this pop-up? They probably figured that you’d be more willing to wait as long as this progress bar holds your cat’s attention.) Anyway, when Android Studio loads your first project, be prepared to wait several minutes for any signs of life on your screen.
Launching your first app
You’ve started up Android Studio and created your first project. The project doesn’t do much except display Hello world! on the screen. Even so, you can run the project and see it in action. Here’s how you start:
-
Take a look at Android Studio’s main window.
When Android Studio initially creates your app, you see the
MainActivity.kt(.ktis the Kotlin code file extension) file. For now, you want to see theactivity_main.xmlfile, shown in Figure 3-5. Just click its tab (which is left of theMainActivity.kttab).In Android Studio, your new app consumes the entire main window. If, for some reason, more than one Android Studio window is open, make sure that the window you're looking at is the one containing your newly created Android app.
-
In Android Studio’s main menu, choose Run⇒ Run ‘app’.
If you see an error message saying “Error running ‘app’: No target device found,” it means that you haven’t created an Android Virtual Device (AVD) yet. The steps shown in the “Creating an Android virtual device” section in Chapter 2 of this minibook tells you how to create an AVD. You must have an AVD defined before the emulator will run. The example screenshots (starting with Figure 3-8) show how the app will look in a Google Pixel 3a running Android 10 (Q) with a Portrait startup orientation.
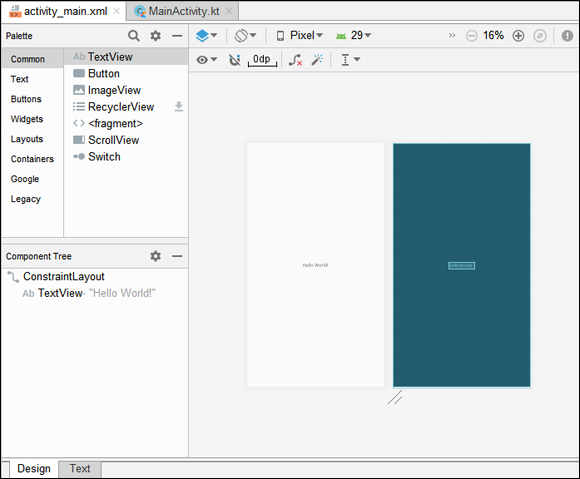
FIGURE 3-5: Look at the design of your new app.
As your application builds, you see messages in the Build Output window, as shown in Figure 3-6. Figure 3-6 actually shows the appearance of this window after the build process completes. Notice that it displays times for each step of the process, a completion message (“Install successfully finished in 10 s 676 ms.”), and a total time. You can even drill down into each of the individual steps to obtain further information.
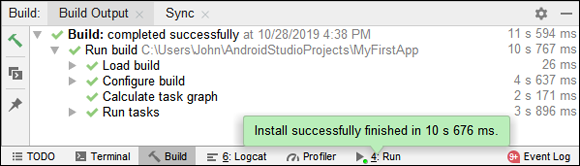
FIGURE 3-6: The Build Output window tells you about the build progress.
As activity occurs in the various windows, you see an indicator next to them telling you there is more information. In this case, notice that the success message is associated with the Run window. -
Click the Run tab.
You see a list of run events like those shown in Figure 3-7. Notice that the list tells you which parts of the code are running. This information isn’t very useful now, but you’ll find it invaluable later when debugging your app.

FIGURE 3-7: The Profiler helps you track application resource usage.
 It’s also useful to see how well your application is running. A profiler studies your application and determines how well it uses resources and what sort of load it places on the device. Because the profiler is separate from Android Studio, you may see one or more messages from your platform asking whether you want to grant permission to the profiler to perform its task. The next step requires you grant permission, but you can simply skip the next step if desired.
 -
Click the Profiler tab.
You see profiling information similar to that shown in Figure 3-7. Because this app is so simple, the CPU usage remains at 0%, for the most part. In this case, the app is using 42.1MB, there is no network activity, and it’s not even using enough energy to record.
-
Click the red square in the Profiler window.
Profiling of your app stops.
Running Your App
In this section, you kick your new app’s tires and take your app around the block. Here’s how:
- Launch your app by following the launch instructions in the “Creating Your First App” section.
-
Wait for the Android emulator to display a lock screen, a home screen, or an app’s screen.
What you see depends on the emulator you selected. The process is much like the process used on a real device. You see the initial boot screen, and then a home screen like the one shown in Figure 3-8, and finally the app’s screen, which appears in Figure 3-9. Don’t worry if you have to squint to see Hello World; it’s right there in the center of the screen in incredibly small letters.
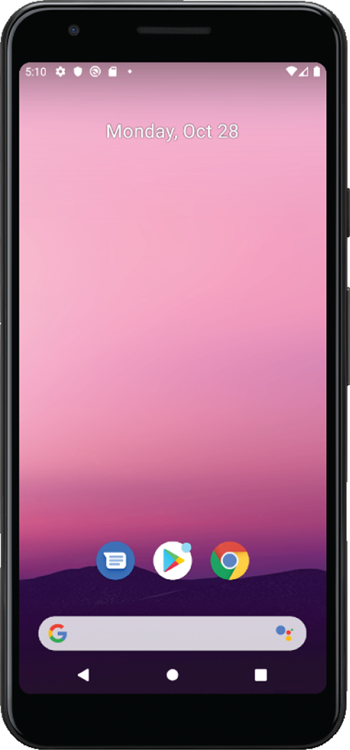
FIGURE 3-8: The home screen appears while Android Studio loads the app.
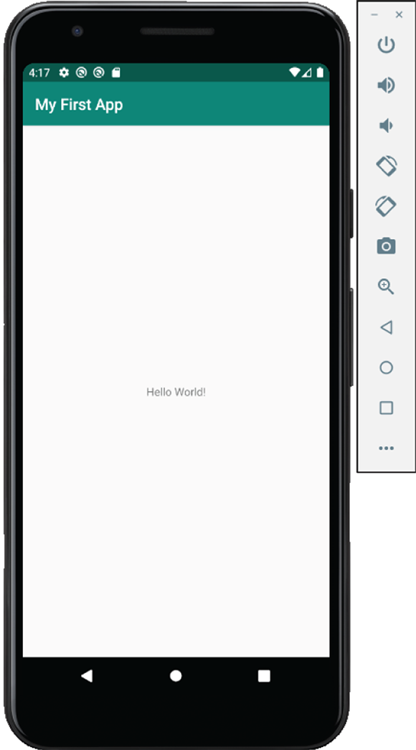
FIGURE 3-9: The app screen appears after the loading process is complete.
Along with the emulator presentation of the device, you get controls for interacting with that device, as shown in Figure 3-9. Notice that you can turn off the device, mute the sound, rotate it in various ways, and interact with features like the camera and buttons. -
We can’t overemphasize this point: Wait for the Android emulator to display a lock screen, a home screen, or an app’s screen.
Android’s emulator takes a long time to start. For example, on a system that has a 2.6 GHz processor with 8GB of RAM, the emulator takes a few minutes to mimic a fully booted Android device. Some people blame the fact that it’s an emulator instead of a simulator. (See Chapter 2 of this minibook for that argument.) Others claim that the translation of graphics hogs the emulator’s time. For whatever reason, you need lots of patience when you deal with Android’s emulator.
The device loading time seems to decrease after the first time you load it. This is because the emulator saves state information that it uses to load the device again later. The state information consumes more disk space on your system but also reduces loading time, so it’s a good trade-off. -
Keep waiting.
While you’re waiting, you might want to visit
https://www.genymotion.com/. For information on Genymotion’s alternative to the standard Android emulator, see Chapter 2 of this minibook.Oh! We see that your emulator is finally displaying the lock screen. It’s time to proceed …
-
If the emulator displays the lock screen, do whatever you normally do to unlock an Android device.
Normally, you perform some sliding or swiping motion.
-
See your app on the emulator’s screen.
Figure 3-9 shows the running of Android’s Hello World app. (The screen even has Hello World! on it.) Android’s development tools create this tiny app when you create a new Android project. Android’s Hello World app has no widgets for the user to push, and the app doesn’t do anything interesting. But the appearance of an app on the Android screen is a very good start. By following the steps in this chapter, you can start creating many exciting apps.
Don’t close an Android emulator unless you know you won’t be using it for a while. The emulator is fairly reliable after it gets going. (It’s sluggish, but reliable.) While the emulator runs, you can modify your Android code and tell Android Studio to run the code again. When you do, Android Studio reinstalls your app on the running emulator. The process isn’t speedy, but you don’t have to wait for the emulator to start. (Actually, if you run a different app — one whose minimum SDK version is higher than the running emulator can handle — Android fires up a second emulator. But in many developer scenarios, jumping between emulators is the exception rather than the rule.)
When you are finished working with the emulator, click the Close button (the X on top of the controls shown previously in Figure 3-9). If you click the Power button, the emulator continues to run; it just emulates the device being turned off.
You Can Download All the Code
Throughout this book, you discover how to create apps that illustrate Android development principles using a simple process. “First, type this code; next, type that code; and so on,” says the book. You can follow the instructions in each and every chapter, but you can also bypass the instructions. You can scoop the book’s examples from a special website. Here’s how:
- Visit
http://www.allmycode.com/androidorhttps://users.drew.edu/bburd/android/. -
Click the link to download this book’s code.
When the download completes, you have a
.zipfile (otherwise known as a compressed archive file). -
Unzip the downloaded file.
“Unzipping” is the same as “uncompressing” or “expanding.” On some computers, this unzipping happens automatically as soon as the download is finished. On other computers, you unzip the file by clicking (or double-clicking) the file's icon. On still other computers, you right-click or Ctrl-click the downloaded file’s icon and select an unzip (or uncompress or expand) option in the resulting context menu.
For more information about
.zipfiles, see the sidebar “Compressed archive files.”After unzipping the file, you have a folder that contains several subfolders. These subfolders have names like
01-05-03. The folder with the name01-05-03contains the third example that appears in Book 1, Chapter 5. -
Launch Android Studio.
For details, see Chapter 2 in this minibook.
What you do next depends on what you see when you launch Android Studio.
-
If you see Android Studio's Welcome screen, select Open an Existing Android Project.
The Open Project dialog box appears.
You start in your personal folder on most operating systems, so you may have to look around on your hard drive if you placed the .zipfolder somewhere else.If you see Android Studio’s main window, choose File⇒ Open in the main menu.
The Open File or Project dialog box appears.
-
In either dialog box, navigate to the folder containing the project that you want to open.
For example, to open the third project in Book 1, Chapter 5, navigate to the
01-05-03folder that's within the unzipped version of the files you downloaded. -
Whatever folder you select, look in that folder for a file named
build.gradle.The
build.gradlefile appears in the project's main folder. Figure 3-10 shows the location of this file for the project you built in the “Starting the IDE and creating your first app” section of this chapter. It will be in the same location for the downloadable source.
FIGURE 3-10: Locating the
build.gradlefile for a project. -
Highlight the
build.gradlefile and click OK.Android Studio opens as normal. In the Sync tab, shown in Figure 3-11, you see messages telling you the progress of the import process. As each step completes, you see a green check mark placed next to it.

FIGURE 3-11: Syncing Android Studio to the project.
The sync process can take a while to complete, so just watch pet videos while you wait. Android Studio has to download the default Gradle wrapper from the Internet unless you have downloaded and installed the offline tools (see Chapter 2 of this minibook for details). Make sure that you have an Internet connection when you perform this step.
If you’re missing something that the project needs on the host system, you see error messages from Android Studio as the import process progresses. It often pays to wait until the process is complete so that you can see all the error messages rather than trying to fix them one at a time.
You can tell everyone that you created the project from scratch. We won't snitch.
Troubleshooting Common IDE Errors
You try to run your first Android app. If your effort stalls, don’t despair. This section has some troubleshooting tips.
Error message: Failed to find target
You’ve created a project with a certain target SDK or told the IDE to compile with a certain API level. But you haven’t installed that API level. If Android Studio displays a link offering to Install Missing Platform(s) and Sync Project, click the link. Otherwise, open the Android SDK manager and install that API level. For details, see Chapter 2 in this minibook.
If you don’t want to install a new API level, you can tinker with the SDK version numbers in the project’s build.gradle file. For details, see Chapter 4 of this minibook.
Error running ‘app’: No target device found
You must have at least one AVD configured before an app can run. In addition, the AVD must be able to support the app. Use the steps in the “Creating an Android virtual device” section of Chapter 2 of this minibook to fix this problem.
Error message: Android Virtual Device may be incompatible with your configuration
This message probably means that you haven’t created an AVD capable of running your project. If Android Studio offers to help you create a new AVD, accept it. Otherwise, open the AVD Manager to create a new AVD. For information about Android Virtual Devices and the AVD Manager, see Chapter 2 of this minibook.
You lose contact with the Android Debug Bridge (ADB)
The Android Debug Bridge (ADB) connects your development computer to a device that’s executing your new Android code. (The ADB also “connects” your development computer to a running emulator, even though the emulator is running on your development computer.)
If you see a message that hints of ADB trouble, try restarting your development computer’s Android Debug Bridge. Here’s how:
-
Click the Terminal tool button at the bottom of Android Studio’s main window.
Congratulations! You just opened Android Studio’s Terminal tool window. If you’re a Mac or Linux user, you see the shell prompt. If you’re a Windows user, you see the Windows command prompt.
-
In the Terminal tool window, go to your
ANDROID_HOME/platform-toolsfolder.For help finding your
ANDROID_HOMEfolder, see the “Installing Android Studio” section in Chapter 2 of this minibook. -
In the
ANDROID_HOME/platform-toolsfolder, type the following two commands:Windows:
adb kill-server
adb start-server
Macintosh and Linux:
./adb kill-server
./adb start-server
For more information about the Android Debug Bridge, refer to see Book 1, Chapter 2.
You don't like whatever AVD opens automatically
In Chapter 2 of this minibook, you create an AVD. And, since the old Chapter 2 days, you may have created some additional AVDs. Now, when you launch an app, your computer fires up one of the many AVDs that you created. That’s fine, but what if the computer fires up your least-favorite AVD? To get control over which AVD starts up, do the following: In Android Studio’s main menu, choose Run⇒ Select Device. A context menu like the one shown in Figure 3-12 appears. The menu allows you to choose any of the devices you have created.
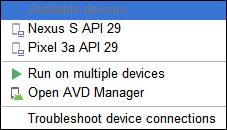
FIGURE 3-12: Choosing a device.
Notice that you can also choose to run your app on multiple devices. To use this option, you choose Run On Multiple Devices from the context menu, which displays the Select Deployment Targets dialog box, shown in Figure 3-13.

FIGURE 3-13: Running on multiple devices.
If you don’t see the device you want to use, perhaps you haven’t created it yet or accidentally deleted it. Choose Open AVD Manager in this case to create the device you want to use.
The Troubleshoot Device Connections option sees use only with devices you connect to your system using a USB connection. Selecting this option displays the Connection Assistant, which begins by scanning your system for USB devices that could be Android compatible. Just follow the directions the Connection Assistant provides to ensure that your system can see the device and to install appropriate drivers when it can’t.
The emulator stalls during startup
After five minutes or so, you don’t see Android’s lock screen or Android’s home screen. Here are several things you can try:
- Lather, rinse, repeat. Close the emulator and launch your application again. Sometimes, the second or third time’s a charm. On rare occasions, you may find that your first three attempts fail but the fourth attempt succeeds.
- Restart the Android Debug Bridge (ADB) server. Follow the instructions in the earlier section “You lose contact with the Android Debug Bridge (ADB).” And while you’re restarting things, it never hurts to restart Android Studio.
- If you have a more powerful computer, try running your app on it. Horsepower matters.
-
Run your app on a real Android device. Testing a brand-new app on a real device makes us queasy. But Android’s sandbox is fairly safe for apps to play in. Besides, apps load quickly and easily on real phones and tablets.
For instructions on installing apps to real Android devices, see the section “Testing Apps on a Real Device,” later in this chapter.
- Try the Genymotion emulator. For news about Genymotion, see Chapter 2 in this minibook.
- Switch to an Android Virtual Device with a lower resolution and screen density. In our experience, older AVDs consume fewer resources on your development computer. So, if an AVD drags you down, follow the instructions in the earlier section “You don’t like whatever AVD opens automatically.” Then, when you run an app, Android Studio prompts you with a Choose Device dialog box. Pick an AVD with the lowest API level (one that satisfies your app’s minimum SDK requirement), and you’ll be on your way.
You can lower an app’s target and minimum SDK version by editing the app’s build.gradle file. But if your app requires features that aren’t available in the lower target or SDK version, you won’t be happy with the results. In the best case, Android Studio displays an error message as soon as you make the change. In the worst case, you see no error message until you try to run the app. When you try to run the app, it crashes.
Error message: The user data image is used by another emulator
If you see this message, some tangle involving the emulator keeps Android from doing its job. First try closing and restarting the emulator.
If a simple restart doesn’t work, try the following steps:
- Close the emulator.
- In Android Studio’s main menu, choose Tools⇒ AVD Manager.
- In the list of virtual devices, look for the AVD that’s causing you trouble.
-
In the Actions column, click the tiny downward-pointing arrow associated with that AVD. (See Figure 3-14.)
A context menu appears.

FIGURE 3-14: Using the Actions icons in the AVD Manager.
-
In the context menu, select Wipe Data.
A pop-up dialog box appears. The dialog box asks you to confirm the wiping of the AVD’s data.
-
In the Confirm Data Wipe pop-up dialog box, click Yes.
The pop-up dialog box disappears (as you thought it would).
-
In the Actions column, click the right-pointing arrow (the arrow that looks like a Play button).
As a result, Android Studio launches a new copy of the emulator, this time with a clean slate.
To read about the Android Virtual Device (AVD) Manager, see Chapter 2 in this minibook.
If the preceding set of steps doesn’t work, take a firmer approach, as follows:
- Close the emulator.
- Open whatever file explorer your computer uses to track down files.
-
In your user home folder, look for a folder named
.android(starting with a dot).For tips on finding your user home folder, see Chapter 2 in this minibook.
-
From the
.androidfolder, drill down even deeper into theavdfolder.The
avdfolder contains a folder for each AVD that you've created. -
Drill down one more level to the folder for the AVD that’s giving you trouble.
For example, if you were running an AVD named Pie1 when you saw the Data Image Is Used by Another Emulator message, navigate to your
Pie1.avdfolder. - Inside your AVD’s folder, delete all the files whose names end with
.lock. - Return to Android Studio and run your app again.
Error message: Unknown virtual device name
Android looks for AVDs in your home folder's .android/avd subfolder, and occasionally Android’s search goes awry. For example, consider that your Windows computer lists the home folder on an i drive. The AVDs are in i:Users<user name>.androidavd. But Android ignores the computer's home folder advice and instead looks in c:Users<user name>. When Android doesn't find any AVDs, Android complains.
You can devise fancy solutions to this problem with junctions or symbolic links. But fancy solutions require special handling of their own. To keep things simple, you can simply copy the i:Users<user name>.android folder's contents to c:Users<user name>.android. That fixes the problem.
The emulator displays a “process isn't responding” dialog box
The formal name for this dialog box is the Application Not Responding (ANR) dialog box. Android displays the ANR dialog box when an app takes too long to do whatever it’s supposed to do. When your app runs on a real device (a phone or tablet), the app shouldn’t make Android display the ANR dialog box. (Other chapters in this minibook give you tips on how to avoid the dialog box.)
But on a slow emulator, a few ANR boxes are par for the course. When you see the ANR dialog box in an emulator, the best idea is to select Wait. Within about ten seconds, the dialog box disappears and the app continues to run.
Changes to your app don’t appear in the emulator
Your app runs and you want to make a few improvements. So, with the emulator still running, you modify your app’s code. But after choosing Run⇒ Run ‘app’, the app’s behavior in the emulator remains unchanged.
When this happens, something is clogged up. Close and restart the emulator. If necessary, use the Wipe User Data trick that we describe in the section “Error message: The user data image is used by another emulator,” earlier in this chapter.
Testing Apps on a Real Device
You can bypass emulators and test your apps on a phone, a tablet, or maybe an Android-enabled refrigerator. To do so, you have to prepare the device, prepare your development computer, and then hook together the two. This section describes the process.
Your device’s Android version must be at least as high as your project’s minimum SDK version.
The simplest way to test your app on a real device is to connect the device to your development computer using a USB cable. Not all USB cables are created equal. Some cables have wires and metal in places where other cables (with compatible fittings) have nothing except plastic. Try to use whatever USB cable came with your Android device. If, like us, you can’t find the cable that came with your device or you don’t know which cable came with your device, try more than one cable. When you find a cable that works, label that able cable. (If the cable always works, then label it stable, able cable.)
To test your app on a real device, follow these steps:
-
Connect the device you want to use to your computer using the USB cable.
You could connect your device later in the process, but doing it now can save you a lot of time and effort when it comes to ensuring that the connection works. If necessary, tell your device that it’s okay to connect to the host computer for USB transfer.
-
On your Android device, find the USB Debugging option:
- If your Android device runs version 3.2 or older, choose Settings⇒ Applications⇒ Development.
- If your Android device runs version 4.0, 4.0.3, or 4.1, choose Settings⇒ Developer Options.
- If your Android device runs version 4.2 or higher, choose Settings⇒ About. In the About list, tap the Build Number item seven times. (Yes, seven times.) Then press the Back button to return to the Settings list. In the Settings list, tap Developer Options.
Now your Android device displays the Development list (a.k.a. the Developer Options list).
-
In the Development (or Developer Options) list, turn on USB debugging.
Your device may display a warning message. For example, here’s what a Q device displays when someone messes with this setting:
USB debugging is intended for development purposes. Use it to copy data between your computer and your device, install apps on your device without notification, and read log data.The stewards of Android are warning that the USB Debugging option can expose a device to malware.
Theoretically, you can keep USB Debugging on all the time. But if you’re very nervous about security, turn off USB Debugging when you’re not using the device to develop apps.
- Set up your development computer to communicate with the device.
- On Windows: As soon as you turn on USB debugging, your system may start installing the required driver. However, if the device driver doesn’t install automatically, visit
http://developer.android.com/sdk/oem-usb.htmlto download your device’s Windows USB driver. Install the driver on your development computer. - On a Mac: /* Do nothing. It just works. */
- On Linux: Visit
http://developer.android.com/guide/developing/device.htmland follow the instructions that you find on that page. (Don’t worry. To connect a device, you don’t have to recompile the Linux kernel.)
- On Windows: As soon as you turn on USB debugging, your system may start installing the required driver. However, if the device driver doesn’t install automatically, visit
-
On your development computer, choose the connected device.
To do this, follow the instructions in the earlier section “You don’t like whatever AVD opens automatically.” The name of your device should appear in the list. However, in some cases, you may see something generic, like Unknown Device or ASUS P027. The point is that the Select Device context menu shown previously in Figure 3-12 will now have another entry in it.
-
Make sure that your Android device’s screen is illuminated.
This particular step might not be necessary, but some developers have scraped so many knuckles trying to get Android devices to connect with computers that they want every advantage they can possibly get.
-
Choose Run⇒ Run ‘app’.
You see the build process proceed as normal, and then the Run tab opens and you see communication occur between Android Studio and your device. Finally, you see the app running on your device (rather than on the emulator).
Eventually, you want to disconnect your device from the development computer. If you’re a Windows user, you dread reading Windows Can’t Stop Your Device Because a Program Is Still Using It. To disconnect your device, first issue the adb kill-server command, as described in the earlier section “You lose contact with the Android Debug Bridge (ADB).” After that, you get the friendly Safe to Remove Hardware message.