
Chances are that by this point, you have the shell or beginnings of a game on the Android platform. It is also possible that you have tried to animate one or all of your characters, weapons, or other on-screen object without luck.
If you have tried to load separate images, you no doubt found the process of flipping those images to create animation painfully slow. The solution to this problem is almost as old as video games themselves:sprite sheets. Most 2D-based video games still employ an animation technique that is well-tested, and well-suited for the task; that is, creating a sprite sheet of the animation frames needed in your game.
In this chapter, you will walk through some solutions to common problems using sprite sheets.
Problem
Loading multiple, separate images for animation takes up too much space and is slow.
How It Works
Let’s start with the basics. A sprite sheet is a single image file that holds all of the different images that can be used to create an animated sprite.
The main character for our sample game—Super Bandit Guy—should be able to run left and right across the screen. This requires that the sprite for Super Bandit Guy be animated when he runs. Rather than create a separate image for each frame of the animation (which would be so resource intensive that the final game might not even load), each image in the animation is loaded into a single file called a sprite sheet. Figure 6-1 shows a detail of the sprite sheet for Super Bandit Guy’s running animation.
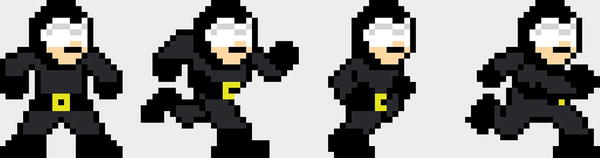
Figure 6-1. Super Bandit Guy running (detail)
Notice that the different frames of animation are all placed in a single file, thus reducing the resources needed to store, recall, swap, and display separate images.
Drop the image into your res/drawable folder. This is the same process used for any other image file. All image files can be stored in the res/drawable folders and then easily recalled by id using R.drawable.<imagename>. However, remember that all image names must be lowercase or you will not be able to call them back.
The question now is this: how do you display only one frame at a time instead of the entire sprite sheet at once? This is actually easier than it seems. Using OpenGL ES, you are going to size this image, or texture, so that the one frame of animation you want show will fit on the vertices at a time (explained in the next solution). Keep in mind, in OpenGL ES your textures and your vertices can be different sizes.
Note Just because all of the images used by OpenGL ES must be square, does not mean that every space in the sprite sheet must contain a frame of animation. While the 4x4sheet we are using for Super Bandit Guy can hold 16 frames of animation, we are only using 10.
Figure 6-2 shows the sprite sheet that is being used for Super Bandit Guy.
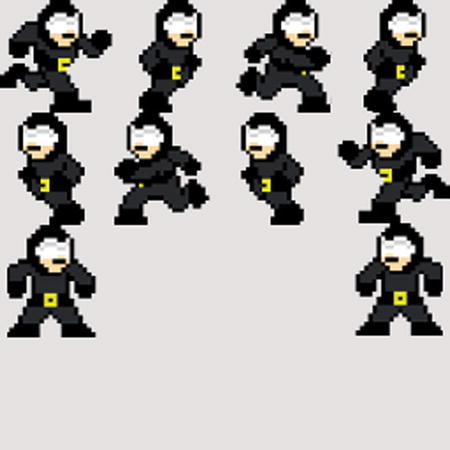
Figure 6-2. Super Bandit Guy (full sprite sheet)
Note The backgrounds of the images have been tinted grey for the purposes of showing them in this book. Ideally, your images should have transparent backgrounds.
6.2 Access Images in the Sprite Sheet
Problem
Displaying a sprite sheet shows the entire image, instead of the individual image that is needed.
Solution
Adjust the texture mapping to display the portion of the sprite sheet that is needed.
How It Works
To understand how this solution works, you need to first understand that the vertices which your texture is mapped to, and the texture object itself, are treated are two separate entities that can be manipulated independently of each other. What this means is that you can resize, move, or alter the texture without affecting the vertices.
You already know that the sprite sheet in Figure 6-2 contains all of the frames of animation needed to make Super Bandit Guy appear as though he is running. However, if you tried to use the sprite sheet as a texture, two things would become immediately apparent. First, the texture appears upside down; and second, the entire sprite sheet is mapped onto the vertices, rather than just one frame of animation.
When OpenGL creates a texture, an image is loaded into a byte array. When the image is loaded into the array, the first byte of the image is loaded into the back of the array, followed by the second byte, and so on. As OpenGL starts to read the texture information from the array, the first byte it reads (the first byte in the array) is actually the last byte that came out of the file. Therefore, OpenGL’s texture is a reversed version of your original image.
You need to flip the texture within OpenGL to make it appear right-sideup. Then you need to adjust the size of the texture that is mapped to your vertices so that only one frame of the sprite sheet is visible. Figure 6-3 illustrates this concept.
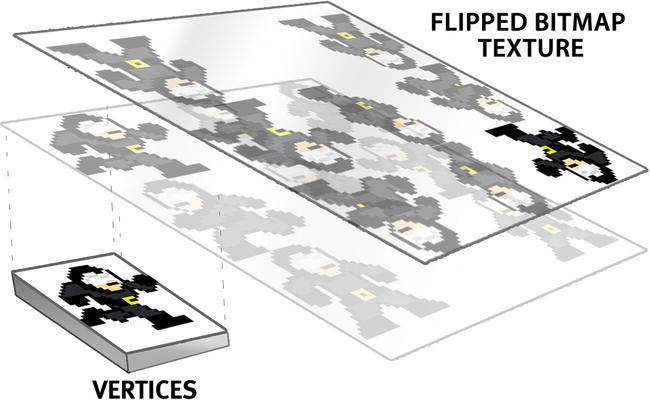
Figure 6-3. Flipping and mapping a sprite sheet texture onto a vertex
First, let’s take care of flipping the image so that it appears right-side up.
Tip OpenGL ES handles the loading of all images into textures the same way, regardless of whether they are sprite sheets. Therefore, all of your images will always appear reversed when they become textures. This step of the solution should be performed when loading all of your textures.
In the code that you have written to load your images into textures, instantiate a new Matrix and use the postScale() method to create new matrix that flips the texture along the y axis. The new matrix is passed into the createBitmap() method that is normally used to load textures.
In Listing 6-1, texture represents the reference id of the image you want to load, which is found in the drawable folder.
Listing 6-1. Using postScale()
InputStreamimagestream = context.getResources().openRawResource(texture);
Bitmap bitmap = null;
Bitmap temp = null;

Matrix mtrx = new Matrix();
mtrx.postScale(1f, -1f);

temp = BitmapFactory.decodeStream(imagestream);
bitmap = Bitmap.createBitmap(temp, 0, 0, temp.getWidth(), temp.getHeight(), mtrx, true);

imagestream.close();
imagestream = null;
Now that your texture is flipped the correct way, it is time to adjust the texture so that only one frame is visibly mapped to your vertices. Again, this can be done on load, when the textures and vertices are built.
The code that you currently have for loading your textures, in part, should look like Listing 6-2.
Listing 6-2. Texture Array
privateFloatBuffervertexBuffer;
privateFloatBuffertextureBuffer;
privateByteBufferindexBuffer;

private float[] vertices = {
0f, 0f, 0f,
1f, 0f, 0f,
1f, 1f, 0f,
0f, 1f, 0f,
};

private float[] texture = {
0f, 0f,
1f, 0f,
1f, 1f,
0f, 1f,
};
Because the default coordinate system in OpenGL ES goes from 0 to 1, the texture array in Listing 6-2 uses the entire texture. The full texture will be mapped onto the vertices using this array. However, given the sprite sheet in Figure 6-2, you only want to see one-quarter of the sprite sheet at a time.
Note The sprite sheet in Figure 6-2 is divided into four rows of four images (not all are used). Therefore, each row is 25 percent of the height of the overall texture, and each column is 25 percent of the width of the overall texture.
Correct the texture array, as shown in Listing 6-3, to display only one frame of animation from your sprite sheet.
Listing 6-3. New Texture Array
privateFloatBuffervertexBuffer;
privateFloatBuffertextureBuffer;
privateByteBufferindexBuffer;

private float[] vertices = {
0f, 0f, 0f,
1f, 0f, 0f,
1f, 1f, 0f,
0f, 1f, 0f,
};

private float[] texture = {
0f, 0f,
.25f, 0f,
.25f, .25f,
0f, .25f,
};
6.3 Change Sprite Sheet Frames
Problem
An image needs to change from one frame in the sprite sheet to another, rather than be static.
Solution
Move from one sprite sheet frame to another by translating the texture along the x and/or y axis.
How It Works
The glTranslatef() method is used in OpenGL ES 1 to translate or move a matrix within the coordinate system. To switch from the first frame in the sprite sheet to the second requires that you translate the texture matrix 25 percent along the x axis. (This is assuming you are using a sprite sheet that is set up like the one in Figure 6-2).
The first step is to put OpenGL ES into texture matrix mode, thus ensuring that you are modifying the texture’s coordinates and not the vertices. The following code puts OpenGL ES into texture matrix mode, and maps the first frame of the sprite sheet (upper left-hand corner) onto the vertices.
gl.glMatrixMode(GL10.GL_TEXTURE);
gl.glLoadIdentity();
gl.glTranslatef(0f,.75f, 0f);
Notice that the y coordinate being passed to glTranslatef() is .75. On the coordinate scale of 0–1, .75 corresponds to the lower left-hand corner of the first row of frames in the sprite sheet. In this code sample, the x and y coordinates being passed to glTranslatef() are 0 and .75, respectively. Carrying this over to the image in Figure 6-4, (0, .75) is the lower left-hand corner of first frame on the first row of the sprite sheet. Figure 6-4 illustrates how the coordinates on the y axis line up with the sprite sheet.
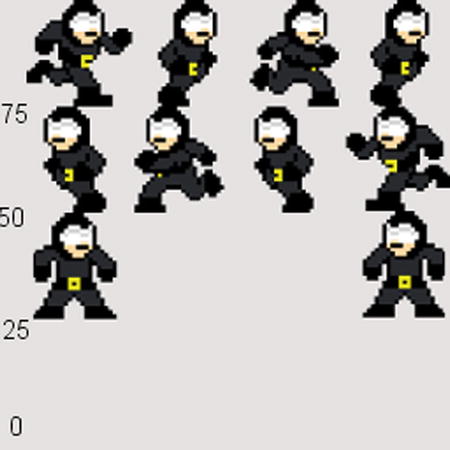
Figure 6-4. Sprite sheet with y-axis coordinates
If you want to change the texture that is mapped to your vertices to the second frame on the first row of the sprite sheet, use the glTranslatef() method to move the texture to (.25, .75). The x coordinate of .25 represents the lower left-hand corner on the x axis of the second frame on the first row.
gl.glMatrixMode(GL10.GL_TEXTURE);
gl.glLoadIdentity();
gl.glTranslatef(.25f,.75f, 0f);
If you are using OpenGL ES 2 or 3, the process for changing sprite sheet frames is different. You will need to add a pair of floats to your fragment shader. These floats will accept the x and y coordinate values for the position of the frame, much like glTranslatef().
First, add the floats to the fragment shader code, as in Listing 6-4.
Listing 6-4. Adding floats to fragment shader code
private final String fragmentShaderCode =
"precisionmediump float;" +
"uniformvec4vColor;" +
"uniformsampler2DTexCoordIn;" +
"uniform float posX;" +
"uniform float posY;" +
"varyingvec2TexCoordOut;" +
"void main() {" +
"}";
Next, modify the main() method of the fragment shader to call texture2d() and pass it the values of posX and posY, as shown in Listing 6-5.
Listing 6-5. Modifying the main() method
private final String fragmentShaderCode =
"precisionmediump float;" +
"uniformvec4vColor;" +
"uniformsampler2DTexCoordIn;" +
"uniform float posX;" +
"uniform float posY;" +
"varyingvec2TexCoordOut;" +
"void main() {" +
" gl_FragColor = texture2D(TexCoordIn, vec2(TexCoordOut.x + posX,TexCoordOut.y + posY));"+
"}";
The shader code is now modified. You need a way to pass the values of posX and posY into the shader code. This is ultimately accomplished using glUniform1f(). The code to change the x and y position of the texture should be placed in the draw() method of the object’s class. Modify the method signature to allow the coordinates to be passed in when draw() is called.
public void draw(float[] mvpMatrix,float posX, float posY) {
...
}
Use glGetUniformLocation() to get the location, in the shader, of the posX and posY floats, and then use glUniform1f() to assign new values, as shown in Listing 6-6.
Listing 6-6. draw()
public void draw(float[] mvpMatrix, float posX, float posY) {
GLES20.glUseProgram(mProgram);

mPositionHandle = GLES20.glGetAttribLocation(mProgram, "vPosition");

GLES20.glEnableVertexAttribArray(mPositionHandle);

intvsTextureCoord = GLES20.glGetAttribLocation(mProgram, "TexCoordIn");
GLES20.glVertexAttribPointer(mPositionHandle, COORDS_PER_VERTEX,
GLES20.GL_FLOAT, false,
vertexStride, vertexBuffer);
GLES20.glVertexAttribPointer(vsTextureCoord, COORDS_PER_TEXTURE,
GLES20.GL_FLOAT, false,
textureStride, textureBuffer);
GLES20.glEnableVertexAttribArray(vsTextureCoord);
GLES20.glActiveTexture(GLES20.GL_TEXTURE0);
GLES20.glBindTexture(GLES20.GL_TEXTURE_2D, textures[0]);
intfsTexture = GLES20.glGetUniformLocation(mProgram, "TexCoordOut");
intfsPosX = GLES20.glGetUniformLocation(mProgram, "posX");
intfsPosY = GLES20.glGetUniformLocation(mProgram, "posY");
GLES20.glUniform1i(fsTexture, 0);
GLES20.glUniform1f(fsPosX, posX);
GLES20.glUniform1f(fsPosY, posY);
mMVPMatrixHandle = GLES20.glGetUniformLocation(mProgram, "uMVPMatrix");

GLES20.glUniformMatrix4fv(mMVPMatrixHandle, 1, false, mvpMatrix, 0);

GLES20.glDrawElements(GLES20.GL_TRIANGLES, drawOrder.length,
GLES20.GL_UNSIGNED_SHORT, drawListBuffer);

GLES20.glDisableVertexAttribArray(mPositionHandle);
}
6.4 Animate Images from a Sprite Sheet
Solution
Flip through multiple sprite sheet images in a specific order.
How It Works
In this solution, you are going to build on the uses of the glTranslatef() and glUnifor1f() methods from the previous solution. The glTranslatef() method, for OpenGL ES 1, has been shown to move the mapped texture on the vertices so that only specific portions of the sprite sheet are visible. If you perform this action fast enough, and with enough frames, you will have animation.
For this solution, you once again use the sprite sheet shown in Figure 6-2. This solution also builds on Chapter 5,“Reading Player Input.”
Create an enumeration that can be set when the player touches either the right or left sides on the screen, indicating that the character should run to the right or left, respectively (see Listing 6-7).
These variables should be placed so that you can access them both from the renderer and from the main Activity.
Listing 6-7. Updating Player Movement
public static intplayerAction = 0;
public static final int PLAYER_MOVE_LEFT = 1;
public static final int PLAYER_STAND = 0;
public static final int PLAYER_MOVE_RIGHT = 2;
You also need to set up six more variables (Listing 6-8).
Listing 6-8. Setting up six more variables
public static float playerCurrentLocation  = .75f;
public static float currentRunAniFrame  = 0f;
public static float currentStandingFrame   = 0f;

public static final float PLAYER_RUN_SPEED = .25f;
public static final float STANDING_LEFT = 0f;
public static final float STANDING_RIGHT = .75f;
playerCurrentLocation is used to track the current location of the sprite on the screen. currentRunAniFrame is used to track the current frame of animation from the sprite sheet, which is making the character appear to run. Like currentRunAniFrame, currentStandingFrame is used to track which frame of the sprite sheet is being used to make the character appear to be standing.
PLAYER_RUN_SPEED will be used to move the sprite across the screen at specific intervals. Combined with the animation, PLAYER_RUN_SPEED is used to give the illusion that the character is actually running. Finally, the STANDING_LEFT and STANDING_RIGHT variables hold the value that represents the lower left corner on the x axis of the two frames from the sprite sheet that represent the character standing. One frame is facing left and the other is facing right.
Referring back to Chapter 5, Listing 6-9 sets the playerAction based on whether the player has touched the right or the left side of the screen. The onTouchEvent for the game’s main Activity has been modified to set the playerAction to either PLAYER_MOVE_RIGHT, PLAYER_MOVE_LEFT, or PLAYER_STAND.
Listing 6-9. onTouchEvent()
@Override
publicbooleanonTouchEvent(MotionEvent event) {
float x = event.getX();
float y = event.getY();
DisplayMetricsoutMetrics = new DisplayMetrics();

display.getMetrics(outMetrics);

int height = outMetrics.heightPixels / 4;

int playableArea = outMetrics.heightPixels - height;
if (y >playableArea){
switch (event.getAction()){
case MotionEvent.ACTION_DOWN:
if(x <outMetrics.widthPixels / 2){
playerAction = PLAYER_MOVE_RIGHT;
}else{
playerAction = PLAYER_MOVE_LEFT;
}
break;
case MotionEvent.ACTION_UP:
playerAction = PLAYER_STAND;
break;
}
}

return false;
}
Next, set up a case statement to read the value of playerAction. The game loop is contained within the onDraw() method of the Renderer. This method is executed on a constant loop. Therefore, you can create a new method in the Renderer named movePlayer() and call it from the onDraw() method of the Renderer.
Every time the onDraw() method executes, it will call movePlayer(). All you need to do in the movePlayer() method is tell OpenGL ES how you would like flip through the sprite sheet and “move” the character.
First, create the movePlayer() method and set up a case statement to iterate though the playerAction. In the code shown in Listing 6-10, goodguy refers to an instantiation of the SuperBanditGuy class. This could represent whatever class you are using in your game.
Listing 6-10. movePlayer()
private void movePlayer(GL10gl){
if(!goodguy.isDead)
{
switch(playeraction){
case PLAYER_MOVE_RIGHT:

break;

case PLAYER_MOVE_LEFT:

break;

case PLAYER_STAND:

break;
}
}
}
In Recipe 6.3, you learned how to use the glTanslatef() and glUniform1f() methods to move from one frame of sprite sheet to another. The only difference in this solution is that you will be automating the process. This means that because onDraw(), and thereby movePlayer(), is called on a loop, you must write the call to glTranslatef() in such a way that it will automatically cycle from one frame to the next each time it is called. Listings 6-11 and 6-12 show what this code looks like when you want to move the character to the right, using both OpenGL ES 1 and OpenGL ES 2/3.
Listing 6-11. Moving the Frame with the Player (OpenGLES 1)
currentStandingFrame   = STANDING_RIGHT;
playerCurrentLocation  += PLAYER_RUN_SPEED;

currentRunAniFrame  += .25f;
if (currentRunAniFrame> .75f)
{
currentRunAniFrame  = .0f;
}

gl.glMatrixMode(GL10.GL_MODELVIEW);
gl.glLoadIdentity();
gl.glPushMatrix();
gl.glScalef(.15f, .15f, 1f);
gl.glTranslatef(playercurrentlocation, .75f, 0f);
gl.glMatrixMode(GL10.GL_TEXTURE);
gl.glLoadIdentity();
gl.glTranslatef(currentRunAniFrame,.75f, 0.0f);
goodguy.draw(gl,spritesheets,SBG_RUNNING_PTR);
gl.glPopMatrix();
gl.glLoadIdentity();
Listing 6-12. Moving the Frame with the Player (OpenGL ES 2/3)
currentStandingFrame   = STANDING_RIGHT;
playerCurrentLocation  += PLAYER_RUN_SPEED;

currentRunAniFrame  += .25f;
if (currentRunAniFrame> .75f)
{
currentRunAniFrame  = .0f;
}

goodguy.draw(mMVPMatrix, currentRunAniFrame, .75f );
First, because the character is running to the right, when he stops running he should be facing right. Therefore, the currentStandingFrame is set to STANDING_RIGHT. Then, the PLAYER_RUN_SPEED is added to the playercurrentlocation,resulting in a value that is .25 away from the original location. When this is rendered, the sprite is moved to the new location.
The next block keeps the animation loop moving. Your sprite sheet has four images with the lower left corners at 0, .25, .50, and .75, respectively, on the x axis. To achieve a smooth animation, you are going to start with the first frame (0) and add .25 to get to the second frame, and so on. When you reach the last frame of animation (.75), you need to start over again at 0. An if() statement checks whether you are at the last frame of animation, and resets you back to the first.
Finally, OpenGL is used to draw the new frame of animation. Notice that glTranslatef() is called twice—once in model matrix mode, and once in texture matrix mode. When it is called in model matrix mode, it moves the physical location of the vertices that your texture is mapped to, thus moving the character to the right. When glTranslatef() is called in texture matrix mode, the frame of animation is advanced.
Listings 6-13 and 6-14 show the finished movePlayer() method, again using both OpenGL ES 1 and OpenGL ES 2/3.
Listing 6-13. Completed movePlayer() ( OpenGL ES 1)
private void movePlayer(GL10gl){
if(!goodguy.isDead)
{
switch(playeraction){
case PLAYER_MOVE_RIGHT:
currentStandingFrame   = STANDING_RIGHT;
playerCurrentLocation  += PLAYER_RUN_SPEED;
currentRunAniFrame  += .25f;
if (currentRunAniFrame> .75f)
{
currentRunAniFrame  = .0f;
}

gl.glMatrixMode(GL10.GL_MODELVIEW);
gl.glLoadIdentity();
gl.glPushMatrix();
gl.glScalef(.15f, .15f, 1f);
gl.glTranslatef(playerCurrentLocation, .75f, 0f);
gl.glMatrixMode(GL10.GL_TEXTURE);
gl.glLoadIdentity();
gl.glTranslatef(currentRunAniFrame,.75f, 0.0f);
goodguy.draw(gl,spritesheets,SBG_RUNNING_PTR);
gl.glPopMatrix();
gl.glLoadIdentity();

break;

case PLAYER_MOVE_LEFT:
currentStandingFrame   = STANDING_LEFT;
playerCurrentLocation  -= PLAYER_RUN_SPEED;
currentRunAniFrame  += .25f;
if (currentRunAniFrame> .75f)
{
currentRunAniFrame  = .0f;
}

gl.glMatrixMode(GL10.GL_MODELVIEW);
gl.glLoadIdentity();
gl.glPushMatrix();
gl.glScalef(.15f, .15f, 1f);
gl.glTranslatef(playerCurrentLocation, .75f, 0f);
gl.glMatrixMode(GL10.GL_TEXTURE);
gl.glLoadIdentity();
gl.glTranslatef(currentRunAniFrame,.50f, 0.0f);
goodguy.draw(gl,spritesheets,SBG_RUNNING_PTR);
gl.glPopMatrix();
gl.glLoadIdentity();

break;

case PLAYER_STAND:
gl.glMatrixMode(GL10.GL_MODELVIEW);
gl.glLoadIdentity();
gl.glPushMatrix();
gl.glScalef(.15f, .15f, 1f);
gl.glTranslatef(playerCurrentLocation, .75f, 0f);
gl.glMatrixMode(GL10.GL_TEXTURE);
gl.glLoadIdentity();
gl.glTranslatef(currentStandingFrame,.25f, 0.0f);
goodguy.draw(gl,spritesheets,SBG_RUNNING_PTR);
gl.glPopMatrix();
gl.glLoadIdentity();
break;
}
}
}
Listing 6-14. Completed movePlayer() (OpenGL ES 2/3)
private void movePlayer(GL10gl){
if(!goodguy.isDead)
{
switch(playeraction){
case PLAYER_MOVE_RIGHT:
currentStandingFrame   = STANDING_RIGHT;
playerCurrentLocation  += PLAYER_RUN_SPEED;
currentRunAniFrame  += .25f;
if (currentRunAniFrame> .75f)
{
currentRunAniFrame  = .0f;
}

goodguy.draw(mMVPMatrix, currentRunAniFrame, .75f );
break;

case PLAYER_MOVE_LEFT:
currentStandingFrame   = STANDING_LEFT;
playerCurrentLocation  -= PLAYER_RUN_SPEED;
currentRunAniFrame  += .25f;
if (currentRunAniFrame> .75f)
{
currentRunAniFrame  = .0f;
}

goodguy.draw(mMVPMatrix, currentRunAniFrame, .50f );
break;

case PLAYER_STAND:
goodguy.draw(mMVPMatrix, currentStandingFrame, .25f );
break;
}
}
}