
If this is your first time coding a game for a mobile device or tablet, you are likely to quickly notice that there is a distinct lack of input options to relay your player’s intentions back into the game code. Without the benefit of game controllers, keyboards, or mice, it can be very hard to supply your player with a complex input system.
Wiring up your game to detect and respond to touch events on the device is not as hard as it might appear on the surface.
Let’s take a look at some of the more common problems in using a touch screen as a game input.
5.1 Detect a Screen Touch
Solution
Use the onTouchEvent() to detect where and when the player touches the screen.
How It Works
Your Android game is launched from a class that extends Activity. This class will be used to detect and react to touch events that happen in your game. Keep in mind the code for your game, and the game loop, will be running in a GLSurfaceView via a Renderer. However, you will still be using the Activity that launched your game to track the input from the player on the screen.
Within your Activity, override the onTouchEvent() as follows:
@Override
public boolean onTouchEvent(MotionEvent event) {
}
The onTouchEvent() takes in a MotionEvent. This MotionEvent is automatically passed in by the system when the event call is generated.
The MotionEvent contains all of the information that you would need to help determine and decipher the action of the player. From the MotionEvent, you get information such as the x and y coordinates where the player touched, the pressure and duration of the touch, and you can even determine the direction of a swipe movement.
For example, here you are simply getting the player’s touch coordinates:
@Override
public boolean onTouchEvent(MotionEvent event) {
float x = event.getX();
float y = event.getY();
}
You can now react to the x and y coordinates, as you see fit.
5.2 Detect a Screen Multi-touch
Solution
Use getPointerCount() and PointerCoords to help retrieve the pointer objects for detecting multi-touch input.
How It Works
The MotionEvent that is passed into onTouchEvent() can track up to five distinct simultaneous screen touches. The concept here is to loop through all of the pointers that were detected using getPointerCount(). Inside of the loop, you are
going to use getPointerID() to retrieve the information that you need for each pointer.
Begin by setting up your onTouchEvent() and looping through the detected pointers, as shown in Listing 5-1.
Listing 5-1. onTouchEvent()
@Override
public boolean onTouchEvent(MotionEvent event) {

MotionEvent.PointerCoords[] coords = new MotionEvent.PointerCoords[event.getPointerCount()];

   For(int i = 0; i< event.getPointerCount(); i++)
   {
event.getPointerCoords(i, coords[i]);
   }
}
You can now get all of the information that you need, from each pointer that was detected. Pass the coord[] into your game loop and you will have access to the x and y coordinates of each touch point. You will also have the touch point’s orientation, pressure, size (area), and the length of major and minor axes.
5.3 Divide the Screen into Touch Zones
Solution
Use the height and width of the screen to determine which side of the screen the player touched.
How It Works
You know how to use the onTouchEvent() to determine if and when the player has touched the screen, and the coordinates that the play touched. This is very useful information when you are trying to create an input system for your game. The problem you now face is in trying to establish whether the x and y coordinates that you have been given fall within a specific area of the screen.
Let’s say you are creating a platform game where the player can run to the left and to the right. You have set up your onTouchEvent() and you are trapping the x and y coordinates each time the player touches the screen. How can you easily determine whether those coordinates should push the player to the left or to the right?
The answer is to divide the screen into touch zones. In this case, we would want one zone on the left-hand side of the screen, and one zone on the right-hand side of the screen. A few simple if statements can then be used to check the locations on the screen that the player touched.
Using the example of a platform game, where the only directions the player can move are to the left and to the right, you can divide the screen into two halves—one representing the left and one the right. You might also want to consider placing the touch zones toward the bottom of the screen, where a player’s thumbs are likely to be.
This means that you would have to ignore any touch coordinates that fall above the left and right touch zones. Take a look at Figures 5-1 and 5-2 for a visual representation of this concept.
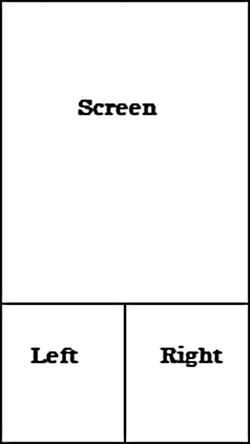
Figure 5-1. Portrait mode with left and right touch zones
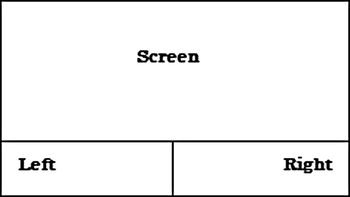
Figure 5-2. Landscape mode with left and right touch zones
The first step to create touch zones is to get the height of the screen. To do this, create a new Display property on a common class, as follows:
public static Display display;
On the main Activity for your application, use the WINDOW_SERVICE to copy the default display to this property, as shown in Listing 5-2.
Listing 5-2. Using WINDOW_SERVICE
MyClass.display = ((WindowManager) getSystemService(Context.WINDOW_SERVICE)).getDefaultDisplay();
You can now determine the height and width of the screen from within your game code, as shown in Listing 5-3.
Listing 5-3. determine the height and width
@Override
public boolean onTouchEvent(MotionEvent event) {
//Get the non-touchable area of the screen -
//the upper two-thirds of the screen
int height = MyClass.display.getHeight() / 3;

//The playable area is now the lower third of the screen
int playableArea = MyClass.display.getHeight() - height;
}
Caution This method works, but is only fully effective if your game uses the full screen as this one does. If your game is not going to use the full screen, wait until after the game’s view loads and call <view>.getHeight().
Using the value playableAreaas a y-axis value, you can easily tell whether your player is touching the correct part of the screen. Create a simple if statement to test the locations of the player’s touch coordinates (see Listing 5-4).
Listing 5-4. Using playableArea
@Override
public boolean onTouchEvent(MotionEvent event) {
//Get the non-touchable area of the screen -
//the upper two-thirds of the screen
int height = MyClass.display.getHeight() / 3;

//The playable area is now the lower third of the screen
 int playableArea = MyClass.display.getHeight() - height;

if (y > playableArea){

//This y coordinate is within the touch zone

}
}
Now that you know the player has touched the correct area of the screen, the left and right and sides of the touch zone can be determined by testing whether the x coordinate is greater than or less than the center point of the screen (see Listing 5-5) .
Listing 5-5. Testing the Touch Zones
@Override
public boolean onTouchEvent(MotionEvent event) {
//Get the non-touchable area of the screen -
//the upper two-thirds of the screen
int height = MyClass.display.getHeight() / 3;

//Get the center point of the screen
int center = MyClass.display.getWidth() / 2;

//The playable area is now the lower third of the screen
int playableArea = MyClass.display.getHeight() - height;

if (y > playableArea){

//This y coordinate is within the touch zone

if(x < center){
//The player touched the left
}else{
//The player touched the right
}

}
}
You have successfully determined whether the player has touched the left- or right-hand side of the screen. Replace the comments with your specific code to initiate actions based on where the player touched.
Problem
You need to determine whether the player swiped or flinged the screen and in what direction.
How It Works
For some games—think Temple Run—you want to let the user swipe or fling the screen to indicate which direction they want to move. A fling upward could represent a jump, for example. This could be a much more versatile method of player input, but it also requires a slight bit more setup code.
The code needed to implement this will go on the same Activity as the OnTouchEvent(). In fact, you can use the two—OnTouchEvent() and SimpleOnGestureListener—in conjunction with each other.
Open your Activity and instantiate a SimpleInGestureListener, as follows:
GestureDetector.SimpleOnGestureListener gestureListener = new GestureDetector.SimpleOnGestureListener(){
};
There are several methods that you need to implement within the gesture listener. However, the only one you will be working with in this solution is OnFling(), which is provided in Listing 5-6.
Listing 5-6. OnFling()
GestureDetector.SimpleOnGestureListener gestureListener = new GestureDetector.SimpleOnGestureListener(){
@Override
public boolean onDown(MotionEvent arg0) {
//TODO Auto-generated method stub
return false;
}

@Override
public boolean onFling(MotionEvent e1, MotionEvent e2, float velocityX,
float velocityY) {
//React to the fling action
return false;
}
@Override
public void onLongPress(MotionEvent e) {
//TODO Auto-generated method stub

}
@Override
public boolean onScroll(MotionEvent e1, MotionEvent e2, float distanceX,
float distanceY) {
//TODO Auto-generated method stub
return false;
}
@Override
public void onShowPress(MotionEvent e) {
//TODO Auto-generated method stub

}
@Override
public boolean onSingleTapUp(MotionEvent e) {
//TODO Auto-generated method stub
return false;
}

};
Now, create a new variable in your Activity, as follows:
private GestureDetector gd;
The GestureDetector will be used to throw the gesture event. Initialize the detector in the onCreate() of the Activity, as follows:
@Override
public void onCreate(Bundle savedInstanceState) {
super.onCreate(savedInstanceState);
gd = new GestureDetector(this,gestureListener);
}
Finally, in the OnTouchEvent(), throw to the gestureListener, like so:
@Override
public boolean onTouchEvent(MotionEvent event) {
returngd.onTouchEvent(event);
}
When the player flings the screen, the code in the OnFling()method will be executed. This takes care of the what and when;next you need to determine what direction.
Notice that OnFling() takes two MotionEvent attributes. Since you have used it earlier, you know that the MotionEvent contains a getX() and a getY() for getting you the respective coordinates of the event.
The two events (e1 and e2) represent the start point and end point of the fling. Therefore, using the x and y coordinates of each event, you can calculate which direction the player moved (see Listing 5-7).
Listing 5-7. Detecting Fling Motion
float leftMotion = e1.getX() - e2.getX();
float upMotion = e1.getY() - e2.getY();

float rightMotion = e2.getX() - e1.getX();
float downMotion = e2.getY() - e1.getY();

if((leftMotion == Math.max(leftMotion, rightMotion)) && (leftMotion > Math.max(downMotion, upMotion)) )
{
//The player moved left
}

if((rightMotion == Math.max(leftMotion, rightMotion)) && rightMotion > Math.max(downMotion, upMotion) )
{
//The player moved right
}
if((upMotion == Math.max(upMotion, downMotion)) && (upMotion > Math.max(leftMotion, rightMotion)) )
{
//The player moved up
}

if((downMotion == Math.max(upMotion, downMotion)) && (downMotion > Math.max(leftMotion, rightMotion)) )
{
//The player moved down
}
Now you can fill in the appropriate code for the action you need to take in your game.
Because this solution jumped around the Activity a bit, Listing 5-8 shows what the finished Activity should look like.
Listing 5-8. Full Code for SBGGameMain
public class SBGGameMain extends Activity {
private GestureDetector gd;

@Override
public void onCreate(Bundle savedInstanceState) {
super.onCreate(savedInstanceState);
setContentView(myContentView);
gd = new GestureDetector(this,gestureListener);
}
@Override
protected void onResume() {
super.onResume();
}

@Override
protected void onPause() {
super.onPause();
}

@Override
public boolean onTouchEvent(MotionEvent event) {
return gd.onTouchEvent(event);
}

GestureDetector.SimpleOnGestureListener gestureListener = new GestureDetector.SimpleOnGestureListener(){
@Override
public boolean onDown(MotionEvent arg0) {
//TODO Auto-generated method stub
return false;
}

@Override
public boolean onFling(MotionEvent e1, MotionEvent e2, float velocityX,
float velocityY) {

float leftMotion = e1.getX() - e2.getX();
float upMotion = e1.getY() - e2.getY();

float rightMotion = e2.getX() - e1.getX();
float downMotion = e2.getY() - e1.getY();

if((leftMotion == Math.max(leftMotion, rightMotion)) && (leftMotion > Math.max(downMotion, upMotion)) )
{

}

if((rightMotion == Math.max(leftMotion, rightMotion)) && rightMotion > Math.max(downMotion, upMotion) )
{

}
if((upMotion == Math.max(upMotion, downMotion)) && (upMotion > Math.max(leftMotion, rightMotion)) )
{

}

if((downMotion == Math.max(upMotion, downMotion)) && (downMotion > Math.max(leftMotion, rightMotion)) )
{

}
return false;
}
@Override
public void onLongPress(MotionEvent e) {
//TODO Auto-generated method stub

}
@Override
public boolean onScroll(MotionEvent e1, MotionEvent e2, float distanceX,
float distanceY) {
//TODO Auto-generated method stub
return false;
}
@Override
public void onShowPress(MotionEvent e) {
//TODO Auto-generated method stub

}
@Override
public boolean onSingleTapUp(MotionEvent e) {
//TODO Auto-generated method stub
return false;
}

};
}
5.5 Use the Device Accelerometer
Solution
Use the device’s built-in accelerometer to detect when the device has been tilted in a specific direction, and then move the character accordingly.
How It Works
Most, if not all, Android devices include an accelerometer. One popular use for this sensor is as another input device for a game. Using feedback from the accelerometer, you can detect whether the player has tilted the device and then react accordingly in the code.
In Listing 5-9, you detect whether the player has tilted the phone left or right, and then set the proper variables to move the character in the tilted direction. First, implement SensorEventListener in your Activity class. Then allow Eclipse (or your IDE of choice) add in the required method overrides.
Listing 5-9. SensorEvenListener
public class SBGGameMain extends Activityimplements SensorEventListener{
@Override
public void onCreate(Bundle savedInstanceState) {
//TODO Auto-generated method stub
}
@Override
protected void onResume() {
//TODO Auto-generated method stub
}
@Override
protected void onPause() {
//TODO Auto-generated method stub
}
@Override
public void onAccuracyChanged(Sensor sensor, int accuracy) {
//TODO Auto-generated method stub

}
@Override
public void onSensorChanged(SensorEvent event) {
//TODO Auto-generated method stub
}

}
Several variables are needed. prevX and prevY track the previous x and y axis tilt location to determine whether there has been a change in tilting. A Boolean, isInitialized, determines whether a tilt has been previously detected; if not, new values are stored in prevX and prevY. A static float, NOISE, holds a value that lets you determine a real tilt change, from ambient device movement. Finally, variables for the SensorManager and accelerometer are set up. See Listing 5-10.
Listing 5-10. SensorManager
public class SBGGameMain extends Activity implements SensorEventListener{
private float prevX;
private float prevY;
private boolean isInitialized;
private final float NOISE = (float) 2.0;
private SensorManager sensorManager;
private Sensor accelerometer;
@Override
public void onCreate(Bundle savedInstanceState) {
//TODO Auto-generated method stub
}
@Override
protected void onResume() {
//TODO Auto-generated method stub
}
@Override
protected void onPause() {
//TODO Auto-generated method stub
}
@Override
public void onAccuracyChanged(Sensor sensor, int accuracy) {
//TODO Auto-generated method stub

}
@Override
public void onSensorChanged(SensorEvent event) {
//TODO Auto-generated method stub
}

}
Next, perform some housekeeping in the onCreate(), onPause(), and onResume()methods before performing the core of the code in the onSensorChanged() method (see Listing 5-11).
Listing 5-11. onSensorChanged
@Override
public void onCreate(Bundle savedInstanceState) {
super.onCreate(savedInstanceState);
gameView = new SBGGameView(this);
setContentView(gameView);

isInitialized= false;
sensorManager= (SensorManager) getSystemService(this.SENSOR_SERVICE);
accelerometer= sensorManager.getDefaultSensor(Sensor.TYPE_ACCELEROMETER);
sensorManager.registerListener(this, accelerometer, SensorManager.SENSOR_DELAY_NORMAL);

}
Override
protected void onResume() {
super.onResume();

sensorManager.registerListener(this, accelerometer, SensorManager.SENSOR_DELAY_NORMAL);

gameView.onResume();

}

@Override
protected void onPause() {
super.onPause();

sensorManager.unregisterListener(this);

gameView.onPause();
}
Now for the core of the solution. The onSensorChanged()method is fired when a change in the sensor is detected; in this case, that is the accelerometer. Trap the change, and use the x and y vectors to set your PLAYER_MOVE_LEFT and PLAYER_MOVE_JUMP, as shown in Listing 5-12.
Listing 5-12. setting the player action
public class SBGGameMain extends Activity implements SensorEventListener{
private float prevX;
private float prevY;
private boolean isInitialized;
private final float NOISE = (float) 2.0;
private SensorManager sensorManager;
private Sensor accelerometer;

@Override
public void onCreate(Bundle savedInstanceState) {
super.onCreate(savedInstanceState);
gameView = new SBGGameView(this);
setContentView(gameView);

isInitialized= false;
sensorManager= (SensorManager) getSystemService(this.SENSOR_SERVICE);
accelerometer= sensorManager.getDefaultSensor(Sensor.TYPE_ACCELEROMETER);
sensorManager.registerListener(this, accelerometer, SensorManager.SENSOR_DELAY_NORMAL);

}
@Override
protected void onResume() {
super.onResume();

sensorManager.registerListener(this, accelerometer, SensorManager.SENSOR_DELAY_NORMAL);

gameView.onResume();

}

@Override
protected void onPause() {
super.onPause();

sensorManager.unregisterListener(this);

gameView.onPause();
}

@Override
public void onAccuracyChanged(Sensor sensor, int accuracy) {
//TODO Auto-generated method stub

}
@Override
public void onSensorChanged(SensorEvent event) {
float x = event.values[0];
float y = event.values[1];
if (!isInitialized) {
prevX = x;
prevY = y;
isInitialized = true;
} else {
float deltaX = Math.abs(prevX - x);
float deltaY = Math.abs(prevY - y);
if (deltaX < NOISE) deltaX = (float)0.0;
if (deltaY < NOISE) deltaY = (float)0.0;
prevX = x;
prevY = y;
if (deltaX > deltaY) {
playeraction = PLAYER_MOVE_LEFT;
} else if (deltaY > deltaX) {
playeraction = PLAYER_MOVE_JUMP;
} else {

}
}
}
}