
Sometimes (or maybe often), you will fall back to regular old image files for your button backgrounds. But what happens to those image files when your button can be displayed at many different sizes? If the width of the button is greater than the width of its background image, the image just stretches, right? Is that always going to look good?
Uniformly stretching your background image will not always look right. Sometimes you need more control over how the image will stretch.
In this section, you will convert BeatBox to use a 9-patch image as the background for the buttons (more on what that means in just a moment). This is not because it is necessarily a better solution for BeatBox – it is a way for you to see how a 9-patch works for those times when you want to use an image file.
First, modify list_item_sound.xml to allow the button size to change based on the available space.
Listing 23.8 Letting those buttons stretch (res/layout/list_item_sound.xml)
<layout xmlns:android="http://schemas.android.com/apk/res/android"
        xmlns:tools="http://schemas.android.com/tools">
    <data>
        <variable
            name="viewModel"
            type="com.bignerdranch.android.beatbox.SoundViewModel"/>
    </data>
    <FrameLayout
        android:layout_width="match_parent"
        android:layout_height="wrap_content"
        android:layout_margin="8dp">
        <Button
            android:layout_width="100dp match_parent"
            android:layout_height="100dp match_parent"
            android:layout_gravity="center"
            android:onClick="@{() -> viewModel.onButtonClicked()}"
            android:text="@{viewModel.title}"
            tools:text="Sound name"/>
    </FrameLayout>
</layout>
Now the buttons will take up the available space, leaving an 8dp margin. The image in Figure 23.7, with a snazzy folded corner and shadow, will be your new button background.

In the solutions for this chapter (see the section called Adding an Icon in Chapter 2), you can find this image along with a pressed version in the xxhdpi drawable folder. Copy these two images into your project’s drawable-xxhdpi folder and apply them as your button background by modifying button_beat_box.xml.
Listing 23.9 Applying the new button background images (res/drawable/button_beat_box.xml)
<selector xmlns:android="http://schemas.android.com/apk/res/android">
    <item android:drawable="@drawable/button_beat_box_pressed"
    <item android:drawable="@drawable/ic_button_beat_box_pressed"
        android:state_pressed="true"/>
    <item android:drawable="@drawable/button_beat_box_normal"
    <item android:drawable="@drawable/ic_button_beat_box_normal"
</selector>
Run BeatBox, and you will see the new button background (Figure 23.8).

Whoa. That looks… bad.
Why does it look like that? Android is uniformly stretching ic_button_beat_box_default.png, including the dog-eared edge and the rounded corners. It would look better if you could specify which parts of the image to stretch and which parts not to stretch. This is where 9-patch images come in.
A 9-patch image file is specially formatted so that Android knows which portions can and cannot be scaled. Done properly, this ensures that the edges and corners of your background remain consistent with the image as it was created.
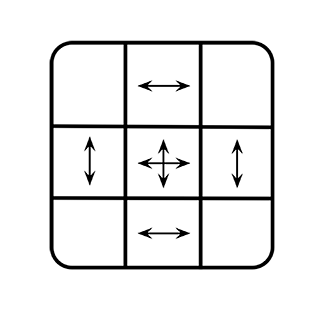
Why are they called 9-patches? A 9-patch breaks your image into a three-by-three grid – a grid with nine sections, or patches. The corners of the grid remain unscaled, the sides are only scaled in one dimension, and the center is scaled in both dimensions, as shown in Figure 23.9.
A 9-patch image is like a regular PNG image in everything except two aspects: Its filename ends with .9.png, and it has an additional one-pixel border around the edge. This border is used to specify the location of the center square of the 9-patch. Border pixels are drawn black to indicate the center and transparent to indicate the edges.
You can create a 9-patch using any image editor, with the draw9patch tool provided as part of the Android SDK, or using Android Studio.
First, convert your two new background images to 9-patch images by right-clicking on ic_button_beat_box_default.png in the project tool window and selecting Refactor → Rename... to rename the file to ic_button_beat_box_default.9.png. (If Android Studio warns you that a resource with the same name already exists, click Continue.) Then, repeat the process to rename the pressed version to ic_button_beat_box_pressed.9.png.
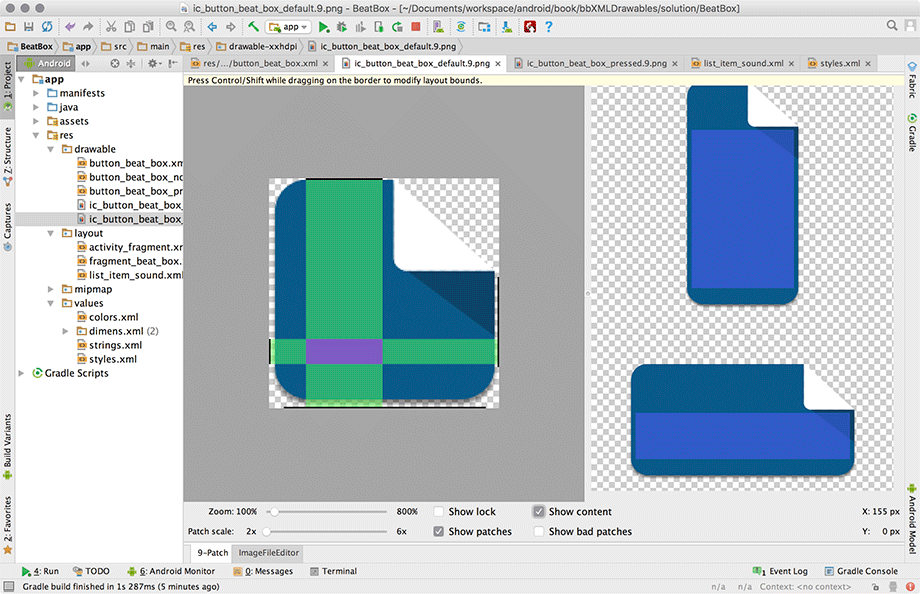
Next, double-click on the default image in the project tool window to open it in Android Studio’s built-in 9-patch editor, as shown in Figure 23.10. (If Android Studio does not open the editor, try closing the file and collapsing your drawable folder in the project tool window. Then re-open the default image.)
In the 9-patch editor, first check the Show patches option to make your patches more visible. Now, fill in black pixels on the top and left borders to mark the stretchable regions of the image (Figure 23.10). You can also drag the edges of the colored overlay to match the figure.

The black line at the top of the image specifies a region to stretch if this image is stretched horizontally. The line on the left indicates which pixels to stretch if the image is stretched vertically.
Repeat the process with the pressed version. Run BeatBox to see your new 9-patch image in action (Figure 23.11).

So the top and left borders of your 9-patch image indicate the areas of the image to stretch. What about the bottom and right borders? You can use them to define an optional content region for the 9-patch image. The content region is the area where content (usually text) should be rendered. If you do not include a content region, it defaults to be the same as your stretchable region.
Use the content area to center the text within the buttons. Go back to ic_button_beat_box_default.9.png and add the right and bottom lines as shown in Figure 23.12. Enable the Show content setting in the 9-patch editor. This setting updates the preview to highlight the areas of the image that will hold your text.
Repeat the process for the pressed version of the image. Be extra sure that both your images are updated with the correct content area lines. When 9-patch images are specified through state list drawables (as they are in BeatBox), the content area does not behave as you might expect. Android will set the content area as the background is initialized and will not change the content area while you press on the button. That means that the content area from one of your two images is ignored! The image that Android will take the content area from is not defined, so it is best to make sure that all of your 9-patch images in a state list drawable have the same content area.
Run BeatBox to see your nicely centered text (Figure 23.13).

Try rotating to landscape. The images are even more stretched, but your button backgrounds still look good and your text is still centered.